1925 FORD MODEL T SERVICE MANUAL1925 FORD MODEL T SERVICE MANUAL
DESCRIPTION:
1925 FORD MODEL T SERVICE MANUAL – PDF DOWNLOAD
The performance of high grade service work is a vital factor in the development of a successful repair business, in fact it is the only safe foundation on which business of this character can be established. High grade service advertises the business standards of the dealer. It inspires confidence in customers, and customer satisfaction is the forerunner of business growth.
The elements of high grade service are: A sincere desire on the part of the automobile dealer or service station to serve car owners so efficiently that they will derive the maximum satisfaction from their investment. Prompt, courteous and intelligent attention to customers’ wants. Skilled mechanics; men who are specialists in promptly diagnosing and correcting car troubles.
A clean, well laid out repair shop, provided with modern service equipment. A well arranged parts department carrying a complete stock of parts and supervised by a parts salesman who knows stock and appreciates the value of courtesy and salesmanship. Too much importance cannot be attached to the employment of competent mechanics, as the quality of their workmanship governs the satisfaction of the customer to a large extent.
A clean, well laid out repair shop provided with modern service equipment is essential to the performance of good service. Modern service equipment not only saves time in performing the various repair operations, but it improves the accuracy of the work. New tools and measuring devices which are now available permit the mechanic to work to limits which practically approach manufacturing standards.
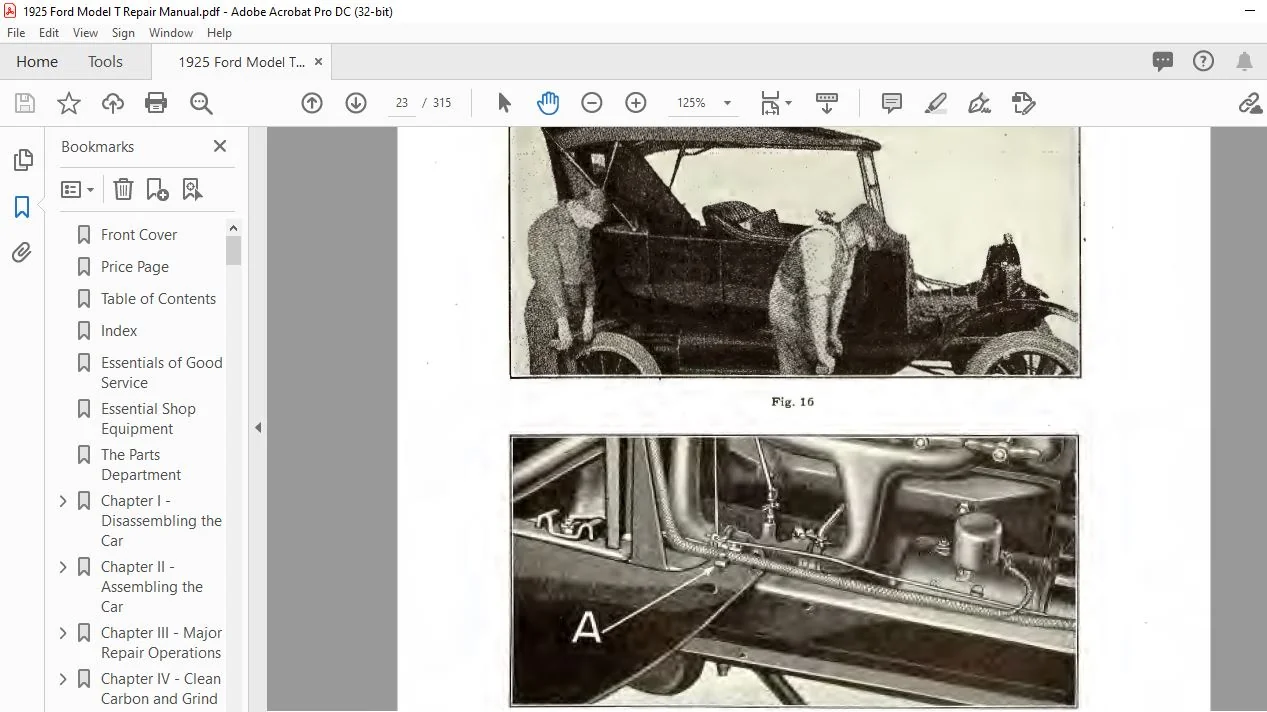
In Fig. 1 is shown an ideal shop layout for the average size dealer. The equipment is conveniently grouped and so arranged that as the work progresses through the shop each repair operation is performed in its regular order.
A feature of this layout is the comparatively small amount of floor space used, the entire layout requiring only 23 x 40′, thus making it adaptable for practically any type of building. The procedure followed when a car is brought in for major repair work is to first assign the car to a section of the shop set aside for repair jobs. The assembly to be overhauled is then removed from the car and by means of chain falls and an overhead track it is delivered to the wash tank for cleaning.
After the cleaning operation it is transferred to the stand or repair bench on which the work is to be performed. When the overhaul work is completed the assembly is returned by means of the overhead track to the car from. which it, was removed. It is then installed in the car and the job is completed.
TABLE OF CONTENTS:
1925 FORD MODEL T SERVICE MANUAL – PDF DOWNLOAD
Front Cover............................................................................................................................  1
Price Page.............................................................................................................................  2
Table of Contents......................................................................................................................  3
Index..................................................................................................................................307
Essentials of Good Service.............................................................................................................  7
Essential Shop Equipment...............................................................................................................  9
The Parts Department................................................................................................................... 11
Chapter I - Disassembling the Car...................................................................................................... 19
	1 - Describe each step............................................................................................................. 19
	2 - Install car covers............................................................................................................. 19
	3 - Box for small parts............................................................................................................ 19
	4 - Disconnect starting motor to switch cable...................................................................................... 19
	Disassembling the Car.............................................................................................................. 19
		5 - Remove rear fenders........................................................................................................ 19
		6 - Remove running boards...................................................................................................... 20
		7 - Remove headlamps........................................................................................................... 20
		8 - Release four hood clamps and lift off hood................................................................................. 20
		9 - Disconnect headlamp wires.................................................................................................. 20
		10 - Remove hood blocks from frame............................................................................................. 20
		11 - Remove front fenders...................................................................................................... 21
		12 - Remove body from chassis.................................................................................................. 21
		13 - Remove running board shields.............................................................................................. 22
		14 - Remove radiator........................................................................................................... 24
		15 - Remove radiator apron..................................................................................................... 24
		16 - Remove fan................................................................................................................ 25
		17 - Remove crankcase front bearing cap........................................................................................ 25
		18 - Remove commutator pull rod................................................................................................ 25
		19 - Disconnect ammeter to cutout wire at cutout............................................................................... 25
		20 - Remove commutator case.................................................................................................... 25
		21 - Remove horn............................................................................................................... 26
		22 - Remove spark plug wires................................................................................................... 26
		23 - Remove engine pan left.................................................................................................... 26
		24 - Remove engine pan right................................................................................................... 26
		25 - Remove carburetor pull rod................................................................................................ 26
		26 - Remove carburetor adjusting rod........................................................................................... 26
		27 - Remove priming wire....................................................................................................... 26
		28 - Shut off gasoline......................................................................................................... 27
		29 - Disconnect feed pipe from carburetor...................................................................................... 27
		30 - Disconnect exhaust pipe from manifold..................................................................................... 27
		31 - Disconnect magneto terminal wire.......................................................................................... 27
		32 - Remove crankcase arm blocks............................................................................................... 27
		33 - Remove crankcase arm bolts top............................................................................................ 27
		34 - Disconnect axle from transmission......................................................................................... 28
		35 - Remove steering gear asembly.............................................................................................. 28
		36 - Disconnect starting motor to switch cable................................................................................. 30
		37 Remove radius rod ball cap and springs...................................................................................... 30
		38 - Remove spark plugs........................................................................................................ 30
		39 - Remove engine from chassis................................................................................................ 30
		40 - Remove coil box........................................................................................................... 30
		41 - Remove lighting wire loom terminals....................................................................................... 30
		42 - Remove commutator loom and case........................................................................................... 30
		43 - Disconnect tail lamp wire................................................................................................. 31
		44 - Remove battery, battery cable, battery box, battery box support, ground connector, and battery to switch cable support.... 31
		45 - Remove feed pipe.......................................................................................................... 32
		46 - Remove gasoline tank...................................................................................................... 32
		47 - Remove terminal block..................................................................................................... 32
		48 - Remove dash............................................................................................................... 32
		49 - Remove the two dash brackets.............................................................................................. 33
		50 - Remove radiator studs, nuts, and storage.................................................................................. 33
		51 - Remove front fender irons................................................................................................. 33
		52 - Remove starting switch.................................................................................................... 33
		53 - Remove tail lamp and license bracket...................................................................................... 33
		54 - Remove exhaust pipe and muffler........................................................................................... 33
		55 - Remove spare rim carrier.................................................................................................. 34
		56 - Remove brake rods from control shaft...................................................................................... 34
		57 - Remove rear axle.......................................................................................................... 34
		58 - Remove rear spring, handers, and perches.................................................................................. 35
		59 - Remove control shaft...................................................................................................... 36
		60 - Remove front axle assembly................................................................................................ 36
		61 - Remove front axle assembly completing disassembly of car.................................................................. 36
	Wiring Diagram (Starter Car)....................................................................................................... 37
Chapter II - Assembling the Car........................................................................................................ 39
	62 - Install Spring Pad............................................................................................................ 39
	63 - Connect Frame to Front Axle Assembly.......................................................................................... 39
	64 - Install crankcase front bearing and clip assembly............................................................................. 39
	65 - Install license bracket over ends of spring clip.............................................................................. 40
	66 - Install front wheel........................................................................................................... 40
	67 - Install control shaft and pipe feed clamp..................................................................................... 40
	68 - Install rear spring........................................................................................................... 40
	69 - Install rear spring clips..................................................................................................... 40
	70 - Install spring clip bars...................................................................................................... 40
	71 - Install rear spring hangers and perches....................................................................................... 41
	72 - Install rear axle assembly.................................................................................................... 41
	73 - Install brake shoes........................................................................................................... 42
	74 - Install rear wheel............................................................................................................ 42
	75 - Connect brake rods to control shaft and adjust brakes......................................................................... 43
	76 - Install rear hub caps......................................................................................................... 44
	77 - Install spare rim carrier..................................................................................................... 44
	78 - Install tail light wire bushing............................................................................................... 44
	79 - Install tail lamp and license bracket......................................................................................... 44
	80 - Install starting switch....................................................................................................... 44
	81 - Install battery bracket assembly and ground connector......................................................................... 44
	82 - Install muffler and exhaust pipe assembly..................................................................................... 45
	83 - Install gasoline tank......................................................................................................... 45
	84 - Install feed pipe............................................................................................................. 45
	85 - Install dash brackets......................................................................................................... 45
	86 - Install dash.................................................................................................................. 46
	87 - Install loom support bolt and support......................................................................................... 46
	88 - Install terminal block "E" on dash............................................................................................ 46
	89 - Install coil box.............................................................................................................. 46
	90 - Install lighting wire loom on dash............................................................................................ 46
	91 - Install battery box and battery............................................................................................... 46
	92 - Install battery to switch cable support....................................................................................... 47
	93 - Connect motor cable, battery wire, and switch cable........................................................................... 47
	94 - Install battery box cover..................................................................................................... 48
	95 - Connect tail lamp wire to tail lamp........................................................................................... 48
	96 - Mount engine in frame......................................................................................................... 48
	97 - Enter universal joint into drive plate assembly............................................................................... 48
	98 - Install crankcase arm bolts - top............................................................................................. 48
	99 - Install crankcase arm blocks.................................................................................................. 48
	100 - Install crankcase arm bolts - side........................................................................................... 48
	101 - Connect axle to transmission................................................................................................. 49
	102 - Connect magneto terminal wire to post........................................................................................ 49
	103 - Connect exhaust pipe to manifold............................................................................................. 49
	104 - Connect front radius rod to crankcase........................................................................................ 49
	105 - Install crankcase front bearing.............................................................................................. 50
	106 - Assemble engine pan - right to engine........................................................................................ 50
	107 - Assemble engine pan - left to engine......................................................................................... 50
	108 - Install front fender iron bolts, radiator springs, studs, and washer nuts.................................................... 50
	109 - Install radiator apron....................................................................................................... 50
	110 - Install front fender irons................................................................................................... 51
	111 - Connect feed pipe to carburetor.............................................................................................. 51
	112 - Turn on gasoline............................................................................................................. 51
	113 - Install carburetor hot air pipe.............................................................................................. 51
	114 - Connect carburetor pull rod to throttle lever................................................................................ 51
	115 - Install carburetor adjusting rod............................................................................................. 51
	116 - Install Priming Wire......................................................................................................... 52
	117 - Install commutator loom...................................................................................................... 52
	118 - Connect headlamp and cutout to ammeter wires................................................................................. 52
	119 - Install commutator case...................................................................................................... 53
	120 - Install steering gear assembly............................................................................................... 53
	121 - Install steering gear bracket block.......................................................................................... 53
	122 - Connect carburetor pull rod to throttle rod lever............................................................................ 54
	123 - Install steering gear ball arm key........................................................................................... 54
	124 - Install ball arm............................................................................................................. 54
	125 - Connect steering gear tube flange to dash.................................................................................... 54
	126 - Install commutator pull rod.................................................................................................. 55
	127 - Install fan and fan belt..................................................................................................... 55
	128 - Install radiator and horn.................................................................................................... 56
	129 - Install carburetor priming rod............................................................................................... 57
	130 Install spark plugs............................................................................................................ 57
	131 - Install running boards and shields........................................................................................... 57
	132 - Install front fenders........................................................................................................ 58
	133 - Install hood blocks.......................................................................................................... 59
	134 - Install headlamps............................................................................................................ 60
	135 - Assemble body to chassis..................................................................................................... 61
	136 - Install priming rod.......................................................................................................... 61
	137 - Connect switch loom wires.................................................................................................... 61
	138 - Connect horn wire to horn.................................................................................................... 61
	139 - Connect starting switch to motor cable....................................................................................... 61
	140 - Install steering post bracket cap............................................................................................ 61
	141 - Install steering wheel....................................................................................................... 62
	142 - Install rear fenders......................................................................................................... 62
	143 - Install spare rim on carrier................................................................................................. 63
	144 - Check oil and fuel levels.................................................................................................... 63
	145 - Install hood on car.......................................................................................................... 63
	Alignment of Front Axle and Wheels................................................................................................. 63
		146 - Check front axle pitch and alignment..................................................................................... 63
		147 - Set axle pitch........................................................................................................... 63
		148 - Tilt axle for pitch...................................................................................................... 63
	Alignment of Front Wheels.......................................................................................................... 64
		149 - Check front wheel camber and gather...................................................................................... 64
		150 - Gather measurement....................................................................................................... 64
		151 - Check gather............................................................................................................. 64
		152 - Camber is non adjust..................................................................................................... 65
		153 - Check camber............................................................................................................. 65
		154 - Using automatic wheel aligner............................................................................................ 65
	Alignment and Focus of Headlamps................................................................................................... 66
		155 - Check headlamp alignment and focus....................................................................................... 66
	Focusing headlamps................................................................................................................. 66
		156 - Focusing headlamps....................................................................................................... 66
	Alignment of Headlamps............................................................................................................. 67
		157 - Align headlamps by bending headlamp brackets............................................................................. 67
		158 - Check headlight alignment................................................................................................ 67
Chapter III - Major Repair Operations.................................................................................................. 68
	159 - Overhauling principal repair operations...................................................................................... 68
	160 - Do not use unnecessary force................................................................................................. 68
	161 - Use new gaskets.............................................................................................................. 68
	162 - Clean and lubricate.......................................................................................................... 68
	Complete Engine and Transmission Overhaul.......................................................................................... 68
		163 - Drain water from radiator................................................................................................ 68
		164 - SHut off gasoline at sediment bulb....................................................................................... 68
		165 - Break wire and run out universal ball cap cap screws..................................................................... 68
		166 - Break wire and run off radius rod ball cap stud nuts..................................................................... 68
		167 - Run off nuts on engine pan bolts......................................................................................... 68
		168 - Lift off hood............................................................................................................ 68
		169 - Disconnect carburetor priming rod........................................................................................ 68
		170 - Disconnect bell crank priming wire....................................................................................... 68
		171 - Disconnect carburetor pull rod........................................................................................... 68
		172 - Remove carburetor pull rod............................................................................................... 68
		173 - Disconnect feed pipe..................................................................................................... 68
		174 - Run out cylinder head outlet connection screws........................................................................... 68
		175 - Loosen radiator rod nut.................................................................................................. 69
		176 - Disconnect horn wires at horn............................................................................................ 69
		177 - Disconnect switch to starting motor cable................................................................................ 69
		178 - Disconnect spark plug wires.............................................................................................. 69
		179 - Remove radiator apron.................................................................................................... 69
		180 - Remove fan and fan belt.................................................................................................. 69
		181 - Run out two crankcase front bearing cap screws........................................................................... 69
		182 - Disconnect carburetor pull rod........................................................................................... 69
		183 - Loosen commutator case spring bolt....................................................................................... 69
		184 - Connect ammeter to cutout wire at cutout................................................................................. 69
		185 - Disconnect headlamp wires................................................................................................ 69
		186 - Lift off hood blocks..................................................................................................... 69
		187 - Loosen the four bolts and one cap screw holding engine pans.............................................................. 69
		188 - Run off nut on end of steering gear post................................................................................. 69
		189 - Run off nuts and withdraw steering gear bracket.......................................................................... 69
		190 - Run off nuts and remove the four steering gear tube flange bolts......................................................... 69
		191 - Swing steering gear bracket caps......................................................................................... 69
		192 - Steering gear is drawn back through dash................................................................................. 69
		193 - Lift out mat and floor boards............................................................................................ 69
		194 - Disconnect exhaust pipe.................................................................................................. 69
		195 - Disconnect magneto terminal wire......................................................................................... 69
		196 - Run off nuts of the two universal call cap bolts......................................................................... 69
		197 - Run off nuts and withdraw crankcase arm bolts (side)..................................................................... 70
		198 - Run off nuts and withdraw two crankcase.................................................................................. 70
		199 - Engine can now be lifted off frame....................................................................................... 70
		Disassembling the Engine....................................................................................................... 70
			200 - Remove exhaust and intake manifolds.................................................................................. 70
			201 - Remove four inlet and exhaust clamp studs............................................................................ 70
			202 - Remove Generator..................................................................................................... 71
			203 - Remove transmission cover door....................................................................................... 71
			204 - Remove crankcase and transmission cover.............................................................................. 71
			205 - Disconnect transmission from engine.................................................................................. 71
			206 - Remove oil pipe...................................................................................................... 71
			207 - Remove valve cover, cylinder head and valves......................................................................... 72
			208 - Remove valve springs................................................................................................. 73
			209 - Remove camshaft...................................................................................................... 73
			210 - Remove main bearing caps............................................................................................. 74
			211 - Remove crankshaft.................................................................................................... 74
		Inspecting the Cylinder Block, Valves and Push Rods............................................................................ 74
			212 - Clean parts before reassembly........................................................................................ 74
			213 - Check cylinder roundness............................................................................................. 74
			214 - Check cylinder with gauge............................................................................................ 75
			215 - Hone cylinder........................................................................................................ 75
			216 - Check cylinder hone type............................................................................................. 75
			217 - Check valves......................................................................................................... 76
			218 - Check pushrod stems.................................................................................................. 76
			219 - Check valve stem guides.............................................................................................. 76
			220 - Check push rod guides................................................................................................ 76
			221 - Reseat valves........................................................................................................ 76
			222 - Fixing stripped threads.............................................................................................. 76
		Rebabbitting the Cylinder Block................................................................................................ 77
			223 - Check babbitt bearings............................................................................................... 77
			224 - Cutout old babbitt................................................................................................... 77
			225 - Pouring quality babbitt.............................................................................................. 77
			226 - Melting babbitt...................................................................................................... 77
			227 - Babbitt forming equipment............................................................................................ 77
			228 - Keeping babbitt clear of oil holes................................................................................... 78
			229 - Pouring into cold blocks............................................................................................. 78
			230 - Ladeling babbitt..................................................................................................... 78
			231 - Cutoff slag babbitt.................................................................................................. 78
			232 - Peening babbitt...................................................................................................... 79
			233 - Prepping babbitt for line reaming.................................................................................... 79
			234 - Babbitt oil hole alignment tool...................................................................................... 79
			235 - Cleaning block....................................................................................................... 80
			236 - Dress up babbitt..................................................................................................... 80
			237 - Drilling out babbitt oil holes....................................................................................... 80
			238 - Check bearing alignment with Prussian blue........................................................................... 82
			239 - Reasons for bearing disalignment..................................................................................... 82
			240 - After babbitting clean off excess babbitt............................................................................ 82
		Inspect Crankshaft and Small Time Gear......................................................................................... 82
			241 - Inspect crankshaft and small timing gear............................................................................. 82
			242 - Check all bearings for out of roundness.............................................................................. 83
			243 - Press time gear on shaft............................................................................................. 83
		Installing Crankshaft and Bearing Caps......................................................................................... 84
			244 - Install crankshaft................................................................................................... 84
			245 - Setting main bearing clearance....................................................................................... 85
			246 - Install new bearings for crankshaft.................................................................................. 85
			247 - Obtaining 65 percent bearing coverage................................................................................ 86
		Running in Crankshaft.......................................................................................................... 86
			248 - Running in crank shaft............................................................................................... 86
			249 - After running in..................................................................................................... 86
			250 - Getting 95 percent bearing surface................................................................................... 87
			251 - Setting clearance.................................................................................................... 87
		Inspecting and Assembling Pistons and Push Rods................................................................................ 87
			252 - Inspecting piston assemblies......................................................................................... 87
			253 - Oil push rods........................................................................................................ 87
		Inspecting and Installing Camshaft, Camshaft Bearings and Large Time Gear...................................................... 87
			254 - Remove bearings from camshaft........................................................................................ 87
			255 - Inspect timing gear.................................................................................................. 87
			256 - Camshaft bearing clearances.......................................................................................... 88
			257 - Camshaft bearing clearance .0005 - .003.............................................................................. 88
		Inspecting and Installing Valve Springs and Seats.............................................................................. 88
			258 - Checking vavle springs............................................................................................... 88
			259 - Assemble valve springs............................................................................................... 88
			260 - Replacing valve springs.............................................................................................. 88
		Valve Timing................................................................................................................... 89
			261 - Adjusting valves using piston timing................................................................................. 89
			262 - If too long - grind stems............................................................................................ 89
			263 - Timing valves........................................................................................................ 89
			264 - Determining when valves are open..................................................................................... 89
			265 - Replace cylinder head................................................................................................ 90
		Disassembling the Transmission................................................................................................. 90
			266 - Disassembling the transmission....................................................................................... 90
			267 - Break wire and run out siz drive plate cap screws.................................................................... 91
			268 - Remove clutch disks.................................................................................................. 91
			269 - Run out clutch disk drum set screw................................................................................... 91
			270 - Remove clutch disk drum with ouller.................................................................................. 92
			271 - Check drum key and washers........................................................................................... 92
			272 - Drums and driven gear removed........................................................................................ 92
			273 - Remove transmission gear shaft....................................................................................... 92
			274 - Check triple gear shafts............................................................................................. 93
			275 - Set triple gear clearance to .002.................................................................................... 93
		Testing the Strength of the Magnets............................................................................................ 94
			276 - Check magnet strength................................................................................................ 94
			277 - Replace bad magnets.................................................................................................. 94
			278 - Inspect ring gear.................................................................................................... 94
			279 - Install new triple gear shafts....................................................................................... 94
			280 - Remove magnets and reinstall......................................................................................... 94
		Removing and Installing Magnets................................................................................................ 95
			281 - Removing old magnets................................................................................................. 95
			282 - Remove old triple gear shafts........................................................................................ 95
			283 - Assemble new magnets observing polarity.............................................................................. 95
			284 - Magnet shipping board................................................................................................ 96
			285 - Assemble magnets on flywheel......................................................................................... 96
			286 - Double check polarity................................................................................................ 96
			287 - Tighten magnet brass screws.......................................................................................... 96
		Removing and Installing Triple Gear Shafts..................................................................................... 97
			288 - Remove triple gear shafts............................................................................................ 97
			289 - Drive out triple gear shafts from inside of flywheel................................................................. 97
		Assembling Transmission........................................................................................................ 97
			290 - Wash all parts in kerosene........................................................................................... 97
			291 - Examine triple gears................................................................................................. 97
			292 - Check triple gears for .005 clearance................................................................................ 97
			293 - Examine gear shaft................................................................................................... 98
			294 - Examine brake drums.................................................................................................. 98
			295 - Check brake drume and shaft clearance................................................................................ 98
			296 - Examine low and reverse drums........................................................................................ 99
			297 - Check reverse, low, and brake drums.................................................................................. 99
			298 - Oil shafts and reassemble triple gear................................................................................ 99
			299 - Clean keyways and insert keys........................................................................................ 99
			300 - Check driven gear teeth.............................................................................................. 99
			301 - Ensure drums turn freely............................................................................................. 99
			302 - Position gear shaft on flywheel...................................................................................... 99
			303 - Place drums on bench................................................................................................. 99
			304 - Mesh triple gears with driven gear...................................................................................100
			305 - Drums and gears revolve freely on shafts.............................................................................100
			306 - Examine gear sleeve washers for wear.................................................................................100
			307 - Install transmission clutch disks....................................................................................100
			308 - Run down clutch disc drum set screw..................................................................................101
			309 - Inspect clutch discs for wear........................................................................................101
			310 - Inspect clutch disc push ring........................................................................................101
			311 - Insert driving plate.................................................................................................101
			312 - Run in 6 cap screws on driving plate.................................................................................101
			313 - Insert clutch shift spring...........................................................................................101
			314 - Compress clutch spring and insert pin................................................................................101
			315 - Adjust clutch fingers................................................................................................101
		Alignment of Magnet Clamps.....................................................................................................102
			316 - Check magnet height..................................................................................................102
			317 - Use gap gauge to check height........................................................................................102
			318 - Clean oil tube.......................................................................................................103
			319 - Adjust magneto clearance to .025 - .040..............................................................................103
			320 - Use of gap gauge.....................................................................................................104
			321 - Shiming magneto gap..................................................................................................104
		Assembling Transmission to Engine..............................................................................................104
			322 - Clean crankshaft flange..............................................................................................104
			323 - Check magnet clearance .025-.040.....................................................................................104
			324 - Examine transmission band linings....................................................................................104
			325 - Position transmission bands..........................................................................................104
		Inspecting and Installing Crankcase............................................................................................104
			326 - Clean crankcase thoroughly...........................................................................................104
			327 - Check crankcase alignment............................................................................................104
			328 - Install new crankcase gaskets........................................................................................105
			329 - Install crankcase bolts..............................................................................................105
			330 - Install transmission cover gaskets and cover.........................................................................106
			331 - Install the ball cap.................................................................................................106
		Completing the Assembly........................................................................................................106
			332 - Install four manifold clamps.........................................................................................106
			333 - Pour 1 gallon oil through crankcase breather.........................................................................106
			334 - Place engine in running in stand ....................................................................................106
			335 - Engine now ready for installation....................................................................................106
		Installing Engine in Car.......................................................................................................107
			336 - Install engine in car................................................................................................107
			337 - Install radiator apron...............................................................................................107
			338 - Install steering gear................................................................................................107
			339 - Connect steering flange to dash......................................................................................107
			340 - Install commutator case and cutout...................................................................................107
			341 - Install steering gear ball arm.......................................................................................107
			342 - Connect commutator pull rod to case..................................................................................107
			343 - Install carburetor pull rod..........................................................................................107
			344 - Install carburetor hot air pipe......................................................................................107
			345 - Install carburetor priming wire......................................................................................107
			346 - Connect carburetor adjusting rod.....................................................................................107
			347 - Connect feed pipe to carburetor......................................................................................107
			348 - Install fan, fan belt, radiator and horn.............................................................................107
			349 - Position hood blocks on frame........................................................................................107
			350 - Connect headlamp plugs...............................................................................................108
			351 - Install spark plugs..................................................................................................108
			352 - Connect switch to starting motor cable...............................................................................108
			353 - Insert horn wires through dash.......................................................................................108
			354 - Install steering post bracket cap....................................................................................108
			355 - Install floor boards and mat.........................................................................................108
			356 - Turn on gasoline at sediment bulb....................................................................................108
			357 - Install hood.........................................................................................................108
			358 - Close radiator drain cock and fill...................................................................................108
		Time Study - Engine and Transmission Overhaul..................................................................................108
			359 - Time study on engine and transmission overhaul.......................................................................108
Chapter IV - Clean Carbon and Grind Valves.............................................................................................109
	Grinding Valves....................................................................................................................110
		369 - Removing valves..........................................................................................................110
		370 - Examine valve seats......................................................................................................111
		371 - Setting ideal valve seat.................................................................................................111
		372 - Grind valves and check clearances........................................................................................113
		373 - Replace cylinder head....................................................................................................113
		374 - Install horn.............................................................................................................113
		375 - Insert cylinder head outlet gasket and outlet............................................................................113
		376 - Screw in spark plugs.....................................................................................................113
		377 - Replace cylinder vavle cover.............................................................................................113
		378 - Install carburetor pull rod..............................................................................................113
		379 - Install hood.............................................................................................................113
		380 - Close radiator drain plug and fill with water............................................................................113
	Time Study - Clean Carbon and Grind Valves.........................................................................................114
		381 - Time Study - Clean carbon and grind valves...............................................................................114
	360 - Drain water from radiator....................................................................................................109
	361 - Lift off hood................................................................................................................109
	362 - Remove carburetor pull rod...................................................................................................109
	363 - Remove cylinder valve cover..................................................................................................109
	364 - Remove spark plugs...........................................................................................................109
	365 - Run out the two cylinder head outlet screws..................................................................................109
	366 - Remove carbon from pistons and block.........................................................................................109
	367 - Use air blower to clean out carbon...........................................................................................109
	368 - Removing carbon with wire brush and drill....................................................................................110
Chapter V - Taking up connecting rod bearings..........................................................................................115
	Time Study - Taking Up Connect.....................................................................................................119
	Taking Up Connecting Rod Bearings..................................................................................................115
		382 - Removing crankcase lower cover...........................................................................................115
		383 - Remove connecting rod bearing caps.......................................................................................115
		384 - Check crankshaft journals for out-of-roundness...........................................................................116
		385 - Dress down cap with a file...............................................................................................116
		386 - Fitting the rod to journal...............................................................................................117
		387 - Adjust No.4 and No.1 then No.2 and No.3..................................................................................117
		388 - Replace crankcase inspection cover.......................................................................................117
		389 - Check babbitt............................................................................................................117
		390 - Before installing rods - check alignment.................................................................................117
		391 - Align rod on jig.........................................................................................................118
		392 - Connecting rod straightening jig.........................................................................................118
		393 - Adjust by removing shims.................................................................................................118
		394 - Scrape bearings..........................................................................................................118
		395 - Oil and assemble rods....................................................................................................118
		396 - Time Study - Taking up connecting Rods...................................................................................119
Chapter VI - Installing new Pistons and Rings..........................................................................................120
	Installing New Pistons and Rings...................................................................................................120
		397 - Theory...................................................................................................................120
		398 - Piston dimensions........................................................................................................120
		399 - Preparing to remove pistons..............................................................................................120
		400 - Inspect cylinder bores for out-of-roundness..............................................................................121
		401 - Inspect pistons for defects..............................................................................................121
		402 - Check pistons for leaks..................................................................................................121
		403 - Check pistons for wear...................................................................................................121
		404 - New piston clearance is .003-.004........................................................................................121
		405 - Select pistons of the same weight........................................................................................121
		406 - Check old piston pins and rods for wear..................................................................................121
		407 - Pin clearance is .001....................................................................................................121
		408 - Pins are fitted as in Par. 415 and 418...................................................................................121
		409 - Check rods for twisting and cracked babbitt..............................................................................122
		410 - Inspect pin and bushing for excessive clearance..........................................................................122
		411 - Piston play instructions.................................................................................................122
		412 - If .002 clearance in piston pin to bushing - replace.....................................................................122
		413 - Piston pin removal.......................................................................................................122
		414 - Piston clamp.............................................................................................................123
		415 - Fitting piston pins......................................................................................................123
		416 - Removing bushings with arbor press.......................................................................................123
		417 - Press in new piston pin bushing..........................................................................................123
		418 - Press in piston pin......................................................................................................123
		419 - Check pin fit............................................................................................................124
		420 - Check alignment of piston and rod........................................................................................124
		421 - Piston rings can now be installed........................................................................................124
	Installing Piston Rings............................................................................................................124
		422 - Installing piston rings and definition...................................................................................124
		423 - Piston ring composition..................................................................................................125
		424 - Renew every 10,000 miles.................................................................................................125
		425 - Removing rings with ring extractor.......................................................................................125
		426 - Check ring gap...........................................................................................................125
		427 - If too small - file......................................................................................................125
		428 - Check ring on surface plate..............................................................................................126
		429 - How the ring to ring groove fits.........................................................................................126
		430 - Set ring gaps 120 degrees apart..........................................................................................127
		431 - Oil rings before installing..............................................................................................127
		432 - Oil connecting rods and assemble.........................................................................................127
		433 - Install cylinder headgasket, cylinder head, and horn.....................................................................127
		434 - Install hood and fill radiator...........................................................................................127
	Time Study - Fitting New Pistons...................................................................................................127
		435 - Time study - Fitting New Pistons.........................................................................................127
	Changing Piston Rings..............................................................................................................127
		436 - Changing Piston Rings....................................................................................................127
Chapter VII - Taking up Main Bearings..................................................................................................128
	Taking Up Main Bearings............................................................................................................128
		437 - Intro....................................................................................................................128
		438 - To take up main bearings.................................................................................................128
		439 - Remove hood..............................................................................................................128
		440 - Remove carburetor pull rod...............................................................................................128
		441 - Remove valve cover.......................................................................................................128
		442 - Remove Crankcase lower cover.............................................................................................128
		443 - Remove rear main bearing cap.............................................................................................129
		444 - Adjust center bearing....................................................................................................130
		445 - Check for tightness......................................................................................................130
	Time Study - Taking up Main Bearings - Present Type Crankcase......................................................................131
		446 - Time Study - Taking up Main Bearings -- Present Type Crankcase...........................................................131
Chapter VIII - Correcting noisy Time Gears.............................................................................................132
	Correcting Noisy Time Gears........................................................................................................132
		447 - Noisy time gears - identify..............................................................................................132
		448 - Disconnect ammeter wire and remove generator.............................................................................132
		449 - Generator gear mesh clearance is .002-.004...............................................................................132
		450 - Replace generator bracket................................................................................................133
		451 - If gears still noisy look elsewhere......................................................................................133
		452 - Replace large timing gear................................................................................................133
		453 - Expose timing gears by removing radiator.................................................................................133
		454 - Remove commutator........................................................................................................133
		455 - Take off gear cover plate................................................................................................133
		456 - Check timing gear back-lash..............................................................................................134
		457 - New time gears .0005 - .003 back lash....................................................................................134
		Removing and Installing Small Time Gear........................................................................................136
			458 - Removing and installing small time gear..............................................................................136
			459 - Examine felt gasket..................................................................................................137
			460 - Lower engine into crankcase..........................................................................................137
			461 - Install fan pulley on crankshaft.....................................................................................137
			462 - Replace starting crank...............................................................................................137
			463 - Replace universal joint ball cap.....................................................................................137
			464 - Connect exhaust manifold to exhaust pipe.............................................................................138
			465 - Replace generator....................................................................................................138
			466 - Grease felt in place.................................................................................................138
			467 - Line up camshaft cover and timer.....................................................................................138
			468 - Use cover gauge to align camshaft cover..............................................................................138
			469 - Install commutator...................................................................................................138
			470 - Check gear mesh before installing radiator...........................................................................139
			Time Study - Noisy Time Gears..............................................................................................139
				471 - Time Study - Noisy Time Gears....................................................................................139
Chapter IX - Installing New Camshaft Bearings..........................................................................................140
	Installing New Camshaft Bearings...................................................................................................140
		472 - Installing new Camshaft Bearings.........................................................................................140
		473 - Remove radiator and fan..................................................................................................140
		474 - Run out camshaft bearing set screws......................................................................................140
		475 - Fix push rods from falling down..........................................................................................140
		476 - Withdraw camshaft........................................................................................................141
		477 - Remove bearings from camshaft............................................................................................141
		478 - Check camshaft for wear..................................................................................................141
		479 - Check camshaft alignment.................................................................................................141
		480 - Check camshaft bearing style.............................................................................................142
		481 - Bearing clearances.......................................................................................................143
		482 - Assemble bearings........................................................................................................143
		483 - Replace large gear.......................................................................................................144
		484 - Withdraw pins from push rods.............................................................................................144
		485 - Replace valve cover......................................................................................................144
		486 - Install hot air pipe.....................................................................................................144
		487 - Install cylinder front cover.............................................................................................144
	Time Study - Installing New Camshaft Bearings......................................................................................145
		488 - Time Study - Installing New Camshaft Bearings............................................................................145
Chapter X - Cleaning the Oil Line......................................................................................................146
	Cleaning the Oil Line..............................................................................................................146
		489 - Lift off hood and remove radiator........................................................................................146
		490 - Place air hose nozzle in end of pipe and blow compressed air.............................................................146
		491 - Check oil flow by cranking rapidly.......................................................................................146
		492 - Drain oil from crankcase.................................................................................................146
		493 - Replace time gear, fill radiator.........................................................................................146
	Time Study - Cleaning Oil Line.....................................................................................................146
		494 - Time Study - Cleaning Oil Line...........................................................................................146
Chapter XI - Stopping Oil Leak at Front End of Crankshaft..............................................................................147
	Stopping Oil Leak at Front of Crankshaft...........................................................................................147
		495 - How it starts............................................................................................................147
		496 - Locate trouble...........................................................................................................147
		497 - Remove and install new gaskets...........................................................................................147
		498 - Solder front wall........................................................................................................148
	Time Study - Oil Leak at Front End of Crankshaft...................................................................................148
		499 - Time Study - Oil Leak at Front End of Crankshaft.........................................................................148
	Time Study - Oil Leak at Crankcase Front Wall......................................................................................148
		500 - Time Study - Oil leak at Crankcase Front Wall............................................................................148
Chapter XII - Replacing transmission bands (old design)................................................................................149
	Replacing Transmission Bands (Old Design)..........................................................................................149
		501 - Describe problem.........................................................................................................149
		502 - To install new bands.....................................................................................................149
		503 - Lift off hood............................................................................................................149
		504 - Disconnect starting motor cable..........................................................................................149
		505 - Run out motor mounting screws............................................................................................149
		506 - Remove mat and floorboards...............................................................................................149
		507 - Disconnect exhause pipe..................................................................................................149
		508 - Disconnect magneto wire..................................................................................................149
		509 - Run out universal joint bolts............................................................................................149
		510 - Run out transmission cover to crankcase bolts............................................................................149
		511 - Loosen transmission band adjusting screw.................................................................................149
		512 - Remove transmission cover................................................................................................149
		513 - Remove starting motor....................................................................................................149
		514 - Lift off transmission cover..............................................................................................150
		515 - Install new transmission band linings....................................................................................150
		516 - Rivet band linings.......................................................................................................150
		517 - Install transmission cover...............................................................................................151
		518 - Compress transmission band springs.......................................................................................152
		519 - Prevent loosing small parts..............................................................................................152
		520 - Connect magneto terminal wire............................................................................................152
		521 - Run up exhaust pipe pack net.............................................................................................152
		522 - Insert two bolts in universal joint......................................................................................152
		523 - remove transmission cover door...........................................................................................152
		524 - Adjust low speed band....................................................................................................152
		525 - Adjust brake and reverse bands...........................................................................................152
		526 - After adjusting examine bands for drag...................................................................................152
		527 - Install transmission door................................................................................................153
		528 - Install floor boards and mat.............................................................................................153
		529 - Connect switch to starting motor.........................................................................................153
		530 - Install hood.............................................................................................................153
	Time Study - Changing Bands (Old Design)...........................................................................................153
		531 - Time Study - Changing Bands (old design).................................................................................153
Chapter XIII - Installing New Type Transmission Bands..................................................................................154
	Installing New Type Transmission Bands.............................................................................................154
		532 - Show detachable ear band.................................................................................................154
		533 - Lug removed from band....................................................................................................154
		534 - How to remove lug........................................................................................................154
		535 - remove new type bands....................................................................................................154
		536 - Don't drop parts in transmission.........................................................................................154
		537 - Remove pedals............................................................................................................154
		538 - Replace bands............................................................................................................154
		539 - Replace reverse band first...............................................................................................155
		540 - Use of band tool.........................................................................................................155
		541 - Adjust bands.............................................................................................................155
		542 - Assemble with lock washer nub in nut groove..............................................................................155
		543 - Installing new style band in older Model T's.............................................................................155
		544 - Make new low speed adjuster..............................................................................................156
		545 - Make tool for bands......................................................................................................156
	Time Study - Changing Bands (New Design)...........................................................................................156
		546 - Time Study - Changing Bands (New Style)..................................................................................156
Chapter XIV - Replacing Transmission Clutch Spring.....................................................................................157
	Replacing Transmission Clutch Spring...............................................................................................157
		547 - Lift up car rear end.....................................................................................................157
		548 - Remove read spring hangers...............................................................................................157
		549 - Break wire and run out universal joint bolts.............................................................................157
		550 - Disconnect axle from transmission........................................................................................157
		551 - Run out (6) transmission cover screws....................................................................................157
		552 - Withdraw ball cap from drive shaft.......................................................................................157
		553 - Compress clutch spring...................................................................................................157
		554 - Install new clutch spring................................................................................................157
		555 - Replace transmission cover door..........................................................................................158
		556 - Install ball cap.........................................................................................................158
		557 - Insert universal joint...................................................................................................158
		558 - Run in ball cap bolts....................................................................................................158
		559 - Connect rear spring to perches...........................................................................................158
		560 - Connect brake rods to control shaft......................................................................................158
		561 - Install floorboards and mat..............................................................................................158
	Time Study - Changing Clutch Spring................................................................................................158
		562 - Time Study - Changing Clutch Spring......................................................................................158
Chapter XV - Overhauling Rear Axle.....................................................................................................159
	Overhauling Rear Axle..............................................................................................................159
		563 - Remove rear axle.........................................................................................................159
		564 - Place axle on axle stand.................................................................................................159
		565 - Removehub key............................................................................................................159
		566 - Remove drive shaft.......................................................................................................159
		567 - Run off 7 rear-end bolts.................................................................................................159
		568 - Withdraw axle............................................................................................................160
		569 - Remove roller bearings...................................................................................................161
		570 - Break wire and run out (10) differential cap screws......................................................................161
		571 - Remove differential drive gear from case.................................................................................161
		572 - Remove inner and outer sleevess..........................................................................................161
		573 - Disconnect brake rod.....................................................................................................162
		574 - Install gear on new axle.................................................................................................162
	Disassembling Drive Shaft..........................................................................................................162
		575 - Run out grease cup.......................................................................................................162
		576 - Replace universal joint..................................................................................................162
		577 - Withdraw drive shaft from torque tube....................................................................................163
		578 - Withdraw pinion gear.....................................................................................................164
		579 - Withdraw roller bearing..................................................................................................164
		580 - Remove bearing sleeve....................................................................................................164
		581 - Remove drive shaft front bushing.........................................................................................164
		Assembling the Drive Shaft.....................................................................................................165
			582 - Clean and examine all parts for reassembly...........................................................................165
			583 - Install drive shaft bushing..........................................................................................165
			584 - Inspect drive shaft..................................................................................................166
			585 - Install drive shaft bushing..........................................................................................166
			586 - Install drive shaft pinion gear......................................................................................166
			587 - Inspect drive shaft roller for cracks and assemble...................................................................167
			588 - Inspect bearing housing for cracks...................................................................................167
			589 - Inspect differential gear for cracks and chipped teeth...............................................................167
			590 - Examine pinion gear..................................................................................................167
			591 - Examine universal joint..............................................................................................167
			592 - Insert joint housing plugs...........................................................................................168
			593 - Insert grease cup....................................................................................................168
		Assembling the Differential....................................................................................................168
			594 - Wash all parts.......................................................................................................168
			595 - Examine axle shaft...................................................................................................168
			596 - Examine differential gear teeth......................................................................................168
			597 - Examine differential case............................................................................................168
			598 - Check spider for wear................................................................................................168
			599 - Install differential drive gear......................................................................................168
			600 - Examine differential pinions for wear................................................................................169
			601 - Insert axle in right housing.........................................................................................169
			602 - Insert axle in left housing..........................................................................................169
			603 - Place washers on axles...............................................................................................169
			604 - Position spider "B" together.........................................................................................169
			605 - Mesh differential pinions............................................................................................169
			606 - Insert 3 differential case bolts.....................................................................................169
			607 - Test for freely rotating differential................................................................................169
			608 - Inspect axle housings for cracks.....................................................................................169
			609 - Examine bearing sleeves for wear.....................................................................................169
			610 - Examine radius rods for cracks.......................................................................................169
			611 - Install radius rods..................................................................................................169
			612 - Connect brake rod to cam shaft lever.................................................................................169
			613 - Examine differential thrust plates and washers for wear..............................................................170
			614 - Insert thrust washers................................................................................................170
			615 - Position thrush washer over dowel pins...............................................................................170
			616 - Inspect roller bearings for cracks...................................................................................170
			617 - Assemble housings....................................................................................................170
			618 - Insert roller bearings in each housin................................................................................171
			619 - Insert bolts in housings.............................................................................................171
			620 - Check for freely revolving axle assembly.............................................................................171
			621 - Assemble drive shaft to housings.....................................................................................171
			622 - Install outer bearings...............................................................................................172
			623 - Place 1 1/2 lbs of high grade gear compound into differential........................................................172
		Connecting Rear Axle Assembly to Car...........................................................................................172
			624 - Lift read end with hoist.............................................................................................172
			625 - Position axle under car..............................................................................................172
			626 - Insert universal joint into transmission drive plate.................................................................172
			627 - Run in the two bolts that connect axle to transmission...............................................................172
			628 - Connect perches to axle..............................................................................................172
			629 - Lower car and remove hooks...........................................................................................172
		Time Study - Rear Axle Overhaul................................................................................................172
			630 - Time Study - Rear Axle Overhaul......................................................................................172
Chapter XVI - Stopping Oil Leak at Rear Wheel..........................................................................................173
	Stopping Oil Leak at Rear Wheel....................................................................................................173
		631 Jack up rear end and remove rear wheels....................................................................................173
		632 - Remove old felt retainer.................................................................................................173
		633 - Withdraw outer roller bearing............................................................................................173
		634 Withdraw outer roller bearing sleeve.......................................................................................173
		635 - Place new retainer over end of axle......................................................................................173
		636 - Install correct sleeve in correct housing................................................................................173
		637 - Insert bearings..........................................................................................................174
		638 - Insert felt retainer.....................................................................................................175
		639 - Insert hub key...........................................................................................................175
		640 - Install wheel............................................................................................................175
	Time Study - Oil Leak at Rear Wheel................................................................................................175
		641 - Time Study - Oil Leak at Rear Wheel......................................................................................175
Chapter XVII - Changing Rear Radius Rods...............................................................................................176
	Removing Radius Rods...............................................................................................................176
		642 - Loosen radius rod lock nuts..............................................................................................176
		643 - Remove cotter pin and run off nuts.......................................................................................176
		644 - Remove rear wheel........................................................................................................176
		645 - Remove brake rod.........................................................................................................176
		646 - Run off nut on brake rod support.........................................................................................176
		647 - Run off nutson ends of radius rods.......................................................................................177
		648 - Turn hub camshaft lever to remove forked end of radius rod...............................................................177
	Installing Rear Radius Rod.........................................................................................................177
		649 - Run lock nuts on radius rod ends.........................................................................................177
		650 - Insert 2 radius rod bolts and tighten up.................................................................................177
		651 - Turn hub camshaft lever to verticle......................................................................................178
		652 - Run down radius rod nut clearing cotter pin hole.........................................................................178
		653 - Install new brake rod support............................................................................................178
		654 - Position forked end of radius rod........................................................................................178
		655 - Install rear wheel.......................................................................................................178
	Time Study - Changing Rear Radius Rod..............................................................................................178
		656 - Time Study - Changing Rear Radius Rods...................................................................................178
Chapter XVIII - Changing a rear spring.................................................................................................179
	Removing Rear Spring from Car......................................................................................................179
		657 - Lift up rear of car......................................................................................................179
		658 - Run off 4 spring hanger nuts.............................................................................................179
		659 - Drive hangers out of spring and perches..................................................................................179
		660 - Remove spring............................................................................................................179
	Installing Rear Spring.............................................................................................................180
		661 - Insert spring into cross member..........................................................................................180
		662 - Insert two spring clip bars..............................................................................................180
		663 Connect rear spring to perchesusing hanger.................................................................................180
		664 - Use block of wood to line up perches.....................................................................................180
		665 - Remove blocks, lower car, and remove lifting hooks.......................................................................180
	Time Study - Changing Rear Spring..................................................................................................180
		666 - Time Study - Changing Rear Spring........................................................................................180
Chapter XIX - Front Axle Assembly Overhaul.............................................................................................181
	Removing Front Axle Assembly from Car..............................................................................................181
		667 - Break wire and run off radius rod nuts...................................................................................181
		668 - Run off steering gear post nut...........................................................................................181
		669 - Raise front end of car...................................................................................................181
		670 - Run off spring clip nuts.................................................................................................181
		671 - Axle can now be removed..................................................................................................181
	Disassembling Axle.................................................................................................................181
		672 - Remove radius rod........................................................................................................181
		673 - Remove spring hanger bars................................................................................................181
		674 - Remove steering gear arm.................................................................................................181
		675 - Remove steering gear connecting rod......................................................................................181
		676 - Remove spindle connecting rod............................................................................................182
		677 - Remove spindles..........................................................................................................182
	Inspecting and Assembling Axle.....................................................................................................182
		678 - Clean and examine parts..................................................................................................182
		679 - Examine spring for broken leaves.........................................................................................182
		680 - Polish and graphite leaves...............................................................................................182
		681 - Assemble spring leaves...................................................................................................182
		682 - Examine bushings for wear................................................................................................182
		683 - Line up oil holes in spring and perch bushings...........................................................................183
		684 - Examine spring hangers for wear..........................................................................................183
		685 - Assemble spring to perches...............................................................................................183
		686 - Examine spindles and spindle arms........................................................................................184
		687 - Replace worn parts.......................................................................................................184
		688 - Examine spindle bolts for defects........................................................................................185
		689 - Insert spindle bolt through spindle......................................................................................185
		690 - Examine steering gear....................................................................................................185
		691 - Examine spindle connecting rod bolts - replace if over .003..............................................................185
		692 - Assemble spindle connecting rods.........................................................................................185
		693 - Grease ball sockets and assemble caps....................................................................................185
		694 - Check for loose sockets..................................................................................................186
		695 - Replace broken oilers....................................................................................................186
	Installing Axle Assembly in Car....................................................................................................187
		696 - Place axle on jacks......................................................................................................187
		697 - Examine steering post key................................................................................................187
		698 - Lover car and remove lifting hooks.......................................................................................187
		699 - Check front axle and wheels for alignment................................................................................187
	Time Study - Front Axle Overhaul...................................................................................................187
		700 - Time Study - Front Axle Overhal..........................................................................................187
Chapter XX - Changing Front Spring.....................................................................................................188
	Removing Front Spring from Car.....................................................................................................188
		701 - Raise front end and run off hanger nuts..................................................................................188
		702 - Run off crank case front bearing nuts....................................................................................188
	Installing Front Spring............................................................................................................188
		703 - Place spring pad over tie bolt...........................................................................................188
		704 - Insert clip bar and license bracket......................................................................................188
		705 - Insert spring hangers over hangers.......................................................................................188
		706 - Position hanger bars over hangers and tighten nuts.......................................................................188
		707 - Remove wood blocks.......................................................................................................188
		708 - Lower car................................................................................................................188
		709 - Check axle alignment.....................................................................................................188
	Time Study - Changing Front Spring.................................................................................................189
		710 - Time Study - Changing Front Spring.......................................................................................189
Chapter XXI - Rebushing Front Spring and Perches.......................................................................................190
	Rebushing Front Spring and Perches.................................................................................................190
		711 - Lift front end and remove hanger bars....................................................................................190
		712 - Drive spring perch bushings out of spring and perches....................................................................190
		713 - Insert new bushings and drive in place with bushing driver...............................................................190
		714 - Install spring hangers...................................................................................................190
		715 - Lower car................................................................................................................190
		716 - Rear springs and perches are rebushed in similar manner..................................................................190
		717 - Check alignment..........................................................................................................190
	Time Study - Rebushing Front Spring and Perches....................................................................................190
		718 - Time Study - Rebushing front Spring and Perches..........................................................................190
Chapter XXII - Changing Front Radius Rods..............................................................................................191
	719 - Break wire and run off rod ball cap nuts.....................................................................................191
	720 - Run off perch nuts and remove radius rod.....................................................................................191
	721 - To install reverse procedure.................................................................................................191
	722 - Check alignment..............................................................................................................191
	723 - Time Study - Changing Front Radius Rod.......................................................................................191
Chapter XXIII - Changing Front Axle....................................................................................................192
	Removing Axle from Car.............................................................................................................192
		724 - Raise front end..........................................................................................................192
		725 - Run off perch nuts.......................................................................................................192
	Installing Front Axle..............................................................................................................192
		726 - Support axle on horses and lower car onto it.............................................................................192
		727 - Insert radius rod ends...................................................................................................192
		728 - Insert spindle bolt through axle and spindle.............................................................................192
		729 - Check alignment of axle..................................................................................................192
	Time Study - Changing Front Axle...................................................................................................192
		730 - Time Study - Changing Front Axle.........................................................................................192
Chapter XXIV - Replacing Front Hub Bearing Cup and Bearing.............................................................................193
	Replacing Front Hub Bearing Cup and Bearing........................................................................................193
		731 - Jack up car and remove front wheel.......................................................................................193
		732 - Remove dust cap and bearing cups.........................................................................................193
		733 - Install new cups and bearings............................................................................................193
		734 - Install dust cap.........................................................................................................194
		735 - Pack wheel hub with grease...............................................................................................194
	Time Study - Changing Front Hub Bearing Cups.......................................................................................194
		736 - Time Study - Changing Front Hub Bearing Cups.............................................................................194
Chapter XXV - Steering Gear Overhaul...................................................................................................195
	Remove Steering Gear from Car......................................................................................................195
		737 - Run off steering gear post nut...........................................................................................195
		746 - Withdraw steering gear through dash......................................................................................195
		738 - Drive off steering gear ball arm.........................................................................................195
		739 - Lift off hood............................................................................................................195
		740 - Disconnect carburetor pull rod...........................................................................................195
		741 - Remove cotter key and disconnect commutator pull rod.....................................................................195
		742 - Drive out lead rod driver pin............................................................................................195
		743 - Disconnect horn wires at horn and terminal block.........................................................................195
		744 - Remove steering gear bracket bolts.......................................................................................195
		745 - Run off steering flange screws...........................................................................................195
	Disassembling the Steering Gear....................................................................................................195
		747 - Run off steering wheel nut...............................................................................................195
		748 - Remove steering gear pinion key..........................................................................................195
		749 - Run out steering gear cover..............................................................................................196
		750 - Withdraw steering gear post..............................................................................................196
		751 - Remove throttle rod lever................................................................................................196
		752 - Remove lead and throttle guide...........................................................................................196
		753 - Remove lead and throttle rod springs.....................................................................................196
		754 - Drive out internal gear case pins........................................................................................197
		755 - Withdraw internal gear case and rods from steering gear tubing...........................................................197
		756 - Spread ends of guides to remove gear case................................................................................197
		757 - Steering gear is now completely disassembled.............................................................................197
	Assembling Steering Gear...........................................................................................................197
		758 - Inspect gear tube for cracks.............................................................................................197
		759 - Check gear case for excessive clearance (.006+)..........................................................................197
		760 - Examine rods for cracks at pin holes.....................................................................................197
		761 - Replace pins with No. 2 taper pins.......................................................................................197
		762 - Insert rods and springs..................................................................................................197
		763 - Insert throttle pins.....................................................................................................197
		764 - Position rod guides......................................................................................................198
		765 - Rivet rod lever to rod...................................................................................................198
		766 - Inspect steering post for wear...........................................................................................198
		767 - Install post in gear case................................................................................................198
		768 - Inspect for wear.........................................................................................................198
		769 - Insert pinions over pinion pins..........................................................................................199
		770 -Pack case with grease.....................................................................................................199
		771 - Insert steering gear pinion key and fit..................................................................................199
	New Design Steering Gear Ratio.....................................................................................................199
		772 - New 5 to 1 steering gear.................................................................................................199
		773 - Old and new not interchangable...........................................................................................199
		774 - Mix of old and new steering gear could cause accident....................................................................199
		775 - Interchangable steering parts............................................................................................200
		776 - 5 to 1 gear part numbers.................................................................................................200
		777 - Teeth layout of gears....................................................................................................200
		778 - Picture of both gear sets................................................................................................200
	Installing Steering Gear in Car....................................................................................................200
		779 - Insert steering gear through hole in dash................................................................................200
		780 - Install rods.............................................................................................................200
		781 - Connect steering gear flange.............................................................................................200
		782 - Insert horn wires........................................................................................................200
		783 - Install steering gear bracket cap........................................................................................201
		784 - Connect carburetor pull rod..............................................................................................201
		785 - Connect commutator pull rod..............................................................................................201
		786 - Install hood.............................................................................................................201
	Time Study - Steering Gear Overhaul................................................................................................201
		787 - Time Study - Steering Gear Overhaul......................................................................................201
Chapter XXVI - Repairing the Radiator..................................................................................................202
	The Solder.........................................................................................................................202
		789 - Solder - What is available...............................................................................................202
	The Iron...........................................................................................................................202
		790 - The iron.................................................................................................................202
		791 - Work squarely............................................................................................................202
		792 - "Tin" iron...............................................................................................................202
		793 - Solder oxidizes..........................................................................................................203
	The Torch..........................................................................................................................203
		794 - The torch................................................................................................................203
	The Acid...........................................................................................................................203
		795 - The acid.................................................................................................................203
		796 - Keep soldering acid clean................................................................................................204
		797 - Store in corked bottle...................................................................................................204
	Miscellaneous......................................................................................................................204
		798 - Apply acid with small horsehair brush....................................................................................204
		799 - Fiber brushfor acid cleanup..............................................................................................204
		800 - Use oven for heating irons...............................................................................................204
		801 - Wear canvas gloves.......................................................................................................204
	Soldering..........................................................................................................................204
		802 - Clean metal before soldering.............................................................................................204
		803 - Fit pieces together......................................................................................................204
		804 - Always solder in direction of flame flow.................................................................................205
		805 - For removing parts use torch.............................................................................................205
	Equipment..........................................................................................................................206
		806 - Equipment needed.........................................................................................................206
		807 - Ensure check valves are used with acetylene..............................................................................206
		808 - 5 - 8 lbs of air for pressure testing....................................................................................206
		809 - Tools required...........................................................................................................206
	Removing the Radiator..............................................................................................................209
		810 - Removing radiator........................................................................................................209
	Removing and Installing Filler Neck................................................................................................209
		811 - Remove filler neck.......................................................................................................209
		812 - Before positioning neck - dip in acid....................................................................................209
	Removing Bottom Tank...............................................................................................................209
		814 - Heat and brush solder from all seams.....................................................................................210
		813 - Remove bottom tank.......................................................................................................209
	Replacing Bottom Tank..............................................................................................................210
		815 - Heat inside of header....................................................................................................210
		816 - Light blue flame is best for soldering...................................................................................210
		817 - In replacing lower tank - fit as close as possible.......................................................................210
		818 - First solder ends and work around........................................................................................211
		819 - Solder reinforcement.....................................................................................................211
	Removing Bottom Header.............................................................................................................212
		820 - Removing bottom header...................................................................................................212
	Replacing Bottom Header............................................................................................................212
		821 - Replacing bottom header..................................................................................................212
		822 - Straighten rods with tube regulator......................................................................................212
		823 - Solder in new header.....................................................................................................213
	Removing Rear Wall.................................................................................................................213
		824 - Removing rear wall.......................................................................................................213
		825 - Heat water inlet and drive out rivets....................................................................................213
	Replacing Rear Wall................................................................................................................213
		826 - Replacing rear wall......................................................................................................213
		827 - Excessive heat warps metal...............................................................................................213
		828 - Close large openings.....................................................................................................213
	Removing Front Wall................................................................................................................214
		829 - Removing front wall......................................................................................................214
	Replacing Front Wall...............................................................................................................214
		830 - Replacing front wall.....................................................................................................214
		831 - Take care in soldering top tank..........................................................................................215
		832 - How to solder top tank...................................................................................................215
	Removing Top Tank..................................................................................................................215
		833 - Removing top tank top....................................................................................................215
		First Method...................................................................................................................215
			834 - First method.........................................................................................................215
			835 - Remove splash plate..................................................................................................215
		Second Method..................................................................................................................216
			836 - Second method........................................................................................................216
			837 - Attach overflow pipe.................................................................................................216
	Replacing Top Tank Top.............................................................................................................216
		First Method...................................................................................................................216
			838 - Replace top tank - method 1..........................................................................................216
			839 - Brush solder from joints.............................................................................................216
			840 - Tack bits before full soldering......................................................................................216
			841 - Flow tight solder....................................................................................................217
		Second Method..................................................................................................................217
			842 - Replace top tank - method 2..........................................................................................217
	Removing Overflow Pipe.............................................................................................................217
		843 - Remove overflow pipe.....................................................................................................217
	Replacing Overflow Pipe............................................................................................................218
		844 - Fit and replace overflow pipe............................................................................................218
		845 - Assemble overflow pipe with washer.......................................................................................218
	Removing Top Header................................................................................................................218
		846 - Remove top header........................................................................................................218
	Replacing Top Header...............................................................................................................218
		847 - Replace top header.......................................................................................................218
		848 - Another way to replace top header........................................................................................218
	Changing the Core..................................................................................................................219
		849 - Remove top tank and supports.............................................................................................219
		850 - Assemble bottom tank to new core.........................................................................................219
	Repairing a Broken Tube............................................................................................................219
		851 - Repair broken tube.......................................................................................................219
		852 - Bending fins to get at break.............................................................................................219
		853 - Soldering breaks.........................................................................................................220
		854 - Replace if large number of bad tubes.....................................................................................220
		855 - Fixing broken center tubes...............................................................................................221
		856 - Fixing broken tubes near lower header....................................................................................221
	Cleaning the Tubes.................................................................................................................221
		857 - Cleaning tubes...........................................................................................................221
		858 - Flush radiator with water................................................................................................221
		859 - Test radiator before reinstalling........................................................................................221
	Replacing Radiator Suppport........................................................................................................221
		860 - Replace radiator support.................................................................................................221
	Testing Radiators..................................................................................................................222
		861 - Test radiator submerged with 5-8 lbs of air..............................................................................222
	Touching Up a Repaired Radiator....................................................................................................222
		862 - Touch up a repaired radiator.............................................................................................222
		863 - Get rid of excess solder.................................................................................................222
	Removing Dents from Top and Bottom Tanks...........................................................................................222
		864 - Removing dents from radiator.............................................................................................222
	Installing Radiator in Car.........................................................................................................223
		865 - Installing radiator in car...............................................................................................223
	Time Study - Repairing the Radiator................................................................................................223
		866 - Time Study - Repairing the Radiator......................................................................................223
	788 - Read before starting job.....................................................................................................202
Chapter XXVII - Carburetor Overhaul....................................................................................................224
	Removing Carburetor from Car.......................................................................................................224
		867 - Lift off hood............................................................................................................224
		868 - Disconnect carburetor pull rod...........................................................................................224
		869 - Disconnect two priming wires at carburetor...............................................................................224
		870 - Shut off gasoline at sediment bulb.......................................................................................224
		871 - Disconnect feed pipe at carburetor.......................................................................................224
		872 - Loosen manifold stud nut and remove hot air pipe.........................................................................224
		873 - Run off carburetor flange bolt nuts......................................................................................224
		874 - Lift out carburetor and place in vise....................................................................................224
	Overhauling the Carburetor.........................................................................................................224
		875 - Remove spray needle......................................................................................................224
		876 - Remove drain valve plug assembly.........................................................................................225
		877 - Remove float.............................................................................................................225
		878 - Withdraw gasoline inlet..................................................................................................225
		879 - Run out spray nozzle.....................................................................................................225
		880 - Run out inlet seat.......................................................................................................225
		881 - Before assembling carburetor.............................................................................................225
		882 - Assemble carburetor position spray nozzle gasket.........................................................................226
		883 - Insert inlet seat and gasket into mixing chamber.........................................................................226
		884 - Insert inlet needle into inlet seat......................................................................................226
		885 - Place float on mixing chamber............................................................................................226
		886 - Install float chamber to carburetor body.................................................................................227
		887 - Install spray needle assembly............................................................................................227
		888 - Test needle seat.........................................................................................................228
	Install Carburetor in Car..........................................................................................................228
		889 - Install carburetor in car................................................................................................228
	Time Study - Carburetor Overhaul...................................................................................................229
		890 - Time Study - Carburetor Overhaul.........................................................................................229
Chapter XXVIII - Installing new Bendix Shaft or Spring.................................................................................230
	Removing Bendix from Car...........................................................................................................230
		891 - Lift off hood............................................................................................................230
		892 - Disconnect switch to starting motor cable................................................................................230
		893 - Remove mat and floor boards..............................................................................................230
		894 - Remove bendix cover......................................................................................................230
	Time Study - Changing Bendix or Spring.............................................................................................232
		903 - Time Study - Changing Bendix or Spring...................................................................................232
	Installing new Shaft of Springs....................................................................................................230
		895 - If spring broken pry out.................................................................................................230
		896 - If spring OK remove bendix head..........................................................................................230
		897 - Remove bendix key........................................................................................................231
		898 Assemble bendix............................................................................................................231
	Installing Bendix in Car...........................................................................................................231
		899 - Check bendix for turning freely..........................................................................................231
		900 - Install bendix on starter shaft..........................................................................................232
		901 - Install bendix gasket and cover..........................................................................................232
		902 - Replace floor boards and mat.............................................................................................232
Chapter XXIX - Generator Overhaul......................................................................................................233
	Generator Overhaul.................................................................................................................233
		904 - Remove generator from car................................................................................................233
		905 - Place generator on bench plate and raise brushes.........................................................................233
		906 - Run out 6 head to yoke screws............................................................................................233
		907 - Withdraw armature........................................................................................................233
		908 - Drive out pinion pin.....................................................................................................234
		909 - Use puller to remove pinion gear from generator..........................................................................234
		910 - Lift out Woodruff key....................................................................................................234
		911 - Remove head from generator shaft.........................................................................................234
		912 - Remove large and small bearings..........................................................................................234
		913 - Remove brush end.........................................................................................................234
		914 - Lift generator terminal bolt out.........................................................................................235
		915 - Remove brush holder assembly.............................................................................................235
		916 - Remove third brush holder................................................................................................236
		917 - Check field coils for grounds............................................................................................236
		918 - Tighten screws for field coils with pole driver..........................................................................236
		919 - Withdraw four pole pieces................................................................................................236
	Assembling Generator...............................................................................................................236
		920 - Before reassembly clean thoroughly.......................................................................................236
		921 - Examine pole pieces for burrs............................................................................................236
		922 - Insert field coils and pole pieces into yoke.............................................................................237
		923 - Use pole spreader to align pole pieces...................................................................................237
		924 - Tighten pole screws with pole screw driver...............................................................................237
		925 - Check coils for shorts...................................................................................................238
		926 - Insert retainer ring and position third brush holder into slot...........................................................238
		927 - Check ring assembly for shorts...........................................................................................239
		928 - Install brush ring assy into brush end bracket...........................................................................239
		929 - Check insulators for breaks..............................................................................................239
		930 - Cross leads..............................................................................................................239
		931 - Install brush end bracket on yoke........................................................................................240
		932 - Line up screw holes with brush ends......................................................................................240
		933 - Before installing armature test for shorts...............................................................................240
		934 - Test for ground..........................................................................................................240
		935 - Test for short circuit by using growler..................................................................................240
		936 - Wash bearings in gasoline................................................................................................241
		937 - Seat large bearing.......................................................................................................241
		938 - Insert generator shaft in bearing........................................................................................241
		939 - Position generator head..................................................................................................241
		940 - Examine gear teeth.......................................................................................................241
		941 - Inspect small bearing for wear...........................................................................................242
		942 - Oil small bearing and fit to generator shaft.............................................................................242
		943 - Insert armature assy into yoke...........................................................................................242
		944 - Run in 6 yoke screws.....................................................................................................242
		945 - Seat 2 brushes and leave 3rd brush open..................................................................................242
		946 - Setting generator brushes................................................................................................242
	Setting Generator Brushes on Test Stand............................................................................................242
		947 - Test generator on test stand.............................................................................................242
		948 - Shift brush ring.........................................................................................................243
		949 - Adjust output to 10-12 amps..............................................................................................243
		950 - Install generater in car.................................................................................................243
	Setting Generator Brushes with Generator Installed in Car..........................................................................243
		951 - Set generator brushes with generator installed in car....................................................................243
	Time Study - Generator Overhaul....................................................................................................244
		952 - Time Study - Generator Overhaul..........................................................................................244
Chapter XXX - Starting Motor Overhaul..................................................................................................245
	Removing Starter Motor from Car....................................................................................................245
		953 - Remove starting motor from car...........................................................................................245
	Disassembling Starting Motor.......................................................................................................245
		954 - Remove cover band........................................................................................................245
		955 - Raise four brushes.......................................................................................................245
		956 - Run out bracket bolts....................................................................................................245
		957 - Withdraw armature........................................................................................................246
		958 - Run out 4 brush brackets to yoke screws..................................................................................246
		959 - Remove brush end bracket.................................................................................................246
		960 - Remove four pole screws..................................................................................................246
		961 - Loosen terminal net......................................................................................................246
		962 - If shaft bushing worn - replace..........................................................................................246
	Assembling the Starting Motor......................................................................................................247
		963 - Before reassembly clean thoroughly in gasoline...........................................................................247
		964 - Install new shaft bushing................................................................................................247
		965 - line ream bushing........................................................................................................247
		966 - Inspect pole pieces......................................................................................................247
		967 - Insert pole pieces in field coils........................................................................................247
		968 - Spread poles.............................................................................................................247
		969 - Test using lamp..........................................................................................................247
		970 - Check motor brush ring for ground........................................................................................247
		971 - Install brush end bracket on end of yoke.................................................................................248
		972 - Test armature in growler.................................................................................................248
		973 - If commutator rough - dress down.........................................................................................248
		974 - Insert armature into yoke................................................................................................248
		975 - Replace dust cover.......................................................................................................248
	Installing Starting Motor in Car...................................................................................................248
		976 - Install starting motor...................................................................................................248
		977 - Install bendix and bendix cover..........................................................................................248
	Time Study - Starting Motor Overhaul...............................................................................................248
		978 - Time Study - Starting Motor Overhaul.....................................................................................248
Chapter XXXI - Tracing Car Troubles....................................................................................................249
	979 - Asset to repairman...........................................................................................................249
	980 - Use systematic methods.......................................................................................................249
	981 - Methods for tracing car troubles discussed...................................................................................249
	Engine Fails to Start..............................................................................................................249
		Cars Equipped with Starters....................................................................................................249
			982 - Engine fails to start................................................................................................249
			983 - If equipped with starter.............................................................................................249
			984 - Turn off ignition and rock car.......................................................................................249
			985 - Remove bendix........................................................................................................249
			986 - Sprung armature shaft................................................................................................249
			987 - Whirring noise.......................................................................................................250
			988 - No spark.............................................................................................................250
			989 - If engine turns freely but does not start............................................................................250
			990 - Remove commutator....................................................................................................250
			Wiring diagram (Starter)...................................................................................................251
		Cars Not Equipped with Starter.................................................................................................252
			991 - Not equipped with starter............................................................................................252
			992 - Check crankshaft endplay.............................................................................................252
			993 - Check magnet strength................................................................................................252
			994 - If car starts - magneto is weak or dead..............................................................................252
			995 - Check for 7 volts....................................................................................................253
		Locating a Grounded or Shorted Coil............................................................................................253
			996 - Locate grounded or shorted coil......................................................................................253
			997 - Check for spark......................................................................................................254
			998 - If not shorted or grounded- weak magnets.............................................................................254
Chapter XXXII - Misfiring..............................................................................................................255
	Misfiring Caused by Trouble in Ignition System or Valves...........................................................................255
		1014 - Check gas and adjust carb needle........................................................................................258
		1015 - Open drain cock in carb and check gas flow..............................................................................259
		1016 - Check sediment bulb for gas flow........................................................................................259
		1017 - Check screen............................................................................................................259
		1018 - Clean sediment bulb.....................................................................................................259
		1019 - Check intake manifold...................................................................................................259
		1020 - Check water leaks.......................................................................................................259
	Misfiring, or Engine Fails to Start, Caused by Trouble in the Fuel System..........................................................258
		1000 - Misfiring (missing) may result from fuel system, ignition system, or valves.............................................255
		1001 - Short plugs with screwdriver............................................................................................255
		1002 - Check wires.............................................................................................................255
		1003 - Check for spark at coilbox terminal.....................................................................................255
		1004 - Bad coil................................................................................................................256
	Testing and Adjusting the Coil Units...............................................................................................257
		1005 - Check points on coil....................................................................................................257
		1006 - Maintain .005 clearance.................................................................................................257
		1007 - Adjust gap to 1/32 inch.................................................................................................257
		1008 - Test coil in coil tester................................................................................................257
		1009 - Properly adjusted coil sparks at each 16 points around ring.............................................................257
		1010 - If weak spark or no spark - dress points or install new points..........................................................258
		1011 - Clean points............................................................................................................258
	Inspecting the Valves..............................................................................................................258
		1012 - if not in ignition system - Check valves................................................................................258
		1013 - Check that valves are not sticking in guides............................................................................258
Chapter XXXII - Back Firing............................................................................................................260
	Back Firing........................................................................................................................260
		1021 - Back firing defined.....................................................................................................260
		1022 - Three causes of backfiring..............................................................................................260
		1023 - Slow-burning worn engine parts or carburetor............................................................................260
		1024 - Back firing due to ignition is grounded wire............................................................................260
		1025 - Pre-ignition............................................................................................................260
		1026 - Check fuel line.........................................................................................................260
		1027 - Determine cause of backfire.............................................................................................260
		1028 - Short and check plug wires..............................................................................................261
		1029 - Check for gasket leakage................................................................................................261
		1030 - Check valves............................................................................................................261
		1031 - Check compression.......................................................................................................261
		1032 - If necessary to short cyls 1 and 2 or 3 and 4 - check inletmanifold gasket..............................................261
		1033 - If cannot locate backfire - check carburetor............................................................................261
		1034 - Check for continual coil buzzing........................................................................................261
		1035 - If coils vibrates constantly - bad commutator wire......................................................................261
Chapter XXXIV - Engine knocks..........................................................................................................262
	Engine Knocks......................................................................................................................262
		1047 - Light rapping may be camshaft bearings..................................................................................263
		1036 - Various knocks..........................................................................................................262
		1037 - Carbon knock............................................................................................................262
		1038 - Loose piston knock......................................................................................................262
		1039 - Connecting rod knock....................................................................................................262
		1040 - Main bearing knock......................................................................................................262
		1041 - Piston pin knock........................................................................................................262
		1042 - With the exception of a carbon knock, all knocks can be found by shorting plugs.........................................262
		1043 - If No. 1 plug shorted and knock disappears - front main or piston.......................................................262
		1044 - If shorting No. 2 plug and knock disappears - #2 cylinger holds the knock.  Same with No. 3.............................263
		1045 - Sounds are deceiving....................................................................................................263
		1046 - Noisy valves............................................................................................................263
	Conditions Which Sometimes Cause Knocks............................................................................................263
		1048 - Loose flywheel on crankshaft............................................................................................263
		1049 - Loose pulley............................................................................................................263
		1050 - Timing gear loose on camshaft...........................................................................................263
		1051 - Excessive thrust on camshaft bearing....................................................................................263
		1052 - Ignition timed incorrectly..............................................................................................263
		1053 - Pistons striking cylinder head..........................................................................................263
		1054 - Excessive play in crankshaft............................................................................................263
		1055 - Magnets striking field coils............................................................................................263
		1056 - Generator bearings tight or broken......................................................................................263
		1057 - Loose fan bushing.......................................................................................................263
		1058 - Crankcase loose in front bearing........................................................................................263
Chapter XXXV - Clutch Troubles.........................................................................................................264
	Slipping Clutch....................................................................................................................264
		1059 - If engine races but no speed pickup - adjust clutch.....................................................................264
		1060 - Adjust clutch...........................................................................................................264
		1061 - Adjust clutch fingers...................................................................................................264
	Car Creeps Forward with Hand Brake Applied.........................................................................................265
		1062 - Car creeps when warm....................................................................................................265
		1063 - Adjust clutch bolt......................................................................................................265
		1064 - If still creeps - Clutch or low band too tight..........................................................................266
		1065 - Cold weather starting...................................................................................................266
	Clutch Pedal Sticks in Low Gear....................................................................................................266
		1066 - Clutch pedal sticks in low gear.........................................................................................266
Chapter XXXVI - Tracing Trouble in the Generator.......................................................................................267
	Tracing Trouble in the Generatpr...................................................................................................267
		1067 - Ammeter registers no charge.............................................................................................267
		1068 - If singing noise - flash generator......................................................................................267
		1069 - Dirty or oily commutator................................................................................................267
		1070 - Clean generator commutator..............................................................................................267
		1071 - Faults due to carbon and dirt...........................................................................................267
		1072 - Test generator..........................................................................................................268
		1073 - Other possibilities.....................................................................................................268
		1074 - Inspect generator for broken or worn parts..............................................................................268
		1075 - If ammeter flutters - check for shorts..................................................................................268
		1076 - Check for ground in terminal............................................................................................268
		1077 - Check for tight bearing.................................................................................................268
		1078 - If less than 2 amps - check for broken wires............................................................................269
		1079 - Loose or worn bearings..................................................................................................269
		1080 - Properly running generator - 3-5 amps...................................................................................269
		1081 - Check for broken parts..................................................................................................269
		1082 - Sand brushes............................................................................................................269
		1083 - Brushes sticking........................................................................................................269
		1084 - Cheaper to install brush holder.........................................................................................269
		1085 - Arcing brushes..........................................................................................................269
		1086 - Test for grounds in field coils without disassembling generator.........................................................270
		1087 - After locating problem - reassemble generator...........................................................................270
Chapter XXXVII - Tracing Trouble in Starting Motor.....................................................................................271
	Tracing Trouble in the Starting Motor..............................................................................................271
		1090 - If high reading and armature turns slow - grounded armature.............................................................271
		1088 - If switch pressed and motor fails to turn over..........................................................................271
		1089 - Conect battery - 50-75 amps - starter OK................................................................................271
		1090 - If high reading and slowly turning armature - grounded armature.........................................................271
		1091 - Jerky and slow turning armature - shorted armature......................................................................271
		1092 - High reading and no rotation of armature - grounded field coils or brush holder.........................................271
		1093 - Cannot rotate and 100-200 amps - bent shaft.............................................................................271
		1094 - If shaft binding - replace bushing......................................................................................271
Chapter XXXVIII - Tracing Trouble in Lighting System...................................................................................272
	Tracing Trouble in the Lighting System.............................................................................................272
		Tail Lamp or One Headlamp Fail to Light........................................................................................273
			1099 - Tail lamp fails.....................................................................................................273
			1100 - If tail lamps still fail - check ignition switch....................................................................273
			1101 - Check ignition switch...............................................................................................273
		1095 - Lamps fail on "Dim" or "Bright".........................................................................................272
		All Lamps Fail to Light........................................................................................................272
			1096 - All lamps fail to light.............................................................................................272
			1097 - No ammeter discharge - Check battery wire on terminal block.........................................................272
			1098 - If all lamps burned out checkcharging circuit.......................................................................273
Chapter XXXIX - Tracing Trouble in Charging Circuit....................................................................................274
	Short Circuits.....................................................................................................................274
		1104 - Tracing a short.........................................................................................................274
		1105 - Ammeter delicate instrument.............................................................................................274
		1106 - Disconnect terminal block to starting switch............................................................................274
	1102 - The charging circuit........................................................................................................274
	1103 - Functioning circuit indicated by ammeter....................................................................................274
	Open Circuits......................................................................................................................274
		1107 - Open Circuits...........................................................................................................274
		1108 - Never burn lights with an open circuit..................................................................................275
		1109 - How to locate an open in the charging circuit...........................................................................275
Chapter XL - Horn Fails to Sound.......................................................................................................276
	1110 - Failure of horn to sound....................................................................................................276
	1111 - Examine horn parts for wear.................................................................................................276
	1112 - If horn button OK look at wires.............................................................................................276
	1113 - Check plunger and diaphram..................................................................................................276
	1114 - Check adjustments...........................................................................................................277
Chapter XLI - Battery Care.............................................................................................................278
	1115 - Battery maintenance.........................................................................................................278
	1116 - Check battery connections...................................................................................................278
	1117 - Clean battery ends with weak ammonia........................................................................................279
	1118 - Leak causing battery to run down............................................................................................279
	1119 - Check brightness of lights..................................................................................................279
	1120 - Detailed procedures for serviceing batteriesare xontained elsewhere.........................................................279
Chapter XLII - Servicing the Improved Car..............................................................................................280
	Servicing the Improved Car.........................................................................................................280
		1122 - Replacing parts.........................................................................................................280
		1121 - Numerous improvements in the 1925 car...................................................................................280
	Replacing New Type Fenders.........................................................................................................280
		1123 - Wider and heavier construction of fenders...............................................................................280
		1124 - New type fender bolts...................................................................................................280
	Removing the Front Fender..........................................................................................................281
		1125 - Remove radiator.........................................................................................................281
		1126 - Drain radiator and lift off hood........................................................................................281
		1127 - Loosen outlet hose......................................................................................................281
		1128 - Runoff radiator nuts....................................................................................................281
		1129 - Pry up 3 loom clips.....................................................................................................281
		1130 - Remove radiator rod.....................................................................................................281
		1131 - Lift radiator off studs.................................................................................................281
		1132 - Remove starting crank ratchet...........................................................................................281
		1133 - Withdraw crank..........................................................................................................282
		1134 - Run off engine pan nuts.................................................................................................282
		1135 - Disconnect headlamp plug................................................................................................283
		1136 - Run off headlamp bracket bolts..........................................................................................283
		1137 - Run off nuts on front fender............................................................................................283
		1138 - Run off front fender to dust shield nuts................................................................................283
		1139 - Lift off fenders........................................................................................................283
	Installing Front Fender............................................................................................................283
		1140 - Install new front fender................................................................................................283
		1141 - Insert bolts through dust shield........................................................................................283
		1142 - Install fender to running board bolts...................................................................................283
		1143 - Install headlamp wire through hood blocks...............................................................................283
		1144 - Insert hood blocks and bolts............................................................................................284
		1145 - Tighten fender bolts....................................................................................................284
	Installing the Radiator............................................................................................................284
		1146 - Install radiator apron..................................................................................................284
		1147 - Position radiator springs...............................................................................................284
		1148 - Attach outlet hose to radiator..........................................................................................284
		1149 - Insert headlamp bolts...................................................................................................284
		1150 - Connect headlamp plug...................................................................................................284
		1151 - Insert lighting wire loom...............................................................................................284
		1152 - Connect carburetor priming rod..........................................................................................284
		1153 - Replace hood............................................................................................................284
		1154 - Align and focus headlamps...............................................................................................284
	Focusing and Aligning the Headlamps................................................................................................284
		1155 - Focus and align improved car headlamps..................................................................................284
		1156 - Align and focus headlamps at 25 feet....................................................................................284
		1157 - Focus headlamps.........................................................................................................285
		1158 - Headlamp alignment tool.................................................................................................285
		1159 - Checking proper alignment...............................................................................................286
	Replacing Rear Fenders.............................................................................................................286
		1160 - Remove new design rear fender...........................................................................................286
		1161 - Unbolt rear taillamp and license bracket................................................................................287
		Installing Rear Fender.........................................................................................................287
			1162 - Install new design fender...........................................................................................287
			1163 - Install bolts.......................................................................................................287
			1164 - Tighten bolts.......................................................................................................287
			1165 - Draw down and tighten fendor nuts and bolts.........................................................................287
	Replacing the New Design Running Boards............................................................................................287
		Removing.......................................................................................................................287
			1166 - Installing new running boards.......................................................................................287
			1167 - Remove by running out 8 bolts.......................................................................................287
			1169 - Withdraw bolts......................................................................................................287
			1170 - Run off nuts on running board ends..................................................................................287
		Installing.....................................................................................................................287
			1171 - Place wood blocks on support and set running boards on and bolt up..................................................287
			1172 - Add bolts and run up nuts...........................................................................................287
			1173 - Insert rear running board bolts.....................................................................................287
			1174 - Insert two front fender to running board bolts......................................................................288
			1175 - Draw down tightly on rear running board nuts........................................................................288
	Replacing the New Dust Shield......................................................................................................288
		Removing.......................................................................................................................288
			1176 - Removing new design dust shield.....................................................................................288
			1177 - Run out wood screws affixing dust shield to body....................................................................288
			1178 - Withdraw hood clip..................................................................................................288
			1179 - Run off hood block bolt.............................................................................................288
			1180 - Run off front fender to dust shield bolts...........................................................................288
			1181 - Withdraw bolts......................................................................................................288
			1182 - Slide off dust shield...............................................................................................289
		Installing.....................................................................................................................289
			1183 - Install dust shield.................................................................................................289
			1184 - Position hood block support.........................................................................................289
			1185 - Draw dust shield forward............................................................................................289
			1186 - Insert hood block bolt..............................................................................................289
			1187 - Insert hood clip....................................................................................................289
			1188 - Insert all dust shield nuts nd bolts................................................................................289
			1189 - Draw up bolts.......................................................................................................289
			1190 - Tighten nuts on ends of hood block bolt.............................................................................289
			1191 - Run down two dust shield body screws................................................................................289
			1192 - Dust shields now installed..........................................................................................289
	The New Type Coil Box..............................................................................................................290
		1193 - New style coil box......................................................................................................290
		1194 - New coil box location...................................................................................................290
		1195 - Note heavy latches......................................................................................................290
		1196 - Remove coil box.........................................................................................................290
		1197 - Run off ignition wire nuts..............................................................................................290
		1198 - Run out 3 cylinder head bolts holding coilbox...........................................................................290
		1199 - To install reverse procedure............................................................................................290
	New Design Fan Bracket.............................................................................................................291
		1200 - New design fan bracket..................................................................................................291
	Adjusting Fan Belt.................................................................................................................291
		1201 - Adjusting fan belt......................................................................................................291
	Replacing Fan Belt.................................................................................................................291
		Installing.....................................................................................................................291
			1203 - Install new fan belt................................................................................................291
		1202 - Replacing fan belt......................................................................................................291
	Replacing Fan......................................................................................................................291
		1204 - Run off fan shaft nut...................................................................................................291
		1205 - To install - reverse the procedure......................................................................................291
	New Design Transmission Brake Band.................................................................................................292
		1206 - New transmission brake band.............................................................................................292
		1207 - All bands come with detachable ears.....................................................................................292
		1208 - Chapter XIII apply to present design bands..............................................................................292
	Transmission Brake Drum............................................................................................................292
		1209 - Transmission brake drum increased surface...............................................................................292
		1210 - Hardened shoes fitted over six lugs.....................................................................................292
		1211 - Shoes easily replaced...................................................................................................292
		1212 - Rebushing brake drum....................................................................................................293
	The Transmission Cover.............................................................................................................293
		1213 - New transmission cover..................................................................................................293
		1214 - Line up ball cap on reassembly..........................................................................................293
		1215 - Alignment of transmission cover.........................................................................................294
		1216 - Fit ball cap............................................................................................................294
		1217 - Recheck.................................................................................................................294
		1218 - Count shims on transmission cover.......................................................................................294
	Replacing the Hub Brake Shoe.......................................................................................................295
		1219 - New brake hub shoe......................................................................................................295
		1220 - no more steel to steel faceoffs.........................................................................................295
		1221 - Braking surface increased from 8 inch diameter to 11 inches.............................................................295
		1222 - New brakes assembled with a large clip..................................................................................295
		1223 - Removal of brake shoes..................................................................................................296
		Removing.......................................................................................................................296
			1224 - Disconnect using special tool.......................................................................................296
		Installing.....................................................................................................................296
			1225 - Installing new brake shoe...........................................................................................296
			1226 - Using special tool..................................................................................................296
			1227 - Rear wheel replaced.................................................................................................296
	Removing and Installing the Gas Tank...............................................................................................297
		1228 - New location of fuel tank...............................................................................................297
		1229 - New location of sediment bulb...........................................................................................297
		1230 - Tank filled from outside of car.........................................................................................297
		Removing.......................................................................................................................297
			1231 - Removing tank.......................................................................................................297
			1232 - Drain tank and remove overflow......................................................................................297
			1233 - Remove overflow pipe set screw......................................................................................298
			1234 - Remove carburetor adjusting rod.....................................................................................298
			1235 - Run off gas tank strap nuts.........................................................................................298
			1236 - Run out ignition screws.............................................................................................298
			1237 - Withdraw ignition switch............................................................................................298
			1238 - Disconnect battery..................................................................................................298
			1239 - Lift out mat and floor boards.......................................................................................298
			1240 - Run out transmission door springs...................................................................................298
			1241 - Loosen pedals.......................................................................................................298
			1242 - Withdraw gas tank straps............................................................................................298
			1243 - Force pedals as far forward as they will go.........................................................................298
			1244 - Move tank back and forth until sediment bulb clears frame...........................................................298
		Installing.....................................................................................................................299
			1245 - Position tank in car................................................................................................299
			1246 - Bend straps over tank...............................................................................................299
			1247 - Insert overflow pipe................................................................................................299
			1248 - Position overflow pipe running down clamp...........................................................................299
			1249 - Screw sediment bulb into connection.................................................................................299
			1250 - Insert feed pipe....................................................................................................299
			1251 - Insert feed pipe....................................................................................................299
			1252 - Insert carburetor adjusting rod.....................................................................................299
			1253 - Position ignition switch in dash....................................................................................299
			1254 - Remove transmission cover and adjust pedals.........................................................................299
			1255 - Replace floor boards and mat........................................................................................299
			1256 - Withdraw rubber tubing..............................................................................................299
			1257 - Install hood and fill gas tank......................................................................................299
	More Room for Driver...............................................................................................................300
		1258 - How to adjust coupe seat................................................................................................300
	Adjusting the Coupe Seat...........................................................................................................300
		1259 - How to move the seat back...............................................................................................300
		1260 - Lift out cushion........................................................................................................300
		1261 - Run off nuts of three seatback strainer bolts...........................................................................300
		1262 - Raise seat 2" and release clip..........................................................................................301
		1263 - Run off spacer board nuts...............................................................................................301
		1264 - By tipping up spacer board, it can be removed...........................................................................301
		1265 - Move seat back 2".......................................................................................................301
		1266 - Additional bolts needed.................................................................................................301
		1267 - Cut down spacer board the same amount as seat was moved.................................................................302
		1268 - Cut board...............................................................................................................302
		1269 - Remove spacer block.....................................................................................................302
		1270 - Withdraw tacks and mark section to be cut...............................................................................302
		1271 - Do not cut spacer board nore than 3"....................................................................................302
		1272 - Keep several spacer boards onhand.......................................................................................303
		1273 - Drill new spacer block holes............................................................................................303
		1274 - Assemble spacer block to spacer board...................................................................................303
		1275 - Install spacer board....................................................................................................303
		1276 - Position seat in car and tighten bolts..................................................................................303
		1277 - Replace seat cushions...................................................................................................303
	Different adjustment methods used on Coupes Equipped with Former Type Seat bar brackets............................................303
		1278 - First run of improved coupe had different bar...........................................................................303
		1279 - Bolt on small metal bracket.............................................................................................303
	Moving Back the Seats in the Improved Tudor........................................................................................304
		1280 - Set back 1 1/2".........................................................................................................304
		1281 - Lift out cushion........................................................................................................304
		1282 - Run off seat leg nuts...................................................................................................304
		1283 - Insert seat legs into forward holes.....................................................................................304
		1284 - Place washer and lockwasherover the end of each seat leg................................................................304
		1285 - Replace the seat cushion................................................................................................304
		1286 - The rear seat can be movedback by sliding back the cushion..............................................................304
Starter Wiring Diagram.................................................................................................................305
Non-Starter Wiring Diagram.............................................................................................................306
Index..................................................................................................................................307
	A..................................................................................................................................307
	B..................................................................................................................................308
	C..................................................................................................................................308
	D..................................................................................................................................309
	E..................................................................................................................................309
	F..................................................................................................................................310
	G .................................................................................................................................310
	H..................................................................................................................................311
	I..................................................................................................................................311
	J..................................................................................................................................311
	K..................................................................................................................................311
	L..................................................................................................................................311
	M..................................................................................................................................311
	N..................................................................................................................................312
	O..................................................................................................................................312
	P..................................................................................................................................312
	Q..................................................................................................................................312
	R..................................................................................................................................312
	S..................................................................................................................................313
	T..................................................................................................................................313
	U..................................................................................................................................314
	V..................................................................................................................................314
	W..................................................................................................................................314
	XYZ................................................................................................................................314
PLEASE NOTE:
This is the same manual used by the DEALERSHIPS to SERVICE your vehicle.
The manual can be all yours – Once payment is complete, you will be taken to the download page from where you can download the manual. All in 2-5 minutes time!!
Need any other service / repair / parts manual, please feel free to contact us at heydownloadss @gmail.com . We may surprise you with a nice offer
SK
✹
What Our Customers Say
★★★★★Live reviews from customers
Loading customer reviews...
🌟 Related Products
Discover more professional manuals for your equipment