1965-1977 Honda 450-500cc Twins Service Manual – PDF DOWNLOAD
Original price was: $80.00.$25.95Current price is: $25.95.
1965-1977 Honda 450-500cc Twins Service Manual – PDF DOWNLOAD
Description
1965-1977 Honda 450-500cc Twins Service Manual – PDF DOWNLOAD
DESCRIPTION:
1965-1977 Honda 450-500cc Twins Service Manual – PDF DOWNLOAD
GENERAL INFORMATION
Introduced in 1965, the Honda 450 was the first Japanese bike to make any headway against the British twins and Harley Sportsters. The engine, ahead of its time in 1965, is still exotic and innovative enough to keep this workhorse in the Honda model line in an enlarged version. The CB500T, introduced in 1975, has a refined 498cc dual overhead cam engine that is a direct descendant of the original 450.
MANUAL ORGANIZATION
- This book provides service information and procedures for all Honda 450 and 500 twins built from 1965 through 1976. Most dimensions and capacities are expressed in English units familiar to U.S. mechanics, as well as in metric units. Where conversion to inches could introduce errors in critical dimensions, only metric measure is specified. In any case, metric tools are required to work on the Honda.
- This chapter provides general information specifications. Figures 1 and 2 show the location bf all identification tags. Chapter Two provides methods and suggestions for finding and fixing troubles fast. Troubleshooting procedures discuss typical symptoms and logical methods to pinpoint the trouble. It also covers some test equipment useful for both preventive maintenance and troubleshooting. Chapter Three explains all periodic lubrication and routine maintenance required to keep your bike in top running condition.
- Chapter Three also includes recommended engine tune-up procedures, eliminating the need to constantly consult chapters covering the various subassemblies. Subsequent chapters describe specific systems such as the engine, transmission, and electrical system. Each chapter provides complete disassembly, repair, and assembly procedures in simple step-by-step form. If a repair is impractical for the home mechanic, it is so indicated. It is usually faster and less expensive to take such repairs to a dealer or competent repair shop.
- Specifications concerning a particular system are included at the end of the appropriate chapter. Some of the procedures in this manual specify special tools. In all cases, the tool is illustrated either in actual use or alone. A well-equipped mechanic may find that he can substitute similar tools already on hand or that he can fabricate his own.
- The terms NOTE, CAUTION, and WARNING have specific meanings in this manual. A NOTE provides additional information to make a step or procedure easier or clearer. Disregarding a NOTE could cause inconvenience, but would not cause damage or personal in jury.
- A CAUTION emphasizes areas where equipment damage could result. Disregarding a CAUTION could cause permanent mechanical damage; however, personal injury is unlikely. A w ARNING emphasizes areas where personal injury or even death could result from negligence. Mechanical damage may also occur.
- WARNINGS are to be taken seriously. In some cases, serious injury or death has been caused when mechanics disregarded similar warnings
SERVICE HINTS
- Most of the service procedures covered are straightforward and can be performed by anyone reasonably handy with tools. It is suggested, however, that you consider your own capabilities carefully before attempting any operation involving major disassembly of the engine. Throughout this manual, keep in mind 2 conventions. “Front” refers to the front of the bike.
- The front of any component, such as the engine, is that end which faces toward the front of the bike. The left and right side refer to a person sitting on the bike, facing forward. For example, the shift lever is on the left side. These rules are simple, but even experienced mechanics occasionally become disoriented. Disconnect battery ground cable before working near electrical connections and before disconnecting wires. Never run the engine with the battery disconnected; the alternator could be seriously damaged.
- Protect :finished surfaces from physical damage or corrosion. Keep gasoline and brake fluid off painted surfaces. Frozen or very tight bolts and screws can often be loosened by soaking with penetrating oil, then sharply striking the bolt head a few times with a hammer and punch ( or a screwdriver for screws). Avoid heat unless absolutely necessary since it may melt, warp, or remove the temper from many parts.
- Avoid flames or sparks when working near a charging battery or flammable liquids such as brake fluid or gasoline. During disassembly of parts, keep a few general cautions in mind. Force is rarely needed to get things apart. If parts are a tight fit, like a magneto on a crankshaft, there is usually a tool designed to separate them.
- Never use a screwdriver to pry apart components with machined surfaces such as crankcase halves and valve covers. You will mar the surfaces and cause leaks. Make diagrams wherever similar-appearing parts are found. For instance, case cover screws are often not the same length.
- You may think you can remember where everything came from-but mistakes are costly. There is also the possibility that you may be sidetracked and not return to work for days, or even weeks; carefully laid out parts may become disturbed.
- Tag all similar internal parts for location and mark all mating parts for position. Record number and thickness of any shims as they are removed. Small parts, such as bolts, can be identified by placing them in plastic sandwich bags and sealing and labeling bags with masking tape. Wiring should be tagged with masking tape and marked as each wire is removed.
- Again, do not rely on memory alone. Read each procedure completely while looking at the actual parts before beginning. Many procedures are complicated and errors can be disastrous. When you thoroughly understand what is to be done, follow the procedure step-by-step.
SAFETY FIRST
Professional motorcycle mechanics can work for years and never sustain a serious injury. If you observe a few rules of common sense and safety, you can enjoy many safe hours servicing your own machine. You could hurt yourself or damage the bike if you ignore these rules.
1. Never use gasoline as a cleaning solvent.
2. Never smoke or use a torch in the vicinity of flammable liquids, such as cleaning solvent in open containers.
3. Never smoke or use a torch in an area where batteries are being charged. Highly explosive hydrogen gas is formed during the charging process.
4. If welding or brazing is required on the machine, remove the fuel tank to a safe distance- at least 50 feet away. Welding gas tanks requires special safety procedures and must be performed by someone skilled in the process.
5. Use the proper sized wrenches to avoid damage to nuts and injury to yourself.
6. When loosening a tight or stuck nut, think about what would happen if the wrench should slip. Protect yourself accordingly.
7. Keep your work area clean and uncluttered.
8. Wear safety goggles during all operations involving drilling, grinding, or use of a cold chisel.
9. Never use worn tools.
10. Keep a fire extinguisher handy and be sure it is rated for gasoline and electrical fires
PARTS REPLACEMENT
Honda makes frequent changes during a model year; some minor, some relatively major. When you order parts from the dealer or other parts distributor, always order by engine and chassis number. Write the numbers down and carry them with you. Compare the new parts to the old parts before purchasing them. If they are not alike, have the parts clerk explain the difference.
SERIAL NUMBER LOCATION
The frame and engine serial numbers are necessary for registration and parts ordering. The frame serial number is stamped on the steering head tube. See Figure 1. The engine serial number is stamped on the left side of the crankcase. See Figure 2. The first digit of each serial number identifies the model, e.g., 6000001 is a K6 and 7000001 is a K7 model
TABLE OF CONTENTS:
1965-1977 Honda 450-500cc Twins Service Manual – PDF DOWNLOAD
QUICK REFERENCE DAT A IX
CHAPTER ONE
GENERAL INFORMATION
Manual organization
Service hints
Parts replacement
Serial number location
TROUBLESHOOTING 5
Operating requirements
Starting difficulties
Poor idling
Misfiring
Flat spots
Lack of power
Overheating
Backfiring
Engine noises
CHAPTER THREE
PERIODIC LUBRICATION AND MAINTENANCE
Routine checks
Periodic maintenance
500 mile/monthly maintenance
1,500 mile/3-month maintenance
Piston seizure
Vibration
High oil consumption
Clutch slip or drag
Transmission problems
Poor handling
Brake system
Lighting system
Troubleshooting guide
3,000 mile/6-month maintenance
6,000 mile/12-month maintenance
Engine tune-up
CHAPTER FOUR
ENGINE 27
Removal
Installation
Cylinder head
Cylinders
Pistons, pins, and rings
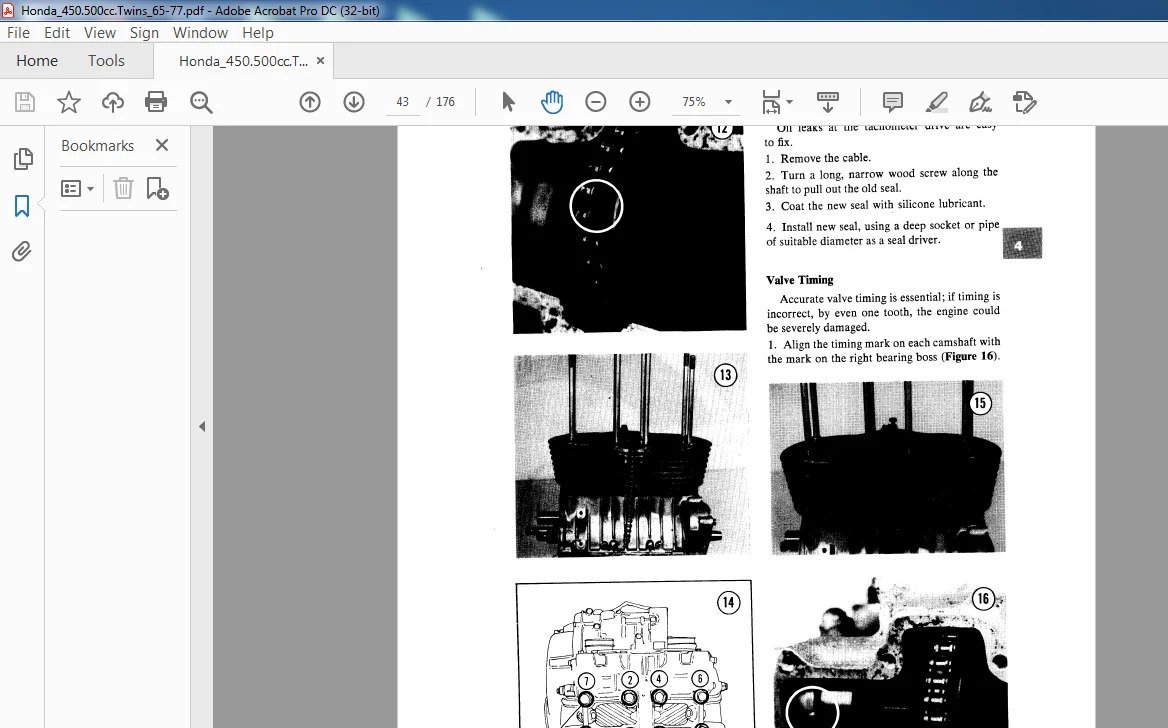
Camshafts
Cam chain guides
CHAPTER FIVE
Valves and valve gear
Oil filter
Oil pump
Crankcase side covers
Crankcase
Crankshaft
CLUTCH AND TRANSMISSION 53
Clutch Transmission (5-speed)
Transmission ( 4-speed) Kickstarter
CHAPTER SIX
FUEL AND EXHAUST SYSTEMS 74
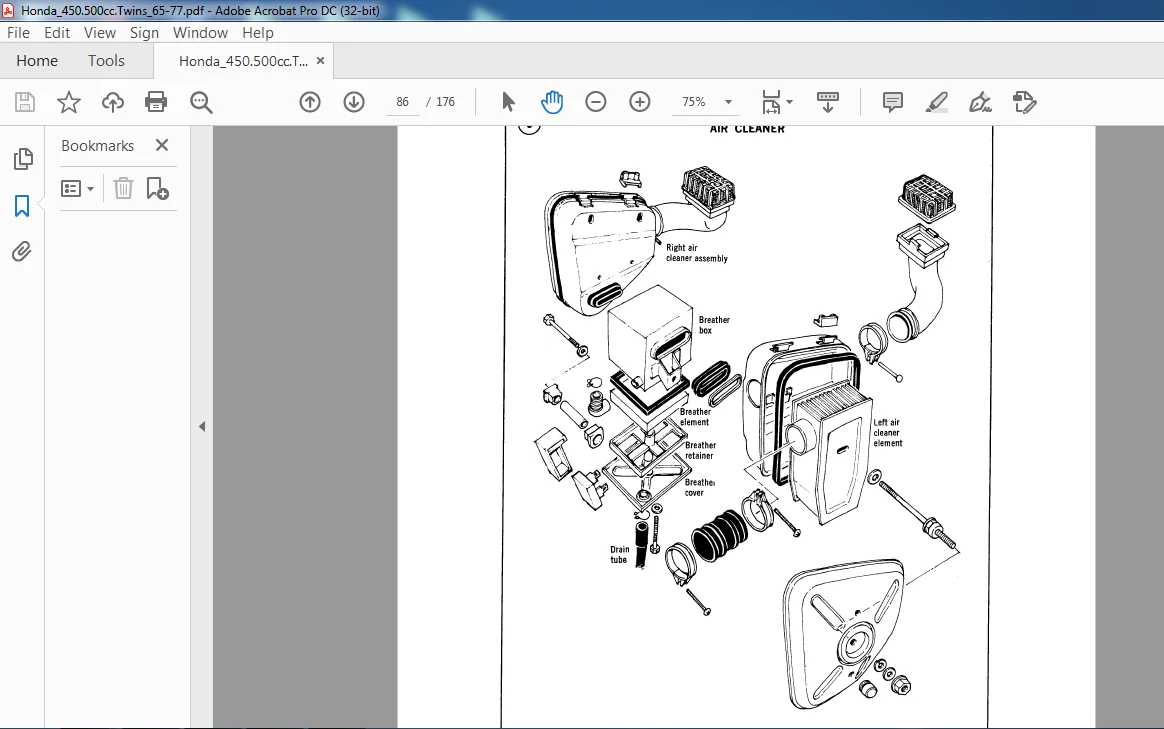
Air cleaners Fuel tank
Carburetors Exhaust system
Throttle linkage
CHAPTER SEVEN
ELECTRICAL SYSTEM
Charging system
Battery
Alternator
Rectifier
Regulator
Ignition system
Ignition coils
Condensers
CHAPTER EIGHT
FRONT SUSPENSION AND STEERING
Front wheel (drum brake)
Front wheel (disc brake)
Front forks (early, 2-spring)
Front forks (early, I-spring)
CHAPTER NINE
Starter motor
Starter clutch
Starter solenoid
Lighting system
Horn
Fuse
Wiring harness
Wiring diagrams
Front forks (CB450 K3 and K4)
Front forks (CB450 K5-K7)
Front forks (CB500T)
110
REAR SUSPENSION 133
Rear wheel
Drive chain
Sprocket
Rear shocks
Swinging arm
CHAPTER TEN
BRAKES 144
Front drum brake
Front disc brake
CHAPTER ELEVEN
Rear drum brake
FRAME 154
Kickstand (sidestand)
Centerstand
APPENDIX
Stripping the frame
Painting the frame
SPECIFICATIONS 157
INDEX 160
002649888
Questions? Email us: [email protected]
IMAGES PREVIEW OF THE MANUAL:
PLEASE NOTE:
- make the payment, you will be directed to the download page IMMEDIATELY.
- This is the same manual used by the dealers inorder to diagnose your vehicle of its faults.
- Require some other service manual or have any queries: please WRITE to us at [email protected]
S.M