1999 -2005 DYAMLIDE REPAIR MANUAL – PDF DOWNLOAD
Original price was: $80.00.$28.95Current price is: $28.95.
1999 -2005 DYAMLIDE REPAIR MANUAL – PDF DOWNLOAD
Description
1999 2005 DYAMLIDE REPAIR MANUAL – PDF DOWNLOAD
DESCRIPTION:
1999 2005 DYAMLIDE REPAIR MANUAL – PDF DOWNLOAD
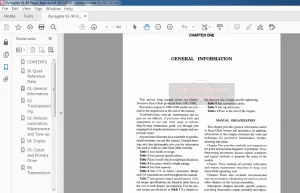
GENERAL INFORMATION:
- This detailed and comprehensive manual covers the Harley-Davidson Dyna Glide Twin Cam 88 model from 1999-on. Procedures and specifications unique to 2002-2005 models are covered in the Supplement at the end of the manual.
- The text provides complete information on maintenance, tune-up, repair and overhaul. Hundreds of photos and drawings guide the reader through every job.
- A shop manual is a reference tool and as in all service manuals, the chapters are thumb tabbed for easy reference. Important items are indexed at the end of the book. All procedures, tables and figures are designed for the reader who may be working on the vehicle for the first time.
- Frequently used specifications and capacities from individual chapters are summarized in the Quick Reference Data at the front of the book.
Tables 1-9 are at the end of this chapter.
Table 1 lists model designation.
Table 2 lists general vehicle dimensions
Table 3 lists vehicle weight.
Table 4 lists decimal and metric equivalents.
Table 5 lists conversion tables.
Table 6 lists general torque specifications.
Table 7 lists technical abbreviations.
Table 8 lists American tap and drill sizes.
Table 9 lists special tools
MANUAL ORGANIZATION
- All dimensions and capacities are expressed in metric and U.S. standard units of measurement. This chapter provides general information on shop safety, tool use, service fundamentals and shop supplies. The tables at the end of the chapter include general vehicle information.
- Chapter Two provides methods for quick and accurate diagnosis of problems. Troubleshooting procedures present typical symptoms and logical methods to pinpoint and repair the problem
- Chapter Three explains all routine maintenance necessary to keep the vehicle running well. Chapter Three also includes recommended tune-up procedures, eliminating the need to constantly consult the chapters on the various assemblies.
- Subsequent chapters describe specific systems such as engine, transmission, clutch, drive system, fuel and exhaust systems, suspension and brakes. Each disassembly, repair and assembly procedure is discussed in step-by-step form.
- Some of the procedures in this manual specify special tools. In most cases, the tool is illustrated in use. Well-equipped mechanics may be able to substitute similar tools or fabricate a suitable replacement. However, in some cases, the specialized equipment or expertise needed may make it impractical for the home mechanic to attempt the procedure. When necessary, such operations are identified in the text with the recommendation to have a dealership or specialist perform the task.
- It may be less expensive to have a professional perform these jobs, especially when considering the cost of the equipment
WARNINGS
, CAUTIONS AND NOTES The terms, WARNING, CAUTION and NOTE have specific meanings in this manual. A WARNING emphasizes areas where injury or even death could result from negligence. Mechanical damage may also occur. WARNINGS are to be taken seriously. ACAUTION emphasizes areas where equipment damage could result. Disregarding a CAUTION could cause permanent mechanical damage, though injury is unlikely. ANOTE provides additional information to make a step or procedure easier or clearer. Disregarding a NOTE could cause inconvenience, but would not cause equipment damage or personal injury
SAFETY
Professional mechanics can work for years and never sustain a serious injury or mishap. Follow these guidelines and practice common sense to safely service the vehicle. 1. Do not operate the vehicle in an enclosed area. The exhaust gasses contain carbon monoxide, an odorless, colorless, and tasteless poisonous gas
Carbon monoxide levels build quickly in small en- closed areas and can cause unconsciousness and death in a short time.
Make sure the work area is properly ventilated or operate the vehicle outside.
2. Never use gasoline or any extremely flammable liquid to clean parts. Refer to Cleaning Parts and Handling Gasoline Safely in this chapter.
3. Never smoke or use a torch in the vicinity of flammable liquids, such as gasoline or cleaning sol- vent.
4. If welding or brazing on the vehicle, remove the fuel tank, carburetor and shocks to a safe distance at least 50 ft. (15 m) away.
5. Use the correct type and size of tools to avoid damaging fasteners.
6. Keep tools clean and in good condition. Replace or repair worn or damaged equipment.
7. When loosening a tight fastener, be guided by what would happen if the tool slips.
8. When replacing fasteners, make sure the new fasteners are of the same size and strength as the original ones.
9. Keep the work area clean and organized.
10. Wear eye protection anytime the safety of the eyes is in question. This includes procedures in- volving drilling, grinding, hammering, compressed air and chemicals.
11. Wear the correct clothing for the job. Tie up or cover long hair so it can not get caught in moving equipment.
12. Do not carry sharp tools in clothing pockets.
13. Always have an approved fire extinguisher available. Make sure it is rated for gasoline (Class B) and electrical (Class C) fires.
14. Do not use compressed air to clean clothes, the vehicle or the work area. Debris may be blown into the eyes or skin. Never direct compressed air at any- one. Do not allow children to use or play with any compressed air equipment.
15. When using compressed air to dry rotating parts, hold the part so it can not rotate. Do not allow the force of the air to spin the part. The air jet is ca- pable of rotating parts at extreme speed. The part may be damaged or disintegrate, causing serious in- jury.
16. Do not inhale the dust created by brake pad and clutch wear. These particles may contain asbestos. In addition, some types of insulating materials and gaskets may contain asbestos. Inhaling asbestos particles is hazardous to health.
17. Never work on the vehicle while someone is working under it.
18. When placing the vehicle on a stand, make sure it is secure before walking away
- Handling Gasoline Safely Gasoline is a volatile flammable liquid and is one of the most dangerous items in the shop. Because gasoline is used so often, many people forget that it is hazardous. Only use gasoline as fuel for gasoline internal combustion engines. Keep in mind, when working on a vehicle, gasoline is always present in the fuel tank, fuel line and carburetor.
To avoid a disastrous accident when working around the fuel system, carefully observe the following precautions:
1. Never use gasoline to clean parts. See Cleaning Parts in this chapter.
2. When working on the fuel system, work outside or in a well-ventilated area.
3. Do not add fuel to the fuel tank or service the fuel system while the vehicle is near open flames, sparks or where someone is smoking. Gasoline vapor is heavier than air, it collects in low areas and is more easily ignited than liquid gasoline.
4. Allow the engine to cool completely before working on any fuel system component.
5. When draining the carburetor, catch the fuel in a plastic container and then pour it into an approved gasoline storage device.
6. Do not store gasoline in glass containers. If the glass breaks, a serious explosion or fire may occur.
7. Immediately wipe up spilled gasoline with rags. Store the rags in a metal container with a lid until they can be properly disposed of, or place them outside in a safe place for the fuel to evaporate.
8. Do not pour water onto a gasoline fire. Water spreads the fire and makes it more difficult to put out. Use a class B, BC or ABC fire extinguisher to extinguish the fire.
9. Always turn off the engine before refueling. Do not spill fuel onto the engine or exhaust system. Do not overfill the fuel tank. Leave an air space at the top of the tank to allow room for the fuel to expand due to temperature fluctuations.
Cleaning Parts Cleaning parts is one of the more tedious and difficult service jobs performed in the home garage. There are many types of chemical cleaners and solvents available for shop use. Most are poisonous and extremely flammable.
To prevent chemical exposure, vapor buildup, fire and serious injury, observe each product warning label and note the following:
1. Read and observe the entire product label before using any chemical. Always know what type of chemical is being used and whether it is poisonous and/or flammable.
2. Do not use more than one type of cleaning solvent at a time. If mixing chemicals is called for, measure the proper amounts according to the manufacturer.
3. Work in a well-ventilated area
. 4. Wear chemical-resistant gloves.
5. Wear safety glasses.
6. Wear a vapor respirator if the instructions call for it.
7. Wash hands and arms thoroughly after cleaning parts.
8. Keep chemical products away from children and pets
9. Thoroughly clean all oil, grease and cleaner residue from any part that must be heated.
10. Use a nylon brush when cleaning parts. Metal brushes may cause a spark.
11. When using a parts washer, only use the solvent recommended by the manufacturer. Make sure the parts washer is equipped with a metal lid that will lower in case of fire.
Warning Labels Most manufacturers attach information and warning labels to the vehicle. These labels contain instructions that are important to personal safety when operating, servicing, transporting and storing the vehicle. Refer to the owner’s manual for the description and location of labels. Order replacement labels from the manufacturer if they are missing or damaged.
SERIAL NUMBERS
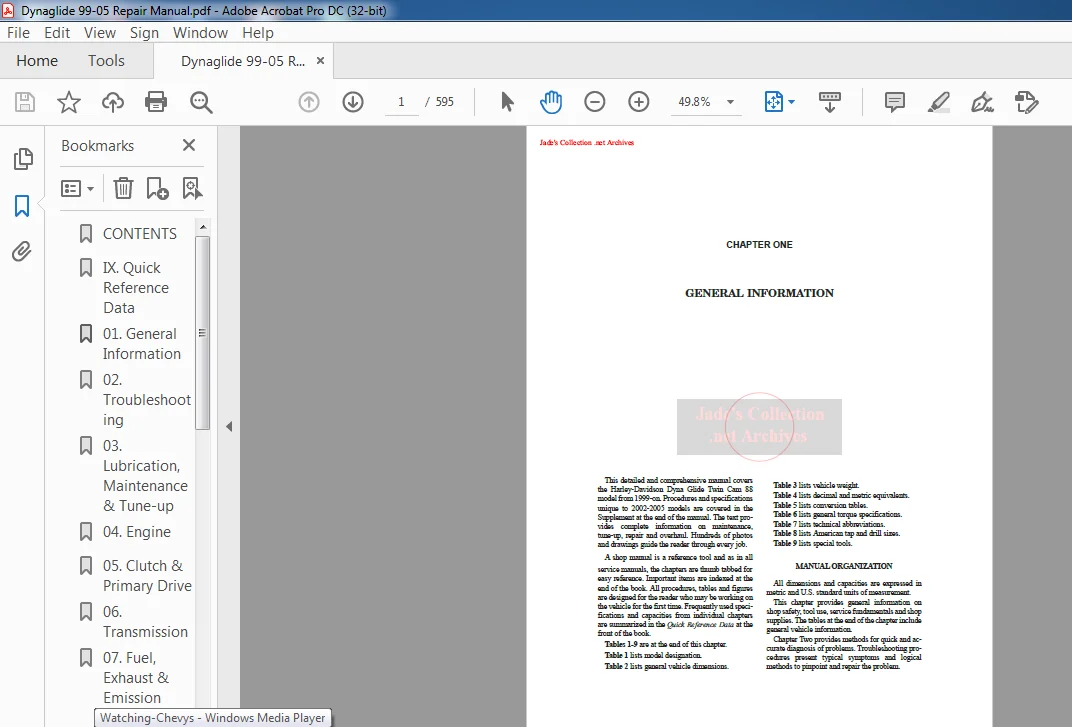
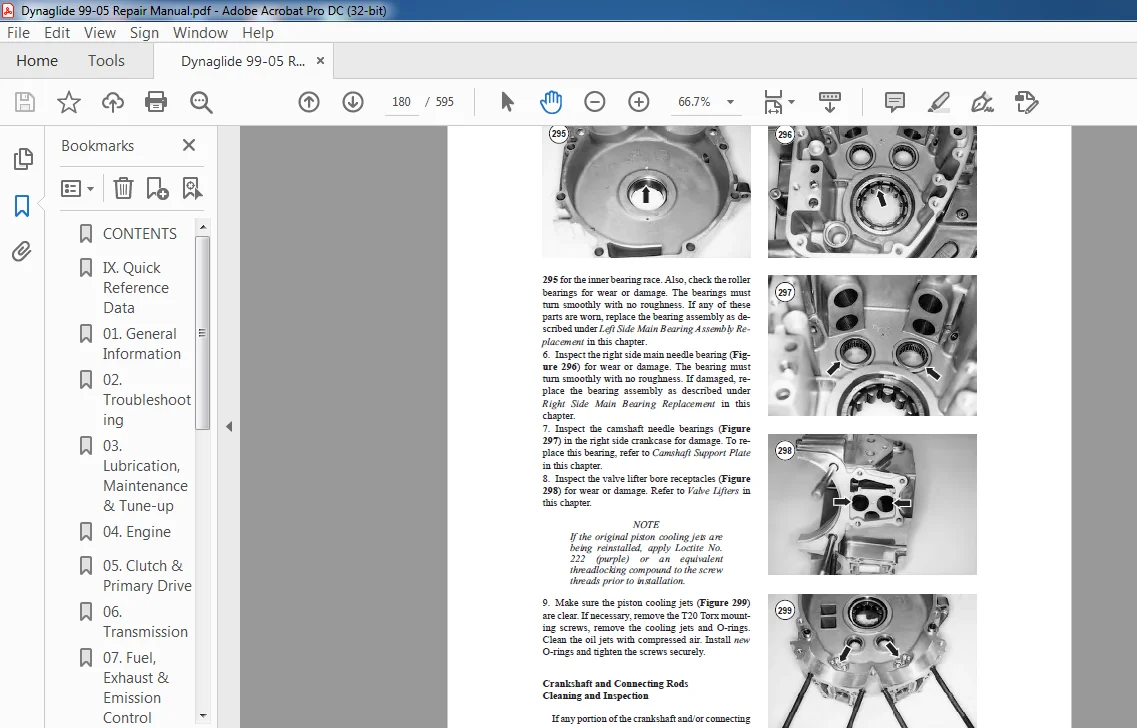
Serial numbers are stamped on various locations on the frame, engine, transmission and carburetor. Record these numbers in the Quick Reference Data section in the front of the book. Have these numbers available when ordering parts . The frame serial number (Figure
1) is stamped on the right side of the frame down tube. The VIN number label (Figure
2) is located just below the frame number on the right side frame down tube. Engine serial number is stamped on a pad on the left side of the crankcase (Figure
3), as well as the right side of the crankcase (Figure
4). The transmission serial number (Figure 5) is stamped on a pad on the right side of the transmission case next to the side door. The carburetor serial number (Figure 6) is located on the side of the carburetor body next to the accelerator pump linkage. Table 1 lists model designation
FASTENERS
- Proper fastener selection and installation is important to ensure that the vehicle operates as designed and can be serviced efficiently. The choice of original equipment fasteners is not arrived at by chance. Make sure that replacement fasteners meet all the same requirements as the originals
- Threaded Fasteners Threaded fasteners secure most of the components on the vehicle. Most are tightened by turning them clockwise (right-hand threads). If the normal rotation of the component being tightened would loosen the fastener, it may have left-hand threads.
- If a left-hand threaded fastener is used, it is noted in the text. Two dimensions are required to match the threads of the fastener: the number of threads in a given distance and the outside diameter of the threads.
- Two systems are currently used to specify threaded fastener dimensions: the U.S. Standard system and the metric system (Figure 7). Pay particular attention when working with unidentified fasteners; mismatching thread types can damage threads.
TABLE OF CONTENTS:
1999 2005 DYAMLIDE REPAIR MANUAL – PDF DOWNLOAD
CONTENTS...............................................592
IX. Quick Reference Data...............................593
01. General Information................................  1
02. Troubleshooting.................................... 38
03. Lubrication, Maintenance & Tune-up................. 66
04. Engine.............................................100
05. Clutch & Primary Drive.............................199
06. Transmission.......................................228
07. Fuel, Exhaust & Emission Control Systems...........272
08. Electrical System..................................306
09. Wheels, Hubs & Tires...............................376
10. Front Suspension & Steering........................406
11. Rear Suspension....................................435
12. Brakes.............................................449
13. Body...............................................499
14. Supplement  2002-2005 Model Service Information....501
15. Index..............................................564
16. Wiring Diagrams....................................571
Need help? Contact: [email protected]
IMAGES PREVIEW OF THE MANUAL:
PLEASE NOTE:
- This is the same manual used by the DEALERSHIPS to SERVICE your vehicle.
- The manual can be all yours – Once payment is complete, you will be taken to the download page from where you can download the manual. All in 2-5 minutes time!!
- Need any other service / repair / parts manual, please feel free to contact us at heydownloadss @gmail.com . We may surprise you with a nice offer
S.M