Bobcat Excavator 331 Service Manual 6722918 (6-12) – PDF DOWNLOAD
$29.95
Bobcat Excavator 331 Service Manual 6722918 (6-12) – PDF DOWNLOAD
(S/N 511920001 & Above)
Description
Bobcat Excavator 331 Service Manual 6722918 (6-12) – PDF DOWNLOAD
FILE DETAILS:
Bobcat Excavator 331 Service Manual 6722918 (6-12) – PDF DOWNLOAD
Language : English
Pages : 352
Downloadable : Yes
File Type : PDF
Size:12.2 MB
DESCRIPTION:
Bobcat Excavator 331 Service Manual 6722918 (6-12) – PDF DOWNLOAD
(S/N 511920001 & Above)
FOREWORD
This manual is for the Bobcat excavator mechanic. It provides necessary servicing and adjustment procedures for the Bobcat excavator and its component parts and systems. Refer to the Operation & Maintenance Manual for operating instructions, starting procedure, daily checks, etc.
SAFETY INSTRUCTIONS
Instructions are necessary before operating or servicing machine. Read and understand the Operation & Maintenance Manual, Operator’s Handbook and signs (decals) on machine. Follow warnings and instructions in the manuals when making repairs, adjustments or servicing. Check for correct function after adjustments, repairs or service. Untrained operators and failure to follow instructions can cause injury or death.
The following publications provide information on the safe use and maintenance of the Bobcat machine and attachments
TABLE OF CONTENTS:
Bobcat Excavator 331 Service Manual 6722918 (6-12) – PDF DOWNLOAD
MAINTENANCE SAFETY 3
CONTENTS 5
FOREWORD 7
SAFETY INSTRUCTIONS 9
SERIAL NUMBER LOCATIONS 10
HYDRAULIC EXCAVATOR SERIAL NUMBER 10
ENGINE SERIAL NUMBER 10
DELIVERY REPORT 10
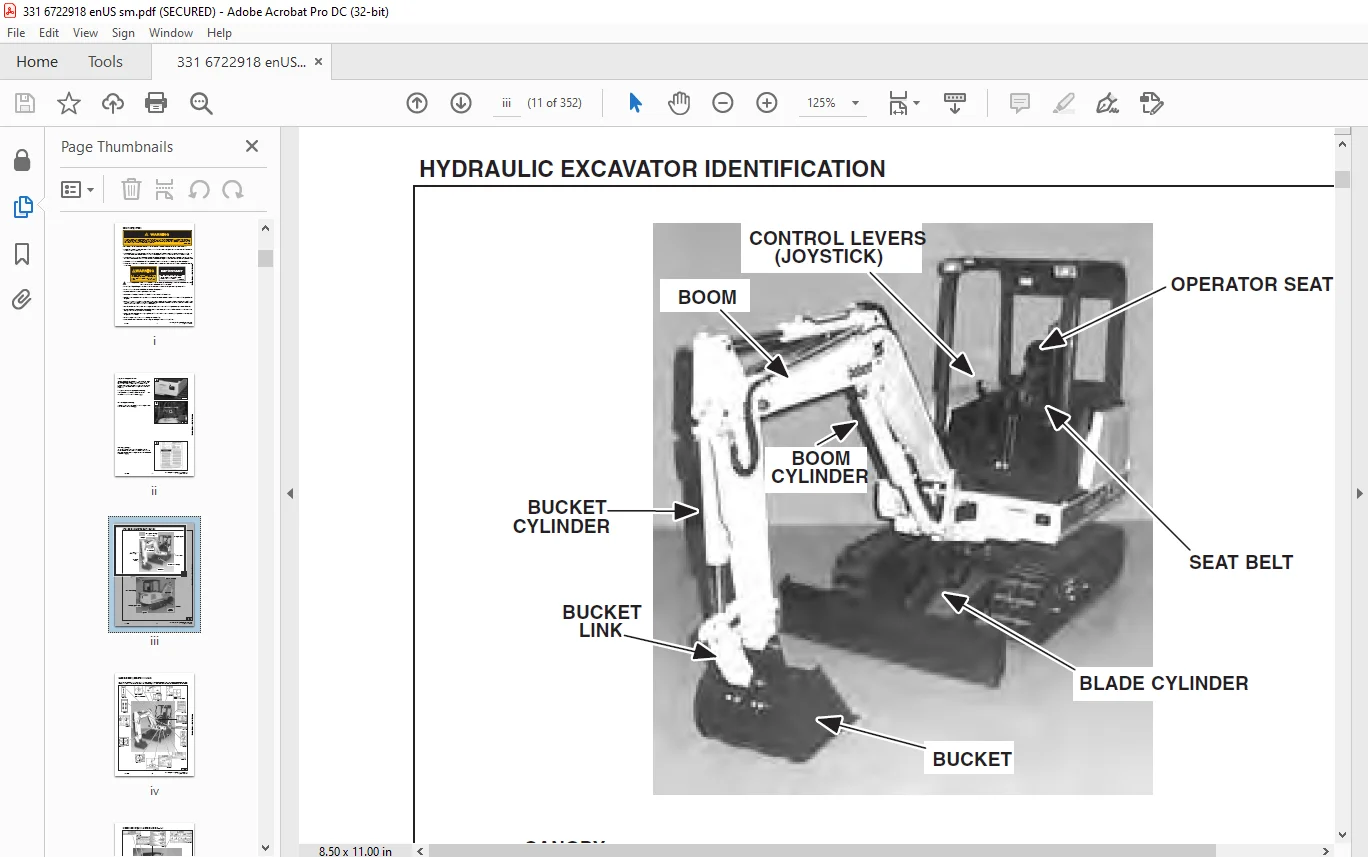
HYDRAULIC EXCAVATOR IDENTIFICATION 11
MACHINE SIGNS TRANSLATIONS (DECALS) 12
PREVENTIVE MAINTENANCE 15
SERVICE SCHEDULE 17
ENGINE COVER 18
Procedure 18
AIR CLEANER SERVICE 18
Replacing the Filter Element 18
FUEL SYSTEM 20
Fuel System Service 20
Fuel Filters 21
Removing Air From the Fuel System 21
ENGINE LUBRICATION SYSTEM 22
Checking The Engine Oil 22
Engine Oil and Filter Replacement 22
COOLING SYSTEM 23
Coolant Level 23
Coolant Replacement 23
HYDRAULIC SYSTEM 24
Checking and Adding Fluid 24
Replacement of the Hydraulic Filter 24
Hydraulic Reservoir 25
Diagnostic Couplers 25
USING A BOOSTER BATTERY (JUMP STARTING) 26
Procedure 26
LUBRICATION OF THE HYDRAULIC EXCAVATOR 27
Procedure 27
FINAL DRIVE CASE 29
Checking Oil Level 29
Draining Final Drive Case 29
HYDRAULIC SECTION 31
HYDRAULIC SCHEMATICS 33
HYDRAULIC SERVICE INFORMATION 37
Description 37
MAIN RELIEF VALVES 37
Checking the Dual Pressure Relief Valves at Diagnostic Couplers 38
Check the Single Pressure Relief Valve (3 Spool Valve) 39
6 Spool Dual Pressure Relief Valve Adjustment Procedure 40
High Pressure Adjustment Procedure (6 Spool Only) 40
Low Pressure Adjustment Procedure (6 Spool Only) 41
3 Spool Single Pressure Relief Valve Adjustment Procedure 42
HYDRAULIC PUMP 43
Checking the Hydraulic Pump 43
Removal and Installation 44
Parts Identification 45
Disassembly 46
Assembly 48
HYDRAULIC CONTROL VALVE (6 Spool) 51
Removal and Installation 51
Parts Identification 52
CONTROL VALVE (6 Spool) 53
Disassembly and Assembly 53
Disassembly 53
Assembly 53
Right Hand Travel 54
Spool Wiper and Spool Seal Installation 55
Boom, Bucket and Arm 56
Relief Valves 56
Auxiliary 59
Spool Seal and Spool Wiper Installation 59
Left Hand Travel 60
Relief Valve 60
Load Check Plug Assembly 60
Spool Seal and Spool Wiper Installation 61
End Cover–Supply and Relief Valve 62
End Cover 63
HYDRAULIC CONTROL VALVE (3 Spool) 64
Removal and Installation 64
PARTS IDENTIFICATION 65
CONTROL VALVE (3 Spool) 66
Disassembly and Assembly 66
Disassembly 66
Assembly 66
House Swing Section 67
Blade and Boom Swing Section 69
Spool Seal and Spool Wiper Installation 70
End Cover–Supply 71
End Cover 72
Pressure Build–up Valve 73
Adjustment Procedure 73
PRESSURE REDUCING VALVE WITH ACCUMULATOR 74
Removal and Installation 74
Parts Identification 74
ACCUMULATOR 75
Disassembly 75
Assembly 79
Setting the Safety Relief Valve 83
Charging 84
AUXILIARY SELECTOR VALVE 85
Removal and Installation 85
Disassembly And Assembly 85
TWO SPEED VALVE 86
Removal and Installation 86
Parts Identification 87
PORT BLOCK 88
Removal and Installation 88
OIL COOLER 89
Removal And Installation 89
HYDRAULIC RESERVOIR AND FUEL RESERVOIR 90
HYDRAULIC FILTER ASSEMBLY 94
Removal And Installation 94
BOOM CYLINDER 95
Removal And Installation 95
Parts Identification 96
ARM CYLINDER 97
Removal And Installation 97
Parts Identification 98
BUCKET CYLINDER 99
Removal And Installation 99
Parts Identification 100
BLADE CYLINDER 101
Removal And Installation 101
Parts Identification 102
BOOM SWING CYLINDER 103
Removal And Installation 103
Parts Identification 104
HYDRAULIC CYLINDER 105
Disassembly 105
Assembly 107
JOYSTICK CONTROL CHANGE 112
To change from I S O to STANDARD control patterndo the following 112
To change STANDARD to I S O control pattern dothe following 112
DRIVE SECTION 113
LEFT CONSOLE 115
Lockout Valve Removal and Installation 115
Cylinder Removal and Installation 115
Removal and Installation 116
LEFT JOYSTICK 117
Removal and Installation 117
Parts Identification 118
Disassembly and Assembly 119
RIGHT CONSOLE 123
Removal and Installation 123
RIGHT CONSOLE COVER 126
Removal and Installation 126
SPEED CONTROL LEVER 128
Low Idle Adjustment 128
High Idle Adjustment 128
Removal and Installation 128
BLADE CONTROL LEVER 129
STEERING LEVERS AND PEDALS 130
Removal and Installation 130
UPPER WORKS AND SWING SECTION 133
ENGINE COVER 135
Removal and Installation 135
SEAT AND SEAT MOUNT 136
Removal and Installation 136
FLOORMAT AND FLOOR PLATE 137
Removal and Installation 137
REAR FLOOR PLATE 138
Removal and Installation 138
SWING MOTOR COVER 138
Removal and Installation 138
INSPECTION COVER 139
Removal and Installation 139
TOOL BOX 139
Removal and Installation 139
LEFT HAND SIDE COVER 140
Removal and Installation 140
RIGHT HAND SIDE COVER 140
Removal and Installation 140
RIGHT HAND CORNER POST 141
Removal and Installation 141
LEFT HAND CORNER POST 141
Removal and Installation 141
COUNTERWEIGHTS 142
Removal and Installation 142
FRONT ENGINE COVER 143
Removal and Installation 143
BUCKET 144
Removal and Installation 144
BUCKET TEETH 144
Removal and Installation 144
ARM 145
Removal and Installation 145
BOOM 146
Removal and Installation 146
BOOM SWING BRACKET 147
Removal and Installation 147
Hose Installation 149
Swing Bracket Bushing Replacement 150
Bushing Removal 150
Bushing Installation 150
Boom Pivot Bushing Replacement 151
Bushing Removal 151
Bushing Installation 151
SWING MOTOR 152
Removal and Installation 152
Disassembly 153
Assembly 156
CROSS PORT RELIEF VALVE 160
Disassembly 160
Assembly 162
Description 163
Testing 163
SWING GEAR BOX ASSEMBLY 164
Parts Identification 164
Disassembly 165
Assembly 171
UPPERSTRUCTURE AND SWING CIRCLE GEAR 181
Removal and Installation 181
Removal and Installation 182
Swing Bearing Removal 182
Swing Bearing Installation 183
Alignment Pins (Threaded) 184
Alignment Pins (Not Threaded) 185
CENTER SWIVEL JOINT 186
Removal And Installation (Through Bottom Access Cover) 186
Parts Identification 188
ROPS CANOPY 189
Removal And Installation 189
CAB 191
Removal And Installation 191
Door Removal And Installation 194
Front Window Removal And Installation 195
Front Lower Glass Removal And Installation 197
Front Upper Plexiglass Removal And Installation 197
Door Glass Removal And Installation 198
Left Hand Side Glass Removal And Installation 198
Rear Glass Removal And Installation 199
Right Hand Side Glass Removal and Installation 199
Right Hand Window Assembly Removal AndInstallation 200
CAB/CANOPY REAR COVER 201
Removal And Installation 201
Installation 201
MAIN FRAME AND TRACKS 203
BLADE 205
Removal and Installation 205
TRACK TENSION 206
Adjustment 206
Rubber Tracks 206
Steel Tracks 207
TRACK 208
Removal and Installation 208
For Rubber Track: 209
For Steel Track: 210
TRACK FRAME 212
Disassembly and Assembly 212
TRACK IDLER 213
Parts Identification 213
Disassembly 214
Assembly 216
TRACK ROLLER 222
Parts Identification 222
Disassembly 223
Assembly 225
TRAVEL MOTOR 230
Removal and Installation 230
Parts Identification 231
TRAVEL MOTOR 232
Disassembly 232
Assembly 247
TRACK 261
Damage Identification and Causes 261
Cutting of the steel cords 261
Abrasion of embedded metals 262
Separation of embedded metals due to external forces 263
Separation of embedded metals due to corrosion 264
Cuts on the lug side rubber 265
Cracks of the lug side rubber due to fatigue 266
Lug abrasion 267
Cracks and cuts on the lug side rubber at the edges of the embedded metals 268
Abrasion of the track roller side rubber surface 269
Cuts on the edges of track roller side rubber 270
ELECTRICAL SYSTEM 271
ELECTRICAL SYSTEM 273
TROUBLESHOOTING 275
ELECTRICAL SYSTEM 275
Description 275
Fuses 276
Fuse Arrangement 276
Electrical System Service 276
BATTERY 277
Checking the Battery 277
Removal and Installation 277
ALTERNATOR 279
Belt Adjustment 279
Removal and Installation 279
STARTER 280
Removal and Installation 280
Disassembly and Assembly 281
Cleaning and Inspection 281
FUEL LEVEL SENDER 282
Removal and Installation 282
Checking 282
INSTRUMENT PANEL 283
Removal and Installation 283
CAB ELECTRICAL (Cab Option) 283
ENGINE SERVICE 285
TROUBLESHOOTING 287
VALVE CLEARANCE 288
Adjustment 288
ENGINE COMPRESSION 289
Checking 289
ELECTRIC FUEL PUMP 290
Removal and Installation 290
Removing Air From the Fuel System 290
FUEL FILTER 290
Removal and Installation 290
FUEL SHUT–OFF SOLENOID 291
Adjustment 291
FUEL SHUT–OFF SOLENOID 291
Removal and Installation 291
Timer Module 291
Removal and Installation 291
FUEL INJECTION PUMP 292
Checking the Injection Pump 292
Removal and Installation 293
Timing the Injection Pump 294
FUEL INJECTOR NOZZLES 295
Removal and Installation 295
Checking the Injector Nozzle 296
GLOW PLUGS 297
Removal and Installation 297
Checking the Glow Plug 297
FAN GUARD 298
Removal and Installation 298
RADIATOR 299
Removal and Installation (S/N 20001–20067) 299
Removal and Installation 300
Removal and Installation (S/N 20068 & Above) 301
AIR CLEANER 303
Removal and Installation 303
MUFFLER 304
Removal and Installation 304
ENGINE 305
Removal and Installation 305
ENGINE FLYWHEEL 308
Removal and Installation 309
Flywheel Ring Gear 309
CYLINDER HEAD 310
Removal 310
Disassembly 311
Servicing the Cylinder Head 311
Assembly 313
Installation 313
ENGINE REPAIR 314
Removing the Gearcase 314
Removing the Timing Gear, Camshaft and Oil Pump 317
Servicing the Timing Gear and Camshaft 320
Servicing the Crankshaft 323
Servicing the Cylinder Liners 324
Lubrication System 325
Oil Pump Service 326
Water Pump Service 326
ENGINE ASSEMBLY 328
Installing the Crankshaft 328
Installing the Pistons 328
Installing the Camshaft and Timing Gears 328
Installing the Gearcase 330
TECHNICAL DATA 333
HYDRAULIC EXCAVATOR SPECIFICATIONS 335
Machine Dimensions 335
Lifting Capacity 336
OPERATIONS & PERFORMANCE 336
ENGINE 336
HYDRAULIC SYSTEM 337
SWING SYSTEM 337
CYLINDER CYCLE TIMES 337
HYDRAULIC CYLINDERS 337
DRIVE SYSTEM 337
UNDERCARRIAGE 337
BRAKES 337
TRACK 337
CAPACITIES 337
DIGGING FORCE 337
ENGINE SPECIFICATIONS 338
Fuel Injection Nozzles 338
Fuel Injection Pump 338
Cylinder Head 338
Valves 338
Valve Springs 338
Rocker Arms 338
Camshaft 338
Cylinder 339
Piston Rings 339
Pistons 339
Crankshaft 339
Oil Pump 339
Engine Oil Specifications 339
Engine Bolt Torque 340
Re–Grinding The Crankshaft 341
FUEL, COOLANT AND LUBRICANTS 342
OIL SPECIFICATIONS 342
Description 342
BUCKET SPECIFICATIONS 343
SERVICE MANUAL REVISIONS 345
331-1 345
331-2 347
331-3 349
331-4 351
IMAGES PREVIEW OF THE MANUAL:

Questions? Email us: [email protected]
https://vimeo.com/841227388?share=copy
PLEASE NOTE:
- This is the SAME exact manual used by your dealers to fix your vehicle.
- The same can be yours in the next 2-3 mins as you will be directed to the download page immediately after paying for the manual.
- Any queries / doubts regarding your purchase, please feel free to contact [email protected]
s.m