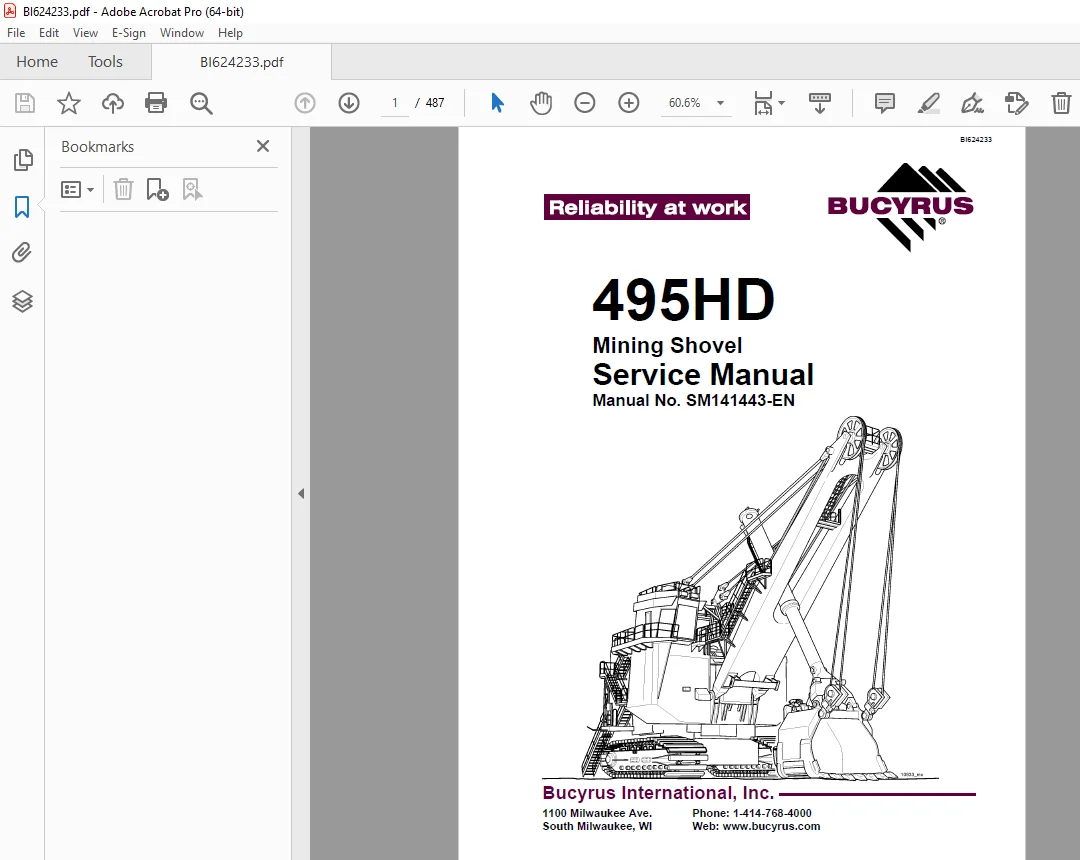
CAT Bucyrus 495HD Mining Shovel Service Manual SM141443-EN PDF DOWNLOAD
$29.95
CAT Bucyrus 495HD Mining Shovel Service Manual SM141443-EN PDF DOWNLOAD
Description
CAT Bucyrus 495HD Mining Shovel Service Manual SM141443-EN PDF DOWNLOAD
FILE DETAILS:
CAT Bucyrus 495HD Mining Shovel Service Manual SM141443-EN PDF DOWNLOAD
Language : English
Pages : 487
Downloadable : Yes
File Type : PDF
IMAGES PREVIEW OF THE MANUAL:
TABLE OF CONTENTS:
CAT Bucyrus 495HD Mining Shovel Service Manual SM141443-EN PDF DOWNLOAD
1 Safety SymbolsS-iS
2 Safety PrecautionsS-ii
S21 General Precautions s-iv
S22 Maintenance Precautions s-v
S23 Operating Precautions s-vii
S24 Fire Prevention s-viii
S25 Warning Signs And Decalss-x
SECTION 1 – INTRODUCTION
11 About This Manual 1-5
111 Purpose1-5
112 Organization 1-5
113 Terminology1-5
114 Revisions 1-6
115 Precautions and Disclaimers 1-6
116 Contact1-6
117 Swinging Restraint & Ballast Box Support 1-7
1171 Ballast Box Support 1-7
118 Swinging Restraint 1-8
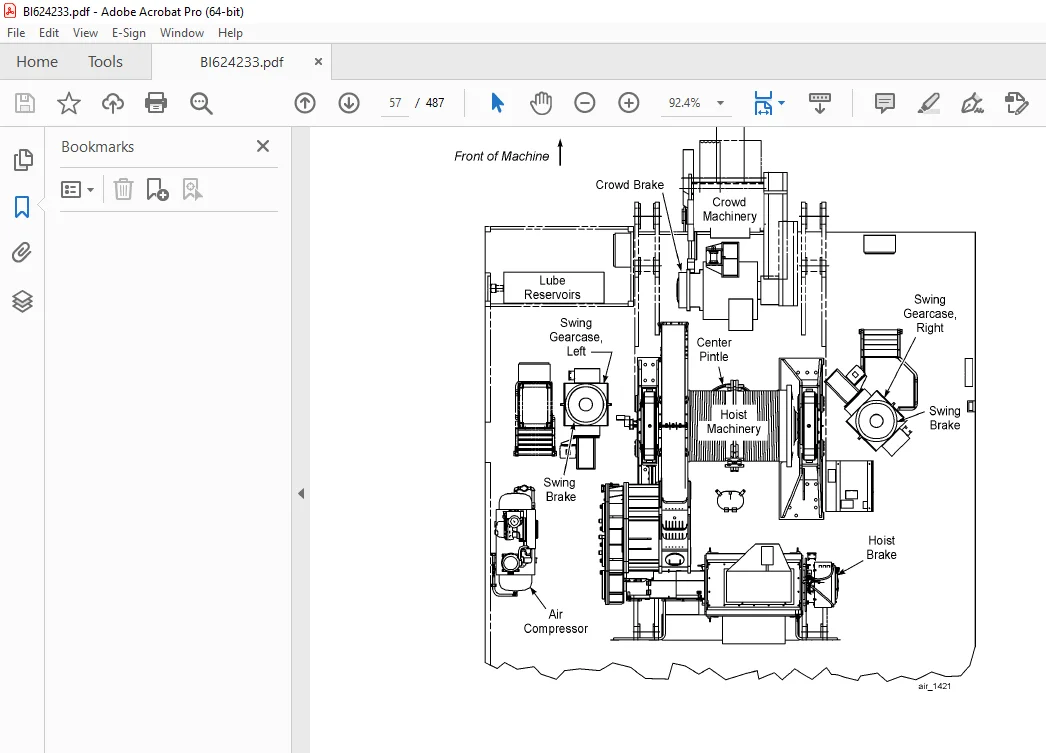
12 Machine Overview1-10
13 Lower Works 1-11
131 Crawlers 1-12
132 Truck Frame 1-14
133 Swing Rack 1-15
134 Roller Circle 1-16
135 Propel Machinery 1-17
136 Collector Rings 1-18
14 Rotating Deck 1-20
141 Revolving Frame 1-20
142 Center Pintle 1-20
143 Deck Extensions 1-22
144 Ballast Box1-22
145 Machinery House 1-22
1451 Vertical Boarding Ladder, Left 1-23
PRELIMINARY SAMPLE 03-25-2011
146 Boarding Stairs 1-25
147 A-Frame 1-26
148 Hoist Machinery 1-27
149 Swing Machinery1-28
1410 Crowd Machinery 1-29
1411 Operator’s Cab 1-30
1412 Compressed Air System1-31
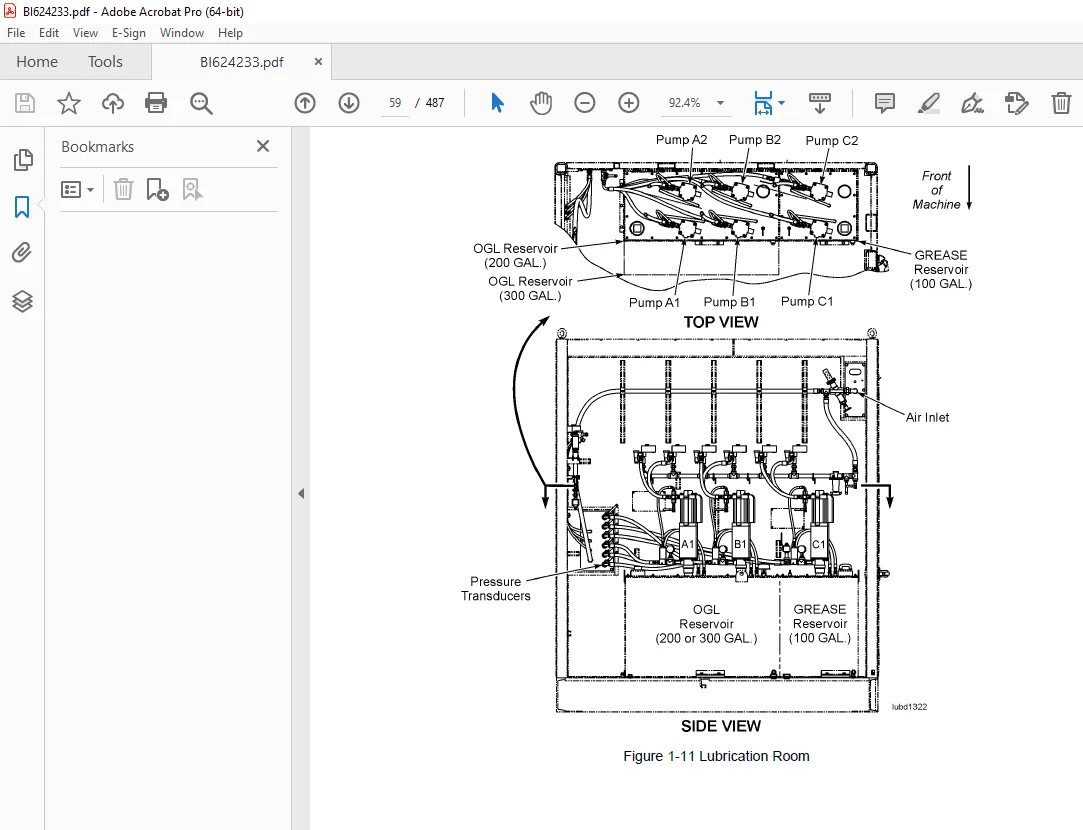
1413 Automatic Lubrication System 1-32
15 Front End Equipment 1-34
151 Suspension Strands 1-34
152 Boom1-35
153 Running Ropes 1-36
154 Saddle Block1-37
155 Dipper Handle1-38
156 Dipper1-39
157 Padlocks 1-39
158 Dipper Trip 1-41
16 Typical Machine Specifications 1-41
17 General Estimated Component Weights1-44
171 Lower Works1-44
172 Upper Works1-46
173 Front End1-48
SECTION 2 – LUBRICATION
21 Lubrication Principles 2-3
22 Greasing Main AC Drive Motors 2-4
221 Type of Grease 2-4
222 Initial Commissioning 2-4
223 Maintenance 2-4
224 Regreasing Intervals 2-5
23 Lubricant Selection2-6
24 Oil Fill Capacities 2-7
241 Types Of Lubricants And Capacities Guidelines 2-7
2411 Quantities for First Fill of Lubricants 2-7
PRELIMINARY SAMPLE 03-25-2011
25 Automatic Lubrication System2-8
251 Lube Room2-9
252 Lube Reservoir Fill / Overflow Plumbing 2-10
2521 Auto Lube Control Panel2-11
253 Lower Works Lubrication 2-11
254 Propel Machinery Lubrication2-15
2541 Lubricant Replacement/Sampling 2-16
25411 Lubricant Change Cycle 2-16
255 Revolving Frame Lubrication 2-17
256 Hoist Machinery Lubrication 2-18
2561 Hoist Gearcase Oil Cooler 2-19
257 Crowd Machinery Lubrication2-22
258 Swing Machinery Lubrication 2-23
259 Air Compressor Lubrication 2-24
2510 Front End Lubrication 2-25
2511 Lincoln Type SL-1 Lubricant Injectors 2-26
25111 SL-1 Lubricant Injector Operation 2-28
2512 Lincoln Type SL-V Lubricant Injectors 2-30
25121 SL-V Lubricant Injector Operation 2-33
25122 Injector Advantages 2-36
26 Lubrication Benchmarks 2-37
261 ACSL – Air Compressor (Screw-Type) Lubricant 2-37
262 MPO – Multipurpose OIL 2-38
263 RWRL – Running Wire Rope Lubricant 2-39
264 EGL – Enclosed Gearcase Lubricant 2-40
265 MPG – Multipurpose Grease 2-44
266 OGL – Open Gear Lubricant 2-48
267 Certified Lubricants Listing 2-52
SECTION 3 – PREVENTIVE MAINTENANCE
31 Introduction3-3
311 Preventive Maintenance Program 3-3
312 Elements of an Effective Maintenance Program 3-4
313 Scheduled Preventive Maintenance Program 3-5
314 General Safety Considerations3-5
32 Maintenance During Machine Operation 3-6
321 Maintenance Precautions 3-6
PRELIMINARY SAMPLE 03-25-2011
33 Preventive Maintenance for Lubrication 3-8
331 Lubricant Cleanliness 3-9
34 Frequency of Inspection and Maintenance 3-10
35 Maintenance Schedules 3-10
351 Maintenance Inspection Check Points 3-10
3511 Daily3-11
3512 Every 100 Hours or Weekly3-15
3513 Every 500 Hours Or Monthly 3-16
3514 Every 1250 Hours or Quarterly3-19
3515 Every 2500 Hours or Semi-Annually 3-23
3516 Every 5000 Hours or Annually 3-26
36 Major Component Locations 3-28
SECTION 4 – SERVICE PROCEDURES
41 Propel Machinery 4-7
411 Crawler Frames and Truck Frame4-8
4111 Crawler Belts 4-10
41111 Belt Adjustment 4-11
41112 Belt Replacement4-14
4112 Crawler Links 4-16
41121 Take-up Tumbler & Axle 4-16
41122 Tumbler Repair 4-18
4113 Upper Rollers 4-19
41131 Upper Roller Repair4-20
4114 Lower Rollers 4-21
41141 Lower Roller Repair4-22
4115 Drive Tumbler 4-23
41151 Drive Tumbler Repair 4-23
41152 Drive Tumbler Rebuild4-24
4116 Tumbler Drive Shaft4-27
41161 Shaft Repair 4-28
412 Propel Motor 4-29
413 Propel Planetary Gearcase 4-31
414 Swing Rack 4-33
415 Roller Circle 4-34
4151 Roller Circle Repair4-36
416 Swing Rack Dust Curtains 4-40
PRELIMINARY SAMPLE 03-25-2011
417 Center Pintle 4-41
4171 Center Pintle Adjustment 4-46
4172 Center Pintle Sleeve Removal 4-47
418 Collector Rings 4-48
4181 Collector Ring Inspection 4-49
4182 Collector Ring Repair 4-50
42 Swing Machinery 4-50
421 Swing Blower 4-52
4211 Swing Motor4-52
4212 Swing Motor Removal 4-53
42121 Swing Motor Installation4-54
4213 Swing Planetary Gearcase 4-55
42131 Swing Gearcase Removal4-56
42132 Gearcase Inspection 4-57
422 Swing Shafts and Pinions4-58
4221 Swing Pinion Removal 4-59
423 Swing Pinion Installation 4-60
424 Swing Shaft Removal4-60
4241 Swing Shaft Installation 4-61
43 Hoist Machinery 4-63
431 Hoist Motor 4-65
432 Hoist Gearcase Assembly4-68
4321 Hoist Gearcase Installation 4-69
4322 Hoist Gearcase Repair 4-73
4323 Motor Coupling Shaft4-73
4324 Hoist Drum Assembly 4-76
43241 Hoist Gear Replacement 4-77
43242 Bearing Replacement 4-79
4325 Hoist Mounting Bolts4-80
4326 Hoist Limit Switch 4-81
433 Hoist Motor 4-82
44 Crowd Machinery 4-84
441 Gearcase Repair 4-86
4411 Crowd Motor4-91
44111 Crowd Gear and Drum 4-93
44112 Crowd Drum Removal4-94
PRELIMINARY SAMPLE 03-25-2011
45 Machinery House 4-96
451 Walkways, Stairways, and Handrails4-97
4511 Vertical Boarding Ladder, left 4-98
452 Boarding Stairs 4-100
46 Front End Equipment4-102
461 Boom Assembly 4-103
462 Boom Repair4-103
463 Boom Limit Switch 4-104
4631 Limit Switch Inspection 4-107
4632 Limit Switch Adjustment4-107
464 Boom Point Sheaves4-108
4641 Boom Point Sheave Removal and Disassembly 4-109
4642 Boom Point Sheave Reassembly and Installation 4-111
465 Boom Bumper 4-111
466 Saddle Block4-113
4661 Saddle Block Repair4-114
4662 Saddle Block Removal 4-115
467 Dipper Handle4-117
4671 Dipper Handle Removal4-118
4672 Retract Rope Take-up Mechanism4-119
4673 Spreader Repair 4-122
468 Dipper Assembly4-123
4681 Latch Bar Adjusting4-126
4682 Dipper Door bumpers 4-127
4683 Dipper Door Snubbers 4-128
46831 Snubber Adjustment 4-129
46832 Allowable Wear 4-129
469 Dipper Padlock 4-130
4691 Dipper Pitch Brace 4-133
4610 Dipper Trip Assembly 4-135
4611 A-Frame4-136
4612 Auxiliary Winch 4-138
4613 Hoist Rope Support Roller 4-139
4614 Boom Support Ropes 4-140
4615 Wire Ropes 4-141
46151 Wire Rope Inspection 4-142
4616 Hoist Rope Reeving & Replacement 4-142
46161 Crowd Rope Reeving & Replacement4-146
4617 Retract Rope Reeving & Replacement4-149
4618 Retract Rope Tightening4-152
PRELIMINARY SAMPLE 03-25-2011
4619 Dipper Trip Rope Reeving & Replacement4-153
4620 Hoist and Crowd Limit Systems4-153
46201 Setting Limits In The Hoist & Crowd System 4-154
462011 Crowd Slowdown/Stop Limits 4-156
462012 Retract Slowdown/Stop Limits 4-157
462013 Lower Slowdown/Stop Limits 4-158
462014 Hoist Slowdown/Stop Limits4-159
SECTION 5 – BRAKES AND COUPLINGS
51 Brakes 5-3
511 Disc Brake Operation 5-3
512 Maintenance 5-4
513 Brake Adjustment Specifications 5-4
514 Hoist Brake5-5
5141 Hoist Brake Adjustment 5-7
5142 Hoist Brake Installation 5-8
5143 Hoist Brake Wear & Release Switches 5-9
515 Crowd Brake 5-10
5151 Crowd Brake Installation5-12
5152 Crowd Brake Wear & Release Switches5-13
516 Propel Brake 5-14
5161 Propel Brake Adjustment5-16
5162 Propel Brake Installation5-18
5163 Tachometer Mounting & Alignment 5-19
517 Swing Brake 5-22
5171 Swing Brake Installation5-24
5172 Swing Brake Wear & Release Switches5-25
5173 Swing Brake Burnishing5-26
518 Spring Replacement — All Brakes 5-27
519 Friction Disc Replacement — All Brakes 5-28
5110 O-Ring Replacement — All Brakes 5-29
5111 Brake Wear & Release Switches — Single Disc Brakes5-32
5112 Brake Wear & Release Switches — Multiple Disc Brakes 5-33
52 Couplings 5-34
521 Grid Couplings5-34
5211 Lubrication 5-34
5212 Coupling Disassembly and Grid Removal 5-35
5213 Grid Coupling Installation 5-36
5214 Seal Replacement without Hub Removal 5-39
5215 Grid Coupling Alignment5-41
PRELIMINARY SAMPLE 03-25-2011
522 Gear Couplings 5-42
5221 Coupling Installation5-42
5222 Gear Coupling Alignment 5-45
5223 Hoist Coupling Shaft Alignment5-46
SECTION 6 – COMPRESSED AIR SYSTEM
61 Air Compressor6-3
611 Compressor Maintenance6-6
612 Lubrication6-6
613 Fluid Level Check 6-6
614 Fluid Filter 6-6
615 Fluid Change 6-6
616 V-Belt Tension6-6
617 V-Belt Removal and Replacement6-7
618 Pressure Switch 6-8
619 Lockout Valves6-8
6110 Safety Warnings6-10
SECTION 7 – AIR FILTRATION
71 House Filter Fans 7-3
711 Lubrication7-4
712 Dynavane Air Cleaner7-4
713 Tenkay Filter 7-6
72 Air Conditioner 7-8
721 Specifications 7-9
SECTION 8 – ENGINEERING DATA
81 Capscrew (Bolt) Grade8-5
811 Bolt Tightening8-5
8111 Torque Wrench Method 8-5
8112 Turn-of-nut Method 8-7
82 Measurement Systems8-8
821 Linear Measurements 8-9
822 Area Measurements 8-9
823 Volume Measurements 8-11
824 Torque Measurements 8-13
8241 Weight Measurements – Conventional 8-13
83 Split Flange Assembly Procedure 8-15
84 Wire Locking Capscrews 8-17
85 Torque Nut Installation 8-18
86 Expansion Bolt Installation 8-18
861 Tightening Procedure for 2-Inch Torque Nut 8-19
862 Tightening Procedure for 2-Inch Torque Nut 8-20
863 Tightening Procedure for 2-Inch Torque Nut 8-21
864 Tightening Procedure for 25-Inch Torque Nut 8-22
865 Tightening Procedure for 3-Inch Torque Nut 8-23
866 Tightening Procedures – Expansion Bolts8-24
8661 Hoist Torque Rod, Tapered Sleeve & 162 Inch Torque Nut8-24
87 Torque Nut Removal Procedure 8-26
871 Thread Lubrication8-26
88 Torque Nut Helpful Hints 8-27
89 Locking Assemblies 8-28
891 Locking Assembly Removal 8-30
810 Pinion and Hub Installation 8-31
81001 Removal from a Shaft 8-31
81002 Mounting a Pinion or Hub on a Shaft 8-31
81003 Pre-heat Advance Requirements – Pinions and Hubs8-34
81004 Motor Coupling Pre-Heat Advance Requirements8-35
811 Maintenance Welding 8-36
8111 Welding Electrodes 8-37
8112 Repair Welding of Cracks 8-38
81121 Preheat8-39
81122 Welding Technique8-39
8113 Repair Welding of Broken Parts8-40
8114 Repair Welding Swing Rack Teeth 8-41
81141 Preparation8-41
81142 Swing Rack Welding Electrodes 8-42
81143 Preheat8-42
81144 Welding Procedure8-43
8115 Welding and Cutting Equipment8-46
8116 Stress Relieving & Temperature Measuring Equipment8-47
812 Wire Rope Care and Maintenance 8-48
8121 Storage 8-48
8122 Checking Diameter 8-48
8123 Handling Wire Rope8-49
8124 Seizing Wire Rope 8-51
8125 End Preparations/Terminations8-53
8126 Wire Rope Clips8-54
81261 Wire Rope Clip Application 8-54
81262 Wedge Sockets 8-56
8127 Inspection of Sheaves and Drums 8-57
8128 Breaking In a New Wire Rope 8-59
8129 Inspection Data 8-59
81210 Guideline to Inspections and Reports 8-60
812101 Wire Rope Inspection Criteria 8-61
8121011 Reduction in Rope Diameter 8-61
8121012 Rope Stretch 8-62
8121013 Abrasion8-63
8121014 Corrosion 8-63
8121015 Kinks 8-63
8121016 Bird Caging8-63
8121017 Localized Conditions 8-63
8121018 Heat Damage 8-64
8121019 Protruding Core8-64
81210110 Damaged End Attachments 8-64
81210111 Peening 8-64
81210112 Scrubbing8-64
81210113 Fatigue Fracture 8-64
81210114 Broken Wires 8-65
81210115 Electric Arc8-65
813 Seals 8-66
8131 Seal Installation8-66
8132 Gearcase Sealing 8-68
SECTION 9 – SCHEMATICS
91 Schematics 9-2
92 Side View 9-3
93 Deck Plan 9-4
94 OGL System A & B Schematic9-5
95 Grease System C Schematic 9-6
96 Air Schematic 9-7
S1 Safety SymbolsS-i
S2 Safety PrecautionsS-ii
S21 General Precautions s-iv
S22 Maintenance Precautions s-v
S23 Operating Precautions s-vii
S24 Fire Prevention s-viii
S25 Warning Signs And Decalss-x
Need help? Contact: [email protected]
https://vimeo.com/856297748?share=copy
DESCRIPTION:
CAT Bucyrus 495HD Mining Shovel Service Manual SM141443-EN PDF DOWNLOAD
General Precautions:
PLEASE NOTE:
- This is the same manual used by the dealers to diagnose and troubleshoot your vehicle
- You will be directed to the download page as soon as the purchase is completed. The whole payment and downloading process will take anywhere between 2-5 minutes
- Need any other service / repair / parts manual, please feel free to contact [email protected] . We still have 50,000 manuals unlisted
G.P