Challenger EU Hay Equipment 1373 1376 Rotary Disc Mower Operator’s Manual
Original price was: $89.95.$22.95Current price is: $22.95.
Challenger EU Hay Equipment 1373 1376 Rotary Disc Mower Operator’s Manual – PDF DOWNLOAD
Description
Challenger EU Hay Equipment 1373 1376 Rotary Disc Mower Operator’s Manual – PDF DOWNLOAD
CHALLENGER EU HAY EQUIPMENT 1373 1376 ROTARY DISC MOWER OPERATOR’S MANUAL:
IMAGES PREVIEW OF THE MANUAL:


DESCRIPTION:
Challenger EU Hay Equipment 1373 1376 Rotary Disc Mower Operator’s Manual – PDF DOWNLOAD
A WORD TO THE OPERATOR :
It is YOUR responsibility to read and understand the safety section in this manual and the manual for all attachments before operating this machine. Remember YOU are the key to safety. Good safety practices not only protect you, but also the people around you. Study the features in this manual and make them a working part of your safety program. Keep in mind that this safety section is written only for this type of machine.
- Practice all other usual and customary safe working precautions, and above all REMEMBER – SAFETY IS YOUR RESPONSIBILITY. YOU CAN PREVENT SERIOUS INJURY OR DEATH. This safety section is intended to point out some of the basic safety situations that may be encountered during FIG. 3 the normal operation and maintenance of your machine. This section also suggests possible ways of dealing with these situations.
- This section is NOT a replacement for other safety practices featured in other sections of this manual. Personal injury or death may result if these precautions are not followed. Learn how to operate the machine and how to use the controls properly.
- Do not let anyone operate the machine without instruction and training. For your personal safety and the personal safety of others, follow all safety precautions and instructions found in the manuals and on safety signs affixed to the machine and all attachments. Use only approved attachments and equipment. Make sure your machine has the correct equipment needed by the local regulations.
This manual :
This manual covers general safety practices for this machine. The operator manual must always be kept with the machine. Right -hand and left -hand, as used in this manual, are determined by facing the direction the machine will travel when in use. The photos, illustrations, and data used in this manual were current at the time of printing, but due to possible in-line production changes, your machine can vary slightly in detail. The manufacturer reserves the right to redesign and change the machine as necessary without notification.
TABLE OF CONTENTS:
Challenger EU Hay Equipment 1373 1376 Rotary Disc Mower Operator’s Manual – PDF DOWNLOAD
1 Safety 7
1 1 Introduction 9
1 1 1 Safety symbol 9
1 1 2 Safety messages 9
1 1 3 Information messages 9
1 1 4 Safety signs 9
1 1 5 A word to the operator 10
1 1 6 This manual 1 1
1 1 6 1 Operator manual holder 1 1
1 2 Operation 12
1 2 1 Prepare for operation 1 2
1 2 2 General information 1 2
1 2 3 Personal protective equipment 1 3
1 2 4 Seat instructions 1 4
1 2 5 Shield and guards 1 4
1 2 6 Exhaust warning 1 5
1 2 7 Flying debris 1 5
1 2 8 Agricultural chemicals 1 5
1 3 Travel on public roads 16
1 4 Maintenance 17
1 4 1 General maintenance information 1 7
1 4 2 Fire prevention and first aid 19
1 4 3 High pressure leaks 20
1 4 4 Replacement parts 20
1 4 5 Tire safety 2 1
1 4 6 Weld on the machine precautions 2 1
1 5 Cylinder stops 22
1 5 1 Lift cylinder lockout valves 2 2
1 5 1 1 Engage the lift cylinder lockout valves 2 2
1 5 1 2 Disengage the lift cylinder lockout valves 2 3
1 5 2 Steering cylinder lockout valves 2 3
1 5 2 1 Engage the steering cylinder lockout valves 2 4
1 5 2 2 Disengage the steering cylinder lockout valves 2 4
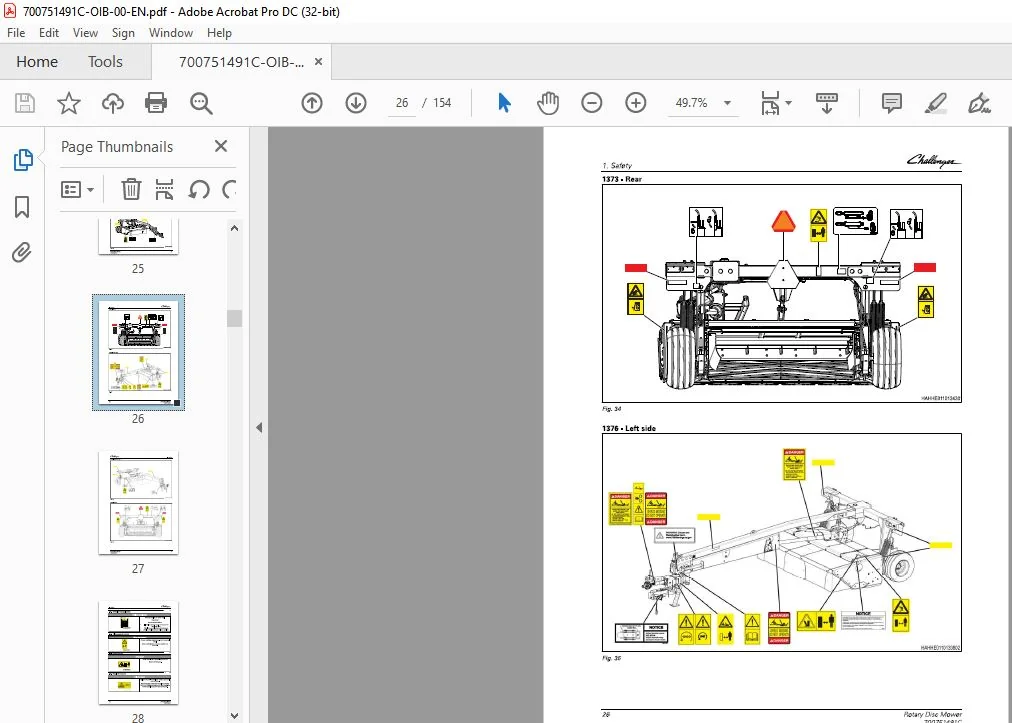
1 6 Safety and informational signs 25
1 6 1 Driveline entanglement 28
1 6 2 Flying objects hazard 28
1 6 3 Crush hazard 28
1 6 4 Explosion hazard 28
1 6 5 Shear hazard 29
1 6 6 Shear hazard 29
1 6 7 Entanglement hazard 29
1 6 8 Operators manual 29
1 6 9 Shear hazard 30
1 6 10 5 40 RPM 30
1 6 1 1 1000 RPM 30
1 6 1 2 Drawbar hitch 30
1 6 1 3 Drawbar hitch 31
1 6 1 4 Oil notice 31
1 6 1 5 Drawbar notice 31
1 6 1 6 Cylinder lockout decal 32
1 6 1 7 Cylinder lockout decal 32
Rotary Disc Mower
700751491C
Table of contents
1 6 1 8
1 6 19
1 6 20
Jack storage decal 3 2
Grease decal 3 2
California Proposition 65 3 3
2 Introduction 35
2 1 Introduction 37
2 1 1 Units of measurement 3 7
2 1 2 Replacement parts 3 7
2 1 3 Intended use 3 7
2 1 4 Proper disposal of waste 3 7
2 2 Machine identification 38
2 2 1 Serial number plate 38
2 2 2 Serial number description 38
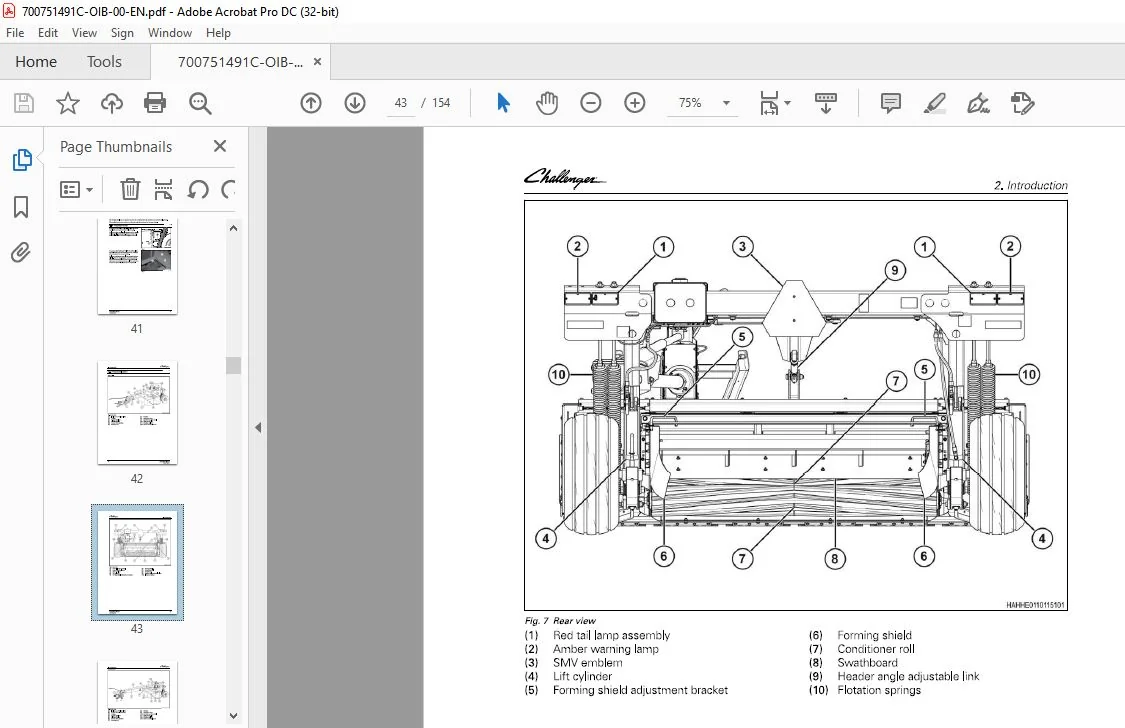
2 3 Description of a pull type rotary mower conditioner 40
2 3 1 Cutterbed 40
2 3 2 Conditioner 40
2 3 3 Swathboard 40
2 3 4 Forming shields 40
2 3 5 Component access 4 1
2 3 6 Component location 4 2
3 Operation 47
3 1 Checklists 49
3 1 1 Examine the machine for daily operation 49
3 1 2 Examine the machine at the end of the day 49
3 1 3 Examine the machine at the end of the season 49
3 1 4 Examine the machine at the start of the season 50
3 2 Tractor connection 51
3 2 1 Connect the side pull hitch 5 1
3 2 2 Connect the 3-point swivel hitch 5 2
3 2 3 Connect the drawbar swivel hitch 5 4
3 2 4 Connect the hydraulic connections 5 6
3 2 5 Connect the electrical connection 5 6
3 3 Tractor disconnect 58
3 3 1 Disconnect the side pull hitch 58
3 3 2 Disconnect the 3-point swivel hitch 58
3 3 3 Disconnect the drawbar swivel hitch 59
3 4 Field operation 60
3 4 1 Crop conditioning 60
3 4 2 Cutoff quality and windrow formation 60
3 4 3 Power take-off and ground speed 60
3 4 4 Hay drying time 61
3 4 5 Engage the header 61
3 4 6 Header lift 61
3 4 7 Header steering – center pivot 62
3 4 7 1 Cut back and forth 63
3 4 7 2 Cut a square corner 64
3 4 8 Cut height 64
3 4 8 1 Change the header angle – manual 65
3 4 8 2 Change the header angle – hydraulic 65
3 4 9 Unplug the header 66
3 5 Conditioner adjustments – Roll 67
3 5 1 Conditioner 67
3 5 2 Conditioner spacing 67
3 5 2 1 Adjust the conditioner roll spacing 67
3 5 3 Conditioner roll pressure 67
3 5 4 Adjust the conditioner roll pressure 68
Rotary Disc Mower
700751491C
Table of contents
3 5 5 Conditioner roll timing 6 8
3 5 5 1 Adjust the conditioner roll timing 6 9
3 6 Conditioner adjustment – T ine 70
3 6 1 Adjust the tine conditioner 70
3 7 Swathboard 71
3 7 1 Adjust the swathboard 71
3 8 Forming shield adjustment 72
3 8 1 Adjust the windrow forming shields 72
3 9 Header flotation 73
3 9 1 Adjust the header flotation 73
3 10 Travel on the road 74
4 Maintenance 77
4 1 Service schedule 79
4 2 Lubrication details 81
4 2 1 Inspection during lubrication 81
4 2 2 Sealed bearings 81
4 2 3 Grease fittings 81
4 2 4 Gearboxes 89
4 2 4 1 Plug location -swivel gearboxes 89
4 2 4 2 Plug location – header drive gearbox 89
4 2 4 3 Plug location – cutterbed drive gearbox 89
4 2 4 4 Examine the gearbox oil level 89
4 2 4 5 Change the gearbox oil 90
4 2 5 Conditioner gearcases 91
4 2 5 1 Plug location – conditioner gearcases 91
4 2 5 2 Examine the gearcase oil level 91
4 2 5 3 Change the gearcase oil 92
4 2 6 Cutterbed 92
4 2 6 1 Cutterbed oil level 92
4 2 6 2 Change the cutterbed oil 92
4 2 7 Lubricate the wheel bearings 94
4 3 Replace a bearing 96
4 4 Cutterbed inspection 97
4 5 Discs 98
4 5 1 Disc maintenance 98
4 5 2 Replace a disc 98
4 6 Knives 100
4 6 1 Knife wedging under disc 100
4 6 2 Knife inspection 100
4 6 3 Disc rotation 101
4 6 4 Replace a fixed blade knife 101
4 6 5 Replace a quick change knife 102
4 6 6 Replace a knife quick change spring 103
4 6 7 Knife type 103
4 6 8 Knife hardware inspection 104
4 7 Belts 105
4 7 1 Belt maintenance 105
4 7 2 Adjust the conditioner belt 105
4 7 3 Replace the conditioner belt 105
4 7 4 Adjust the header drive belt 107
4 7 5 Replace the header drive belt 107
4 8 Slip clutch 109
4 8 1 Run in the slip clutch 109
4 9 Install the wheels 110
Rotary Disc Mower
700751491C
Table of contents
4 10 Storage 111
5 Troubleshooting 113
5 1 Header troubleshooting 115
5 2 Cutterbed troubleshooting 116
5 3 Conditioner troubleshooting 117
5 4 Crop conditioning and windrow formation 118
5 5 Cutoff quality 119
6 Specifications 12 1
6 1 Specifications 123
6 1 1 Dimensions and weights 1 2 3
6 1 2 Header specifications 1 2 3
6 1 3 Cutterbed specifications 1 2 3
6 1 3 1 Cutterbed bolt torque 1 2 3
6 1 4 Drive system specifications 1 2 4
6 1 5 Tire specifications 1 2 4
6 1 6 Tractor specifications 1 2 4
6 1 7 Maximum roading speed 1 2 4
6 1 8 Conditioner specifications 1 2 5
6 1 9 Lubrication specifications 1 2 5
7 Accessories 1 27
7 1 Accessories and options 129
7 1 1 Hydraulic header tilt kit 1 2 9
7 1 2 Weight kit 1 2 9
7 1 3 Aggressive cage kit 1 30
7 1 4 Drawbar hitch 1 30
7 1 5 3-point hitch 1 30
7 1 6 Bumper kit 1 31
8 Assembly 133
8 1 General information 135
8 1 1 Shipping damage and missing parts 1 35
8 1 2 Safety precautions 1 35
8 2 Assembly 136
8 2 1 Prepare the header for assembly 1 36
8 2 2 Install the tongue 1 38
8 2 3 Install the wheels 1 40
8 2 4 Install the clutch shaft and the steering arm 1 4 1
8 2 5 Install the curtain magnets 1 4 2
8 2 6 Install the 3-point hitch 1 43
8 2 7 Install the drawbar hitch 1 4 5
8 2 8 Finish the assembly 1 4 7
8 2 9 Examine the cutterbed for lubricant 1 4 7
8 3 Checklists 1 4 8
8 3 1 Pre-delivery checklist 1 48
8 3 2 Delivery checklist 1 48
9 Index 149
PLEASE NOTE:
- This is the SAME exact manual used by your dealers to fix your vehicle.
- The same can be yours in the next 2-3 mins as you will be directed to the download page immediately after paying for the manual.
- Any queries / doubts regarding your purchase, please feel free to contact [email protected]
S.V