CLAAS CUTTER BAR 3.90 M – 9.00 M LEXION REPAIR MANUAL – PDF DOWNLOAD
Original price was: $78.00.$22.95Current price is: $22.95.
CLAAS CUTTER BAR 3.90 M – 9.00 M LEXION REPAIR MANUAL – PDF DOWNLOAD
Description
CLAAS CUTTER BAR 3.90 M – 9.00 M LEXION REPAIR MANUAL – PDF DOWNLOAD
DESCRIPTION:
CLAAS CUTTER BAR 3.90 M – 9.00 M LEXION REPAIR MANUAL – PDF DOWNLOAD
INTRODUCTION
- INTRODUCTION TO THE CLAAS REPAIR MANUAL This CLAAS REPAIR MANUAL is intended to help maintain the permanent availability, and thus the high value of CLAAS cutterbars, through careful maintenance and technical monitoring by Customer Service.
- This REPAIR MANUAL is based on the experience gained by our Customer Service technicians and at the factory. The series of figures shows the sequence of a repair procedure; the text provides the necessary instructions on setting and using special CLASS tools.
- The main repair procedures are described is such a way that individual or short work procedures are easy to follow. The CLAAS REPAIR MANUAL is based on a loose-leaf system. It is complemented by supplements according to the technical advancement of the machines and is thus permanently kept up to date as a reference manual.
- As a precaution, please always compare the setting values and filling quantities with those specified in the current operating instructions for the respective machine
INTRODUCTION TO THE
CLAAS REPAIR MANUAL
- The CLAAS REPAIR MANUAL is split into main groups and sub-groups. The first digit of the numbering at the foot of each page indicates the main group, the digit behind the dot the sub-group and the digit behind the slash the page number.
- In each sub-group, the figures and pages are consecutively numbered beginning with 1. Differences between the machine types are indicated by the figure or text headings. Assembly procedures which apply to all machine types dealt with in this manual are kept neutral. In the case of supplements, the sub-groups are complemented or replaced. Any supplements are
- filed in the respective main group/ sub-group and the table of contents is replaced. The pictograms ensure swift orientation in the case of recurrent assembly procedures. Their meaning is explained at the beginning of this manual.
- Informative elucidations can be found in the section entitled »GENERAL REPAIR INSTRUCTIONS« at the beginning of this manual. Please read and observe these important instructions. They are the basis for safe and long-term operation after repairwork.
TABLE OF CONTENTS:
CLAAS CUTTER BAR 3.90 M – 9.00 M LEXION REPAIR MANUAL – PDF DOWNLOAD
A
Assembling and fitting the bearing tube
for the variable reel speed drive 51 /17
Assembling the electric reel speed changer 51 / 13
Assembling the spring-loaded variable
speed pulley for the reel 51 /21
Assembling the wobble mechanism
(390 m – 750 m cutterbar) 32 / 7
Assembling the wobble mechanism
(900 m cutterbar) 32 /13
B
Bearing tube for the variable reel
speed drive, dismantled 51 /16
D
Dismantling the electric reel speed changer 51 / 11
Dismantling the wobble mechanism 32 / 3
F
Fit the intake auger
(5,40 m – 9,00 m cutterbar) 42 /19
Fitting and adjusting the feed
drivechain(41) 41/ 1
Fitting and adjusting the knife
drive belt (40) 32 / 1
Fitting and adjusting the reel
drive chain (42) 51 / 1
Fitting and adjusting the reel
drive chain (46) 51 / 2
Fitting the adjusting shaft
(390 m – 450 m cutterbar) 42 /10
Fitting the cam rollers 52 / 3
Fitting the electric reel speed changer 51 / 15
Fitting the electric variable speed pulley
for the reel 5 1 / 9
Fitting the intake auger
(390 m – 450 m cutterbar) 42 /18
Fitting the intake auger bearing (left)
(390 m – 450 m cutterbar) 42 / 2
Fitting the intake auger bearing (right)
(390 m – 450 m cutterbar) 42 / 7
Fitting the intake auger bearing (right)
(540 m – 900 m cutterbar) 42 /12
Fitting the intake auger control shafts 42 /16
Fitting the intake auger finger 42 /14
Fitting the knife drive (40) guide roller 32 /19
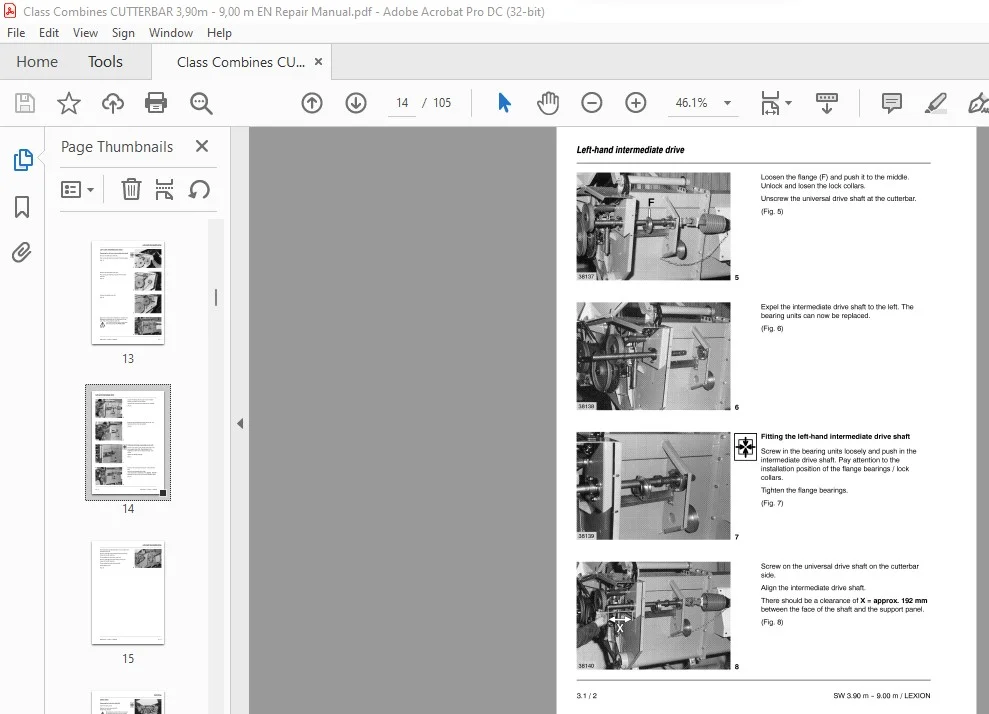
Fitting the left-hand intermediate drive shaft 31 / 2
Fitting the middle reel spiders
(390 m – 750 m cutterbar) 52 /11
Fitting the middle reel spiders
(900 m cutterbar) 52 /12
Fitting the outer left-hand reel spider
(390 m – 900 m cutterbar) 52 / 9
Fitting the outer right-hand reel spider
(390 m – 750 m cutterbar) 52 / 6
Fitting the outer right-hand reel spider
(900 m cutterbar) 52 / 7
Fitting the reel 52 / 2
Fitting the reel drive belt (43) 51 / 3
Fitting the reel drive chain (44) 51 / 4
Fitting the reel drive chain (45) 51 / 4
Fitting the reel drive chain (46) sprocket 51 / 7
Fitting the reel shaft
(750 m to 900 m cutterbar) 52 /10
Fitting the reel shaft bearing 52 / 2
Fitting the right-hand intermediate
drive shaft 51 / 6
Fitting the slip clutch for the intake auger 41 / 2
Fitting the slip clutch for the reel drive 51 /25
Fitting the the reel drive (45) sprocket 51 /23
G
G eneral Repair Instructions 4
Group Overview 11
Installing the wobble mechanism 32 /17
Intake auger 42 / 1
Intake auger drive 41 / 1
Introduction 1
K
Knife drive 32 / 1
Knife drive (40) guide roller, dismantled 32 /19
Knife drive (40) jockey pulley, dismantled 32 /20
L
Left-hand intermediate drive 31 / 1
p
Pictograms 3
R
Reel 52 / 1
Reel drive 51 / 1
Reel spider, dismantled
(390 m – 750 m cutterbar) 52 / 5
Remove the intake auger
(540 m – 900 m cutterbar) 42 /19
Removing the adjusting shaft
(390 m – 450 m cutterbar) 42 / 9
Removing the bearing tube for the
variable reel speed drive 51 / 16
Removing the belt pulley for the
knife drive (40) 32 / 2
Removing the cam rollers 52 / 3
Removing the electric reel speed changer 51 /10
Removing the electric variable speed
pulley for the reel 51 / 8
Removing the feed drive chain (41) 41 / 1
Removing the intake auger
(390 m – 450 m cutterbar) 42 /18
Removing the intake auger bearing (left)
(390 m – 450 m cutterbar) 42 / 1
Removing the intake auger bearing (right)
(390 m – 450 m cutterbar) 42 / 3
Removing the intake auger bearing (right)
(540 m – 900 m cutterbar) 42 / 11
Removing the intake auger control shafts 42 /14
Removing the intake auger finger 42 /14
Removing the knife drive (40) guide roller 32 /19
Removing the knife drive (40) jockey pulley 32 /19
Removing the knife drive belt (40) 32 / 1
Removing the left-hand intermediate
drive shaft 31 / 1
Removing the middle reel spiders
(390 m – 750 m cutterbar) 52 /10
Removing the middle reel spiders
(900 m cutterbar) 52 /12
Removing the outer left-hand reel spider
(390 m – 900 m cutterbar) 52 / 8
Removing the outer right-hand reel spider
(390 m – 750 m cutterbar) 52 / 5
Removing the outer right-hand reel spider
(900 m cutterbar) 52 / 6
Removing the reel 52 / 1
Removing the reel drive (45) sprocket 51 /22
Removing the reel drive belt (43) 51 / 2
Removing the reel drive chain (42) 51 / 1
Removing the reel drive chain (44) 51 / 3
Removing the reel drive chain (45) 51 / 4
Removing the reel drive chain (46) 51 / 1
Removing the reel drive chain (46) sprocket 51 / 7
Removing the reel shaft
(750 m – 900 m cutterbar) 52 / 9
Removing the reel shaft bearing 52 / 2
Removing the right-hand intermediate
drive shaft 51 / 5
Removing the slip clutch for the
intake auger 41 / 1
Removing the slip clutch for the reel drive 51 /24
Removing the spring-loaded variable
speed pulley for the reel 51 /18
Removing the wobble mechanism 32 / 2
s
Slip clutch for the intake auger, dismantled 41 / 2
Slip clutch for the reel drive, dismantled 51 /25
Spring-loaded variable speed pulley
for the reel, dismantled 51 /20
Sprocket for the reel drive, dismantled (45) 51 /23
T
The electric reel speed changer,
dismantled 51 /12
The intake auger bearing (left),
dismantled (390 m – 450 m cutterbar) 42 / 2
The intake auger bearing (right),
dismantled (390 m – 450 m cutterbar) 42 / 6
Tightening torques (in Nm)
for hexagon head bolts, cheese
head screws and hexagon nuts 9
w
Wobble mechanism, dismantled
(390 m – 750 m cutterbar) 32 / 6
Wobble mechanism, dismantled
(900 m cutterbar) 32 /12
52 I 7
IMAGES PREVIEW OF THE MANUAL:
CLAAS CUTTER BAR 3.90 M – 9.00 M LEXION REPAIR MANUAL – PDF DOWNLOAD:
PLEASE NOTE:
- This is the same manual used by the dealers to diagnose and troubleshoot your vehicle
- You will be directed to the download page as soon as the purchase is completed. The whole payment and downloading process will take anywhere between 2-5 minutes
- Need any other service / repair / parts manual, please feel free to contact [email protected] . We still have 50,000 manuals unlisted