CLAAS Forage Harvesters RU 600 Contour Typ 661 600 Infeed Improvement Fitting instructions Manual_DE_EN_FR_IT – PDF DOWNLOAD
Original price was: $78.00.$21.95Current price is: $21.95.
CLAAS Forage Harvesters RU 600 Contour Typ 661 600 Infeed Improvement Fitting instructions Manual_DE_EN_FR_IT – PDF DOWNLOAD
Description
CLAAS Forage Harvesters RU 600 Contour Typ 661 600 Infeed Improvement Fitting instructions Manual_DE_EN_FR_IT – PDF DOWNLOAD
IMAGES PREVIEW OF THE MANUAL:
DESCRIPTION:
CLAAS Forage Harvesters RU 600 Contour Typ 661 600 Infeed Improvement Fitting instructions Manual_DE_EN_FR_IT – PDF DOWNLOAD
General instructions
Safety precautions
Work may be carried out only by specialist
workshops authorised by CLAAS and having
qualified personnel.
The general safety, accident prevention and environmental
protection regulation must be observed.
Read and observe the Safety chapter in the Operator’s
manual.
Carry out work under the raised machine/front attachment
or raised components only when a safe support
is provided.
Before carrying out work on the hydraulic system,
lower machine/front attachment and hydraulically
actuated components to the ground. Depressurise
the system.
All work must be carried out with the drive disengaged
and the engine stopped! – Remove the
ignition key!
Relieve the tension of pre-loaded energy accumulators
(springs, accumulators, hydraulic cylinders) and
of components which are pre-loaded by energy accumulators
properly prior to starting installation work!
Check the tight seat of all bolts after assembly.
Carry out a function test.
TABLE OF CONTENTS:
CLAAS Forage Harvesters RU 600 Contour Typ 661 600 Infeed Improvement Fitting instructions Manual_DE_EN_FR_IT – PDF DOWNLOAD
1 Einleitung
Einleitung 11
2 Inhalt
3 Allgemeine Hinweise
Besonders zu beachten 31
Kennzeichnung von Warn- und Gefahrenhinweisen 31
Bestimmungsgemäße Verwendung 32
Sicherheitsaufkleber mit Warnbildzeichen 32
Allgemeine Sicherheitshinweise 32
4 Lieferumfang
Anbausatz Einzugsverbesserung 0497 2661 41
5 Einbau Einzugsverbesserung
Abdeckungen demontieren 51
Zugfedern ausbauen 52
Zugfeder einbauen 52
Bohrung setzen 52
RU 600 Typ 661 bis Maschinennummer 661 0 1804 52
RU 600 Typ 661 ab Maschinennummer 661 0 1805
und RU 600 Typ 903 52
Zugfedern montieren 53
Mitnehmer montieren 54
Leisten auf Einzugschnecke montieren 55
Vor Inbetriebnahme prüfen und beachten! 57
1 Introduction
Introduction 11
2 Table of contents
3 General instructions
Of special importance 31
Identification of warnings and dangers 31
Designated use 32
Safety decals with warning symbols 32
General safety instructions 32
4 Shipping package
Fitting kit infeed improvement 0497 2661 41
5 Fitting the infeed improvement
Dismantling covers 51
Removing the tension springs 52
Mounting the tension springs 52
Increasing the hole 52
RU 600 Type 661 up to machine number 661 0 1804 52
RU 600 Type 661 from machine number 661 0 1805
and RU 600 Type 903 52
Fitting the tension springs 53
Fitting the carriers 54
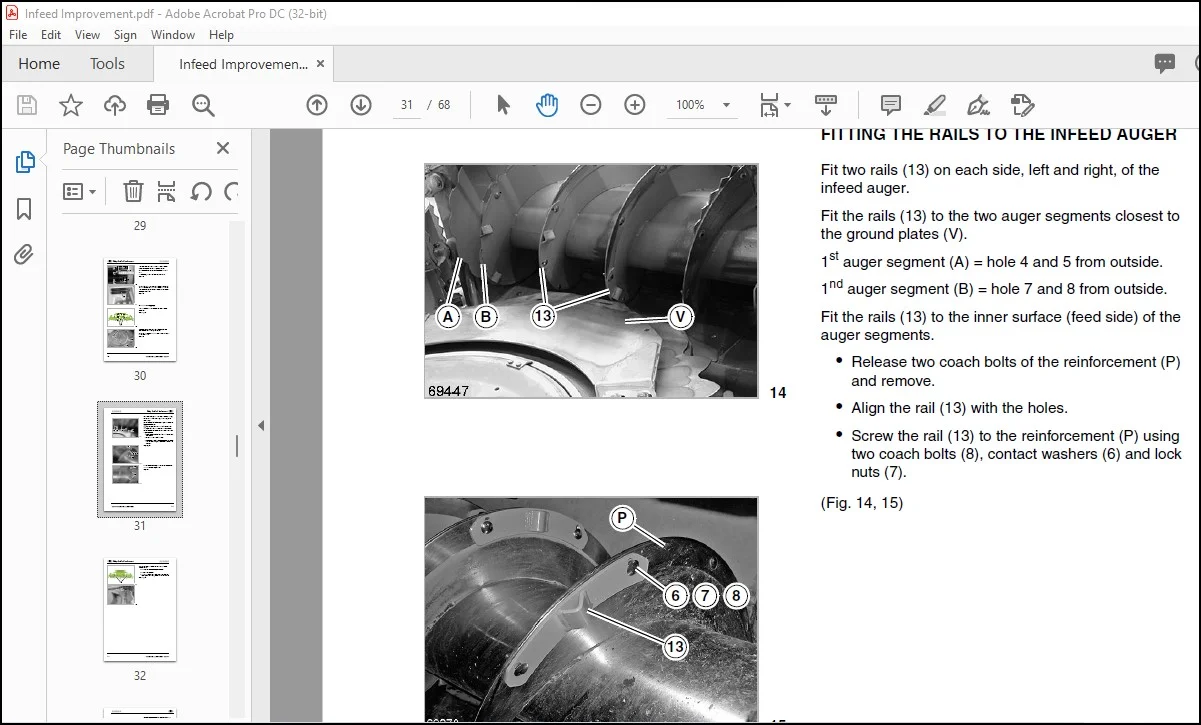
Fitting the rails to the infeed auger 55
Check and observe the following before putting into operation 57
]1 Introduction
Introduction 11
2 Table des matières
3 Conseils généraux
Important 31
Identification des prescriptions concernant les avertissements et
les dangers 31
Utilisation conforme à l’usage prévu 32
Etiquette de sécurité avec pictogramme de danger 32
Consignes de sécurité générales 32
4 Pièces fournies
Accessoires pour l’amélioration de l’alimentation 0497 2661 41
5 Montage de l’amélioration de l’alimentation
Démontage des caches 51
Démonter les ressorts tendeurs 52
Monter les ressorts tendeurs 52
Effectuer l’alésage 52
RU 600 modèle 661 jusqu’au no de machine 661 0 1804 52
RU 600 modèle 661 à partir du no de machine 661 0 1805
et RU 600 modèle 903 52
Monter les ressorts tendeurs 53
Monter la broche d’entraînement 54
Monter les méplats sur la vis d’alimentation 55
Vérifier les points suivants avant la mise en service de la machine
! 57
1 Introduzione
Introduzione 11
2 Indice
3 Indicazioni generali
Avvertenze importanti 31
Simbologia concernente gli avvertimenti e gli avvisi di pericolo 31
Norme per il corretto impiego 32
Decalcomanie con simboli di pericolo 32
Indicazioni generali per la sicurezza 32
4 Complessivo di fornitura
Kit di montaggio del dispositivo di potenziamento dell’alimentazione
0497 2661 41
5 Montaggio del dispositivo di potenziamento
dell’alimentazione
Smontare le coperture 51
Smontare le molle tenditrici 52
Montare le molle tenditrici 52
Preparare i fori 52
RU 600 Tipo 661 fino alla macchina Nr 661 0 1804 52
RU 600 Tipo 661 dalla macchina Nr 661 0 1805
e RU 600 Tipo 903 53
Montare le molle tenditrici 54
Montare i trascinatori 54
Montare le barre sulla coclea convogliatrice 55
Prima della messa in campo, controllare e osservare! 57
PLEASE NOTE:
- This is the same manual used by the dealers to diagnose and troubleshoot your vehicle
- You will be directed to the download page as soon as the purchase is completed. The whole payment and downloading process will take anywhere between 2-5 minutes
- Need any other service / repair / parts manual, please feel free to contact [email protected] . We still have 50,000 manuals unlisted
S.M