CLAAS LEXION 560 / 550 LEXION 540 / 540 C LEXION 530 / 520 / 510 Operator’s Manual- PDF DOWNLOAD
Original price was: $78.00.$26.95Current price is: $26.95.
CLAAS LEXION 560 / 550 LEXION 540 / 540 C LEXION 530 / 520 / 510 Operator’s Manual- PDF DOWNLOAD
Description
CLAAS LEXION 560 / 550 LEXION 540 / 540 C LEXION 530 / 520 / 510 Operator’s Manual- PDF DOWNLOAD
DESCRIPTION:
CLAAS LEXION 560 / 550 LEXION 540 / 540 C LEXION 530 / 520 / 510 Operator’s Manual- PDF DOWNLOAD
INTRODUCTION
The present Operator’s Manual applies to the CLAAS combine-harvesters
LEXION 560, type 584
LEXION 550, type 584
LEXION 540, type 584
LEXION 540 C, type 584
LEXION 530, type 583
LEXION 520, type 583
LEXION 510, type 583.
- It is primarily intended for the machine operator and contains information on using, setting and operating the machine. In general, texts and pictures apply to all machine models covered by this manual
- The information given applies equally, except where reference is made to a particular model in captions to the pictures or in the main text.
- Operation and maintenance of important accessories is also covered by this manual. A separate Operator’s Manual is available for cutterbars.
- Please read the instructions which apply to the appropriate accessories on your machine. Provided all instructions regarding maintenance and care of your machine are followed, you can count on many years of reliable service.
- Please have your authorised CLAAS dealer carry out the recommended regular inspections. The neglecting of regular maintenance and proper machine operation lead to reduced performance and loss of time.
- If proper operation and careful maintenance is ensured, your combine harvester, which incorporates latest harvesting technology, will render you excellent service
General Information
ROAD TRAFFIC REGULATIONS
- In addition to his driving licence, the operator must always carry the copy of the vehicle type approval registration issued by the Kraftfahrt-Bundesamt (the Federal Motor Vehicle Executive). A warning triangle and, on machines over 4 t permissible total weight, at least one wheel chock must always be carried on the combine.
- When driving on public roads with the combine harvester comply with all the requirements stated under letter C in the copy of the vehicle type approval registration (§ 18 Section 5 StVZO) issued by the Kraftfahrt-Bundesamt (the Federal Motor Vehicle Executive).
- On machines with excess width (width over the tyres), a vehicle type approval registration for individual vehicles (single expert opinion) and a special approval in accordance with § 70, Section 1, clauses 1 and 2 of the StVZO must be carried instead of the General Operating Permit. Furthermore, all the requirements stated in the vehicle type approval registration for individual vehicles and in the special approval must be observed.
- The issue of a special approval differs from country to country. The excess width must be marked in accordance with the regulations for the marking of road vehicles with excess width (e.g. two marker boards at the front and back, protective bar, two amber flashing warning beacons).
- If any part(s) of the combine harvester is/are subsequently modified whose condition is/are prescribed or the operation of which (after being modified) could represent a hazard to other road users, then the vehicle type approval registration shall no longer be valid and application must be made for a new vehicle type approval registration.
- In this case the machine must be presented to the motor vehicle safety inspection authority responsible (e.g. TÜV) in order to obtain an expert opinion certificate (§ 19 section 2 StVZO). If you are in any doubt as to whether this situation applies in your case, please contact us as manufacturers.
- If a transport vehicle for front end attachments is towed behind the combine harvester then the cable for the lighting system must be connected and the good condition of the lighting system assured. If the combine is equipped with a maize picker head or folding cutterbar, the regulations and requirements of the machine’s General Operating Permit must be observed, in particular the requirements concerning ballast weights and tyres.
Registration
- As a self propelled working machine with a maximum speed of up to 20 km/h, the combine is not subject to registration and does not need to have licence plates fitted.
- The machine must be clearly and indelibly marked on the left-hand side with the Christian name and surname of the owner and his address.
- The towing of trailers in the trailer hitch when driving on public roads is not permitted. Road traffic regulations may vary between countries.
- In case of discrepancies between the instructions provided by the manufacturer and the traffic regulations of the relevant countries, the traffic regulations of the countries concerned apply.
TABLE OF CONTENTS:
CLAAS LEXION 560 / 550 LEXION 540 / 540 C LEXION 530 / 520 / 510 Operator’s Manual- PDF DOWNLOAD
1 Introduction
Introduction 111
2 Contents
Contents 211
3 General Information
Road traffic regulations 311
Important notice 321
Identification plate / Serial number 331
Identification plate 332
Machine serial number 332
Engine serial number
CATERPILLAR C-13, exhaust gas class 3a 332
Engine serial number
CATERPILLAR C-10 333
Engine serial number
CATERPILLAR C-9, exhaust gas class 2 333
Engine serial number
CATERPILLAR C-9, exhaust gas class 3a 333
Engine serial number
CATERPILLAR 3126 B 333
Engine serial number
CATERPILLAR C-66 334
Straw chopper identification plate 334
Cab serial number 334
4 Safety Rules
Safety Rules 411
Cylinder safety lock 414
Fire extinguisher 414
Battery isolating switch 415
Wheel chocks 415
Positioning the wheel chocks 415
Hydraulic system 416
Danger of injury due to
escaping hydraulic liquid 416
Accumulators 417
Relieving the Auto-Contour accumulator 417
Relieving the Autopilot accumulator 417
Relieving the standard spreader accumulator 418
Safety decals with pictorials 421
5 Specifications
CLAAS LEXION 560 / 550 / 540 / 540 C 511
Weights 5112
CLAAS LEXION 530 / 520 521
Weights 5211
CLAAS LEXION 510 531
Weights 5310
Safety features 541
6 Prior to operation
Carry out prior to initial operation 611
Cab 621
Cab with automatic climate control 621
Automatic climate control 622
Operating and display elements 622
Putting the automatic air
conditioner into operation 623
Setting the cab temperature 624
Manually setting the evaporator blower speed 624
Activating ECON operating mode 625
Deactivating ECON operating mode 625
REHEAT operation
(Dehumidify cab windows) 626
Displaying the outside temperature 627
Changing the temperature
display to °Fahrenheit 627
Floor heating 627
Display of malfunction: error in thermometer
F0 (cab, blue) 628
Display of malfunction: error in thermometer
F1 (exhaust, yellow) 628
Display of malfunction: error in thermometer
F2 (outside, red) 628
Cab with air conditioner
(Standard version) 629
Putting the air conditioning
system into operation 6210
Heater 6212
Floor heating 6212
Reheat system
(fogged windows) 6212
Malfunction, possible cause or remedy –
air conditioner system 6213
Cooling box 6215
Cooling unit
(option) 6215
Cooling bag
(option) 6215
Ice bucket
(option) 6215
Windscreen washer 6216
Crop inspection 6216
Opening and closing the cab roof 6216
Cab emergency exit 6217
Operator’s platform 631
Operator’s platform overview 631
Control console 633
Screen
(vehicle information display) 634
Screen
(harvest display) 635
C keys 636
Rotary switch D 636
Steering column 637
Ignition switch 637
Multi-function switch 638
Vehicle information unit 639
Multi-function handle 6310
Steering column adjustment 6311
Adjusting the steering column top 6311
212 BA LEXION 560 – 510 – 000 299 524 2
Contents
Steering wheel height adjustment 6312
Central terminal compartment 6312
Fuses 6314
Relays 6316
Operator’s seat 6318
Operator’s seat, mechanical 6318
Operator’s seat air suspension
(option) 6321
Lighting and socket outlets 641
Headlights, working lights, mirrors 641
Sidefinder
(option) 647
Pathfinder lighting 647
Side position lights in case of excess width 648
Socket outlets 6412
Access ladder 651
Access and ladder extension 651
Front ladder 655
Pre-assembling the ladder
(from serial no ) 655
Mounting the ladder 655
Swivelling the ladder
(up to serial no ) 658
Swivelling the ladder
(from serial no ) 659
Ladder starting protection 6510
Rear ladder 6511
Other uses of the rear ladder 6512
Side panels 661
Opening and closing the side
panels and the tailgate 661
Opening the tailgate 662
Adjusting the gripping height
of the side panels 662
Adjusting the side panel lock 663
Tool cabinet 663
Toolbox 663
Folding down the tool cabinet 664
Mudguards / side panels 671
Installing the mudguards 671
Adapting the side panels
(Rice harvesting machines) 672
Rear axles 681
Adjustable rear drive axle
(260 m – 320 m) 682
Changing the adjustable rear drive axle 260 m – 320 m
from transport to working position 682
Adjusting the track width 684
Rear axle
(304 m) 688
Altering the 304 m rear axle
from transport to working position 688
Adjustable rear axle
(254 m – 299 m) 6810
Changing the adjustable rear axle 254 m – 299 m
from transport to working position 6810
Adjusting the track width 6811
Additional weights of rear axle 691
Rear axle additional weights for
LEXION 560 – 540 691
Rear axle additional weights for
LEXION 530 – 510 692
Liquid filling for rear axle tyres 693
Installing the rear axle weights 693
Cutterbar hydraulic cylinders 6101
Attaching cutterbar hydraulic cylinders 6101
Number of cutterbar cylinders 6101
Dual wheels 6111
Mounting the dual wheels 6111
Operating the front ladder
with dual tyres installed 6114
Grain tank 6121
Closing the grain tank drain holes 6121
Opening the grain tank cover completely by hand
(8100 / 7800 / 7300 litres grain tank) 6122
Driving the combine 6131
Engine speed rotary switch 6131
Average engine idle speed 6131
Starting the engine 6132
Forward travel / reverse travel 6132
Gear selection 6133
Adjusting the stiffness of ground
speed control lever 6134
Stopping 6134
Driving behaviour 6134
Handling with cutterbar trailer 6135
Steering 6135
Brakes 6135
Foot brake 6135
Parking brake 6136
Stopping the engine 6137
Engaging/disengaging the
CLAAS 4-Trac system 6137
Towing the machine 6138
Emergency operation – Electro-hydraulic
gearshift (EHS) 6139
Emergency operation decal 6139
Engaging the neutral gearbox
position mechanically 61310
Adjusting the initial gearbox position
(the gearbox can be shifted
electro-hydraulically again) 61311
Engaging the neutral gearbox
position hydraulically 61313
Engaging the 2nd gear hydraulically 61313
CLAAS Autopilot
(Maize picker) 6141
Putting the CLAAS Autopilot into operation 6141
CLAAS Autopilot
(Grain cutterbar) 6143
Adjusting the directional stability
of the combine harvester 6143
Setting the laser sensor in the field 6145
Rough adjustment 6146
Fine adjustment 6147
000 299 524 2 – BA LEXION 560 – 510 213
Contents
Laser sensor (crop edge has
moved out of visible range) 6147
Adjusting the right laser sensor
(accessory) 6148
Putting the CLAAS Autopilot into operation 6149
Use in rape with left-hand side cutter 61410
Towing 6151
Towing the machine 6151
Forward towing 6151
Backward towing 6151
7 Installing and removing the cutterbar
Installing the cutterbar 711
Tilting the cutterbar from transport position 711
Adjusting the cutterbar cross levelling hydraulic cylinder
(up to serial no ) 712
Machines equipped with Auto Contour 712
Adjusting the cutterbar cross levelling hydraulic cylinder
(from serial no ) 713
Machines equipped with Auto Contour 713
Aligning the coupling pin
(machines without Auto Contour) 713
Attaching the front attachment 714
Locking cutterbars and maize pickers
(Cutterbars without Auto Contour) 715
Connecting the universal drive shaft 716
Mounting the stands 717
Removing the cutterbar 721
Removing the universal coupling 721
Removing the universal drive shaft 721
Opening the cutterbar locking 722
Laying down the cutterbar on the ground 722
Placing the cutterbar on the cutterbar trailer 722
8 Operation CEBIS
Contents 811
CLAAS on-board information system (CEBIS) 821
CEBIS Monitor and rotary switch 823
C-keys 823
Rotary switch D 823
Multifunctional handle M 823
Window sections E
(Harvest display) 823
Flagging box 823
Rotary switch D 826
Prior-to-initial operation 827
Vehicle information display 829
Harvest display 829
Yield mapping 8210
Flagging 8211
GPS 8213
Mapping ON/OFF 8213
Mapping monitor 8213
Load GPS data 8213
Presettings reel 8215
Reel horizontal position 8215
Reel speed 8215
Reel height 8217
Presettings front attachment 8219
Clearance between snapping plates 8219
Cutterbar table length 8219
Cutting height settings (CAC) 8221
Cutting height settings for LEXION Montana 8223
Partial width selection 8225
Yield meter 8226
Componentes 8226
Basic setting and calibration 8226
Preparation for yield measurement 8227
Moisture measurement ON/OFF,
moisture correction, storage moisture 8227
Quick guide to accurate measuring data 8227
Yield measurement 8229
Calibration factor 8229
Set zero yield 8229
Test-weighing 8231
Weight measured 8231
Moisture correction 8231
Moisture mesaurement ON/OFF 8231
Set zero angle 8233
Storage moisture 8233
Display dry yield 8233
Setting combine to type of crop 8235
List of threshable crops 8235
Load CLAAS adjustments 8235
Load own adjustments 8237
Save own adjustments 8237
Print machine adjustments 8237
Display of CLAAS adjustments 8237
Display of own adjustments 8237
Cleaning by blowing 8239
Recording harvest work 8241
Planned work records 8241
Next planned work record 8241
Previous planned work record 8243
New planned work record 8243
Change a planned work record 8243
Start / Stop 8245
Completed work records 8247
Next or previous completed work record 8247
Restart a completed work record 8247
Printer 8247
Area correction 8247
Daily recorder 8249
Printing daily recordings 8249
Clear daily recordings 8249
Total recorder 8251
Printing recorder summaries 8251
Crop recorder 8251
Copy the chip card 8253
Adjustments 8255
Cutterbar 8255
Sensitivity CAC 8255
Cutterbar upper and lower limits 8257
Partial width proportions 8257
Working position 8257
Working width 8259
214 BA LEXION 560 – 510 – 000 299 524 2
Contents
Auto reel height 8259
Reel end stops 8259
Cutterbar automatics 8261
Cutterbar table length stops 8261
Fore & aft reel adjustment stops 8261
Vario automatics ON/OFF 8263
Snapping plate end stops 8263
Speeds 8265
Learning speeds 8265
Learning max no-load speed 8265
Belt slip limit indicator 8267
Chaff spreader speed monitor 8267
Returns elevator speed monitor 8267
Tachometer 8269
Calibration run 8269
Impulses/100 8269
Sensitivity Autopilot 8271
Zero Autopilot front attachment 8271
Zero steering 8271
Separation 8273
Sensor test 8273
Upper and lower sieve end stops 8273
Upper and lower sieve adjustment 8275
Returns limit 8275
Set zero returns 8275
CEBIS 8277
Language 8277
Date/Time 8279
Display positive/negative 8279
Measuring units 8281
Version 8281
Own display 8283
Maintenance 8285
XXh OK 8285
XXh service list 8285
Operator’s manual 8287
Basic settings 8287
Guide to adjustments 8289
Problems/Remedies 8289
CEBIS 8291
Check list 8291
Safety rules 8291
Code protection 8293
Engine load 8295
Engine diagnosis 8295
Alarms 8296
Alerts 8296
Problems / remedies – yield meter 8297
Guide for impulses / 100 m 8298
9 Operation – Basic machine
Feeder housing 911
Feeder chains 911
Front attachment reverser 912
Front attachment floatation springs 913
Checking the setting of the floatation springs 913
Cutting height indicator 914
Spring pressure indicator 915
Blocking the front attachment floatation springs
(Hydraulic lock) 915
Unlocking the front attachment floatation springs
(Hydraulic lock) 915
Blocking the front attachment floatation springs
(Mechanical lock) 916
Unlocking the front attachment floatation springs
(Mechanical lock) 916
Adjusting the drop rate of the front attachment 916
Engaging the front attachment
(switch console, up to serial no ) 917
Engaging the front attachment
(switch console, from serial no ) 917
Disengaging the front attachment
(switch console) 918
Front attachment QUICK STOP
(switch console) 918
Disengaging the front attachment
(multi-function handle) 919
Front attachment QUICK STOP
(multi-function handle) 919
Threshing mechanism 921
Stone trap
(small stone trap) 921
Stone trap
(large stone trap) 922
Engaging the threshing mechanism 923
Disengage the threshing mechanism 923
Threshing drum 924
Cleaning the threshing mechanism 924
Concave setting 925
Basic concave setting 925
Designations and dimensions for grain concave / maize
concave (small stone trap) 9210
Designations and dimensions for grain concave / maize
concave (large stone trap) 9211
Designations and dimensions on spike tooth concave
(small stone trap) 9212
Designations and dimensions on spike tooth concave
(large stone trap) 9213
Adjusting the concave position sensor 9214
Threshing drum speed 9215
Drum drives 9215
Two-step variable-speed drive 9215
Removing and installing the preconcave segments
(small stone trap) 9216
Removing and installing the preconcave segments
(large stone trap) 9218
Concave segment 9219
Removing a concave segment
(small stone trap) 9219
Installing the concave segment
(small stone trap) 9220
Removing the concave segment
(large stone trap) 9221
Installing the concave segment
(large stone trap) 9222
Disawning 9223
000 299 524 2 – BA LEXION 560 – 510 215
Contents
Unslugging the threshing drum 9223
Deflector curtain 9224
Adjusting the deflector curtain 9225
Straw walker 931
Straw walker 931
Cleaning the straw walker 931
Warning signal 932
Multiple finger separation system 932
Straw walker performance monitor 933
Straw walker sensor 933
Straw walker risers 934
Rice risers 934
Centre riser 935
Side risers 936
Parallel risers 937
CCM risers 938
Cleaning
(Standard cleaning system) 941
Cleaning unit 941
Preparation floor 942
Frogmouth sieves 943
Electric sieve adjustment 943
Removing the sieves 944
Removing the upper sieves 944
Removing the lower sieves 946
Installing the sieves 947
Tightening torques of axial mountings
for the upper and lower sieves 947
Sieves – Basic setting 948
Harvesting without lower sieves 949
Covering the returns pan 949
Cleaning fan 949
Fan speed adjustment 9410
Under-ventilated cleaning step
LEXION 560 – 520 9410
Adjusting the pre-separation deflector
LEXION 560 – 520 9410
Wind board
LEXION 560 – 520 9411
Cleaning step
LEXION 510 9411
Wind boards
LEXION 510 9412
Fan shutters for threshing grass seed and similar crops
(accessory) 9412
Dynamic slope compensation
(3-D cleaning system) 9413
Returns 9414
Inspecting the returns 9414
Upper sieve performance monitor 9415
Sieve pan sensor 9415
Grain delivery 951
Augers and auger troughs 951
Elevators 952
Grain tank 953
Safety decal (0516 2751) 953
Grain tank extension 954
Unloading the grain tank 955
Emergency unloading grain tank cover 956
Grain tank unloading aid
(accessory) 956
Grain tank unloading tube 957
Swinging the grain tank
unloading tube out and in 957
Grain tank unloading tube transport position 958
Cleaning covers on the grain
tank unloading tube 959
Shear bolt for grain tank unloading 959
Engaging and disengaging grain
tank unloading 9510
Grain tank access 9510
Automatic chain lubrication – grain tank unloading
(accessory) 9511
Grain tank fill indicator 9511
Straw chopper 961
Straw chopper 961
Before using the chopper for
the first time, check 961
Straw chopper with standard spreader 962
Putting the straw chopper into operation
(swinging the standard spreader to
chopping position) 962
Putting the straw chopper out of operation
(swinging the standard spreader to
swathing position) 963
Swinging the standard spreader to cutterbar
trailer transport position 964
Adjusting the cross blade 964
Adjusting the length of cut 965
Engaging the rasp bar
(accessory) 966
Adjusting the standard spreader spreading width
(up to serial no ) 966
Adjusting the standard spreader spreading width
(from serial no ) 967
Adjusting the height of standard spreader 968
Adjusting the spreading width centre
of standard spreader 969
Reducing the chopper speed 9610
Chaff spreader / Straw spreader 971
Chaff spreader 971
Adjusting the chaff spreader speed 971
Adjusting the spreading width 972
Folding the chaff spreader open 972
Folding the chaff spreader in 974
Chaff spreader feed pan 974
Removing the chaff spreader feed pan 974
Installing the chaff spreader feed pan 975
Straw spreader 976
Adjusting the spreading width 976
Fitting the spreader rotors 976
LEXION 560 – 510 sieve charts and suggested
combine adjustments
(standard cleaning system) 981
LEXION 560 – 510 sieve chart
(standard cleaning system) 981
216 BA LEXION 560 – 510 – 000 299 524 2
Contents
LEXION 560 – 510 suggested combine adjustments
(standard cleaning system) 982
Disawning 991
Disawner plates 991
Concave segment 991
Malfunction, cause and / or remedy –
Basic machine 9101
10 Maintenance – Basic machine
Important maintenance instructions 1011
Important maintenance instructions
and safety rules 1011
Front attachment 1011
Correct tension of steel roller chains 1011
Belts 1012
Variable-speed drives 1012
Bolts 1012
Lubrication 1012
Brakes 1013
Wheels / tyres 1014
Hydraulic system 1015
Electrical system 1016
Air conditioner 1017
Safety guards / spare parts 1018
Unbalance 1018
Welding 1019
Maintenance schedules and lubricants charts 1021
Maintenance schedules 1021
Lubricants charts 1024
Hydraulic system 1031
Accumulators 1031
Checking the oil level 1031
Change hydraulic oil 1032
Changing the hydraulic oil filter 1033
Saturation of hydraulic oil filter
(from serial no ) 1033
Replacing the return filter
(up to serial no ) 1034
Replacing the return filter
(from serial no ) 1034
Filling instructions when replacing the hydraulic oil
(Sauer 90 R 130 / 90 M 100) 1035
Bleeding the cutterbar cross levelling hydraulic cylinder
(up to serial no ) 1035
Bleeding the cutterbar cross levelling hydraulic cylinder
(from serial no ) 1037
Transmission / Brakes 1041
Manual gearbox 1041
Checking the oil level 1041
Oil change 1041
Final drive 19 t / two-step 1042
Checking the oil level 1042
Oil change 1042
Final drive 21 t / single-step 1042
Checking the oil level 1042
Oil change 1042
Final drive gearbox
(planetary gear) 1043
Checking the oil level 1043
Oil change 1043
Threshing drum reduction gearbox 1044
Oil change 1044
Checking the oil level 1044
Transfer gearbox
(engine) 1045
Checking the oil level 1045
Oil change 1045
Grain tank unloading gearbox 1045
Checking the oil level 1045
Oil change 1045
Foot brake and brake fluid 1046
Parking brake 1046
Feeder housing 1051
Tension feeder chains 1051
Cleaning the suction blower
(accessory) 1052
Elevator chains 1061
Tensioning the grain elevator chain
(machine without yield meter) 1061
Tensioning/relieving the tension
of the grain elevator chain
(machine with yield meter) 1062
Tensioning the returns elevator chain 1062
Drive belts / drive chains 1071
General Information 1071
Drive system diagram, left-hand side 1072
Drive belts, drive chains 1072
Drive system diagram, right-hand side 1073
Drive belts, drive chains 1073
Removing the belt (1) 1074
Installing the belt (1) 1075
Removing the belt (2) 1076
Installing the belt (2) 1078
Removing the belt (3) 1079
Installing the belt (3) 10710
Removing the belt (4) 10712
Installing the belt (4) 10714
Removing the belt (5) 10716
Installing the belt (5) 10717
Removing the belt (6) 10719
Installing the belt (6) 10720
Removing the belt (7) 10721
Installing the belt (7) 10723
Removing the belt (8) 10726
Installing the belt (8) 10727
Removing the belt (9) 10729
Installing the belt (9) 10732
Removing the belt (10) 10734
Installing the belt (10) 10736
Removing the chain (11) 10738
Installing the chain (11) 10739
Removing the belt (12) 10741
Installing the belt (12) 10742
Removing the belt (13) 10744
Installing the belt (13) 10745
Removing the belt (14) 10747
Installing the belt (14) 10748
000 299 524 2 – BA LEXION 560 – 510 217
Contents
Removing the belt (17) 10749
Installing the belt (17) 10751
Removing the belt (18) 10753
Installing the belt (18) 10755
Removing the belt (19) 10756
Installing the belt (19) 10757
Removing the belt (20) 10759
Installing the belt (20) 10761
Removing the belt (22) 10764
Installing the belt (22) 10765
Removing the belt (45) 10767
Installing the belt (45) 10768
Removing the belt (46) 10770
Installing the belt (46) 10771
Removing the belt (48) 10773
Installing the belt (48) 10775
Removing the belt (51) 10776
Installing the belt (51) 10777
Removing the belt (52) 10778
Installing the belt (52) 10779
Removing the belt (53) 10781
Installing the belt (53) 10782
Removing the belt (54) 10784
Installing the belt (54) 10785
Removing the chain (55) 10786
Installing the chain (55) 10786
Installing the chain (56) 10788
Removing the belt (57) 10789
Installing the belt (57) 10790
Remove belt (58)
(CATERPILLAR C9 / 3126 B) 10792
Installing belt (58)
(CATERPILLAR C9 / 3126 B) 10793
Removing belt (58)
(CATERPILLAR C10) 10794
Installing the belt (58)
(CATERPILLAR C10) 10795
Removing the belt (59) 10796
Installing the belt (59) 10797
Cab / air conditioner 1081
Cab 1081
Cleaning the filters 1081
Cleaning the units located in the cab roof 1081
Cleaning the cab screens 1082
Air conditioner 1083
Cleaning the condenser 1083
Checking refrigerant level 1083
Replacing the filter receiver drier 1084
Required refrigerant quantity –
refrigerant R 134 a 1084
Oil for the compressor 1085
Maintenance work before the harvest 1085
Fire extinguisher 1091
Compressed-air system
(accessory) 10101
Compressed air connections 10102
Compressed-air gun and woven hose 10102
Draining the accumulator 10103
Pressure controller 10103
Checking the safety valve 10104
Straw chopper 10111
Replacing the free-swinging knives for grain 10111
Removing the straw guide plate 10111
Installing the straw guide plate 10113
Removing the free-swinging
knives for grain 10115
Bolting down the free-swinging
knives for grain 10115
Replacing the stationary knives 10117
Winter storage instructions for combines 10121
11 Maintenance – Engine
Important maintenance instructions 1111
Important maintenance instructions
and safety rules 1111
Maintenance schedules and lubricants charts 1121
Maintenance schedule
CATERPILLAR C-10 / C-9 / 3126 B,
exhaust gas class 2 1121
Lubricants chart
CATERPILLAR C-10 / C-9 / 3126 B,
exhaust gas class 2 1122
Maintenance schedule
CATERPILLAR C-13 / C-9 / C-66,
exhaust gas class 3a 1123
Lubricants chart
CATERPILLAR C-13, C-9, C-66,
exhaust gas class 3a 1124
Engine maintenance 1131
Engine overview
CATERPILLAR C-13 1131
Engine overview
CATERPILLAR C-10 1131
Engine overview
CATERPILLAR C-9
exhaust gas class 3a 1132
Engine overview
CATERPILLAR C-9
exhaust gas class 2 1132
Engine overview
CATERPILLAR C-66 1133
Engine overview
CATERPILLAR 3126 B 1133
Fuel system / engine oil 1141
Fuel system 1141
Fuel tank 1141
Fuel tank breather
(from serial no ) 1141
Fuel shut-off tap 1142
Water separator / fuel prefilter
(standard equipment – small version) 1142
Water separator / fuel pre-filter
(accessory, replaces fuel pre-filter Fig 5) 1143
Replacing the fuel filter cartridge
(CATERPILLAR C-13 / C-10 / C-9 / 3126 B) 1144
Replacing the fuel filter cartridge
(CATERPILLAR C-66) 1145
218 BA LEXION 560 – 510 – 000 299 524 2
Contents
Bleeding the fuel system
(CATERPILLAR C-13 / C-10 / C-9 / 3126 B) 1146
Manual fuel primer pump with fuel pre-cleaner
(CATERPILLAR C-66) 1146
Engine oil level check 1146
Engine oil change 1147
Draining used oil 1148
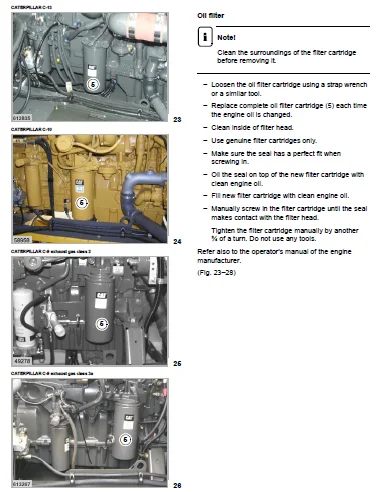
Oil filter 11410
Topping up engine oil 11412
Cooling system 1151
Coolant 1151
Water drain plugs on the engine block 1151
Radiator 1152
Filling the cooling system with coolant 1153
Overpressure 1153
Frost protection / corrosion protection 1153
Warning sign 1153
Coolant temperature 1154
Shut down the overheated engine 1154
Rotary chaff screen 1155
Cleaning the radiator 1157
Dry-type air filter 1161
Warning device 1162
Cleaning the air filter intake screen 1162
Cleaning the air filter with plastic housing 1163
Removing the air filter main cartridge 1163
Cleaning the air filter main cartridge 1164
Installing the air filter main cartridge 1164
Cleaning the air filter with metal housing 1165
Removing the air filter main cartridge 1165
Cleaning the air filter main cartridge 1166
Installing the air filter main cartridge 1167
Safety filter cartridge 1167
Removing and installing safety cartridge
(plastic housing) 1168
Removing and installing safety cartridge
(metal housing) 1169
Alternator 1171
Cleaning the alternator 1171
Electrical system 1181
Battery 1181
Alternator 1182
Engine problems, cause and / or remedy 1191
Engine winter storage 11101
Engine preservation 11101
12 Lubrication chart
Lubricants and lubrication instructions 1211
13 Index
Index 1311
IMAGES PREVIEW OF THE MANUAL:
CLAAS LEXION 560 / 550 LEXION 540 / 540 C LEXION 530 / 520 / 510 OPERATOR’S MANUAL- PDF DOWNLOAD:
PLEASE NOTE:
- This is the same manual used by the DEALERSHIPS to SERVICE your vehicle.
- The manual can be all yours – Once payment is complete, you will be taken to the download page from where you can download the manual. All in 2-5 minutes time!!
- Need any other service / repair / parts manual, please feel free to contact us at heydownloadss @gmail.com . We may surprise you with a nice offer
S.M