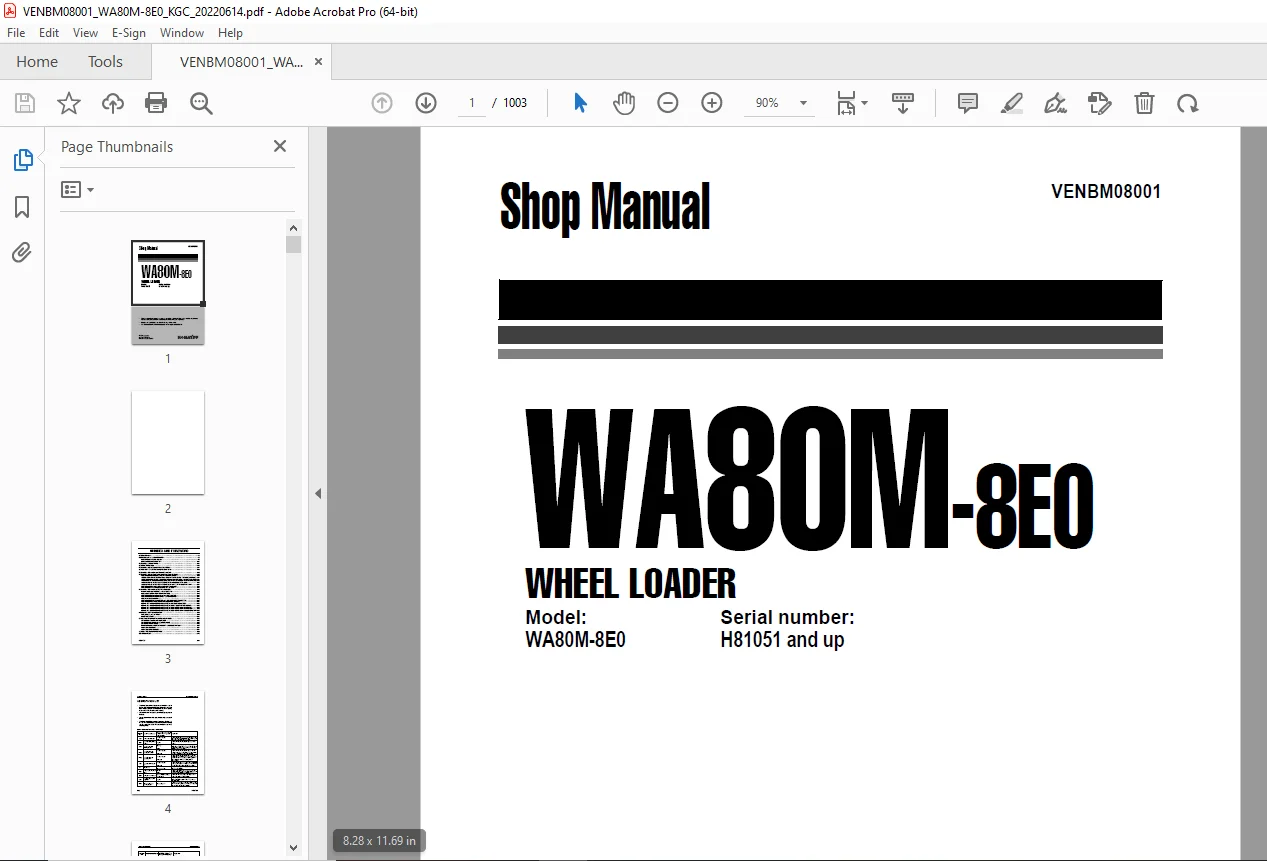
Komatsu WA80M-8E0 Wheel Loader Shop Manual VENBM08001 PDF
$36.95
Komatsu WA80M-8E0 Wheel Loader Shop Manual VENBM08001 – PDF DOWNLOAD
- Model: Serial number:
WA80M-8E0 H81431 and up
Description
Komatsu WA80M-8E0 Wheel Loader Shop Manual VENBM08001 – PDF DOWNLOAD
FILE DETAILS:
Komatsu WA80M-8E0 Wheel Loader Shop Manual VENBM08001 – PDF DOWNLOAD
Language : English
Pages : 1028
Downloadable : Yes
File Type : PDF
IMAGES PREVIEW OF THE MANUAL:
TABLE OF CONTENTS:
Komatsu WA80M-8E0 Wheel Loader Shop Manual VENBM08001 – PDF DOWNLOAD
- Model: Serial number:
WA80M-8E0 H81431 and up
VENBM08001 WA80M-8E0 . 1
INDEX AND FOREWORD . 3
ABBREVIATION LIST 4
List of abbreviations used in the text . 4
List of abbreviations used in the circuit diagrams . 9
FOREWORD, SAFETY, BASIC INFORMATION 10
HOW TO READ THE SHOP MANUAL 10
Composition of the shop manual . 10
Symbols 12
Signal word 12
Unit . 12
SAFETY NOTICE FOR OPERATION 13
Safety matters . 13
General precautions 14
Precautions for preparatory work . 15
Precautions during work 15
Precautions for slinging work and making signals . 17
Precautions for using mobile crane . 20
Precautions for using overhead traveling crane . 20
Selecting wire ropes . 21
PRECAUTIONS TO PREVENT FIRE 23
Fire caused by fuel, oil, coolant or window washer fluid . 23
Fire caused by accumulation or attachment of flammable material 23
Fire coming from electric wiring . 23
Fire caused by piping 24
Fire around the machine due to highly heated exhaust gas . 24
Explosion caused by lighting equipment . 24
ACTIONS IF FIRE OCCURS . 25
PRECAUTIONS FOR DISPOSING OF WASTE MATERIALS . 26
ACTIONS TAKEN TO MEET EXHAUST GAS REGULATIONS 27
PRECAUTIONS FOR HANDLING HYDRAULIC EQUIPMENT . 28
Select an appropriate workplace 28
Disassembly and maintenance work in the field 28
Sealing of openings (prevention of flowing out of oil) . 28
Preventing intrusion of foreign materials during refilling . 29
Replacing hydraulic oil while its temperature is high 29
Avoid reusing the hydraulic oil and lubricating oil 29
Flushing operation . 29
Cleaning operation . 30
PRECAUTIONS FOR DISCONNECTION AND CONNECTION OF PIPINGS 31
PRECAUTIONS FOR HANDLING ELECTRICAL EQUIPMENT 42
Defective contact of connectors (defective contact between male and female connectors) . 42
Defective crimping or soldering of connectors 43
Disconnection in wiring 43
Water entering the connector by high-pressure jetting 43
Entry of water, dirt, or dust when disconnecting a connector . 43
Oil, mud, or dust stuck to connector . 44
Select an appropriate workplace 45
Sealing the opening 45
How to clean parts when dirt is stuck 45
Precautions for replacing fuel filter cartridge 45
Select an appropriate workplace 46
Sealing the opening 46
PRACTICAL USE OF KOMTRAX . 47
Merit of using KOMTRAX . 47
How to make a full use of KOMTRAX 48
How to operate KOMTRAX . 48
Disconnecting connectors . 49
Connecting connectors 50
Drying wiring harness 52
Handling controller 53
Method for disconnecting Deutsch connector . 54
Method for connecting Deutsch connector 54
Method for disconnecting slide lock type connector (FRAMATOME-3, FRAMATOME-2) 55
Method for connecting slide lock type connector (FRAMATOME-3, FRAMATOME-2) . 55
Method for disconnecting slide lock type connector (FRAMATOME-24) 55
Method for connecting slide lock type connector (FRAMATOME-24) . 56
Method for disconnecting connector with lock to pull . 57
Method for connecting connector with lock to pull 57
Method for disconnecting connector with lock to push (BOSCH-3) . 58
Method for connecting connector with lock to push (BOSCH-3) 58
Method for disconnecting connector with lock to push (AMP-3) . 59
Method for connecting connector with lock to push (AMP-3) 59
Method for disconnecting connector with lock to push (SUMITOMO-3) 59
Method for connecting connector with lock to push (SUMITOMO-3) . 59
Method for disconnecting connector with lock to push (SUMITOMO-4) 59
Method for connecting connector with lock to push (SUMITOMO-4) . 59
Method for disconnecting connector with housing to rotate 60
Method for connecting connector with housing to rotate . 60
Method for connecting ring terminals and strip fuses to power stud of printed circuit boards . 61
HOW TO READ ELECTRICAL WIRE CODE . 62
TYPE, SYMBOL, AND MATERIAL . 62
COLOR CODES TABLE 63
EXPLANATION OF TERMS FOR MAINTENANCE STANDARD 64
STANDARD DIMENSION AND TOLERANCE . 64
STANDARD CLEARANCE AND STANDARD VALUE 65
STANDARD INTERFERENCE 65
REPAIR LIMIT AND ALLOWABLE VALUE OR ALLOWABLE DIMENSION 65
ALLOWABLE CLEARANCE 66
ALLOWABLE INTERFERENCE . 66
STANDARD TIGHTENING TORQUE TABLE . 67
CONVERSION TABLE . 75
METHOD OF USING THE CONVERSION TABLE . 75
EXAMPLES OF USING THE CONVERSION TABLE TO CONVERT A UNIT FROM MM TO IN . 75
TEMPERATURE 79
SPECIFICATIONS . 81
DIMENSIONS, WEIGHTS AND OPERATING DATA . 82
SPECIFICATIONS . 84
WEIGHT TABLES 85
LUBRICANTS AND OPERATING MEDIUMS . 86
BASIC PROCEDURES OF MAINTENANCE 88
OIL 88
FUEL . 88
COOLANT 89
GREASE . 89
STORING OIL AND FUEL . 89
FILTERS 90
OUTLINE OF ELECTRIC SYSTEM . 90
TIGHTENING TORQUE LIST – METRIC SCREWS AND NUTS 91
STRUCTURE AND FUNCTION . 93
ABBREVIATION LIST 97
List of abbreviations used in the text . 97
List of abbreviations used in the circuit diagrams . 102
ELECTRICAL SYSTEM 103
BOOT-UP SYSTEM . 104
LAYOUT DRAWING OF BOOT-UP SYSTEM . 104
AROUND THE CAB AND FLOOR . 105
BATTERY DISCONNECT SWITCH 106
FUNCTION OF BATTERY DISCONNECT SWITCH 106
PREHEATING SYSTEM 108
FUNCTION OF AUTOMATIC PREHEATING SYSTEM 109
OPERATION OF AUTOMATIC PREHEATING SYSTEM . 109
ENGINE SYSTEM 110
LAYOUT DRAWING OF ENGINE SYSTEM 110
COOLING SYSTEM . 111
LAYOUT DRAWING OF COOLING SYSTEM . 111
SPECIFICATIONS OF COOLING SYSTEM . 112
COOLING FAN CONTROL SYSTEM . 113
FUNCTION OF COOLING FAN CONTROL SYSTEM . 114
COOLING FAN REVERSE ROTATION FUNCTION (Option) . 114
COMPONENT PARTS OF COOLING SYSTEM 115
STRUCTURE OF COOLING FAN MOTOR . 115
CONTROL SYSTEM . 116
AROUND THE CAB AND FLOOR . 117
MACHINE MONITOR SYSTEM . 118
MACHINE MONITOR SYSTEM DIAGRAM . 118
KOMTRAX SYSTEM . 119
KOMTRAX SYSTEM DIAGRAM . 119
FUNCTION OF KOMTRAX SYSTEM . 119
COMPONENT PARTS OF CONTROL SYSTEM 120
MACHINE MONITOR 120
Function of KOMTRAX terminal . 130
HST CONTROLLER . 132
Structure of HST controller 132
Real time monitoring function 132
Self-diagnosis function 132
CAN TERMINATING RESISTOR . 138
Function of CAN terminating resistor . 138
ENGINE CONTROLLER 139
Real time monitoring function 139
Self-diagnosis function 139
ACCELERATOR PEDAL 140
Acceleration signal 140
Idling validation signal . 140
Output Characteristics . 141
HYDRAULIC SYSTEM . 142
Structure of hydraulic tank 143
Specifications of hydraulic tank . 143
Structure of main control valve 145
POWER TRAIN SYSTEM . 147
OPERATION OF POWER TRAIN SYSTEM 148
FUNCTION OF THE CLOSED CIRCUIT SYSTEM 150
SPECIFICATIONS OF THE HST SYSTEM . 150
STRUCTURE OF THE HST SYSTEM 151
20km/h without SpeedControl 151
20km/h or 40km/h with SpeedControl . 152
COMPONENT PARTS OF POWER TRAIN SYSTEM 153
Structure of drive shaft . 153
Function of drive shaft 153
Structure of HST pump 154
Operation of HST pump 156
Components of HST pump . 157
HST motor 161
Structure of transfer box 163
Function of transfer box . 164
Structure of front axle 165
Structure of rear axle . 166
Function of differential . 168
Function of towing system 170
WORK EQUIPMENT SYSTEM 171
Layout of work equipment system 171
WORK EQUIPMENT LOCK SYSTEM . 173
ECSS (Option) 174
Function of ECSS . 174
Operation of ECSS 174
RETURN TO DIG (option) . 175
Structure 175
Function . 175
Main control valve . 176
Emergency lowering . 176
Loader Linkage with quick-coupler 178
STEERING SYSTEM 180
STEERING COLUMN 181
Structure of steering column . 181
General view . 181
PRIORITY VALVE . 184
ORBITROL-VALVE . 185
STEERING RELIEF VALVE 186
BRAKE SYSTEM . 187
LAYOUT DRAWING OF BRAKE SYSTEM . 187
SERVICE BRAKE ASSEMBLY . 188
Inching Function . 188
PARKING BRAKE ASSEMBLY . 190
STRUCTURE OF BRAKE SYSTEM 190
UNDERCARRIAGE AND FRAME 191
Rear axle mount 192
Frame, axle mount and center hinge pin . 193
TIRE . 194
Structure of radial tire . 194
General view . 194
Structure 194
Structure of bias tire . 195
General view . 195
Structure 195
WORK EQUIPMENT . 196
STRUCTURE OF WORK EQUIPMENT 196
STRUCTURE OF BUCKET 197
General view and sectional view 197
CAB AND ITS ATTACHMENTS 198
ROPS FOPS CAB 198
Structure of ROPS FOPS cab . 198
Function of ROPS FOPS cab 199
CAB MOUNT 200
Structure of cab mount . 200
General view . 200
Function of cab mount 200
STANDARD VALUE TABLE . 211
ABBREVIATION LIST 212
List of abbreviations used in the text . 212
List of abbreviations used in the circuit diagrams . 217
STANDARD VALUE TABLE . 218
Standard value table for engine 218
Standard value table for chassis . 219
TEST CERTIFICATE . 221
TESTING AND ADJUSTING 223
ABBREVIATION LIST 227
List of abbreviations used in the text . 227
List of abbreviations used in the circuit diagrams . 233
TEST ENGINE WITH SOFTWARE TOOL . 234
CONNECTION OF A COMPUTER TO THE MACHINE 234
ENGINE AND COOLING SYSTEM 236
TEST ENGINE SPEED 236
Method for testing engine speed 236
Method for testing engine low idle speed . 236
Method for testing engine high idle speed 237
Method for testing engine speed HST stall 238
Method for testing engine speed at hydraulic stall . 239
Method for testing engine speed at full stall (HST stall and hydraulic stall) 240
TEST EXHAUST GAS COLOUR 242
Testing tool for exhaust gas colour 242
TEST AND ADJUST VALVE CLEARANCE 244
METHOD FOR TESTING AND ADJUSTINGVALVE CLEARANCE 245
TEST COMPRESSION PRESSURE 246
METHOD FOR TESTING COMPRESSION PRESSURE 246
Compression pressure inspection procedures . 247
Injector reassembly procedures . 248
TEST ENGINE OIL PRESSURE . 249
METHOD FOR TESTING ENGINE OIL PRESSURE . 249
METHOD FOR BLEEDING AIR FROM FUEL SYSTEM . 250
TEST FUEL CIRCUIT FOR LEAKAGE 251
METHOD FOR TESTING FUEL CIRCUIT FOR LEAKAGE 251
Testing method of fuel circuit for leakage at engine stopped . 251
Testing method of fuel circuit for leakage at engine low idle 252
Testing method of fuel circuit for leakage at engine high idle . 252
HANDLE NO-INJECTION CRANKING OPERATION . 253
TEST DOC AND MUFFLER STACK FOR LOOSENESS AND DAMAGE 254
METHOD FOR TESTING DOC AND MUFFLER STACK FOR LOOSENESS AND DAMAGE 254
TEST INSTALLED CONDITION OF CYLINDER HEADS AND MANIFOLDS . 255
METHOD FOR TESTING INSTALLED CONDITION OF CYLINDER HEADS AND MANIFOLDS . 255
TEST ENGINE PIPING FOR DAMAGE AND LOOSENESS 256
METHOD FOR TESTING ENGINE PIPING FOR DAMAGE AND LOOSENESS 256
TEST AND ADJUST AIR CONDITIONER COMPRESSOR BELT TENSION 257
METHOD FOR CHECKING AIR CONDITIONER COMPRESSOR BELT 257
METHOD FOR ADJUSTING AIR CONDITIONER COMPRESSOR BELT . 258
TEST ALTERNATOR BELT . 259
METHOD FOR TESTING ALTERNATOR BELT . 259
POWER TRAIN 260
TEST AND ADJUST HST PRESSURE CUT OFF . 260
TEST DRIVE SHAFT FOR LOOSENESS, BACKLASH, AND DAMAGE . 262
METHOD FOR TESTING DRIVE SHAFT FOR LOOSENESS, BACKLASH, AND DAMAGE . 262
STEERING SYSTEM 263
Operating time for steering wheel 263
Operating force of steering wheel 264
TEST AND ADJUST STEERING CIRCUIT OIL PRESSURE 265
METHOD FOR TESTING STEERING CIRCUIT OIL PRESSURE . 266
METHOD FOR ADJUSTING STEERING CIRCUIT OIL PRESSURE . 267
BLEED AIR FROM STEERING CYLINDER CIRCUIT . 268
METHOD FOR BLEEDING AIR FROM STEERING CYLINDER CIRCUIT . 268
BLEED AIR FROM BRAKE CIRCUIT . 269
TEST BRAKING PERFORMANCE . 271
MEASURING THE STOPPING DISTANCE 271
TEST AND ADJUST BRAKE PEDAL 272
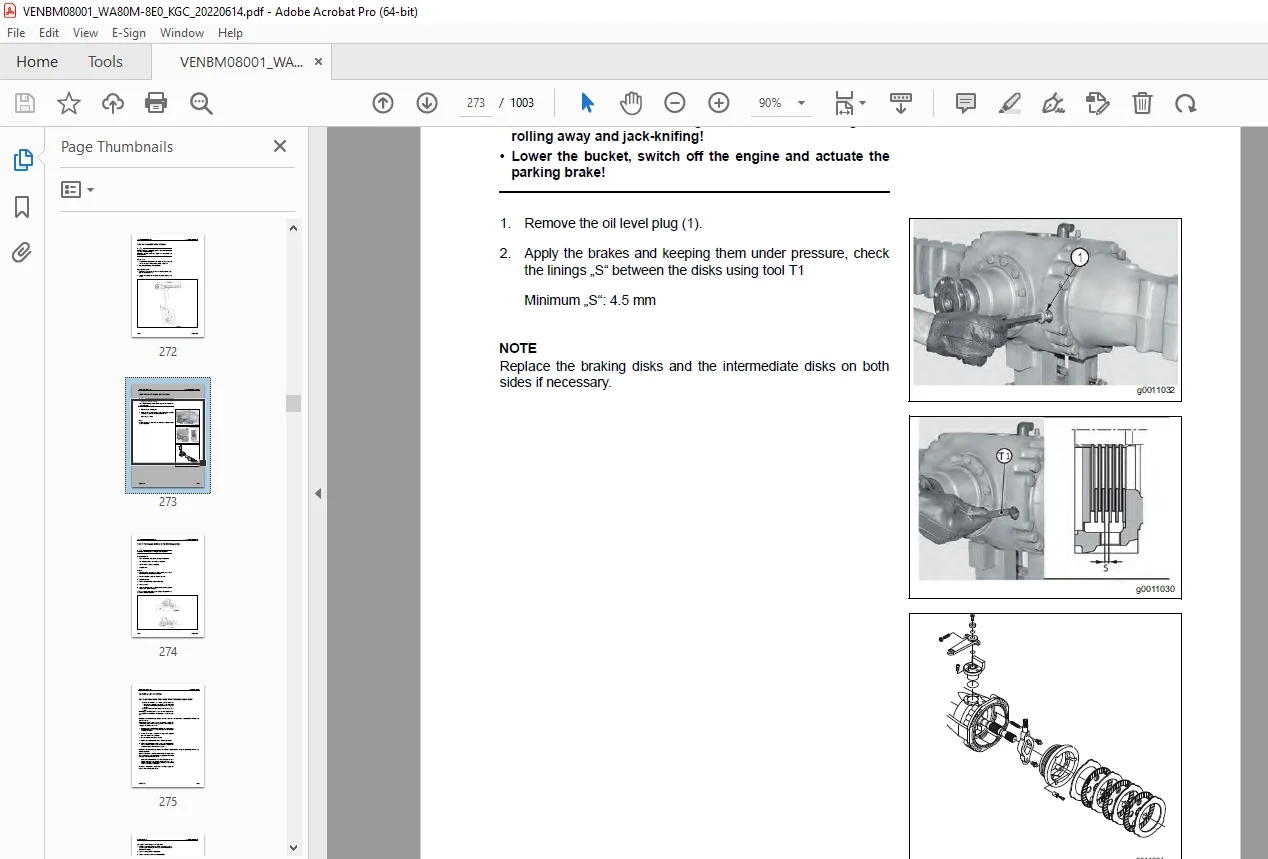
TEST WEAR OF WHEEL BRAKE DISC 273
TEST PARKING BRAKE PERFORMANCE . 274
HYDRAULIC SYSTEM . 275
Release the remaining pressure from small accumulator for gear switching and safety valves (option) 275
Releasing the remaining pressure in ECSS . 277
TEST AND ADJUST WORK EQUIPMENT PRESSURE 278
TEST BOOST PRESSURE 279
TESTING AND ADJUSTING COOLING FAN SPEED 280
TEST ECSS ACCUMULATOR NITROGEN GAS PRESSURE 282
METHOD FOR TESTING THE ECSS ACCUMULATOR NITROGEN GAS PRESSURE 283
METHOD FOR CHARGING THE ECSS ACCUMULATOR WITH NITROGEN GAS . 284
ELECTRICAL SYSTEM 286
SET AND ADJUST EACH EQUIPMENT 286
SET AND OPERATE MACHINE MONITOR 287
Switch panel . 287
Operator mode and service mode of machine monitor 288
OPERATOR MODE 290
Setting usage limitation (password) 290
Change password 291
SERVICE MODE . 293
METHOD FOR OPERATING SERVICE MODE 293
Table of self-define monitoring 296
ABNORMALITY RECORD MENU 305
DEFAULT MENU . 316
METHOD FOR SETTING WITH DEFAULT SETTING MENU (OPTION SELECTION) 318
ADJUSTMENT MENU 321
METHOD FOR ADJUSTING WITH ADJUSTMENT MENU (T/C DEVICE CALIBRATION) . 321
HANDLE BATTERY DISCONNECT SWITCH . 324
TEST DIODES 326
TROUBLESHOOTING 329
ABBREVIATION LIST 333
List of abbreviations used in the text . 333
List of abbreviations used in the circuit diagrams . 339
RELATED INFORMATION ON TROUBLESHOOTING . 340
GENERAL TROUBLESHOOTING POINTS . 340
SEQUENCE OF EVENTS IN TROUBLESHOOTING 342
CHECKS BEFORE TROUBLESHOOTING 344
Engine, lubricating oil and coolant 344
Hydraulic and mechanical equipment . 344
Electric equipment . 345
Exterior . 345
Interior . 345
INSPECTION PROCEDURE BEFORE TROUBLESHOOTING 346
WALK-AROUND CHECK 346
PROCEDURE FOR TESTING AND TROUBLESHOOTING 348
INFORMATION DESCRIBED IN TROUBLESHOOTING TABLE . 349
CONNECTOR LOCATION LIST 351
CONNECTOR CONTACT IDENTIFICATION . 360
SPARE FUSES AND RELAY 397
USB socket on central electric board (CEB) . 402
FAILURE CODES TABLE 405
TROUBLESHOOTING BY FAILURE CODE (DISPLAY OF HST-CONTROLLER CODE) . 423
POWER ON . 424
8.2.1 Documentation of Power On (PwrOn) 424
8.2.1 – 2 Interface 424
8.2.1 – 3 Description 425
8.2.1 – 3.3 State 2: Check sensor supply voltages 428
8.2.1 – 3.4 State 3: Check hardware monitoring errors 428
8.2.1 – 3.5 State 4: Check first application specific start condition 428
8.2.1 – 3.6 State 5: Check central switch 428
8.2.1 – 3.7 State 6: Configure safouts . 429
8.2.1 – 3.8 State 7: Check safouts . 429
8.2.1 – 3.9 State 8: Check diesel engine speed . 429
8.2.1 – 3.10 State 9: Enable sensor supply monitoring 430
8.2.1 – 3.11 State 10: Check hardware monitoring errors 430
8.2.1 – 3.12 State 11: Check second applications specific start condition 430
8.2.1 – 3.12 State 11: Check second applications specific start condition 430
8.2.1 – 3.13 State 12: Run . 430
8.2.1 – 3.14 Diagnosis Configuration Notes . 431
8.2.1 – 4 Input Signals 431
8.2.1 – 5 Parameters . 432
8.2.1 – 6 Output Signals . 432
8.2.1 – 7 Error Information 432
Abbreviations for Failure Code (HST-controller) 434
FAILURE CODE (#R0CIB) 435
FAILURE CODE (#R0CKB) 436
FAILURE CODE (#R0CLB) 437
FAILURE CODE (#R0CMB) 438
FAILURE CODE (#R0CPV) 439
FAILURE CODE (#R0CQB) 440
FAILURE CODE (#R0CRB) 441
FAILURE CODE (#R0CSB) 442
FAILURE CODE (#R0CTB) 443
FAILURE CODE (#R0CWB) 444
FAILURE CODE (#R0JLB) 445
FAILURE CODE (#R0JMB) 446
FAILURE CODE (#R0JNB) 447
FAILURE CODE (#R0JOB) 448
FAILURE CODE (#R0JPB) 449
FAILURE CODE (#R0QR2) 450
FAILURE CODE (#R0QS2) 451
FAILURE CODE (#R0QT4) 452
FAILURE CODE (#R0QU3) 453
FAILURE CODE (#R0QV4) 454
FAILURE CODE (#R0QY4) 455
FAILURE CODE (#R0QZ4) 456
FAILURE CODE (#R0R0V) 457
FAILURE CODE (#R0R1V) 458
FAILURE CODE (#R0SHV) 459
FAILURE CODE (#R0SJV) 460
FAILURE CODE (#R0SLV) 461
FAILURE CODE (#R0XU2) 462
FAILURE CODE (#R0XU3) 463
FAILURE CODE (#R0XU4) 464
FAILURE CODE (#R0XUB) 465
FAILURE CODE (#R0XV2) 466
FAILURE CODE (#R0XV3) 467
FAILURE CODE (#R0XV4) 468
FAILURE CODE (#R0XVB) 469
FAILURE CODE (#R0XW2) 470
FAILURE CODE (#R0XW3) 471
FAILURE CODE (#R0XW4) 472
FAILURE CODE (#R0XWB) 473
FAILURE CODE (#R14W2) 474
FAILURE CODE (#R14WB) 475
FAILURE CODE (#R14X2) 476
FAILURE CODE (#R14XB) 477
FAILURE CODE (#R14Y2) 478
FAILURE CODE (#R14YB) 479
FAILURE CODE (#R14Z2) 480
FAILURE CODE (#R14ZB) 481
FAILURE CODE (#R1502) 482
FAILURE CODE (#R1504) 483
FAILURE CODE (#R150B) 484
FAILURE CODE (#R1512) 485
FAILURE CODE (#R151B) 486
FAILURE CODE (#R15C2) 487
FAILURE CODE (#R15C3) 488
FAILURE CODE (#R15C4) 489
FAILURE CODE (#R15CB) 490
FAILURE CODE (#R15CV) 491
FAILURE CODE (#R1KWJ) 492
FAILURE CODE (#R1KWV) 493
FAILURE CODE (#R1L0B) 494
FAILURE CODE (#R1L2B) 495
FAILURE CODE (#R1L4V) 496
FAILURE CODE (#R1QB2) 497
FAILURE CODE (#R1QBB) 498
FAILURE CODE (#R1QBV) 499
FAILURE CODE (#R1QD2) 500
FAILURE CODE (#R1QDB) 501
FAILURE CODE (#R1QE2) 502
FAILURE CODE (#R1QEB) 503
FAILURE CODE (#R1QEV) 504
FAILURE CODE (#R1XEB) 505
FAILURE CODE (#R1XFB) 506
FAILURE CODE (#R1XG2) 507
FAILURE CODE (#R1XGB) 508
FAILURE CODE (#R1XJB) 509
FAILURE CODE (#R20XB) 510
FAILURE CODE (#R20YB) 511
FAILURE CODE (#R268B) 512
FAILURE CODE (#R2693) 513
FAILURE CODE (#R2694) 514
FAILURE CODE (#R2695) 515
FAILURE CODE (#R269B) 516
FAILURE CODE (#R26AB) 517
FAILURE CODE (#R26B3) 518
FAILURE CODE (#R26B4) 519
FAILURE CODE (#R26B5) 520
FAILURE CODE (#R26BB) 521
FAILURE CODE (#R26OB) 522
FAILURE CODE (#R26P3) 523
FAILURE CODE (#R26P4) 524
FAILURE CODE (#R26P5) 525
FAILURE CODE (#R26PB) 526
FAILURE CODE (#R280B) 527
FAILURE CODE (#R2813) 528
FAILURE CODE (#R2814) 529
FAILURE CODE (#R2815) 530
FAILURE CODE (#R281B) 531
FAILURE CODE (#R2BKB) 532
FAILURE CODE (#R2BLB) 533
FAILURE CODE (#R2J92) 534
FAILURE CODE (#R2J9V) 535
FAILURE CODE (#R2JK2) 536
FAILURE CODE (#R2JK9) 537
FAILURE CODE (#R2JKB) 538
FAILURE CODE (#R2JL2) 539
FAILURE CODE (#R2JL9) 540
FAILURE CODE (#R2JLB) 541
FAILURE CODE (#R2JM2) 542
FAILURE CODE (#R2JM9) 543
FAILURE CODE (#R2JMB) 544
FAILURE CODE (#R2JN2) 545
FAILURE CODE (#R2JN9) 546
FAILURE CODE (#R2JNB) 547
FAILURE CODE (#R2JO2) 548
FAILURE CODE (#R2JO9) 549
FAILURE CODE (#R2JOB) 550
FAILURE CODE (#R2JP2) 551
FAILURE CODE (#R2JP9) 552
FAILURE CODE (#R2JPB) 553
FAILURE CODE (#R2JR2) 554
FAILURE CODE (#R2JR9) 555
FAILURE CODE (#R2JRB) 556
FAILURE CODE (#R2JS2) 557
FAILURE CODE (#R2JS9) 558
FAILURE CODE (#R2JSB) 559
FAILURE CODE (#R2JT2) 560
FAILURE CODE (#R2JT9) 561
FAILURE CODE (#R2JTB) 562
FAILURE CODE (#R2JU2) 563
FAILURE CODE (#R2JU9) 564
FAILURE CODE (#R2JUB) 565
TROUBLESHOOTING OF ELECTRICAL SYSTEM (E- MODE) . 566
TROUBLESHOOTING FOR HYDRAULIC AND MECHANICAL SYSTEMS (H MODE) 584
TROUBLESHOOTING OF ENGINE (S-MODE) . 593
S-4 ENGINE STARTABILITY IS POOR 597
S-9 EXHAUST SMOKE IS BLACK . 605
S-12 FUEL CONSUMPTION IS EXCESSIVE . 609
S-14 OIL PRESSURE DROPS 611
S-18 UNUSUAL NOISE IS HEARD 615
S-19 VIBRATION IS EXCESSIVE 616
DISASSEMBLY AND ASSEMBLY . 619
ABBREVIATION LIST 621
List of abbreviations used in the text . 621
RELATED INFORMATION ON DISASSEMBLY AND ASSEMBLY 626
HOW TO READ THIS MANUAL 626
Reading the work procedures 626
Reading the symbols 626
Reading the signal word 627
Reading the unit . 627
COATING MATERIALS LIST . 628
Adhesive . 628
Liquid gasket 629
Molybdenum disulfide lubricant . 629
Seizure prevention compound 630
Grease . 630
Primer . 631
Adhesive . 631
Caulking material 631
ENGINE AND COOLING SYSTEM 632
REMOVE AND INSTALL SUPPLY PUMP ASSEMBLY 632
Removal of supply pump assembly 632
Reassembly of supply pump 634
REMOVE AND INSTALL INJECTOR ASSEMBLY . 636
Removal of injector 636
Reassembly of injector . 637
REMOVE AND INSTALL CYLINDER HEAD ASSEMBLY 639
Remove cylinder head assembly 640
Install the cylinder head 643
REMOVE AND INSTALL EGR VALVE ASSEMBLY 649
Remove the EGR cooler assembly . 649
Remove the EGR valve . 650
REMOVE AND INSTALL STARTING MOTOR ASSEMBLY . 651
Removal of Starter Motor . 651
Disassembly of Starter Motor . 651
Reassembly of Starter Motor 654
Install the Starter Motor 655
REMOVE AND INSTALL AIR CONDITIONER COMPRESSOR BELT . 656
METHOD FOR REMOVING AIR CONDITIONER COMPRESSOR BELT 656
METHOD FOR INSTALLING AIR CONDITIONER COMPRESSOR BELT 657
REMOVE AND INSTALL ALTERNATOR BELT . 658
REMOVE AND INSTALL ALTERNATOR ASSEMBLY . 660
Remove the alternator assembly . 660
Install alternator assembly 661
REMOVE AND INSTALL COOLING FAN AND FAN MOTOR ASSEMBLY 662
Removal of fan assembly 662
Installation of fan assembly . 663
REMOVE AND INSTALL RADIATOR AND HYDRAULIC TANK ASSEMBLY 663
Removal of radiator and hydraulic tank assembly 663
Installation of radiator and hydraulic tank assembly . 666
REMOVE AND INSTALL ENGINE ASSEMBLY . 667
Remove engine assembly . 667
INSTALLATION OF ENGINE ASSEMBLY 671
REMOVE AND INSTALL ENGINE FRONT OIL SEAL . 672
REMOVE AND INSTALL ENGINE HOOD ASSEMBLY 673
Removal of engine hood assembly consisting of plastic and steel hood . 673
Removal of steel hood 673
Installation of steel hood . 674
Removal of engine hood assembly 674
Installation of engine hood assembly . 675
REMOVE AND INSTALL AFTERTREATMENT DEVICE . 676
METHOD FOR REMOVING AFTER TREATMENT DEVICE ASSEMBLY 677
REMOVE AND INSTALL FUEL TANK ASSEMBLY 679
Remove the fuel tank . 679
Installation of fuel tank 680
Fuelling fuel tank . 680
REMOVE AND INSTALL AIR CLEANER ASSEMBLY 681
Removal of air cleaner assembly 681
Installation of air cleaner assembly . 682
REMOVE AND INSTALL AIR CONDITIONER COMPRESSOR ASSEMBLY . 682
Removal of air conditioner compressor assembly . 683
Installation of air compressor assembly 683
REMOVE AND INSTALL AIR CONDITIONER CONDENSER ASSEMBLY 684
Remove air conditioner condenser assembly 685
Installation of air conditioner condenser assembly . 686
POWER TRAIN 688
PUMP FOR STEERING, WORK EQUIPMENT, COOLING FAN . 688
Removal of the pump for steering, work equipment and cooling fan . 688
Installation of hydraulic pump assembly 688
ARTICULATED JOINT ASSEMBLY . 689
Removal of articulation joint assembly . 689
Installation of articulation joint assembly 689
HST MOTOR ASSEMBLY . 690
Removal of HST motor assembly 690
Installation of variable motor assembly 691
HST PUMP ASSEMBLY 692
Removal of HST pump assembly . 692
Installation of variable motor assembly 693
GEARBOX (TRANSFER ASSEMBLY) 694
PRECAUTIONS FOR ASSEMBLY AND DISASSEMBLY . 694
Safety precautions . 694
HYDRAULIC GEAR CONTROL . 695
Exploded view 695
Disassembly 696
Assembly . 699
HYDRAULIC GEAR CONTROL (CONTACTLESS SENSOR) 704
Exploded view 704
Disassembly 705
Assembly . 709
COUNTER-REVOLUTION SENSOR 715
Replacement 715
SHORT FLANGED REDUCTION GEAR . 716
Exploded view 716
Disassembly 717
Assembly . 725
GEARBOX INSTALLATION . 738
Disassembly 738
INTEGRATED GEAR BOX 741
Disassembly 742
Assembly . 746
Special Tool . 750
REAR AXLE ASSEMBLY . 751
Removal of rear axle assembly 751
Installation of rear axle assembly . 753
PRECAUTIONS FOR ASSEMBLY AND DISASSEMBLY OF AXLE COMPONENTS 754
Safety precautions . 754
PLANETARY REDUCTION AND AXLE SHAFT . 755
Exploded view 755
Disassembly 756
Assembly . 760
Special Tools 764
RING AND PINION ADJUSTING: STEP FOR PRELOADED DIFFERENTIAL . 766
Exploded view 766
Install and adjust . 767
DIFFERENTIAL WITH BLOCK TO SPHERES 100% 770
Exploded view 770
Disassembly 771
Assembly . 774
LIMITED SLIP DIFFERENTIAL UNIT 45% . 777
Exploded view 777
Disassembly 778
Assembly . 780
FRONT AXLE ASSEMBLY 783
Removal of front axle assembly . 783
Installation of front axle assembly 784
PRECAUTIONS FOR ASSEMBLY AND DISASSEMBLY OF AXLE COMPONENTS 785
Safety precautions . 785
CHECKING WEAR AND REPLACING THE BRAKING DISCS 786
Exploded view 786
Disassembly 787
Assembly . 789
Special tools 791
DISASSEMBLY AND ASSEMBLY AXLE HOUSING ASSEMBLY . 792
PLANETARY REDUCTION AND AXLE SHAFT . 792
Exploded view 792
Disassembly 793
Assembly . 797
Special tools 801
DISASSEMBLY AND ASSEMBLY DIFFERENTIAL ASSEMBLY . 804
Differential unit 804
Exploded view 804
Disassembly 805
Assembly . 807
Special tools 809
MANUAL EMERGENCY RELEASE . 810
Exploded view 810
Release 811
Adjustment . 812
MECHANICAL PARKING BRAKE . 813
Exploded view 813
Disassembly 814
Assembly . 816
NORMAL DIFFERENTIAL UNIT . 818
Exploded view 818
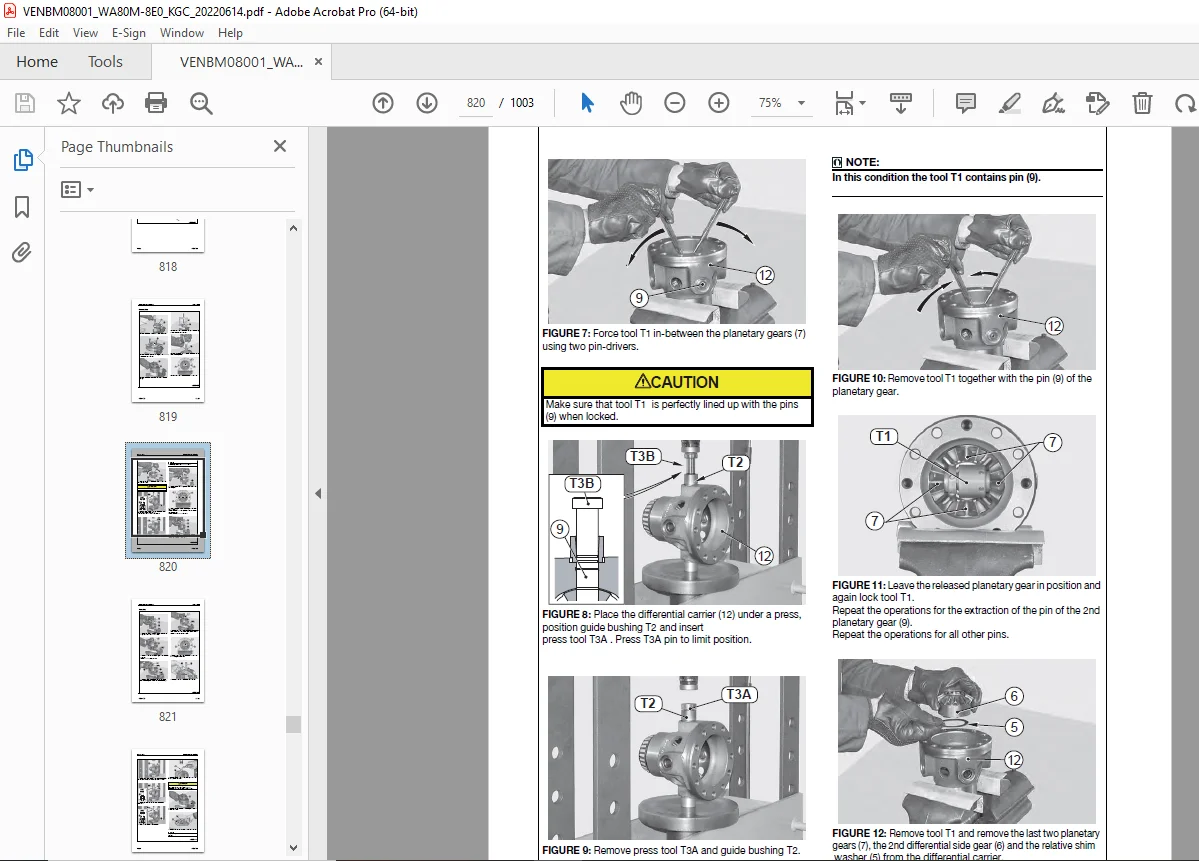
Disassembly 819
Assembly . 821
Special tools 824
LIMITED SLIP DIFFERENTIAL UNIT (25% AND 45%) . 827
Exploded view 827
Disassembly 828
Assembly . 831
Special tools 834
HYDRAULIC DIFFERENTIAL LOCK 837
Exploded view 837
Disassembly 838
Assembly . 841
Special tools 843
UNDERCARRIAGE AND FRAME 844
REMOVAL AND INSTALLATION OF COUNTERWEIGHTASSEMBLY 844
Removal of counterweight assembly 844
Installation of counterweight assembly . 844
HYDRAULIC SYSTEM . 845
REMOVE AND INSTALL LIFT CYLINDER ASSEMBLY 845
Remove lift cylinder assembly 845
Removal of lift cylinder assembly 845
Install lift cylinder assembly . 846
REMOVE AND INSTALL DUMP CYLINDER ASSEMBLY 846
Remove dumb cylinder assembly 846
Remove dump cylinder assembly 846
Installation of dump cylinder assembly . 847
REMOVE AND INSTALL STEERING CYLINDER ASSEMBLY 847
Remove steering cylinder assembly 848
Remove steering cylinder assembly 848
Install steering cylinder assembly . 848
WORK EQUIPMENT SYSTEM 849
REMOVE AND INSTALL MAIN VALVE ASSEMBLY . 849
Removal of main control valve assembly . 849
Installation of main control valve assembly 852
Removal of multifunction lever . 853
REMOVE AND INSTALL QUICK COUPLER ASSEMBLY 854
Remove quick coupler assembly 854
Install quick coupler assembly . 855
CAB AND ITS ATTACHMENTS 856
REMOVE AND INSTALL OPERATOR‘S CAB GLASS (ADHERED GLASS) 856
Preparation work for replacing the front window pane . 857
Preparation work for replacing the rear window pane 857
Preparation work for replacing the door window pane 858
Left door assembly . 858
Right door assembly 858
Remove operator’s cab glass (adhered glass) 858
Install operator’s cab glass (adhered glass) . 860
REMOVE AND INSTALL AIR CONDITIONER UNIT ASSEMBLY . 862
Remove air conditioner unit assembly . 863
Install heater unit assembly . 865
REMOVE AND INSTALL OPERATOR‘S SEAT ASSEMBLY 865
Remove operator‘s seat assembly (STD) 865
Install operator‘s seat assembly (STD) . 866
Remove operator‘s seat assembly (air suspension, heatable) . 866
Install operator‘s seat assembly (air suspension, heatable) 867
REMOVE AND INSTALL SEAT BELT . 868
Remove seat belt on STD seat . 868
Install seat belt on STD seat 869
Remove seat belt on suspension, heatable seat 869
Install seat belt on suspension, heatable seat . 870
ELECTRICAL SYSTEM 871
REMOVE AND INSTALL ENGINE CONTROLLER ASSEMBLY 871
Method for removing engine controller assembly . 872
REMOVE AND INSTALL HST CONTROLLER ASSEMBLY . 874
Method for removing the cover of the console . 874
REMOVE AND INSTALL MACHINE MONITOR ASSEMBLY 875
Method for removing machine monitor assembly . 875
Method for installing machine monitor assembly . 878
REMOVE AND INSTALL CENTRAL ELECTRIC BOARD (CEB) 879
Remove the cover of the console 879
Remove central electric board (CEB) 880
Remove I/O controller 64P 880
Remove differential lock relay . 880
Install differential lock rely . 880
Install I/O controller 64P . 881
Install central electric boar (CEB) 881
Installation of the cover of the console . 882
REMOVE AND INSTALL RELAYBOX 884
Remove relaybox 884
Remove battery relay . 885
Remove the grommet frame from cables . 885
Install the battery relay 886
Install the grommet frame to cables 886
Install relay box 887
MAINTENANCE STANDARD . 889
ABBREVIATION LIST 891
List of abbreviations used in the text . 891
List of abbreviations used in the circuit diagrams . 896
ENGINE AND COOLING . 897
MAINTENANCE STANDARD OF ENGINE MOUNT . 897
MAINTENANCE STANDARD OF DAMPER . 898
MAINTENANCE STANDARD OF COOLING FAN MOTOR 899
HYDRAULIC SYSTEM . 900
CAB AND ITS ATTACHMENTS 904
Cabin – adjustment . 904
APPENDIX . 905
ABBREVIATION LIST 907
List of abbreviations used in the text . 907
List of abbreviations used in the circuit diagrams . 912
AIR CONDITIONER SYSTEM . 913
PRECAUTIONS FOR REFRIGERANT 913
AIR CONDITIONER COMPONENT 914
Specifications of air conditioner 914
CONFIGURATION AND FUNCTION OF REFRIGERATION CYCLE 915
OUTLINE OF REFRIGERATION CYCLE . 916
Compression (Compressor) . 916
Condensation (Condenser) . 916
Expansion (Expansion valve) 916
Evaporation (Evaporator) . 917
Relation between refrigerant and cooling trouble . 917
AIR CONDITIONER TROUBLESHOOTING CHART 919
Cooling trouble 919
Heating trouble 919
CONNECTION OF SERVICE TOOL . 920
METHOD FOR CONNECTING SERVICE TOOL . 921
PRECAUTIONS FOR DISCONNECTING AND CONNECTING HOSES AND TUBES IN AIR CONDITIONER PIPINGS 922
Precautions for disconnection 922
Precautions for connection . 923
HANDLE COMPRESSOR OIL 924
Management of compressor oil (SANDEN: SP-10 for use with R134a) 924
Filling of compressor oil 924
The quantity of compressor oil when the compressor is replaced . 925
OTHER 927
HYDRAULIC CIRCUIT DIAGRAM 931
WIRING DIAGRAMS 934
Contents . 934
1-0 SYMBOLS SUMMARY, ABBREVIATIONS . 935
1-1 HARNESS ARRANGEMENT DETAILS, JOYSTICK BUTTONS 936
1-2 CAN BUS SUMMARY 937
2-0 POWER SUPPLY, STARTER SWITCH . 938
2-1 GROUNDING 939
2-2 RELAYB., STARTER, ALTERN., BATTERY, GLOW PLUG 940
2-3 MAIN ENGINE (EGR) RELAYS . 941
3-0 AFTERTREATMENT SYS., DPF SENS., OIL PRESS., TRAVEL PED . 942
3-1 ECU, ENGINE SENSORS 943
3-2 INJECTOR, FUEL PUMP, AIR CLEANER, WATER SEPA . 944
4-0 MONITOR, I/O CONTROLLER64P, BUZZER . 945
4-1 KOMTRAX CTRL, SERVICE CONNECTOR 946
4-2 FLUID-SENSORS (OIL, FUEL, COOLANT), SPEED SENS . 947
5-0 SEC. ENG. STOP, IMMOBILIZER, DRIVING FUNCT . 948
5-1 HST CONTROLLER . 949
5-2 HST CONTROLLER INPUTS 950
5-3 CREEP 951
6-0 FAN DRIVE, REVERSE FAN . 952
7-0 AIR CONDITIONER, OPERATOR’S SEATI 953
7-1 WASHER, WIPER, REAR WINDOW HEATER, HORN 954
8-0 LIGHTING FRONT . 955
8-1 FLASHER 956
8-2 REAR LIGHT, LICENSE PL., BACKUP AL., REAR FLASH 957
8-3 WORK LAMPS . 958
8-4 INTERIOR LAMP, ROTATING BEACON, PLUG BOX . 959
9-0 DRIVING RANGE, ECSS, OVER CENTER V., AUTO INCH . 960
9-1 RETURN TO DIG, QUICK COUPLER, DIFF LOCK 961
9-2 RADIO, BLANK OPT., DPF REGEN. SW, MAINT. SW 962
W1 WIRING HARNESS LIST . 963
W2 CONNECTOR LIST 1 964
W2 CONNECTOR LIST 2 965
W2 CONNECTOR LIST 3 966
W2 CONNECTOR LIST 4 967
W2 CONNECTOR LIST 5 968
W3 PIN LOCATION LIST 1 . 969
W3 PIN LOCATION LIST 2 . 970
W3 PIN LOCATION LIST 3 . 971
W3 PIN LOCATION LIST 4 . 972
W3 PIN LOCATION LIST 5 . 973
W3 PIN LOCATION LIST 6 . 974
W3 PIN LOCATION LIST 7 . 975
W3 PIN LOCATION LIST 8 . 976
W3 PIN LOCATION LIST 9 . 977
W3 PIN LOCATION LIST 10 978
W3 PIN LOCATION LIST 11 979
W3 PIN LOCATION LIST 12 980
W3 PIN LOCATION LIST 13 981
W3 PIN LOCATION LIST 14 982
W3 PIN LOCATION LIST 15 983
W3 PIN LOCATION LIST 16 984
W3 PIN LOCATION LIST 17 985
W3 PIN LOCATION LIST 18 986
W3 PIN LOCATION LIST 19 987
W3 PIN LOCATION LIST 20 988
W3 PIN LOCATION LIST 21 989
W3 PIN LOCATION LIST 22 990
W3 PIN LOCATION LIST 23 991
W3 PIN LOCATION LIST 24 992
W3 PIN LOCATION LIST 25 993
W3 PIN LOCATION LIST 26 994
W3 PIN LOCATION LIST 27 995
W3 PIN LOCATION LIST 28 996
W4 PARTS LIST 1 997
W4 PARTS LIST 2 998
W4 PARTS LIST 3 999
Connector diagram 1000
Connector diagram 1 1000
Connector diagram 2 1001
Connector diagram 3 1002
Connector table for the operator‘s cab wiring harness (Part 1/2) .1002
Connector diagram 4 1003
Connector table for operator‘s cab wiring harness (Part 2/2) .1003
DESCRIPTION:
Komatsu WA80M-8E0 Wheel Loader Shop Manual VENBM08001 – PDF DOWNLOAD
- Model: Serial number:
WA80M-8E0 H81431 and up
G.B 27/12/24