Trusted Business
Verified & Licensed
Virus Free Files
100% Safe Downloads
Secure Payment
SSL Protected
Instant Delivery
Available Immediately
Sale!


Komatsu Wheel Loader WA85-3 Operation & Maintenance Manual SN HA960051 and up – PDF DOWNLOAD
Original price was: $35.95.$15.95Current price is: $15.95.
Komatsu Wheel Loader WA85-3 Operation & Maintenance Manual
Book Code: VEAM960200
SERIAL NUMBER: HA960051 and up
Instant PDF Download
Available immediately
Save to Your Device
Download & keep forever
Antivirus Scanned
100% virus-free
Trusted Worldwide
175,000+ customers
Description
Komatsu Wheel Loader WA85-3 Operation & Maintenance Manual
DESCRIPTION:
Komatsu Wheel Loader WA85-3 Operation & Maintenance Manual
FOREWORD:
- This manual describes procedures for operation, handling, lubrication, maintenance, checking, and adjustment. It will help the operator and maintenance personnel realize peak performance through effective, economical and safe machine operation and maintenance.
- Keep this manual handy and have all personnel read it periodically. If this manual is lost or becomes dirty and can not be read, request a replacement manual from your local distributor. If you sell the machine, be sure to give this manual to the new owner.
- Continuing improvements in the design of this machine can lead to changes in detail, which may not be reflected in this manual. Consult your local distributor or Komatsu America International Company for the latest available information on your machine or for questions regarding information in this manual.
KOMATSU WHEEL LOADER WA85-3 OPERATION & MAINTENANCE MANUAL SN HA960051 AND UP – PDF DOWNLOAD:
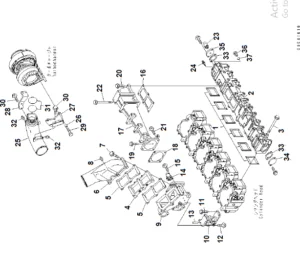
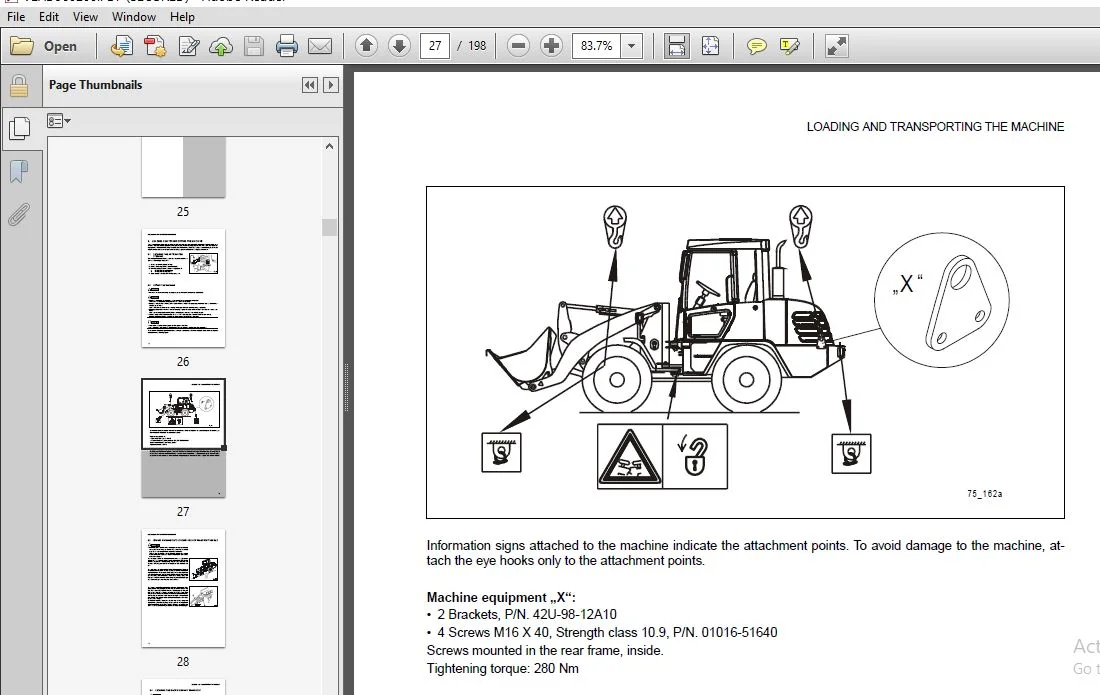
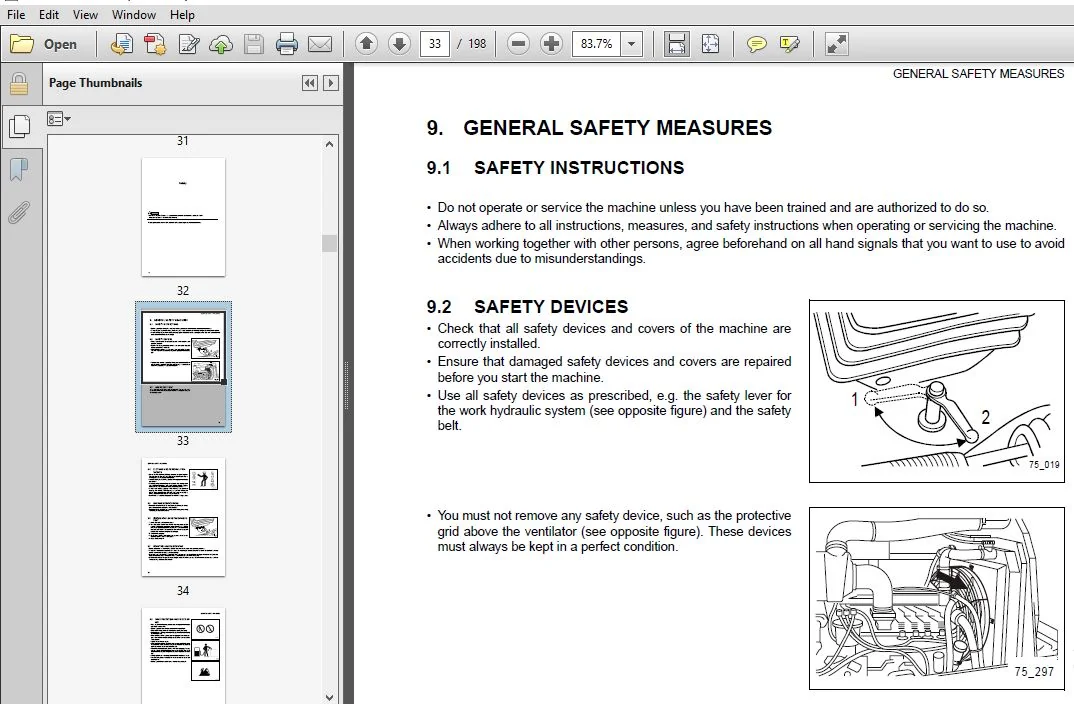
IMAGES PREVIEW OF THE MANUAL:
TABLE OF CONTENTS:
Komatsu Wheel Loader WA85-3 Operation & Maintenance Manual
MAIN MENU............................................................................................................... 0 COVER................................................................................................................... 1 Table of Contents....................................................................................................... 7 Introduction............................................................................................................ 15 1. Forword.......................................................................................................... 16 2. Safety Information............................................................................................... 17 3. Introduction..................................................................................................... 18 3.1 Features.................................................................................................... 18 3.2 Breaking in a New Machine................................................................................... 18 4. Location of Plates, Table to Enter Serial No. and Distributor.................................................... 19 4.1 Machine Serial No. Plate position........................................................................... 19 4.2 Engine Serial No. Plate Position............................................................................ 19 4.3 Table to Enter Serial No. and Distributor................................................................... 19 5. Why You Should Read these Operating Instructions................................................................. 20 6. Notes on Safety Regulations...................................................................................... 21 6.1 Correct Use................................................................................................. 21 6.2 Safety Notes in the Operating Instructions.................................................................. 21 7. Equipment........................................................................................................ 22 Loading and Transporting the Machine.................................................................................... 25 8. Loading and Transporting the Machine............................................................................. 26 8.1 Securing the Articulated Steering........................................................................... 26 8.2 Lifting the Machine......................................................................................... 26 8.3 Driving Machine Onto Loading Area of Transport Vehicle...................................................... 28 8.4 Securing the Machine During Transport....................................................................... 29 8.5 After Transport............................................................................................. 29 Safety.................................................................................................................. 31 9. General Safety Measures.......................................................................................... 33 9.1 Safety Instructions......................................................................................... 33 9.2 Safety Devices.............................................................................................. 33 9.3 Emergency Exit.............................................................................................. 33 9.4 Clothing and Personal Protection............................................................................ 34 9.5 Machine Modifications....................................................................................... 34 9.6 Before You Leave the Driver's Seat.......................................................................... 34 9.7 Mounting and Dismounting.................................................................................... 34 9.8 Fire Prevention and Fire Fighting........................................................................... 35 9.8.1 Fire Extinguisher and First-Aid Kit................................................................... 36 9.9 Protection Against Asbestos Dust............................................................................ 36 9.10 Protection Against Injuries................................................................................ 37 9.11 Working at High Temperatures............................................................................... 37 9.12 Roll-Over Protection System (ROPS)......................................................................... 38 9.13 Attachment for Protection Against Falling Objects (FOPS)................................................... 38 9.14 Attachments................................................................................................ 38 9.15 Battery.................................................................................................... 39 10. Safety Measures during Operation................................................................................ 40 10.1 Before You Start the Engine................................................................................ 40 10.1.1 Workplace Safety..................................................................................... 40 10.1.2 In the Driver's Cab.................................................................................. 40 10.1.3 In-Door Operation.................................................................................... 41 10.1.4 Gas, Dust, and Inflammable Vapours................................................................... 41 10.1.5 Mirrors, Windows, and Lighting....................................................................... 41 10.2 Machine Operation.......................................................................................... 42 10.2.1 Before You Start the Engine.......................................................................... 42 10.2.2 Reversing............................................................................................ 42 10.2.3 Driving.............................................................................................. 43 10.2.4 Driving On Slopes.................................................................................... 43 10.2.5 Emergency Lowering System............................................................................ 44 10.2.6 Working Close to Overhead Power Transmission Lines................................................... 44 1 - Do not leave the driver's cab. The driver's cab is a "Faraday cage" protecting you from elect....... 45 2 - Warn other persons and tell them to stay far away from both the power line and your machine......... 45 3 - Try to move the machine out of the range of influence of the overhead power transmission line....... 45 4 - Have the power in the line switched off............................................................. 45 10.2.7 Loading.............................................................................................. 45 1 - First, dump a heap of earth in front of the hill.................................................... 45 2 - Fill the bucket with earth again and drive the machine into the heap of earth. Dump the bucke....... 45 10.2.8 Good Vision.......................................................................................... 45 10.2.9 Working On Snow...................................................................................... 45 10.2.10 Height Limitation................................................................................... 45 10.2.11 Brakes.............................................................................................. 46 10.2.12 Working On Loose Soil............................................................................... 46 10.2.13 Working with the Forklift Truck Attachment.......................................................... 47 10.2.14 Parking the Machine................................................................................. 48 10.3 Transport.................................................................................................. 49 10.3.1 Loading and Unloading the Machine.................................................................... 49 10.3.2 Transport............................................................................................ 49 11. Safety Measures During Maintenance.............................................................................. 50 11.1 Personnel.................................................................................................. 50 11.2 Prior to Start of Maintenance Measures..................................................................... 50 11.2.1 Warning Sign......................................................................................... 50 11.2.2 Tools................................................................................................ 50 11.2.3 Safety-Related Parts................................................................................. 50 11.2.4 Prior to Start of Inspection and Maintenance......................................................... 51 11.2.5 Securing the Articulated Steering.................................................................... 51 11.2.6 Supporting the Work Unit............................................................................. 51 1 - Park the machine on even ground..................................................................... 51 2 - Apply the parking brake............................................................................. 51 3 - Place wheel chocks in front of the wheels to prevent the machine from rolling away.................. 51 4 - Lower the cutting edge or the teeth of the completely empty bucket onto the ground.................. 51 11.3 During Maintenance......................................................................................... 52 11.3.1 Attachments.......................................................................................... 52 11.3.2 Working Under the Machine............................................................................ 52 11.3.3 Keeping the Machine Clean............................................................................ 52 11.3.4 Specific Measures.................................................................................... 52 11.3.5 Refueling and Topping Off Oil........................................................................ 53 11.3.6 Coolant.............................................................................................. 53 11.3.7 Use of Lighting...................................................................................... 54 11.3.8 High-Pressure Hoses.................................................................................. 54 11.3.9 Handling High-Pressure Oil........................................................................... 54 11.3.10 Fan and Belts....................................................................................... 55 11.3.11 Waste Material...................................................................................... 55 11.4 Tires...................................................................................................... 56 11.4.1 Storing Tires........................................................................................ 56 12. Labeling........................................................................................................ 57 12.1 Position of Safety Labels.................................................................................. 57 12.2 Position of Standard Labels................................................................................ 59 1 - Instrument panel........................................................................................ 63 2 - Horn button............................................................................................. 63 3 - Light switch............................................................................................ 63 4 - Direction indicator lever............................................................................... 63 5 - Inch-brake pedal........................................................................................ 63 6 - Unlocking system of left door........................................................................... 63 7 - Parking brake........................................................................................... 63 8 - Safety lever for work hydraulic system.................................................................. 63 9 - Steering column adjustment.............................................................................. 63 10 - Driving direction switch............................................................................... 63 11 - Multifunctional lever.................................................................................. 63 12 - Control lever for special equipment.................................................................... 63 13 - Accelerator pedal...................................................................................... 63 14 - Socket................................................................................................. 63 15 - Unlocking system of right door......................................................................... 63 16 - Car radio (Option)..................................................................................... 63 17 - Lever of emergency lowering system..................................................................... 63 1 - Rocker arm.............................................................................................. 62 2 - Bucket cylinder......................................................................................... 62 3 - Bucket.................................................................................................. 62 4 - Boom.................................................................................................... 62 5 - Front wheel............................................................................................. 62 6 - Lift cylinder........................................................................................... 62 7 - Head lamp............................................................................................... 62 8 - Rear wheel.............................................................................................. 62 Controls and InDicators................................................................................................. 61 13. General View of Machine......................................................................................... 62 14. Controls and Indicators......................................................................................... 63 14.1 General View............................................................................................... 63 14.1.1 SWITCHES AND CONTROLS................................................................................ 64 14.2 Instrument Panel........................................................................................... 65 14.3 Warning Lights............................................................................................. 66 1 - Brake fluid warning light............................................................................... 66 2 - Air filter warning light................................................................................ 66 3 - Parking brake warning light............................................................................. 66 4 - Charging current warning light.......................................................................... 66 5 - Engine oil-pressure warning light....................................................................... 66 14.4 Control Lamps.............................................................................................. 69 1 - Driving direction switch indicator...................................................................... 69 2 - Direction indicator control lamp........................................................................ 69 3 - Air preheater control lamp.............................................................................. 69 4 - Heated rear windscreen indicator........................................................................ 69 5 - High beam control lamp.................................................................................. 69 6 - Low beam control lamp................................................................................... 69 14.5 Measuring Indicators....................................................................................... 72 1 - Fuel level indicator.................................................................................... 72 2 - Operating hour meter.................................................................................... 72 3 - Coolant temperature indicator........................................................................... 72 14.6 Switches................................................................................................... 74 1 - Switch and control lamp of hazard flashers.............................................................. 74 2 - Switch of front windscreen wiper and washer............................................................. 74 3 - Switch of rear windscreen wiper and washer.............................................................. 74 4 - Direction indicator lever............................................................................... 74 5 - Horn button............................................................................................. 74 6 - Light switch............................................................................................ 74 7 - Driving direction switch................................................................................ 74 8 - Start switch............................................................................................ 74 9 - Fan rotary switch, for ventilation and heating.......................................................... 74 10 - Heating temperature switch............................................................................. 74 11 - Heated rear windscreen switch.......................................................................... 74 12 - Switch and control lamp for driving range up to 12.43 mph (20 km/h).................................... 74 13 - Working lights switch and control lamp................................................................. 74 14 - Switch for inside lighting (without fig.).............................................................. 74 15 - Battery main switch (option, without fig.)............................................................. 74 14.7 Control Levers, Pedals..................................................................................... 80 1 - Brake pedal............................................................................................. 80 2 - Parking brake........................................................................................... 80 3 - Safety lever to close or open the work hydraulic system................................................. 80 4 - Steering column adjustment.............................................................................. 80 5 - Accelerator pedal....................................................................................... 80 6 - Multifunctional lever................................................................................... 80 7 - Control lever for special equipment..................................................................... 80 8 - Switching lever for bucket (without fig.)............................................................... 80 14.8 Articulated Steering Catch................................................................................. 85 14.9 Traction Device............................................................................................ 85 14.10 Socket.................................................................................................... 85 14.11 Door Unlocking System..................................................................................... 86 14.12 Alarm Horn for Reverse Driving............................................................................ 86 20 - Brake fluid warning light.............................................................................. 64 21 - Air filter warning light............................................................................... 64 22 - Parking brake warning light............................................................................ 64 23 - Charging current warning light......................................................................... 64 24 - Driving direction switch indicators.................................................................... 64 25 - Engine oil-pressure warning light...................................................................... 64 26 - Direction indicator control lamp....................................................................... 64 27 - Air preheater control lamp............................................................................. 64 28 - Heated rear windscreen indicator....................................................................... 64 29 - Working lights switch and control lamp................................................................. 64 30 - Driving range switch and control lamp for speed up to 12.43 mph (20 km/h).............................. 64 31 - Coolant temperature indicator.......................................................................... 64 32 - Operating hour meter................................................................................... 64 33 - High beam control lamp................................................................................. 64 34 - Low beam control lamp.................................................................................. 64 35 - Fuel supply indicator.................................................................................. 64 36 - Rear windscreen wiper switch and washer................................................................ 64 37 - Front windscreen wiper switch and washer............................................................... 64 38 - Hazard flasher switch and control lamp................................................................. 64 Operation............................................................................................................... 87 15. Running in the Machine.......................................................................................... 88 16. Preparing the Machine Start..................................................................................... 89 16.1 Visual Checks.............................................................................................. 89 16.1.1 Before you start the engine.......................................................................... 89 16.1.2 Before starting working with the machine............................................................. 89 17. Adjustments Prior to Machine Start.............................................................................. 91 17.1 Adjusting the Driver’s Seat................................................................................ 91 17.2 Adjusting the Steering Column.............................................................................. 92 1 - Push down the locking lever (2)......................................................................... 92 2 - Adjust it in such a way that you can reach the steering wheel from a comfortable seating posi........... 92 3 - Pull up the locking lever again to lock the steering column in this position............................ 92 17.3 Adjusting the Armrest...................................................................................... 92 1 - Loosen the screw (2).................................................................................... 92 2 - Either pull out or push back the armrest to reach the multifunctional lever. Your forearm sho........... 92 3 - Re-tighten the screw.................................................................................... 92 17.4 Adjusting the Rear-View Mirrors............................................................................ 92 17.5 Adjusting the Heating and Ventilation System............................................................... 93 17.5.1 Adjusting the ventilation system..................................................................... 93 17.5.2 Adjusting the heating system......................................................................... 93 17.6 Putting on the Safety Belt................................................................................. 94 17.6.1 Putting on the safety belt........................................................................... 94 1 - Sit down on the driver's seat....................................................................... 94 2 - Slowly and continuously pull out the belt........................................................... 94 3 - Insert the lock tongue into the lock socket until the lock engages.................................. 94 4 - Then, pull the belt to check whether or not the lock tongue is fully engaged........................ 94 17.6.2 Taking off the safety belt........................................................................... 94 18. Starting and Switching Off the Engine........................................................................... 95 18.1 Starting the Engine........................................................................................ 95 1 - Ensure parking brake is engaged......................................................................... 95 2 - Set the drive direction switch to its neutral position ‘N’.............................................. 95 3 - Turn the ignition key into the operating position ‘I’. The fuel supply (1) is indicated. The ........... 95 4 - Press down slightly the accelerator pedal............................................................... 95 5 - If the control lamp of the air preheater has gone out, you can turn the ignition key to the s........... 95 6 - Release the ignition key as soon as the engine started. It automatically returns to the opera........... 95 7 - Check whether all warning lights have gone out.......................................................... 95 18.1.1 Warming up the engine................................................................................ 96 1 - Press down slightly the accelerator pedal and let the engine run without load at medium speed....... 96 2 - Proceed as follows in order to heat up the hydraulic oil at low ambient temperatures: Allow t....... 96 3 - While the engine is warming up, observe all measuring instruments and warning lights and elim....... 96 4 - Let the engine run with lightweight load further until the engine coolant temperature indicat....... 96 5 - Ensure that the exhaust gas colour is normal and that the exhaust pipe produces neither abnor....... 96 18.2 Switching Off the Engine................................................................................... 97 1 - Check the temperature of the engine with the help of the coolant temperature indicator (1).............. 97 2 - If the engine is overheated, you must let it run at medium speed or 5 minutes before you swit........... 97 3 - Lower the work unit..................................................................................... 97 4 - Turn the ignition key into its stop position ‘0’ in order to switch off the engine...................... 97 5 - Pull the ignition key from the start switch............................................................. 97 19. Driving......................................................................................................... 98 19.1 Start-Up................................................................................................... 98 1 - Start up the engine as described in chapter "18.1 Starting the Engine".................................. 98 2 - Release the work hydraulic system by setting the locking lever of the work hydraulic system t........... 98 3 - Raise the work unit to its transport position. If the work unit is in transport position, the........... 98 4 - Press down the brake pedal and hold it in this position................................................. 98 5 - Release the parking brake. Press the celebration adjustment knob to this at the parking brake........... 98 6 - Set the drive direction switch to the desired direction setting......................................... 98 7 - Release the brake pedal and press down the accelerator pedal at the same time in order to sta........... 98 19.1.1 Starting the machine on slopes....................................................................... 99 1 - Start up the engine as described in chapter "18. Starting and Switching Off the Engine"............. 99 2 - Make sure that the parking brake is pulled. The parking brake warning light lights up............... 99 3 - Press down the brake pedal.......................................................................... 99 4 - Release the parking brake........................................................................... 99 5 - Set the drive direction switch to the desired direction setting..................................... 99 6 - Press down the accelerator pedal and release slowly the brake pedal at the same time in order....... 99 19.2 Changing the Driving Direction............................................................................. 99 19.3 Reverse Driving............................................................................................100 19.4 Turning....................................................................................................100 19.4.1 Turning on slopes, embankments or hill flanks........................................................100 19.5 Braking....................................................................................................101 19.5.1 Pulling the parking brake............................................................................101 1 - Press the locking button............................................................................101 2 - Pull up the parking brake lever.....................................................................101 3 - Release the locking button. The control lamp of the parking brake lights up.........................101 19.5.2 Releasing the parking brake..........................................................................101 1 - Lift up the parking brake lever a little............................................................101 2 - Press the locking button............................................................................101 3 - Push the parking brake lever down...................................................................101 4 - Release the locking button. The control lamp of the parking brake goes out..........................101 19.5.3 Braking with the service brake.......................................................................101 19.5.4 If the service brake breaks down.....................................................................101 19.5.5 Braking on slopes....................................................................................102 19.6 Stopping...................................................................................................102 1 - Release the accelerator pedal and press down the brake pedal............................................102 2 - Set the drive direction switch into its neutral position ‘N’............................................102 3 - Apply the parking brake.................................................................................102 4 - Lower the work unit onto the ground.....................................................................102 5 - Protect the work hydraulic system against unintentional activation by turning the locking lev...........102 19.6.1 Parking the machine on a slope.......................................................................102 19.7 Longer-Distance Driving....................................................................................103 20. Operating the Machine...........................................................................................104 20.1 Preparing the Work Equipment...............................................................................104 20.1.1 Selecting a work unit................................................................................104 20.1.2 Picking up the work unit (except multi-purpose bucket)...............................................104 1 - Make sure that the change-over lever for the additional control unit is in position '2' (fig........104 2 - Start the engine....................................................................................104 3 - Unlock the quick-change unit by setting the control lever for special equipment into position.......104 4 - Lift the boom slightly by setting the multi-function lever into position ‘H’ (fig. 75_016)..........104 5 - Tilt the quick-change unit slightly to the front by setting the multi-function lever into pos.......104 6 - Drive the machine to the work unit until the quick-change unit (3) is below the pickup hooks .......104 7 - Tip in the quick-change unit until the work unit is connected to the limit stops on the the q.......104 8 - Lock the quick-change unit by setting the control lever for special equipment into position ‘.......104 9 - Check whether the work unit is completely locked in by tipping it in and then dumping it............104 20.1.3 Removing the work unit...............................................................................105 1 - Lower the work unit onto level ground...............................................................105 2 - Unlock the quick-change unit by setting the control lever for special equipment into position.......105 3 - Set the quick-change unit into the dumping position ‘A’ (fig. 75_016) using the multi-functio.......105 4 - Make sure that nobody is behind the machine and drive the machine away from the work unit...........105 20.1.4 Picking up the multi-purpose bucket..................................................................105 1 - Set the change-over lever for the additional control unit into position '2' (fig. 75_160)...........105 2 - Start the engine....................................................................................105 3 - Unlock the quick-change unit by setting the control lever for special equipment into position.......105 4 - Lift the boom slightly by setting the multi-function lever into position ‘H’ (fig. 75_016)..........105 5 - Tilt the quick-change unit slightly to the front by setting the multi-function lever into pos.......105 6 - Drive the machine to the work unit until the quick-change unit (1) is below the pickup hooks .......105 7 - Tip in the quick-change unit until the work unit is connected to the limit stops on the the q.......105 8 - Lock the quick-change unit by setting the control lever for special equipment into position ‘.......105 9 - Connect the hydraulic hoses of the multi-purpose bucket to the quick attach couplers (2) (fig.......106 10 - Lock the quick-change unit by setting the control lever for special equipment into position .......106 11 - Set the change-over lever for the additional control circuit into position '1' (fig. 75_160).......106 12 - Check whether the work unit is completely locked in by tipping it in and then dumping it...........106 20.1.5 Removing the multi-purpose bucket....................................................................107 1 - Lower the multi-purpose bucket onto level ground....................................................107 2 - Turn the change-over lever for the additional control circuit to position ‘2’ (fig. 75_160).........107 3 - Unlock the quick-change unit by setting the control lever for special equipment into position.......107 4 - Loosen the hydraulic hoses of the multi-purpose bucket from the quick attach couplers...............107 5 - Set the quick-change unit into the dumping position ‘A’ (fig. 75_016) using the multi-functio.......107 6 - Make sure that nobody is behind the machine and drive the machine away from the work unit...........107 20.2 Tire Service Life..........................................................................................108 20.2.1 Level indicator for the bucket.......................................................................108 20.3 Loading....................................................................................................109 20.3.1 Removing piled up soil...............................................................................109 1 - Drive in straight line to the piled up soil.........................................................109 2 - While driving forward, lower the bucket rapidly until it reaches a height of approx. 11.8 in .......109 3 - Then, proceed with slowly lowering the bucket onto the ground.......................................109 4 - Brake right in front of the material to be removed using the service brake, while pressing do.......109 5 - Press down the accelerator pedal and drive the bucket into the material to be removed. In ord.......110 6 - To prevent that the bucket digs in too deep into the material to be removed, you must lift th.......110 7 - Tip in the bucket...................................................................................110 8 - If there is too much material inside the bucket, you must briefly tip it in, dump it and lowe.......110 20.3.2 Excavation works.....................................................................................111 1 - Drive up to the soil heap in a straight line........................................................111 2 - Slow down the machine using the service brake while keeping the accelerator pedal pressed dow.......111 3 - Bend the bucket edge slightly down..................................................................111 4 - While driving forward, move slightly the multi-function lever of the boom in order to remove .......111 5 - Move the multi-function lever of the boom slightly up and down to reduce the resistance durin.......111 20.4 Transporting...............................................................................................112 20.5 Dumping / Unloading........................................................................................112 20.5.1 Loading in diagonal direction........................................................................112 20.5.2 V-shaped loading.....................................................................................113 20.5.3 Piling up material...................................................................................113 20.6 Planing....................................................................................................114 20.6.1 Filling up...........................................................................................114 20.6.2 Taking off soil......................................................................................114 20.6.3 Cutting the Ground...................................................................................114 20.7 Working With the Forklift Truck Attachment.................................................................115 20.7.1 Picking up the load..................................................................................115 1 - Approach slowly the load to be picked up............................................................115 2 - Drive so far under the load until it touches the fork back of the forklift truck attachment.........115 3 - Tip in slightly the forklift truck attachment so that the load cannot fall down.....................115 4 - Lower the boom to its transport position. The two red arrows of the transport position markin.......115 5 - Then lift the load to the appropriate height only shortly before you reach the stacking surfa.......115 6 - Set the load surface slowly and from above onto the stacking........................................115 7 - Slowly lower the boom so far that you can pull out the fork tines below the load....................115 8 - Make sure that nobody is behind the machine and drive off backwards from the deposit surface........115 20.8 Precautions For Special Operations.........................................................................116 20.8.1 Working in water.....................................................................................116 20.8.2 Working on snow......................................................................................116 20.8.3 Dumping on steep slopes..............................................................................116 20.8.4 Working in the vicinity of electrical overhead lines.................................................116 20.8.5 Operation on slopes..................................................................................116 20.8.6 Working on loose soil................................................................................116 20.9 After the work is finished.................................................................................116 1 - Walk around the machine and visually inspect the work unit, the car body and the chassis. In ...........116 2 - Fill up the fuel tank...................................................................................116 3 - Remove highly flammable material from the engine room since it represents a fire risk...................116 4 - Clean roughly the chassis landing gear..................................................................116 20.10 Instructions for Winter Operation.........................................................................117 20.10.1 Before the cold season..............................................................................117 20.10.2 After Operation.....................................................................................117 20.10.3 After the cold season...............................................................................117 20.11 Longer Standstill Periods of the Machine..................................................................117 20.11.1 Before the standstill...............................................................................117 20.11.2 During the standstill...............................................................................118 20.11.3 After the standstill................................................................................118 Troubleshooting.........................................................................................................119 21. Troubleshooting.................................................................................................120 21.1 Warning Lights and Indicators..............................................................................120 21.2 Electrical System..........................................................................................121 21.3 Engine.....................................................................................................122 21.4 Hydraulic system...........................................................................................125 21.5 Brakes.....................................................................................................127 21.6 Axles......................................................................................................128 21.7 Emergency Steering Characteristics.........................................................................129 21.8 Emergency Lowering System..................................................................................129 1 - Ensure that nobody is standing under the work unit......................................................129 2 - Turn the lever of the emergency lowering system to position '2'. The work unit is lowered, or...........129 3 - Turn the lever of the emergency lowering system back to position '1'....................................129 21.9 Starting the Engine with a Battery Jumper Cable............................................................130 21.9.1 Connecting the Jumper Cable..........................................................................130 1 - Turn the start switch of the defective machine to '0' (OFF).........................................130 2 - Connect one clamp of the battery jumper cable to the positive terminal (+) of the discharged .......130 3 - Connect the other clamp of the battery jumper cable to the positive terminal (+) of the charg.......130 4 - Connect one clamp of the battery jumper cable to the negative terminal (-) of the charged bat.......130 5 - Connect the other clamp of the battery jumper cable to the engine block of the machine with t.......130 21.10 Starting the Engine.......................................................................................131 21.10.1 Disconnecting the Battery Jumper Cable..............................................................131 1 - Disconnect one clamp of the battery jumper cable from the engine block..............................131 2 - Disconnect the other clamp of the battery jumper cable from the negative terminal (-) of the .......131 3 - Disconnect the clamp of the battery jumper cable from the positive terminal (+) of the charge.......131 4 - Disconnect the other clamp of the battery jumper cable from the positive terminal (+) of the .......131 21.11 Towing the Machine........................................................................................132 1 - Set the driving-direction switch to position 'N'........................................................132 2 - Loosen both screws (1) and remove the cover plate (2)...................................................132 3 - Remove protecting caps from the valves..................................................................132 4 - Hold the valve (3) in position, using a wrench..........................................................132 5 - Loosen the counter-nut (4) an re-insert the threaded stud (5) clockwise, using a hexagonal so...........132 6 - Re-tighten firmly the counter-nut (4). Perform these operations on both valves..........................132 21.12 Towing a Machine with Defective Brakes....................................................................133 Maintenance.............................................................................................................135 22. Maintenance Basics..............................................................................................136 22.1 Preparing the Machine for Maintenance......................................................................136 1 - Park the machine on solid and level ground..............................................................136 2 - Set the machine to the specified position for maintenance and repair....................................136 3 - Lower the work unit to the ground and position it as shown in the drawing...............................136 4 - Set all control levers to either the neutral or the hold position '0'...................................136 5 - Turn the safety lever of the work hydraulic system to position '1'......................................136 6 - Take out the start key and store it in a safe place.....................................................136 7 - Apply the parking brake.................................................................................136 8 - Apply the warning sign you received together with the tools at the start switch.........................136 9 - Put wheel chocks in front and behind the wheels.........................................................136 10 - Secure the articulated steering with the articulated steering catch....................................136 11 - If required, remove dirt...............................................................................136 22.2 Cleaning the Machine.......................................................................................137 1 - Park the machine on level ground........................................................................137 2 - Apply the parking brake.................................................................................137 3 - Place wheel chocks in front of the wheels to prevent the machine from rolling away......................137 4 - With the bucket in its dumping position, lower the bucket onto the ground with either its cut...........137 22.2.1 Precautionary Measures When Cleaning the Machine.....................................................137 22.2.2 Fire Prevention......................................................................................137 22.3 Working-Area-Dependent Maintenance.........................................................................137 22.3.1 Muddy or Wet Working Areas...........................................................................137 22.3.2 Dusty Working Areas..................................................................................137 22.4 Lubricants and Operating Agents............................................................................138 22.4.1 Draining Hot Lubricants and Fluids...................................................................138 22.4.2 Checking the Oil Level and Changing Oil..............................................................138 22.4.3 Changing Filters.....................................................................................138 22.4.4 Refuelling and Topping off Oil.......................................................................138 22.4.5 Oil..................................................................................................138 22.4.6 Lubricating Grease...................................................................................139 22.4.7 Biodegradable Hydraulic Oil and Lubricating Grease...................................................139 22.4.8 Fuel.................................................................................................139 22.4.9 Storage of Oil and Fuel..............................................................................139 22.4.10 Coolants............................................................................................140 22.4.11 Windscreen Washer Liquid............................................................................140 22.4.12 Table of Lubricants and Operating Agents............................................................142 22.4.13 Lubrication chart...................................................................................143 22.5 Replacing Safety-Related Parts.............................................................................144 22.5.1 Welding Instructions.................................................................................144 22.6 Spare Parts and Consumable Components......................................................................145 22.7 Electrical System..........................................................................................146 1 - Checking the tension of the generator belt,.............................................................146 2 - Checking the generator belt for damage and wear, and....................................................146 3 - Checking the acid level in the battery..................................................................146 22.7.1 Fuses................................................................................................146 22.7.2 Fuse Assignment......................................................................................146 22.7.3 Slow-Blowing Fuses...................................................................................147 22.8 Tires......................................................................................................148 22.8.1 Tire Components......................................................................................148 1 - Steel Cord Belt.....................................................................................148 2 - Radial Carcass......................................................................................148 3 - Bead Core...........................................................................................148 4 - Liner...............................................................................................148 5 - Diagonal Carcass....................................................................................148 6 - Bead Cores..........................................................................................148 22.8.2 Checking the Tires...................................................................................148 22.8.3 Checking the Tire Pressure...........................................................................148 22.9 Tools......................................................................................................150 22.10 Torque for Standard Nuts and Bolts........................................................................151 23. Maintenance Schedule............................................................................................153 24. Maintenance Prior to Start......................................................................................155 24.1 Visual Checks..............................................................................................155 24.2 Cooling System, Checking the Coolant Level, Topping off Coolant............................................155 1 - Open the engine hood....................................................................................155 2 - Check whether the coolant level in the expansion tank is between the FULL and LOW markings. I...........155 3 - Remove the cover cap of the overflow tank...............................................................155 4 - Top coolant until the level reaches up to the FULL marking..............................................155 5 - After topping, firmly close the cover cap. If the expansion tank is empty again after a short...........155 24.3 Engine, Checking the Oil Level, Topping off Oil............................................................156 1 - Pull out the oil dipstick (1) and wipe off the oil with a clean cloth...................................156 2 - Completely re-insert the oil dipstick and pull it out again after a few seconds. The oil leve...........156 3 - If the oil level does not reach up to the (L) marking, top off engine oil...............................156 4 - Wait three minutes before you check the oil level again. If the oil level is above the (H) ma...........156 5 - Close the oil filler (2)................................................................................156 24.4 Engine, Draining Off Oil...................................................................................157 1 - Loosen the screw (1) at the bottom cover plate (2) and swivel the cover plate to the side...............157 2 - Put the oil trough to pan...............................................................................157 3 - Remove the cover cap (3) of the drain screw.............................................................157 4 - Unscrew the drain screw (4).............................................................................157 5 - Let the excess oil flow off.............................................................................157 6 - Screw in the drain screw................................................................................157 7 - Check the oil level again...............................................................................157 8 - Put on the cover cap....................................................................................157 9 - Fasten the bottom cover plate with the screw............................................................157 24.5 Checking the Fuel Level, Refueling.........................................................................158 1 - Turn the start switch to the operating position 'I' and check the fuel level indicated on the...........158 2 - Then, return the start switch to the stop position '0'..................................................158 3 - If required, refuel via the filler (1)..................................................................158 4 - After refueling, firmly close the filler................................................................158 24.6 Checking the Controls......................................................................................159 1 - Turn the start switch to the operating position 'I'.....................................................159 2 - Check that the following alarm and control indicators are on until the engine is started:...............159 3 - Check that the fuel level indicator (5) indicates the fuel level in the fuel tank.......................159 24.7 Checking the Parking Brake.................................................................................160 24.7.1 Test Conditions......................................................................................160 24.7.2 Test Procedure.......................................................................................160 1 - Start the engine, set the machine to straight driving, and drive the machine with an empty bu.......160 2 - Stop the machine with the service brake and do not release your foot again to keep the servic.......160 3 - Lower the bucket....................................................................................160 4 - Set the driving direction switch (1) to its neutral position 'N'....................................160 5 - Switch off the engine...............................................................................160 6 - Apply the parking brake (2) and slowly release the pedal of the service brake.......................160 24.8 CHecking the Service Brake.................................................................................160 24.9 Checking the Electrical Connections........................................................................161 24.10 Other Maintenance Measures Prior to Start.................................................................161 25. Maintenance Every 10 Operating Hours............................................................................162 25.1 Lubrication................................................................................................162 1 - Before you start maintenance work, park and secure the machine as described in the chapter "1...........162 2 - Clean the grease nipples marked by arrows...............................................................162 3 - Use a grease gun to fill the grease nipples with a sufficient volume of lubricating grease..............162 4 - Remove the used lubricating grease that is pressed out of the bearings..................................162 26. Maintenance After the First 50 Operating Hours..................................................................163 26.1 Engine, Changing Oil and Replacing the Oil Filter Cartridge................................................163 1 - Before you start maintenance work, park and secure the machine as described in the chapter "2...........163 2 - Loosen the screw (1) at the bottom cover plate (2) and swivel the cover plate to the side...............163 3 - Put the oil trough under the drain screw (4)............................................................163 4 - Remove the cover cap (3) of the drain screw.............................................................163 5 - Screw the drain hose (5) onto the drain plug (4). This will at the same time cause the drain ...........163 6 - Let the oil drain off into the oil trough...............................................................163 7 - Check the removed oil for metal parts or undesired material. If the oil contains such particl...........163 8 - Remove the drain hose (5), this will cause the drain valve (4) to close.................................163 9 - Screw on the cover cap (3)..............................................................................163 10 - Fasten the bottom cover plate with the screw...........................................................163 26.1.1 Replacing the Oil Filter Cartridge...................................................................164 11 - Turn the filter screwdriver counterclockwise to unscrew the filter cartridge (1)...................164 12 - Clean the filter holder. Completely fill up the new filter cartridge with engine oil. Slight.......164 13 - When installing the filter cartridge, make sure that the sealing surface of the cartridge sl.......164 14 - After replacing the filter cartridge, fill in clean engine oil until the oil level reaches u.......164 15 - Close the oil filler (2)...........................................................................164 16 - Let the engine run in idle for about five minutes and check whether oil is leaking out.............164 17 - Switch off the engine..............................................................................164 18 - Wait about ten minutes, then check the oil level again. The oil level must be between the 'H.......164 26.2 V-Belt, Checking the Condition.............................................................................165 26.3 V-Belt, Checking and Adjusting the Tension.................................................................165 1 - Before you start maintenance work, park and secure the machine as described in the chapter "2...........165 2 - Press down the V-belt in the middle of the longest straight part. You should be able to press...........165 3 - Loosen the fastening screw (1) at the generator.........................................................165 4 - Loosen the connecting screw (2) between the generator and the guide rail................................165 5 - Loosen the fastening screw (3) at the guide rail........................................................165 6 - Tilt the generator to adjust the tension of the V-belt..................................................165 7 - Fasten the generator and the guide rail.................................................................165 8 - Check the tension of the V-belt and re-adjust it, if required...........................................165 26.4 Hydraulic System, Replacing the Filter Insert..............................................................166 1 - Lower the work equipment onto the floor.................................................................166 2 - Park the machine........................................................................................166 3 - Turn the inlet and ventilation screw (1) several revolutions to let the pressure escape.................166 4 - Clean the surface of the filter cap (2) and the area around the filter cap..............................166 5 - Unscrew the filter cap..................................................................................166 6 - Pull out the filter element (3) at the handle (4) ......................................................166 7 - Pull the filter element off the handle and dispose of the filter element................................166 8 - Clean the inner surface of the filter housing. Before you start cleaning, check that there is...........166 9 - Put the handle onto the new filter element..............................................................166 10 - Insert the new filter element into the housing.........................................................166 11 - Screw on the filter cap and tighten it with 2.039 kgm (20 Nm)..........................................166 12 - Ventilate the system at the tank according to the specification (see "32.2 Bleeding the Hydr...........166 13 - Perform a test run and check that the system is tight..................................................166 26.5 Checking and Tightening the Wheel Nuts.....................................................................167 26.6 Front and Rear Axle, Changing Oil..........................................................................168 26.6.1 Planet gear..........................................................................................168 1 - Move the machine until the check drill hole (1) of the planet gear at the wheel that you want.......168 2 - Put the oil trough under the oil discharge hole.....................................................168 3 - Unscrew the screw plug (1) and let the oil flow off.................................................168 4 - Turn the wheel to bring the drill hole of the planet gear into horizontal position..................168 5 - Top up the planet gear with oil, until the oil reaches up to the bottom edge of the check dri.......168 6 - Clean the screw plug and replace the gaskets........................................................168 7 - Re-tighten firmly the screw plug....................................................................168 8 - Change the oil in the planet gear for the other wheel as described under the points 3 through 7.....168 26.6.2 Differential.........................................................................................168 1 - Unscrew the screw plugs (1) and (2) at the front axle and let the oil flow off......................168 2 - Clean the screw plugs and replace the gaskets.......................................................168 3 - Re-tighten firmly the screw plug....................................................................168 4 - Top up with oil, until the oil reaches up to the bottom edge of the check drill hole of screw.......168 5 - Re-tighten firmly the screw plug (2)................................................................168 6 - Unscrew the screw plugs (4) and (5) at the rear axle and let the oil flow off. Then, proceed .......168 26.7 Transfer Gear - Changing Oil...............................................................................169 1 - Before you start maintenance work, park and secure the machine as described in the chapter "2...........169 2 - Clean the surfaces of the screw plugs (1) and (2) and the area around the screw plugs...................169 3 - Unscrew the screw plugs.................................................................................169 4 - Let the oil flow off....................................................................................169 5 - Clean the screw plugs and replace the gaskets...........................................................169 6 - Tightly screw in the screw plug (2).....................................................................169 7 - Fill in oil via the check drill hole (1), until the oil reaches up to the bottom edge of the ...........169 8 - Tightly screw in the screw plug (1).....................................................................169 27. Maintenance Every 50 Operating Hours............................................................................170 27.1 Checking the cooling System, coolant level in the radiator and expansion tank..............................170 1 - Stop the engine and let it cool down....................................................................170 2 - Open the engine cover...................................................................................170 3 - Turn the radiator cap (arrow) slowly to the first stop and let the pressure escape. Then pres...........170 4 - Check that the radiator is filled up to the overflow with coolant. If not then top off to the...........170 5 - After topping off, fit the radiator cap and tighten.....................................................170 6 - Check that the coolant level in the expansion tank is between the marks full and low....................170 7 - Top off to the full mark if required....................................................................170 8 - After topping off, refit the tank cap and tighten.......................................................170 27.2 Draining Off Water and Dirt Deposits From the Fuel Tank....................................................171 1 - Place a container under the drain plug of the fuel tank (see arrow).....................................171 2 - Open the drain plug, drain off water and dirt...........................................................171 3 - Close the drain plug when clean fuel starts to leak out.................................................171 27.3 Checking the Service Brake and Oil Level, Refilling Oil....................................................171 1 - For maintenance operations, park and secure machine as described in chapter "22.1 Preparing t...........171 2 - Check the brake fluid level at the expansion tank. The oil level must be 0.394 in (10 mm) to ...........171 3 - If the oil level is too low, fill prescribed oil into the expansion tank................................171 4 - If you detect a significant oil loss, inform your local Komatsu dealer..................................171 27.4 Checking the Battery and Acid Level........................................................................172 1 - For maintenance operations, park and secure the machine as described in chapter "22.1 Prepari...........172 2 - Check the battery and pole terminals for proper fit.....................................................172 3 - Clean the environment of the plugs......................................................................172 4 - Remove all plugs and check whether the battery acid is at the acid level markings. Refill dis...........172 5 - Measure the specific density of the battery acid and read off the battery charging using the ...........172 6 - Recharge insufficiently charged batteries...............................................................172 7 - Lock the cells with the cleaned plugs.Re-Charging the Battery...........................................172 27.4.1 Re-charging a built-in battery.......................................................................173 1 - The battery may be overheated.......................................................................173 2 - Decrease in the battery acid volume.................................................................173 3 - Damage of the electrode plates......................................................................173 27.5 Lubrication................................................................................................174 27.5.1 Lubricating points of the work equipment.............................................................174 1 - Park and secure machine for the maintenance operations as described in chapter "22.1 Preparin.......174 2 - Clean the grease nipples which are indicated by the arrows..........................................174 3 - Use a grease gun to press sufficient grease into the grease nipples.................................174 4 - Remove the old grease which is extruding at the bearings............................................174 28. Maintenance Every 100 Operating Hours...........................................................................175 28.1 Draining the Water Separator, Removing Water and Dirt Deposits.............................................175 1 - Screw out the drain plug (2)............................................................................175 2 - Let the water run off...................................................................................175 3 - Screw in the drain plug and tight it....................................................................175 4 - Check for tightness.....................................................................................175 29. Maintenance Every 250 Operating Hours...........................................................................176 29.1 Changing the Engine Oil and Oil Filter Cartridge...........................................................176 29.2 Checking the V-Belt Condition..............................................................................176 29.3 Checking and Adjusting the V-belt Tension..................................................................176 29.4 Lubrication................................................................................................176 29.4.1 Lubricating points of the steering cylinder..........................................................176 1 - For maintenance operations, park the machine as described in chapter "22.1 Preparing the Mach.......176 2 - Clean the grease nipples which are indicated by the arrows..........................................176 3 - Use a grease gun to press sufficient grease into the grease nipples.................................176 4 - Remove the old grease which is extruding at the bearings............................................176 29.5 Front and Rear Axle, Checking the Oil Level................................................................177 29.5.1 Planet gear..........................................................................................177 1 - Move the machine until the oil level marking at the planetary gearing of the wheel which you .......177 2 - Unscrew the locking screw (1) of the drill hole.....................................................177 3 - Check the oil level. The oil level must reach up to the bottom edge of the check drill hole.........177 4 - If the oil level is too low, top off oil via the check drill hole of the screw plug. For deta.......177 5 - Tightly screw in the screw plug.....................................................................177 6 - Check the oil level at the other wheel of the front and rear axle. For this purpose, proceed .......177 29.5.2 Differential.........................................................................................177 1 - Unscrew the locking screw (2) of the drill hole at the front axle. Check the oil level as des.......177 2 - Unscrew the locking screw (2) of the drill hole at the rear axle. Check the oil level as desc.......177 29.6 Air Filter, Removing and Re-Installing the Filter Insert, Checking and Cleaning the Filter I...............178 29.6.1 Structure of the air filter..........................................................................178 29.6.2 Maintenance demand...................................................................................178 29.6.3 Removing the filter cartridge........................................................................178 1 - For maintenance operations, park and secure machine as described in chapter "22.1 Preparing t.......178 2 - Open the twistlocks on the cover of the air filter housing (2)......................................178 3 - Remove the cover of air filter housing..............................................................178 4 - Pull out the filter cartridge (3)...................................................................178 29.6.4 Cleaning or exchanging the filter cartridge..........................................................179 29.6.5 Checking the filter cartridge........................................................................180 29.6.6 Assembling the air filter cartridge..................................................................180 1 - Check the safety filter for proper fit..............................................................180 2 - Insert the filter cartridge into filter housing in such a way that the seal of the insert loc.......180 3 - Assemble the air filter cap.........................................................................180 29.7 Cleaning the Radiator Segments.............................................................................180 30. Maintenance Every 500 Operating Hours...........................................................................181 30.1 Changing the Fuel Filter and Filter Element................................................................181 1 - For maintenance operations, park and secure machine as described in chapter "22.1 Preparing t...........181 2 - Clean the area around the fuel filter (1)...............................................................181 3 - Unscrew the filter element counterclockwise with the filter screwdriver.................................181 4 - Clean the filter head...................................................................................181 5 - Fill up the new filter element with clean fuel..........................................................181 6 - Lubricate the sealing faces of the filter element lightly with engine oil...............................181 7 - During reassembly, re-tighten the filter element manually, until the seal is fitting. Then re...........181 8 - Then purge the fuel system..............................................................................181 9 - Start the engine and check for leaks....................................................................181 30.1.1 Bleeding the Fuel System.............................................................................182 1 - For maintenance operations, park and secure machine as described in chapter "22.1 Preparing t.......182 2 - Loosen the vent screw (1) at the water separator....................................................182 3 - Unlock the fuel pump (2) by pressing the cover down and swivelling it out of the way................182 4 - Operate fuel pump until bubble-free fuel leaks out at the vent screw................................182 5 - Re-tighten the vent screw...........................................................................182 6 - Loosen the vent screw (4) at the fuel filter (3)....................................................182 7 - Operate the fuel pump until bubble-free fuel leaks out at the vent screw............................182 8 - Re-tighten vent screw...............................................................................182 9 - Re-lock the cover of the fuel pump..................................................................182 10 - Start up the engine and bleed the lines, one after the other, while engine is running until .......182 30.2 Changing the Filter Cartridge of the Hydraulic System......................................................183 30.3 Cleaning the Water Separator...............................................................................183 1 - Loosen the drain plug (2)...............................................................................183 2 - Let the water and fuel run off..........................................................................183 3 - Loosen the screw (4) at the bottom side.................................................................183 4 - Remove the housing (5) from the cover...................................................................183 5 - Remove the gasket (6)...................................................................................183 6 - Remove the filter element (7), the gasket (8) and the spiral spring (9).................................183 7 - Remove water and dirt from the housing..................................................................183 8 - Clean the filter element and blow-dry it with compressed air............................................183 9 - Check the filter element and replace it, if it is damaged...............................................183 10 - Re-insert the spiral spring, the gasket (8) and the filter element.....................................183 11 - Position the gasket (6) and the housing................................................................183 12 - Insert a new o-ring (10)...............................................................................183 13 - Re-tighten the drain plug at the bottom side...........................................................183 14 - Remove the attachment screw (3)........................................................................183 15 - Fill up the water separator with fuel..................................................................183 16 - Re-tighten firmly the attachment screw.................................................................183 30.4 Lubrication................................................................................................184 1 - For maintenance operations, park and secure machine as described in chapter "22.1 Preparing t...........184 2 - Clean the grease nipples................................................................................184 3 - Use a grease gun to press sufficient grease into the grease nipples.....................................184 4 - Remove the old grease which is extruding at the bearings................................................184 30.5 Transfer Gear, Checking the Oil Level and Refilling Oil....................................................184 1 - For maintenance operations, park and secure machine as described in chapter "22.1 Preparing t...........184 2 - Clean the screw plug (1) and the adjacent environment...................................................184 3 - Unscrew the screw plug..................................................................................184 4 - Check the oil level. The oil level must be at the lower edge of the control drill hole of the...........184 5 - If the oil level is too low, fill up with oil using the control drill hole of the screw plug............184 6 - Clean the screw plug and insert a new packing ring......................................................184 7 - Re-tighten firmly the screw plug........................................................................184 30.6 Air Filter, Replacing the Filter Insert, Replacing the Safety Filter.......................................185 30.6.1 Replacing the Filter Insert..........................................................................185 1 - Open the air filter and remove the air-filter insert (1). Proceed as described in chapter "29.......185 2 - Use a lamp to check the new air filter for damages..................................................185 3 - Re-install the air-filter insert as described in chapter "29.6 Air Filter, Removing and Re-In.......185 30.6.2 Replacing the Safety Filter..........................................................................185 1 - Open the air filter and remove the air-filter insert (1). Proceed as described in chapter "29.......185 2 - Pull out the safety filter (2)......................................................................185 3 - In order to prevent that dust enters the interior of the engine, it is required to the air as.......185 4 - Clean the interior of the air-filter enclosure and remove the cloth from the air aspiration o.......185 5 - Use a lamp to check the new safety filter for damages. If it is in perfect condition, press i.......185 6 - Re-install the air-filter insert as described in chapter "29.6 Air Filter, Removing and Re-In.......185 31. Maintenance Every 1000 Operating Hours..........................................................................186 31.1 Cooling System, Exchanging Coolant and Cleaning the System.................................................186 31.1.1 Draining off the coolant.............................................................................186 1 - Switch off the engine and let it cool down..........................................................186 2 - Turn the radiator cap (arrow) slowly to the side, up to the first fixed stop, and let the pre.......186 3 - Stretch a tube onto the drain opening (1) of the discharge cock and insert the other tube end.......186 4 - Open the discharge cock and let the coolant run off.................................................186 5 - Close the discharge cock............................................................................186 31.1.2 Cleaning the Cooling System..........................................................................187 6 - Fill up the cooling system slowly with cleaning fluid...............................................187 7 - With the radiator cap opened, let the engine run for 5 minutes with a coolant temperature of .......187 8 - After the cleaning, switch off the engine and open the drain valve to let the entire cooling .......187 9 - Let the engine run for five minutes with a coolant temperature of approx. 176 F (80 C).............187 10 - Then, let the cooling system run empty again. If the extruding water is not clean, the cooli.......187 11 - Close the drain valve..............................................................................187 31.1.3 Filling off Coolant..................................................................................187 12 - Empty and clean the expansion tank.................................................................187 13 - Prepare the coolant as prescribed..................................................................187 14 - Fill off the coolant slowly into the cooling system up to the overflow shoot of the radiator.......187 15 - To bleed the cooling system while the radiator cap is removed, let the engine run idle for f.......187 16 - Switch off the engine, wait approx. three minutes and then refill coolant up to overflow sho.......187 17 - Fill off coolant into the expansion tank, until the coolant level is between the FULL and LO.......187 31.2 Front Axle, Oil Change.....................................................................................188 31.3 Rear Axle, Oil Change......................................................................................188 31.4 Transfer Gear, Oil Change..................................................................................188 31.5 Service Brake..............................................................................................188 31.5.1 Changing oil.........................................................................................188 31.5.2 Checking tubes and lines.............................................................................188 31.5.3 Checking the brake disks for wear and tear...........................................................188 31.5.4 Adjusting the clearance of the brake disks...........................................................188 31.6 Checking and Adjusting System Pressures....................................................................188 31.7 Checking and Adjusting the Valve clearance.................................................................188 31.8 Checking and Adjusting the Injection Nozzles, Nozzle Pressure and Fuel-Jet Pattern.........................188 32. Maintenance Every 2000 Operating Hours..........................................................................189 32.1 Hydraulic System, Oil Change...............................................................................189 1 - Park the machine on level ground........................................................................189 2 - Lower the work unit onto the ground.....................................................................189 3 - Switch off the engine...................................................................................189 4 - Secure the articulated steering with the articulated steering lock (1)..................................189 5 - Unlock the feeding and ventilation screw (2) by turning it slowly to let the pressure escape............189 6 - Loosen the screw plug (4) of the hydraulic oil tank and let the oil run off.............................189 7 - Re-tighten the screw plug with its seal being in perfect condition......................................189 8 - Unscrew the feeding and ventilation screw...............................................................189 9 - Fill up oil until the oil level is between the center and top edge of the inspection glass (3)..........189 10 - Start up the engine....................................................................................189 11 - Raise and lower the work equipment several times, while operating the bucket at the same time..........189 12 - Lower the bucket onto the ground and bring it into mining position.....................................189 13 - Check the oil level with the engine running idle in its low speed position.............................189 14 - Ventilate the hydraulic oil tank (see section "32.2 Bleeding the Hydraulic Oil Tank")..................189 32.2 Bleeding the Hydraulic Oil Tank............................................................................190 1 - Loosen the feeding and ventilation screw by turning it a couple of rotations............................190 2 - Start up the engine.....................................................................................190 3 - Bring the boom into its highest position................................................................190 4 - Bring bucket into its tip-in position (up to its limit stop)............................................190 5 - Re-tighten the feeding and ventilation screw............................................................190 32.3 Cooling System, Checking the Antifreeze Content of the Coolant.............................................190 32.4 Checking the Cooling System................................................................................190 32.5 Checking the Fuel Pump.....................................................................................190 32.6 Checking the Fuel and Coolant Tubes, Replacing the Tubes (if required).....................................190 32.7 Checking the Water Pump....................................................................................191 32.8 Checking and Adjusting the Fuel Injection and Injection time...............................................191 32.9 Engine, Intake Valves and Outlet Valves - Grinding In the Valve Bases......................................191 Technical Data..........................................................................................................193 33. Technical Data..................................................................................................194 33.1 Noise Emission Levels......................................................................................195 33.2 Vibration Level............................................................................................195 33.3 Limit Values for Slopes....................................................................................196 33.3.1 Maximum slope angle for operating the machine........................................................196 33.3.2 Tilting/tipping angle................................................................................196
PLEASE NOTE:
- This is the same manual used by the DEALERSHIPS to SERVICE your vehicle.
- The manual can be all yours – Once payment is complete, you will be taken to the download page from where you can download the manual. All in 2-5 minutes time!!
- Need any other service / repair / parts manual, please feel free to contact us at heydownloadss @gmail.com . We may surprise you with a nice offer