Massey Ferguson EU Hay Equipment MF2300 Series Large Square Baler-CE Operator Manual – PDF DOWNLOAD
Original price was: $68.95.$27.95Current price is: $27.95.
Massey Ferguson EU Hay Equipment MF2300 Series Large Square Baler-CE Operator Manual – PDF DOWNLOAD
Description
Massey Ferguson EU Hay Equipment MF2300 Series Large Square Baler-CE Operator Manual – PDF DOWNLOAD
DESCRIPTION:
Massey Ferguson EU Hay Equipment MF2300 Series Large Square Baler-CE Operator Manual – PDF DOWNLOAD
A word to the operator:
- It is your responsibility to read and understand the safety section in this manual and the manual for all implements before you operate this machine. You are responsible for your safety. Good safety procedures prevent injury to you and the persons around you. Make the information in the safety section of this manual a part of your safety procedure.
- This safety section is written only for this type of machine. Safety is your responsibility. You can prevent injury and death. This safety section gives basic safety examples that can occur during the operation and maintenance of your machine. This safety section is not a replacement for safety instruction in other sections of this manual.
- Injury or death can occur if the safety instruction is not obeyed. Learn how to operate the machine and how to use the controls correctly. Do not operate the machine if you do not know how to operate the machine. Do not let persons operate the machine that do not know how to operate the machine. Follow all safety instructions in the manuals and on the safety signs on the machine, the implements, and the attachments. Use only approved attachments and implements. Make sure that your machine has the correct equipment that is necessary by the local regulations.
This manual
This manual covers general safety instructions for this machine. Keep this manual with the machine. Right and left, as used in this manual, are given as if you are in the operator seat. The photos, illustrations, and data used in this manual were up to date when published, but in-line production changes can make your machine have small differences. The manufacturer reserves the right to redesign and change the machine as necessary without notification.
General information :
- When parking, park the machine and the tractor on a solid level surface. put all controls in neutral and apply the tractor park brake. Stop the tractor engine and take the key with you. Make sure the tractor and implement are in the proper operating condition according to the operator manuals. Make sure the tractor brakes and the machine brakes are adjusted correctly. The tractor must have enough weight and braking capacity, especially when operating on roads and terrain that is not even.
- Use a tractor of recommended size and weight to tow the machine. See the machine specifications for the minimum tractor size and weight. Tractor must be equipped with rollover protective structure (RO PS) and a seat belt. use seat belt during operation. Do not dismount from moving machinery. Always operate the machine with the terminal turned on. Never start the tractor with the PTO engaged or terminal turned on.
- Stay off slopes too steep for operation. Where possible avoid operating the machine near ditches, embankments, and holes. Reduce ground speed when operating on rough, slippery, or muddy surfaces and when turning or crossing slopes. Be aware of the size of the machine and have enough space available to allow for operation. Make sure all persons are clear of the rear of the bale chute when raising and lowering the chute, ejecting or dumping a bale. Do not stand between the tractor and the implement to install the hitch pin when the tractor engine is running.
TABLE OF CONTENTS:
Massey Ferguson EU Hay Equipment MF2300 Series Large Square Baler-CE Operator Manual – PDF DOWNLOAD
1 Safety 11
1 1 Introduction 13
1 1 1 Safety symbol 1 3
1 1 2 Safety messages 1 3
1 1 3 Information messages 1 3
1 1 4 Safety signs 1 3
1 1 5 A word to the operator 1 4
1 1 6 This manual 1 5
1 1 6 1 Operator manual storage 1 5
1 2 Operation 16
1 2 1 General information 1 6
1 2 2 Prepare for operation 17
1 2 3 Persona! protective equipment 17
1 2 4 Seat instructions 1 8
1 2 5 Shield and guards 1 8
1 2 6 Exhaust warning 19
1 2 7 Flying debris 19
1 2 8 Handrails 19
1 2 9 Agricultural chemicals 19
1 3 Travel on public roads 21
1 4 Maintenance 23
1 4 1 General maintenance information 2 3
1 4 2 Fire prevention and first aid 2 5
1 4 3 High pressure leaks 2 6
1 4 4 Tire safety 2 6
1 4 5 Replacement parts 27
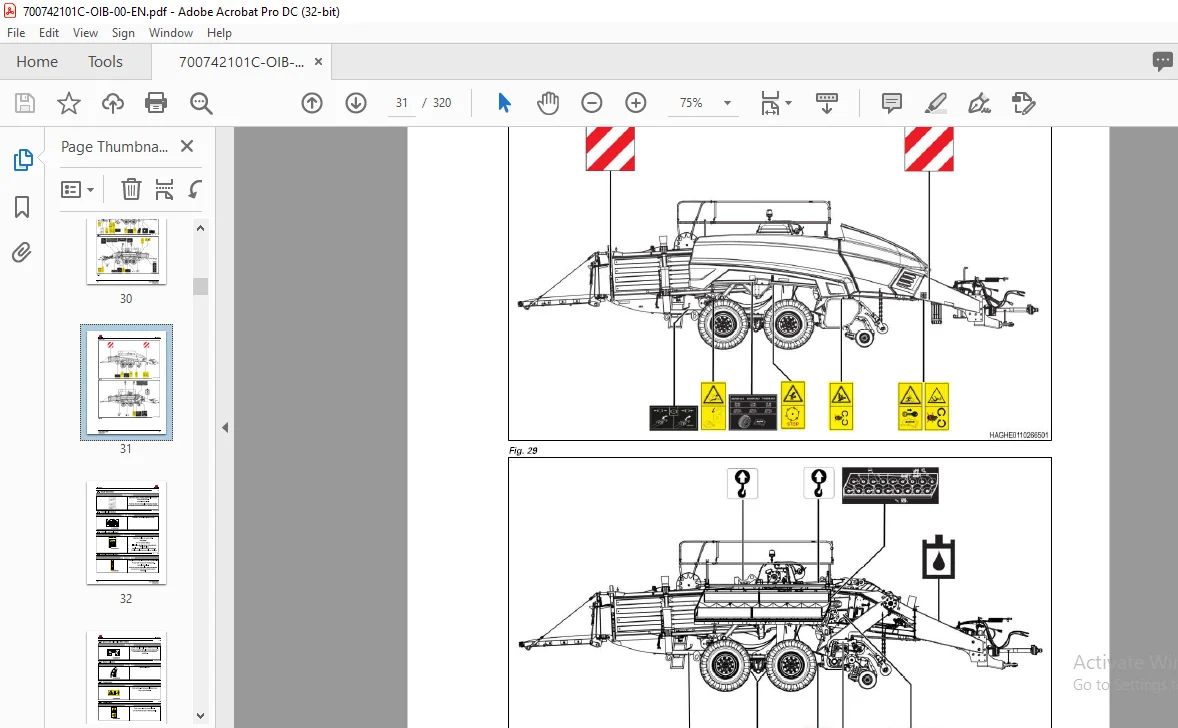
1 5 Safety and information signs 28
1 5 38 Parking brake 39
2 Introduction 41
2 1 Introduction 43
2 1 1 Units of measurement 4 3
2 1 2 Replacement parts 4 3
2 1 3 lntended use 4 3
2 1 4 Proper disposai of waste 4 3
2 2 Machine identification 44
2 2 1 Location of the serial number plates and the statutory plates – if necessary 4 4
2 2 2 Serial number description 4 5
2 3 Machine components 47
2 3 1 Outside view – left side 47
2 3 2 Outside view – right side 48
2 3 3 lnner view – left side 49
2 3 4 lnner view – right side 50
2 3 5 Description of operation 50
2 4 Knotters 51
2 4 1 Double knotter system 51
2 4 2 Knotter operation 51
3 Operation 55
3 1 Get Started 59
Large Square Baler
3 1 1 Connect the tractor to the machine 5 9
3 1 2 Understand the terminal 5 9
3 1 3 Start and stop work records 60
3 1 4 Examine the machine 61
3 1 5 Lower and lift the roller baie chute 61
3 1 6 Start to make baies, no baie in the baie chamber 63
3 1 7 Start to make baies, a baie in the baie chamber 64
3 1 8 How to stop the baie procedure 64
3 1 9 Eject a baie 65
Checklists 67
3 2 1 Daily checklist 67
3 2 2 Inspection after the first hour of operation 67
High quality hay 68
3 3 1 Crop preparation 68
3 3 2 Crop moisture 68
3 3 3 High quality hay baling 69
3 3 4 Dry hay baie storage 69
Brakes and locks 70
3 4 1 Flywheel brake 70
3 4 2 Knotter/needle lockout 71
3 4 3 Stuffer latch 71
3 4 4 Pickup lockout valve 71
Connect to the tractor 72
3 5 1 Hitch component identification 72
3 5 2 Set the tangue height 72
3 5 3 Tractor setup dimensions with an 80 mm (3 1 5 in) ball hitch, a CE spherical ball
hitch, or a 5 0 mm (2 in) ring hitch 73
Connect a 5 0 mm (2 in) ring hitch to the tractor 74
Connect an 80 mm (3 1 5 in) ball hitch to the tractor 74
Operate a manual jack installed on the tangue 75
Operate a hydraulic jack installed on the tangue 75
lnstall the safety transport chain 76
Constant velocity implement driveline, if equipped 77
3 5 9 1 Connect a quick disconnect yoke to a power take-off (PTO) 77
3 5 9 2 Check the constant velocity implement driveline for correct length 79
3 5 1 0 lmplement driveline, if equipped 80
3 5 1 0 1 Connect a quick disconnect yoke to a power take-off 80
3 5 1 0 2 Adjust the pedestal gearbox 81
Electrical, hydraulic, and brake connections 82
3 6 1 Connect the machine road lamp harness plug 82
3 6 2 Connect the contrai harness plug 82
3 6 3 Connect the machine hydraulic hases to the tractor 82
3 6 4 Connect the machine brake hases to the tractor 84
Baler operation 85
3 7 1 General terminal information 85
3 7 2 Prepare to baie 85
3 7 3 Plunger position indication 86
3 7 4 Start the machine 86
3 7 4 1 Start the machine: determine the direction of plunger travel 86
3 7 4 2 Start the machine: plunger on the retraction (green) stroke 88
3 7 4 3 Start the machine: plunger on the compression (red) stroke 89
3 7 4 4 Start the machine: machine does not start after four attempts 89
3 7 5 Make the first baie 90
3 7 6 Make baies 91
3 7 7 Stop the machine 91
3 7 8 Stuffer cycle 92
Main work screens 93
Large Square Baler
3 8 1 Digi-Star® – Introduction and precautions 94
3 8 2 Digi-Star® – Setup and re-calibration 95
3 8 3 Digi-Star® – Tare the roller baie chute 96
3 8 4 Drive arrows 96
3 8 5 Flakes per baie 97
3 8 6 Baie density cylinder pressure 98
3 8 7 Strokes per flake 98
3 8 8 User specified items 99
3 8 9 lndicator and quick jump icons 1 0 0
Plunger load 103
3 9 1 Information used to set the plunger load 1 0 4
3 9 2 Contrai the baie density cylinders manually 1 0 4
3 9 3 Set the plunger load target 105
Baie length 106
3 10 1 Set the baie length 106
3 10 2 Tie a baie manually 106
3 10 3 Set the baie length to zero 106
Machine settings 10a
3 11 1 Knotter lubrication 1 0 8
3 11 2 Speed source 1 0 8
3 11 3 Chain lubrication, optional 1 0 9
3 11 4 Set the moisture alarm 1 0 9
3 11 5 Audible indicator setting 110
3 11 6 Lamp settings screen 111
3 11 7 Machine options 111
3 11 8 Twine alarm settings 11 2
3 11 9 Two terminal setup 11 2
Service screens 113
3 1 2 1 Machine information 113
3 1 2 2 Switch position 113
3 1 2 3 Current measurements 11 4
3 1 2 4 Voltage measurements 115
3 1 2 5 Frequency measurements 115
3 1 2 6 Life time counter 116
Errors 117
3 13 1 Visual alarm descriptions 117
3 13 2 Active errors 117
3 13 3 Stored errors 11 8
Work records 119
Calibrations 121
3 15 1 Calibrate the baie length 1 2 1
3 15 2 Calibrate the needle home position 122
3 15 3 Calibrate the plunger position 1 23
3 15 4 Calibrate the density door position 1 2 4
Lamps 126
3 16 1 Field lamp locations 126
3 16 2 Contrai screen and contrai switch for the field lamps 126
3 16 3 Beacon lamps 1 2 7
3 16 4 Flashers and marker lamps 1 2 8
Pickup and windguard 129
3 17 1 Pickup height 1 2 9
3 17 2 Adjust the pickup wheels 1 2 9
3 17 3 Adjust the pickup flotation 13 0
3 17 4 Adjust the windguard height 13 0
Knotter and needles 132
3 1 8 1 Monitoring flags 13 2
Large Square Baler
700742101C
Table of contents
3 1 8 2 Correct the problem of missing knots 1 3 3
3 19 Roller baie chute 134
3 19 1 Lower the roller bale chute 1 3 4
3 19 2 Lift the roller baie chute 1 3 4
3 20 Tandem axle steering Iock 136
3 20 1 Tandem axle steering Iock indication 1 3 7
3 21 Prepare to road the machine or move the machine on a trailer 138
3 22 Lifting and tie down 140
3 2 2 1 Lift points 14 0
3 2 2 2 Tie down points 14 0
3 2 2 3 Lift and move a machine correctly 14 0
3 23 Twine 142
3 2 3 1 lnstall twine balls 14 2
3 2 3 2 Set the twine use counter to zero 14 2
3 2 3 3 Thread the left twine box 14 3
3 2 3 4 Thread the right twine box 14 4
3 2 3 5 Thread the needles 14 6
3 2 3 6 Thread the knotters 14 7
3 2 3 7 Thread and tie the needle and the knotter twines 14 7
3 24 Removing a baie from the baie chamber 149
3 24 1 Release the baie chamber pressure to remove a baie 14 9
3 24 2 Remove a baie with the ejector 14 9
3 24 3 High moisture baies 1 5 1
3 25 Air brake pressure release 152
3 26 Disconnect the tractor 153
4 Maintenance 155
4 1 Service schedule 159
4 2 General maintenance information 163
4 2 1 Maintenance safety 16 3
4 2 2 Front step 16 3
4 2 2 1 Lower the front step 16 3
4 2 2 2 Lift the front step 16 3
4 2 3 Ladder and handrails 16 4
4 2 4 Sealed bearings 16 4
4 2 5 Electrical system general information 16 4
4 2 6 Hydraulic system general information 16 4
4 2 7 Jack points 16 4
4 2 8 Open the twine boxes 16 5
4 2 9 Close the twine boxes 16 5
4 3 Lubrication points 168
4 3 1 Driveline lubrication and maintenance 16 8
4 3 1 1 Driveline chains 16 9
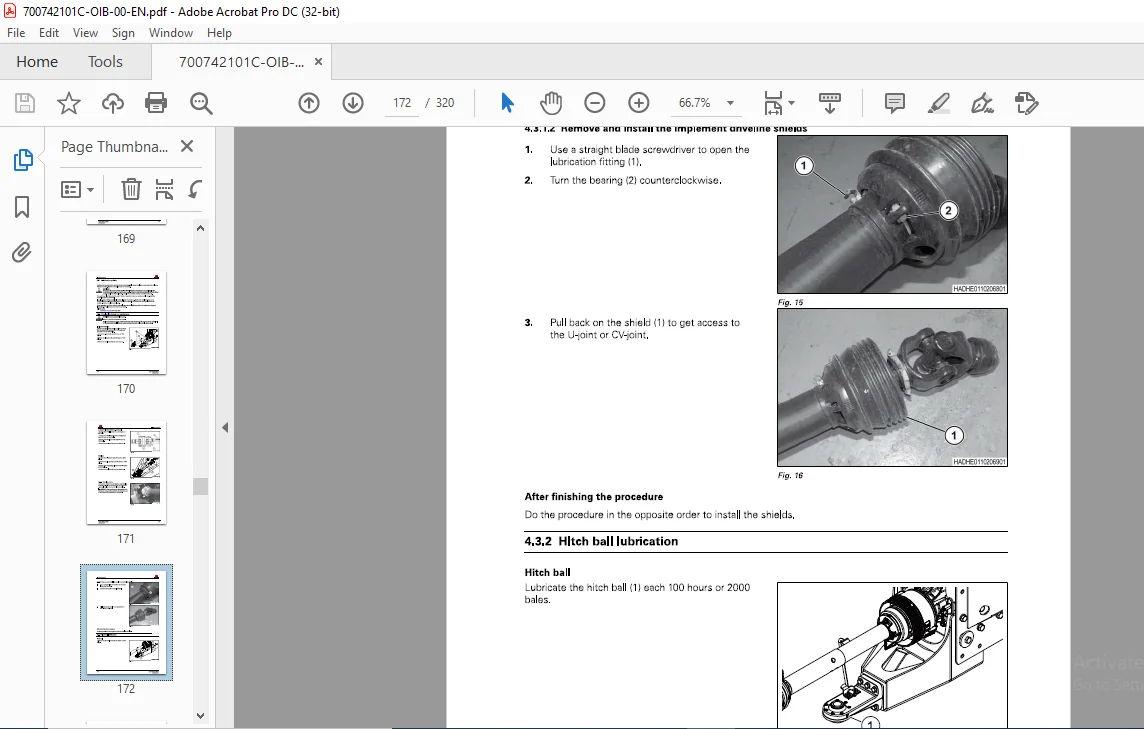
4 3 1 2 Remove and install the implement driveline shields 170
4 3 2 Hltch ball lubrication 170
4 3 3 Connecting rad lubrication 171
4 3 4 Drive sprocket lubrication 171
4 3 5 Stuffer drive lubrication 171
4 3 6 Knotter/needle clutch lubrication 172
4 3 7 Brake linkage lubrication 172
4 3 8 Steering axle pivot and tie rad lubrication 172
4 3 9 Tandem axle pivot bushings lubrication 173
4 3 10 Knotter center bearing lubrication 173
4 3 1 1 Baie density linkage lubrication 173
4 3 1 2 Packer clutch lubrication 174
4 4 Main Gearbox 175
Large Square Baler
4 4 1 Do a main gearbox oil level check 175
4 4 2 Change the main gearbox oil 175
Pedestal gearbox 177
4 5 1 Do a pedestal gearbox oil level check 177
4 5 2 Change the pedestal gearbox oil 177
Hydraulic system 179
4 6 1 Do a hydraulic oil level check 179
4 6 2 Change the hydraulic oil and filter 179
Shearbolts 181
4 7 1 Replace the stuffer/knotter shearbolt 181
4 7 2 Shearbolt specifications 1 8 2
Knotter lubrication pump 183
4 8 1 Prime the knotter lubrication lines 1 8 3
Chain lubrication pump, optional 185
Flywheel brake 186
4 10 1 Examine the flywheel brake adjustment 1 86
4 10 2 Adjust the flywheel brake 1 86
Slip clutches 188
4 1 1 1 Automatic reset clutch 1 88
4 1 1 2 Main drive slip clutch adjustment 1 88
4 1 1 3 Packer slip clutch adjustment 1 88
4 1 1 4 Pickup slip clutch adjustment 1 89
Drive chains 190
4 1 2 1 Roller chain maintenance 190
4 1 2 2 Adjust the packer chain 190
4 1 2 3 Adjust the packer chain support rails 191
4 1 2 4 Adjust the stuffer/knotter/needle chain 19 2
4 1 2 5 Adjust the pickup chains on the right side 19 3
4 1 2 6 Adjust the pickup chain on the left side 19 3
Stuffer 194
4 1 3 1 Adjust the stuffer sensor door 194
4 1 3 2 Adjust the stuffer clutch 197
4 1 3 3 Adjust the stuffer brake 199
4 1 3 4 Stuffer chute adjustment 201
T ime the machine 202
Plunger 204
4 1 5 1 Plunger inspection 2 04
4 1 5 2 Adjust the plunger knives 2 04
4 1 5 3 Examine the top and the side hay dogs 2 0 5
4 1 5 4 Examine the stationary hay dogs 2 0 5
Knotter system maintenance 206
4 16 1 Magnet to hold parts 206
4 16 2 Twine tension 206
4 16 3 Billhook and billhook cam 208
4 16 4 Adjust the billhook and the billhook cam 209
4 16 5 Replace a billhook 209
4 16 6 Replace a twine knife 2 1 2
4 16 7 Adjust the stripper arm 2 14
4 16 8 Twine dise operation 2 16
4 16 9 Time the twine dise 2 16
4 16 10 Adjust the twine holder 2 17
4 16 1 1 Knotter service parts 2 1 8
Needle maintenance 219
4 1 7 1 lnstall a needle 2 19
4 1 7 2 Center a needle 2 19
4 1 7 3 Needle actuating rod length 2 20
Large Square Baler
700742101C
Table of contents
4 17 4 Examine the needle penetration 220
4 17 5 Adjust the needle penetration – all needles 221
4 17 6 Adjust the needle penetration for one needle 221
4 17 7 Adjust the needle roller height 222
4 17 8 Adjust the needle lateral load 223
4 17 9 Adjust the twine fingers 223
4 17 10 Adjust the tucker arms 225
4 17 11 Adjust the knotter/needle brake 226
4 17 1 2 lnspect the knotter/needle inner cam lobe 227
4 18 Adjust the needle protection linkage 228
4 19 Sensors and switches, positions and specifications 230
4 20 T ires, wheels, and axles 23 2
4 20 1 Tire pressure 23 2
4 20 2 Wheel hardware 23 2
4 20 3 Axle hardware 23 2
4 21 Hitch 234
4 2 1 1 Examine and adjust the hitch ball 23 4
4 22 Brakes 235
4 22 1 Procedure to examine the brakes 23 5
4 22 2 Adjust the brakes 23 5
4 22 3 lnspect the brake lining 23 6
4 22 4 lnspect the park brake system 23 6
4 22 5 Examine an air brake system 23 6
4 22 6 Clean an air brake filter 23 6
4 22 7 Bleed the hydraulic brake system 23 7
4 22 8 Examine a hydraulic brake system 23 7
4 22 9 Drain condensation from an air tank 23 8
4 23 Prepare for storage 239
4 24 Prepare for a new season 240
5 Troubleshooting 243
5 1 Shearbolt troubleshooting 245
5 2 Main drive train troubleshooting 248
5 3 Main gearbox troubleshooting 249
5 4 Feed system troubleshooting 250
5 5 Stuffer troubleshooting 252
5 6 Knotter/needle clutch troubleshooting 254
5 7 Tying troubleshooting 255
5 8 Needle troubleshooting 263
5 9 Baie shape troubleshooting 264
5 10 Knotter blower troubleshooting 265
5 11 Knotter lubrication system troubleshooting 266
5 1 2 Hydraulic system troubleshooting 267
5 1 3 Alarm troubleshooting 270
5 1 4 Ejector troubleshooting 272
5 1 5 Brake troubleshooting 273
5 1 6 Electronic troubleshooting 274
6 Specification 277
6 1 Specifications 279
6 1 1 Dimensions and weights 27 9
6 1 2 Drive system specifications 27 9
6 1 3 Shearbolt specifications 2 8 0
Large Square Baler
Hydraulic specifications 2 8 0
Pickup specifications 2 8 0
Packer specifications 2 8 1
Stuffer specifications 2 8 1
Plunger specifications 2 8 1
Twine specifications 2 8 2
Knotter and needle specifications 2 8 2
Baie chamber tension specifications 2 8 2
Ejector specifications 2 8 2
Roller baie chute specifications 2 8 3
Lamp specifications 2 8 3
Lubricants and capacities 2 8 3
Tire specifications 2 8 4
Brake specifications 2 8 4
Maximum speed 2 8 4
Tractor requirements 2 8 4
Noise level 2 8 5
7 Accessories 287
7 1 Accessories 289
7 1 1 lmplement driveline ( I D L) 2 8 9
7 1 2 C 10 0 0 and C 2 1 0 0 Terminal kits 2 8 9
7 1 3 Power adapter plug 2 8 9
7 1 4 Shearbolts and Iock nuts 2 8 9
7 1 5 Service parts kits 2 90
7 1 6 ASA B E type ball hitch 2 90
7 1 7 Ball hitch bushing 2 90
7 1 8 ISO type hitches 2 90
8 Asse m b ly 293
8 1 Assem b ly 295
8 1 1 Examine the machine before assembly 2 95
8 1 2 Machine assembly 2 95
8 1 2 1 Remove the shipping bracket 2 95
8 1 2 2 lnstall the pickup wheels 2 96
8 1 2 3 Lift the handrails 2 97
8 1 2 4 lnstall the monitor flags 298
8 1 2 5 lnstall the beacon lamps 2 99
8 1 2 6 Speed decal, if required 3 0 0
8 1 2 7 lnstall the implement driveline 3 0 0
8 1 2 8 lnstall an optional constant velocity driveline 3 0 2
8 1 3 Assemble the tandem axle 3 06
8 1 4 Connect the tractor 3 06
8 1 5 Set up the knotter lubrication system 3 06
8 1 6 Make the final adjustments 3 0 7
8 2 Checkl ists 308
8 2 1 Pre-delivery checklist 3 0 8
8 2 2 Delivery checklist 3 0 8
9 I n dex 309
MASSEY FERGUSON EU HAY EQUIPMENT MF2300 SERIES LARGE SQUARE BALER-CE OPERATOR MANUAL – PDF DOWNLOAD:
IMAGES PREVIEW OF THE MANUAL:
PLEASE NOTE:
- This is the SAME exact manual used by your dealers to fix your vehicle.
- The same can be yours in the next 2-3 mins as you will be directed to the download page immediately after paying for the manual.
- Any queries / doubts regarding your purchase, please feel free to contact [email protected]
S.V