Samsung HS50A HS60A Ultrasound Service Manual PDF
Original price was: $65.00.$18.95Current price is: $18.95.
Comprehensive Samsung HS50A HS60A ultrasound service manual PDF with HS50A troubleshooting guide, HS60A disassembly procedures, Samsung ultrasound maintenance instructions, HS50A error codes diagnostics, HS60A parts list and diagrams, and probe cleaning guidelines. Covers introduction, safety, installation, inspection, product structure, service mode, troubleshooting, disassembly, probes, maintenance, and service parts for HS50A/HS60A models.
Description
Samsung HS50A HS60A Ultrasound Service Manual PDF DOWNLOAD
Description
This Samsung HS50A HS60A ultrasound service manual PDF (SM-HS50A/HS60A-ENG-01, Version 1.00.00, 2016) is an indispensable resource for biomedical technicians servicing the HS50A and HS60A ultrasound systems from Samsung Medison. It provides a detailed HS50A troubleshooting guide with power issues, monitor problems, error messages during booting, image faults, and USB device failures, including trouble shooting trees for efficient resolutions. The manual features comprehensive HS60A disassembly procedures for components like HDD, front end, control panel, touch panel, dust filter/fan, ODD, and monitor, with preparation and reassembly notes.
Samsung ultrasound maintenance instructions cover operational environment, cleaning/disinfecting, air filter replacement, accuracy checks, and data maintenance like user settings and patient info backups. HS50A error codes diagnostics classify faults with remedies and testing methods. The HS60A parts list and diagrams include body cover, control panel, monitor/arm, system, and cable parts with exploded views for accurate replacements. Probe sections detail lists, gels, sheaths, safety precautions, cleaning/disinfecting, and biopsy kit assembly.
Safety includes classifications, electromechanical standards, declarations, patient privacy policy, and precautions for use with danger, warning, caution, and note symbols. Visual aids like interconnect diagrams and block diagrams support the HS50A troubleshooting guide and HS60A disassembly procedures throughout.
Table of Contents (Extracted from Pages 12-15, Categorized with Subsections and Page References):
- Chapter 1. Introduction (1)
- 1.1. Product Specifications (2)
- 1.2. Product Configuration (5)
- 1.2.1. Monitor (7)
- 1.2.2. Control Panel (9)
- 1.2.3. Console (16)
- 1.2.4. Peripheral Devices (19)
- 1.2.5. Probes (21)
- 1.2.6. Accessories (23)
- 1.2.7. Optional Functions (24)
- Chapter 2. Safety (1)
- 2.1. Purpose of Use (2)
- 2.1.1. Restrictions (2)
- 2.2. Safety Information (3)
- 2.2.1. Safety Symbols (3)
- 2.2.2. LABEL (6)
- 2.3. Electrical Safety (7)
- 2.3.1. Prevention of Electric Shock (7)
- 2.3.2. Related Information (9)
- 2.3.3. ESD (9)
- 2.3.4. EMI (10)
- 2.3.5. EMC (10)
- 2.4. Mechanical Safety (17)
- 2.4.1. Moving the Equipment (17)
- 2.4.2. Safety Notes (18)
- 2.5. Biological Safety (20)
- 2.5.1. ALARA Principle (20)
- 2.6. Protecting the Environment (34)
- 2.1. Purpose of Use (2)
- Chapter 3. Installing Product (1)
- 3.1. Transporting (2)
- 3.1.1. Caution on Transporting (2)
- 3.1.2. Brake (2)
- 3.1.3. Precautions on Ramps (2)
- 3.1.4. Humidity and Temperature (3)
- 3.2. Unpacking the Product (4)
- 3.2.1. Dismantling the Product Box (4)
- 3.2.2. Accessories (5)
- 3.2.3. Release of the Locking Mechanism (5)
- 3.3. Installation Environment (6)
- 3.3.1. Caution (6)
- 3.4. Installing the Product (7)
- 3.4.1. Installation Safety (7)
- 3.4.2. Connecting Peripherals (9)
- 3.5. System Power (12)
- 3.5.1. Turning the Power On (12)
- 3.5.2. Shutting down the System (12)
- 3.6. System Settings (13)
- 3.6.1. ECG Setup (14)
- 3.6.2. General System Settings (16)
- 3.6.3. Customize (24)
- 3.6.4. Peripherals (26)
- 3.6.5. Connectivity (28)
- 3.6.6. Service (41)
- 3.6.7. Help (41)
- 3.1. Transporting (2)
- Chapter 4. Product Inspection (1)
- 4.1. Inspecting the Functions (2)
- 4.1.1. Basic Inspections (2)
- 4.1.2. Detailed Inspections (3)
- 4.1. Inspecting the Functions (2)
- Chapter 5. Product Structure (1)
- 5.1. Overview (3)
- 5.2. System Block Diagram (5)
- 5.2.1. System Block Diagram (5)
- 5.2.2. System Rack Design (6)
- 5.3. Basic Structure of the Product (7)
- 5.3.1. Electronic Structure (7)
- 5.3.2. Ultrasound System Part (7)
- 5.3.3. PC Part (8)
- 5.3.4. User Interface Part (8)
- 5.4. Ultrasound System Part (9)
- 5.4.1. Main Functions of the PSA (Probe Select Assembly) (9)
- 5.4.2. Beam Former Board (11)
- 5.4.3. Back End Board (15)
- 5.5. PC Part (19)
- 5.5.1. PC Module (19)
- 5.5.2. Rear IO Board (20)
- 5.5.3. Software DSC (21)
- 5.6. User Interface Part (23)
- 5.6.1. Control Panel (23)
- 5.6.2. Main Monitor (25)
- 5.6.3. Touch-Screen (26)
- 5.6.4. Display Layout (27)
- 5.7. Power Part (28)
- 5.7.1. ADM (28)
- 5.7.2. Power Block Diagram (29)
- 5.8. Interconnect Diagram (30)
- 5.8.1. HS50/HS60 Interconnect Diagram 1/2 (30)
- 5.8.2. HS50/HS60 Interconnect Diagram 2/2 (31)
- 5.8.3. Cable Description (32)
- Chapter 6. Service Mode (1)
- 6.1. Service Mode (3)
- 6.1.1. How to Shift to Service Mode (3)
- 6.2. Service Information (4)
- 6.3. Configuration (5)
- 6.3.1. Clock (5)
- 6.3.2. Keyboard/Region (5)
- 6.3.3. TCP/IP (6)
- 6.3.4. Option (7)
- 6.3.5. User Account and User Account Management (8)
- 6.3.6. Printer (9)
- 6.4. System (10)
- 6.4.1. Upgrade Software (10)
- 6.4.2. System Serial Number (11)
- 6.4.3. Window Explorer (12)
- 6.4.4. Install Recovery System (13)
- 6.5. Diagnostics (14)
- 6.5.1. Control Panel Test (14)
- 6.5.2. Keyboard Test (14)
- 6.5.3. Power On Self Test (14)
- 6.5.4. Built in Self Test (14)
- 6.5.5. Monitor Test (14)
- 6.6. Backup and Restore (15)
- 6.6.1. Backup (15)
- 6.6.2. Restore (15)
- 6.6.3. Log Backup (15)
- 6.7. Report (16)
- 6.7.1. Report (16)
- 6.8. Demo Play (17)
- 6.8.1. Demo Play (17)
- 6.9. Entering the Installation Key (18)
- 6.1. Service Mode (3)
- Chapter 7. Troubleshooting (1)
- 7.1. Power Issues (2)
- 7.1.1. Power Does Not Turn on (2)
- 7.1.2. Power Does Not Turn off (2)
- 7.1.3. Power Turns off by Itself (2)
- 7.2. Monitor (3)
- 7.2.1. Nothing Is Displayed on the Screen (3)
- 7.2.2. Screen is Discolored (3)
- 7.3. Error Messages (4)
- 7.3.1. Error Occurs During Booting (4)
- 7.4. Image (4)
- 7.4.1. 2D Mode: There is No IMAGE ECHO or IMAGE FORMAT (4)
- 7.4.2. Lines (Noise) Appear in 2D Mode Image (4)
- 7.4.3. M, C, PW, CW Mode Trouble (4)
- 7.5. USB Device Detection Failure (5)
- 7.5.1. Failed to recognize the USB (Removable device) device (5)
- 7.6. Trouble Shooting Tree (6)
- 7.1. Power Issues (2)
- Chapter 8. Disassembly and Assembly (1)
- 8.1. Power Issues (2)
- 8.1.1. Preparation (2)
- 8.2. Disassembling the Product (3)
- 8.2.1. Rear Side Disassembly (3)
- 8.2.2. HDD Disassembly (5)
- 8.2.3. Front End Disassembly (6)
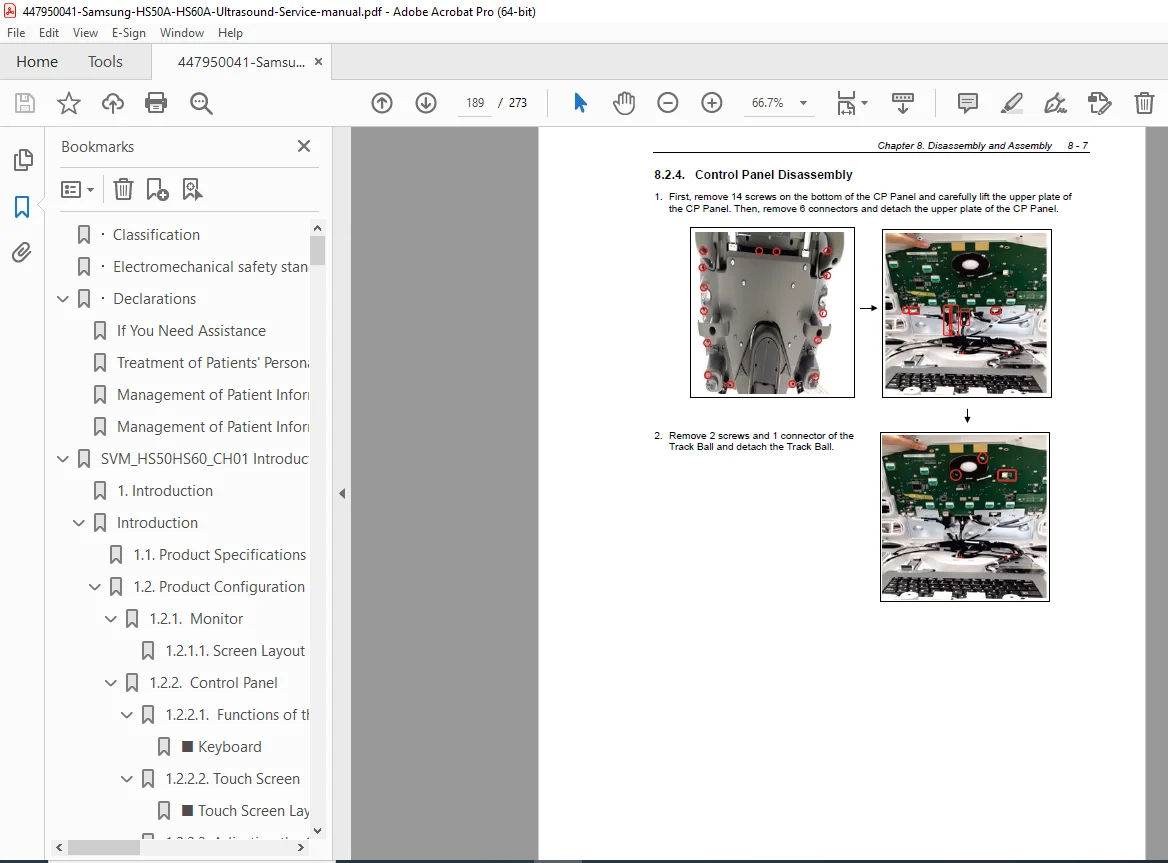
- 8.2.4. Control Panel Disassembly (7)
- 8.2.5. Touch Panel Disassembly (8)
- 8.2.6. Dust Filter and Fan Disassembly (9)
- 8.2.7. ODD Disassembly (10)
- 8.2.8. Monitor Disassembly (11)
- 8.1. Power Issues (2)
- Chapter 9. Probes (1)
- 9.1. Probes (2)
- 9.1.1. Probe List (2)
- 9.1.2. Ultrasound Transmission Gel (18)
- 9.1.3. Sheaths (19)
- 9.1.4. Probe Safety Precautions (19)
- 9.1.5. Cleaning and Disinfecting the Probe (21)
- 9.2. Biopsy (37)
- 9.2.1. Biopsy Kit Components (37)
- 9.2.2. Using the Biopsy Kit (38)
- 9.2.3. Assembling the Biopsy Kit (40)
- 9.2.4. Cleaning and Disinfecting the Biopsy Kit (43)
- 9.1. Probes (2)
- Chapter 10. Maintenance (1)
- 10.1. Operational Environment (2)
- 10.2. Product Maintenance (3)
- 10.2.1. Cleaning and Disinfecting (3)
- 10.2.2. Cleaning Air Filters (6)
- 10.2.3. Accuracy Checks (7)
- 10.3. Data Maintenance (8)
- 10.3.1. User Settings Backup (8)
- 10.3.2. Backing Up Patient Information (8)
- 10.3.3. Software (8)
- Chapter 11. Service Parts List (1)
- 11.1. Body Cover Parts (2)
- 11.2. Control Panel Parts (9)
- 11.3. Monitor & Arm Parts (17)
- 11.4. System Parts (21)
- 11.5. System Cable Parts (24)
File Details
- Manual Name: HS50A/HS60A Service Manual
- Models Covered: HS50A, HS60A
- Year: 2016
- Manual PDF Quality: High-resolution with clear text, diagrams, and illustrations
- No of Pages: 273