Volkswagen Golf 1984 & Jetta 1984 Workshop Manual – PDF DOWNLOAD
$42.95
Volkswagen Golf 1984 & Jetta 1984 Workshop Manual – PDF DOWNLOAD
Description
Volkswagen Golf 1984 & Jetta 1984 Workshop Manual – PDF DOWNLOAD
FILE DETAILS:
Volkswagen Golf 1984 & Jetta 1984 Workshop Manual – PDF DOWNLOAD
Language : English
Pages : 2198
Downloadable : Yes
File Type : PDF
IMAGES PREVIEW OF THE MANUAL:
TABLE OF CONTENTS:
Volkswagen Golf 1984 & Jetta 1984 Workshop Manual – PDF DOWNLOAD
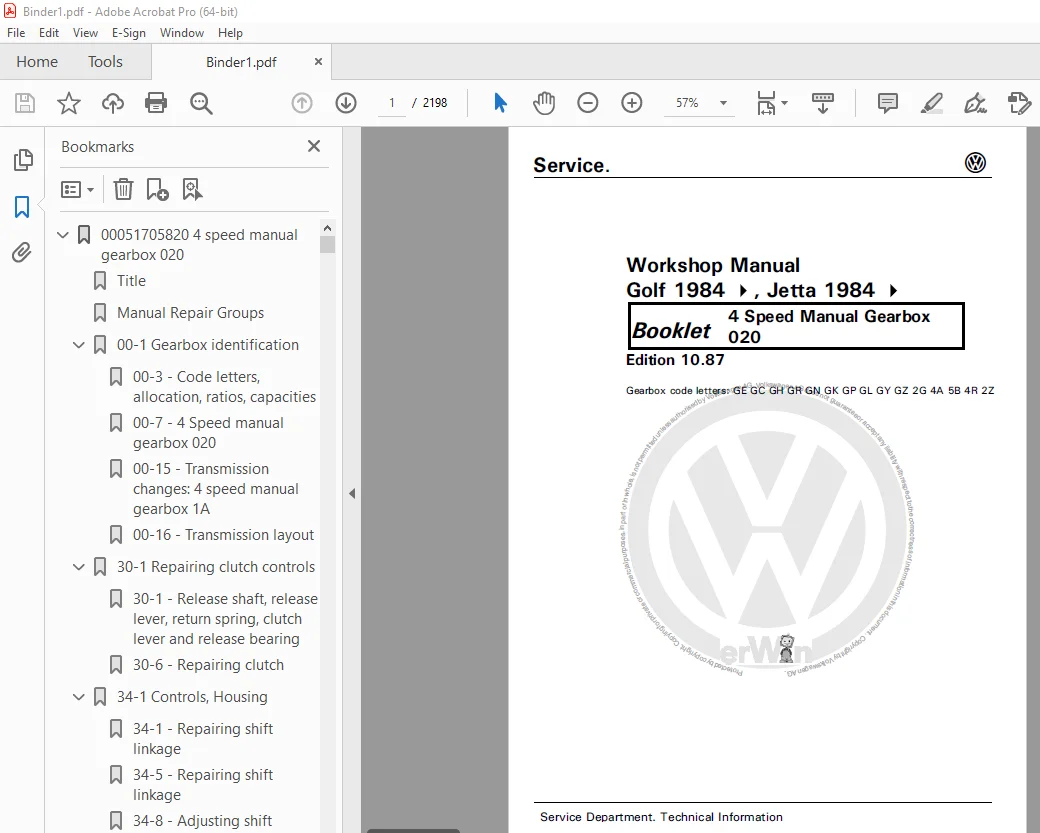
00051705820 4 speed manual gearbox 020 1
Title 1
Manual Repair Groups 2
00-1 Gearbox identification 4
00-3 – Code letters, allocation, ratios, capacities 5
00-7 – 4 Speed manual gearbox 020 7
00-15 – Transmission changes: 4 speed manual gearbox 1A 11
00-16 – Transmission layout 11
30-1 Repairing clutch controls 13
30-1 – Release shaft, release lever, return spring, clutch lever and release bearing 13
30-6 – Repairing clutch 15
34-1 Controls, Housing 20
34-1 – Repairing shift linkage 20
34-5 – Repairing shift linkage 22
34-8 – Adjusting shift linkage 23
34-10 – Repairing shift linkage 24
34-15 – Adjusting gear shift linkage 27
34-20 – Modifications to the shift linkage 29
34-20 – Boot with cap 29
34-22 – One-piece shift rod bearing 30
34-23 – Relay lever with larger rubber ball 31
34-23 – Type of grease 31
34-24 – Removing and installing bonded rubber bushes for gearbox carrier 31
34-29 – Removing and installing gearbox 34
34-36 – Dismantling and assembling gearbox 37
34-40 – Removing and installing Housing 39
34-57 – Service installation of the 5 speed manual gearbox 48
34-59 – Selector shaft cover modified 49
34-60 – Selector shaft lever serf-locking nut 49
34-61 Dismantling and assembling gearbox 50
34-61 – Removing and installing drive shaft, output shaft and differential 50
34-64 – Removing and installing drive shaft 51
34-72 – Dismantling and assembling Gearbox 55
34-77 – Modifications to gearbox housing 58
34-78 – Repairing bearing housing 58
34-86 – TDC sensor adapter in clutch housing 62
34-87 – “Floating” shift fork rod 63
34-88 – Location and bearings of gearshift shaft in gearbox modified 63
34-94 – Gearbox breather relocation 66
34-96 – Additionally securing magnet in clutch housing with sealing compound 67
35-1 Dismantling and assembling input shaft 68
35-20 – Adjusting input shaft 77
35-25 – Dismantling and assembling output shaft 80
35-45 – Adjusting output shaft 90
35-50 – Securing the output shaft needle roller bearing 92
35-51 – Repair instructions: 93
39-1 Repairing differential 94
39-1 – Removing and installing drive flange oil seal 94
39-3 – Dismantling and assembling differential 95
39-15 – Adjusting differential 101
39-19 – Differential bevel gear shaft secured with extended rivets 103
39-20 – Adjustment list 103
00051705920 5 speed manual gearbox 020 104
RLF SA Golf, Scirocco 5 speed manual Gearbox 020 104
List of Workshop Manual Repair Groups 105
00-1 Gearbox identification 108
00-3 – Speedometter drive pinions 109
00-4 – Code letters, gearbox allocation, ratios, oil capacities (up to 07 82) 109
00-6 – Code letters, gearbox allocation, ratios, oil capacities (up to 07 82) 110
00-8 – Code letters, gearbox allocation, ratios, oil capacities (up to 07 82) 111
00-10 – Code letters, gearbox allocation, ratios, oil capacities (from 8 82) (up to 07 83) 112
00-12 – Code letters, gearbox allocation, ratios, oil capacities (from 8 82 up to 07 83) 113
00-14 – Code letters, gearbox allocation, ratios, oil capacities (from 8 82 up to 7 83) 114
00-16 – Code letters, gearbox allocation, ratios, oil capacities (from 8 83) 115
00-18 – Code letters, gearbox allocation, ratios, oil capacities (from 8 83) 116
00-20 – Code letters, gearbox allocation, ratios, oil capacities (from 8 83) 117
00-22 – Code letters, gearbox allocation, ratios, oil capacities (from 8 83) 118
00-26 – Transmission layout 120
30-1 Clutch 122
30-1 – Repairs to the clutch mechanism 122
30-4 – Clutch cable chafing against brake fluid reservoir 123
30-6 – Repairs to clutch (190/200 mm dia ) 124
34-1 Controls, Housing 129
34-1 – Operation of shift mechanism 129
34-4 – Repair shift linkage 130
34-8 – Adjusting gearshift linkage 132
34-10 – Adjusting selector shaft retaining screw 133
34-11 – Adjusting retaining screw for 5th gear 134
34-12 – Selector shaft lever self-locking nut 134
34-13 – Removing and installing bonded rubber bushes for gearbox carrier 135
34-15 – Removing and installing gearbox 136
34-19 – General view 138
34-21 – Dismantling and assembling gearbox 139
34-26 – Dismantling and assembling gearbox 141
34-29 – Dismantling and assembling gearbox 143
34-51 – Dismantling and assembling gearbox 154
34-58 – Dismantling and assembling gearbox 157
34-62 – Dismantling and assembling gearbox 159
34-66 – Vehicles with gearchange and consumption indicator 161
34-67 – Additional bearing for output shaft 162
34-69 – Gearbox breather relocation 163
34-70 – TDC sensor adapter in clutch housing 163
34-71 – Spring for the reverse gear relay lever 164
34-72 – Modified locating and mounting of the selector shaft in the gearbox 164
34-76 – Additionally securing magnet in clutch housing with sealing compound 166
34-77 – Selector shaft cover modified 167
35-1 Gears, Shafts 168
35-1 – Dismantling and assembling input shaft 168
35-15 – Dismantling and assembling output shaft 175
35-25 – Adjusting output shaft 180
35-30 – Synchronizer hub for 5th gear with retaining ring for locking keys 182
35-33 – Dismantling and assembling output shaft (pinion shaft) 184
39-1 Final drive, Differential 185
39-1 – Removing and installing drive flange oil seal 185
39-3 – Dismantling and assembling differential 186
39-12 – Adjustment table 190
39-13 – Adjusting differential 191
39-16 – Play free location of drive flange shafts 192
39-17 – Differential with cones: dismantling and assembling 193
39-23 – Differential bevel gear shaft secured with extended rivets 196
00051706220 General body repairs 197
RLF SA Citi Golf Body repair work 197
List of Workshop Manual Repair Groups 198
55-1 Bonnet, flaps 200
55-1 – Adjusting engine bonnet lock cable – Golf, Jetta 200
55-2 – Renewing tailgate – Golf 200
55-3 – Boot lock / exploded view – Jetta 201
55-4 – Installing gas – filled spring – Golf 201
57-1 Front door / exploded view – Golf, Jetta 203
57-11 – Front door / exploded view – Scirocco 208
58-1 Rear door / exploded view – Golf, Jetta 209
58-8 – Stiff window winder operation 212
60-1 Sliding roof / exploded view – Golf, Jetta 214
60-7 – Adjustment operations on the sliding roof – Golf, Jetta 217
60-9 – Cleaning water drain hoses – Jetta 218
60-10 – Tilting roof/exploded view – Scirocco 218
60-12 – Removing tilting roof panel – Scirocco 219
60-13 – Installing tilting roof panel and manual drive – Scirocco 220
60-14 – Adjustment operations on the tilting roof – Scirocco 220
60-17 – Cleaning water drain hoses – Scirocco 222
63-1 Renewing bumper covering – Golf, Jetta 223
63-3 – Renewing rear bumper side part – Scirocco 224
63-4 – Painting of Citi Golf polypropylene bumpers 224
64-1 Service installation of vent wing – Golf 226
66-1 Service installation of left-hand outer rear-view mirror (with linkage) – Golf 227
66-3 – Service installation of left-hand outer rear-view mirror (with linkage) 228
66-7 – Sticking on trim strips – Scirocco 230
66-8 – Removing radiator grille – Jetta 230
70-1 Removing and installing instrument panel – Jetta 231
70-5 – Removing and installing knee bar – Jetta 233
70-6 – Removing and installing front door trim panel – Jetta 233
70-9 – Removing and installing rear door trim panel – Jetta 235
70-11 – Removing and installing instrument panel – Scirocco 236
74-1 Renewing rear seat – Golf 237
00051707320 K Jetronic ignition system EV GX GZ RG 238
Title 238
Manual Repair Groups 239
Technical Bulletin No 1 313
Contents 240
00051707420 KE Jetronic ignition system GX HT RD 317
Title 317
Manual Repair Groups 318
Technical Bulletin No 1 392
Contents 319
00051707720 Diesel injection and glow plug system JP JR ME RA SB 1V 393
Title 393
Manual Repair Groups 394
Contents 395
00051708220 Heating Air conditioner 432
80 – Heating 436
1 – Repairing heater -up to model year 1976- 436
1 1 – Repairing heater -up to model year 1976- 436
1 2 – Removing and installing heating and ventilation controls 439
1 3 – Repairing fresh and heater controls 440
1 4 – Dismantling and assembling fresh air box 441
2 – Servicing heating system -from model year 1977- 443
2 1 – Servicing heating system -from model year 1977- 443
2 2 – Removing and installing fresh air/heater controls and switch 447
2 3 – Replacement of leaking Golf heat exchangers 449
87 – Air conditioning 450
1 – Safety precautions 450
1 1 – Safety precautions 450
1 2 – Safety precautions to be taken when working on vehicles with air conditioner or when handling refrigerant 450
2 – Air conditioner – repairs 451
2 1 – Air conditioner – repairs 451
2 2 – Repairs to the air conditioner which can only be done in specially equipped workshops 452
2 3 – Instructions on general repairs to air conditioned vehicles 453
2 4 – Opening and evacuating the air conditioner 453
2 5 – Repairs to system which can be done without special equipment -up to model year 1979- 454
2 6 – Removing and installing controls complete 461
2 7 – Combined air conditioner -from model year 1980- 463
2 8 – Removing and installing compressor bracket -up to model year 1977- 467
2 9 – Removing and installing compressor bracket -from model year 1978- 472
2 10 – Removing and installing compressor belt 476
2 11 – Removing and installing compressor bracket -from model year 1979- 478
2 12 – Removing and installing compressor bracket -from model year 1979- 482
2 13 – Removing and installing compressor bracket -Scirocco- 487
2 14 – Removing and installing compressor bracket -Scirocco only, from August 1988- 491
3 – Servicing air conditioner 496
3 1 – Servicing air conditioner 496
3 2 – Servicing air conditioner controls – up to model year 1979- 496
3 3 – Servicing air conditioner controls -from model year 1980- 502
4 – Current flow diagramm 504
4 1 – Current flow diagramm 504
4 2 – Current flow diagramm -up to model year 1976- 504
4 3 – Additional current flow diagramm -from model year 1977- 507
4 4 – Additional current flow diagramm -from model year 1978- 511
4 5 – Additional current flow diagramm -from model year 1979- 514
4 6 – Additional current flow diagramm -from model year 1980- 519
4 7 – Additional current flow diagramm -from model year 1981- 523
5 – Vacuum hose 526
5 1 – Vacuum hose 526
5 2 – Vacuum hose layout -up to model year 1979- 526
5 3 – Vacuum hose connection layout -from model year 1980- 528
5 4 – Vacuum hose connection layout 530
6 – Checking vacuum system 532
6 1 – Checking vacuum system 532
6 2 – Checking vacuum system -up to model year 1979- 532
6 3 – Detent positions 534
7 – Fault finding – Checking air distribution -up to model year 1979- 536
7 1 – Fault finding – Checking air distribution -up to model year 1979- 536
7 2 – Checking combined ventilation, heating and air conditioner system 536
8 – Fault finding instructions -from model year 1980- 539
8 1 – Fault finding instructions -from model year 1980- 539
8 2 – Checking vacuum system 540
8 3 – Fault finding instructions 543
00053323020 Golf Jetta 1984 546
Title 546
Manual Repair Groups 547
Contents 548
00053775120 4 Speed Manual Gearbox 020 643
00 – Technical data 647
1 – Gearbox identification 647
1 1 – Gearbox identification 647
1 2 – Code letters, allocation, ratios, capacities 648
1 3 – 4 Speed manual gearbox 020 650
1 4 – Transmission changes: 4 speed manual gearbox 1A 653
1 5 – Transmission layout 654
30 – Clutch 657
1 – Repairing clutch controls 657
1 1 – Repairing clutch controls 657
1 2 – Release shaft, release lever, return spring, clutch lever and release bearing 657
1 3 – Repairing clutch 661
34 – Controls, Housing 667
1 – Controls, Housing 667
1 1 – Controls, Housing 667
1 2 – Repairing shift linkage 667
1 3 – Repairing shift linkage 671
1 4 – Adjusting shift linkage 673
1 5 – Repairing shift linkage 675
1 6 – Adjusting gear shift linkage 679
1 7 – Modifications to the shift linkage 683
1 8 – Boot with cap 683
1 9 – One-piece shift rod bearing 684
1 10 – Relay lever with larger rubber ball 685
1 11 – Type of grease 685
1 12 – Removing and installing bonded rubber bushes for gearbox carrier 686
1 13 – Removing and installing gearbox 687
1 14 – Dismantling and assembling gearbox 691
1 15 – Removing and installing Housing 695
1 16 – Service installation of the 5 speed manual gearbox 704
1 17 – Selector shaft cover modified 704
1 18 – Selector shaft lever serf-locking nut 705
2 – Dismantling and assembling gearbox 706
2 1 – Dismantling and assembling gearbox 706
2 2 – Removing and installing drive shaft, output shaft and differential 706
2 3 – Removing and installing drive shaft 709
2 4 – Dismantling and assembling Gearbox 714
2 5 – Modifications to gearbox housing 717
2 6 – Repairing bearing housing 719
2 7 – TDC sensor adapter in clutch housing 724
2 8 – “Floating” shift fork rod 725
2 9 – Location and bearings of gearshift shaft in gearbox modified 726
2 10 – Gearbox breather relocation 730
2 11 – Additionally securing magnet in clutch housing with sealing compound 730
35 – Gears, Shafts 732
1 – Dismantling and assembling input shaft 732
1 1 – Dismantling and assembling input shaft 732
1 2 – Adjusting input shaft 743
1 3 – Dismantling and assembling output shaft 746
1 4 – Adjusting output shaft 758
1 5 – Securing the output shaft needle roller bearing 760
1 6 – Repair instructions: 761
39 – Final drive, Differential 762
1 – Repairing differential 762
1 1 – Repairing differential 762
1 2 – Removing and installing drive flange oil seal 762
1 3 – Dismantling and assembling differential 764
1 4 – Adjusting differential 772
1 5 – Differential bevel gear shaft secured with extended rivets 774
1 6 – Adjustment list 775
00053776120 5 speed manual Gearbox 020 776
00 – Technical data 780
1 – Gearbox identification 780
1 1 – Gearbox identification 780
1 2 – Speedometter drive pinions 781
1 3 – Code letters, gearbox allocation, ratios, oil capacities (up to 07 82) 781
1 4 – Code letters, gearbox allocation, ratios, oil capacities (up to 07 82) 782
1 5 – Code letters, gearbox allocation, ratios, oil capacities (up to 07 82) 783
1 6 – Code letters, gearbox allocation, ratios, oil capacities (from 8 82) (up to 07 83) 783
1 7 – Code letters, gearbox allocation, ratios, oil capacities (from 8 82 up to 07 83) 784
1 8 – Code letters, gearbox allocation, ratios, oil capacities (from 8 82 up to 7 83) 785
1 9 – Code letters, gearbox allocation, ratios, oil capacities (from 8 83) 786
1 10 – Code letters, gearbox allocation, ratios, oil capacities (from 8 83) 787
1 11 – Code letters, gearbox allocation, ratios, oil capacities (from 8 83) 787
1 12 – Code letters, gearbox allocation, ratios, oil capacities (from 8 83) 788
1 13 – Transmission layout 790
30 – Clutch 793
1 – Clutch 793
1 1 – Clutch 793
1 2 – Repairs to the clutch mechanism 793
1 3 – Clutch cable chafing against brake fluid reservoir 796
1 4 – Repairs to clutch (190/200 mm dia ) 797
34 – Controls, Housing 803
1 – Controls, Housing 803
1 1 – Controls, Housing 803
1 2 – Operation of shift mechanism 803
1 3 – Repair shift linkage 806
1 4 – Adjusting gearshift linkage 810
1 5 – Adjusting selector shaft retaining screw 811
1 6 – Adjusting retaining screw for 5th gear 812
1 7 – Selector shaft lever self-locking nut 812
1 8 – Removing and installing bonded rubber bushes for gearbox carrier 813
1 9 – Removing and installing gearbox 814
1 10 – General view 817
1 11 – Dismantling and assembling gearbox 819
1 12 – Dismantling and assembling gearbox 824
1 13 – Dismantling and assembling gearbox 827
1 14 – Dismantling and assembling gearbox 842
1 15 – Dismantling and assembling gearbox 847
1 16 – Dismantling and assembling gearbox 850
1 17 – Vehicles with gearchange and consumption indicator 853
1 18 – Additional bearing for output shaft 854
1 19 – Gearbox breather relocation 856
1 20 – TDC sensor adapter in clutch housing 856
1 21 – Spring for the reverse gear relay lever 857
1 22 – Modified locating and mounting of the selector shaft in the gearbox 857
1 23 – Additionally securing magnet in clutch housing with sealing compound 860
1 24 – Selector shaft cover modified 861
35 – Gears, Shafts 862
1 – Gears, Shafts 862
1 1 – Gears, Shafts 862
1 2 – Dismantling and assembling input shaft 862
1 3 – Dismantling and assembling output shaft 872
1 4 – Adjusting output shaft 880
1 5 – Synchronizer hub for 5th gear with retaining ring for locking keys 883
1 6 – Dismantling and assembling output shaft (pinion shaft) 885
39 – Final drive, Differential 886
1 – Final drive, Differential 886
1 1 – Final drive, Differential 886
1 2 – Removing and installing drive flange oil seal 886
1 3 – Dismantling and assembling differential 888
1 4 – Adjustment table 895
1 5 – Adjusting differential 895
1 6 – Play free location of drive flange shafts 897
1 7 – Differential with cones: dismantling and assembling 898
1 8 – Differential bevel gear shaft secured with extended rivets 902
00053779220 Running gear 904
Title 904
Manual Repair Groups 905
Technical Bulletin No 1 1040
Technical Bulletin No 2 1054
Technical Bulletin No 3 1060
Technical Bulletin No 4 1061
Technical Bulletin No 5 1064
Technical Bulletin No 6 1065
Contents 906
00053780320 General body repairs Golf Convertible 1979 1067
Title 1067
Manual Repair Groups 1068
Technical Bulletin No 1 1125
Technical Bulletin No 2 1128
Technical Bulletin No 3 1130
Technical Bulletin No 4 1139
Technical Bulletin No 5 1149
Contents 1069
00053781120 Heating Air conditioner 1166
Title 1166
Manual Repair Groups 1167
Technical Bulletin No 1 1225
Technical Bulletin No 2 1227
Technical Bulletin No 3 1228
Technical Bulletin No 4 1232
Technical Bulletin No 5 1240
Contents 1168
00053782220 Electrical system 1242
Title 1242
Manual Repair Groups 1243
Technical Bulletin No 1 1418
Contents 1244
00053786120 General body repairs 1419
Title 1419
Manual Repair Groups 1420
Technical Bulletin No 1 1468
Technical Bulletin No 2 1473
Technical Bulletin No 3 1474
Technical Bulletin No 4 1476
Technical Bulletin No 5 1482
Technical Bulletin No 6 1484
Technical Bulletin No 7 1489
Technical Bulletin No 8 1490
Technical Bulletin No 9 1492
Contents 1421
00053788220 Electrical system Scircoco 1981 1494
Title 1494
Manual Repair Groups 1495
Technical Bulletin No 1 1628
Contents 1496
00053789220 4 Cyl injection engine (2 valve) Mechanics 1629
00 – Technical data 1633
1 – Technichal data 1633
1 1 – Technichal data 1633
1 2 – Engine number 1633
1 3 – Engine summary 1633
10 – Removing and installing engine 1636
1 – Engine removal and installation 1636
1 1 – Engine removal and installation 1636
1 2 – Notes on engine removal 1636
1 3 – Notes on installation 1637
1 4 – Tightening torques 1638
1 5 – Additional installation procedures and notes for vehicles with air conditioning 1638
13 – Crankshaft group 1640
1 – Dismantling and assembling engine 1640
1 1 – Dismantling and assembling engine 1640
1 2 – Installing toothed belt 1651
1 3 – Adjusting alternator V-belt tension 1653
2 – Dismantling and assembling cylinder block, crankshaft and flywheel 1654
2 1 – Dismantling and assembling cylinder block, crankshaft and flywheel 1654
2 2 – Installing release plate retaining ring 1661
2 3 – Renewing crankshaft oil seal -pulley end 1662
2 4 – Crankshaft dimensions 1663
2 5 – Installing drive plate 1664
2 6 – Marking flywheel with ignition timing notch 1664
3 – Dismantling and assembling pistons and conrods 1666
3 1 – Dismantling and assembling pistons and conrods 1666
3 2 – Piston and cylinder dimensions 1674
15 – Cylinder head, Valve gear 1676
1 – Removing and installing cylinder head 1676
1 1 – Removing and installing cylinder head 1676
1 2 – Installing cylinder head 1680
1 3 – Testing compression 1681
2 – Servicing valve gear 1682
2 1 – Servicing valve gear 1682
2 2 – Reworking valve seats 1690
2 3 – Checking hydraulic tappets 1692
2 4 – Renewing camshaft oil seal 1693
2 5 – Removing and installing camshaft 1693
2 6 – Checking valve guides 1694
2 7 – Renewing valve guides 1695
2 8 – Renewing valve stem oil seal -with cylinder head installed 1695
2 9 – Checking and adjusting valve clearance 1696
17 – Lubrication 1699
1 – Removing and installing lubrication system components 1699
1 1 – Removing and installing lubrication system components 1699
1 2 – Oil cooler 1706
1 3 – Checking oil pressure switch and oil pressure (engine codes: DX, JH, JJ, KT, 2H) 1710
1 4 – Checking oil pressure switch and oil pressure (engine code: EG) 1711
19 – Cooling system 1713
1 – Removing and installing cooling system components 1713
1 1 – Removing and installing cooling system components 1713
1 2 – Draining and refilling with coolant 1721
1 3 – Fan run-on for cooling injectors 1722
1 4 – Repair air deflector installation 1722
20 – Fuel supply system 1723
1 – Removing and installing fuel system components 1723
1 1 – Removing and installing fuel system components 1723
1 2 – Removing and installing fuel tank with ancillary components (> 1/84, 40-litre fuel tank) 1723
1 3 – Removing and installing fuel tank with ancillary components (2/84 >, 55-litre fuel tank) 1730
1 4 – Removing and installing fuel pump, fuel filter, and pressure accumulator (engine codes: DX and KT > 1/84, EG JJ) 1735
1 5 – Removing and installing fuel pump, fuel filter, and pressure accumulator (engine codes: DX and KT 2/84 >, JH) 1737
1 6 – Removing and installing fuel pump and fuel filter (engine code: 2H) 1739
1 7 – Rules of cleanliness 1740
1 8 – Connecting remote control V A G 1348/3A 1743
1 9 – Checking fuel pumps (engine codes: DX, EG, JH, JJ, KT) 1743
1 10 – Checking fuel pump (engine code: 2H) 1746
1 11 – Checking fuel pump non-return valve (engine codes: DX, EG, JH, JJ, KT) 1749
1 12 – Checking fuel pump relay (engine codes: DX, EG, JH, JJ, KT) 1750
1 13 – Checking fuel pump relay (engine code: 2H) 1751
1 14 – Retrotitting adapter plate for fuel pump relay (engine code: EG > 7/82) 1752
1 15 – Removal and installation of fuel gauge sender, fuel lift pump 1753
1 16 – Renewing fuel gauge sender, fuel lift pump (engine codes: DX and KT 2 84 >, JH) 1753
1 17 – Removing and installing fuel tank (> 1/84, 40- litre fuel tank) 1755
1 18 – Removing and installing fuel tank (2/84 >, 55- litre fuel tank) 1757
1 19 – Checking fuel system for leaks (> 1/84, 40-litre fuel tank) 1758
2 – Servicing activated charcoal filter unit 1760
2 1 – Servicing activated charcoal filter unit 1760
2 2 – Engine code: JH > 7/86 1760
2 3 – Engine code: JH 8/86 > 1762
2 4 – Engine code: 2H 1764
3 – Throttle-mechanism 1766
3 1 – Throttle-mechanism 1766
3 2 – Throttle cable adjustment, manual gearbox 1766
3 3 – Servicing throttle controls, automatic gearbox (engine codes: JH, 2H) 1767
3 4 – Adjusting throttle controls 1768
26 – Exhaust system 1771
1 – Removing and installing exhaust system components 1771
1 1 – Removing and installing exhaust system components 1771
1 2 – Engine Codes: DX, EG JJ KT 1771
1 3 – Engine Code: JH 1774
1 4 – Engine Code: 2H 1777
1 5 – Removing and installing spring clips (engine codes: DX 8/83 >, JH, KT) 1780
1 6 – Tensioning and relaxing spring clips (engine codes: DX 8/83 >, JH, KT) 1780
2 – Checking exhaust gas recirculation (EGR) (engine code: JJ) 1781
2 1 – Checking exhaust gas recirculation (EGR) (engine code: JJ) 1781
00053790120 34 PICT Keihin carburettor and ignition system 1783
22 – Mixture preparation, Carburetor 1787
1 – Air cleaner – 34 PICT carburettor 1787
1 1 – Air cleaner – 34 PICT carburettor 1787
1 2 – Checking automatic intake air preheating 1788
1 3 – Checking temperature regulator 1788
1 4 – Checking intake manifold preheating 1789
2 – Servicing 34 PICT carburettor 1790
2 1 – Servicing 34 PICT carburettor 1790
2 2 – Top part of carburettor 1791
2 3 – Bottom part of carburettor 1793
2 4 – carburettor adjustment data 1796
2 5 – Jets and settings 1797
2 6 – Adjusting idling speed 1799
2 7 – Checking and adjusting cold idling speed 1800
2 8 – Checking function of pull-down unit 1801
2 9 – Checking and adjusting choke valve gap 1801
2 10 – Basic throttle valve setting 1802
2 11 – Checking and adjusting amount injected by accelerator pump 1802
2 12 – Cold idling valve 1805
2 13 – Water-heated and electrically heated automatic choke 1806
2 14 – Vacuum connections 1808
3 – Air cleaner – Keihin carburettor 1810
3 1 – Air cleaner – Keihin carburettor 1810
3 2 – Checking automatic intake air preheating 1810
3 3 – Checking intake manifold preheating 1810
4 – Servicing Keihin carburettor>07 78 1812
4 1 – Servicing Keihin carburettor>07 78 1812
4 2 – carburettor adjustment data 1816
4 3 – Jets and settings 1817
4 4 – Adjusting idling speed 1818
4 5 – Checking and adjusting cold idle speed 1819
4 6 – Adjusting throttle valve gap for overrun boost 1819
4 7 – Checking and adjusting throttle valve positioner 1820
4 8 – Checking and adjusting quantity injected by accelerator pump 1821
4 9 – Adjusting choke cable 1822
5 – Servicing Keihin carburettor 08 78 > 1823
5 1 – Servicing Keihin carburettor 08 78 > 1823
5 2 – Top part carburettor 1825
5 3 – Bottom part of carburettor 1827
5 4 – carburettor adjustment data 1829
5 5 – Jets and settings 1830
5 6 – Adjusting idling speed 1832
5 7 – Checking and adjusting cold idle speed 1833
5 8 – Checking and adjusting choke valve gap 1834
5 9 – Checking vacuum system of pull-down unit 1835
5 10 – Checking and adjusting quantity injected by accelerator pump 1836
5 11 – Basic setting of throttle valve stage II 1837
5 12 – Checking vacuum limiter 1838
5 13 – Checking stage II thermopneumatic valve 1838
5 14 – Checking and adjusting float level 1839
5 15 – Checking overrun boost 1839
5 16 – Adjusting choke cable 1843
5 17 – Vacuum connections 1844
28 – Ignition system 1854
1 – Servicing breaker-triggered ignition system 1854
1 1 – Servicing breaker-triggered ignition system 1854
1 2 – Adjustment data, spark plugs 1858
1 3 – Distributor data 1860
1 4 – Installing distributor 1863
1 5 – Checking and adjusting dwell angle and ignition timing point 1864
1 6 – Checking ignition timing 1865
1 7 – Vacuum unit leak test 1866
1 8 – Checking vacuum advance control 1868
2 – Servicing TIC-H ignition system 1870
2 1 – Servicing TIC-H ignition system 1870
2 2 – Safety precautions for TCI-H ignition system 1876
2 3 – Adjustment data, spark plugs 1877
2 4 – Distributor data 1878
2 5 – Installing distributor 1880
2 6 – Checking and adjusting ignition timing point 1881
2 7 – Checking ignition timing 1882
2 8 – Vacuum unit leak test 1884
2 9 – Checking TCI-H ignition system 1887
2 10 – Checking DIS switch unit 1889
2 11 – Removing and installing rotor plate 1890
2 12 – Checking vacuum advance control 1890
2 13 – Adjusting engines with Digital Idling Stabilizer (DIS) 1891
2 14 – Setting adjustments for engines with DIS/TCI 07 00 > 1892
00253772220 4 cyl carburetor engine mechanics (1 5 1 6 and 1 8 litre engine) 1894
00 – Technical data 1898
1 – Technical data 1898
1 1 – Technical data 1898
1 2 – Engine number 1898
1 3 – Characteristic engine features 1898
10 – Removing and installing engine 1901
1 – Removing and installing engine 1901
1 1 – Removing and installing engine 1901
1 2 – Notes on removing 1901
1 3 – Taking engine off gearbox 1905
1 4 – Attaching engine to repair stand 1907
1 5 – Notes on installing 1907
1 6 – Tightening torques 1909
1 7 – Additional operations and instructions for vehicles with air conditioner 1909
13 – Crankshaft group 1912
1 – Dismantling and assembling engine 1912
1 1 – Dismantling and assembling engine 1912
1 2 – Installing toothed belt 1919
1 3 – Adjusting V belt tension for alternator 1922
2 – Dismantling and assembling cylinder block, crankshaft and flywheel 1923
2 1 – Dismantling and assembling cylinder block, crankshaft and flywheel 1923
2 2 – Renewing crankshaft oil seal – pulley end 1930
2 3 – Crankshaft dimensions 1932
2 4 – Installing drive plate 1932
2 5 – Subsequent machining of ignition timing notch 1934
3 – Dismantling and assembling pistons and conrods 1936
3 1 – Dismantling and assembling pistons and conrods 1936
3 2 – Piston and cylinder dimensions 1944
15 – Cylinder head, Valve gear 1947
1 – Removing and installing cylinder head 1947
1 1 – Removing and installing cylinder head 1947
1 2 – Installing cylinder head 1951
1 3 – Checking compression pressure 1952
2 – Servicing valve gear 1953
2 1 – Servicing valve gear 1953
2 2 – Reworking valve seats 1963
2 3 – Removing and installing camshaft 1966
2 4 – Checking hydraulic bucket tappets 1967
2 5 – Renewing valve stem oil seals 1968
2 6 – Checking valve guides 1969
2 7 – Renewing valve guides 1969
2 8 – Renewing camshaft oil seal 1969
2 9 – Checking and adjusting valve clearance 1970
17 – Lubrication 1973
1 – Removing and installing parts of lubrication system 1973
1 1 – Removing and installing parts of lubrication system 1973
1 2 – Checking oil pressure switch and oil pressure 1980
19 – Cooling system 1982
1 – Removing and installing parts of cooling system 1982
1 1 – Removing and installing parts of cooling system 1982
1 2 – Draining and filling cooling system 1988
1 3 – Checking cooling system and cap 1989
1 4 – Modified radiator attachment 1989
1 5 – Installing service cardboard air deflectors 1990
20 – Fuel supply system 1992
1 – Removing and installing parts of fuel system 1992
1 1 – Removing and installing parts of fuel system 1992
1 2 – Removing and installing fuel tank with attachments 1994
1 3 – Modified fuel tank with modified breather system 2003
1 4 – Removing and installing fuel tank with attachments 2004
1 5 – Removing and installing fuel tank 2007
1 6 – Adjusting throttle cable – manual gearbox 2008
2 – Servicing throttle controls – automatic gearbox 2010
2 1 – Servicing throttle controls – automatic gearbox 2010
2 2 – Adjusting throttle cable 2012
2 3 – Adjusting accelerator pedal cable 2013
2 4 – Adjusting throttle controls – automatic gearbox 2013
26 – Exhaust system 2016
1 – Removing and installing parts of exhaust system 2016
1 1 – Removing and installing parts of exhaust system 2016
1 2 – Removing and installing clamping springs 2025
1 3 – Tightening/loosening clamping springs 2025
1 4 – Checking exhaust gas recirculation and exhaust afterburning 2026
2 – Vehicles with 2B2 carburettor and air pump for exhaust afterburning (01 76 >) 2027
2 1 – Vehicles with 2B2 carburettor and air pump for exhaust afterburning (01 76 >) 2027
2 2 – Checking exhaust gas recirculation 2030
2 3 – Checking exhaust afterburning 2031
3 – Vehicles with PICT carburettor and air pump for exhaust afterburning (08 76 >) 2032
3 1 – Vehicles with PICT carburettor and air pump for exhaust afterburning (08 76 >) 2032
3 2 – Checking exhaust gas recirculation 2034
3 3 – Checking exhaust afterburning 2034
4 – Vehicles with engine code FN > 07 79, Keihin carburettor and manual gearbox 2036
4 1 – Vehicles with engine code FN > 07 79, Keihin carburettor and manual gearbox 2036
4 2 – Checking exhaust gas recirculation 2038
5 – Vehicles with PICT carburettor and exhaust afterburning without air pump (03 78 >) 2040
5 1 – Vehicles with PICT carburettor and exhaust afterburning without air pump (03 78 >) 2040
5 2 – Checking exhaust gas recirculation 2042
5 3 – Checking exhaust afterburning 2042
00253773220 K Jetronic Ignition system 2044
01 – Self-diagnosis, Electrical check 2048
1 – Electrical check of the regulated exhaust system (engine code: JH) 2048
1 1 – Electrical check of the regulated exhaust system (engine code: JH) 2048
1 2 – Test table – Golf 2049
1 3 – Test table – Scirocco 2050
25 – Mixture preparation, Injection 2052
1 – K-jetronic injection system 2052
1 1 – K-jetronic injection system 2052
1 2 – Fitting locations – overview (engine code: JH) 2052
1 3 – Servicing K-Jetronic injection system 2055
1 4 – Technical data 2071
1 5 – Safety measures 2074
1 6 – Rules for cleanliness 2074
1 7 – Idling adjustment (engine code: DX, EG, JJ, KT, and JH without catalyst) 2075
1 8 – Idling adjustment (engine code: JH with catalyst) 2077
1 9 – Checking idling speed boost (09 84 >) 2080
1 10 – Checking adjusting lever and control plunger 2082
1 11 – Checking and adjusting air flow meter plate position (engine code: DX and KT >02 86, EG,JH, JJ) 2082
1 12 – Checking/adjusting rest position and free travel of air glow meter plate (engine code: DX and KT 03 86 >) 2083
1 13 – Removing and installing control plunger (engine code: DX and KT 03 86>) 2086
1 14 – Checking cold start valve and thermo time switch 2086
1 15 – Cold acceleration enrichment: Retrofitting (engine code: DX and KT >07 84, JH with vacuum switch 08 87>) 2088
1 16 – Checking cold acceleration enrichment (engine code: DX and KT 08 84 >) 2092
1 17 – Checking diaphragm pressure switch (engine code:DX and KT 08 84 >) 2093
1 18 – Checking and adjusting idling switch (engine code: DX and KT 08 84 >) 2093
1 19 – Checking and adjusting full throttle switch (engine code: JH) 2094
1 20 – Checking auxiliary air valve 2095
1 21 – Checking warm-up valve 2096
1 22 – Checking and adjusting system pressure 2097
1 23 – Checking Holding pressure 2098
1 24 – Comparing injection delivery 2099
1 25 – Basic throttle valve setting 2101
1 26 – Checking regulated exhaust system (engine code: JH) 2101
1 27 – Vacuum connections (engine code: EG) 2109
1 28 – Vacuum connections (engine code: DX 11 90 >) 2111
28 – Ignition system 2112
1 – Servicing ignition system 2112
1 1 – Servicing ignition system 2112
1 2 – Servicing contact breaker controlled ignition system (engine code: EG > 07 79) 2113
1 3 – Adjustment data, spark plug 2118
1 4 – Distributor data 2118
1 5 – Installing distributor 2119
1 6 – Checking and adjusting dwell angle ignition timing 2120
1 7 – Checking ignition timing control 2121
1 8 – Serving TDI-H ignition system (engine code: EG 08 79 >, DX, JH, JJ, KT) 2124
1 9 – Dismantling and assembling distributor (engine code: EG 08 79 >, DX, JH, JJ, KT) 2128
1 10 – Adjustment data, spark plugs 2132
1 11 – Distributor data 2134
2 – Safety measures for TCI-H system 2135
2 1 – Safety measures for TCI-H system 2135
2 2 – Installing distributor 2136
2 3 – Checking and adjusting ignition timing 2137
2 4 – Checking ignition timing control 2138
2 5 – Checking TCI-H switch unit and Hall sender 2142
2 6 – Checking DIS switch unit 2144
D4B807E3B5B Body Repairs General Body Repairs 2145
1 Safety instructions 2149
1 1 Part removal 2149
1 2 Battery and welding operation 2149
1 3 Electronic control unit 2149
1 3 1 Processing of the electronic control unit after repair dueto a traffic accident 2149
1 4 Paint, glass, soft pad and trim 2150
1 5 Fuel tank or fuel delivery pipeline 2150
1 6 Air conditioner 2150
1 6 1 Remedial measures: 2150
1 7 Airbag System 2151
1 8 Check the seat belts 2151
1 8 1 Belt body 2152
1 8 2 Automatic retractor (locking function) 2152
1 8 3 Visual inspection of the seat belt buckle 2153
1 8 4 Seat belt buckle function 2153
1 8 5 Seat belt guide member and tongue 2154
1 8 6 Fixing piece and fixing point 2154
1 9 Safety specifications for the seat belt tensioner 2154
1 10 Body repair on a vehicle equipped with the seat belt tensioners 2155
1 10 1 The following vehicles have been equipped with: 2155
1 11 Perform cutting off, correcting and/or leveling on a vehicleequipped with airbags 2156
1 12 Remove the front seats with a side airbag 2156
2 Basic instruction 2157
2 1 Diagnosis of the accident vehicle 2157
2 2 Condition of the body and/or the parts for delivery to thepainting workshop 2157
2 3 Correction 2157
2 4 Cutting 2157
2 5 Body-cut part and part section 2157
2 6 Original connection 2158
2 7 Galvanized body parts 2158
2 8 Remove the rest part 2158
2 9 New parts 2158
2 10 Parts 2158
2 11 Molded foam plastic pads 2159
3 Symbolic interpretation 2160
3 1 Symbolic interpretation for welding 2160
3 2 Symbolic interpretation for the operation method 2160
3 2 1 Grinding 2161
3 2 2 Thinning 2161
3 2 3 Punching 2161
3 2 4 Drilling 2162
3 2 5 Polishing 2162
3 2 6 Cavity corrosion protection 2162
3 2 7 Bonding 2163
3 2 8 Precise sealing 2163
4 Body repair tools 2164
4 1 Flaring tool -V A G 1317- 2164
4 2 Punching pliers -V A G 1329- 2164
4 3 Basic equipment -V A G 1366/3- 2164
4 4 Bottom protection layer spray gun -V A G 1379- 2165
4 5 Electric blower -V A G 1416- 2165
4 6 Door tensioner -V A G 1438- 2165
4 7 Body equipment component -V A G 1439- 2166
4 8 Pneumatic cutting knife -V A G 1523 A- 2166
4 9 Air chisel -V A G 1577- 2166
4 10 Edge closing iron block -V A G 1585- 2167
4 11 Welding fume ventilator -V A G 1586- 2167
4 12 Welding spot releasing device -V A G 1731- 2167
4 13 Pneumatic spray gun -V A G 1761/1- 2168
4 14 Pneumatic punching and thinning pliers -VAS 1996- 2168
4 15 Pneumatic adhesive spray gun -V A G 2005- 2168
4 16 Door hinge correction tool 2169
4 17 Hose kit 5023 for the inert gas protection welding 2169
4 18 Angle grinder -VAS 5174- 2169
4 19 Angle grinder -VAS 5175- 2170
4 20 Wire brush -VAS 5182- 2170
5 Body bonding 2171
5 1 Transporter 1991 → 2171
5 1 1 Separation process: 2171
5 1 2 Bonding process: 2171
5 2 Bonding types 2171
5 2 1 Bonding-strong 2171
5 2 2 Bonding-spot welding 2172
5 3 Repair method for replacing the parts 2172
5 3 1 Spot welding and bonding 2172
5 3 2 Plug welding and bonding (if spot welding is impossible) 2172
5 3 3 Welding fume ventilator 2173
5 3 4 Preparations 2173
5 3 5 Trimming 2173
6 Corrosion protection measures 2174
6 1 Corrosion protection 2174
7 Waste disposal instructions 2175
7 1 Waste disposal 2175
7 2 Air pressure tappet exhaust 2175
7 3 Airbag 2176
7 3 1 Waste disposal 2176
8 Contact corrosion protection 2177
8 1 Connection of aluminum alloy/magnesium alloy with steel 2177
9 Steel plate repair 2178
9 1 High-strength body plate 2178
9 2 Galvanized body parts 2178
9 2 1 Preparations 2178
9 2 2 Part cutting 2179
9 2 3 Connection process 2179
9 3 Welding on the galvanized body steel plate 2179
9 3 1 Inert gas protection plug welding SG of the galvanized steelplate 2179
9 3 2 Resistance pressure spot welding RP of the galvanized steelplate 2180
9 3 3 Welding transformer 2180
9 3 4 Welding clamp 2180
9 4 Tearing test 2180
10 Aluminum repair 2181
10 1 Painting 2181
10 2 Surface treatment 2181
10 3 Leveling 2182
10 4 Temperature control for heating 2182
11 Plastic repair method 2183
11 1 Material 2183
11 2 Repairing the pit 2184
11 3 Repairing the scratch 2185
11 4 Repair the crack 2187
11 5 Repairing the small hole (the diameter is more than 30 mm) 2188
11 6 Plastic repair (glass fibre material) 2189
11 7 Repair process 2190
11 7 1 Repairing the breakage position 2190
11 7 2 Repairing the surface damage 2192
12 Glass repair 2193
12 1 Repairing the windshield 2193
12 1 1 Premises 2193
12 1 2 Required special tools, operating equipment, testing instrumentsand auxiliary tools 2194
12 1 3 Repair description 2195
S.V 26/01/2025