Volkswagen Passat 1988 Workshop Manual – PDF DOWNLOAD
$31.95
Volkswagen Passat 1988 Workshop Manual – PDF DOWNLOAD
Description
Volkswagen Passat 1988 Workshop Manual – PDF DOWNLOAD
FILE DETAILS:
Volkswagen Passat 1988 Workshop Manual – PDF DOWNLOAD
Language : English
Pages : 667
Downloadable : Yes
File Type : PDF
IMAGES PREVIEW OF THE MANUAL:
TABLE OF CONTENTS:
Volkswagen Passat 1988 Workshop Manual – PDF DOWNLOAD
00051096120 General body repairs 1
01 – Eigendiagnose 9
1 – Self diagnosis of airbag system 9
1 1 – Self diagnosis of airbag system 9
1 2 – Function 9
1 3 – Test prerequisites for self diagnosis 9
1 4 – Connecting fault reader V A G 1551 and selecting function 9
1 5 – Interrogating fault memory 12
1 6 – Fault table 13
1 7 – Fault table / Rapid data transfer 13
1 8 – Erasing fault memory, ending output 14
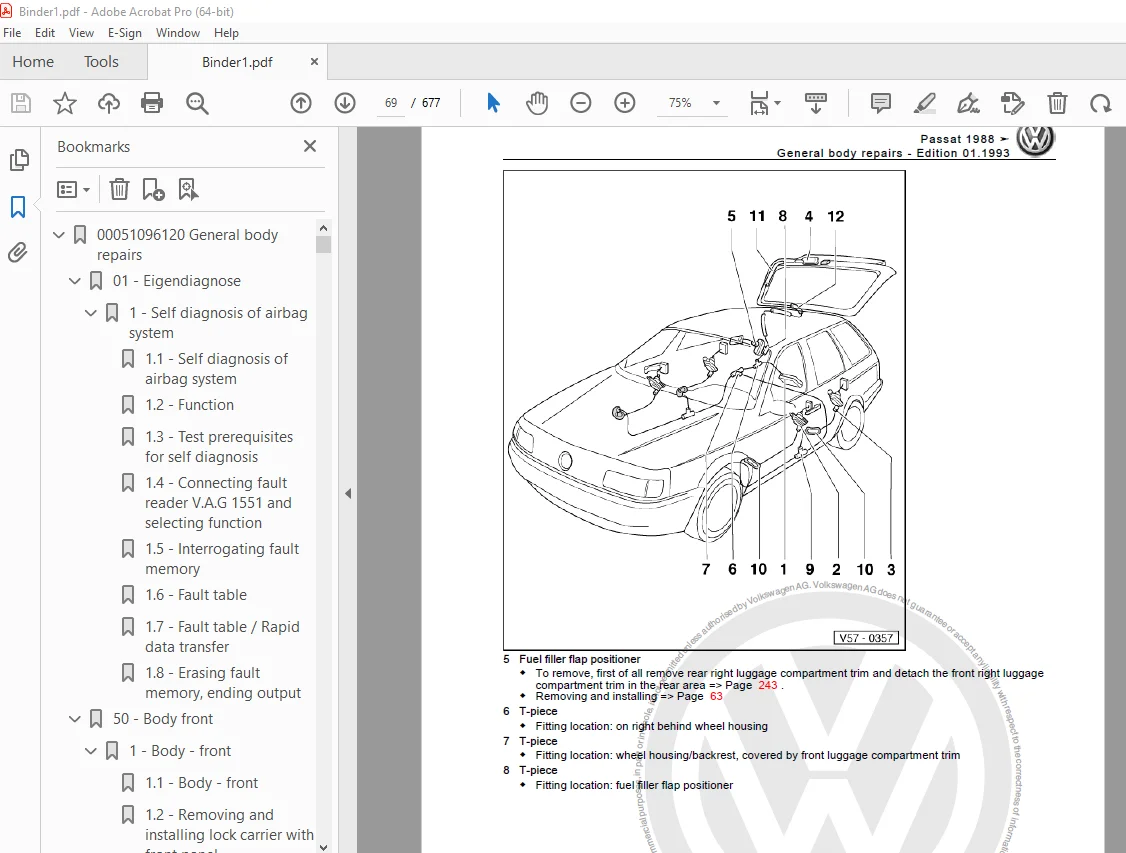
50 – Body front 16
1 – Body – front 16
1 1 – Body – front 16
1 2 – Removing and installing lock carrier with front panel 17
1 3 – Removing and installing front wing 18
1 4 – Cutting out hole for telescopic aerial 19
55 – Bonnet, Flaps 21
1 – Removing and installing bonnet 21
1 1 – Removing and installing bonnet 21
1 2 – Removing and installing bonnet lock cable 21
2 – Removing and installing boot lid/tailgate 23
2 1 – Removing and installing boot lid/tailgate 23
2 2 – Removing and installing boot lid lock (Notchback) 23
2 3 – Removing and installing tailgate lock (Variant) 25
2 4 – Adjusting pull rod 27
2 5 – Removing and installing lock cylinder 28
2 6 – Removing and installing lock cylinder (central locking) 30
2 7 – Removing gas-filled strut for tailgate 33
2 8 – Releasing gas from strut 34
2 9 – Springs and attachment points for boot lid 34
2 10 – Adjusting tailgate 36
57 – Front doors/Door components/Central locking system 38
1 – Servicing front door 38
1 1 – Servicing front door 38
1 2 – Servicing front door with electric window lifter 42
1 3 – Removing and installing door 45
1 4 – Removing and installing window lifter 46
1 5 – Removing door window 47
1 6 – Fitting door window to window lifter 47
1 7 – Removing outer window channel 47
1 8 – Installing outer window channel 48
1 9 – Fitting lifting rail onto door window 48
1 10 – Removing door inner seal 49
1 11 – Removing and installing electric window lifters 49
1 12 – Servicing electric window lifters 50
1 13 – Removing and installing impact bar > 7 91 only USA 8 91 > Standard 51
1 14 – Servicing door handle for central locking 52
1 15 – Removing and installing door handle 54
1 16 – Removing and installing door lock 55
1 17 – Removing inner release handle 56
1 18 – Installing lock cylinder 56
1 19 – Renewing door lock switch 57
1 20 – Maintaining common key locking 58
2 – Servicing door lock with operating mechanism 59
2 1 – Servicing door lock with operating mechanism 59
2 2 – Removing and installing door lock with tolerance compensator 01 92 > 64
3 – Servicing central locking (Notchback) 66
3 1 – Servicing central locking (Notchback) 66
3 2 – Servicing central locking (Estate) 68
3 3 – Removing and installing front door positioner 72
3 4 – Removing and installing rear door positioner 73
3 5 – Functional check of central locking 74
58 – Rear doors/Door components 76
1 – Servicing rear door 76
1 1 – Servicing rear door 76
1 2 – Removing and installing door 79
1 3 – Removing and installing window lifters 79
1 4 – Removing and installing door window 80
1 5 – Fitting door window to window lifter 80
1 6 – Removing outer window channel 81
1 7 – Installing outer window channel 81
1 8 – Fitting lifting rail to door window 81
1 9 – Servicing rear electric window lifters 82
1 10 – Removing and installing impact bar > 7 91 only USA, 8 91 > Standard 86
1 11 – Servicing door lock with mechanism 87
1 12 – Removing and installing door handle 91
1 13 – Removing and installing door lock 91
1 14 – Removing interior door release mechanism 92
1 15 – Removing door inner seal 92
60 – Sliding/tilting roof 93
1 – Servicing sliding/tilting roof 93
1 1 – Servicing sliding/tilting roof 93
1 2 – Removing sliding/tilting roof panel 97
1 3 – Installing sliding/tilting roof panel 98
1 4 – Checking and adjusting parallel running 99
1 5 – Removing panel headliner for sliding/tilting roof 100
1 6 – Adjusting sliding/tilting roof panel (height adjustment) 101
1 7 – Checking cable drive (0 position) 102
1 8 – Removing sliding/tilting roof carrier unit 103
1 9 – Cleaning water drain hoses 106
2 – Servicing sliding/tilting roof 108
2 1 – Servicing sliding/tilting roof 108
2 2 – Removing sliding/tilting roof glass panel 112
2 3 – Adjusting panel seal 112
2 4 – Installing sliding/tilting roof glass panel 113
2 5 – Removing sliding headlining 113
2 6 – Installing sliding headlining 114
2 7 – Checking parallel running 114
2 8 – Adjusting parallel running 115
2 9 – Sliding/tilting roof glass panel (height adjustment) 115
2 10 – Checking cable drive (0 position) 117
2 11 – Removing sliding/tilting roof carrier unit 118
2 12 – Cleaning water drain hoses 118
63 – Bumpers 119
1 – Servicing bumpers 119
1 1 – Servicing bumpers 119
1 2 – Removing and installing front bumper 119
1 3 – Removing air intake grille 122
1 4 – Removing front bumper from side member 122
1 5 – Removing and installing rear bumper 124
1 6 – Renewing bumper cover 125
64 – Glazing 127
1 – Removing and installing windows 127
1 1 – Removing and installing windows 127
1 2 – Tools 129
1 3 – Materials 130
1 4 – Removing and installing windscreen (flush-bonded) 131
1 5 – Removing windscreen 133
1 6 – Installing windscreen 134
1 7 – Removing and installing rear window of Notchback (flush-bonded) 135
1 8 – Removing broken rear window 136
1 9 – Removing undamaged rear window 137
1 10 – Removing undamaged rear window 138
1 11 – Removing rear window Variant > 07 90 139
1 12 – Removing broken rear window 140
1 13 – Removing undamaged rear window 141
1 14 – Installing rear window 141
1 15 – Removing undamaged rear window Variant 08 90 > 143
1 16 – Removing broken rear window 145
1 17 – Installing rear window 145
1 18 – Preparing undamaged rear window for glazing 146
1 19 – Preparing new rear window for glazing 147
1 20 – Preparing body flange for glazing 148
1 21 – Installation instructions 148
1 22 – Curing time 149
1 23 – Touching up paint damage 149
1 24 – Cleaning off excess adhesive sealing material 149
1 25 – Removing and installing window 150
1 26 – Removing and installing side window (Variant) 151
66 – Exterior equipment 152
1 – Removing and installing roof moulding (Notchback) 152
1 1 – Removing and installing roof moulding (Notchback) 152
2 – Removing and installing roof moulding (Variant) 153
2 1 – Removing and installing roof moulding (Variant) 153
2 2 – Removing and installing roof railing 157
3 – Removing and installing front panel 160
3 1 – Removing and installing front panel 160
4 – Removing and installing wheel housing liner 161
4 1 – Removing and installing wheel housing liner 161
5 – Removing and installing exterior mirror 162
5 1 – Removing and installing exterior mirror 162
6 – Removing and installing rear spoiler 164
6 1 – Removing and installing rear spoiler 164
6 2 – Retrofitting rear spoiler 166
6 3 – Bonding protective film to left and right side panels 167
7 – Removing and installing boot lid trim panel (Notchback) 168
7 1 – Removing and installing boot lid trim panel (Notchback) 168
8 – Removing and installing tailgate trim panel (Variant) 170
8 1 – Removing and installing tailgate trim panel (Variant) 170
9 – Removing and installing protective strips 172
9 1 – Removing and installing protective strips 172
10 – Removing and installing wheel arch trim (front/rear) and door protective strips 173
10 1 – Removing and installing wheel arch trim (front/rear) and door protective strips 173
11 – Removing and installing sill panel trim (GT) 175
11 1 – Removing and installing sill panel trim (GT) 175
11 2 – Removing and installing sill panel trim 176
11 3 – Renewing sill panel trim (> Chassis No 31 JE 013 409) 177
68 – Interior equipment 179
1 – Removing and installing seat belts 179
1 1 – Removing and installing seat belts 179
1 2 – Removing and installing belt height adjustment fittings 181
1 3 – Removing front belt anchor 182
1 4 – Removing front belt latch 182
1 5 – Removing and installing rear belt reel 183
2 – Servicing electrically operated passive restraint system (ELRA) 185
2 1 – Servicing electrically operated passive restraint system (ELRA) 185
2 2 – Removing drive unit 188
2 3 – Removing and installing automatic reel with triggering solenoid 189
2 4 – Functional check 189
3 – Inspecting seat belts 190
3 1 – Inspecting seat belts 190
4 – Removing and installing interior mirror 193
4 1 – Removing and installing interior mirror 193
4 2 – Repair method with glass-metal adhesive 193
5 – Removing and installing airbag 195
5 1 – Removing and installing airbag 195
5 2 – Safety precautions when working on the airbag 196
5 3 – Replacing airbag units following an accident 196
5 4 – Removing and installing driver airbag unit 197
5 5 – Removing and installing steering wheel 199
5 6 – Removing and installing coil connector with slip ring 200
5 7 – Removing and installing front passenger’s airbag unit 201
5 8 – Removing retaining frame 204
5 9 – Removing and installing airbag control unit (J234) 204
5 10 – Disposing of airbag units 204
6 – Removing and installing luggage compartment cover 206
6 1 – Removing and installing luggage compartment cover 206
6 2 – Retrofitting luggage compartment cover (Part No 302) 207
70 – Trim/Insulation 209
1 – Removing and installing dash panel 209
1 1 – Removing and installing dash panel 209
1 2 – Removing passenger side oddments tray 209
1 3 – Removing and installing driver’s side 209
1 4 – Removing glove box 212
1 5 – Servicing glove box 213
1 6 – Removing and installing centre console 215
2 – Servicing front door trim 218
2 1 – Servicing front door trim 218
2 2 – Removing front door trim – two-piece with door tray 218
2 3 – Removing and installing rear door trim – one-piece 221
2 4 – Removing and installing rear door trim – two-piece with door tray 223
2 5 – Removing and installing window crank 226
2 6 – Removing trim plate for interior door latch 226
2 7 – Dismantling door tray with storage box 227
2 8 – Dismantling door tray with speaker mounting 227
2 9 – Renewing door insulation sheeting 228
2 10 – Removing rear door trim cover (Notchback) 228
2 11 – Removing rear door trim cover (Variant) 229
2 12 – Preparing trim for switch mounting (electric window lifter) 229
3 – Removing and installing trim 231
3 1 – Removing and installing trim 231
3 2 – Removing and installing upper A pillar trim 231
3 3 – Removing upper A pillar trim for ELRA 233
3 4 – Detaching upper A pillar trim for ELRA from transport rail 235
3 5 – Removing and installing lower A pillar trim 236
3 6 – Removing and installing B pillar trim 239
3 7 – Removing B pillar trim for ELRA 241
3 8 – Removing and installing upper C pillar trim 242
3 9 – Removing and installing lower C pillar trim 244
3 10 – Removing and installing lower C pillar upholstery 246
3 11 – Removing and installing D pillar (Notchback) 247
3 12 – Removing and installing D pillar trim (Estate) 248
3 13 – Removing and installing D pillar trim (Notchback) 249
3 14 – Removing and installing front luggage compartment trim and belt reel cover (Estate) 251
3 15 – Removing and installing rear luggage compartment trim (Variant) 253
3 16 – Removing and installing tailgate trim (Variant) 254
3 17 – Removing belt guide 255
3 18 – Removing and installing inner sill panel trim 255
3 19 – Removing knee pad 256
4 – Servicing roof trim 259
4 1 – Servicing roof trim 259
4 2 – Removing and installing moulded headliner (Notchback) 259
4 3 – Removing and installing moulded headliner with sliding/tilting roof (Notchback) 261
4 4 – Removing and installing moulded headliner (Variant) 263
4 5 – Removing and installing moulded headliner with sliding/tilting roof (Variant) 267
4 6 – Cutting out, removing and installing roof insulation/reinforcement (RIR) 270
4 7 – Making opening in moulded headliner for temperature sensor 272
5 – Removing and installing boot side trim 273
5 1 – Removing and installing boot side trim 273
5 2 – Removing and installing cover cap for hinges on tailgate (Variant) 275
72 – Seat frames 277
1 – Servicing seat frames 277
1 1 – Servicing seat frames 277
1 2 – Removing and installing front seat 277
1 3 – Removing and installing front seat backrest (standard and sport seat) 278
1 4 – Removing front seat backrest (seat with door pocket, normal and sport seat) 279
1 5 – Removing front seat backrest (GL equipment with comfort seat) 279
2 – Servicing front seat frame 280
2 1 – Servicing front seat frame 280
2 2 – Servicing front seat backrest frame 283
2 3 – Renewing seat backrest frame 283
2 4 – Removing rear bench seat (without fore and aft adjustment) 284
2 5 – Removing rear backrest (without fore and aft adjustment) 285
2 6 – Removing two-piece backrest from centre mounting (only Variant) 285
3 – Removing and installing rear seat with fore and aft adjustment 286
3 1 – Removing and installing rear seat with fore and aft adjustment 286
4 – Retrofitting child bench seat 287
4 1 – Retrofitting child bench seat 287
74 – Seats – Upholstery, Covers 292
1 – Removing and installing seat covers and padding 292
1 1 – Removing and installing seat covers and padding 292
1 2 – Removing and installing cover and padding for front seat cushion 292
1 3 – Removing and installing cover and padding for front seat backrest 294
1 4 – Removing and installing seat cover and upholstery for rear bench seat 297
1 5 – Removing and installing cover and padding for rear seat backrest (one-piece) 298
1 6 – Removing and installing seat covers and upholstery for divided backrest 301
1 7 – Removing and installing lock 304
1 8 – Removing centre armrest 304
1 9 – Removing and installing upholstery clips 305
00051095620 Digifant ignition and injection system (1 8 ltr engine) 306
Title 306
Manual Repair Groups 307
Technical Bulletin No 1 363
Contents 308
00051097420 6 Cyl injection engine Mechanics 365
00 – Technical data 369
1 – Technical data 369
1 1 – Technical data 369
1 2 – Engine number 369
1 3 – Engine data 369
10 – Removing and installing engine 371
1 – Removing and installing engine 371
1 1 – Removing and installing engine 371
1 2 – Notes on removing 371
1 3 – Notes on installing 374
1 4 – Tightening torques 375
1 5 – Assembly mountings 376
1 6 – Aligning engine and gearbox 377
1 7 – Additional information and removal instructions for vehicles with air conditioner 377
13 – Crankshaft group 379
1 – Dismantling and assembling engine 379
1 1 – Dismantling and assembling engine 379
1 2 – Removing and installing ribbed belt 398
1 3 – Checking valve timing 399
1 4 – Adjusting valve timing 400
2 – Removing and installing sealing flanges and flywheel/drive plate 406
2 1 – Removing and installing sealing flanges and flywheel/drive plate 406
2 2 – Renewing crankshaft oil seal – vibration damper end – 408
2 3 – Removing and installing drive plate 410
3 – Removing and installing crankshaft 412
3 1 – Removing and installing crankshaft 412
4 – Dismantling and assembling pistons and conrods 415
4 1 – Dismantling and assembling pistons and conrods 415
4 2 – Piston and cylinder dimensions 421
15 – Cylinder head, Valve gear 422
1 – Removing and installing cylinder head 422
1 1 – Removing and installing cylinder head 422
1 2 – Removing and installing cylinder head cover 429
1 3 – Installing cylinder head 431
1 4 – Checking compressions 432
2 – Servicing valve gear 433
2 1 – Servicing valve gear 433
2 2 – Reworking valve seats 439
2 3 – Removing and installing camshafts 440
2 4 – Checking hydraulic bucket tappets 443
2 5 – Checking valve guides 444
2 6 – Renewing valve guides 444
2 7 – Renewing valve stem seals 445
17 – Lubrication 447
1 – Removing and installing parts of the lubrication system 447
1 1 – Removing and installing parts of the lubrication system 447
1 2 – Dismantling and assembling oil filter housing 453
1 3 – Dismantling and assembling oil pump 456
1 4 – Checking oil pressure and oil pressure switch 459
19 – Cooling system 460
1 – Removing and installing parts of cooling system 460
1 1 – Removing and installing parts of cooling system 460
1 2 – Parts of cooling system body side 461
1 3 – Parts of cooling system engine side 464
1 4 – Dismantling and assembling coolant thermostat housing 468
1 5 – Draining and filling cooling system 471
1 6 – Removing and installing radiator and radiator fan 472
1 7 – Removing and installing coolant pump 473
1 8 – Checking coolant continued circulation pump and radiator fan run-on 475
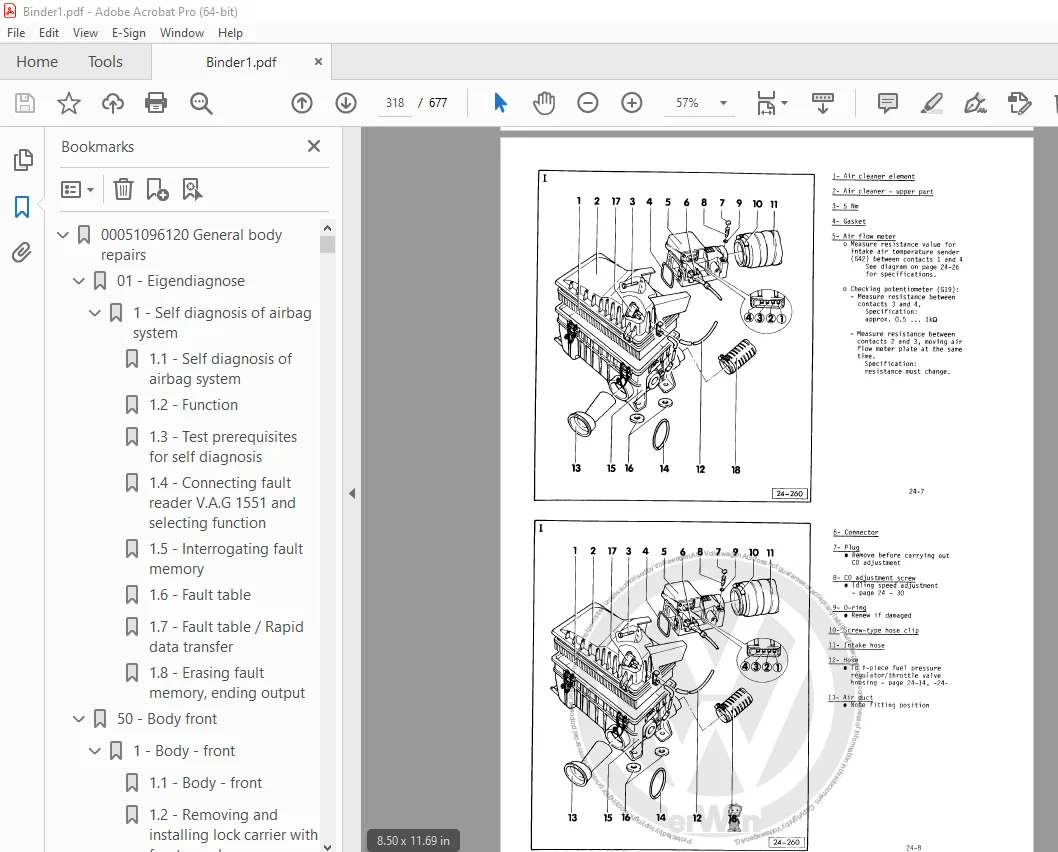
20 – Fuel supply system 477
1 – Removing and installing parts of fuel supply system 477
1 1 – Removing and installing parts of fuel supply system 477
1 2 – Removing and installing fuel tank with its attachments and fuel filter 478
1 3 – Safety precautions when working on the fuel supply system 484
1 4 – Rules for cleanliness 484
1 5 – Adjusting throttle cable 484
1 6 – Removing and installing fuel delivery unit 486
1 7 – Checking fuel pump 487
1 8 – Removing and installing parts of the activated charcoal filter system 492
1 9 – Checking fuel tank breather 494
26 – Exhaust system 496
1 – Removing and installing parts of exhaust system 496
1 1 – Removing and installing parts of exhaust system 496
1 2 – Exhaust manifold, front exhaust pipe and catalyst with attachments 496
1 3 – Silencer with mountings 499
2 – Exhaust gas recirculation system 500
2 1 – Exhaust gas recirculation system 500
2 2 – Checking exhaust gas recirculation valve with temperature sensor 502
3 – Secondary air system 504
3 1 – Secondary air system 504
3 2 – Function 504
3 3 – Removing and installing parts of the secondary air system 505
3 4 – Checking combi-valve 508
3 5 – Checking secondary air pump motor 508
3 6 – Checking change-over valve 509
3 7 – Removing and installing combi-valve and secondary air pump motor 510
00051097620 Running gear self diagnosis 512
Title 512
Manual Repair Groups 513
Technical Bulletin No 1 623
Contents 514
D4B807E3B5B Body Repairs General Body Repairs 624
1 Safety instructions 628
1 1 Part removal 628
1 2 Battery and welding operation 628
1 3 Electronic control unit 628
1 3 1 Processing of the electronic control unit after repair dueto a traffic accident 628
1 4 Paint, glass, soft pad and trim 629
1 5 Fuel tank or fuel delivery pipeline 629
1 6 Air conditioner 629
1 6 1 Remedial measures: 629
1 7 Airbag System 630
1 8 Check the seat belts 630
1 8 1 Belt body 631
1 8 2 Automatic retractor (locking function) 631
1 8 3 Visual inspection of the seat belt buckle 632
1 8 4 Seat belt buckle function 632
1 8 5 Seat belt guide member and tongue 633
1 8 6 Fixing piece and fixing point 633
1 9 Safety specifications for the seat belt tensioner 633
1 10 Body repair on a vehicle equipped with the seat belt tensioners 634
1 10 1 The following vehicles have been equipped with: 634
1 11 Perform cutting off, correcting and/or leveling on a vehicleequipped with airbags 635
1 12 Remove the front seats with a side airbag 635
2 Basic instruction 636
2 1 Diagnosis of the accident vehicle 636
2 2 Condition of the body and/or the parts for delivery to thepainting workshop 636
2 3 Correction 636
2 4 Cutting 636
2 5 Body-cut part and part section 636
2 6 Original connection 637
2 7 Galvanized body parts 637
2 8 Remove the rest part 637
2 9 New parts 637
2 10 Parts 637
2 11 Molded foam plastic pads 638
3 Symbolic interpretation 639
3 1 Symbolic interpretation for welding 639
3 2 Symbolic interpretation for the operation method 639
3 2 1 Grinding 640
3 2 2 Thinning 640
3 2 3 Punching 640
3 2 4 Drilling 641
3 2 5 Polishing 641
3 2 6 Cavity corrosion protection 641
3 2 7 Bonding 642
3 2 8 Precise sealing 642
4 Body repair tools 643
4 1 Flaring tool -V A G 1317- 643
4 2 Punching pliers -V A G 1329- 643
4 3 Basic equipment -V A G 1366/3- 643
4 4 Bottom protection layer spray gun -V A G 1379- 644
4 5 Electric blower -V A G 1416- 644
4 6 Door tensioner -V A G 1438- 644
4 7 Body equipment component -V A G 1439- 645
4 8 Pneumatic cutting knife -V A G 1523 A- 645
4 9 Air chisel -V A G 1577- 645
4 10 Edge closing iron block -V A G 1585- 646
4 11 Welding fume ventilator -V A G 1586- 646
4 12 Welding spot releasing device -V A G 1731- 646
4 13 Pneumatic spray gun -V A G 1761/1- 647
4 14 Pneumatic punching and thinning pliers -VAS 1996- 647
4 15 Pneumatic adhesive spray gun -V A G 2005- 647
4 16 Door hinge correction tool 648
4 17 Hose kit 5023 for the inert gas protection welding 648
4 18 Angle grinder -VAS 5174- 648
4 19 Angle grinder -VAS 5175- 649
4 20 Wire brush -VAS 5182- 649
5 Body bonding 650
5 1 Transporter 1991 → 650
5 1 1 Separation process: 650
5 1 2 Bonding process: 650
5 2 Bonding types 650
5 2 1 Bonding-strong 650
5 2 2 Bonding-spot welding 651
5 3 Repair method for replacing the parts 651
5 3 1 Spot welding and bonding 651
5 3 2 Plug welding and bonding (if spot welding is impossible) 651
5 3 3 Welding fume ventilator 652
5 3 4 Preparations 652
5 3 5 Trimming 652
6 Corrosion protection measures 653
6 1 Corrosion protection 653
7 Waste disposal instructions 654
7 1 Waste disposal 654
7 2 Air pressure tappet exhaust 654
7 3 Airbag 655
7 3 1 Waste disposal 655
8 Contact corrosion protection 656
8 1 Connection of aluminum alloy/magnesium alloy with steel 656
9 Steel plate repair 657
9 1 High-strength body plate 657
9 2 Galvanized body parts 657
9 2 1 Preparations 657
9 2 2 Part cutting 658
9 2 3 Connection process 658
9 3 Welding on the galvanized body steel plate 658
9 3 1 Inert gas protection plug welding SG of the galvanized steelplate 658
9 3 2 Resistance pressure spot welding RP of the galvanized steelplate 659
9 3 3 Welding transformer 659
9 3 4 Welding clamp 659
9 4 Tearing test 659
10 Aluminum repair 660
10 1 Painting 660
10 2 Surface treatment 660
10 3 Leveling 661
10 4 Temperature control for heating 661
11 Plastic repair method 662
11 1 Material 662
11 2 Repairing the pit 663
11 3 Repairing the scratch 664
11 4 Repair the crack 666
11 5 Repairing the small hole (the diameter is more than 30 mm) 667
11 6 Plastic repair (glass fibre material) 668
11 7 Repair process 669
11 7 1 Repairing the breakage position 669
11 7 2 Repairing the surface damage 671
12 Glass repair 672
12 1 Repairing the windshield 672
12 1 1 Premises 672
12 1 2 Required special tools, operating equipment, testing instrumentsand auxiliary tools 673
12 1 3 Repair description 674
S.V 29/01/2025