Wacker Neuson CX50 2070 CX80 Weidemann Wheel Loader Repair Manual – PDF DOWNLOAD
Original price was: $78.00.$30.95Current price is: $30.95.
Wacker Neuson CX50 2070 CX80 Weidemann Wheel Loader Repair Manual – PDF DOWNLOAD
Description
Wacker Neuson CX50 2070 CX80 Weidemann Wheel Loader Repair Manual – PDF DOWNLOAD
IMAGES PREVIEW OF THE MANUAL:

FILE DETAILS:
Wacker Neuson CX50 2070 CX80 Weidemann Wheel Loader Repair Manual – PDF DOWNLOAD
Language : English
Pages :512
Downloadable : Yes
File Type : PDF
Size:112 MB
TABLE OF CONTENTS:
Wacker Neuson CX50 2070 CX80 Weidemann Wheel Loader Repair Manual – PDF DOWNLOAD
Repair Manual 3
Before you continue reading 3
Safety 21
Repair work (complete vehicle) 25
Safety instructions for repair work (complete vehicle) 25
Engine 27
Safety instructions for working on the engine 27
Hydraulic system 29
Safety instructions for working on the hydraulic system 29
Drive and axles 31
Safety instructions for working on the drive and axles 31
Brake system 33
Safety instructions for working on the brake system 33
Vehicle frame and load arm 35
Safety instructions for working on the vehicle frame and load arm 35
Operator’s platform and cab 37
Safety instructions for working on the operator’s platform and cab 37
Electrical system 39
Safety instructions for working on the electrical system 39
Technical data 45
Technical data 49
11 Technial data for Perkins engine 49
12 Technial data for Deutz engine 49
Filling quantities 51
Tightening torques 53
Pressure values 55
41 Pressure values for Perkins engine 55
42 Pressure values for Deutz engine 56
Flow rates 57
51 Flow rates for Perkins engine 57
52 Flow rates for Deutz engine 57
Safety stickers 59
Meaning and position of the safety stickers 59
Testing equipment 65
71 Test pump 65
72 Flow meter 65
73 Generator tester 65
74 Magnetic field tester 67
75 Test pressure gauge 67
Special tools 69
81 Expulsion and driving sleeves 69
82 Sealing plate (2 x) 70
83 Insertion tool 70
84 Driving bolts 71
85 Electrical contact key 71
86 Half-shells and pull-off fixture 72
87 Assembly tool 72
88 Hose clamp 73
89 Tool for contact removal 74
Hose book 75
Inspections 81
Complete vehicle 85
11 Inspection log for Perkins engine 85
12 Inspection log for Deutz engine 86
13 Telescopic arm inspection log 87
Engine 89
21 Checking and adjusting the valve play (Perkins) 89
22 Checking and adjusting the valve play (Deutz) 91
23 Inspecting the exhaust system for leaks 94
24 Checking the radiator installation 95
25 Inspecting the radiator for leaks 95
26 Troubleshooting on the engine 97
Hydraulic system 99
31 Driving hydraulics 99
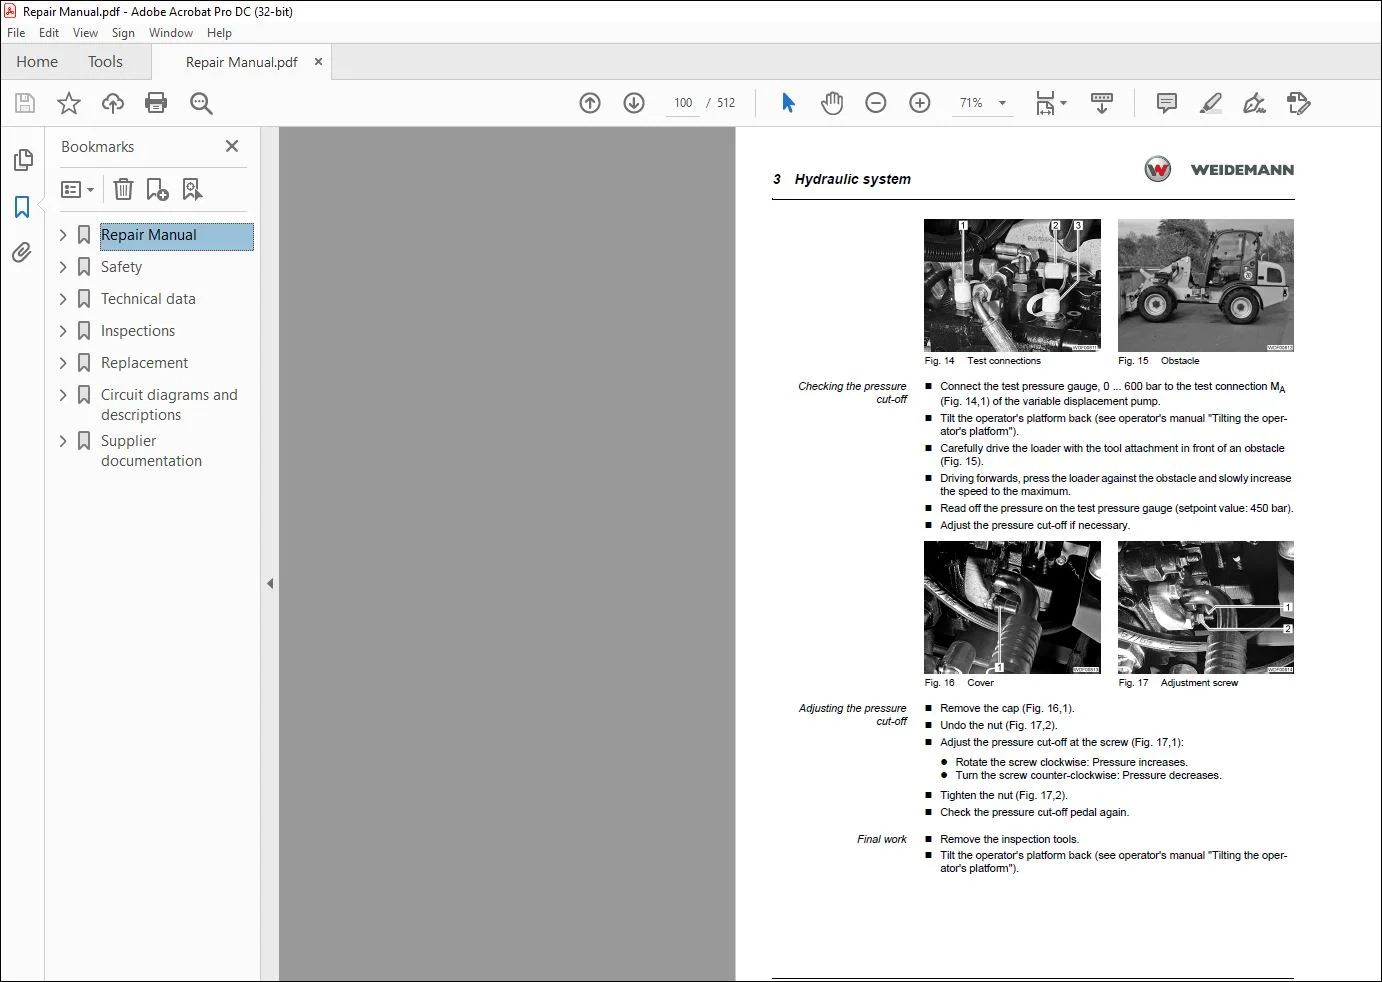
311 Checking and adjusting the starting speed 99
312 Checking and adjusting the pressure cut-off 99
313 Checking the variable displacement pump high pressure101
314 Checking the variable displacement pump supply pressure102
315 Checking the variable displacement pump positioning pressure103
316 Adjusting the driving speed104
317 Checking and adjusting the control commencement of the variable displacement motor105
32 Testing the steering hydraulics107
33 Checking and adjusting the inching108
34 Working hydraulics109
341 Checking the gear pump109
342 Checking the function of the pilot control112
343 Checking the control valve function114
35 Troubleshooting on the hydraulic system115
Drive and axles119
41 Inspecting the differential lock119
42 Checking the water filling of the wheels120
43 Troubleshooting on the drive121
Vehicle frame and load arm123
51 Checking and adjusting the curling to load and dumping stops123
52 Troubleshooting on the telescopic arm124
Cab125
61 Checking the heater and the air-conditioning unit125
62 Troubleshooting in the cab126
Electrical system127
71 Checking the generator127
72 Checking the starter127
73 Checking the temperature sensors128
74 Testing the fuel level sensor129
75 Checking and adjusting the tilt switch130
76 Troubleshooting on the electrical system131
Replacement137
Complete vehicle143
11 Helpful tips143
12 Replacing protective stickers143
Engine145
21 Engine (Perkins)145
211 Engine removal145
212 Engine installation148
213 Replacing the front rubber buffers152
214 Replacing the rear rubber buffers153
215 Replacing the clutch PA flange154
216 Cleaning the engine (after toppling the loader)155
22 Engine (Deutz)157
221 Engine removal157
222 Preparations for engine installation162
223 Engine installation164
224 Replacing the front rubber buffers169
225 Replacing the rear rubber buffers170
226 Replacing the clutch PA flange171
227 Cleaning the engine (after toppling the loader)172
23 Radiator173
231 Removing the radiator173
232 Installing the radiator175
24 Air filter system177
241 Replacing the suction hose177
242 Replacing the complete air filter179
243 Replacing the air filter housing179
25 Fuel system181
251 Replacing the complete fuel filter (Perkins)181
252 Replacing the complete main fuel filter (Perkins)182
253 Replacing the water separator (Perkins)183
254 Replacing the fuel pre-filter (Deutz)184
255 Replacing the fuel feed pump (Perkins)184
256 Replacing the sieve filter of the fuel feed pump (Deutz)186
257 Replacing the fuel line187
258 Tank lock emergency opening188
259 Replacing the Bowden cable of the accelerator188
26 Exhaust system190
261 Replacing the muffler and tail pipe190
262 Replacing the flue and flexi-pipe191
Hydraulic system193
31 Complete vehicle193
311 Depressurizing the hydraulic system193
312 Sealing the hydraulic cylinder193
313 Replacing the pivot bearing on the hydraulic cylinder196
32 Driving hydraulics198
321 Replacing the variable displacement pump198
322 Replacing the clutch hub199
323 Replacing the annular shaft seal of the variable displacement pump200
324 Replacing the variable displacement motor201
33 Steering hydraulics203
331 Cleaning the priority valve203
332 Replacing the priority valve204
333 Replacing the orbital steering valve205
334 Removing the steering cylinder206
335 Installing the steering cylinder207
34 Brake hydraulics209
341 Replacing the main brake cylinder209
342 Replacing the brake hydraulics tank210
343 Venting the brake hydraulics211
344 Replacing the brake fluid212
345 Replacing the 3/2-way valve214
35 Working hydraulics (gear pump, valves)215
351 Replacing the gear pump215
352 Sealing the gear pump216
353 Removing the control valve218
354 Installing the control valve218
355 Sealing the control valve219
356 Replacing the 2/2-way valve (curl stop)224
36 Working hydraulics (hydraulic cylinder)225
361 Replacing the lifting cylinder225
362 Replacing the lifting cylinder (telescopic arm)227
363 Removing the tipping cylinder229
364 Removing the tipping cylinder (telescopic arm)231
365 Installing the tipping cylinder233
366 Installing the tipping cylinder (telescopic arm)234
367 Replacing the rod-end bearing of the tipping cylinder237
368 Replacing the telescopic cylinder238
369 Replacing the counterbalance cylinder (telescopic arm)239
3610 Replacing components of the load holding control valve241
37 Control hydraulic242
371 Depressurizing the control hydraulic242
372 Replacing the pilot control242
373 Adjusting the resting strength and play of the pilot control245
374 Replacing the pulsation damper246
375 Replacing the diaphragm accumulator247
376 Replacing the 2/2-way valve of the control hydraulic247
38 Auxiliary hydraulics and hydraulic lock248
381 Replacing the locking cylinder248
39 Tank, filter and hydraulic lines250
391 Replacing the hydraulic fluid tank250
392 Replacing the complete return filter252
393 Replacing the pressure filter253
394 Cleaning the pressure filter254
395 Replacing the hydraulic line255
396 Replacing the hydraulic line (telescopic arm)255
Drive and axles257
41 Replacing the drive shaft257
42 Front axle258
421 Removing the front axle258
422 Installing the front axle260
43 Rear axle263
431 Removing the rear axle263
432 Installing the rear axle265
Brake system (mechanical section)269
51 Service brake269
511 Replacing the brake shoes269
512 Replacing the brake drum270
52 Parking brake271
521 Replacing the Bowden cable of the parking brake271
Vehicle frame and load arm273
61 Front carriage273
611 Replacing the front fender273
62 Rear carriage and engine hood273
621 Replacing the rear fender273
622 Replacing the base plate274
623 Replacing the rear weight275
624 Replacing the engine hood277
625 Emergency release of the engine hood278
626 Replacing the lock of the engine hood278
627 Replacing the battery cover280
63 Center joint281
631 Detaching the center joint281
632 Detaching the center joint (telescopic arm)283
633 Connecting the center joint285
634 Connecting the center joint (telescopic arm)288
635 Replacing the bearing in the self-aligning bearing291
636 Replacing the lower bearing292
64 Insulation mats294
641 Replacing an insulation mat294
65 Load arm295
651 Replacing the complete load arm295
652 Replacing the bearings of the short drawbar297
653 Replacing the bearings of the short reversing lever298
654 Replacing the bearings of the long reversing lever299
655 Replacing the upper bearing of the long drawbar301
656 Replacing the lower bearing of the long drawbar301
657 Replacing the front bearing of the load arm303
658 Replacing the rear bearing of the load arm303
66 Telescopic arm305
661 Replacing the complete telescopic arm305
662 Removing the inner cylinder308
663 Installing the inner cylinder311
664 Replacing the energy chain314
665 Replacing a slide bar of the outer cylinder315
666 Replacing a slide bar of the inner cylinder316
667 Removing and installing the tilt mechanism317
668 Replacing the right-hand tipping lever with drawbar320
669 Replacing the left-hand tipping lever with drawbar323
67 Tool attachment325
671 Replacing the tool attachment325
672 Replacing the tool attachment (telescopic arm)326
673 Replacing the locking pin329
Operator’s platform and cab331
71 Seat331
711 Replacing the driver’s seat331
712 Replacing the complete seat belt331
72 Frame332
721 Removing the complete cab332
722 Installing the complete cab336
723 Replacing the front rubber buffers of the cab340
724 Replacing the rear rubber buffers of the cab341
725 Replacing the roof grille of the cab342
726 Replacing the floor mats342
727 Replacing the radio console344
73 Windows/windshield and doors345
731 Replacing the windshield wiper arms345
732 Replacing the windshield washer container346
733 Replacing a bonded-in window347
734 Replacing a window with rubber clamping profile349
735 Replacing the door350
736 Replacing the door lock352
737 Replacing the door stay352
74 Steering column353
741 Replacing the steering column353
742 Replacing the cladding of the steering column354
743 Replacing the steering wheel356
75 Heater and air-conditioning unit357
751 Replacing the Bowden cable of the temperature sensor357
752 Removing and installing the vaporizer of the air- conditioning unit358
753 Removing and installing the air-conditioning compressor359
754 Removing and installing the air-conditioning unit condenser361
76 Cab lift hydraulic362
761 Replacing the hand pump362
762 Replacing the hydraulic cylinder363
763 Replacing the Bowden cable of the cab lift hydraulic364
Electrical system367
81 Generator, battery and motors367
811 Replacing the generator (Perkins)367
812 Replacing the generator (Deutz)368
813 Replacing the starter (Perkins)369
814 Replacing the starter (Deutz)370
815 Replacing the rear windshield wiper motor371
816 Replacing the front windshield wiper motor373
817 Replacing the heater blower374
82 Switches375
821 Replacing the battery disconnect switch375
822 Replacing the ignition lock376
823 Replacing the engine temperature sensor376
824 Replacing the temperature sensor of the hydraulic fluid tank378
825 Replacing the return filter overpressure switch379
826 Replacing the parking brake switch379
827 Replacing the switch of the service brake380
828 Replacing the steering column switch381
829 Replacing the switches in the cab382
83 Sensors383
831 Replacing the glow-plug indicator (Perkins)383
832 Replacing the fuel level sensor384
833 Replacing the vacuum gauge385
834 Replacing the tilt switch386
84 Relays, coils and fuses387
841 Replacing a relay387
842 Replacing the solenoid valve of the variable displacement pump387
843 Replacing the coil and core on the variable displacement pump388
844 Replacing the solenoid valve core on the variable displacement motor389
845 Replacing the control unit390
85 Indicator lamps, audible reverse warning device and instruments391
851 Replacing the engine-hour indicator391
852 Replacing the fuel tank gauge392
853 Replacing the instrument lighting394
854 Replacing the horn395
855 Replacing the audible reverse warning device396
86 Lighting system397
861 Replacing a complete headlamp with indicator397
862 Replacing a complete tail lamp398
863 Replacing the headlight399
Attachments401
91 Replacing the earth bucket digging tooth401
92 Replacing the prongs of the fork & grab401
93 Replacing the hydraulic cylinder of the fork & grab402
94 Replacing the hydraulic cylinder of the multi-purpose bucket403
95 Replacing the valve of the multi-purpose bucket404
Circuit diagrams and descriptions413
Hydraulic circuit diagram417
Electrical circuit diagram421
Plug assignments / contact assignments449
31 Plug assignments449
311 Main plug connections fitting & cab451
312 Plug connections instrument steering column457
313 Plug connections – cab459
314 Plug connections – machine463
315 Plug connections – lighting467
32 Contact assignments468
321 Components of the instrument steering column469
322 Components of the cab470
Technical description473
Supplier documentation483
Engine workshop manual (example)487
Variable displ pump repair instructions (example)489
Variable displ motor repair instructions (example)491
Planetary axle workshop manual (example)493
Electrical components495
Need help? Contact: [email protected]
https://vimeo.com/736107887
PLEASE NOTE:
- This is the SAME exact manual used by your dealers to fix your vehicle.
- The same can be yours in the next 2-3 mins as you will be directed to the download page immediately after paying for the manual.
- Any queries / doubts regarding your purchase, please feel free to contact [email protected]
S.M