Yale Forklift A839 (ERC070_80_100_120HG) Service Manual – PDF DOWNLOAD
524150783-1600YRM0326-(03-2007)-UK-EN1
toc1
Steering Axle1
Safety Precautions Maintenance and Repair
General
Description
Steering Axle Assembly Repair
Steering Axle GP/GLP/GDP070-110LG/MG (B813), GC/GLC070-120LG/MG
Remove
Install
Steering Axle GDP60-70CA (GP/GLP/GDP135-155CA) (A878, B878), GLP
Remove
Install
Wheels and Hubs Repair (All Units)
Remove and Disassemble
Clean
Inspect
Assemble and Install
Spindles and Bearings Repair (All Units)
Remove
Clean
Assemble and Install
Tie Rods Repair (All Units)
Remove
Clean
Install
Steering Cylinder Repair
Remove and Disassemble
Clean and Inspect
Assemble and Install
Troubleshooting
524150790-2100YRM0103-(03-2007)-UK-EN25
toc25
Tilt Cylinders25
Safety Precautions Maintenance and Repair
General
Description
Tilt Cylinder Repair
Remove
Disassemble
Clean
Assemble
Tilt Cylinders With O-Ring or Single-Lip Seals
Tilt Cylinders
Install
Tilt Cylinder Leak Check
Tilt Cylinder Stroke and Mast Tilt Angle Adjustment
Torque Specifications
Piston Rod Nut
Retainer
Troubleshooting
tables25
Table 1 Movement Rates (Maximum) for Tilt Cylinders
524150794-4000YRM0135-(03-2011)-UK-EN41
toc41
Lift Cylinders41
Safety Precautions Maintenance and Repair
Safety Procedures When Working Near Mast
General
Description
Lowering Control Valve
Cylinders (General)
Lift Cylinder Repair
Lift Cylinder Removal Without Removing Mast
Standard Masts With Main Lift Cylinder Fastened to Crossmember o
Standard and Full Free-Lift Masts With Lift Cylinder Fastened to
Masts That Have Two Cylinders, Main Lift Cylinder and Free-Lift
Disassemble
Assemble
Lift Cylinder Installation in Mast
Standard Masts With Main Lift Cylinder Fastened to Crossmember o
Standard and Full Free-Lift Masts With Lift Cylinder Fastened to
Chevron-Style Packing
Chevron-Style Packing Installation on Piston
Chevron-Style Packing Installation in Packing Gland
Lift Cylinders for HI VIS® Masts
Description
Lowering Control Valve
Remove
Disassemble
Assemble
Install
Main Lift Cylinders
Free-Lift Cylinder
Lift System Leak Check
Specifications
Troubleshooting
tables41
Table 1 Cylinder Retainer Torque Specifications and Weight Guid
524150797-8000YRM0231-(02-2023)-UK-EN73
General79
Threaded Fasteners
Nomenclature, Threads
Strength Identification
Cotter (Split) Pins
Fastener Torque Tables
Conversion Table
524150797-8000YRM0231-(03-2020)-UK-EN95
General99
Threaded Fasteners
Nomenclature, Threads
Strength Identification
Cotter (Split) Pins
Fastener Torque Tables
Conversion Table
524153919-4000YRM0741-(03-2005)-UK-EN115
toc115
Lift Cylinders115
Safety Precautions Maintenance and Repair
Safety Procedures When Working Near Mast
General
Description
Lowering Control Valve (Velocity Fuse)
Lift Cylinder Repair
Remove
Disassemble
Assemble
Install
Lift System Leak Check
Troubleshooting
524153920-4000YRM0736-(07-2010)-UK-EN131
toc131
Masts131
Safety Precautions Maintenance and Repair
General
Description and Operation
Carriages
Two-Stage Mast With Limited Free-Lift
Two-Stage Mast With Full Free-Lift
Three-Stage Mast With Full Free-Lift
Safety Procedures When Working Near Mast
Fork Replacement
Remove
Install
Carriage Repair
Remove
Sideshift Carriage Repair
Remove
Disassemble
Assemble
Install
Two-Stage Mast With Limited Free-Lift Repair
Remove, GLP/GDP3 5-5 5LJ/MJ (GP/GLP/GDP070-120LJ/MJ) Model Lift
Remove, GC070-120LJ/MJ, ERC070-120HG (A839), and ERC35-55HG (ERC
Disassemble
Clean and Inspect
Assemble
Install, GLP/GDP3 5-5 5LJ/MJ (GP/GLP/GDP070-120LJ/MJ) Lift Truck
Install, GC070-120LJ/MJ, ERC070-120HG (A839), and ERC35-55HG (ER
Two-Stage Mast With Full Free-Lift Repair
Remove
Disassemble
Clean and Inspect
Assemble
Install
Three-Stage Mast With Full Free-Lift Repair
Remove
Disassemble
Clean and Inspect
Assemble
Install
Mast Operation Check
Lift and Tilt System Leak Check
Lift System
Tilt System
Tilt Cylinder Stroke and Backward Tilt Angle Adjustment
Lift Chain Adjustments
Mast Adjustments
Carriage Adjustment
Troubleshooting
tables131
Table 1 Tilt Cylinder Leak Check Specifications, GC070-120LJ/MJ
Table 2 Hook-Type Carriage Chain Adjustment
Table 3 Pin-Type Carriage Chain Adjustment
524158039-0620YRM0294-(09-2016)-UK-EN189
General193
Brush and Commutator Inspection
Hydraulic Pump Motor and Traction Motor
Steering Pump Motor
Normal Commutator Surface
Commutator Problems
Brush Replacement
Stoning the Commutator
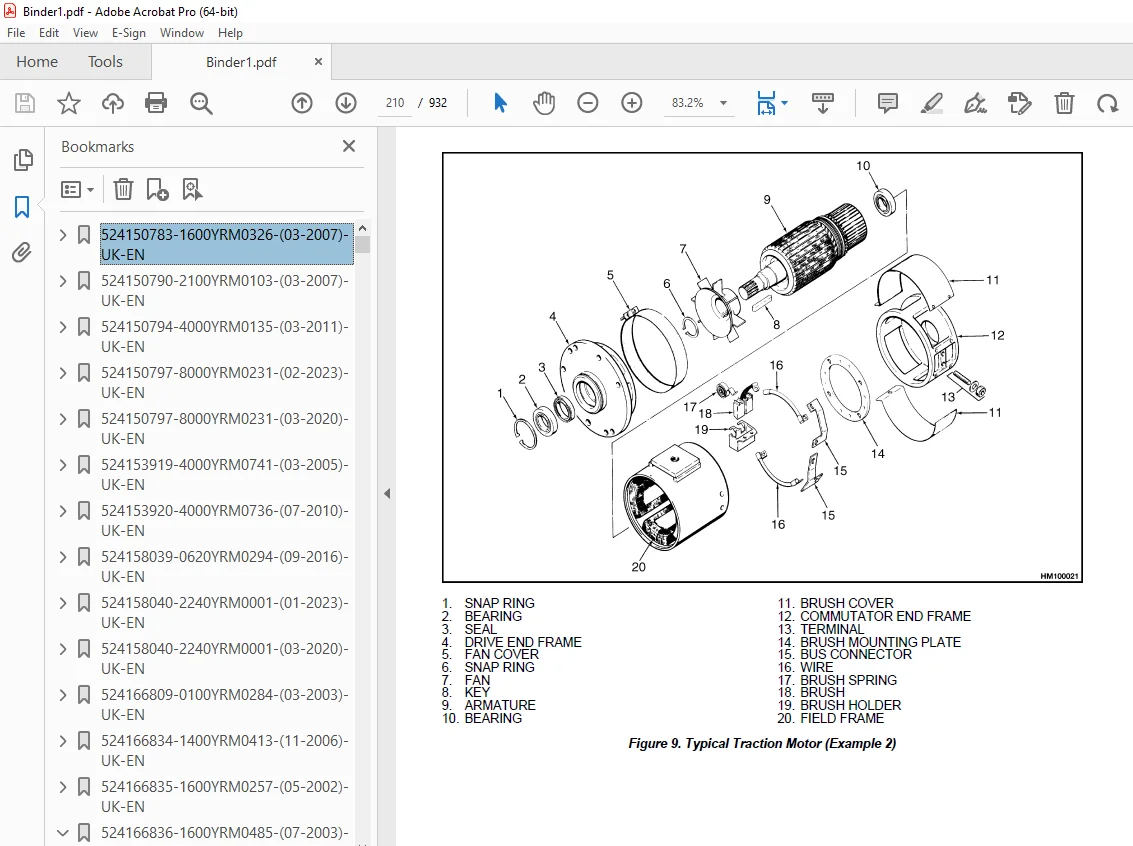
Motors Repair
Disassemble
Traction Motor and Hydraulic Pump Motor
Steering Pump Motor
Assemble
Traction Motor and Hydraulic Pump Motor
Steering Pump Motor
Brush Alignment, Traction and Hydraulic Motors
Tests for Damaged Field and Armature
Test for an Open Circuit in One Armature Winding
Test for Short Circuit in One Armature Winding
Test for Short Circuit to Armature Shaft
Test for Open Circuit in Field Coil
Test for Short Circuit in Field Coil
Test for Short Circuit Between Field and Motor Case
Brush Holder Test
Troubleshooting
524158040-2240YRM0001-(01-2023)-UK-EN225
General231
Battery Type
Lead-Acid Batteries
Lithium-Ion Batteries
Specific Gravity
Chemical Reaction in a Cell
Electrical Terms
Battery Selection
Battery Voltage
Battery as a Counterweight
Battery Ratings
Kilowatt-Hours
Battery Maintenance
Safety Procedures
Maintenance Records
New Battery
Cleaning Battery
Adding Water to Battery
Hydrometer
Battery Temperature
Charging Battery
Types of Battery Charges
Methods of Charging
Troubleshooting Charger
Knowing When Battery Is Fully Charged
Where to Charge Batteries
Equipment Needed
Battery Connectors
Battery Care
Troubleshooting
524158040-2240YRM0001-(03-2020)-UK-EN253
General257
Battery Type
Lead-Acid Batteries
Lithium-Ion Batteries
Specific Gravity
Chemical Reaction in a Cell
Electrical Terms
Battery Selection
Battery Voltage
Battery as a Counterweight
Battery Ratings
Kilowatt-Hours
Battery Maintenance
Safety Procedures
Maintenance Records
New Battery
Cleaning Battery
Adding Water to Battery
Hydrometer
Battery Temperature
Charging Battery
Types of Battery Charges
Methods of Charging
Troubleshooting Charger
Knowing When Battery Is Fully Charged
Where to Charge Batteries
Equipment Needed
Battery Connectors
Battery Care
Troubleshooting
524166809-0100YRM0284-(03-2003)-UK-EN279
toc279
Frame279
Safety Precautions Maintenance and Repair
General
Description
Overhead Guard Repair
Remove
Install
Battery Restraint and Seat Assembly Repair
Seat Brake Assembly, Adjust
Counterweight Repair
Remove
Install
Traction Motor Repair
Remove
Install
Hydraulic Tank Repair
Inspect
Small Leaks, Repair
Large Leaks, Repair
Clean
Steam Method
Chemical Solution Method
Additional Preparations For Repair
Painting Instructions
Safety Label Replacement
tables279
Table 1 Battery Specifications
Table 2 Seat Brake Adjustment
Table 3 Counterweights
524166834-1400YRM0413-(11-2006)-UK-EN301
toc301
Drive Axle, Speed Reducer, and Differential301
Safety Precautions Maintenance and Repair
General
Description
Drive Axle, Speed Reducer, and Differential Repair
Remove
General
Traction Motor, Speed Reducer, and Differential
Motor, Speed Reducer, and Differential, Remove
Disassemble
Speed Reducer
Differential
Clean
Inspect
Assemble
Speed Reducer
Input Gear, Install
New Pinion, Install
Differential
Drive Axle Housing
Remove
Clean
Inspect
Assemble
Troubleshooting
tables301
Table 1 Pinion Assembly Shims Adjustment
Table 2 Ring and Pinion Tooth Contact Adjustment
524166835-1600YRM0257-(05-2002)-UK-EN325
toc325
Steering Control Unit325
Safety Precautions Maintenance and Repair
General
Description
Control Valve Section
Metering Section
Disassembly and Inspection
Disassemble and Inspect
Assembly
Assemble
Troubleshooting
524166836-1600YRM0485-(07-2003)-UK-EN377
toc377
Steering System for Electric Lift Trucks377
Safety Precautions Maintenance and Repair
General
Description
Steering Wheel and Column Assembly Repair
Assembly Components, Remove
Assembly Components, Install
Power Steering Motor and Pump
Description
Remove and Disassemble, Models ERC 20-30AGF (ERC040-065RF/ZF, RG
Remove and Disassemble, Models ERC35-55HG (ERC70-120HD, ERC70-12
Remove and Disassemble, Models ERP20-30ALF
Remove and Disassemble, Models ERC/P16-20AAF (ERC040-065AF, AG/B
Assemble and Install, All Models With A Vertical Mount Except ER
Assemble and Install, Models ERP20-30ALF
Assemble and Install, Models ERC/P16-20AAF (ERC030-040AF, AG/BG)
Power Steering Pump, Repair
Seal, Replace
Hydraulic Steering Motor
Steering System Air Removal
Steering Pressure Check
Optical Encoder and Activator Circuits Check
Troubleshooting
524166837-1800YRM0338-(05-2009)-UK-EN405
toc405
Brake System405
Safety Precautions Maintenance and Repair
General
Description and Operation
Brake Booster and Master Cylinder
Master Cylinder
Service Brake Assembly
Parking Brake
Seat Brake
Brake Shoe Assemblies Repair
Remove and Disassemble
Clean and Inspect
Assemble and Install
Master Cylinder Repair
Master Cylinder For Lift Truck Models GC/GLC70-120LG/MG (B818) a
Remove
Disassemble
Assemble
Install
Master Cylinder For Lift Truck Models ERC70-120HD, ERC70-120HG (
Remove and Disassemble
Clean and Inspect
Assemble and Install
Brake Booster Repair
Remove
Disassemble
Clean and Inspect
Assemble
Install
Brake System Air Removal
Brake Pedal Adjustment
Brake Pedal GP/GLP/GDP70-120LG/MG (B813) With Manual Transmissio
Brake Shoes Adjustment
Parking Brake Adjustment
Parking Brake Adjustment, Lift Truck Models GC/GLC70-120LG/MG (B
Parking Brake Lever and Switch Adjustment ERC70-120HD and ERC70-
Seat Brake Assembly
Remove
Clean and Inspect
Install
Adjustments
Solenoid Adjustment
Traction cutoff Switch Adjustment
Cable Adjustment
Brake Booster Relief Valve Check
Troubleshooting
524166838-1900YRM0286-(07-2002)-UK-EN441
toc441
Hydraulic System441
Safety Precautions Maintenance and Repair
General
Description
Hydraulic System
Operation
Hydraulic System
Hydraulic Pump
Steering Pump
Hydraulic Pump Repair
Remove
Seal, Replace
Install
Main Control Valve Check and Adjust
Linkage and Switches
Relief Valve
Steering Relief Valve Check and Adjust
Specifications
Relief Valve Pressures
Capacities
Hydraulic Pump Capacities
Troubleshooting
524166839-2000YRM0077-(02-2009)-UK-EN459
toc459
Manual hydraulic Control Valve459
Safety Precautions Maintenance and Repair
General
Description
Operation
Lift Section
Tilt Section
Tilt Backward
Tilt Forward
Relief Valve
Solenoid Valve for Auxiliary Function
Main Control Valve Repair
Remove and Disassemble – Control Valve Without OPS Solenoid
Remove and Disassemble – Control Valve With OPS Solenoid
Clean and Inspect
Assemble – Control Valve Without OPS
Assemble – Control Valve With OPS
Install
Solenoid Valve for Auxiliary Function Repair
Remove and Disassemble
Assemble and Install
Troubleshooting
Pressure Relief Valve Check and Adjustment
Primary Relief Valve
Secondary Relief Valve
Control Lever Arrangement and Adjustment
Specifications
Troubleshooting
524166840-2200YRM0560-(07-2005)-UK-EN487
toc487
Electrical System487
Safety Precautions Maintenance and Repair
General
Description
ZX Series Display Panels
Optional Basic Display Panel
Features of the Optional Basic Display Panel
Description of Features on the Optional Basic Display Panel
Standard Display Panel
Features of the Standard Display Panel
Description of Features on the Standard Display Panel
Premium Display Panel
Features on the Premium Display Panel
Description of Features on the Premium Display Panel
Curtis 1215 Display Panel
Description and Features
Operation
SEM Display Panels – Features
Descriptions of Common Features
LED Symbol Indicators – SEM
LCD Screen
Battery Discharge Indicator (BDI)
Service Reminder
Status Codes
Hourmeter
Additional Features of Premium Display Panel
Descriptions of Additional Features
LCD Screen
Operator Passwords
Daily Checklist and Service Items
Performance Modes
Status Code Lists
Adjustment of BDI
SEM Display Panel Indicators
All Indicator Symbols
Hourmeter Indicator Symbol
Wrench Symbol
Battery Symbol
Battery Discharge Indicator (BDI)
Brake Fluid Too Low Symbol
Parking Brake Symbol
Fasten Seat Belt Symbol
LCD Screen (Standard Display Panel)
Additional Components of Premium Display Panel
Alpha Numerical Screen
STAR Push Button
Push Buttons ##1 Through ##5 – SEM
Other Control Components
Display Panel Components – ZX, and Curtis Replacement
ZX Panel Replacement
Curtis 1215 Display Panel Replacement
Remove
Install
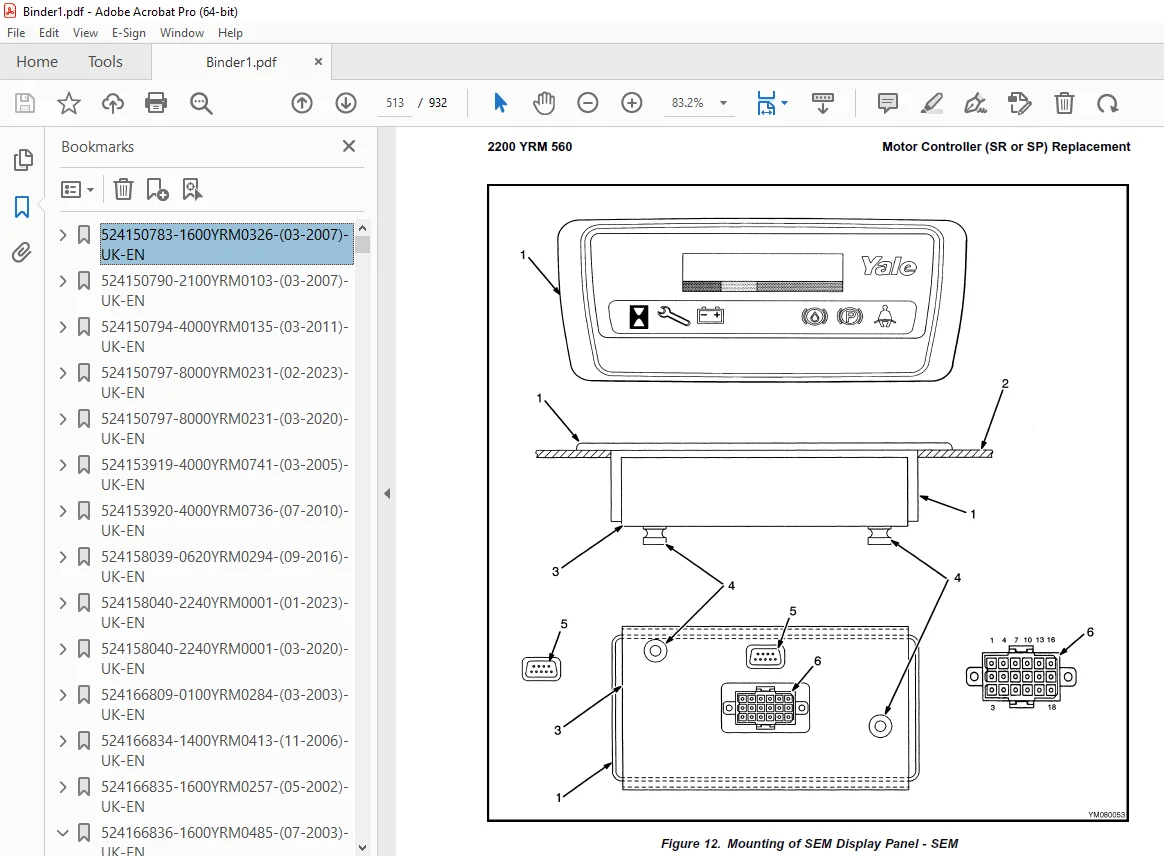
SEM Display Panel Replacement
Motor Controller (SR or SP) Replacement
Remove
Install
Control Components Replacement
Start Switch, Replace
Brake Light Switch, Replace
Seat Switch, Replace
External Seat Switch, Adjust
Switch for Optional Seat Brake, Replace
Parking Brake Switch, Replace
Direction Switches Foot Directional Control Replace
Direction Control Switches (Steering Column), Replace
Direction Control Switches, ERC070-120HG (Steering Column), Repl
Brake Fluid Switch, Replace
Brush Wear and Overtemperature Sensors
Rocker Switches for Lights
Accelerator Position Sensor, Replace
On-Demand Steering Components
Lights, Converter, Relay, and Reverse Alarm
Incandescent Brake, Tail, and Reverse Light Assembly, Replace
LED Brake, Tail, and Reverse Light Assembly, Replace
Remove
Install
Flashing Light Assembly, Replace
Front, Rear Driving Light, or Spot Light Assemblies, Replace
Operator Compartment Light Assembly, Replace
Converter, Replace
Relay, Replace
Reverse Alarm, Replace
Horn and Horn Button
Horn Switch and Cover
Hydraulic Pump Switches
Control and Power Fuses Check
ZX Motor Controllers
SEM Motor Controllers
SEM Controller Field Diagnostic Procedure
Armature FET Test
Field FET Test
Brush Wear and Overtemperature Sensors Check – ZX Motor Controll
Thermal Sensors – SEM Motor Controllers Check
Start Switch Adjustment
Accelerator Potentiometer and Start Switch, ERC070-120HG Lift Tr
ERC070-120HG
Direction Switches Foot Directional Control Pedal
Brake Light Switch Adjustment
Seat Switch Check
Optional Seat Brake Switch Adjustment
Parking Brake Switch Adjustment
Direction Switches Check
Foot Directional Control Pedal
Steering Column
Hydraulic Pump Switch Adjustment
Foot Directional Control or Accelerator Pedal Adjustment
Accelerator Position Sensor Adjustment
524166842-2200YRM0725-(07-2002)-UK-EN555
toc555
SEM Display Panel555
Safety Precautions Maintenance and Repair
General
SEM Display Panel Features
Common Features Descriptions
LED Symbol Indicators
LCD Screen
Battery Discharge Indicator (BDI)
Service Reminder
Status Codes
Hourmeter
Premium Display Panel Additional Features
Additional Features Descriptions (Available With Premium Display
LCD Screen
Operator Passwords
Daily Check List and Service Items
Performance Modes
Status Code Lists
BDI, Adjust
SEM Display Panel Indicators
All Indicator Symbols
Hourmeter Indicator Symbol
Wrench Indicator Symbol
Battery Indicator Symbol
Battery State-of-Charge (BDI)
Brake Fluid Low Symbol
Parking Brake Symbol
Fasten Seat Belt Symbol
LCD Screen (Standard Display Panel)
Premium Display Panel Additional Components
Alpha Numerical Screen
STAR Push Button
Push Buttons ##1 Through ##5
Computer Adjustments
Computer System
Connect PC to SEM Display Panel
ITW Switches Software Program (for SEM Display Panel)
Description
Where to Get Help
Hardware and Software Requirements
How to Start ITW Switches Program
Menus
Create a Setup File
SEM Display Panel Replacement
General
Remove and Replace
tables555
Table 1 Adapter Pins (DB25F to DB9)
524166843-2200YRM0808-(06-2005)-UK-EN595
toc595
Transistor Motor Controllers (SR and SP)595
Safety Precautions Maintenance and Repair
Description
Model Number Data for Transistor Motor Controllers (SR and SP)
Motor Controller Checks and Adjustments
Checks and Adjustments Using a Handset
General
Connect Handset
Start Sequence
Check or Delete Stored Status Codes
Returning Lift Truck to Normal Operation
Checks and Adjustments on Workbench
How to Check and Adjust Registers
Function Parameters Adjustments
General
Function Numbers
When Handset is Connected to Motor Controller in Lift Truck
Function Numbers 1 through 15
Function Numbers 16 through 30
Function Numbers 48 through 63
Function Number Descriptions
Traction Motor Controller (Label Letter – SR)
Functions with Premium Display Panel Only
Pump Motor Controller (Label Letter – SP)
Functions With Premium Display Panel Only
Troubleshooting
General
Status Codes
Status Code Charts
Transistor Motor Controllers Repairs
General
General Maintenance Instructions
Special Precautions
Fuses
Contactors
Repair
Contactor Driver Module
Contactor Driver, Replace
Motor Controller Plug
Brush Wear Indicators
Thermal Sensors
Motor Controller, Replace
Parameter Tables
General
Function Numbers
Motor Controller Checks and Adjustments
Parameter Tables
Theory of Operation
General
SEM System Description
SEM System Operation (SR Motor Controller)
Reverse Circuit
Performance and Efficiency
Field Weakening
Regenerative Braking
Creep Speed
Controlled Acceleration
Current Limit
Braking
Regenerative Braking to Zero Speed
Pedal Position Braking
Auto Braking
Auxiliary Speed Control
Field Weakening
Speed Limits
Ramp Operation
Ramp Start
Anti-Rollback
Steer Pump Contactor Time Delay
Coil Drivers and Internal Coil Suppression
System Protective Override
SRO (Static Return to Off)
Accelerator Volts Hold Off
Pulse Monitor Trip (PMT)
Thermal Protector (TP)
Low Voltage
SP Pump Motor Controllers
Contactor Driver Module
Diagnostics
Systems Diagnostics
Standard Status Codes
Stored Status Codes
Hourmeter Readings
Maintenance Management Capability
tables595
Table 1 Speed/Torque Compensation
Table 2 Function Map for Motor Controllers SR (Traction)
Table 3 Function Map for Motor Controllers SP (Lift Pump Motor)
Table 4 List of Status Codes
Table 5 Large (P) Plug (23-Pin) Connections/Descriptions for Mo
Table 6 Small Plug (12-Pin) Connections/Descriptions for Motor
Table 7 Traction Control – SR Transistor Control Settings, 11-I
Table 8 Traction Control – SR Transistor Control Settings, 13-I
Table 9 Traction Control – SR Transistor Control Settings, 13-I
Table 10 Hydraulic Pump – SR Transistor Control Settings (36/48
524166844-2200YRM0942-(08-2007)-UK-EN689
toc689
Display Panel for SEM Controls689
Safety Precautions Maintenance and Repair
General
SEM Display Panel Features
Descriptions of Common Features
LED Symbol Indicators
LCD Screen
Battery Discharge Indicator (BDI)
Service Reminder
Status Codes
Hourmeter
Additional Features of Premium Display Panel
Descriptions of Additional Features (Available With Premium Disp
LCD Screen
Operator Passwords
Daily Check List and Service Items
Performance Modes
Status Code Lists
Adjustment of BDI
SEM Display Panel Indicators
All Indicator Symbols
Hourmeter Indicator Symbol
Wrench Indicator Symbol
Battery Indicator Symbol
Battery State-of-Charge (BDI)
Brake Fluid Too Low Symbol
Parking Brake Symbol
Fasten Seat Belt Symbol
LCD Screen (Standard Display Panel)
Additional Components of Premium Display Panel
Alphanumeric Screen
STAR Push Button
Push Buttons 1 Through 5
Adjustments With a Computer
Computer System
Connect PC to SEM Display Panel
ITW Switches Windows Software Program (for SEM Display Panel)
Description
Getting Help
Hardware and Software Requirements
Install
How to Start ITW Switches Program
Menus
Sample Sessions
Replacement
SEM Display Panel
Remove and Replace
tables689
Table 1 Adapter Pins (DB25F to DB9)
524166845-4000YRM0340-(09-2002)-UK-EN741
toc741
Masts741
Safety Precautions Maintenance and Repair
General
Description and Operation
Carriages
Two-Stage Mast With Limited Free-Lift
Two-Stage Mast With Full Free-Lift Mast
Three-Stage Mast With Full Free-Lift
Safety Procedures When Working Near Mast
Forks Replacement
Remove and Install
Hook Fork
Remove
Install
Pin Fork
Remove
Install
Carriage Repair
Remove
Sideshift Carriage Repair
Sideshift Carriage (Earlier Designs)
Disassemble
Assemble
Install
Sideshift Carriage (1993 and Later Design)
Remove
Repairs
Install
Weight of Mast Parts
Two-Stage Mast With Limited Free-Lift Repair
Remove
Disassemble
Clean and Inspect
Assemble
Install
Two-Stage Mast With Full Free-Lift Repair
Remove
Disassemble
Clean and Inspect
Assemble
Install
Three-Stage Mast With Full Free-Lift
Remove
Disassemble
Clean and Inspect
Assemble
Install
Mast Operation Check
Lift and Tilt System Leak Check
Lift System
Tilt System
Tilt Cylinder Stroke and Backward Tilt Angle Adjustment
Lift Chain Adjustments
Mast Adjustments
Carriage Adjustment
Troubleshooting
524166846-8000YRM0915-(07-2002)-UK-EN783
toc783
Periodic Maintenance783
Safety Precautions Maintenance and Repair
General
Serial Number Data
How to Move Disabled Lift Truck
How to Tow Lift Truck
How to Put Lift Truck on Blocks
How to Raise Drive Tires
How to Raise Steering Tires
Maintenance Schedule
Maintenance Procedures Every 8 Hours or Daily
How to Make Checks with Key Switch OFF
Tires and Wheels
Forks
Adjust
Remove
Install
Inspect Mast, Forks, and Lift Chains
Safety Labels
Steering Column Latch
Operator Restraint System
Battery Restraint System
Battery
Hydraulic System
How to Make Checks with Key Switch ON
Gauges, Horn, and Fuses
Steering System
Service Brakes
Parking Brake
Control Levers and Pedals
Lift System Operation
Maintenance Procedures Every 500 Hours or 3 Months
Differential and Speed Reducer
Wheel Nuts
Steering Axle Spindles
Mast
Brake Fluid
Other Lubrication
Seat Brake
Electrical Inspection
Contactors
Motor Brushes
Maintenance Procedures Every 1000 Hours or 6 Months
Lift Chains
Wear Check
Lubrication
Forks
Maintenance Procedures Every 2000 Hours or Yearly
Hydraulic System
Hydraulic Tank Breather
Change Filter for Hydraulic Oil
Change Hydraulic Oil
Differential and Speed Reducer
Service Brakes
Contactors
Wheel Bearings
Steer Wheels, Lubrication
Drive Wheels, Lubrication
Lift Chains
Battery Maintenance
How to Charge Battery
How to Change Battery
Safety Procedures When Working Near Mast
Lift and Tilt System Leaks Check
Check Lift Cylinders for Leaks
Check Tilt Cylinders for Leaks
Lift Chain Adjustments
How to Check PMT Circuit
Welding Repairs
Overhead Guard Changes
Tires and Wheels
General
Remove Wheels from Lift Truck
Remove Tire from Wheel and Install Tire on Wheel
Install Wheels
Battery Specifications
tables783
Table 1 Maintenance Schedule
Table 2 Hook-Type Carriage Chain Adjustment
Table 3 Pin-Type Carriage Chain Adjustment
524166847-8000YRM0916-(07-2002)-UK-EN821
toc821
Capacities and Specifications821
Safety Precautions Maintenance and Repair
Lift Truck Weights
Tire Sizes
Capacities
Hydraulic System
Mast Speeds
Mast Creep Speeds
Battery Specifications
Traction Speed and Traction Motor Current
Hoist Motor Current
Torque Specifications
Brake System
Differential
Drive Axle
Frame
Mast
Main Control Valve
Steering System
Tilt Cylinders
524166848-8000YRM0917-(01-2004)-UK-EN833
toc833
Diagrams833
Safety Precautions Maintenance and Repair
524167640-2200YRM0947-(08-2007)-UK-EN859
toc859
Troubleshooting and Adjustments With a Computer859
Safety Precautions Maintenance and Repair
Computer System
Connect a PC to a Control Card
Installation
SMARTSET™ Windows Software Program
How to Start the Program
DEMO Mode
Selecting the Communications Port
Verification of Controller and Lift Truck
Select Lift Truck Series
Controller Card Register Parameter List
How to Change a Parameter
How to Save a Changed Parameter File
How to Load a Saved Parameter File
How to Show and Remove Saved Parameter Files
How to Return to Factory Default Settings
How to Save Changes to Control Card
How to View Status Codes
Saving Status Codes
How to Show and Remove Saved Status Code Files
Closing and Clearing Status Code List
How to View Saved Register Data and Saved Status Data
How to Save Register Data and Status Code Data In RTF and TXT
GE Sentry™ Software Program
Installation
Description
How to Start GE SENTRY Program
How to Reset MIN and MAX Display
Graphing Mode
How to Exit GE SENTRY Program
tables859
Table 1 Cable Connections – Computer to Control
Table 2 Adapter Pins (DB25F to DB9)
Table 3 Plug-Z Connection
524179949-2200YRM0595-(07-2003)-UK-EN897
toc897
EV-100ZX™ SCR Motor Controller897
Safety Precautions Maintenance and Repair
Register Parameters
General
Function Numbers
Control Card Checks and Adjustments
Register Parameter Tables
tables897
Table 1 EV-100ZX Parameters – ERC040-065RF/ZF, and ERP20-30ALF
Table 2 EV-100ZX Parameters – ERC040-065RF/ZF (36 to 48V) (Trac
Table 3 EV-100ZX Parameters – ERC20-30AGF, and ERP20-30ALF (72
Table 4 EV-100ZX Parameters – ERC20-30AGF (72 to 80V) (Traction
Table 5 EV-100ZX Parameters – ERC20-30AGF (72 to 80V) (Low Ener
Table 6 EV-100ZX Parameters – ERC70-120HD, ERC040-065RF/ZF, and
Table 7 EV-100ZX Parameters – ERC35-55HG, ERC20-30AGF, and ERP2