Description
Comprehensive Service Information for Bobcat E45 Excavators
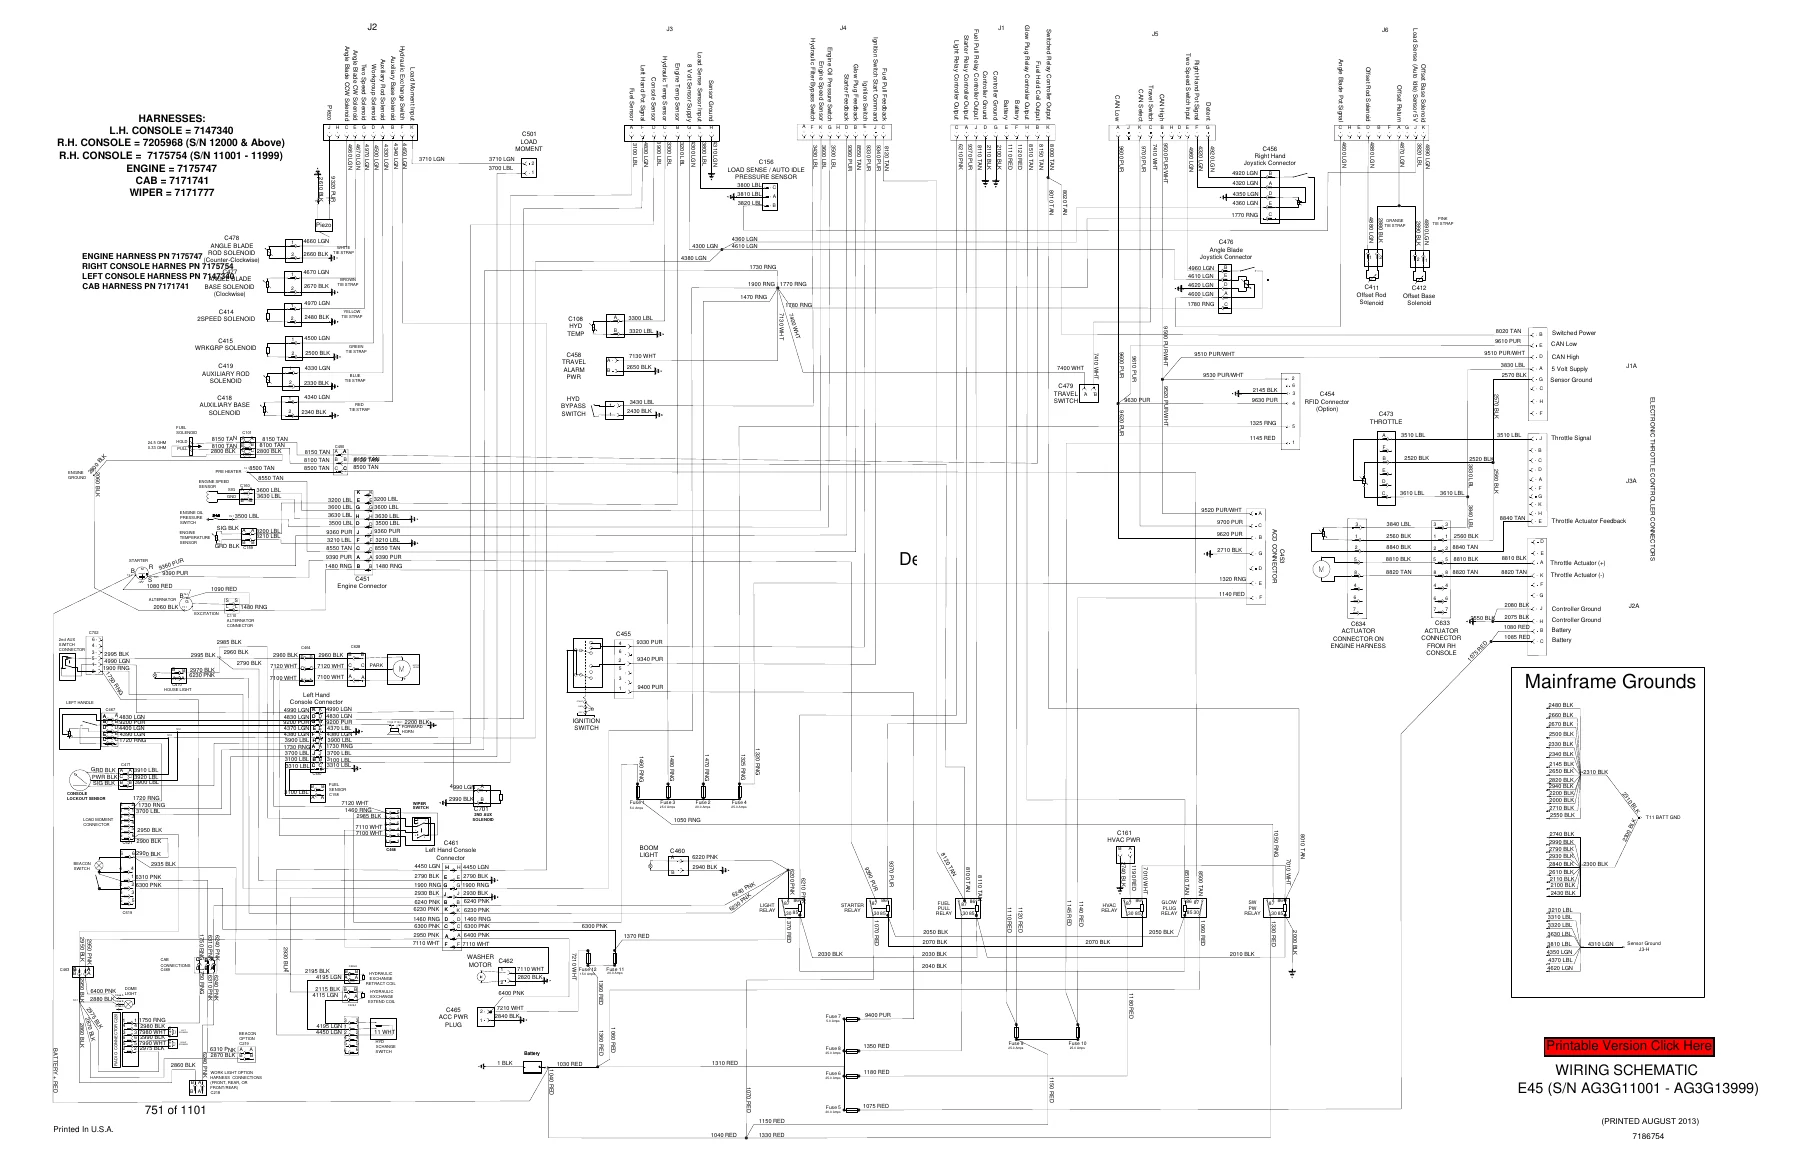
This is the complete factory service manual for the Bobcat E45 Compact Excavator, a 1,101-page technical reference used by Bobcat dealerships and professional mechanics. This Bobcat E45 Compact Excavator Service Manual provides everything needed to diagnose, service, and repair the machine correctly, including detailed step-by-step procedures, specifications, and schematics. Covering serial number ranges AG3G11001 & Above, AHHC11001 & Above, B3NM11001 & Above, and B3NR11001 & Above, it is the official guide for all mechanical, electrical, and hydraulic systems.
File Details
- Manual Type: Official Factory Service Manual
- Brand / Model: Bobcat E45 Compact Excavator
- Language: English
- Page Count: 1,101 Pages
- File Format: PDF
- Document Number: 6989437enUS
- Publication Date: January 2020
Chapters & Systems Covered
The Bobcat E45 Compact Excavator Service Manual is organized into major sections, each covering a critical system or component of the machine. The chapters include:
- General Information & Safety: Foreword, Safety Instructions, Fire Prevention, Serial Number Locations, Delivery Report, Excavator Identification.
- Maintenance & Service (Section 10): Lifting and Blocking, Lifting the Excavator, Operator Cab (ROPS/TOPS), Transporting, Service Schedule, Air Cleaner Service, Cab Filters, Engine Cooling System, Fuel System, Engine Lubrication System, Hydraulic System, Lubricating the Excavator (Earlier and Later Models), Pivot Pins, Travel Motor, Spark Arrester Muffler, Emergency Exit, Seat Belt, Control Console Lockouts, Towing, Remote Start Tool Kits.
- Hydraulic System (Section 20): Glossary of Symbols, Troubleshooting Charts, Cylinder Service and Overhaul (Boom, Arm, Boom Swing, Bucket, Blade, Clamp, Angle Blade, Extendable Arm), Main Relief Valve, Port Relief Valve, Cross Port Relief Valve, Pressure Reducing Valve, Hydraulic Control Valve Disassembly/Assembly, Hydraulic Pump Testing and Overhaul, Manifold/Accumulator, Travel Motor, Swivel Joint, Swing Motor, Control Pattern Selector Valve, Joystick Service (Right and Left), Hydraulic Filter Mount, Reservoir, Oil Cooler, Direct to Tank Valve, Blade Control Lever, Case Drain Filter, Travel Control Valve, Air Bleed Procedure, X-Change Manifold, Secondary Auxiliary Valve, Boom/Arm Lock Valves.
- Undercarriage (Section 30): Blade (Standard and Angle), Track Undercarriage Components (Rubber and Steel Tracks), Track Tension Adjustment, Track Removal and Installation, Idler Service, Track Tensioner Service, Roller Service, Sprocket Service, Track Maintenance & Damage Identification, Swing Circle Gear.
- Upperstructure & Swing Section (Section 40): Removal and Installation of Major Components: Upperstructure, ROPS Canopy, Cab, Seat, Consoles (Right and Left), Covers, Counterweight, Travel Levers and Pedals, Floor Mat, Fuel Tank, Horn, Swing Frame, Boom, Standard, Long, and Extendable Arm, Bucket, Clamp, Tailgate, X-Change (Hydraulic), Quick Coupler Systems (KLAC, Lehnhoff, Pin Grabber).
- Electrical System & Analysis (Section 50): Electrical System Information, Battery Service, Alternator, Starter, Lights, Magnetic Lockout Sensor, Fuel Level Sender, Diagnostic Service Codes (for multiple serial number ranges), Deluxe Instrument Panel Setup, Control Panel Setup, Instrument Panel/Controller, Key Switch, Wiper Motor, Motion Alarm System, Service PC Connection, Shut-off Switch, Travel Motor Auto-Shift, Auto Idle Pressure Sensor, Bobcat Machine IQ.
- Engine Service (Section 60): Complete Engine Information, Specifications, Torque Data, Troubleshooting, Removal and Installation, Engine Speed Control (including calibration), Muffler, Air Cleaner, Engine Cooling System (Radiator, Fan, Water Pump, Thermostat), Lubrication System, Fuel System (Pump, Injectors, Shut-off Solenoid), Cylinder Head Service, Crankshaft and Piston Service, Camshaft and Timing Gears, Flywheel and Housing, RPM Sensor.
- HVAC Systems (Sections 70 & 71): Separate sections for earlier and later serial number models covering A/C system flow, regular maintenance, troubleshooting, system charging and reclamation, and removal/installation of all HVAC components (Compressor, Condenser, Receiver/Drier, Evaporator/Heater Unit, Thermostat, Expansion Valve, Blower Fan, Heater Valve, Ducts).
- Specifications (Section SPEC): Full machine dimensions, rated lift capacities, performance data, engine and hydraulic specifications, torque values for SAE and metric bolts, hydraulic connection specs, fluid specs, conversion charts, and a comprehensive list of service tools.
This Bobcat E45 Compact Excavator Service Manual is the definitive resource for performing any repair or maintenance task. The depth of information ensures that complex jobs like hydraulic pump testing, cylinder rebuilding, track system maintenance, and electrical diagnostics can be carried out accurately and safely. The manual’s systematic approach, combined with its extensive troubleshooting guides, makes it invaluable for both professional mechanics and experienced owners dedicated to maintaining their Bobcat E45.
Complete PDF Bookmark Tree
Complete Bookmarks
The complete bookmarks in the “Bobcat E45 Compact Excavator Service Manual – PDF Download” are as follows:
MAINTENANCE SAFETYp. 3
CONTENTSp. 5
+FOREWORDp. 7
FOREWORDp. 9
SAFETY INSTRUCTIONSp. 11
+FIRE PREVENTIONp. 13
Maintenancep. 13
Operationp. 13
Electricalp. 13
Hydraulic Systemp. 13
Fuelingp. 13
Startingp. 13
Spark Arrester Exhaust Systemp. 13
Welding And Grindingp. 14
Fire Extinguishersp. 14
+SERIAL NUMBER LOCATIONSp. 15
Excavator Serial Numberp. 15
Engine Serial Numberp. 15
DELIVERY REPORTp. 16
EXCAVATOR IDENTIFICATIONp. 17
+SAFETY AND MAINTENANCEp. 19
+LIFTING AND BLOCKING THE EXCAVATORp. 23
+LIFTING THE EXCAVATORp. 25
+OPERATOR CAB (ROPS / TOPS)p. 27
Descriptionp. 27
Cab Doorp. 28
Front Windowp. 29
Front Wiperp. 30
Window Washer Reservoirp. 30
Right Side Windowsp. 31
+OPERATOR CANOPY (ROPS / TOPS)p. 33
+TRANSPORTING THE EXCAVATOR ON A TRAILERp. 35
Loading And Unloadingp. 35
Fasteningp. 36
+TAILGATEp. 37
Opening And Closingp. 37
Adjusting The Latchp. 37
+RIGHT SIDE COVERp. 39
+SERVICE SCHEDULEp. 41
Maintenance Intervalsp. 41
+AIR CLEANER SERVICEp. 43
Daily Checkp. 43
Replacing Filter Elementsp. 43
+CAB FILTERS (S/N AG3G11001 – AG3G13999 AND AHHC11001 – AHHC12999)p. 45
Cleaning And Maintenancep. 45
+CAB FILTERS (S/N AG3G14000 & ABOVE, AHHC13000 & ABOVE, B3NM11001 & ABOVE AND B3NR11001 & ABOVE)p. 47
Cleaning And Maintenancep. 47
+ENGINE COOLING SYSTEMp. 49
Cleaningp. 49
Checking Levelp. 50
Removing And Replacing Coolantp. 51
+FUEL SYSTEMp. 53
Fuel Specificationsp. 53
Biodiesel Blend Fuelp. 53
Filling The Fuel Tankp. 54
Fuel Filtersp. 55
Draining The Fuel Tankp. 55
Removing Air From The Fuel Systemp. 56
+ENGINE LUBRICATION SYSTEMp. 57
Checking And Adding Engine Oilp. 57
Engine Oil Chartp. 57
Removing And Replacing Oil And Filterp. 58
+HYDRAULIC SYSTEMp. 59
Checking And Adding Hydraulic Oilp. 59
Hydraulic / Hydrostatic Fluid Chartp. 60
Removing And Replacing The Hydraulic Filtersp. 60
Removing And Replacing The Hydraulic Fluidp. 62
+LUBRICATING THE EXCAVATOR (EARLIER MODELS)p. 65
Lubrication Locationsp. 65
+LUBRICATING THE EXCAVATOR (LATER MODELS)p. 69
Lubrication Locationsp. 69
+PIVOT PINSp. 73
Inspection And Maintenancep. 73
+TRAVEL MOTORp. 75
Checking And Adding Oilp. 75
Removing And Replacing Oilp. 75
+SPARK ARRESTER MUFFLERp. 77
+EMERGENCY EXITp. 79
Right Side Rear Windowp. 79
Front Windowp. 79
+SEAT BELTp. 81
Inspection And Maintenancep. 81
+CONTROL CONSOLE LOCKOUTSp. 83
Inspection And Maintenancep. 83
+TOWING THE EXCAVATORp. 85
+REMOTE START TOOL KIT – MEL1563p. 87
Remote Start Tool – MEL1563p. 87
Service Tool Harness Communicator – MEL1566p. 89
+REMOTE START TOOL (SERVICE TOOL) KIT – 7217666p. 91
Descriptionp. 91
Remote Start Tool (Service Tool) – 7022042p. 92
Excavator Service Tool Harness – 6689747p. 93
Computer Service Tool Harness – 6689746p. 94
+HYDRAULIC SYSTEMp. 95
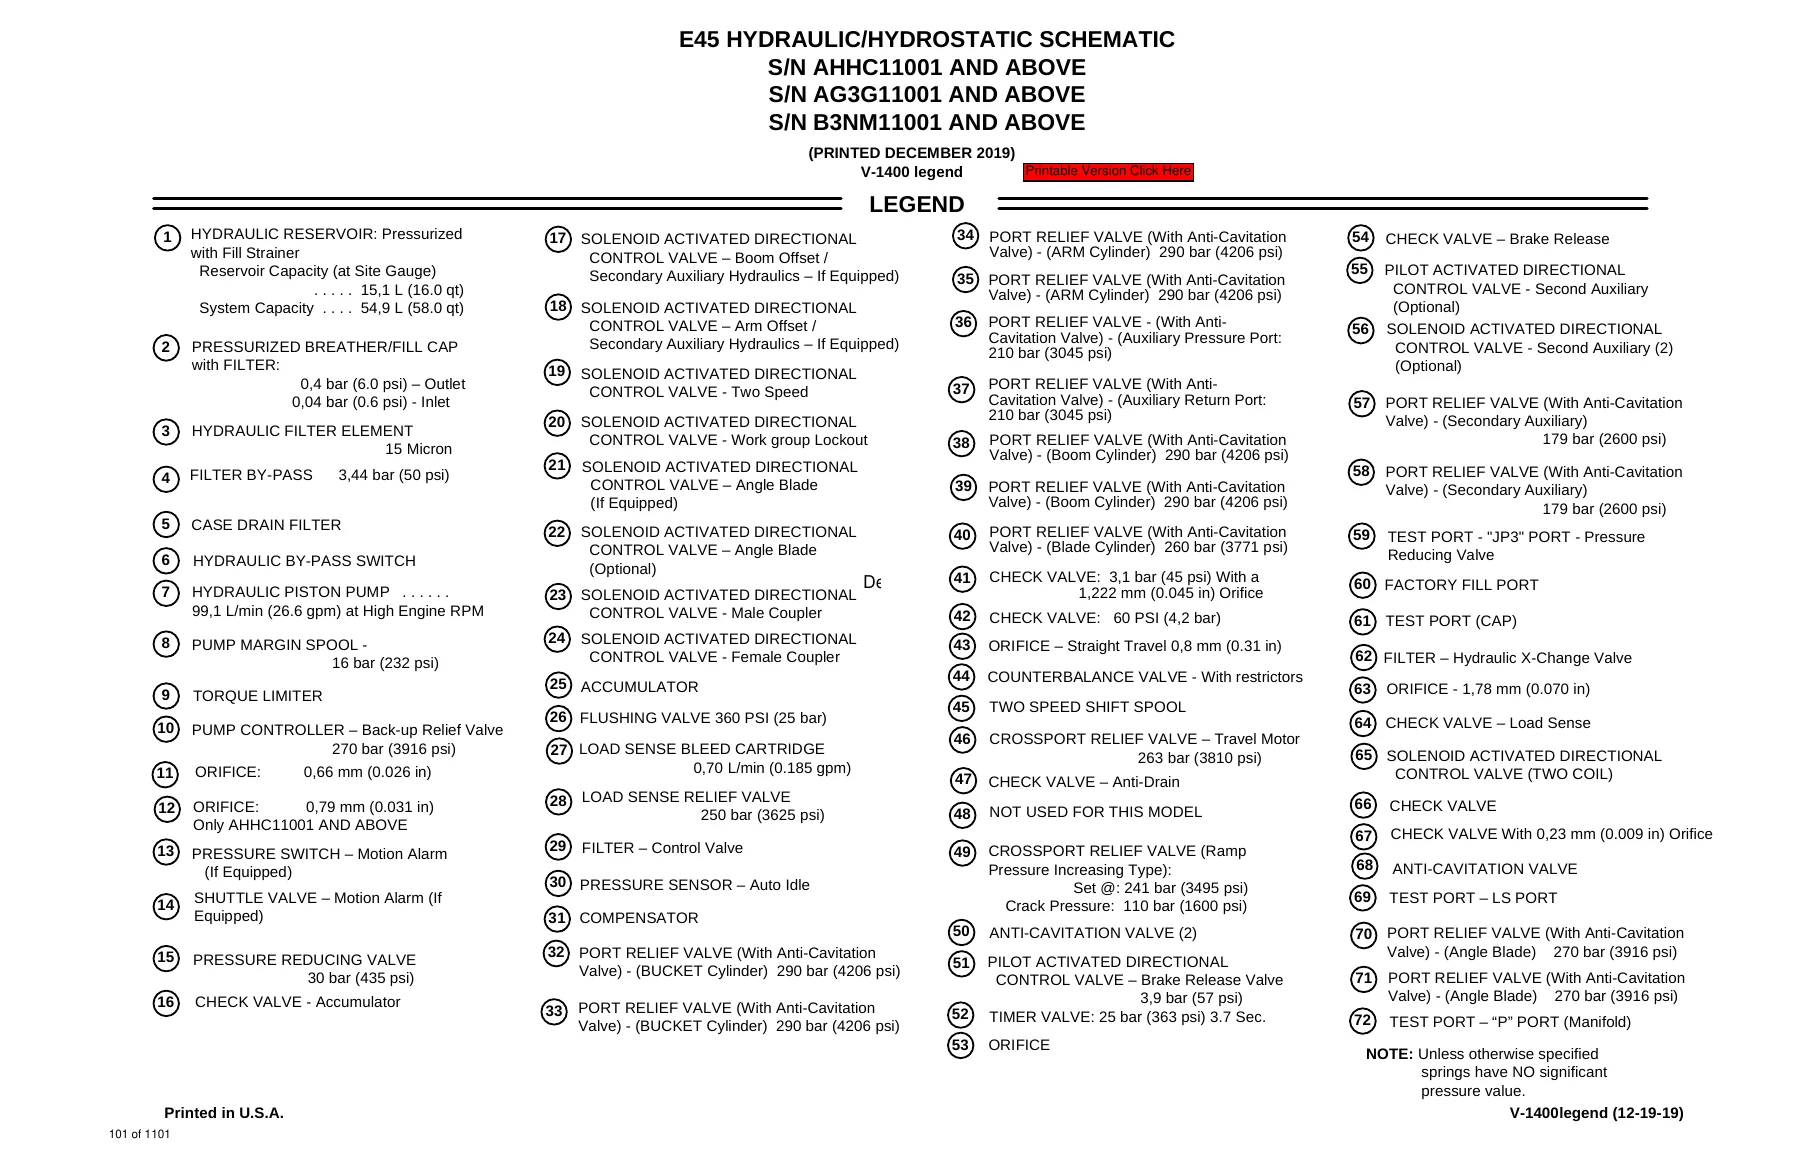
HYDRAULIC / HYDROSTATIC SCHEMATICSp. 101
+HYDRAULIC SYSTEM INFORMATIONp. 109
Glossary Of Hydraulic / Hydrostatic Symbolsp. 109
Troubleshooting The Hydraulic Circuitp. 112
Troubleshooting The Cylinder Circuitp. 113
Troubleshooting The Swing (Upperstructure Slew) Circuitp. 114
Troubleshooting The Travel Circuitp. 115
+CYLINDER (BOOM) (S/N AG3G11007 & ABOVE, AHHC11007 & ABOVE, B3NM11001 & ABOVE AND B3NR11001 & ABOVE)p. 117
Testingp. 117
Removal And Installationp. 119
Parts Identificationp. 122
Disassemblyp. 123
Assemblyp. 126
+CYLINDER (BOOM) (S/N AG3G11006 & BELOW, AHHC11006 & BELOW)p. 131
Testingp. 131
Removal And Installationp. 133
Parts Identificationp. 136
Disassemblyp. 137
Assemblyp. 140
+CYLINDER (ARM)p. 145
Testingp. 145
Removal And Installationp. 147
Parts Identificationp. 149
Disassemblyp. 150
Assemblyp. 152
+CYLINDER (BOOM SWING)p. 157
Testingp. 157
Removal And Installationp. 159
Parts Identificationp. 161
Disassemblyp. 162
Assemblyp. 164
+CYLINDER (BUCKET)p. 167
Testingp. 167
Removal And Installationp. 169
Parts Identificationp. 171
Disassemblyp. 172
Assemblyp. 174
+CYLINDER (BLADE)p. 177
Testingp. 177
Removal And Installationp. 179
Parts Identificationp. 180
Disassemblyp. 181
Assemblyp. 183
+CYLINDER (CLAMP)p. 187
Testingp. 187
Removal And Installationp. 188
Parts Identificationp. 190
Disassemblyp. 191
Assemblyp. 194
+CYLINDER (ANGLE BLADE)p. 199
Testingp. 199
Removal And Installationp. 200
Parts Identificationp. 202
Disassemblyp. 203
Assemblyp. 205
+CYLINDER (EXTENDABLE ARM)p. 209
Testingp. 209
Parts Identificationp. 211
Disassemblyp. 212
Assemblyp. 214
+VALVE (MAIN RELIEF)p. 219
Testing And Adjustingp. 219
+VALVE (PORT RELIEF)p. 221
Testing And Adjusting Port Relief Valve Pressurep. 221
+VALVE (CROSS PORT RELIEF)p. 223
Testingp. 223
Removal And Installationp. 226
+VALVE (PRESSURE REDUCING)p. 227
Testing And Adjustingp. 227
+HYDRAULIC CONTROL VALVEp. 229
Descriptionp. 229
Removal And Installationp. 229
Parts Identificationp. 233
Disassembly And Assemblyp. 234
Inlet Valve Section Disassembly And Assemblyp. 238
Boom Swing Valve Section Disassembly And Assemblyp. 242
Slew Valve Section Disassembly And Assemblyp. 245
Blade Valve Section Disassembly And Assemblyp. 249
Right And Left Travel Valve Section Disassembly And Assemblyp. 253
Angle Blade, Boom, Auxiliary, Arm And Bucket Valve Section Disassembly And Assemblyp. 255
+HYDRAULIC PUMPp. 259
Hydraulic Pump Work Sheetp. 259
Pump Testingp. 262
Removal And Installationp. 271
Coupler Removal And Installationp. 272
Hydraulic Pump Startupp. 273
Torque Limiter Assembly Parts Identificationp. 274
Torque Limiter Assembly Removal And Installationp. 275
Torque Limiter Valve Assembly Disassembly And Assemblyp. 275
Pump Control Parts Identificationp. 276
Pump Control Removal And Installationp. 277
Pump Control Disassembly And Assemblyp. 277
Parts Identificationp. 282
Disassembly And Assemblyp. 283
+MANIFOLD ASSEMBLY / ACCUMULATOR (WITHOUT ANGLE BLADE)p. 291
Descriptionp. 291
Removal And Installationp. 291
Parts Identificationp. 293
Disassembly And Assemblyp. 294
+MANIFOLD ASSEMBLY / ACCUMULATOR (WITH ANGLE BLADE)p. 301
Descriptionp. 301
Removal And Installationp. 301
Parts Identificationp. 303
Disassembly And Assemblyp. 304
+TRAVEL MOTORp. 311
Removal And Installationp. 311
Parts Identification Hydraulic Motorp. 312
Parts Identification Gear Reduction Hubp. 313
Disassemblyp. 314
Assemblyp. 324
+TRAVEL MOTOR (S/N AG3G16000 & ABOVE)p. 337
Removal And Installationp. 337
Parts Identification Hydraulic Motorp. 338
Parts Identification Gear Reduction Hubp. 339
Disassemblyp. 340
Assemblyp. 348
+SWIVEL JOINTp. 357
Removal And Installationp. 357
Parts Identification Angle Blade Swivel (S/N AG3G11001 – AG3G14543, AHHC11001 – AHHC13622)p. 359
Parts Identification Angle Blade Swivel (S/N AG3G14544 – AG3G14767, AHHC13623 & Above)p. 360
Parts Identification Angle Blade Swivel (S/N AG3G14768 & Above)p. 361
Parts Identification Straight Blade Swivel (S/N AG3G11001 – AG3G14542, AHHC11001 – AHHC13622)p. 362
Parts Identification Straight Blade Swivel (S/N AG3G14543 – AG3G14767, AHHC13623 & Above)p. 363
Parts Identification Straight Blade Swivel (S/N AG3G14768 & Above)p. 364
Disassembly And Assemblyp. 365
+SWING MOTORp. 367
Removal And Installationp. 367
Parts Identificationp. 369
Disassembly And Assemblyp. 370
+SWING MOTOR (DRIVE CARRIER)p. 379
Removal And Installationp. 379
Parts Identificationp. 380
Disassembly And Assemblyp. 381
+CONTROL PATTERN SELECTOR VALVEp. 387
Removal And Installationp. 387
Parts Identificationp. 388
Disassembly And Assemblyp. 389
+RIGHT CONTROL LEVER (JOYSTICK) (S/N AG3G11001 – AG3G13999 AND AHHC11001 – AHHC12999)p. 391
Testingp. 391
Handle Removal And Installationp. 392
Joystick Assembly Removal And Installationp. 394
Parts Identificationp. 395
Disassemblyp. 396
Assemblyp. 401
+RIGHT CONTROL LEVER (JOYSTICK) (S/N AG3G14001 & ABOVE, AHHC13001 & ABOVE, B3NM11001 & ABOVE AND B3NR11001 & ABOVE)p. 405
Testingp. 405
Handle Removal And Installationp. 406
Joystick Assembly Removal And Installationp. 408
Parts Identificationp. 409
Disassemblyp. 410
Assemblyp. 414
+LEFT CONTROL LEVER (JOYSTICK) (S/N AG3G11001 – AG3G13999 AND AHHC11001 – AHHC12999)p. 419
Testingp. 419
Handle Removal And Installationp. 420
Joystick Assembly Removal And Installationp. 422
Parts Identificationp. 423
Disassemblyp. 424
Assemblyp. 429
+LEFT CONTROL LEVER (JOYSTICK) (S/N AG3G14001 & ABOVE, AHHC13001 & ABOVE, B3NM11001 & ABOVE AND B3NR11001 & ABOVE)p. 433
Testingp. 433
Handle Removal And Installationp. 434
Joystick Assembly Removal And Installationp. 436
Parts Identificationp. 437
Disassemblyp. 438
Assemblyp. 442
+HYDRAULIC FILTER MOUNTp. 447
Removal And Installationp. 447
+HYDRAULIC RESERVOIRp. 449
Removal And Installationp. 449
+OIL COOLERp. 451
Removal And Installationp. 451
+DIRECT TO TANK VALVEp. 453
Removal And Installationp. 453
+BLADE CONTROL LEVERp. 455
Handle Removal And Installationp. 455
Removal And Installationp. 457
Parts Identificationp. 459
Disassembly And Assemblyp. 460
+CASE DRAIN FILTER MOUNTp. 465
Removal And Installationp. 465
+TRAVEL CONTROL VALVEp. 467
Removal And Installationp. 467
Parts Identificationp. 468
Disassembly And Assemblyp. 469
+REMOVING AIR FROM THE HYDRAULIC SYSTEMp. 475
+MANIFOLD (HYDRAULIC X-CHANGE) (EARLIER MODELS)p. 477
Removal And Installationp. 477
Parts Identificationp. 478
Disassembly And Assemblyp. 479
+MANIFOLD (HYDRAULIC X-CHANGE) (LATER MODELS)p. 483
Removal And Installationp. 483
Parts Identificationp. 484
Disassembly And Assemblyp. 485
+MANIFOLD (PIN GRABBER)p. 491
Removal And Installationp. 491
Parts Identificationp. 492
Disassembly And Assemblyp. 493
+SECONDARY AUXILIARY VALVE (EARLIER MODELS)p. 495
Removal And Installationp. 495
Parts Identificationp. 497
Disassembly And Assemblyp. 498
+SECONDARY AUXILIARY VALVE (LATER MODELS)p. 503
Removal And Installationp. 503
Parts Identificationp. 505
Disassembly And Assemblyp. 506
+VALVE (BOOM LOCK)p. 509
Removal And Installationp. 509
+VALVE (ARM LOCK)p. 511
Removal And Installationp. 511
+UNDERCARRIAGEp. 513
+BLADEp. 515
Removal And Installationp. 515
+BLADE (ANGLE)p. 517
Removal And Installationp. 517
Cutting Edge Removal And Installationp. 518
+TRACK UNDERCARRIAGE COMPONENTS (RUBBER TRACK)p. 519
Descriptionp. 519
Track Lug Heightp. 519
Checking Tensionp. 520
Adjusting Tensionp. 521
Track Removal And Installationp. 523
Idler Removal And Installationp. 524
Idler Parts Identificationp. 525
Idler Disassemblyp. 526
Idler Assemblyp. 528
Track Tensioner Removal And Installationp. 531
Track Tensioner Parts Identificationp. 532
Track Tensioner Disassembly And Assemblyp. 533
Roller Removal And Installationp. 535
Sprocket Removal And Installationp. 536
+TRACK UNDERCARRIAGE COMPONENTS (STEEL TRACK)p. 537
Descriptionp. 537
Checking Tensionp. 538
Adjusting Tensionp. 539
Track Removalp. 541
Track Installationp. 543
Idler Removal And Installationp. 544
Idler Parts Identificationp. 545
Idler Disassemblyp. 546
Idler Assemblyp. 548
Track Tensioner Removal And Installationp. 551
Track Tensioner Parts Identificationp. 552
Track Tensioner Disassembly And Assemblyp. 553
Roller Removal And Installationp. 555
Sprocket Removal And Installationp. 556
Guide Plate Removal And Installationp. 556
+TRACK MAINTENANCEp. 557
Track Damage Identificationp. 557
+SWING CIRCLE GEARp. 569
Swing Bearing Removalp. 569
Swing Bearing Installationp. 570
+UPPERSTRUCTURE AND SWING SECTIONp. 571
+UPPERSTRUCTUREp. 575
Removalp. 575
Installationp. 577
+ROPS CANOPYp. 579
Removal And Installationp. 579
+CABp. 583
Removal And Installationp. 583
Door Removal And Installationp. 586
Front Window Removal And Installation (Earlier Model)p. 587
Front Window Removal And Installation (Later Model)p. 588
Front Window Disassembly And Assembly (Later Model)p. 589
Front Window Adjustment (Later Model)p. 590
Right Side Rear Sliding Window Removal And Installationp. 592
Right Side Front Sliding Window Removal And Installationp. 592
Right Side Front And Rear Sliding Window Weather Strip Removal And Installationp. 593
Right Side Front And Rear Sliding Window Wiper Strip Removal And Installationp. 593
Glass Removalp. 593
Glass Installationp. 594
+SEATp. 601
Removal And Installationp. 601
Seat Mount Removal And Installationp. 602
+RIGHT CONSOLE (S/N AG3G11001 – AG3G13999 AND AHHC11001 – AHHC12999)p. 603
Console Cover Removal And Installationp. 603
+RIGHT CONSOLE (S/N AG3G14000 & ABOVE, AHHC13000 & ABOVE, B3NM11001 & ABOVE AND B3NR11001 & ABOVE)p. 609
Console Cover Removal And Installationp. 609
+LEFT CONSOLEp. 615
Lower Console Cover Removal And Installationp. 615
Upper Console Cover Removal And Installationp. 616
Compression Spring Removal And Installationp. 619
Lock Lever Removal And Installationp. 621
Console Removal And Installationp. 621
+LEFT UPPERSTRUCTURE COVERp. 623
Removal And Installationp. 623
+RIGHT UPPERSTRUCTURE COVERp. 625
Removal And Installationp. 625
+COUNTERWEIGHTp. 627
Removal And Installationp. 627
Long Arm Counterweight Removal And Installationp. 630
+TRAVEL LEVERS AND PEDALSp. 631
Removal And Installationp. 631
Disassembly And Assemblyp. 632
+FLOOR MATp. 633
Removal And Installationp. 633
+FUEL TANKp. 635
Removal And Installation (Canopy Equipped Excavator)p. 635
Removal And Installation (Cab Equipped Excavator)p. 636
Fuel Tank Fitting Removal And Installationp. 636
+HORNp. 637
Removal And Installationp. 637
+SWING FRAMEp. 639
Removal And Installationp. 639
Boom Swing Frame Hose Routingp. 642
Bushing Removalp. 643
Bushing Installationp. 644
+BOOMp. 645
Removal And Installationp. 645
+STANDARD AND LONG ARMp. 647
Removal And Installationp. 647
Arm To Boom Bushing Removal And Installationp. 648
Arm To Bucket And Bucket Link Bushing Removal And Installationp. 649
+ARM (EXTENDABLE)p. 651
Removal And Installationp. 651
Arm To Boom Bushing Removal And Installationp. 652
Arm To Bucket Bushing Removal And Installationp. 653
Disassembly And Assemblyp. 654
Shimming Procedurep. 661
+BUCKETp. 663
Bucket Teeth Removal And Installationp. 663
Bucket Side Cutting Edge Removal And Installationp. 664
+CLAMPp. 665
Removal And Installationp. 665
+TAILGATEp. 667
Removal And Installationp. 667
Latch Removal And Installationp. 668
+X-CHANGEp. 669
Removal And Installationp. 669
Disassemblyp. 670
Assemblyp. 671
+X-CHANGE (HYDRAULIC) (EARLIER MODELS)p. 673
Removal And Installationp. 673
Parts Identificationp. 675
Disassemblyp. 676
Assemblyp. 681
Expansion Plug Installationp. 689
+X-CHANGE (HYDRAULIC) (LATER MODELS)p. 691
Removal And Installationp. 691
Parts Identificationp. 693
Disassemblyp. 694
Assemblyp. 700
Expansion Plug Installationp. 708
+QUICK COUPLER (KLAC™ SYSTEM)p. 709
Troubleshootingp. 709
Daily Inspectionp. 709
Removal And Installationp. 710
Parts Identificationp. 712
Disassemblyp. 713
Assemblyp. 715
+QUICK COUPLER (LEHNHOFF® SYSTEM)p. 717
Troubleshootingp. 717
Daily Inspectionp. 717
Removal (MS03 And MS08)p. 718
Installation (MS03 And MS08)p. 719
Parts Identification (MS03)p. 720
Disassembly And Assembly (MS03)p. 721
Parts Identification (MS08)p. 722
Disassembly (MS08)p. 723
Assembly (MS08)p. 726
+QUICK COUPLER (PIN GRABBER)p. 731
Troubleshootingp. 731
Daily Inspectionp. 732
Removal And Installationp. 733
Parts Identificationp. 734
Disassembly And Assemblyp. 735
+RIGHT SIDE COVER (EARLIER MODELS)p. 737
Removal And Installationp. 737
Latch Removal And Installationp. 738
Latch Adjustmentp. 739
+RIGHT SIDE COVER (LATER MODELS)p. 741
Removal And Installationp. 741
Latch Removal And Installationp. 742
Latch Adjustmentp. 742
+TOOL BOXp. 745
Removal And Installationp. 745
+ELECTRICAL SYSTEM AND ANALYSISp. 747
ELECTRICAL SCHEMATICSp. 747
+ELECTRICAL SYSTEM INFORMATIONp. 762
Troubleshooting Chartp. 762
Descriptionp. 763
Fuse And Relay Location / Identificationp. 763
+BATTERYp. 766
Servicingp. 766
Removing And Installingp. 767
Using A Booster Battery (Jump Starting)p. 768
+ALTERNATORp. 770
Belt Adjustmentp. 770
Belt Replacementp. 770
Charging System Inspectionp. 772
Alternator Voltage Testingp. 773
Low Voltage Testingp. 773
High Voltage Testingp. 774
Removal And Installationp. 775
Parts Identificationp. 777
+STARTERp. 778
Testingp. 778
Removal And Installationp. 779
Parts Identificationp. 780
+LIGHTSp. 782
Removal And Installationp. 782
Boom Light Removal And Installationp. 783
Boom Light Bulb Replacementp. 783
+MAGNETIC LOCKOUT SENSORp. 784
Removal And Installationp. 784
+FUEL LEVEL SENDERp. 786
Removal And Installationp. 786
Testingp. 787
+DIAGNOSTIC SERVICE CODES (S/N AG3G11001 – AG3G13999 AND AHHC11001 – AHHC12999)p. 788
+DIAGNOSTIC SERVICE CODES (S/N AG3G14000 & ABOVE, AHHC13000 & ABOVE, B3NM11001 & ABOVE AND B3NR11001 & ABOVE)p. 790
Viewing Service Codesp. 790
Number Codes Listp. 791
+DELUXE INSTRUMENT PANEL SETUP (S/N AG3G11001 – AG3G13999 AND AHHC11001 – AHHC12999)p. 794
Passwordsp. 794
Password Entry (For Starting And Operating The Machine)p. 794
Changing The Operator Passwordp. 794
Password Lockout Featurep. 795
Job Clockp. 795
RPMp. 795
Maintenance Clockp. 796
+CONTROL PANEL SETUP (S/N AG3G14000 & ABOVE, AHHC13000 & ABOVE, B3NM11001 & ABOVE AND B3NR11001 & ABOVE)p. 798
Panel Setup (Deluxe Instrument Panel)p. 798
Password Setup (Keyless Start Panel)p. 804
Password Lockout Featurep. 805
Password Setup (Deluxe Instrument Panel)p. 806
Maintenance Clockp. 808
+INSTRUMENT PANEL / CONTROLLER (S/N AG3G11001 – AG3G13999 AND AHHC11001 – AHHC12999)p. 810
Removal And Installationp. 810
+INSTRUMENT PANEL (S/N AG3G14000 & ABOVE, AHHC13000 & ABOVE, B3NM11001 & ABOVE AND B3NR11001 & ABOVE)p. 812
Removal And Installationp. 812
+CONTROLLER (S/N AG3G14000 & ABOVE, AHHC13000 & ABOVE, B3NM11001 & ABOVE AND B3NR11001 & ABOVE) (GATEWAY AND AUXILIARY)p. 814
Descriptionp. 814
Gateway Controller Removal And Installationp. 814
Auxiliary Controller Removal And Installationp. 815
+KEY SWITCHp. 816
Removal And Installationp. 816
+WIPER MOTORp. 818
Removal And Installationp. 818
+MOTION ALARM SYSTEMp. 820
Descriptionp. 820
Inspectingp. 820
Adjusting Switch Positionp. 821
+SERVICE PC (LAPTOP COMPUTER)p. 822
Connecting The Remote Start Toolp. 822
Connecting Remote Start Tool (Service Tool)p. 822
Operationp. 823
+SHUT-OFF SWITCHp. 824
Descriptionp. 824
Removal And Installationp. 825
+TRAVEL MOTOR AUTO-SHIFTp. 828
Auto-Shift Drive System (If Equipped)p. 828
Troubleshootingp. 829
+AUTO IDLE PRESSURE SENSORp. 832
Descriptionp. 832
Removal And Installationp. 833
+BOBCAT MACHINE IQ WIRELESS COMMUNICATIONSp. 834
Descriptionp. 834
Controller Removal And Installationp. 834
Antenna Removal And Installationp. 836
Procedurep. 838
+ENGINE SERVICEp. 840
+ENGINE INFORMATIONp. 844
Descriptionp. 844
Specificationsp. 845
Crankshaft Re-Grind Datap. 851
Torque For Kubota® Metric Boltsp. 852
Troubleshootingp. 853
Removal And Installationp. 854
Compression Checkingp. 863
+ENGINE SPEED CONTROLp. 864
Removal And Installationp. 864
Auto Idle Descriptionp. 865
Auto Idle Controller Removal And Installationp. 866
Calibrationp. 867
Actuator Removal And Installation (Earlier Model)p. 870
Actuator Removal And Installation (Later Model)p. 873
+MUFFLERp. 874
Removal And Installationp. 874
+AIR CLEANERp. 876
Housing Removal And Installationp. 876
+ENGINE COOLING SYSTEMp. 878
Radiator Removal And Installationp. 878
Fan Removal And Installationp. 882
Water Pump Removal And Installationp. 883
Water Pump Disassembly And Assemblyp. 883
Thermostat Housing Removal And Installationp. 884
Thermostat – Checkingp. 884
+LUBRICATION SYSTEMp. 886
Oil Pan Removal And Installationp. 886
Oil Pump Removal And Installationp. 887
Oil Pump Inspectionp. 887
Engine Oil Pressure – Testingp. 888
+FUEL SYSTEMp. 890
Fuel Shutoff Solenoid – Checkingp. 890
Fuel Shut-off Solenoid Removal And Installationp. 891
Fuel Injection Pump – Checkingp. 892
Fuel Injection Pump Removal And Installationp. 893
Fuel Injection Pump – Timingp. 896
Fuel Camshaft Removal And Installationp. 898
Fuel Camshaft Governorp. 899
Fuel Injector Removal And Installationp. 900
Fuel Injector Nozzle Pressure – Checkingp. 902
Nozzle Spray Conditionp. 903
Valve Seat Tightnessp. 903
+CYLINDER HEADp. 904
Glow Plugs – Testingp. 904
Glow Plugs Removal And Installationp. 905
Valve Clearance Adjustmentp. 906
Valve Timing – Checkingp. 906
Cylinder Head Removal And Installationp. 907
Cylinder Head Disassembly And Assemblyp. 910
Cylinder Head – Servicingp. 911
Cylinder Head Top Clearancep. 911
Valve Guide – Checkingp. 912
Valve Guide Removal And Installationp. 913
Reconditioning The Valve And Valve Seatp. 914
Valve Springp. 915
Valve Tappetsp. 916
Rocker Arm And Shaft – Checkingp. 917
Push Rod Alignment – Checkingp. 917
+CRANKSHAFT AND PISTONSp. 918
Piston And Connecting Rod Removal And Installationp. 918
Piston And Connecting Rod – Servicingp. 920
Cylinder Bore – Checkingp. 922
Connecting Rod Alignmentp. 923
Crankshaft Gear Removal And Installationp. 924
Crankshaft And Bearings Removal And Installationp. 925
Crankshaft And Bearings – Servicingp. 928
+CAMSHAFT AND TIMING GEARSp. 932
Timing Gearcase Cover Removal And Installationp. 932
Timing Gears Backlash – Checkingp. 935
Idle Gear And Camshaft Removal And Installationp. 936
Camshaft – Servicingp. 938
Idle Gear And Shaft – Servicingp. 939
+FLYWHEEL AND HOUSINGp. 940
Hydraulic Pump Coupler Removal And Installationp. 940
Flywheel Removal And Installationp. 942
Flywheel Ring Gearp. 942
+FLYWHEEL RPM SENSORp. 944
Descriptionp. 944
Removalp. 944
Installationp. 944
+HEATING, VENTILATION AND AIR CONDITIONING S/N AG3G11001 – AG3G13999 AND AHHC11001 – AHHC12999p. 946
+AIR CONDITIONING SYSTEM FLOWp. 948
Descriptionp. 948
Chartp. 949
Componentsp. 950
Safety Equipmentp. 954
+REGULAR MAINTENANCEp. 956
Cab Filtersp. 956
Air Conditioning Compressor Belt Adjustmentp. 957
Air Conditioning Compressor Belt Replacementp. 957
Condenserp. 958
Air Conditioning Lubricationp. 958
Evaporator / Heater Coilp. 958
Air Conditioning Service Chartp. 959
+TROUBLESHOOTINGp. 960
Blower Motor Does Not Operatep. 960
Blower Motor Operates Normally, But Air Flow Is Insufficientp. 960
Insufficient Cooling Although Air Flow And Compressor Operation Are Normalp. 960
The Compressor Operates Improperly Or Not At Allp. 960
Gauge Pressure Related Troubleshootingp. 961
Temperature / Pressure Chartp. 962
Poor A/C Performancep. 963
HVAC Repair And Leaksp. 963
Electrical Systemp. 964
Engine Coolant Bypassing The Heater Valvep. 966
+SYSTEM CHARGING AND RECLAMATIONp. 968
Refrigerant Identificationp. 968
Reclamation And Charging With Recovery / Charging Unitp. 970
+COMPRESSORp. 972
Removal And Installationp. 972
Oilp. 974
Oil Checkp. 975
+CONDENSERp. 978
Removal And Installationp. 978
+RECEIVER / DRIERp. 980
Receiver / Drier Removal And Installationp. 980
Pressure Relief Valve Removal And Installationp. 981
Pressure Switch Removal And Installationp. 981
+EVAPORATOR / HEATER UNITp. 982
Removal And Installationp. 982
+THERMOSTATp. 984
Descriptionp. 984
Removal And Installationp. 985
+EXPANSION VALVEp. 988
Removal And Installationp. 988
+EVAPORATOR COILp. 990
Removal And Installationp. 990
+HEATER COILp. 992
Removal And Installationp. 992
+BLOWER FANp. 994
Removal And Installationp. 994
+HEATER VALVEp. 996
Removal And Installationp. 996
+HVAC DUCTp. 998
Removal And Installationp. 998
+HEATING, VENTILATION AND AIR CONDITIONING S/N AG3G14000 & ABOVE, AHHC13000 & ABOVE, B3NM11001 & ABOVE AND B3NR11001 & ABOVEp. 1000
+AIR CONDITIONING SYSTEM FLOWp. 1002
Descriptionp. 1002
Chartp. 1003
Componentsp. 1004
Safety Equipmentp. 1008
+REGULAR MAINTENANCEp. 1010
Cab Filtersp. 1010
Air Conditioning Compressor Belt Adjustmentp. 1011
Air Conditioning Compressor Belt Replacementp. 1011
Condenserp. 1012
Air Conditioning Lubricationp. 1012
Evaporator / Heater Coilp. 1012
Air Conditioning Service Chartp. 1014
+TROUBLESHOOTINGp. 1016
Blower Motor Does Not Operatep. 1016
Blower Motor Operates Normally, But Air Flow Is Insufficientp. 1016
Insufficient Cooling Although Air Flow And Compressor Operation Are Normalp. 1016
The Compressor Operates Improperly Or Not At Allp. 1016
Gauge Pressure Related Troubleshootingp. 1017
Temperature / Pressure Chartp. 1018
Poor A/C Performancep. 1019
HVAC Repair And Leaksp. 1019
Electrical Systemp. 1020
Engine Coolant Bypassing The Heater Valvep. 1022
+SYSTEM CHARGING AND RECLAMATIONp. 1024
Refrigerant Identificationp. 1024
Reclamation And Charging With Recovery / Charging Unitp. 1026
+COMPRESSORp. 1028
Removal And Installationp. 1028
Oilp. 1030
Oil Checkp. 1031
+CONDENSERp. 1034
Removal And Installationp. 1034
+RECEIVER / DRIERp. 1036
Receiver / Drier Removal And Installationp. 1036
Pressure Relief Valve Removal And Installationp. 1037
Pressure Switch Removal And Installationp. 1037
+EVAPORATOR / HEATER UNITp. 1038
Removal And Installationp. 1038
+THERMOSTATp. 1040
Descriptionp. 1040
Removal And Installationp. 1041
+EXPANSION VALVEp. 1044
Removal And Installationp. 1044
+EVAPORATOR COILp. 1046
Removal And Installationp. 1046
+HEATER COILp. 1048
Removal And Installationp. 1048
+BLOWER FANp. 1050
Removal And Installationp. 1050
+HEATER VALVEp. 1052
Removal And Installationp. 1052
+HVAC DUCTp. 1054
Removal And Installationp. 1054
+SPECIFICATIONSp. 1056
+EXCAVATOR SPECIFICATIONSp. 1058
Machine Dimensionsp. 1058
Machine Dimensions (Standard Arm)p. 1059
Machine Dimensions (Long Arm)p. 1060
Machine Dimensions (Extendable Arm)p. 1061
Machine Dimensions (Angle Blade)p. 1062
Rated Lift Capacity (Standard Arm)p. 1063
Rated Lift Capacity (Standard Arm With Additional Counterweight)p. 1064
Rated Lift Capacity (Long Arm)p. 1065
Rated Lift Capacity (Extendable Arm)p. 1066
Performancep. 1067
Controlsp. 1067
Enginep. 1068
Hydraulic Systemp. 1069
Hydraulic Cylindersp. 1070
Hydraulic Cycle Timesp. 1070
Drive Systemp. 1070
Slew Systemp. 1070
Undercarriagep. 1070
Electricalp. 1071
Capacitiesp. 1071
Tracksp. 1071
Ground Pressurep. 1072
+TORQUE SPECIFICATION FOR BOLTSp. 1074
Torque For General SAE Boltsp. 1074
Torque For General Metric Boltsp. 1075
+HYDRAULIC CONNECTION SPECIFICATIONSp. 1076
O-ring Face Seal Connectionp. 1076
Straight Thread O-ring Fittingp. 1076
Tubelines And Hosesp. 1077
Flare Fittingp. 1077
O-ring Flare Fittingp. 1078
Port Seal Fittingp. 1080
Push To Connect Fittingsp. 1081
+HYDRAULIC FLUID SPECIFICATIONSp. 1084
+CONVERSIONSp. 1086
Decimal And Millimeter Equivalent Chartp. 1086
U.S. To Metric Conversion Chartp. 1087
+SERVICE TOOLS REQUIREDp. 1088
Remote Start Toolsp. 1088
Hydraulic Toolsp. 1089
Engine Toolsp. 1092
Electrical Toolsp. 1094
General Toolsp. 1094
HVAC Toolsp. 1095
+ALPHABETICAL INDEXp. 1096
SERVICE SCHEDULE SYMBOLSp. 1100
Key Systems Covered In Detail
Beyond the chapter list, this manual offers exhaustive coverage of the machine’s core systems. This includes complete overhaul procedures for the hydraulic piston pump, detailed testing and calibration for the load-sensing hydraulic system, and comprehensive assembly/disassembly instructions for all cylinders and the main control valve. The undercarriage section provides critical data for track tension and component service. For the engine, it offers full overhaul specs for the Kubota diesel, including timing, valve adjustment, and injection pump service, alongside detailed engine removal and installation procedures.
What This Manual Enables You To Do
- Complex Repairs: Perform major overhauls of the hydraulic system, engine, and drive train with factory-specified clearances and torque values.
- Accurate Diagnostics: Use the detailed troubleshooting charts and diagnostic service codes to quickly identify issues with the electrical, hydraulic, and engine management systems.
- Preventive Maintenance: Follow the detailed service schedule and lubrication procedures to extend the life of your Bobcat E45 and prevent costly downtime.
- Component Overhaul: Rebuild critical components like the travel motor, swing motor, and hydraulic cylinders to like-new condition.
- Safe Servicing: Adhere to the specific safety warnings and procedures for working on a compact excavator, protecting yourself and your equipment.
Why An Official Factory Manual Matters
Using the correct service information is essential for the proper maintenance and repair of your Bobcat E45. This Bobcat E45 Compact Excavator Service Manual contains the exact procedures, specifications, and diagnostic information that Bobcat engineers use. Using aftermarket or generic guides can lead to incorrect repairs, use of improper fluids or parts, and safety risks, potentially resulting in equipment damage, poor performance, and increased repair costs. This manual provides the assurance that every procedure is performed to factory standards.
Instant PDF Download
This is a digital product. Once your payment is confirmed, you will have immediate access to the full PDF file. The Bobcat E45 Compact Excavator Service Manual can be viewed on any device (computer, tablet, or smartphone) and printed for use in the workshop or field. No shipping costs, no waiting—get the complete service information you need instantly.
Reviews
There are no reviews yet.