
Canon CXDI Control Software NE Version 2.19 Operation Manual BT81609E01
Original price was: $29.95.$17.95Current price is: $17.95.
The complete 264-page Canon CXDI Control Software NE Version 2.19 Operation Manual (BT81609E01, 2019) covering worklist setup, exposure, image review, post-processing, long-length stitching, stand-alone imaging and the full fatal error, error and warning code lists.
Description
Canon CXDI Control Software NE Version 2.19 Operation Manual
The Canon CXDI Control Software NE Version 2.19 Operation Manual is the working reference for the software that runs a Canon digital radiography room. Issued as document BT81609E01 with a revision date of 2019-07, this 264-page volume takes the operator from logging in and pulling study orders off the HIS/RIS worklist all the way through exposure, image review, post-processing, output and error resolution. Screens are identified throughout by their active tab names, so a written procedure such as the [EXAM > Worklist] screen or the [PAST > View] screen matches exactly what is on the image-capture computer in front of you.
Canon splits the operating instructions into two volumes: this Operation Manual and the separate Setup Guide. This manual is the day-to-day half, the one that stays at the console once the system has been installed and configured.
File Details
- Manual type: Operation Manual (first of the two operating instruction volumes)
- Brand: Canon
- Software covered: CXDI Control Software NE Version 2.19
- Document number: BT81609E01
- Revision date: 2019-07
- Language: English
- Page count: 264
- File format: PDF
Chapters Covered
- 1 Getting Started
- Introduction
- Notations, screen names, buttons, mouse wheel and touch-screen operations
- Workflow diagram for a general radiographic examination
- Part names of screens (Quick reference)
- List operations
- Detector connection information
- 2 Starting and Shutting Down the Software
- Starting the software and logging in
- Shutting down the software and the Shutdown Confirmation Dialog Box
- Conducting offline examinations
- Utilizing peripheral devices
- 3 Preparing for Examinations
- Selecting study orders (Worklist tab)
- Selecting protocols by body part or by category
- Creating study orders (Manual tab)
- Creating emergency study orders (Emergency button)
- 4 Conducting Examinations
- Conducting radiographic examinations
- Replacing a protocol before examination
- Replacing protocols after examination
- Recapturing, rejecting and repeating images
- Suspending an examination
- Rebinding other study information with that of the suspended study order
- Binding study information with the images of an emergency study
- Adding information to a complete protocol
- 5 Reviewing Images
- Reviewing images on the [EXAM > Examination] screen
- Reviewing images on the [PAST > View] screen, including storage media and copied studies
- Reviewing images created by Multiple Image Processing
- Deleting studies from the [PAST > Past List] screen
- 6 Post-Processing Images
- Using the toolbar (basic processing: rotation, flip, inversion, pan, zoom, brightness/contrast, laterality markers, ROI, crop, mask, copy)
- Using the Image Processing panel (LUT, enhancement, dynamic range, noise reduction, grid suppression, sharpness, peripheral mask)
- Using the Measurement panel (distance, angle, Cobb angle, height difference)
- Using the Annotation panel and custom annotations
- Using the optional image processing functions (Free Rotation, Scatter Correction, Advanced Edge Enhancement)
- 7 Other Functions
- Outputting images, including automatic and manual arrangement, printing and transfer
- Creating a DICOM disc
- Sending radiation dose reports
- Checking the operation history
- Checking and switching the database
- 8 Stitching Images (Long-length imaging with multiple exposures)
- Long-length imaging with multiple exposures
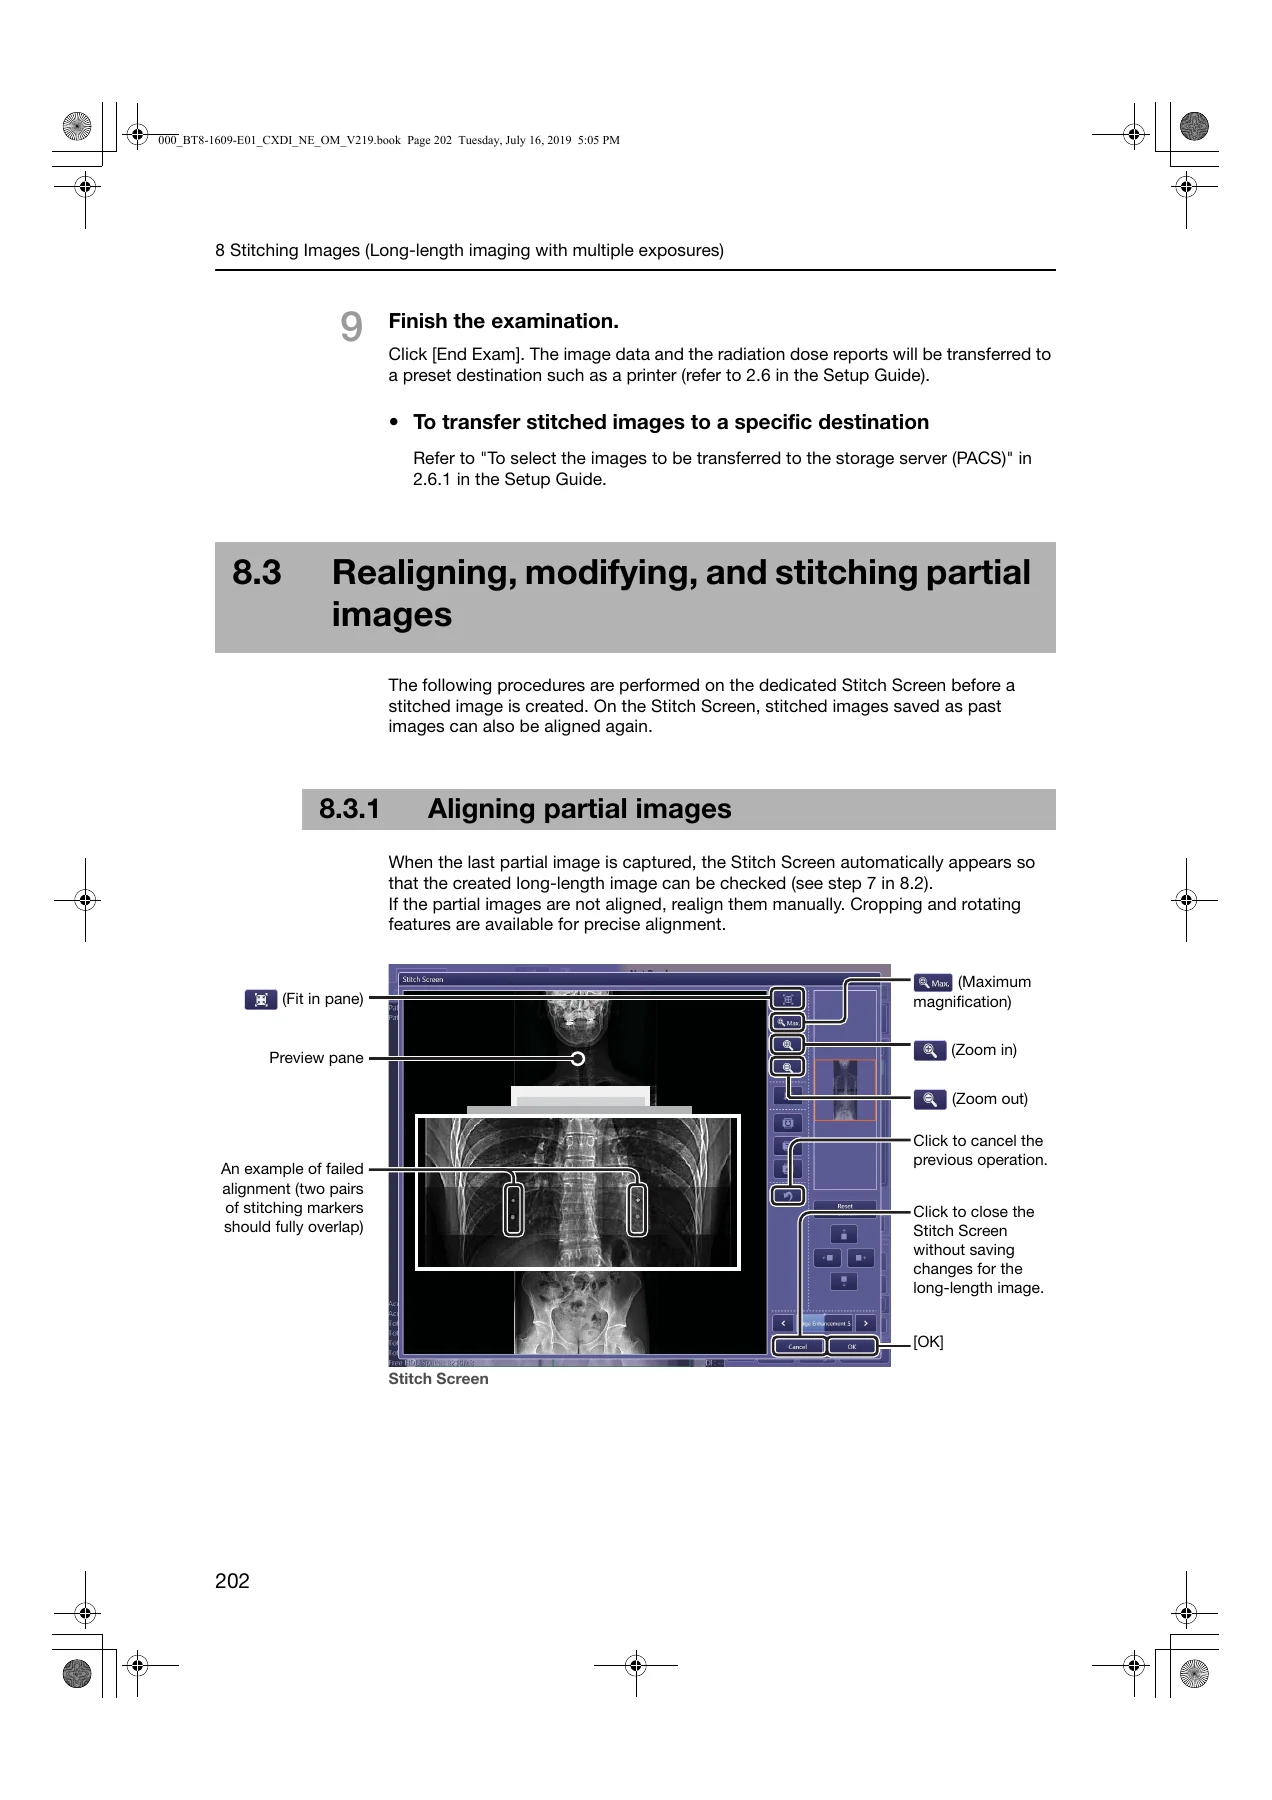
- Capturing and stitching partial images
- Realigning, modifying, and stitching partial images
- 9 Non Generator Connection Imaging
- Non Generator Connection imaging
- Compatible detector list
- Conducting Non Generator Connection imaging
- Detector sleep mode
- 10 Stand-alone Imaging
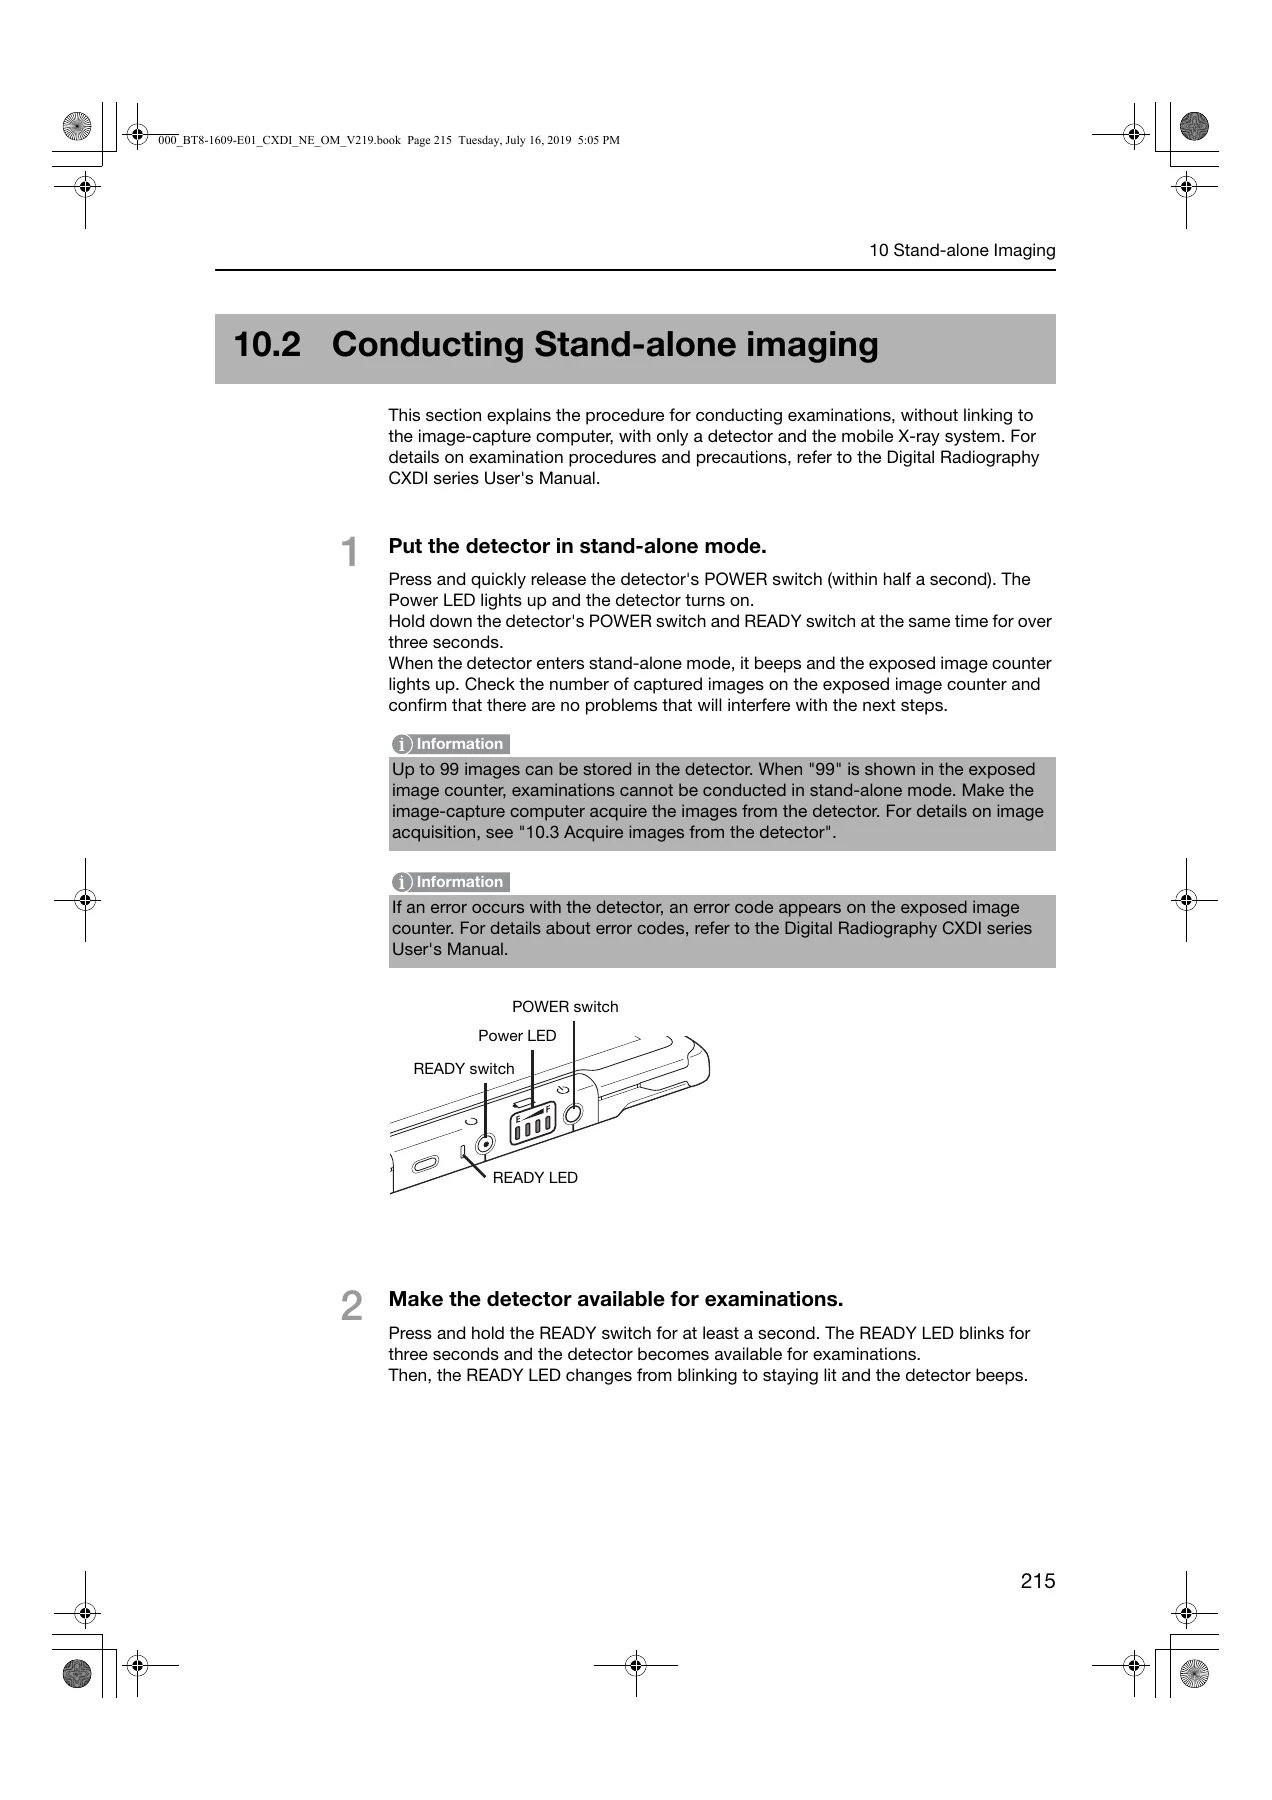
- Stand-alone imaging and supported detector series
- Conducting Stand-alone imaging
- Acquiring images from the detector
- 11 Troubleshooting Remedies
- Confirming details of the problem
- Fatal error list
- Error list
- Warning list
Read as a whole, the volume describes one continuous radiographic workflow rather than a set of disconnected features. Study orders arrive from the HIS/RIS database or are entered manually, protocols carry the workspace, grid and image processing parameters for the examination, the detector status indicator tells the operator when a protocol is actually in the Ready state, and every captured image can be reprocessed, re-measured, re-annotated or re-sent without leaving the software. The closing troubleshooting chapter is unusually detailed for an operation manual, listing fatal codes, error codes and warning codes alongside the specific remedy for each.
Running an Examination With CXDI NE 2.19
The examination chapters are the heart of the Canon CXDI Control Software NE Version 2.19 Operation Manual. Chapter 4 walks through protocol selection, patient positioning, exposure, and the transition from a Ready thumbnail to a processed preview image, including the behaviour of the system status indicator through Waiting, Ready, Capturing and Not Ready states. It also covers the recovery paths that matter in a busy department: retaking a rejected image with the Series/Image Information dialog, repeating a capture without rejecting the original, suspending an examination so incomplete protocols survive for later, and rebinding correct patient study information onto images that were captured against the wrong order.
Chapter 3 handles the front of the workflow, including the Emergency button for immediately starting an examination with a temporary patient name and ID and binding the correct HIS/RIS study information afterwards. Chapter 2 covers starting and shutting down the software cleanly, the Transfer All Data and Backup Database options in the Shutdown Confirmation Dialog Box, and running offline when the mobile X-ray system has no network connection.
Image Processing, Measurement and Output
Chapter 6 is where the manual earns its keep for anyone who processes rather than just captures. The toolbar section covers rotation and flipping, negative/positive inversion, panning, zoom and high-resolution review, brightness and contrast, laterality marker placement, ROI-based brightness adjustment, cropping, peripheral masking and image copying. The Image Processing panel section explains the LUT control and its SA, SB, SC and LN curve shapes, the Auto and REX brightness adjustment modes, enhancement, dynamic range adjustment, noise reduction, grid suppression, sharpness and peripheral mask controls, along with how access groups are switched and how parameter changes are saved as defaults.
Measurement tools are documented down to the click sequence: distance between two points, angle from three points, Cobb angle from six points for scoliosis assessment, and height difference from four points for alignment checks around knee arthroplasty. The correction of magnification option lets measured values and the on-screen scale be corrected from SOD and SID values. Chapter 7 then covers output, from automatic image arrangement on film sheets and printable area adjustment through manual transfer to PACS and storage media, DICOM disc creation, and radiation dose report transmission.
Long-Length Stitching, Non Generator Connection and Stand-alone Imaging
Chapter 8 details stitch type protocols for full spine and full leg imaging, covering how partial images are captured, how stitching markers are used for automatic alignment, and how to realign saved stitched images manually on the Stitch Screen using cropping, 90-degree rotation, free rotation and edge enhancement. Chapter 9 explains Non Generator Connection imaging, where the detector detects X-ray without communicating with the generator, and lists the compatible detectors: CXDI-401G Wireless, CXDI-401C Wireless, CXDI-701G Wireless, CXDI-701C Wireless, CXDI-801G Wireless, CXDI-801C Wireless, CXDI-710C Wireless, CXDI-810C Wireless and CXDI-410C Wireless. Chapter 10 covers stand-alone imaging on the 710 series detectors, where exposures are stored in the detector internal memory and later acquired by the image-capture computer.
Scope Note
This is the software operation volume. Detector hardware handling, installation, protocol configuration from the system setup screen and QC calibration are handled in the separate Setup Guide and the Digital Radiography CXDI series User’s Manual, which the operation manual references throughout. Buyers looking for hardware service procedures or board-level repair information will not find them here.
Who This Manual Is For
Radiographers and radiology technicians who operate a CXDI NE 2.19 console, PACS and RIS administrators who need to understand how studies, images and dose reports move through the system, application specialists running training, and biomedical engineering staff who field the first call when an error code appears at the console. The troubleshooting chapter alone is worth the download for anyone who has to decode an E-series or W-series message without a service engineer on site.
Get the Canon CXDI Control Software NE Version 2.19 Operation Manual
With this manual on hand you can work through the full examination cycle without guesswork: pull and narrow study orders, confirm the detector is genuinely in the Ready state before exposing, recover cleanly from a rejected image or a suspended study, rebuild a stitched long-length image that failed to align, and identify the exact remedy for a fatal, error or warning code instead of improvising. Correct procedure matters in radiography because a mis-selected protocol, a missed patient information check or an image sent to storage before post-processing cannot be undone afterwards, and the manual flags those points explicitly.
IMAGES PREVIEW
The Canon CXDI Control Software NE Version 2.19 Operation Manual is delivered as an instant PDF download after payment, with no shipping and no waiting. Read it on a workstation, a tablet or a phone, print the chapters you need for the console, and keep the error code lists within reach of the room where they will actually be used.
Reviews
There are no reviews yet.