Description
Rotax 125 MAX evo, Junior MAX evo, Mini MAX evo & Micro MAX evo Repair Manual
This Rotax 125 MAX evo Repair Manual is the factory-issued BRP-Rotax repair reference for the complete MAX evo kart engine family: 125 MAX evo, 125 Junior MAX evo, 125 Mini MAX evo, and 125 Micro MAX evo. Dated November 1, 2021, it walks a technician through every stage of engine disassembly, inspection, measurement, and reassembly, using the exact procedures, torque values, and wear-limit tables that BRP-Rotax authorized service centers work from.
- Manual type: Repair Manual
- Brand/Engine family: Rotax 125 MAX evo / Junior MAX evo / Mini MAX evo / Micro MAX evo
- Language: English
- Page count: 174 pages
- File format: PDF
- Edition date: November 1, 2021
Chapters Covered
- Introduction & General Information — safety symbols, warnings, manual scope
- Chapter 1 – General Note — abbreviations and terms, safety notice, technical documentation, use for intended purpose, technical data
- Chapter 2 – Maintenance — authorized personnel, process advice, consumable materials, special tools, inspection and servicing intervals
- Chapter 3 – Engine — system description, removal of ignition system, exhaust system, radiator, fuel line, Bowden cable, engine removal from kart chassis, positioning on trestle mounting plate
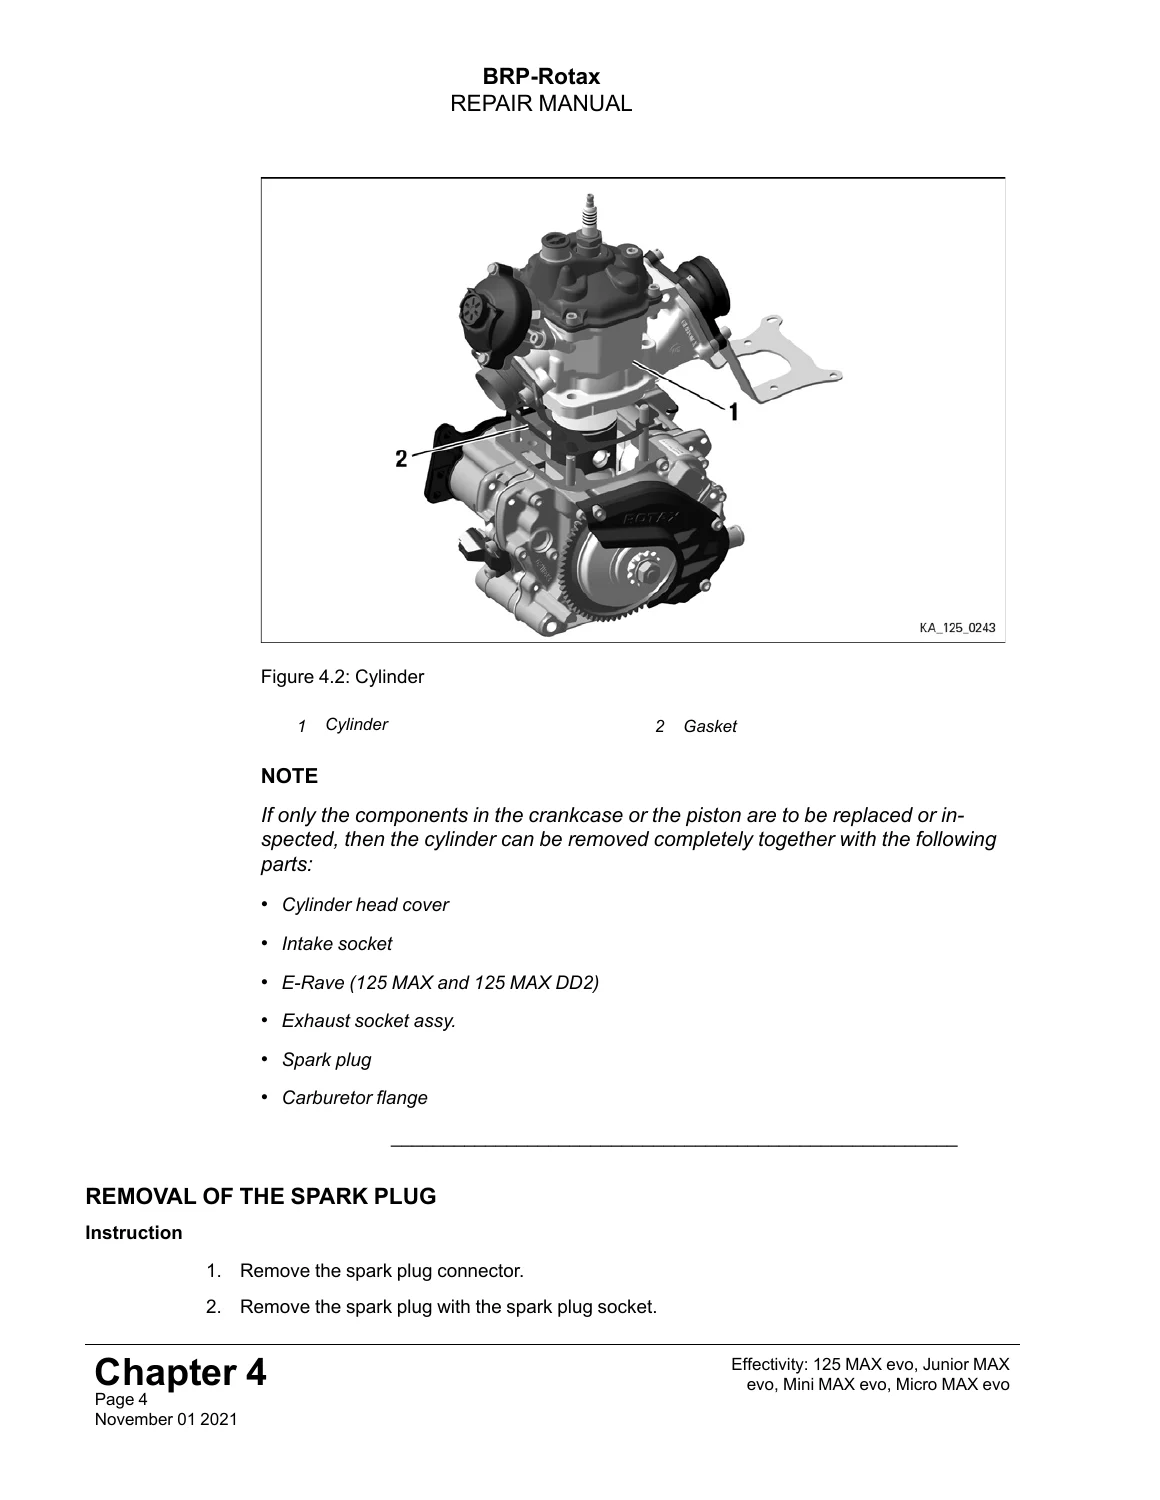
- Chapter 4 – Top End Engine Components — cylinder removal, spark plug, cylinder head cover, thermostat, combustion chamber insert, exhaust socket, intake socket and reed valve
- Chapter 5 – Bottom End Engine Components — balance drive and water pump gear disassembly, oil drain, gear cover and gears, crankcase disassembly, main bearing and oil seal removal, crankshaft repair kit installation, crankshaft disassembly and inspection, housing halves inspection, crankcase assembly
- Chapter 6 – Carburetor and Intake Silencer — carburetor and intake silencer removal, fuel pump removal, carburetor and intake silencer disassembly, inspection of components
- Chapter 7 – Centrifugal Clutch, Primary and Balance Drive — clutch and starter gear assembly removal, centrifugal clutch removal, electric starter removal, clutch drum and sprocket removal, inspection and reassembly, clutch drum installation, electric starter installation, gearbox oil filling
- Chapter 8 – Cooling System — radiator removal, cooling water hose removal, inspection, radiator and hose installation, final tasks
- Chapter 9 – Exhaust System — exhaust system removal, checking, disassembly and assembly, installation, engine installation onto kart chassis, fuel line installation
Complete PDF Bookmark Tree
Complete Bookmarks
The complete bookmarks in the “Rotax 125 MAX evo, Junior MAX evo, Mini MAX evo & Micro MAX evo Repair Manual (2021)” are as follows:
+REPAIR MANUALp. 2
Chapter INTROp. 2
+Chapter Chapter 1p. 4
Abbreviations and terms used in this Manualp. 5
+Safetyp. 6
Safety noticep. 6
Instructionp. 7
Technical documentationp. 8
Use for intended purposep. 8
Technical datap. 9
+Chapter Chapter 2p. 12
General notep. 13
Authorized personnelp. 14
Process advicep. 15
Consumable materialsp. 17
Special toolsp. 19
Inspection and servicing intervals of the engine componentsp. 21
+Chapter Chapter 3p. 24
System descriptionp. 25
+Preparation for removalp. 26
Removal of the ignition systemp. 26
Removal of the exhaust systemp. 29
Removal of radiator with cap assy.p. 29
Removal of the fuel linep. 30
Removal of the Bowden cablep. 31
Removal of the engine from kart chassisp. 31
Positioning the engine on the trestle mounting platep. 32
+Chapter Chapter 4p. 34
System descriptionp. 35
+Cylinder removalp. 36
Removal of the spark plugp. 37
Removal of the cylinder head coverp. 38
Removal of the thermostatp. 38
Removal of the combustion chamber insertp. 39
Removal of the exhaust socketp. 40
Removal of the intake socket and reed valvep. 41
Removal of the exhaust valve (125 MAX only)p. 41
Removal of the pistonp. 43
+Cylinder components inspectionp. 44
Inspection of cylinder componentsp. 44
Inspection of piston and piston ringp. 45
Inspection of the Piston diameterp. 46
Inspection of the Piston and cylinder sizingp. 47
Inspection of the Piston pin, circlipp. 48
Inspection of the spark plugp. 49
Inspection of the cylinder head coverp. 50
Inspection of the combustion chamber insertp. 50
Inspection of the exhaust socketp. 51
Inspection of the carburetor flange and reed valvep. 52
Inspection of the exhaust valve (125 MAX only)p. 53
+Cylinder components installationp. 54
Installation of exhaust valve (125 MAX only)p. 54
Installation of exhaust valve, gasket, valve rod housingp. 55
Installation of the exhaust valve pistonp. 55
Installation of pistonp. 57
Installation of the cylinderp. 58
Installation of the exhaust socketp. 60
Installation of the carburetor flange and reed valvep. 60
Installation of combustion chamber insertp. 62
Installation of cylinder head coverp. 62
Inspection and adjustment of squish gapp. 64
Installation of spark plugp. 66
+Chapter Chapter 5p. 68
System descriptionp. 69
+Disassembly of the balance drive and water pump gearsp. 72
Drain oilp. 72
Removal of the gear cover and gearsp. 73
+Disassembling the crankcasep. 76
Removal of main bearings and oil sealsp. 78
+Installation of the crankshaft repair kitp. 82
Disassembling of the crankshaftp. 82
Inspection of the crankshaftp. 88
Crankshaft not in specificationp. 90
Crankshaft – assemblyp. 91
+Crankcase inspectionp. 97
Inspection of water pump drivep. 97
Inspection of water pump shaftp. 98
Inspection of balance shaft drivep. 98
Inspection of balance shaftp. 99
Inspection of the housing halvesp. 100
+Crankcase – assemblyp. 101
Installation of oil seal, ball bearing and needle bushingp. 101
Installation of ball bearing and oil seal for crankcasep. 103
Assembly of crankshaft, water pump shaft and balance shaftp. 106
Assembly of the crankcasep. 107
+Installation of crankcase assy.p. 108
Installation of balance and water-pump shaft drivep. 108
+Chapter Chapter 6p. 112
System descriptionp. 113
+Removal of the carburetor and intake silencerp. 114
Removal of the carburetor and intake silencerp. 114
Removal of the fuel pumpp. 115
Disassembly of the carburetorp. 116
Disassembly of the intake silencerp. 118
+Carburetor and intake silencer – inspection of componentsp. 119
Inspection of the carburetorp. 119
Inspection of the fuel pumpp. 120
Inspection of the intake silencerp. 120
+Installing the carburetor and intake silencerp. 122
Assembly of carburetorp. 122
Assembly of float housingp. 122
Assembly of intake silencerp. 123
Installation of fuel pump, carburetorp. 124
+Chapter Chapter 7p. 126
System descriptionp. 127
+Removal of the clutch and starter gear assy.p. 129
Removal of the centrifugal clutch assy.p. 129
Removal of the electric starterp. 129
Removal of the clutch drump. 130
Removal of the sprocketp. 132
Removal of the starter gear assy.p. 133
+Inspection of clutch and starter gear assy.p. 136
Inspection of the clutch drump. 136
Inspection of the needle cage and sprocketp. 136
Inspection of the starter reduction gear assy.p. 136
Inspection of the electric starterp. 137
Inspection of the clutch and starter gear assy.p. 138
Electric starter repair kitp. 139
Disassembling of electric starterp. 139
Assembling of electric starterp. 140
+Installation of clutch and starter gear assy.p. 142
Installation of the starter reduction gear assy.p. 142
Installation of the starter gear assy.p. 142
Assembly of the clutch drump. 144
Installation of the sprocketp. 144
Installation of bearing sleeve (for sprockets with 11 teeth only)p. 145
Installation of the clutch drump. 146
Installation of the electric starterp. 148
Filling gearbox with oilp. 150
+Chapter Chapter 8p. 152
System descriptionp. 153
+Removal of radiatorp. 155
Removal of the cooling water hosep. 155
+Inspection of cooling systemp. 157
Radiator – inspection of componentsp. 157
+Installing the radiatorp. 158
Installation of the cooling water hosesp. 158
Installation of the radiator on enginep. 159
Final tasksp. 161
+Chapter Chapter 9p. 162
System descriptionp. 163
+Removal of the exhaust systemp. 165
Checking the exhaust systemp. 166
Disassembling the exhaust systemp. 166
Assembling the exhaust systemp. 166
Installation of the exhaust systemp. 167
+Preparation for installationp. 168
Removing the engine from the trestle mounting platep. 168
Installation of the engine on kart chassisp. 168
Installation of the fuel linep. 168
Installation of the bowden cablep. 169
Installation of the ignition systemp. 169
Installation of the exhaust systemp. 170
Indexp. 172
Taken as a whole, this Rotax 125 MAX evo Repair Manual gives a kart technician a complete, chapter-by-chapter path from a running engine down to individual crankshaft components and back again, with the factory measurement points, wear limits, and reassembly torques needed to do the job to Rotax’s own standard.
Engine Coverage & Technical Highlights
The manual is built around one 125cc two-stroke platform shared across four output tunes – MAX evo, Junior MAX evo, Mini MAX evo, and Micro MAX evo – with a common 54.00 mm bore and 54.5 mm stroke and 125.0 ccm displacement. Technical data tables list nominal power and torque figures for each variant (from 7 kW/10.9 Nm on the Micro MAX evo up to 22 kW/21 Nm on the MAX evo), idle speed, spark plug type, oil-in-gasoline lubrication ratio (1:50), coolant capacities, chain dimensions, and drive sprocket tooth counts. Special-tool part numbers are called out throughout – fixation tools for the crankshaft and sprocket, insertion jigs for oil seals and needle bushings, the crankshaft repair jig, and the trestle mounting plate – so a shop can see exactly what’s needed before starting a job.
Crankshaft Measurement & Rebuild Data
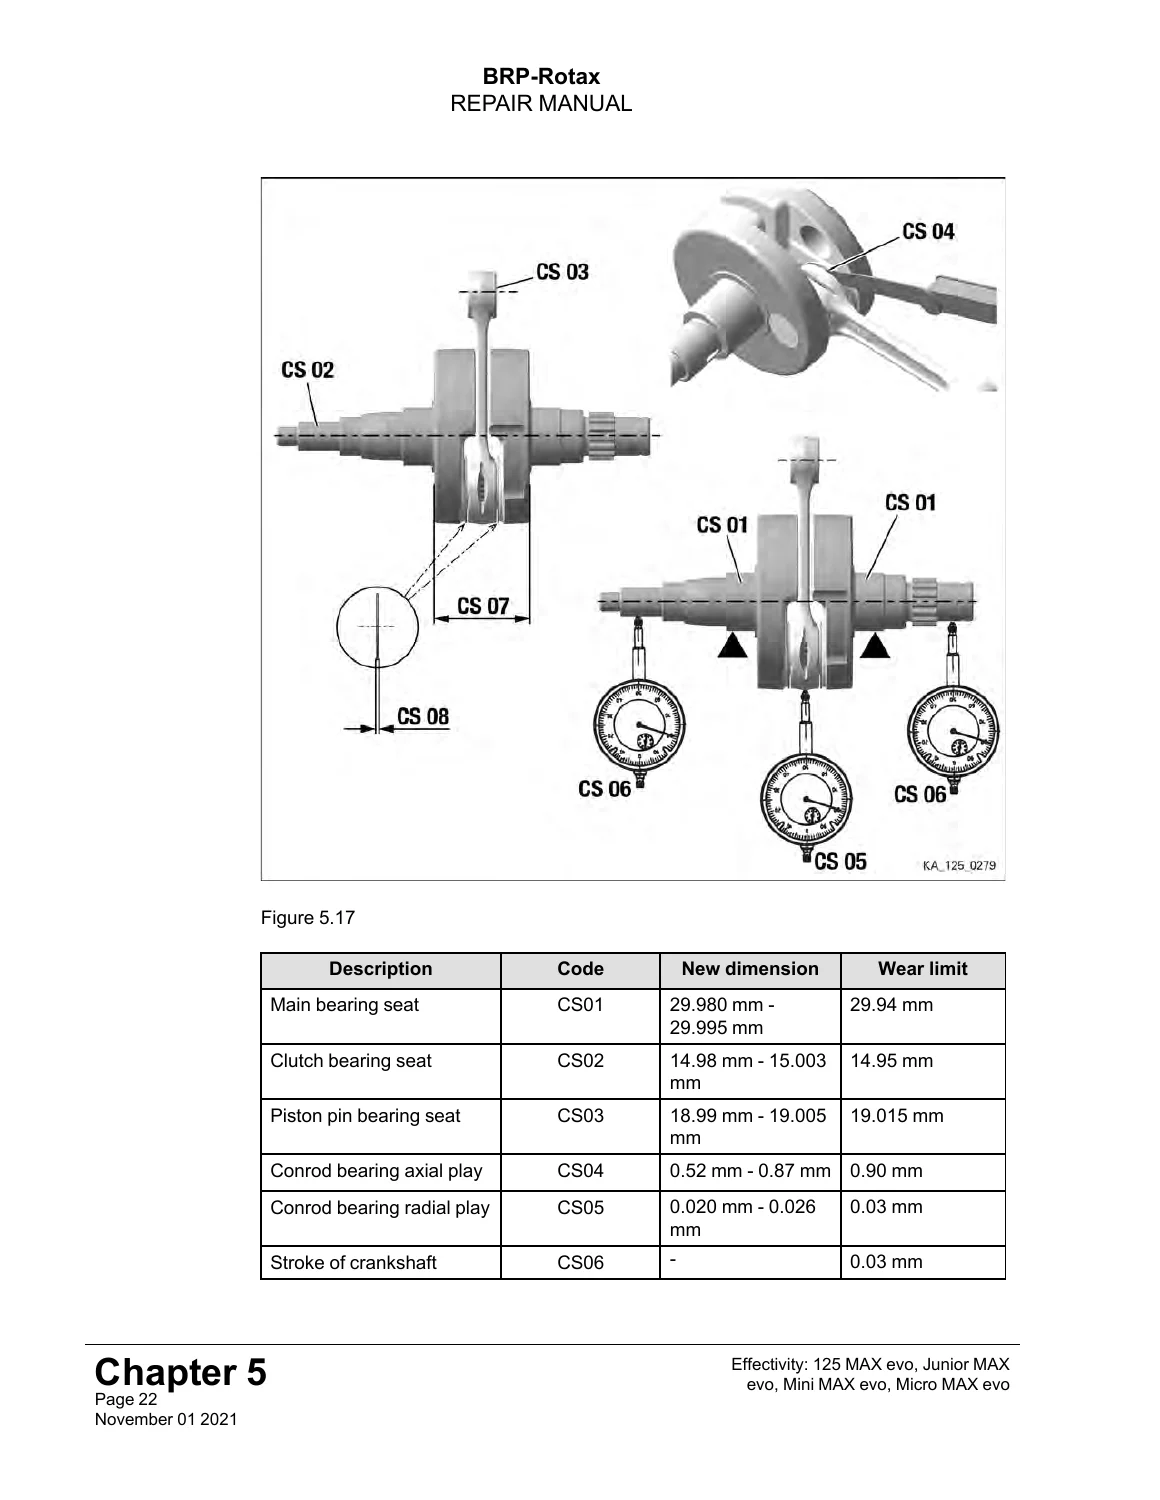
Chapter 5 includes the crankshaft measuring points (CS01 through CS08) with new-part dimensions and wear limits for the main bearing seats, clutch bearing seat, piston pin bearing seat, connecting rod bearing axial and radial play, crankshaft runout, crank web distance, and thrust washer thickness – the exact figures needed to decide whether a crankshaft can be re-aligned with the repair jig or must be replaced outright.
Whether you’re rebuilding the bottom end after a wear-limit failure, servicing the carburetor and intake silencer, replacing clutch and starter gear components, or simply working through the scheduled inspection intervals in Chapter 2, this Rotax 125 MAX evo Repair Manual supplies the correct disassembly order, torque specifications, and wear tolerances so the job is done to factory spec rather than guesswork. Getting these steps and clearances right protects an engine that runs at up to 11,500 rpm from premature wear or in-race failure. The manual downloads instantly as a PDF after purchase – no shipping, no waiting – and can be read on a phone, tablet, laptop, or printed for use right at the workbench.

Reviews
There are no reviews yet.