Valtra Tractor A3 Series Operator’s Manual – PDF DOWNLOAD
Original price was: $86.95.$28.95Current price is: $28.95.
Valtra Tractor A3 Series Operator’s Manual – PDF DOWNLOAD
Description
Valtra Tractor A3 Series Operator’s Manual – PDF DOWNLOAD
FILE DETAILS:
Valtra Tractor A3 Series Operator’s Manual – PDF DOWNLOAD
Language : English
Pages : 259
Downloadable : Yes
File Type : PDF
Size: 13.8 MB
IMAGES PREVIEW OF THE MANUAL:
DESCRIPTION:
Valtra Tractor A3 Series Operator’s Manual – PDF DOWNLOAD
About this manual:
- This operator’s manual is for Valtra A3 Series tractors. The A3 models are A83 h
and A93 h. - The manual is meant for agricultural tractors only. If the tractor is used for other
applications, it is the owner’s responsibility to ensure compliance with local
regulations. In this case, always contact your dealer first. - The purpose of this manual is to enable the owner and operator to use the tractor
in a proper manner. Providing that the instructions are followed carefully, the
tractor will provide years of service in the tradition of Valtra.
WARNING: Before using the tractor, read and understand all the
instructions in this manual.They must then be strictly followed when
operating and maintaining the tractor.
IMPORTANT: When using the tractor, always follow all valid laws and regulations
even if they are not specifically pointed out in this manual. - The manual contains detailed instructions for operating, servicing and
maintaining the tractor. - Alternative equipment in the manual refers to equipment that can be selected
when ordering the tractor. - Extra equipment refers to equipment which can be bought and installed on the
tractor later. - Due to the continual development of the products, the content of this manual may
not always correspond to the new product. Therefore, we retain the right to make
alterations without prior notification. - Maintenance, repairs and adjustments which are not described in this manual
require special tools and exact technical data. For such work contact your dealer
who has specially trained personnel to help you.
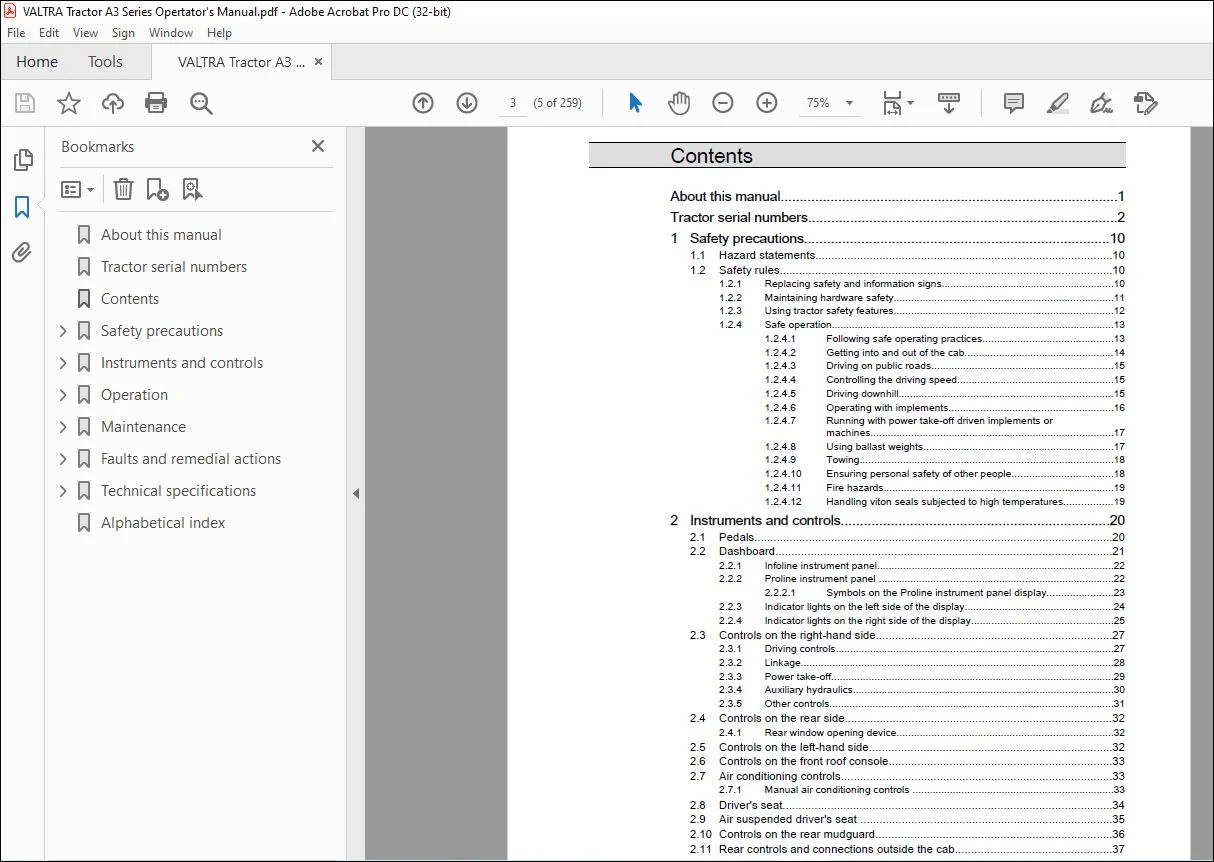
TABLE OF CONTENTS:
Valtra Tractor A3 Series Operator’s Manual – PDF DOWNLOAD
About this manual 1
Tractor serial numbers 2
1 Safety precautions 10
1 1 Hazard statements 10
1 2 Safety rules 10
1 2 1 Replacing safety and information signs 10
1 2 2 Maintaining hardware safety 11
1 2 3 Using tractor safety features 12
1 2 4 Safe operation 13
1 2 4 1 Following safe operating practices 13
1 2 4 2 Getting into and out of the cab 14
1 2 4 3 Driving on public roads 15
1 2 4 4 Controlling the driving speed 15
1 2 4 5 Driving downhill 15
1 2 4 6 Operating with implements 16
1 2 4 7 Running with power take-off driven implements or
machines 17
1 2 4 8 Using ballast weights 17
1 2 4 9 Towing 18
1 2 4 10 Ensuring personal safety of other people 18
1 2 4 11 Fire hazards 19
1 2 4 12 Handling viton seals subjected to high temperatures 19
2 Instruments and controls 20
2 1 Pedals 20
2 2 Dashboard 21
2 2 1 Infoline instrument panel 22
2 2 2 Proline instrument panel 22
2 2 2 1 Symbols on the Proline instrument panel display 23
2 2 3 Indicator lights on the left side of the display 24
2 2 4 Indicator lights on the right side of the display 25
2 3 Controls on the right-hand side 27
2 3 1 Driving controls 27
2 3 2 Linkage 28
2 3 3 Power take-off 29
2 3 4 Auxiliary hydraulics 30
2 3 5 Other controls 31
2 4 Controls on the rear side 32
2 4 1 Rear window opening device 32
2 5 Controls on the left-hand side 32
2 6 Controls on the front roof console 33
2 7 Air conditioning controls 33
2 7 1 Manual air conditioning controls 33
2 8 Driver’s seat 34
2 9 Air suspended driver’s seat 35
2 10 Controls on the rear mudguard 36
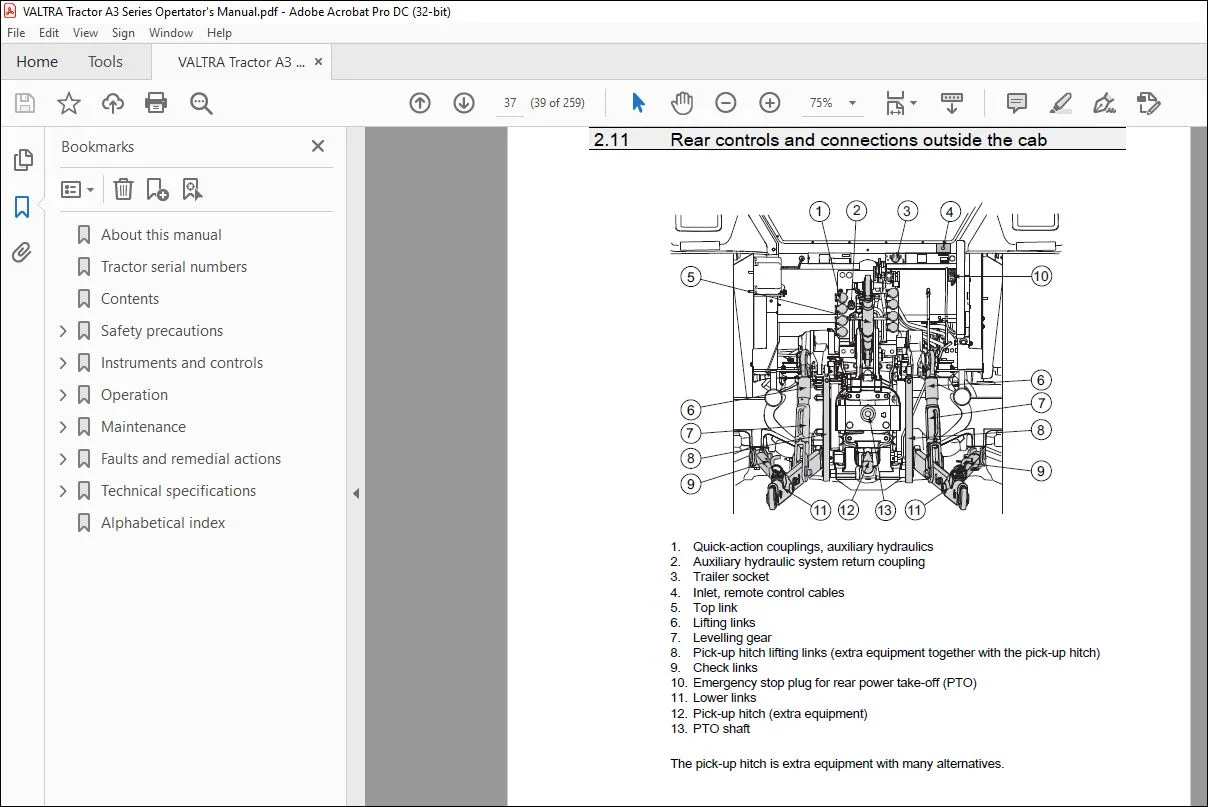
2 11 Rear controls and connections outside the cab 37
3 Operation 38
3 1 Running the tractor in 38
3 2 Preparing for use 38
3 2 1 Adjusting the driver’s seat 38
3 2 2 Adjusting the air-suspended driver’s seat 40
3 2 3 Adjusting the armrest 43
3 2 4 Adjusting the steering wheel 44
Contents
– 3 –
3 2 5 Adjusting mirrors 45
3 2 6 Using the windscreen wiper and washer 45
3 2 7 Using the rear window wiper 46
3 2 8 Using the rear window washer 46
3 2 9 Power shuttle lever 47
3 2 10 Using the main switch 47
3 2 11 Control stop 48
3 2 12 Using the control stop 49
3 2 13 Using the ignition switch 49
3 2 14 Using the roof hatch 51
3 3 Starting the tractor 51
3 3 1 Starting under normal conditions 51
3 3 2 Starting under cold conditions 53
3 3 3 Starting with an auxiliary battery 53
3 4 Using lights 54
3 4 1 Using headlights 54
3 4 2 Using upper headlights 55
3 4 3 Using working lights 55
3 4 4 Using the cab light 56
3 5 Using notification devices 56
3 5 1 Using the direction indicators 56
3 5 2 Using the horn 57
3 5 3 Using the rotating warning light 57
3 5 4 Using hazard warning flashers 58
3 6 Heating and ventilation 58
3 6 1 Using the heater 58
3 6 2 Using the extra heater 59
3 6 3 Controlling ventilation nozzles 60
3 6 4 Using the manual air conditioning 60
3 7 Power outlets 62
3 7 1 Lighter 62
3 7 2 Two-pin power socket 62
3 7 3 Three-pin power socket 63
3 7 4 Trailer socket 64
3 7 5 Two-pin power socket on the bonnet 64
3 8 Driving the tractor 65
3 8 1 Steering 65
3 8 2 Power shuttle 65
3 8 3 Using the power shuttle lever 66
3 8 4 Using the parking brake 66
3 8 5 Using the clutch pedal 68
3 8 6 Braking 69
3 8 7 Starting to drive 69
3 8 8 Transmission system 70
3 8 8 1 Selecting the range gear 71
3 8 8 2 Selecting the speed gear 72
3 8 9 Parking the tractor 72
3 8 10 Cruise control 73
3 8 10 1 Cruise control switches 73
3 8 10 2 Programming the driving speed cruise control 74
3 8 10 3 Activating and deactivating the driving speed cruise
control 74
3 8 10 4 Programming the engine speed cruise control 76
3 8 10 5 Activating and deactivating the engine speed cruise
control 77
3 8 10 6 Decreasing the cruise control setting 77
3 8 10 7 Increasing the cruise control setting 78
3 8 11 Automatic traction control 79
3 8 12 Using the automatic traction control 80
3 8 13 Differential lock 81
Contents
– 4 –
3 8 14 Engaging and disengaging the differential lock 81
3 8 15 Four-wheel drive 82
3 8 16 Engaging and disengaging the four-wheel drive 82
3 8 17 Engaging and disengaging the four-wheel drive automatic function 83
3 8 18 Driving start automatics 83
3 8 19 Activating and deactivating the driving start automatics 84
3 8 20 Permitted driving inclinations for driving the tractor on a slope 84
3 9 Proline instrument panel display 85
3 9 1 Fixed views 85
3 9 2 Selecting a view 86
3 9 3 Top and middle row views 86
3 9 3 1 Working time view 87
3 9 3 2 Cruise control view 88
3 9 3 3 Driving speed view 88
3 9 3 4 Rear power take-off speed view 88
3 9 3 5 Front power take-off speed view 89
3 9 3 6 Engine speed view 89
3 9 3 7 Fuel consumption views 89
3 9 3 8 Rear lower links’ position view 91
3 9 3 9 Front lower links’ position view 91
3 9 3 10 Gearbox temperature view 92
3 9 3 11 Travel distance view 92
3 9 3 12 Surface area view 93
3 9 4 Periodical maintenance view 93
3 9 4 1 Clearing the periodical maintenance view 93
3 9 5 Resetting views 94
3 9 6 Enlarging the middle row 95
3 9 7 Changing parameters 96
3 9 7 1 Activating and exiting the setting mode 96
3 9 7 2 Changing the parameter value 97
3 9 7 3 Setting the display backlight level 97
3 9 7 4 Setting the implement width 98
3 9 7 5 Changing the hour display 98
3 9 7 6 Changing the minute display 98
3 9 7 7 Changing the clock mode 99
3 9 7 8 Activating the direction indicator buzzer 99
3 9 7 9 Changing the temperature unit 99
3 9 7 10 Changing the length unit 100
3 9 7 11 Changing the volume unit 100
3 9 7 12 Activating and deactivating the front power take-off speed
view 101
3 9 7 13 Activating and deactivating the front lower links’ position
view 101
3 9 7 14 Adjusting the display contrast 101
3 10 Rear linkage 102
3 10 1 Diagnose light 102
3 10 2 Lift/lower indicator lights 103
3 10 3 Activating the linkage 103
3 10 4 Using the lift/stop/lower switch 104
3 10 5 Using the position control knob 105
3 10 6 Using the linkage floating position 105
3 10 7 Using the lift/lower switch and lift/lower push buttons 107
3 10 8 Setting the lowering speed 107
3 10 9 Limiting the lifting height 108
3 10 10 Draft control 109
3 10 11 Activating and deactivating the draft control 110
3 10 12 Passing the position set by the position control knob 110
3 10 13 Passing the height set by the lifting height selector 111
3 10 14 Using the drive balance control 112
3 11 Three-point linkage 114
Contents
– 5 –
3 11 1 Attaching implements 115
3 11 2 Using telescopic lower links 117
3 11 3 Using quick couplings for lower links 117
3 11 3 1 Setting the release cable for lower link quick couplings 118
3 11 4 Adjusting lifting links 120
3 11 5 Adjusting lower links 120
3 11 6 Adjusting the check links’ length 121
3 12 Auxiliary hydraulics 122
3 12 1 Controlling the auxiliary hydraulics rear valves 1 and 2 123
3 12 2 Controlling the auxiliary hydraulics rear valves 3 and 4 124
3 12 3 Setting valves for single-action or double-action 125
3 12 4 Using quick-action couplings 126
3 12 5 Connecting an external hydraulic motor to the auxiliary hydraulics 126
3 13 Using the front linkage 127
3 13 1 Setting front linkage lifting link positions 128
3 14 Using the Valtra front loader 129
3 14 1 Softdrive 131
3 14 2 Locking the equipment 131
3 14 3 Using the continuous floating position 132
3 14 4 Using the floating position with joystick buttons 133
3 14 5 Controlling the extra cylinder with the change valve 134
3 15 Power take-off 135
3 15 1 Attaching implements to the power take-off 135
3 15 2 Rear power take-off 137
3 15 2 1 Activating rear power take-off 138
3 15 2 2 Starting rear power take-off 139
3 15 2 3 Stopping rear power take-off temporarily 140
3 15 2 4 Deactivating rear power take-off 141
3 15 2 5 Stopping the rear power take-off in emergency 142
3 15 2 6 Using the rear power take-off automatic stop 143
3 15 3 Front power take-off 144
3 15 3 1 Using the front power take-off 144
3 16 Towing devices 145
3 16 1 Pick-up hitch 145
3 16 1 1 Unlatching the pick-up hitch 145
3 16 1 2 Latching the pick-up hitch 146
3 16 2 Agricultural drawbar devices 147
3 16 3 Towing device frames 148
3 16 3 1 Adjusting the jaw height 149
3 16 3 2 Attaching to the mechanical jaw 151
3 16 3 3 Attaching to the automatic jaw 151
3 17 Air pressure system 153
3 18 Trailer 155
3 18 1 Trailer air pressure brakes 155
3 18 2 Trailer fluid brake valve 156
4 Maintenance 158
4 1 Maintenance schedule 158
4 2 Service inspection 158
4 3 Performing maintenance tasks 159
4 3 1 Cleaning the tractor 160
4 3 1 1 Cleaning the engine compartment 161
4 3 2 Greasing lubricating points fitted with grease nipples 161
4 3 3 Supporting the tractor 161
4 4 Recommended fuel and lubricants 163
4 4 1 Fuel 163
4 4 1 1 Quality requirements for engine fuel 163
4 4 1 2 Storing fuel 163
4 4 1 3 Biodiesel fuel 164
4 4 2 Grease 164
Contents
– 6 –
4 4 2 1 Universal Grease – NLGI2 universal grease 164
4 4 2 2 Calsium LF – NLGI2 calsium grease LF 164
4 4 2 3 Grease Moly – NLGI2 moly grease 165
4 5 Storing the tractor 165
4 5 1 Storing the tractor for a period shorter than two months 165
4 5 2 Storing the tractor for a period longer than two months 165
4 6 Running the tractor in after storage 166
4 6 1 Running the tractor in after a storing period shorter than two months 166
4 6 2 Running the tractor in after a storing period longer than two months 166
4 7 Periodical maintenance 167
4 7 1 Periodical maintenance chart 167
4 7 2 Daily maintenance 169
4 7 2 1 Checking the engine oil level 169
4 7 2 2 Checking the oil level in the transmission system 170
4 7 2 3 Checking the coolant level 171
4 7 2 4 Cleaning radiators 172
4 7 2 5 Draining the water from the air pressure system 173
4 7 3 Weekly maintenance 173
4 7 3 1 Greasing the three-point linkage 173
4 7 3 2 Checking the pick-up hitch 174
4 7 3 3 Greasing the pick-up hitch 174
4 7 3 4 Maintaining the front linkage 175
4 7 3 5 Checking the front power take-off 176
4 7 3 6 Greasing front axle mounting bearings 176
4 7 3 7 Checking belts’ tension 177
4 7 3 8 Adjusting the air conditioning compressor belt 177
4 7 3 9 Adjusting the air compressor belt 178
4 7 3 10 Changing the belts 178
4 7 3 11 Checking the fuel system prefilter and sediment bowl 181
4 7 3 12 Checking the tyre pressure 183
4 7 3 13 Checking wheel nuts’ tightness 183
4 7 3 14 Windscreen washer fluid reservoir 183
4 7 4 Maintenance every 500 hours 183
4 7 4 1 Greasing door hinges 183
4 7 4 2 Changing the engine oil and the oil filter 184
4 7 4 3 Checking the breather pipe 185
4 7 4 4 Checking the brake fluid level 186
4 7 4 5 Cleaning the cab ventilation air filter 186
4 7 4 6 Cleaning the extra heater’s air filter 187
4 7 4 7 Checking the brake pedal free travel 188
4 7 4 8 Adjusting brake pedals’ travel 188
4 7 4 9 Checking the parking brake 190
4 7 4 10 Adjusting the parking brake 190
4 7 4 11 Changing transmission oil filters 193
4 7 4 12 Changing hydraulic system oil filters 194
4 7 4 13 Checking the oil level in the front axle differential 195
4 7 4 14 Checking the oil level in front axle hubs 195
4 7 4 15 Changing front PTO housing oil and washing oil filter 196
4 7 4 16 Checking front PTO rubber couplings 197
4 7 4 17 Checking and greasing the trailer air-pressure brake
system 197
4 7 4 18 Adjusting engine valves 198
4 7 5 Maintenance every 1000 hours or yearly 198
4 7 5 1 Changing oil in the transmission system 198
4 7 5 2 Cleaning the suction strainer 199
4 7 5 3 Changing the transmission breather 200
4 7 5 4 Changing oil in the front axle differential 201
4 7 5 5 Changing oil in the front axle hubs 201
4 7 5 6 Changing the cab ventilation air filter 202
4 7 5 7 Changing the extra heater’s air filter 202
Contents
– 7 –
4 7 5 8 Changing engine air filters 204
4 7 5 9 Cleaning the cyclone block 206
4 7 5 10 Greasing the flywheel ring gear 207
4 7 5 11 Checking the front wheel toe-in 207
4 7 5 12 Adjusting toe-in of front wheels 208
4 7 5 13 Checking the power shuttle operation 209
4 7 5 14 Tightening frame nuts and bolts 209
4 7 6 Maintenance every 2000 hours or every other year 209
4 7 6 1 Changing the brake fluid 209
4 7 6 2 Bleeding the brake system 210
4 7 6 3 Cleaning the cooling system 212
4 7 6 4 Maintaining the air conditioning 215
4 8 Checks and adjustments 216
4 8 1 Changing tyres 216
4 8 2 Track widths 216
4 8 2 1 Front axle track widths 217
4 8 2 2 Rear axle track widths 217
4 8 3 Using chains 218
4 8 4 Using twin-mounted wheels 218
4 8 5 Engine 218
4 8 5 1 Bleeding the fuel system 218
4 8 6 Electrical system 219
4 8 6 1 Safety precautions for the electrical system 219
4 8 6 2 Checking the battery 220
4 8 6 3 Alternator 220
4 8 6 4 Protecting the electrical system before welding 220
4 8 6 5 Fuses and relays 221
4 8 6 6 Fuses and relays in the electric centre 222
4 8 6 7 Engine induction air preheater fuse 224
4 8 6 8 Cab power supply fuse 224
4 8 6 9 Engine control unit fuse 225
4 8 6 10 Adjusting headlights 225
4 8 7 Steering system 226
4 8 7 1 Adjusting the steering angle 226
4 8 8 Cab and shields 227
4 8 8 1 Limiting the door opening 227
4 8 8 2 Checking and adjusting front mudguards 227
4 8 9 Hydraulic system 228
4 8 9 1 Adjusting lifting links of the pick-up hitch 228
4 8 9 2 Maintaining the automatic jaw of the wagon towing device 229
5 Faults and remedial actions 230
5 1 Handling error situations 230
5 2 Errors indicated by the indicator lights 230
5 2 1 Cleaning the main engine air filter 231
5 2 2 Identifying a blocked transmission or hydraulic system filter 232
5 3 Warning symbols on the Proline instrument panel display 234
5 3 1 Low fuel pressure warning 234
5 3 2 Fuel level sensor open circuit warning 234
5 3 3 Fuel level sensor short circuit warning 235
5 4 Steering system malfunctions 235
5 5 Towing the tractor 236
5 5 1 Towing the tractor when the engine is running 236
5 5 2 Towing the tractor when the engine is not running 236
6 Technical specifications 237
6 1 Dimensions 237
6 2 Weights 237
6 3 Maximum permissible axle loading 237
6 4 Tyres 237
Contents
– 8 –
6 4 1 Wheel nuts tightening torque 238
6 4 2 Wheel stud dimensions 238
6 4 3 Front axle tyre loadings and pressures 238
6 4 4 Rear axle tyre loadings and pressures 238
6 5 Spacing for wheel discs 239
6 6 Track widths 239
6 6 1 Rear track widths 239
6 6 2 Front track widths 239
6 7 Engine 240
6 7 1 Engine lubrication system 240
6 7 2 Fuel system 240
6 7 3 Air cleaner 240
6 7 4 Cooling system 241
6 8 Electrical system 241
6 9 Power transmission 241
6 9 1 Power shuttle 241
6 9 2 Clutch 242
6 9 3 Gearbox 242
6 9 4 Rear axle differential lock 242
6 9 5 Rear power take-off 242
6 9 5 1 Rear power take-off alternatives 242
6 9 5 2 Rear power take-off ratios 242
6 9 5 3 Rear power take-off shafts 243
6 9 5 4 Lower link end distance from rear power take-off shaft 243
6 9 5 5 Maximum power take-off output 243
6 9 6 Front power take-off 243
6 9 6 1 Front power take-off ratios 243
6 9 6 2 Front power take-off shafts 243
6 10 Brake system 244
6 11 Steering system 244
6 11 1 Front axle 244
6 11 2 Turning circle radius 245
6 12 Cab and shields 245
6 12 1 Cab filter capacity 245
6 12 2 Windscreen washer 245
6 12 3 Air conditioning system 245
6 12 4 Noise level 246
6 12 5 Exposure to vibration 246
6 13 Hydraulic system 246
6 13 1 Low pressure circuit 246
6 13 2 High pressure circuit 246
6 13 3 Auxiliary hydraulics 246
6 13 3 1 Valves for auxiliary hydraulics 246
6 13 3 2 Counter pressure when using the return connection for
auxiliary hydraulics 247
6 13 4 Rear linkage 247
6 13 4 1 Maximum lifting force on the whole lifting area 247
6 13 4 2 Lifting range at the end of the lower links 247
6 13 5 Front linkage 247
6 13 6 Trailer hitches and towing devices 248
6 13 6 1 Pick-up hitch 248
6 13 6 2 Agricultural towing device 248
6 13 6 3 Towing device frames 249
6 13 6 4 Drawbar eye 249
Alphabetical index 250
Need help? Contact: [email protected]
PLEASE NOTE:
- This is not a physical manual but a digital manual – meaning no physical copy will be couriered to you. The manual can be yours in the next 2 mins as once you make the payment, you will be directed to the download page IMMEDIATELY.
- This is the same manual used by the dealers inorder to diagnose your vehicle of its faults.
- Require some other service manual or have any queries: please WRITE to us at [email protected]
S.V