Videojet 9560 Service Manual Print Apply Label Applicator Guide PDF
Original price was: $95.00.$15.95Current price is: $15.95.
Complete Videojet 9560 service manual covering thermal transfer print and apply label applicator systems with CLARiTY operating system. This comprehensive 188-page technical guide includes detailed installation procedures, configuration settings, maintenance schedules, troubleshooting diagnostics, motor calibration, Leader/Follower setup, and complete system specifications. Essential reference for packaging line technicians, industrial automation engineers, and certified label applicator specialists.
Description
Videojet 9560 Service Manual Print Apply Label Applicator Guide PDF DOWNLOAD
DESCRIPTION:
Official Videojet 9560 Service Manual – Complete Technical Documentation for Print and Apply Label Applicators
This is the official Videojet 9560 Service Manual PDF (Part Number 463499-01, Revision AA, June 2024) published by Videojet Technologies Inc., providing comprehensive technical service documentation for the Videojet 9560 print and apply label applicator system. This essential 188-page professional service manual is designed for qualified technicians servicing label applicators in packaging, manufacturing, logistics, and distribution facilities worldwide.
The Videojet 9560 is an advanced print and apply label applicator that eliminates unscheduled downtime and reduces costs and errors in case coding operations. Featuring Intelligent Motion™ technology and the intuitive CLARiTY® operating system, this system ensures automatic and precise control with zero manual adjustments.
📋 COMPREHENSIVE MANUAL COVERAGE – COMPLETE SECTION BREAKDOWN:
COMPLIANCE INFORMATION
- European Union (CE Marking):
- EMC Directive 2014/30/EU compliance
- Low Voltage Directive 2014/35/EU
- Machinery Directive 2006/42/EU
- EN 61000 electromagnetic compatibility standards
- EN 62368-1 safety requirements
- U.S.A. (FCC Compliance):
- FCC Part 15 Class A digital device compliance
- Radio frequency interference regulations
- UL 62368-1 safety certification
- Canada (CSA Compliance):
- CAN/CSA C22.2 No. 62368-1 certification
- Radio interference regulations compliance
- Wi-Fi Module Compliance:
- RF exposure requirements (20 cm separation distance)
- Wireless communication safety standards
SUPPORT AND TRAINING
- Contact Information:
- Videojet Technologies Inc. (Wood Dale, IL, USA)
- 1-800-843-3610 toll-free support
- International distributor network
- Service Program: Support options and service agreements
- Customer Training: Available training programs for technicians and operators
SECTION 1: INTRODUCTION (Pages 1-1 to 1-5)
- Equipment Description:
- Videojet 9560 print and apply label applicator overview
- Intelligent Motion™ technology features
- Direct Apply capability for high-speed labeling
- Zero manual adjustment system design
- Build-back prevention features
- Maximum uptime and productivity advantages
- About the Manual:
- Intended for service technicians
- Configuration, maintenance, and troubleshooting procedures
- Related Publications:
- Operator Manual (P/N 463495)
- Illustrated Part Breakdown (P/N 463503)
- 300T Tamp Applicator Addendum (P/N 462475)
- Rear Corner Wrap Applicator Addendum (P/N 462571)
- Front of Pack Applicator Addendum (P/N 462554)
- EtherNet/IP™ Protocol Document (P/N 463507)
- PROFINET® Protocol Document (P/N 463508)
- CLARiTY Alarms Document (P/N 463564)
- Language Codes:
- Complete list of 30+ available language translations
- Language code reference for ordering translated manuals
- Content Presentation:
- Positional references and orientation conventions
- Units of measurement (metric and imperial)
- Safety information symbology and warnings
- Abbreviations and Acronyms: Technical terminology reference
- Chapters in the Manual: Complete chapter overview
SECTION 2: SAFETY (Pages 2-1 to 2-7)
- Introduction: Comprehensive safety overview for service personnel
- Equipment Safety Guidelines:
- Comply with Electrical Codes: Local and national electrical standards
- Electrical Power:
- Proper voltage and grounding requirements
- Power disconnect procedures
- Lockout/tagout protocols
- Do Not Remove Warning Labels: Safety label preservation
- Grounding and Bonding:
- Proper earth grounding procedures
- ESD (electrostatic discharge) protection
- Printhead Safety:
- High temperature warnings (printhead reaches 200°C/392°F)
- Thermal burn prevention
- Printhead replacement safety
- Print Ribbon Safety Guidelines:
- Ribbon handling precautions
- Static electricity considerations
- Proper disposal procedures
- Placement of the Equipment:
- Ventilation requirements
- Clearance specifications
- Environmental considerations
- Using Accessories: Approved accessory installation
- Other Important Guidelines:
- Cleaning Safety:
- Approved cleaning agents
- Chemical safety precautions
- Equipment shutdown procedures
- Equipment Handling:
- Lifting and moving procedures
- Weight considerations
- Mounting stability
- Cleaning Safety:
- Wi-Fi Safety Guidelines:
- RF exposure requirements
- Antenna placement (20 cm separation distance)
- Wireless operation precautions
SECTION 3: MAIN PARTS (Pages 3-1 to 3-19)
- Equipment Description: Detailed component overview
- CLARiTY Display:
- Touchscreen interface specifications
- Display mounting and connections
- User interface features
- Label Applicator (LPA):
- Main Controller Board:
- Processor and control electronics
- Memory specifications
- Communication interfaces
- Connectors:
- Power connectors
- I/O connectors
- Communication port assignments
- Sensor connectors
- Motor drive connectors
- Gap Sensor and Print Roller Sensor PCB:
- Label gap detection technology
- Print roller position sensing
- Sensor adjustment procedures
- Ribbon and Printhead Sensor PCB:
- Ribbon presence detection
- Ribbon end sensing
- Printhead temperature monitoring
- Label Drive Motor PCB:
- Stepper motor control
- Motion control algorithms
- Speed regulation
- Supply Reel Hall Sensor PCB:
- Label supply monitoring
- Reel diameter sensing
- Low label warnings
- Dancer Arm Sensor PCB:
- Web tension control
- Dancer arm position sensing
- Tension adjustment
- Ribbon Web:
- Ribbon path routing
- Ribbon width specifications
- Compatible ribbon types
- Label Web:
- Label path configuration
- Label size specifications (width, length)
- Die-cut and continuous label support
- Emergency Stop (E-Stop):
- E-stop button location
- Safety circuit operation
- Reset procedures
- Sensors:
- Optical sensors
- Proximity sensors
- Hall effect sensors
- Sensor calibration procedures
- Main Controller Board:
- Printhead:
- Thermal transfer printhead technology
- Resolution specifications (203 dpi, 300 dpi, 600 dpi options)
- Printhead life expectancy
- Latch Mechanism:
- Printhead pressure adjustment
- Latch release procedures
- Alignment specifications
SECTION 4: INSTALLATION (Pages 4-1 to 4-25)
- Tools and Supplies:
- Required installation tools list
- Recommended torque specifications
- Test equipment requirements
- Unpacking and Inspecting the Label Applicator:
- Shipment inspection checklist
- Damage assessment procedures
- Package contents verification
- Selection of Suitable Installation Position:
- Production line integration considerations
- Conveyor height and speed compatibility
- Product flow analysis
- Positioning of Label Applicator/Peel Tip:
- Application position calculations
- Peel tip adjustment range
- Applicator angle settings
- Installing the Label Applicator:
- Assembling the Stand:
- Stand assembly procedures
- Height adjustment mechanisms
- Leveling and stabilization
- Setting up the Production Line:
- Conveyor integration
- Product detector positioning
- Timing and synchronization
- Mounting the CLARiTY Display:
- Display bracket installation
- Cable routing
- Viewing angle optimization
- Installing the Product Detector:
- Photoeye placement
- Detection zone configuration
- Sensitivity adjustment
- Cable Connections:
- Power cable installation
- Communication cable routing
- I/O cable connections
- Proper cable strain relief
- Loading the Web:
- Label roll installation
- Ribbon roll installation
- Threading procedures
- Web path verification
- Wi-Fi Installation (where fitted):
- Antenna installation
- Network configuration
- Security settings
- Turning On the Machine:
- Initial power-up sequence
- System boot procedures
- Self-test verification
- Setting up the User Interface:
- Language selection
- Date/time configuration
- Display brightness adjustment
- Assembling the Stand:
SECTION 5: CLARiTY OPERATING SYSTEM (Pages 5-1 to 5-29)
- Getting Started with CLARiTY:
- Using the Home Page:
- Navigation menu structure
- Status indicators
- Quick access functions
- Production counter displays
- Using the Home Page:
- How to Configure the LPA:
- CLARiTY Configuration Manager:
- PC-based configuration software
- Parameter management
- Remote configuration capability
- How to Install the CLARiTY Configuration Manager:
- Software installation procedures
- System requirements
- Driver installation
- How to Connect CLARiTY Configuration Manager to LPA:
- Ethernet connection
- USB connection
- Wi-Fi connection
- How to Edit Parameters:
- Parameter tree navigation
- Value modification procedures
- Validation and error checking
- How to Save Changes in the LPA:
- Configuration commit procedures
- Backup creation
- How to Archive Current Parameters:
- Creating configuration archives
- Archive naming conventions
- Archive storage locations
- How to Load a Saved Archive:
- Archive restoration procedures
- Configuration comparison
- Creating, Editing and Restoring USB Archive:
- USB backup procedures
- Portable configuration management
- CLARiTY Configuration Manager:
- How to Set Extended Inputs:
- Extended Inputs 1-2:
- Input function assignment
- Active high/low configuration
- Debounce settings
- Extended Inputs 1-2:
- How to Set Extended Outputs:
- External Outputs 1-3:
- Output function assignment
- Relay/solid-state configurations
- Timing parameters
- External Outputs 1-3:
- Working with Passwords:
- Password creation and management
- User access levels
- Security best practices
- CLARiTY Power Saving:
- Energy saving modes
- Display timeout settings
- System standby configuration
- How to Configure Job Settings:
- Job Creation and Settings:
- Creating new print jobs
- Label design parameters
- Variable data configuration
- CLARiTY Configuration Settings:
- Print quality parameters
- Speed settings
- Application modes
- Job Creation and Settings:
- Managing Clones:
- How to Create a Clone:
- System cloning procedures
- Multi-machine deployment
- How to Restore a Clone:
- Clone restoration procedures
- Configuration verification
- How to Create a Clone:
SECTION 6: MAINTENANCE AND TROUBLESHOOTING (Pages 6-1 to 6-28)
- Maintenance:
- Preventive Maintenance Schedule:
- Daily maintenance tasks
- Weekly cleaning procedures
- Monthly inspection requirements
- Quarterly service intervals
- Annual comprehensive maintenance
- Preventive Maintenance Schedule:
- Replacement Instructions:
- Component replacement procedures
- Part number references
- Installation verification
- Motor Calibration Wizard:
- Calibrate Ribbon Motors:
- Ribbon take-up motor calibration
- Ribbon supply motor calibration
- Tension optimization
- Calibrate Printhead Motors:
- Printhead lift motor calibration
- Print pressure optimization
- Calibrate Ribbon Motors:
- Updating the CLARiTY Operating System:
- CLARiTY Update via PC:
- Firmware download procedures
- Update file transfer
- Installation verification
- CLARiTY Update via USB Memory Stick:
- USB update preparation
- Offline update procedures
- CLARiTY Update via PC:
- Troubleshooting:
- Diagnostics Wizard:
- Automated diagnostic routines
- Sensor verification tests
- Motor function tests
- Printhead:
- Printhead resistance testing
- Print quality diagnostics
- Dot-out detection
- Replacement criteria
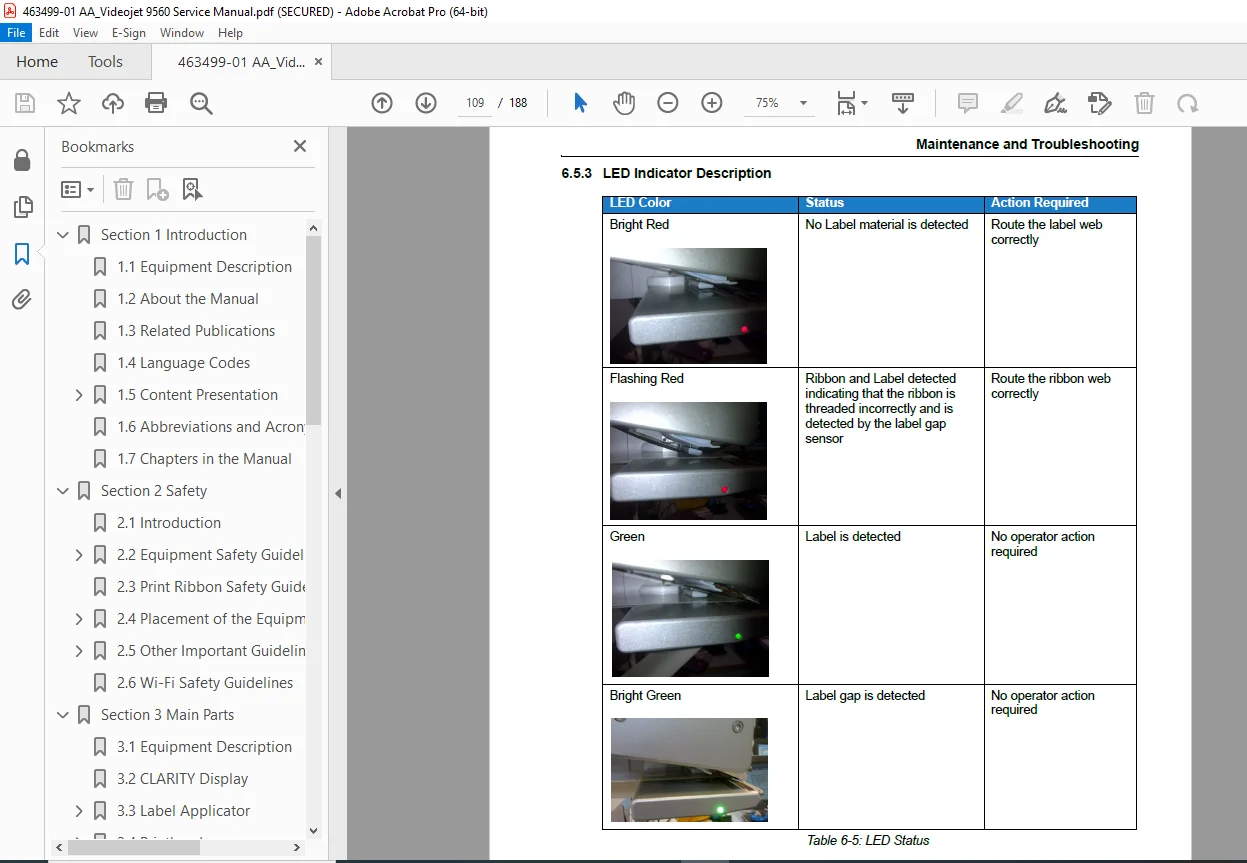
- LED Indicator Description:
- Status LED meanings
- Error indication codes
- Diagnostics Wizard:
- Faults and Warnings:
- CLARiTY Error Messages:
- Complete error code reference
- Troubleshooting procedures for each error
- Front of Pack Applicator Specific Faults:
- Application-specific error codes
- Rear Corner Wrap Applicator Specific Faults:
- Corner wrap error diagnostics
- Barcode Scanner Faults and Warnings:
- Scanner communication errors
- Verification failures
- Job File Faults and Warnings:
- File loading errors
- Format validation failures
- Printer Power Faults:
- Power supply diagnostics
- Voltage monitoring
- CLARiTY Display Faults:
- Touchscreen issues
- Display communication errors
- I/O Faults:
- Input/output diagnostics
- Signal integrity testing
- Communication Faults:
- Network connectivity issues
- Protocol errors
- Emulation Faults:
- Printer emulation errors
- Compatibility issues
- Printing Faults:
- Print quality problems
- Ribbon issues
- Registration errors
- Label Web Faults:
- Label feeding problems
- Gap detection errors
- Ribbon Wrinkle Faults:
- Wrinkle detection
- Tension adjustment solutions
- CLARiTY Error Messages:
SECTION 7: LEADER/FOLLOWER SETUP (Pages 7-1 to 7-16)
- Working with Leader/Follower:
- Leader/Follower Benefits:
- Multi-line synchronization
- Redundancy and backup
- Throughput optimization
- Leader/Follower Applications:
- Typical use cases
- Configuration scenarios
- Leader/Follower Terminology:
- Master/slave concepts
- Synchronization modes
- LPA Terminology:
- System naming conventions
- Software Configuration:
- Network setup requirements
- Basic and Advanced Configuration:
- Configuration level selection
- Basic Configuration – Configuring Follower LPAs:
- Follower setup procedures
- Automatic synchronization
- Advanced Configuration:
- Custom synchronization settings
- Priority management
- Auto-Changeover Mode:
- Automatic failover configuration
- Backup LPA activation
- Using Leader/Follower Mode – Group Job Select:
- Synchronized job selection
- Group management
- The Leader LPA:
- Leader designation
- Control functions
- Leader/Follower Benefits:
APPENDIX A: SPECIFICATIONS (Pages A-1 to A-5)
- Dimensions:
- CLARiTY Display: Physical dimensions and mounting specifications
- Label Applicator: Overall dimensions and clearance requirements
- Weight: Equipment weight specifications
- System Specifications:
- Label width range (25mm to 152mm / 1″ to 6″)
- Label length range (25mm to 254mm / 1″ to 10″)
- Maximum print width
- Print speed capabilities
- Application speed range
- Operating Specifications:
- Electrical Specifications:
- Input voltage (100-240 VAC, 50/60 Hz)
- Power consumption
- Fuse ratings
- Environmental Specifications:
- Operating temperature range (5°C to 40°C / 41°F to 104°F)
- Storage temperature
- Humidity range (20% to 85% RH non-condensing)
- Electrical Specifications:
- External Connectors and Interface Specifications:
- Ethernet connector
- USB ports
- I/O connector pinouts
- Serial communication ports
- Networking and External Communications:
- Supported protocols (EtherNet/IP™, PROFINET®)
- Network addressing
- Communication parameters
APPENDIX B: CLARiTY CONFIGURATION MANAGER (Pages B-1+)
- Detailed parameter reference guide
- Configuration tree structure
- Advanced parameter descriptions
APPENDIX C: MAIN BOARD TEST POINTS (Pages C-1+)
- Main controller board test point locations
- Voltage specifications for troubleshooting
- Signal measurement procedures
APPENDIX D: THEORY OF PRINTING (Pages D-1+)
- Thermal transfer printing principles
- Print quality factors
- Resolution and dot size relationships
APPENDIX E: AVAILABILITY (Pages E-1+)
- Overall Equipment Effectiveness (OEE):
- Availability calculation tools
- Performance metrics
- Quality measurements
APPENDIX F: Wi-Fi COMMUNICATIONS (Pages F-1 to F-4)
- Connecting to a Wi-Fi Network:
- Network discovery
- Connection procedures
- Network Profiles:
- Profile creation and management
- Multiple network support
- Connect to Hidden Wi-Fi Network:
- Manual SSID entry
- Security configuration
- Certificates:
- Enterprise security certificates
- Certificate installation procedures
📄 FILE DETAILS:
Manual Name: Videojet 9560 Service Manual
Part Number: 463499-01
Revision: AA
Publication Date: June 2024
Equipment: Videojet 9560 Print and Apply Label Applicator with CLARiTY® Operating System
Applications: Packaging line coding, case labeling, logistics labeling, compliance labeling, high-speed labeling for:
- Food and beverage packaging
- Pharmaceutical packaging
- Consumer goods
- Logistics and distribution
- Manufacturing and assembly
- Automotive parts labeling
System Features: - Intelligent Motion™ technology
- CLARiTY® touchscreen operating system
- Direct Apply capability
- Zero manual adjustment
- Multiple applicator options (tamp, corner wrap, front of pack)
- Leader/Follower multi-line synchronization
- EtherNet/IP™ and PROFINET® connectivity
Manual Quality: Professional high-quality PDF with detailed technical illustrations, wiring diagrams, configuration screenshots, and troubleshooting flowcharts
Total Pages: 188 pages
Language: English (US) – Available in 30+ languages with specific part number codes
File Size: Approximately 13.1 MB
Format: PDF with AES encryption (print allowed, copy allowed)
Publisher: Videojet Technologies Inc., Wood Dale, Illinois, USA
Copyright: © 2024 Videojet Technologies Inc.
Confidentiality: Contains confidential and proprietary information
🔧 WHO NEEDS THIS MANUAL:
This Videojet 9560 service manual is essential for:
- Packaging line maintenance technicians
- Industrial automation engineers
- Label applicator service specialists
- Production equipment mechanics
- Videojet certified service engineers
- Facility maintenance departments
- Contract packaging service providers
- Equipment integrators and installers
- Plant engineering teams
- Technical training instructors
- Anyone responsible for servicing Videojet 9560 label applicators
⚡ KEY TECHNICAL INFORMATION INCLUDED:
✓ Complete installation procedures with stand assembly and line integration
✓ CLARiTY Configuration Manager setup and parameter editing
✓ Motor calibration wizard for ribbon and printhead motors
✓ Comprehensive troubleshooting with error code reference
✓ Preventive maintenance schedules and replacement procedures
✓ Leader/Follower multi-line synchronization configuration
✓ Wi-Fi network setup and wireless communications
✓ EtherNet/IP™ and PROFINET® protocol configuration
✓ Extended I/O configuration for external integration
✓ Firmware update procedures (PC and USB methods)
✓ Printhead diagnostics and replacement criteria
✓ Web threading procedures for labels and ribbon
✓ Safety compliance documentation (CE, FCC, UL, CSA)
✓ Complete specifications including electrical, mechanical, and environmental
✓ Test point locations for main board troubleshooting
💎 SPECIAL FEATURES:
Intelligent Motion™ Technology: Advanced motion control system providing automatic and precise control with zero manual adjustments for maximum uptime.
CLARiTY® Operating System: Intuitive touchscreen interface with comprehensive configuration management, password protection, and power-saving modes.
Direct Apply Capability: High-speed label application without tamp applicator for top and side applications, preventing missed packs during build-back.
Leader/Follower Mode: Multi-line synchronization allowing multiple applicators to work together with auto-changeover for redundancy and maximum productivity.
Multiple Applicator Options: Support for 300T Tamp, Rear Corner Wrap, and Front of Pack applicators with specific fault diagnostics for each configuration.
Industrial Network Connectivity: Native support for EtherNet/IP™ and PROFINET® industrial automation protocols for seamless factory integration.
Wi-Fi Communications: Optional wireless connectivity for remote monitoring, configuration, and diagnostics with enterprise security support.
OEE Tools: Overall Equipment Effectiveness availability tracking tools for performance monitoring and optimization.
Multilingual Support: Available in 30+ languages with specific part number codes for global deployment.
June 2024 Latest Revision: Most current service information with latest troubleshooting procedures and configuration guidelines.
⚠️ IMPORTANT SAFETY AND COMPLIANCE NOTES:
High Temperature Hazard: Printhead reaches temperatures up to 200°C (392°F) during operation. Allow adequate cooling time before servicing.
Electrical Safety: Equipment must be properly grounded per local electrical codes. Comply with lockout/tagout procedures during service.
Compliance Certifications: Equipment carries CE marking, FCC Part 15 Class A, UL 62368-1, and CSA C22.2 certifications. Unauthorized modifications void certifications.
Wi-Fi RF Exposure: When Wi-Fi module is fitted, maintain 20 cm (8 inch) separation distance from antenna during operation per FCC/IC requirements.
Qualified Personnel Only: Service procedures should only be performed by trained and authorized Videojet service technicians or qualified facility maintenance personnel.
Confidential Information: This manual contains confidential and proprietary information. Unauthorized copying, use, or disclosure is strictly prohibited.
Class A Equipment: This is a Class A industrial product. Operation in residential areas may cause harmful interference requiring user correction at their own expense.
Shielded Cables Required: Must use shielded cables to ensure FCC Class A compliance.
Emergency Stop: E-stop button must be accessible and functional at all times for safety-critical shutdown.
⚡ INSTANT DOWNLOAD – ESSENTIAL FOR VIDEOJET 9560 SERVICE! Get immediate access to this comprehensive Videojet 9560 service manual and ensure proper installation, configuration, maintenance, and troubleshooting of print and apply label applicators. Download now and service your packaging equipment with factory-authorized procedures used by Videojet certified engineers worldwide!