Description
Volkswagen Golf & Golf Variant 2015 Onward Electrical Equipment Repair Manual PDF
The Volkswagen Golf & Golf Variant 2015 Onward Electrical Equipment Repair Manual PDF is a dedicated electrical service reference for Golf 2015 onward and Golf Variant 2015 onward. Rather than treating electrical equipment as a small section of a general vehicle manual, this document concentrates on the electrical components, control modules, lighting, starting and charging equipment, switches, driver-assistance hardware, wiper and washer systems, fuse and relay installations, connectors and wiring-related repair work used across these vehicles.
The manual is built around Volkswagen repair groups and provides component overviews alongside removal, installation, adjustment, calibration and repair procedures. Many sections identify individual components by their Volkswagen designations, such as control modules, sensors, motors, switches, lamps and antennas, making the manual especially useful when the technician needs to identify where a component is located and how it is removed or installed without relying on guesswork.
File Details
- Manual type: Repair Manual – Electrical Equipment
- Models: Golf 2015 onward; Golf Variant 2015 onward
- Edition: 12.2015
- Language: English
- Pages: 320
- File format: PDF
- Publication identifier: D4B80416634
- Print number: K0059241521
Electrical Repair Scope
This Volkswagen Golf electrical equipment repair manual begins with electrical-work safety and repair information before moving into the vehicle’s major electrical systems. Safety guidance addresses Start/Stop-equipped vehicles, road testing with measuring equipment and the precautions required around HID headlamps. The repair information also calls attention to contact corrosion and correct wire routing and securing, both important considerations when dealing with intermittent or repeat electrical faults.
The charging and starting section is especially substantial. It covers the battery and battery tray, battery disconnection and connection, checking and charging, the ground cable with Battery Monitoring Control Module J367 and adaptation of that module. Generator coverage includes component overviews, removal and installation, checking, ribbed-belt pulley work and voltage-regulator replacement. Starter procedures distinguish between vehicle configurations, and the manual supplies component layouts, fastening information and tightening specifications where applicable.
Lighting, Visibility and Driver Assistance
A large part of the Volkswagen Golf & Golf Variant 2015 Onward Electrical Equipment Repair Manual PDF is devoted to systems that combine conventional electrical hardware with control modules and sensors. The wiper and washer chapters address the windshield and rear-window systems, service position, blades and arms, wiper motors, the rain/light recognition sensor, washer reservoirs, fluid-level sensing, pumps, nozzles, headlamp washers, lift cylinders and washer hoses.
Exterior lighting coverage extends well beyond simple bulb replacement. The headlamp chapter includes halogen and HID configurations, headlamp removal and installation, adjustment and installation-position correction, turn-signal bulbs, headlamp housing repair, conversion from LHD to RHD, beam-adjustment motors, HID control modules, power output stages, daytime-running lamp modules, positioning motors, swivel-module sensors and adaptive cornering-lamp motors. Additional sections cover fog lamps, mirror-mounted lamps, tail lamps, rear-lid lamps, brake lamps, back-up lamps, turn signals, high-mounted brake lamps and license-plate lighting.
The manual also contains procedures for several assistance and convenience systems. Adaptive Cruise Control coverage includes component locations, control-module removal and installation and calibration. Parking Aid and Parallel Parking Assist sections identify control modules, warning buzzers and front and rear sensors. Automatic headlamp range control, trailer-hitch electrical equipment and Blind Spot Detection are also addressed, including blind-spot warning lamps, control modules and calibration.
Access, Controls and Interior Electrical Equipment
For keyless and starting-system work, the manual provides component-location information for Access/Start Authorization and Keyless Access Authorization. It covers the Access/Start System Interface J965, exterior door-handle touch sensors and the various access/start antennas positioned in the passenger compartment, doors, luggage compartment and rear bumper area.
The steering-column switch module chapter goes into the lock cylinder, ignition-switch key-lock solenoid, ignition/starter switch, steering-column switch module, Steering Column Electronics Control Module J527, turn-signal switch, cruise-control switch, intermittent-wiper switch, anti-theft immobilizer reader coil and steering-lock housing. This gives the Golf 2015 electrical repair manual useful depth for jobs involving ignition, steering-column controls and related electronic interfaces.
Interior electrical coverage includes both lighting and controls distributed throughout the cabin. Component-location overviews identify lamps in the instrument panel, doors, center console, luggage compartment and roof trim. Individual procedures cover glove-compartment, footwell, entry, warning, vanity-mirror, interior, reading and luggage-compartment lamps. The controls chapter includes the rotary light switch, headlamp-range adjuster, driving-profile button, Start/Stop button, ASR/ESP button, parking-aid and parking-assistance buttons, center-console switch modules, emergency-flasher switch, seat-heating controls, mirror adjuster, power-window switches, locking buttons, door contact switches, sunroof button and interior reading-lamp controls.
Additional interior electrical subjects include the anti-theft alarm system, driver-assistance front camera, cigarette lighter and electrical sockets, including the 12 V-230 V converter arrangement shown in the manual.
Chapters Covered
- 00 – General, Technical Data
- Safety Precautions
- Repair Information
- Battery – General Information and Battery Types
- 27 – Battery, Starter, Generator, Cruise Control
- Battery
- Generator
- Starter
- Cruise Control System
- Start/Stop System
- Adaptive Cruise Control
- Special Tools
- 90 – Instruments
- 92 – Wiper/Washer Systems
- Windshield Wiper System
- Windshield Washer System
- Rear Window Wiper System
- Rear Window Washer System
- Headlamp Washer System
- Washer Fluid Hoses
- Special Tools
- 94 – Exterior Lights, Switches
- Headlamp
- Fog Lamps
- Lamps in Exterior Rearview Mirror
- Tail Lamps
- High-Mounted Brake Lamp
- License Plate Lamp
- Access/Start Authorization
- Steering Column Switch Module
- Parking Aid
- Parallel Parking Assist
- Automatic Headlamp Range Control
- Trailer Hitch
- Blind Spot Detection
- Special Tools
- 96 – Interior Lights, Switches
- Lamps
- Controls
- Anti-Theft Alarm System
- Driver Assistance Systems Front Camera
- Cigarette Lighter and Socket
- Special Tools
- 97 – Wiring
- Relay Carriers, Fuse Panels and E-Boxes
- Control Modules
- Connectors
- Connector Housings, Releasing and Disassembling
- Antenna Wires, Repairing
- Fiber-Optic Cable
- Vehicle Diagnostic Tester
- Revision History
Taken together, these repair groups provide a broad working reference for locating electrical components, understanding their installation, removing and replacing modules and assemblies, carrying out specified adjustments and calibrations, and handling wiring or connector-related repair tasks. Component overview illustrations are used throughout the manual to show assemblies, numbered parts and installation locations, while procedure sections provide the sequence and cautions applicable to the work.
Wiring, Fuse Panels and Control Modules
The wiring repair group makes this manual useful even when the required job goes beyond replacing a lamp, switch or motor. It identifies relay carriers, fuse panels and E-boxes and includes procedures for removing and installing the E-box, its relay and fuse panels, and the relay/fuse carrier positioned behind the driver’s side of the instrument panel.
Complete PDF Bookmark Tree
Complete Bookmarks
The complete bookmarks in the “Volkswagen Golf & Golf Variant 2015 Onward Electrical Equipment Repair Manual PDF” are as follows:
+00 – General, Technical Datap. 9
+1 Safety Precautionsp. 9
1.1 Start/Stop System Safety Precautionsp. 9
1.2 Safety Precautions, Road Test with Testing Equipmentp. 9
1.3 HID Headlamps Usage and Safety Precautionsp. 10
+2 Repair Informationp. 12
2.1 Contact Corrosionp. 12
2.2 Wire Routing and Securingp. 12
+3 Batteryp. 13
3.1 Battery, General Informationp. 13
3.2 Battery Typesp. 13
+27 – Battery, Starter, Generator, Cruise Controlp. 14
+1 Batteryp. 14
1.1 Overview – Batteryp. 14
1.2 Battery, Removing and Installingp. 15
1.3 Battery, Disconnecting and Connectingp. 17
1.4 Battery Tray, Removing and Installingp. 18
1.5 Battery, Checkingp. 19
1.6 Battery, Chargingp. 19
1.7 Ground Cable with Battery Monitoring Control Module -J367-, Removing and Installingp. 19
1.8 Battery Monitoring Control Module -J367-, Adaptingp. 20
+2 Generatorp. 21
+2.1 Overview – Generatorp. 21
2.1.1 Overview – Generator without Bushingsp. 21
2.1.2 Overview – Generator with Bushingsp. 22
+2.2 Generator, Removing and Installingp. 23
2.2.1 Generator, Removing and Installing, 1.4L TSI Enginep. 23
2.2.2 Generator, Removing and Installing, Vehicles with 2.0L TSI Enginep. 24
2.2.3 Generator, Removing and Installing, Vehicles with 1.8L TSI-Enginep. 26
2.2.4 Generator, Removing and Installing, Vehicles with 1.6L MPI Enginep. 27
2.2.5 Generator, Removing and Installing, Vehicles with TDI Enginep. 28
2.3 Generator, Checkingp. 30
+2.4 Ribbed Belt Pulley, Removing and Installingp. 30
2.4.1 Ribbed Belt Pulley without Freewheel, Removing and Installingp. 30
2.4.2 Ribbed Belt Pulley with Freewheel, Removing and Installing, Boschp. 30
2.4.3 Ribbed Belt Pulley with Freewheel, Removing and Installing, Valeop. 32
2.4.4 Decoupling Belt Pulley with Freewheel, Removing and Installingp. 33
+2.5 Voltage Regulator, Removing and Installingp. 35
2.5.1 Voltage Regulator, Removing and Installing, Boschp. 35
2.5.2 Voltage Regulator, Removing and Installing, Valeop. 36
+3 Starterp. 38
+3.1 Overview – Starterp. 38
3.1.1 Overview – Starter, Vehicles with Manual Transmissionp. 38
3.1.2 Overview – Starter, Vehicles with DSG Transmission DQ200–7Fp. 39
3.1.3 Overview – Starter, Vehicles with DSG Transmission DQ250-6Fp. 40
3.1.4 Overview – Starter, Vehicles with Automatic Transmissionp. 41
+3.2 Starter, Removing and Installingp. 41
3.2.1 Starter, Removing and Installing, Vehicles with Manual Transmissionp. 41
3.2.2 Starter, Removing and Installing, Vehicles with DSG Transmission DQ200–7Fp. 43
3.2.3 Starter, Removing and Installing, Vehicles with DSG Transmission DQ250-6Fp. 44
3.2.4 Starter, Removing and Installing, Vehicles with Automatic Transmissionp. 45
4 Cruise Control Systemp. 47
+5 Start/Stop Systemp. 48
5.1 General Description for Start/Stop Systemp. 48
5.2 Component Location Overview – Start/Stop Systemp. 48
+6 Adaptive Cruise Controlp. 49
6.1 Component Location Overview – Adaptive Cruise Control (ACC)p. 49
+6.2 Control Module for Adaptive Cruise Control, Removing and Installingp. 50
6.2.1 Adaptive Cruise Control Module, Removing and Installing, with Retaining Platep. 50
6.2.2 Adaptive Cruise Control Module, Removing and Installing, from the Retaining Platep. 51
6.2.3 Control Module for Adaptive Cruise Control, Removing and Installing at Adapter Framep. 52
6.3 Adaptive Cruise Control, Calibratingp. 53
7 Special Toolsp. 54
+90 – Instrumentsp. 57
+1 Instrument Clusterp. 57
1.1 Overview – Instrument Clusterp. 57
1.2 Instrument Cluster -KX2-, Removing and Installingp. 57
+2 Hornp. 59
2.1 Overview – Hornp. 59
2.2 High Tone Horn -H2-/Low Tone Horn -H7-, Removing and Installingp. 59
+92 – Wiper/Washer Systemsp. 61
+1 Windshield Wiper Systemp. 61
+1.1 Overview – Windshield Wiper Systemp. 61
1.1.1 Overview – Windshield Wiper Systemp. 61
1.1.2 Overview – Windshield Wiper Motor and Windshield Wiper Framep. 63
1.2 Wiper, Moving Into Service Positionp. 64
1.3 Wiper Blade, Removing and Installingp. 64
1.4 Windshield Wiper Arms, Removing and Installingp. 65
1.5 Windshield Wiper Arms, Adjustingp. 66
1.6 Windshield Wiper Motor -V-, Removing and Installingp. 67
1.7 Windshield Wiper Motor, Replacingp. 68
1.8 Windshield Wiper Motor, Deactivating Alternating Park Position Functionp. 69
+1.9 Rain/Light Recognition Sensor, Removing and Installingp. 70
1.9.1 Rain/Light Recognition Sensor, Removing and Installing, Vehicles with Front Camera for Assistance Systemsp. 70
1.9.2 Rain/Light Recognition Sensor, Removing and Installing, Vehicles without Front Camera for Assistance Systemsp. 72
+1.10 Rain/Light Recognition Sensor, Servicingp. 74
1.10.1 Rain/Light Recognition Sensor, Servicing, TRWp. 74
1.10.2 Rain/Light Recognition Sensor, Servicing, Valeop. 75
+2 Windshield Washer Systemp. 77
+2.1 Overview – Windshield Washer Systemp. 77
2.1.1 Overview – Windshield Washer System, with Headlamp Washer Systemp. 77
2.1.2 Overview – Windshield Washer System, without Headlamp Washer Systemp. 79
2.2 Washer Fluid Reservoir, Removing and Installingp. 80
2.3 Windshield Washer Fluid Level Sensor, Removing and Installingp. 81
2.4 Windshield Washer Pump, Removing and Installingp. 82
2.5 Spray Nozzles, Removing and Installingp. 82
2.6 Spray Nozzles, Adjustingp. 83
+3 Rear Window Wiper Systemp. 84
3.1 Overview – Rear Window Wiper Systemp. 84
3.2 Wiper Blade, Removing and Installingp. 85
3.3 Windshield Wiper Arm, Removing and Installingp. 85
3.4 Wiper Arm, Adjustingp. 86
3.5 Rear Window Wiper Motor -V12-, Removing and Installingp. 86
+4 Rear Window Washer Systemp. 88
+4.1 Overview – Rear Window Washer Systemp. 88
4.1.1 Overview – Rear Window Washer System, Sedan, Except GTIp. 88
4.1.2 Overview – Rear Window Washer System, Sedan, GTIp. 89
4.1.3 Overview – Rear Window Washer System, Wagonp. 90
4.2 Washer Fluid Reservoir, Removing and Installingp. 90
4.3 Rear Window Washer Pump, Removing and Installingp. 90
+4.4 Spray Nozzle, Removing and Installingp. 91
4.4.1 Spray Nozzle, Removing and Installing, Except GTIp. 91
4.4.2 Spray Nozzle, Removing and Installing, Only GTIp. 91
4.5 Spray Nozzle, Adjustingp. 92
+5 Headlamp Washer Systemp. 93
5.1 Overview – Headlamp Washer Systemp. 93
5.2 Washer Fluid Reservoir, Removing and Installingp. 93
5.3 Headlamp Washer Pump -V11-, Removing and Installingp. 94
5.4 Spray Nozzles, Removing and Installingp. 94
5.5 Spray Nozzles, Adjustingp. 95
5.6 Lift Cylinder, Removing and Installingp. 95
+6 Washer Fluid Hosesp. 97
6.1 Washer Fluid Hoses, Servicingp. 97
7 Special Toolsp. 98
+94 – Exterior Lights, Switchesp. 99
+1 Headlampp. 100
+1.1 Overview – Headlampp. 100
1.1.1 Overview – Halogen Dual Headlampp. 101
1.1.2 Overview – HID Headlampp. 103
1.1.3 Overview – HID Headlamp for Cornering Lamp and LED Daytime Running Lampp. 105
1.1.4 Overview – HID Headlamp with Dynamic High Beam Control and LED-Daytime Running Lampsp. 107
1.1.5 Overview – Headlamp Housing Repair Setp. 109
1.2 Headlamp, Removing and Installingp. 109
+1.3 Headlamp, Adjustingp. 113
1.3.1 Halogen Twin Headlamp, Adjustingp. 113
1.3.2 HID Headlamp, Adjustingp. 113
1.3.3 Fog Lamp, Adjustingp. 113
1.3.4 Auxiliary Headlamps, Adjustingp. 113
1.4 Headlamp Installation Position, Correctingp. 113
+1.5 Left/Right Front Turn Signal Bulb -M5- /-M7-, Removing and Installingp. 115
1.5.1 Left/Right Front Turn Signal Bulb -M5-/-M7-, Removing and Installing, Halogen Dual Headlampp. 115
1.5.2 Left/Right Front Turn Signal Bulb -M5-/-M7-, Removing and Installing, HID Headlampsp. 116
1.6 Headlamp Housing Repair Kit, Installingp. 117
+1.7 Headlamp, Changing from LHD to RHDp. 118
1.7.1 Headlamp, Changing from LHD to RHD, Halogen Dual Headlampp. 118
1.7.2 Headlamp, Changing from LHD to RHD, Except Halogen Dual Headlampp. 119
+1.8 Left/Right Headlamp Beam Adjustment Motor – V48-/-V49-, Removing and Installingp. 119
1.8.1 Left/Right Headlamp Beam Adjustment Motor – V48-/-V49-, Removing and Installing, Halogen Dual Headlampsp. 119
1.8.2 Left/Right Headlamp Beam Adjustment Motor – V48-/-V49-, Removing and Installing, HID Headlampsp. 120
1.9 Low Beam Headlamp Bulb, Removing and Installingp. 121
1.10 Left/Right High Beam Headlamp Bulb – M30-/-M32-, Removing and Installingp. 122
1.11 Left/Right HID Headlamp Bulb – L13-/-L14-, Removing and Installingp. 123
+1.12 Left/Right Position Lamp Bulb – M1-/-M3-, Removing and Installingp. 125
1.12.1 Left/Right Position Lamp Bulb – M1-/-M3-, Removing and Installing, Halogen Dual Headlampp. 125
1.12.2 Left/Right Position Lamp Bulb – M1-/-M3-, Removing and Installing, HID Headlampp. 126
+1.13 Left/Right Daytime Running Lamp Bulb – L174-/-L175-, Removing and Installingp. 126
1.13.1 Left/Right Daytime Running Lamp Bulb – L174-/-L175-, Removing and Installing, Halogen Dual Headlampp. 126
1.13.2 Left/Right Daytime Running Lamp Bulb -L174-/-L175-, Removing and Installing, HID Headlampp. 126
1.14 Left/Right Daytime Running Lamp and Position Lamp LED Module – L176-/-L177-, Removing and Installingp. 127
1.15 Left/Right Low Beam Headlamp Reflector Motor -V294-/-V295-, Removing and Installingp. 127
1.16 Left/Right Cornering Lamp Bulb – L148-/-L149-, Removing and Installingp. 127
1.17 Left/Right HID Headlamp Control Module – J343-/-J344-, Removing and Installingp. 128
1.18 Left/Right Headlamp Power Output Stage -J667-/-J668-, Removing and Installingp. 129
1.19 Left/Right Daytime Running Lamp and Position Lamp Control Module – J860-/-J861-, Removing and Installingp. 130
1.20 Sensor for Left/Right Variable Headlamp Positioning Motor – G695-/-G696-, Removing and Installingp. 131
1.21 Left/Right Variable Headlamp Positioning Motor -V446-/-V447-, Removing and Installingp. 131
1.22 Left/Right Swivel Module Position Sensor -G474-/-G475-, Removing and Installingp. 131
1.23 Left/Right Adaptive Cornering Lamp Motor – V318-/-V319-, Removing and Installingp. 132
+2 Fog Lampsp. 133
+2.1 Overview – Fog Lampsp. 133
2.1.1 Overview – Fog Lamps, Except GTIp. 133
2.1.2 Overview – Fog Lamps, GTIp. 134
+2.2 Fog Lamp, Removing and Installingp. 134
2.2.1 Fog Lamp, Removing and Installing, Except GTIp. 134
2.2.2 Fog Lamp, Removing and Installing, GTIp. 135
2.3 Left/Right Front Fog Lamp Bulb – L22-/-L23-, Removing and Installingp. 135
+3 Lamps in Exterior Rearview Mirrorp. 137
3.1 Overview – Lamps in Exterior Rearview Mirrorp. 137
3.2 Turn Signal, Removing and Installingp. 138
3.3 Exterior Rearview Mirror Entry Lamp, Removing and Installingp. 140
+4 Tail Lampsp. 141
+4.1 Overview – Body Tail Lampsp. 141
4.1.1 Overview – Body Tail Lamps, Sedan, with Bulbsp. 141
4.1.2 Overview – Body Tail Lamps, Sedan, with LEDp. 143
4.1.3 Overview – Body Tail Lamps, Wagonp. 144
+4.2 Overview – Rear Lid Tail Lampsp. 145
4.2.1 Overview – Rear Lid Tail Lamps, Sedan, with Bulbsp. 145
4.2.2 Overview – Rear Lid Tail Lamps, Sedan, with LEDp. 146
4.2.3 Overview – Rear Lid Tail Lamps, Wagonp. 147
+4.3 Rear Lid Tail Lamp, Removing and Installingp. 148
4.3.1 Rear Lid Tail Lamp, Removing and Installing, Sedanp. 148
4.3.2 Rear Lid Tail Lamp, Removing and Installing, Wagonp. 149
+4.4 Tail Lamp, Correcting Installed Positionp. 150
4.4.1 Tail Lamp, Correcting Installed Position, Sedanp. 150
4.4.2 Tail Lamp, Correcting Installed Position, Wagonp. 151
+4.5 Tail Lamp, Removing and Installingp. 152
4.5.1 Tail Lamp, Removing and Installing, Sedanp. 152
4.5.2 Tail Lamp, Removing and Installing, Wagonp. 153
+4.6 Right and Left Tail Lamp Bulb – M2-/-M4-, Removing and Installingp. 153
4.6.1 Right and Left Tail Lamp Bulb – M2-/-M4-, Removing and Installing, Sedanp. 153
4.6.2 Right and Left Tail Lamp Bulb – M2-/-M4-, Removing and Installing, Wagonp. 154
+4.7 Left/Right Rear Fog Lamp Bulb – L46-/-L47-, Removing and Installingp. 156
4.7.1 Left/Right Rear Fog Lamp Bulb – L46-/-L47-, Removing and Installing, Sedanp. 156
4.7.2 Left/Right Rear Fog Lamp Bulb -L46-/-L47-, Removing and Installing, Wagonp. 157
+4.8 Left/Right Brake/Tail Lamp Bulb -M21-/-M22-, Removing and Installingp. 158
4.8.1 Left/Right Brake/Tail Lamp Bulb – M21-/-M22-, Removing and Installing, Sedanp. 158
4.8.2 Left/Right Brake/Tail Lamp Bulb – M21-/-M22-, Removing and Installing, Wagonp. 159
+4.9 Back-Up Lamp, Removing and Installingp. 160
4.9.1 Back-Up Lamp Bulb, Removing and Installing, Sedanp. 160
4.9.2 Back-Up Lamp Bulb, Removing and Installing, Wagonp. 161
+4.10 Turn Signal Bulb, Removing and Installingp. 162
4.10.1 Turn Signal Bulb, Removing and Installing, Sedanp. 162
4.10.2 Turn Signal Bulb, Removing and Installing, Wagonp. 163
+5 High-Mounted Brake Lampp. 165
+5.1 Overview – High-Mounted Brake Lampp. 165
5.1.1 Overview – High-Mounted Brake Lamp, Except GTIp. 165
5.1.2 Overview – High-Mounted Brake Lamp, GTIp. 166
+5.2 High-Mounted Brake Lamp, Removing and Installingp. 166
5.2.1 High-Mounted Brake Lamp, Removing and Installing, Except GTIp. 166
5.2.2 High-Mounted Brake Lamp, Removing and Installing, GTIp. 167
+6 License Plate Lampp. 169
+6.1 Left/Right License Plate Lamp – X4-/-X5-, Removing and Installingp. 169
6.1.1 Left/Right License Plate Lamp -X4-/-X5-, Removing and Installing, Sedanp. 169
6.1.2 Left/Right License Plate Lamp -X4-/-X5-, Removing and Installing, Wagon with LEDp. 169
6.1.3 Left/Right License Plate Lamp -X4-/-X5-, Removing and Installing, Wagon with Bulbp. 170
+6.2 Left/Right License Plate Lamp Bulb – X4-/-X5-, Removing and Installingp. 171
6.2.1 Left/Right License Plate Lamp Bulb – X4-/-X5-, Removing and Installing, Sedanp. 171
6.2.2 Left/Right License Plate Lamp Bulb – X4-/-X5-, Removing and Installing, Wagonp. 172
+7 Access/Start Authorizationp. 174
7.1 Component Location Overview – Access/Start Authorization Systemp. 174
+7.2 Component Location Overview – Keyless Access Authorization Systemp. 176
7.2.1 Component Location Overview – Front Keyless Access Authorization Systemp. 176
7.2.2 Component Location Overview – Rear Keyless Access Authorization System, Sedanp. 177
7.2.3 Component Location Overview – Rear Keyless Access Authorization System, Wagonp. 178
+7.3 Access/Start System Interface -J965-, Removing and Installingp. 178
7.3.1 Access/Start System Interface -J965-, Removing and Installing, Except North Americap. 178
7.3.2 Access/Start System Interface -J965-, Removing and Installingp. 179
7.4 Driver Exterior and Front Passenger Exterior Door Handle Touch Sensor – G415-/-G416-, Removing and Installingp. 180
7.5 Access/Start System Antenna 1 in Vehicle Interior -R138-, Removing and Installingp. 181
7.6 Driver Access/Start System Antenna -R134-, Removing and Installingp. 181
7.7 Front Passenger Access/Start System Antenna -R135-, Removing and Installingp. 181
+7.8 Access/Start System Antenna in Luggage Compartment -R137-, Removing and Installingp. 182
7.8.1 Access/Start System Antenna in Luggage Compartment -R137-, Removing and Installing, Sedanp. 182
7.8.2 Access/Start System Antenna in Luggage Compartment -R137-, Removing and Installing, Wagonp. 182
7.9 Access/Start System Antenna in Rear Bumper -R136-, Removing and Installingp. 183
+8 Steering Column Switch Modulep. 184
+8.1 Overview – Steering Column Switch Modulep. 184
8.1.1 Overview – Steering Column Switch Module with Mechanical Ignition Switchp. 184
8.1.2 Overview – Steering Column Switch Module and Electronic Ignition Switchp. 186
8.2 Lock Cylinder, Removing and Installingp. 187
8.3 Ignition Switch Key Lock Solenoid -N376-, Removing and Installingp. 188
8.4 Ignition/Starter Switch, Removing and Installingp. 189
+8.5 Steering Column Switch Module, Removing and Installingp. 190
8.5.1 Steering Column Switch Module, Removing and Installing, Kostalp. 190
8.5.2 Steering Column Switch Module, Removing and Installing, Valeop. 192
+8.6 Steering Column Electronics Control Module -J527-, Removing and Installingp. 195
8.6.1 Steering Column Electronics Control Module -J527-, Removing and Installing, Kostalp. 195
8.6.2 Steering Column Electronics Control Module -J527-, Removing and Installing, Valeop. 197
+8.7 Turn Signal Switch -E2-, Removing and Installingp. 200
8.7.1 Turn Signal Switch -E2-, Removing and Installing, Kostalp. 200
8.7.2 Turn Signal Switch -E2-, Removing and Installing, Valeop. 201
8.8 Cruise Control Switch -E45-, Removing and Installingp. 202
8.9 Windshield Wiper Intermittent Mode Switch -E22-, Removing and Installingp. 202
+8.10 Anti-Theft Immobilizer Reader Coil -D2-, Removing and Installingp. 202
8.10.1 Anti-Theft Immobilizer Reader Coil -D2-, Removing and Installing, Vehicles with Ignition Keyp. 202
8.10.2 Anti-Theft Immobilizer Reader Coil -D2-, Removing and Installing, Vehicles with Keyless Accessp. 202
8.11 Steering Lock Housing, Removing and Installingp. 203
+9 Parking Aidp. 205
+9.1 Overview – Parking Aidp. 205
9.1.1 Overview – Front Parking Aidp. 205
9.1.2 Overview – Rear Parking Aid, Sedanp. 207
9.1.3 Overview – Rear Parking Aid, Wagonp. 208
9.2 Parking Aid Control Module -J446-, Removing and Installingp. 208
9.3 Front Parking Aid Warning Buzzer -H22-, Removing and Installingp. 209
+9.4 Rear Parking Aid Warning Buzzer -H15-, Removing and Installingp. 210
9.4.1 Rear Parking Aid Warning Buzzer -H15-, Removing and Installing, Sedanp. 210
9.4.2 Rear Parking Aid Warning Buzzer -H15-, Removing and Installing, Wagonp. 210
9.5 Front Parking Aid Sensor, Removing and Installingp. 211
9.6 Rear Parking Aid Sensor, Removing and Installingp. 213
+10 Parallel Parking Assistp. 214
+10.1 Overview – Parallel Parking Assistp. 214
10.1.1 Overview – Parallel Parking Assist, Sedanp. 214
10.1.2 Overview – Parallel Parking Assist, Wagonp. 215
10.2 Control Module, Removing and Installingp. 215
10.3 Front Sensor, Removing and Installingp. 216
10.4 Rear Sensor, Removing and Installingp. 216
+11 Automatic Headlamp Range Controlp. 217
+11.1 Overview – Automatic Headlamp Range Controlp. 217
11.1.1 Overview – Automatic Headlamp Range Control, Sedanp. 217
11.1.2 Overview – Automatic Headlamp Range Control, Wagonp. 218
11.2 Control Module for Headlamp Range/Cornering Lamp and Headlamp Range, Removing and Installingp. 219
+12 Trailer Hitchp. 221
+12.1 Overview – Trailer Hitch Socketp. 221
12.1.1 Overview – Trailer Hitch Socket, Sedanp. 221
12.1.2 Overview – Trailer Hitch Socket, Wagonp. 222
12.2 Trailer Socket -U10-p. 222
+12.3 Towing Recognition Control Module -J345-, Removing and Installingp. 223
12.3.1 Towing Recognition Control Module -J345-, Removing and Installing, Sedanp. 223
12.3.2 Towing Recognition Control Module -J345-, Removing and Installing, Wagonp. 223
+13 Blind Spot Detectionp. 225
+13.1 Overview – Blind Spot Detectionp. 225
13.1.1 Overview – Blind Spot Detection, Sedanp. 225
13.1.2 Overview – Blind Spot Detection, Wagonp. 226
13.2 Blind Spot Detection Warning Lamp in Left/Right Exterior Mirror – K303-/-K304-, Removing and Installingp. 227
+13.3 Blind Spot Detection Control Module -J1086-/Blind Spot Detection Control Module 2 -J1087-, Removing and Installingp. 228
13.3.1 Blind Spot Detection Control Module -J1086-/Blind Spot Detection Control Module 2 -J1087-, Removing and Installing, Sedanp. 228
13.3.2 Blind Spot Detection Control Module -J1086-/Blind Spot Detection Control Module 2 -J1087-, Removing and Installing, Wagonp. 229
+13.4 Blind Spot Detection, Calibratingp. 230
13.4.1 Preparing for Calibrationp. 230
13.4.2 Calibration Preparation Workp. 232
13.4.3 Blind Spot Detection Control Module -J1086-/Blind Spot Detection Control Module 2 -J1087-, Calibratingp. 235
14 Special Toolsp. 237
+96 – Interior Lights, Switchesp. 239
+1 Lampsp. 240
1.1 Component Location Overview – Instrument Panel Lampsp. 241
1.2 Component Location Overview – Front Door Lampsp. 242
1.3 Component Location Overview – Rear Door Lampsp. 243
1.4 Component Location Overview – Center Console Lampsp. 244
+1.5 Component Location Overview – Luggage Compartment Lampsp. 245
1.5.1 Component Location Overview – Luggage Compartment Lamps, Sedanp. 245
1.5.2 Component Location Overview – Luggage Compartment Lamps, Wagonp. 246
+1.6 Component Location Overview – Roof Trim Panel Lampsp. 247
1.6.1 Component Location Overview – Roof Trim Panel Lamps, Sedanp. 247
1.6.2 Component Location Overview – Roof Trim Panel Lamps, Wagon, without Panorama Roofp. 248
1.6.3 Component Location Overview – Roof Trim Panel Lamps, Wagon, with Panorama Roofp. 249
1.7 Glove Compartment Lamp -W6-, Removing and Installingp. 249
1.8 Bulb for Glove Compartment Lamp -W6-, Replacingp. 250
+1.9 Left/Right Front Footwell Lamp -K268-/-K269-, Removing and Installingp. 251
1.9.1 Left Front Footwell Lamp -K268-, Removing and Installing, Driver Sidep. 251
1.9.2 Right Front Footwell Lamp -K269-, Removing and Installing, Front Passenger Sidep. 251
1.10 Left/Right Front Footwell Illumination Bulb -L151-/-L152-, Removing and Installingp. 252
1.11 Central Locking -Safe- Indicator Lamp -K133-, Removing and Installingp. 252
1.12 Left/Right Front Entry Lamp -W31-/-W32-, Removing and Installingp. 253
1.13 Entry Lamp Bulb, Removing and Installingp. 254
1.14 Driver/Front Passenger Door Warning Lamp -W30-/-W36-, Removing and Installingp. 254
1.15 Driver/Front Passenger Door Opener Illumination Bulb -L108-/-L109-, Removing and Installingp. 254
1.16 Left/Right Front Door Ambient Lighting Bulb 2 – L203-/-L204-, Removing and Installingp. 255
1.17 Left/Right Rear Entry Lamp -W33-/-W34-, Removing and Installingp. 255
1.18 Left/Right Rear Door Warning Lamp – W37-/-W38-, Removing and Installingp. 256
1.19 Selector Lever Transmission Range Position Display Unit -Y26-, Removing and Installingp. 256
+1.20 Luggage Compartment Lamp -W3-, Removing and Installingp. 256
1.20.1 Luggage Compartment Lamp -W3-, Removing and Installing, Sedanp. 256
1.20.2 Luggage Compartment Lamp -W3-, Removing and Installing, Wagonp. 257
+1.21 Bulb for Luggage Compartment Lamp -W3-, Removing and Installingp. 257
1.21.1 Bulb for Luggage Compartment Lamp -W3-, Removing and Installing, Sedanp. 257
1.21.2 Bulb for Luggage Compartment Lamp -W3-, Removing and Installing, Wagonp. 258
1.22 Driver/Front Passenger Vanity Mirror Lamp -W20-/-W14-, Removing and Installingp. 258
1.23 Driver/Front Passenger Vanity Mirror Lamp -W20-/-W14- Bulb, Removing and Installingp. 259
+1.24 Front Interior Lamp -W1- Bulb, Removing and Installingp. 260
1.24.1 Front Interior Lamp -W1- Bulb, Removing and Installing, LEDp. 260
1.24.2 Front Interior Lamp -W1- Bulb, Removing and Installing, with Bulbsp. 260
+1.25 Rear Interior Lamp -W43- Bulb, Removing and Installingp. 261
1.25.1 Rear Interior Lamp -W43- Bulb, Removing and Installing, with Bulbsp. 261
1.25.2 Rear Interior Lamp -W43- Bulb, Removing and Installing, LEDp. 262
1.26 Left/Right Rear Reading Lamp -W11-/-W12-, Removing and Installingp. 262
1.27 Left/Right Rear Interior Lamp -W47-/-W48-, Replacingp. 262
+2 Controlsp. 266
2.1 Component Location Overview – Instrument Panel Controlsp. 267
2.2 Component Location Overview – Controls in Front Doorsp. 268
2.3 Component Location Overview – Controls in Rear Doorsp. 269
2.4 Component Location Overview – Controls in Center Consolep. 270
2.5 Component Location Overview – Controls in Luggage Compartmentp. 271
2.6 Component Location Overview – Controls in Roof Trim Panelp. 272
2.7 Rotary Light Switch -EX1-, Removing and Installingp. 273
2.8 Headlamp Range Control Adjuster -E102-, Removing and Installingp. 273
2.9 Driving Profile Selection Button -E735-, Removing and Installingp. 274
2.10 Start/Stop Mode Button -E693-, Removing and Installingp. 274
2.11 ASR/ESP Button -E256-, Removing and Installingp. 274
2.12 Parking Aid Button -E266-, Removing and Installingp. 274
2.13 Parallel Parking Assistance Button -E581-, Removing and Installingp. 274
2.14 Center Console Switch Module 1 and 2 -EX23-/-EX30-, Removing and Installingp. 275
2.15 Emergency Flasher Switch -EX3-, Removing and Installingp. 276
2.16 Left/Right Seat Heating Button -E653-/-E654-, Removing and Installingp. 277
2.17 Glove Compartment Lamp Switch -E26-, Removing and Installingp. 277
2.18 Exterior Rearview Mirror Adjuster -EX11-, Removing and Installingp. 277
2.19 Power Window Control Head in Driver Door -E512-, Removing and Installingp. 278
2.20 Front Passenger Power Window Button -E716-, Removing and Installingp. 279
2.21 Driver Interior Locking Button -E308-, Removing and Installingp. 279
2.22 Interior Monitoring And Vehicle Inclination Deactivation Button -E616-, Removing and Installingp. 280
2.23 Driver and Front Passenger Door Contact Switch – F2-/-F3-, Removing and Installingp. 281
2.24 Driver and Passenger Side Rear Power Window Button -E711-/-E713-, Removing and Installingp. 281
2.25 Left/Right Rear Door Contact Switch -F10-/-F11-, Removing and Installingp. 281
2.26 Start System Button -E378-, Removing and Installingp. 281
2.27 Rear Lid Contact Switch, Removing and Installingp. 282
2.28 Driver and Front Passenger Vanity Mirror Lamp Contact Switch – F147-/-F148-, Removing and Installingp. 282
2.29 Sunroof Button -E325-, Removing and Installingp. 282
2.30 Front Interior Lamp/Reading Lamp, Removing and Installingp. 283
2.31 Rear Interior Lamp/Reading Lamp, Removing and Installingp. 283
2.32 Left/Right Front Reading Lamp Button – E633-/-E634-, Removing and Installingp. 285
+3 Anti-Theft Alarm Systemp. 286
3.1 Overview – Interior Monitoringp. 286
3.2 Alarm Horn -H12-, Removing and Installingp. 287
+3.3 Anti-Theft Alarm System Sensor -G578-, Removing and Installingp. 287
3.3.1 Anti-Theft Alarm System Sensor -G578-, Removing and Installing, Version with Two Screwsp. 287
3.3.2 Anti-Theft Alarm System Sensor -G578-, Removing and Installing, Version with Four Screwsp. 289
+4 Driver Assistance Systems Front Camerap. 291
4.1 Driver Assistance Systems Front Camera, Removing and Installingp. 291
+5 Cigarette Lighter and Socketp. 292
5.1 Overview – Converter with Socket, 12 V-230 Vp. 292
5.2 Cigarette Lighter -U1-, Removing and Installingp. 293
5.3 Socket Illumination Bulb -L42-, Removing and Installingp. 293
5.4 Rear Cigarette Lighter Illumination Bulb -L32-, Removing and Installingp. 293
5.5 Socket -U-, Removing and Installingp. 293
5.6 Converter with Socket, 12 V-230 V -U13-, Removing and Installingp. 293
6 Special Toolsp. 295
+97 – Wiringp. 296
+1 Relay Carriers, Fuse Panels and E-Boxesp. 296
+1.1 Component Location Overview – Relay Carriers, Fuse Panels and E-Boxesp. 296
1.1.1 Relay Carriers, Fuse Panels and E-Boxesp. 296
1.1.2 Relay Carrier and Instrument Panel/A-Pillar Fuse Panelp. 298
1.2 E-Box, Removing and Installingp. 298
+1.3 E-Box Relay and Fuse Panels, Removing and Installingp. 300
1.3.1 Fuse Panel B -SB-, Removing and Installingp. 300
1.3.2 Fuse Panel A -SA-, Removing and Installingp. 301
1.4 Relay and Fuse Carrier Behind Instrument Panel on Driver Side, Removing and Installingp. 302
+2 Control Modulesp. 303
+2.1 Component Location Overview – Control Modulesp. 303
2.1.1 Component Location Overview – Front Control Modulesp. 303
2.1.2 Component Location Overview – Rear Control Modulesp. 305
2.2 Overview – Control Modulesp. 306
2.3 Overview – Data Bus On Board Diagnostic Interfacep. 307
2.4 Vehicle Electrical System Control Module -J519-, Removing and Installingp. 307
2.5 Data Bus On Board Diagnostic Interface -J533-, Removing and Installingp. 308
2.6 Vehicle Electrical System Control Module -J519- Bracket, Removing and Installingp. 309
2.7 Vehicle Electrical System Control Module -J519- Bracket, Replacingp. 310
2.8 Parking Aid Control Module -J446-/Parallel Parking Assistance Control Module -J791- Bracket, Removing and Installingp. 310
+3 Connectorsp. 312
+3.1 Wiring Harnesses and Connectors, Repairingp. 312
3.1.1 Electric Wiring Harnesses and Connectors, Repairingp. 312
3.1.2 Connector Housings and Connectors, Repairingp. 312
4 Connector Housings, Releasing and Disassemblingp. 313
5 Antenna Wires, Repairingp. 314
6 Fiber-Optic Cablep. 315
7 Vehicle Diagnostic Testerp. 316
8 Revision Historyp. 317
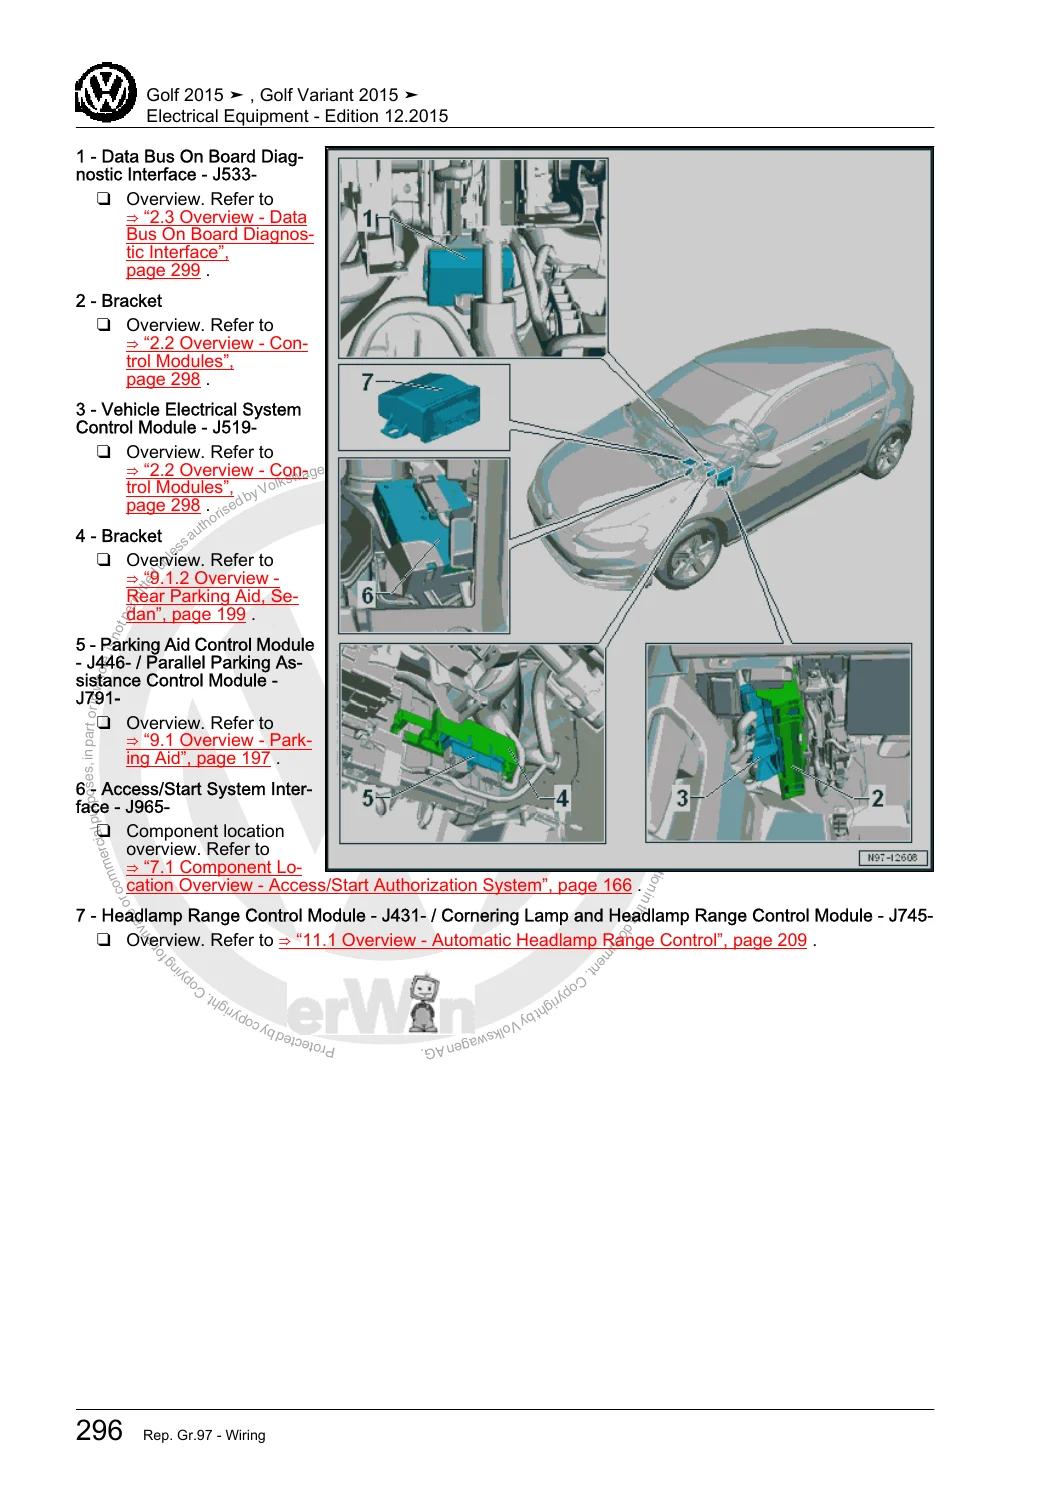
Control-module coverage includes component-location overviews for front and rear areas, an overview of the Data Bus On Board Diagnostic Interface, removal and installation of the Vehicle Electrical System Control Module J519 and Data Bus On Board Diagnostic Interface J533, and related control-module brackets. The manual then moves into wiring harness and connector repair, connector-housing release and disassembly, antenna-wire repair and fiber-optic cable information. Where diagnostic-tool procedures are required, the document directs the technician to the relevant electrical-equipment diagnostic information.
Procedures, Illustrations and Workshop Information
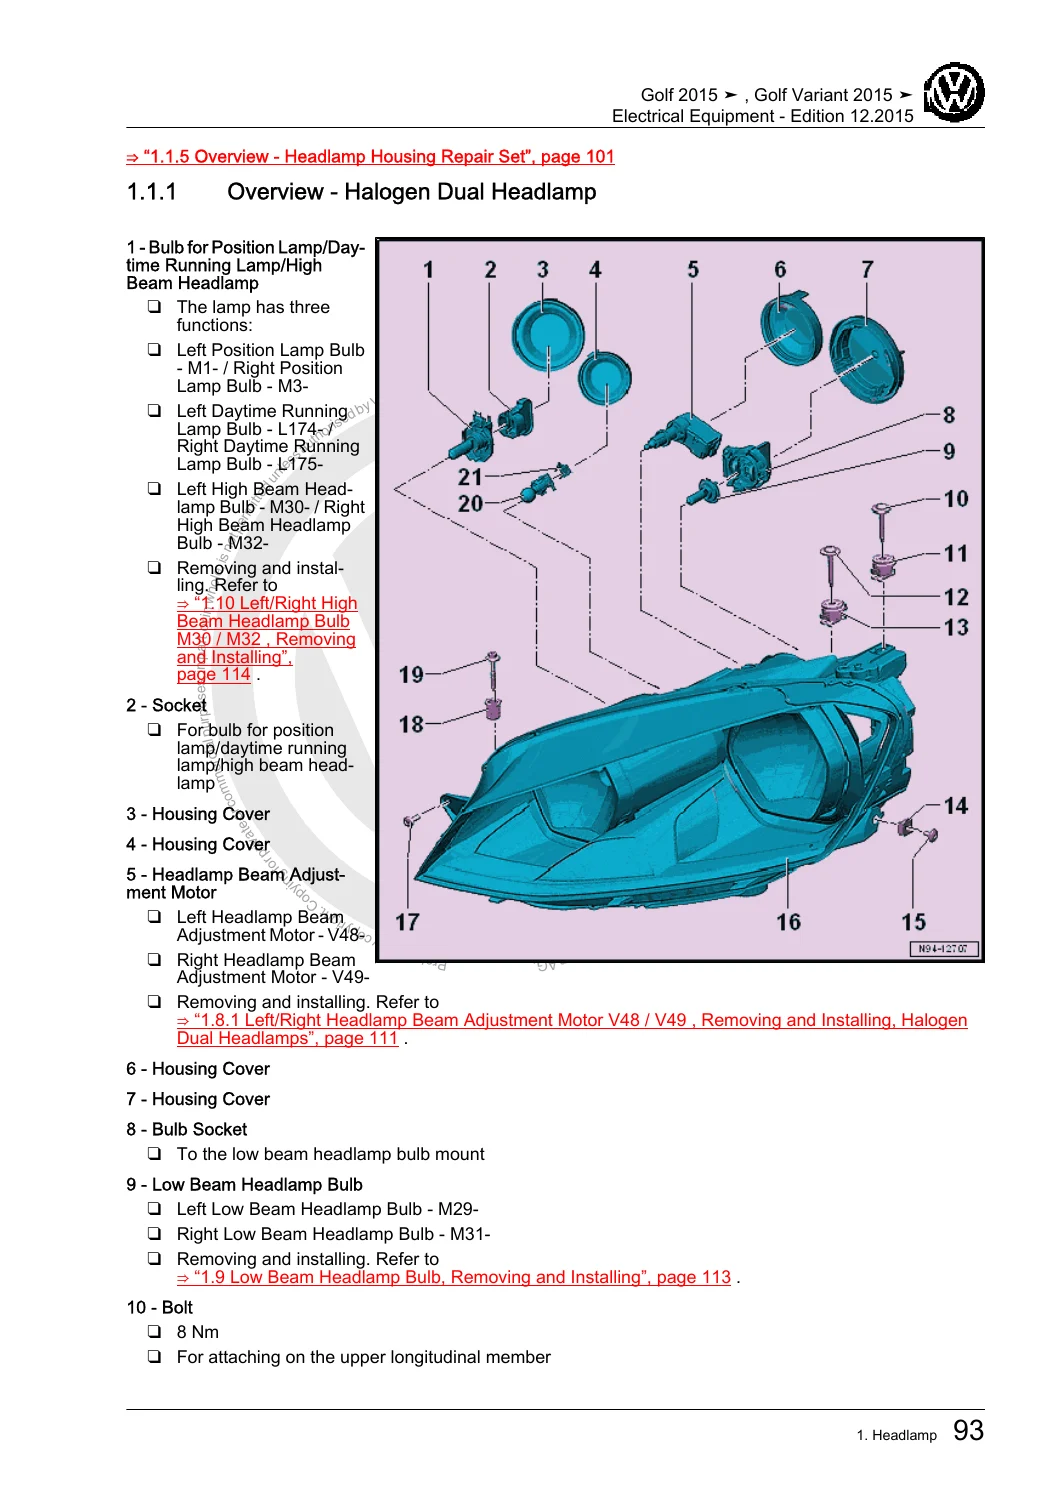
The manual combines descriptive repair steps with assembly and component-location illustrations. For example, headlamp overviews identify bulbs, sockets, covers, adjustment motors, fasteners and the headlamp assembly itself, while control-module location diagrams place modules within the vehicle and show their installation areas. Similar illustrated overviews are provided throughout the battery, starter, lighting, access/start, steering-column, parking-assistance and wiring sections.
Removal and installation instructions commonly include preliminary electrical precautions, connector release methods, installation requirements, function checks and references to the applicable tightening specifications. Some sections also identify special tools and workshop equipment required for the procedure. This level of detail makes the Volkswagen Golf 2015 onward electrical equipment manual useful both for planned component replacement and for investigating an electrical system before unnecessary parts are changed.
Get the Correct Electrical Repair Procedures
With the Volkswagen Golf & Golf Variant 2015 Onward Electrical Equipment Repair Manual PDF, you can work from model-specific procedures when servicing batteries, starters, generators, wipers, washers, headlamps, interior and exterior lighting, switches, access/start equipment, parking-assistance hardware, electrical control modules, fuse and relay carriers, connectors and related wiring. The manual’s component locations, removal and installation sequences, adjustments, calibrations, safety instructions and tightening information help reduce uncertainty and support repairs using the procedures and specifications provided for these vehicles.
After purchase, the manual is delivered instantly as a PDF download. There is no physical book and no shipping delay. You can open the PDF on a computer, tablet or phone and print the pages you need for workshop use.

Reviews
There are no reviews yet.