

2015 Harley-Davidson Street Models Service Manual – XG500 XG750 Repair Guide PDF
Original price was: $39.95.$22.95Current price is: $22.95.
The complete 2015 Harley-Davidson Street Models service manual (99611-15B) covering XG500 and XG750 – engine, chassis, transmission, fuel, cooling, electrical, wiring diagrams and connector repair in one 418-page PDF.
Description
File Details
- Manual type: Service manual – maintenance, repair and overhaul
- Brand: Harley-Davidson
- Models covered: XG500 and XG750 Street models
- Model year: 2015
- Document number: 99611-15B
- Publication: ©2014 Harley-Davidson, printed in the U.S.A.
- Language: English
- File format: PDF
- Pages: 418
Chapters Covered in This 2015 Harley-Davidson Street Models Service Manual
The 2015 Harley-Davidson Street Models Service Manual is organised into eight numbered chapters plus three appendices, and the table of contents below follows the manual’s own wording.
- 1 Safety – safety messages, customer safety, personal protection, tool safety, product safety and hazardous materials, including fuel, battery, coolant, hydraulic (brake) fluid and engine oil safety.
- 2 Maintenance – fastener torque values; general servicing procedures; maintenance schedule; fuel and oil; replace engine oil and filter; inspect tires; lubricate cable and chassis; inspect brakes; replace front and rear brake pads; check and replace brake fluid; check, adjust and lubricate throttle cables; check and adjust clutch; adjust brake linkage; rebuild front fork and replace oil; adjust and lubricate steering head bearings; inspect radiator and coolant; inspect fuel lines and fittings; inspect and lubricate jiffy stand; inspect rear fork bearing; inspect and adjust drive belt and sprockets; inspect rear wheel compensator; inspect rear shock absorber bushings; inspect exhaust system; inspect air filter; inspect and adjust valve lash; inspect battery; clean and inspect spark plugs; storage; troubleshooting.
- 3 Chassis – front wheel; rear wheel; rear wheel compensator; wheel runout; sealed wheel bearings; tires; wheel alignment; front brake master cylinder; front brake caliper; rear brake master cylinder; rear brake caliper; brake lines; bleed brakes; side covers; front fork; steering head/fork stem and bracket assembly; rear fork; belt guards; shock absorbers; clutch control; throttle control; speed screen; hand grips; handlebar; mirrors; front fender; rear fender; saree guard; front and rear license plate brackets; rider foot controls; passenger footpegs; seat; jiffy stand.
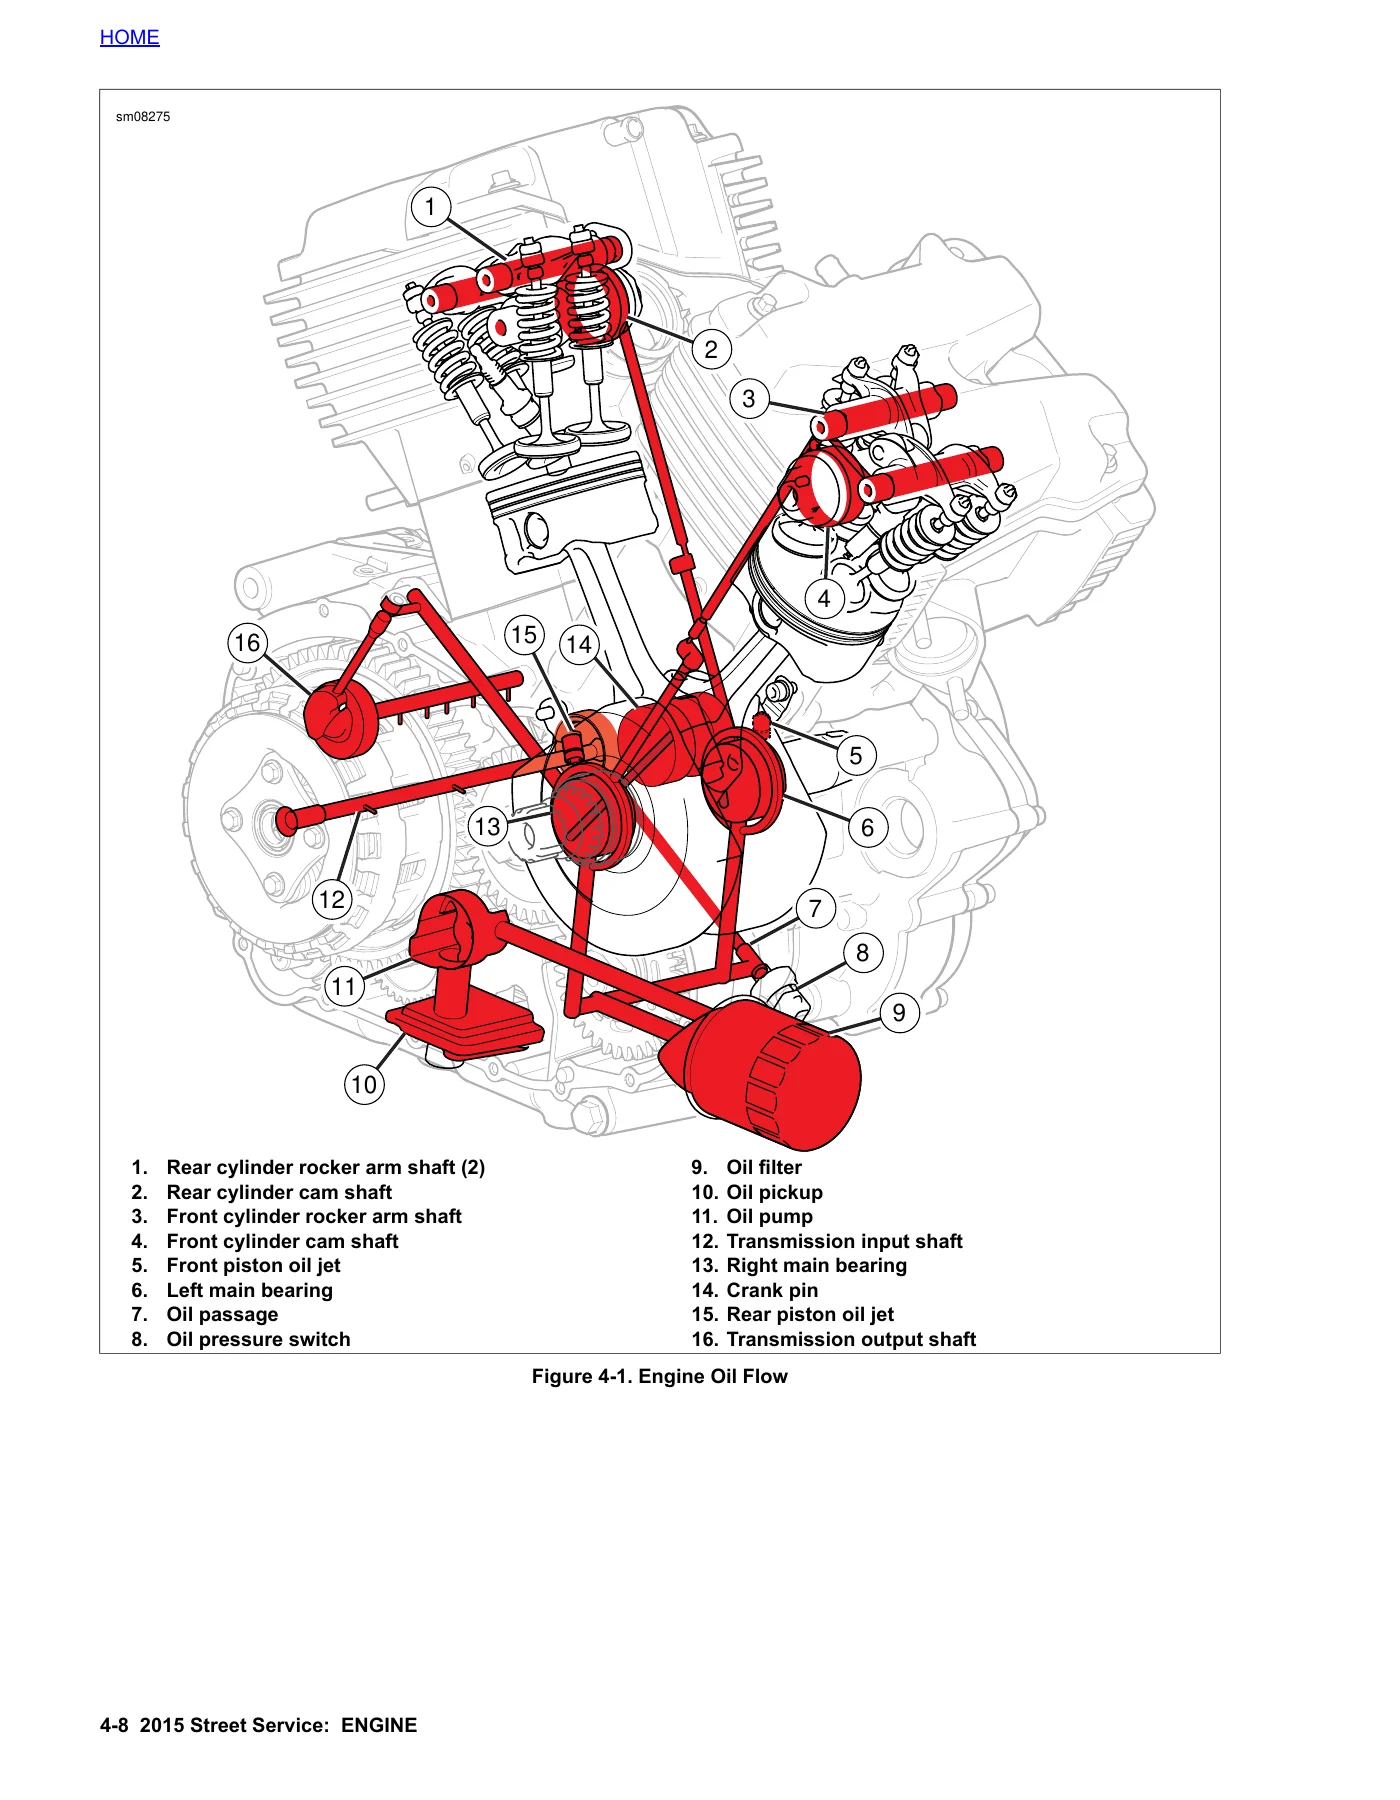
- 4 Engine – engine oil flow; breather operation; oil pressure; troubleshooting; front engine mount; rear engine mount; replace engine; rebuild engine; intake adapter; cylinder head covers; camshaft sprocket and timing chain; cylinder heads; rocker arms; camshaft; valves; chain guide; cylinders; pistons; alternator cover; primary cover; balancer; crankshaft gear; starter gear; oil pump; crankcase; crankshaft and connecting rods; main bearings; oil strainer; crankcase oil nozzles; oil passage plugs.
- 5 Drive/Transmission – transmission operation and power flow through all six gears; drive belt; output pulley; shifter shaft; clutch; drum and forks; transmission; transmission right crankcase bearings; transmission left crankcase bearings.
- 6 Fuel and Exhaust – air cleaner; lift rear of fuel tank; fuel tank; fuel line; fuel pressure test; fuel pump; vent tube; vapor valve; idle air control (IAC); fuel injectors; temperature manifold absolute pressure (TMAP) sensor; breather hoses; induction module; oxygen (O2) sensor; muffler; exhaust system; intake leak test; purge solenoid, charcoal canister and purge lines for California emissions.
- 7 Cooling System – coolant flow; diagnose and test; coolant; thermostat housing; coolant pump; coolant overflow tank; coolant hoses; engine coolant temperature (ECT) sensor; radiator.
- 8 Electrical – fuses and relays; power disconnect; starter; starter solenoid; alternator; voltage regulator; ignition switch; ignition coil; spark plug cable; left handlebar switch housing; right handlebar switch housing; speedometer; oil pressure switch; neutral indicator switch; horn; headlamp; front turn signal lamps; rear turn signal lamps; turn signal flasher; tail lamp; license plate lamp; electronic control module (ECM); cooling fan; vehicle speed sensor (VSS); bank angle sensor; jiffy stand sensor; battery tray; engine ground cable; engine wire harness; main wiring harness.
- Appendix A – Connector Repair – Bosch Compact 1.1M, Delphi GT 150, Deutsch DT, Furukawa QLW, Molex MX 150, Sumitomo DL/MT/MTW/MTL, Tyco 070 Multilock, Tyco GET 64, Tyco Junior Power Timer, Tyco Sealed Timer, Tyco Super Seal 1.5 and Yazaki SSD connectors, with disconnect, connect, terminal removal, terminal installation and crimping procedures.
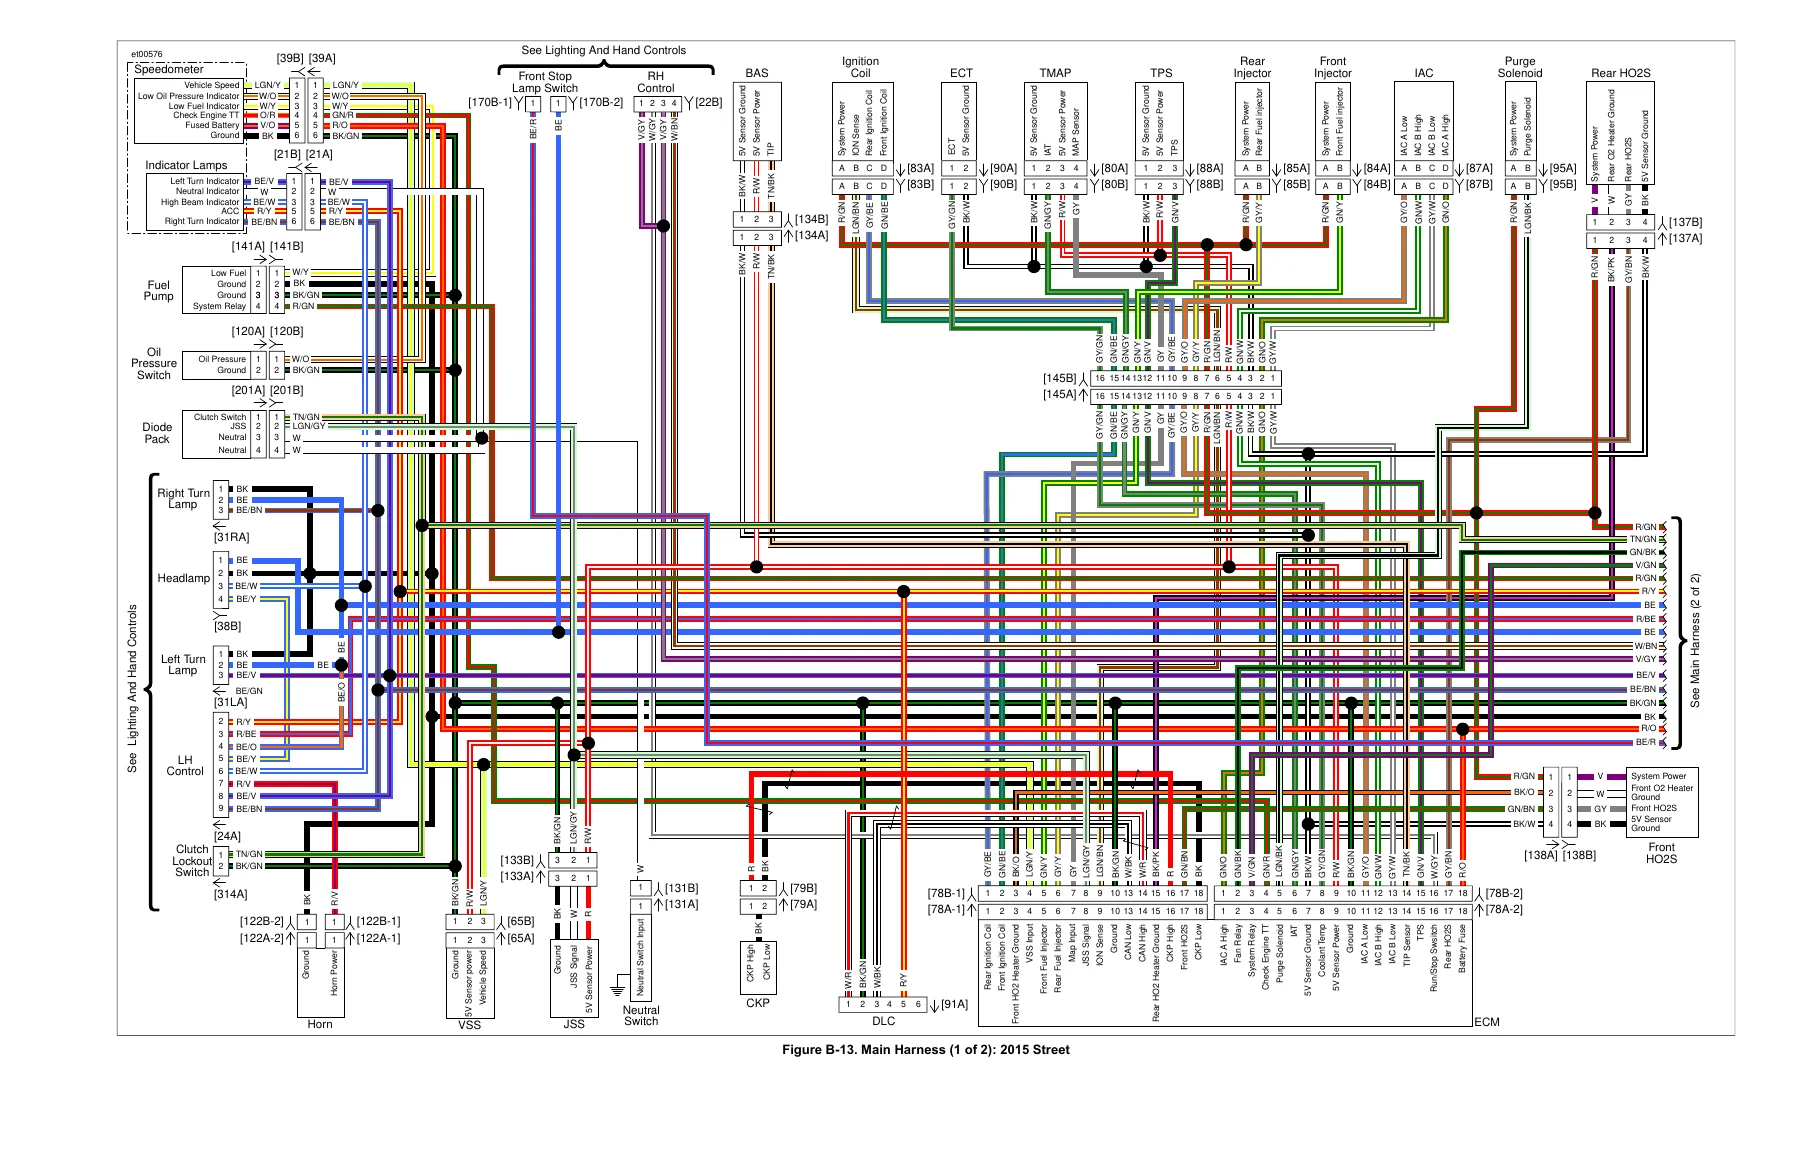
- Appendix B – Wiring – component location views, wiring diagram information, wire colour codes, wiring diagram symbols, 2015 Street wiring diagrams, connector locations and connector end views.
- Appendix C – Reference – metric conversions, fluid conversion, torque conversion and the acronyms and abbreviations glossary.
Together these chapters turn a bare motorcycle into a fully documented machine. The chassis and maintenance chapters handle everything a rider touches at service time, from tire tread and brake pad thickness through steering head fall-away adjustment and drive belt deflection. The engine and drive chapters go far deeper, covering a full teardown and rebuild sequence for the 60-degree V-twin, the six-speed transmission, the balancer and the oil pump. The fuel, cooling and electrical chapters carry the sensor-level detail needed to diagnose a fault rather than simply replace parts, and the wiring appendix gives you the connector end views and terminal crimping procedures that make electrical work actually finishable.
How the Procedures Are Laid Out
Every section in this 2015 Harley-Davidson Street Models Service Manual follows the same predictable pattern, which is what makes it usable in a workshop rather than just readable on a couch. Each topic is broken into Prepare, Remove, Install, Disassemble, Clean/Inspect, Assemble and Complete as applicable, so you can tell at a glance whether a job is a straight swap or a full rebuild. Prepare topics list the procedures that must happen before the main task and link to them, and Complete topics list what has to be done to return the motorcycle to ride-ready condition.
Steps are written twice over. Numeric steps give the experienced technician the high-level sequence. Alpha steps underneath give the less experienced technician step-by-step instructions for the same operation. Symbols mark the parts that matter: lubricant to be applied, parts that must be discarded and replaced, sealant or threadlocker callouts, special tool recommendations, and measurement points that have to be gauged against specification.
Specifications, Torque Values and Wiring
Fastener torque values are gathered at the front of each chapter in their own table, so you are not hunting through the text for the figure you need mid-assembly. Chapter 4 alone carries engine specifications, service wear limits, valve lash, piston ring gaps, connecting rod and crankshaft journal data, cylinder liner and piston dimensions, compression and leakage thresholds. Chapter 3 lists chassis dimensions, weights, GVWR and GAWR, capacities, wheel and tire runout limits, tire pressures and fork oil level. Chapter 7 supplies coolant capacities, cap pressures, thermostat opening temperatures and cooling fan switch points. Chapter 8 covers battery, spark plug, starter, alternator, regulator, fuse and ignition coil specifications.
The wiring appendix is a complete working document in its own right. Component location views step around the motorcycle from front to back, wire colour codes are given as alpha codes for both solid and striped wires, and the main harness is broken into readable diagram sheets covering ignition and accessory circuits, grounds, lighting and hand controls. Connector end views give the terminal number and wire colour for each cavity, so a continuity check or a terminal replacement can be done without guesswork.
Why This Manual Matters for XG500 and XG750 Owners
The 2015 Street models use a liquid-cooled Revolution X V-twin, a six-speed transmission and a belt final drive, and the service procedures for those systems are specific. Valve lash is adjusted with a tappet adjusting wrench and a jamnut torque figure that has to be right. Cam timing depends on aligning a single black chain link with the arrow on the cam sprocket and two black links with the marks on the crankshaft sprocket. The balancer gear has to be pinned before the shaft nut is torqued. Belt deflection has to be set with a tension gauge at a defined load. Getting any of those wrong is expensive; having the figures in front of you is not.
The manual also carries the model identification data you need when ordering parts. A unique 17-digit Vehicle Identification Number is assigned to each motorcycle, stamped on the right side of the frame near the steering head, with an abbreviated VIN stamped on the left side of the crankcase between the engine cylinders. The VIN breakdown table in Chapter 3 decodes the world manufacturer identifier, motorcycle type, model, engine type, configuration and calibration, check digit, model year, assembly plant and sequential number. For the 2015 model year the model year code is F, the XG500 is coded NA and the XG750 is coded NB, and engine type is A for the 500 cc Revolution X and B for the 750 cc unit.
Get the 2015 Harley-Davidson Street Models Service Manual
IMAGES PREVIEW
This 2015 Harley-Davidson Street Models Service Manual is supplied as an instant-download PDF. There is no shipping, no waiting, and no physical book to keep clean on a workbench – open it on a laptop, tablet or phone in the garage, or print the pages for the job you are doing and take them to the lift. Search the document on screen, jump straight to the chapter you need, and keep the torque tables and wiring sheets next to you while you work.
With XG500 and XG750 coverage in a single document, you can service both machines, run your own scheduled maintenance, chase down an electrical fault with the wiring diagrams and connector end views, rebuild a front fork, adjust valve lash, replace a clutch pack, pull a crankcase apart and put it back together with the correct tightening sequences in front of you. Whether you are doing a first oil and filter change or a full engine rebuild, the procedures, specifications and torque values you need are already in this PDF.

Reviews
There are no reviews yet.