Description
Bobcat S550 Skid-Steer Loader Service Manual 6990677enUS – July 2019 PDF
The Bobcat S550 Skid-Steer Loader Service Manual 6990677enUS – July 2019 PDF is a detailed service and repair reference for the S550 loader covering machines with serial numbers AHGM11001 & Above and B3GY11001 & Above. Prepared for the Bobcat loader mechanic, it provides servicing and adjustment procedures for the loader and its component parts and systems. Across 1310 pages, the manual brings together maintenance procedures, troubleshooting information, component removal and installation, disassembly and assembly instructions, service specifications, hydraulic and hydrostatic schematics, electrical diagnosis, engine service, HVAC work, and machine specifications.
This S550 service manual is particularly useful when work goes beyond routine operator maintenance. It follows the machine system by system, showing the technician where components are located, how assemblies are tested, how service tools are used, and where serial-number changes alter a procedure or component. The manual also makes clear that operating instructions, starting procedures, and daily operator checks are covered in the separate Operation & Maintenance Manual, while this document concentrates on shop-type service, adjustment, diagnosis, and repair.
File Details
- Manual type: Service Manual
- Brand / model: Bobcat S550 Skid-Steer Loader
- Document number: 6990677enUS
- Date: 07-19 (July 2019)
- Serial coverage: S/N AHGM11001 & Above; S/N B3GY11001 & Above
- Language: English
- Pages: 1310
- File format: PDF
Service Depth and Machine Coverage
The manual identifies the S550 with a Bobcat direct-injected D24NAP turbocharged and intercooled diesel engine. The engine service material covers specifications and mechanical service as well as fuel, cooling, lubrication, intake and related systems. The loader specifications section identifies the machine as using a 2.4 L Bobcat Engine Tier 4 configuration, while the service chapters provide the detailed procedures needed to inspect, test and repair the systems around it.
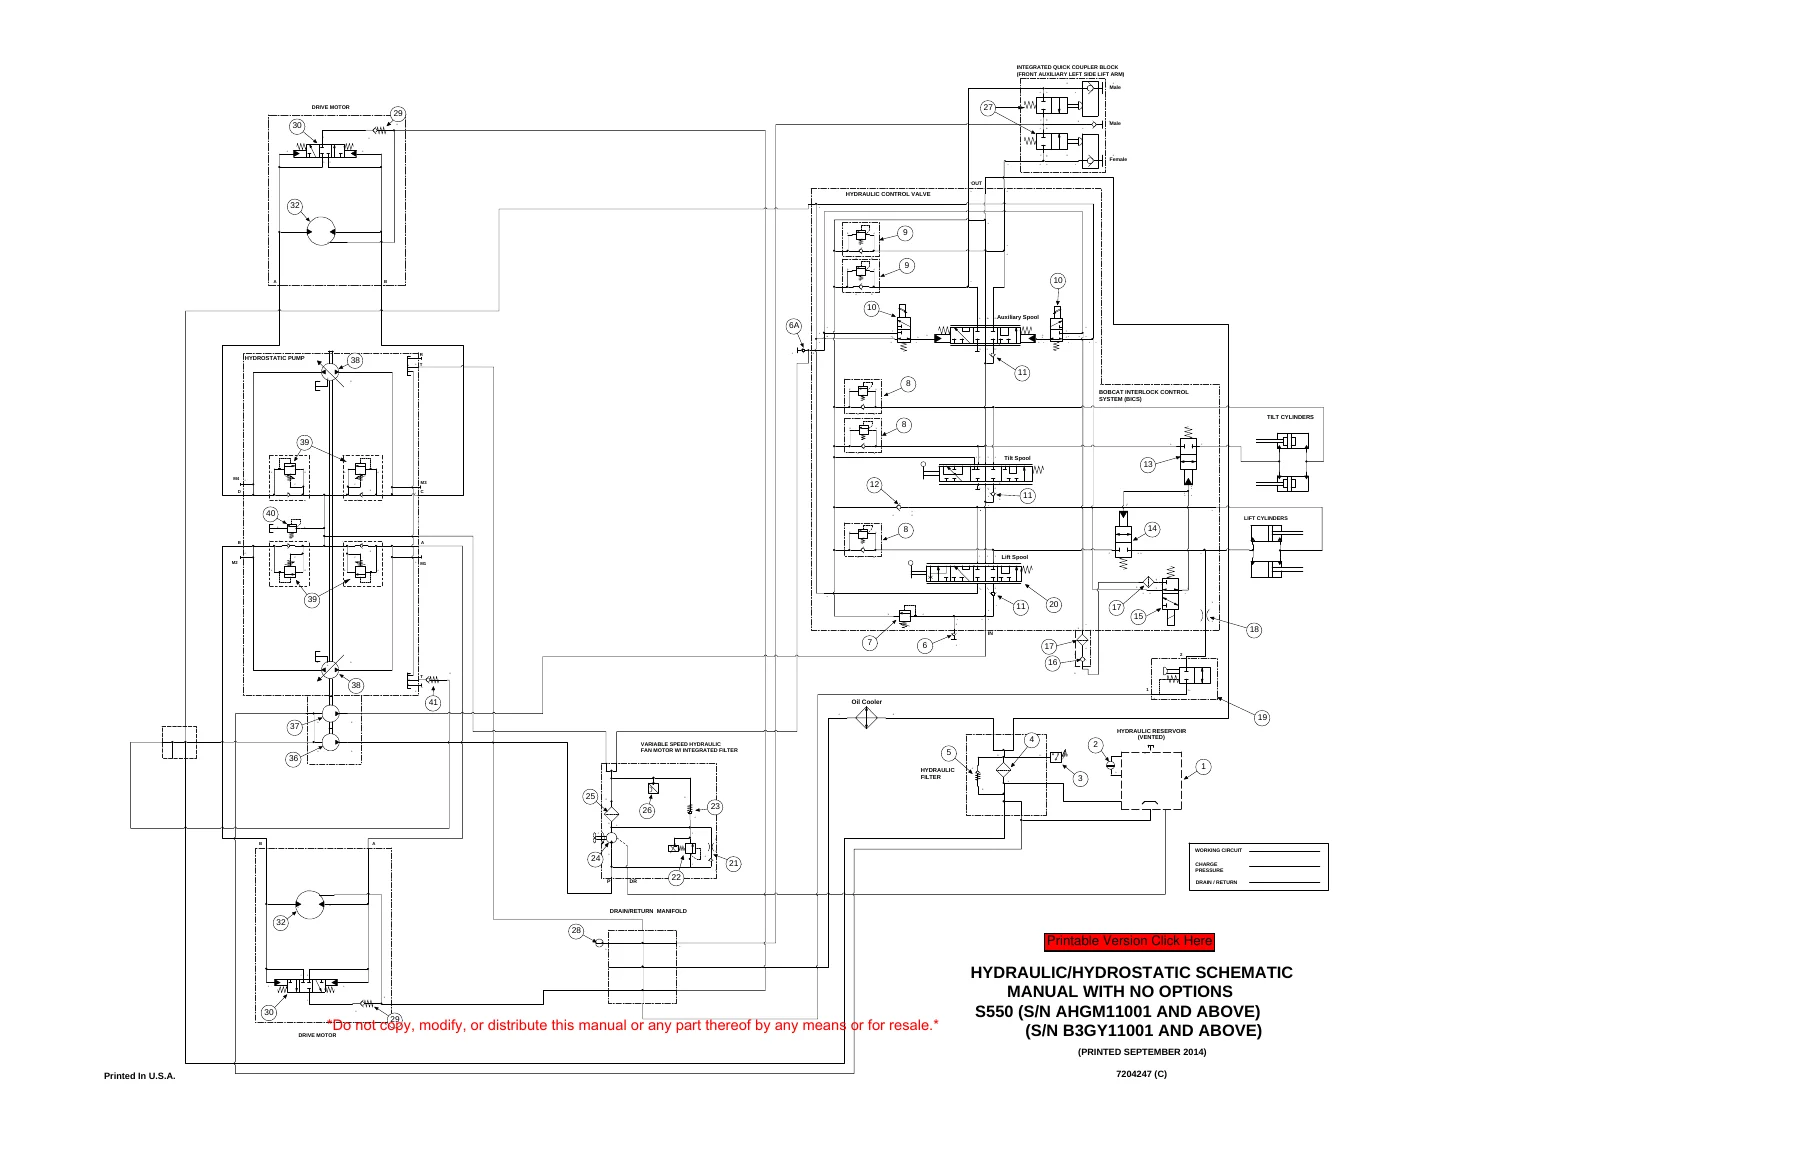
Hydraulic and hydrostatic coverage is a major part of this Bobcat S550 repair manual. The hydraulic section includes troubleshooting, lift and tilt cylinders, the Bob-Tach cylinder, relief valves, standard and ACS/SJC control valves, the lift arm bypass control valve, standard-flow and high-flow pumps, filters, reservoir, oil cooler, auxiliary circuits, Power Bob-Tach components and automatic ride control. The hydrostatic section addresses drive motors, two-speed versions, motor carriers, hydrostatic pumps, drive belt components, two-speed valve blocks and the drain manifold. Full schematic pages show the working, charge and drain circuits and distinguish manual and SJC configurations as well as option and serial-number variations.
Electrical work is supported by system information, fuse and relay identification, controller and instrument-panel coverage, service codes, charging and starting components, switches, sensors and electrical/hydraulic controls. The manual also includes diagnostic material that links service-code information to troubleshooting procedures. For mechanical repairs, the mainframe and drive chapters cover areas such as brakes, drive components, lift arms, Bob-Tach structures, panels, cab-related parts and other chassis assemblies, with removal and installation procedures distributed throughout the manual.
Chapters Covered
- Safety and Maintenance
- Lifting and blocking the loader; lift arm support device; operator cab
- Transporting and towing; remote start and service tool kits
- Service schedule and maintenance intervals
- Engine air cleaner, cooling, fuel and lubrication service
- Hydraulic / hydrostatic fluid and filters; final drive chaincase
- Bob-Tach inspection; lubrication; tires; pivot pins; storage and return to service
- Stopping procedure, emergency exit and seat belt inspection
- Hydraulic System
- Hydraulic / hydrostatic symbol glossary and troubleshooting
- Lift, tilt and Bob-Tach cylinders: testing, removal, parts, disassembly and assembly
- Main relief valve testing and adjustment
- Standard hydraulic control valve and ACS / SJC hydraulic control valve
- Lift arm bypass control valve
- Standard-flow and high-flow hydraulic pump testing and service
- Hydraulic / hydrostatic filters, reservoir and oil cooler
- Bucket position valve, rear auxiliary diverter valve and front auxiliary coupler block
- Power Bob-Tach blocks with serial-specific coverage; automatic ride control
- Hydrostatic System
- System description and troubleshooting
- Hydrostatic drive motors and two-speed drive motors
- Motor carriers and two-speed motor carriers
- Hydrostatic pumps, including SJC and serial-specific SJC pump coverage
- Drive belt, two-speed valve block and drain manifold
- Drive System
- Brake system and brake disc service
- Drive components and final-drive related service procedures
- Mainframe
- Loader structural and access components
- Lift arms, Bob-Tach related structures, cab and panel service procedures
- Electrical System
- Electrical system information and troubleshooting
- Fuse and relay location / identification and solenoid testing
- Instrument panels, lights, engine control unit and diagnostic service codes
- Electrical / hydraulic controls, including ACS and SJC configurations
- Starting, charging, switches, sensors, harnesses and control functions
- Engine Service
- D24NAP engine information and service specifications
- Cooling and lubrication systems
- Fuel system, high-pressure fuel components, injectors and injector coding
- Engine mechanical service and adjustment procedures
- Heating, Ventilation and Air Conditioning (HVAC)
- Air-conditioning system flow and performance checks
- Troubleshooting, refrigerant-system service and leak-related procedures
- Compressor, condenser, evaporator, blower and heater-related service
- Specifications
- S550 machine dimensions, performance and operating data
- Engine, drive, hydraulic and electrical specifications
- Fluid capacities, tires and technical service guide specifications
- Loader torque data, hydraulic connection specifications and service tools
- Alphabetical Index
Taken as a whole, the Bobcat S550 Skid-Steer Loader Service Manual 6990677enUS – July 2019 PDF gives a mechanic a structured path from symptom and system identification through testing, adjustment, component access, removal, repair and reassembly. It combines illustrated procedures with service data rather than treating the loader as a collection of isolated parts. Serial-specific notes are important because the manual shows changes within the covered production range, including different hydraulic components and schematic arrangements for particular serial-number groups.
Diagnostics, Schematics and Service Specifications
For troubleshooting, the manual does more than provide component descriptions. Hydraulic charts address problems such as slow or uneven hydraulic action, lift-arm behavior and relief-pressure issues. Hydrostatic troubleshooting covers loss of drive, steering behavior, overheating and related causes. Electrical chapters connect fuse and relay layouts, service codes and component tests to the machine’s control systems. HVAC diagnosis includes system checks and troubleshooting for cooling performance and electrical operation.
The schematic material is especially valuable for pressure and flow diagnosis. Hydraulic / hydrostatic diagrams identify the reservoir, filters, relief and anti-cavitation valves, pumps, drive motors, BICS control functions, auxiliary circuits and option-dependent components. The diagrams include separate coverage for manual controls and SJC, and the manual distinguishes no-option and all-option arrangements where applicable. This makes the S550 skid-steer loader service manual useful when tracing a circuit before disconnecting lines or when comparing a machine’s serial number and equipment configuration with the correct schematic.
Complete PDF Bookmark Tree
Complete Bookmarks
The complete bookmarks in the “Bobcat S550 Skid-Steer Loader Service Manual 6990677enUS – July 2019 PDF” are as follows:
MAINTENANCE SAFETYp. 3
CONTENTSp. 5
+FOREWORDp. 7
FOREWORDp. 9
SAFETY INSTRUCTIONSp. 11
+FIRE PREVENTIONp. 13
Maintenancep. 13
Operationp. 13
Electricalp. 13
Hydraulic Systemp. 13
Fuelingp. 13
Startingp. 13
Spark Arrester Exhaust Systemp. 13
Welding And Grindingp. 14
Fire Extinguishersp. 14
+SERIAL NUMBER LOCATIONSp. 15
Loader Serial Numberp. 15
Engine Serial Numberp. 15
DELIVERY REPORTp. 16
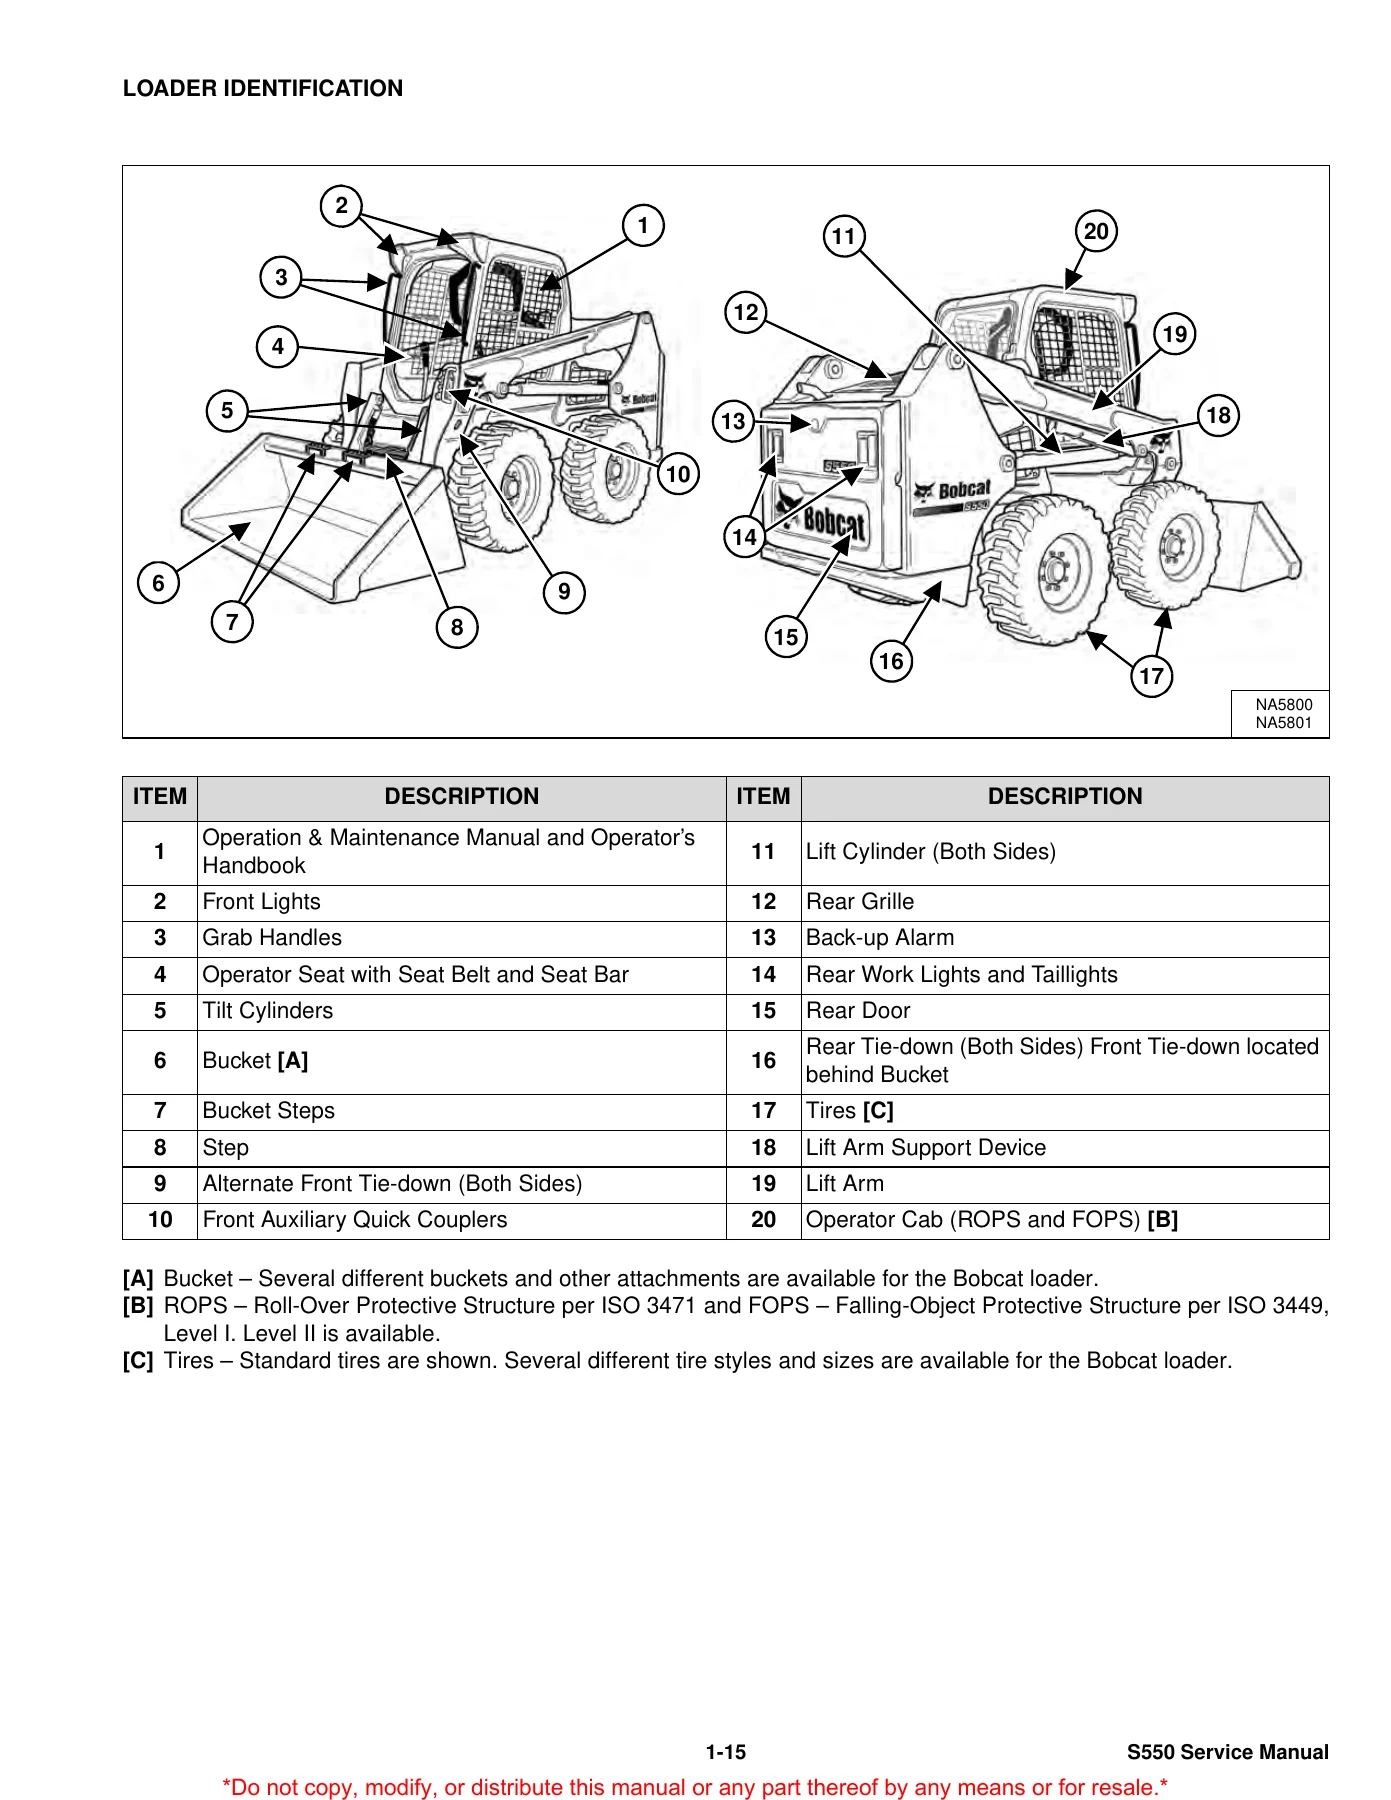
LOADER IDENTIFICATIONp. 17
+SAFETY AND MAINTENANCEp. 19
+LIFTING AND BLOCKING THE LOADERp. 23
+LIFT ARM SUPPORT DEVICEp. 25
Descriptionp. 25
Installingp. 26
Removingp. 27
+OPERATOR CABp. 29
Descriptionp. 29
Cab Door Sensorp. 29
Raisingp. 30
Loweringp. 31
Special Applications Kitp. 32
Special Applications Kit Inspection And Maintenancep. 32
Forestry Door And Window Kitp. 33
Forestry Door And Window Kit Inspection And Maintenancep. 33
+TRANSPORTING THE LOADER ON A TRAILERp. 35
Loading And Unloadingp. 35
Fasteningp. 35
+TOWING THE LOADERp. 37
+REMOTE START TOOL KIT – MEL1563p. 39
Remote Start Tool – MEL1563p. 39
Service Tool Harness Communicator – MEL1566p. 41
Remote Start Procedurep. 41
+REMOTE START TOOL (SERVICE TOOL) KIT – 7217666p. 45
Descriptionp. 45
Remote Start Tool (Service Tool) – 7022042p. 46
Loader Service Tool Harness – 6689747p. 47
Computer Service Tool Harness – 6689746p. 48
Remote Start Procedurep. 49
+SERVICE SCHEDULEp. 53
Maintenance Intervalsp. 53
+ENGINE AIR CLEANERp. 55
+ENGINE COOLING SYSTEMp. 57
Maintenance Platformp. 57
Cleaningp. 57
Checking And Adding Coolantp. 60
Removing And Replacing Coolantp. 61
+FUEL SYSTEMp. 63
Fuel Specificationsp. 63
Biodiesel Blend Fuelp. 63
Filling The Fuel Tankp. 64
Fuel Filterp. 65
Removing Air From The Fuel Systemp. 67
+ENGINE LUBRICATION SYSTEMp. 69
Checking And Adding Engine Oilp. 69
Engine Oil Chartp. 69
Removing And Replacing Oil And Filterp. 70
+HYDRAULIC / HYDROSTATIC SYSTEMp. 73
Checking And Adding Fluidp. 73
Hydraulic / Hydrostatic Fluid Chartp. 73
Removing And Replacing Hydraulic Fluidp. 74
Removing And Replacing Hydraulic / Hydrostatic Filterp. 76
Removing And Replacing Hydraulic Charge Filterp. 77
Replacing Reservoir Breather Capp. 79
+FINAL DRIVE TRANSMISSION (CHAINCASE)p. 81
Checking And Adding Fluidp. 81
Removing And Replacing Fluidp. 81
+BOB-TACH (HAND LEVER)p. 83
Inspection And Maintenancep. 83
+BOB-TACH (POWER)p. 85
Inspection And Maintenancep. 85
+LUBRICATING THE LOADERp. 87
Lubrication Locationsp. 87
+TIRE MAINTENANCEp. 91
Wheel Nutsp. 91
Rotatingp. 91
Mountingp. 92
+PIVOT PINSp. 93
Inspection And Maintenancep. 93
+LOADER STORAGE AND RETURN TO SERVICEp. 95
Storagep. 95
Return To Servicep. 95
+STOPPING THE ENGINE AND LEAVING THE LOADERp. 97
+EMERGENCY EXITp. 99
Rear Window Identificationp. 99
Rear Window Removal (Latches)p. 99
Rear Window Removal (Rubber Cord)p. 99
External Access (Rear Window With Latches)p. 100
External Access (Rear Window With Rubber Cord)p. 100
Front Doorp. 100
+SEAT BELTp. 103
Inspection And Maintenancep. 103
+HYDRAULIC SYSTEMp. 105
HYDRAULIC / HYDROSTATIC SCHEMATICSp. 111
+HYDRAULIC SYSTEM INFORMATIONp. 127
Glossary Of Hydraulic / Hydrostatic Symbolsp. 127
Troubleshootingp. 131
+CYLINDER (LIFT)p. 133
Testingp. 133
Removal And Installationp. 134
Parts Identificationp. 137
Disassemblyp. 138
Assemblyp. 140
+CYLINDER (TILT)p. 143
Testingp. 143
Removal And Installationp. 144
Base End Pivot Pin Removal And Installationp. 145
Parts Identificationp. 146
Disassemblyp. 147
Assemblyp. 149
+CYLINDER (LIFT) (B3GY11244 & ABOVE)p. 153
Testingp. 153
Removal And Installationp. 154
Parts Identificationp. 157
Disassemblyp. 158
Assemblyp. 160
+CYLINDER (TILT) (B3GY11244 & ABOVE)p. 165
Testingp. 165
Removal And Installationp. 166
Base End Pivot Pin Removal And Installationp. 167
Parts Identificationp. 168
Disassemblyp. 169
Assemblyp. 171
+CYLINDER (BOB-TACH)p. 175
Testingp. 175
Removal And Installationp. 176
Parts Identificationp. 177
Disassemblyp. 178
Assemblyp. 179
+MAIN RELIEF VALVEp. 183
Descriptionp. 183
Testingp. 184
Adjustingp. 186
Removal And Installationp. 187
+HYDRAULIC CONTROL VALVE (STANDARD)p. 189
Descriptionp. 189
Removal And Installationp. 190
Mount Bracket Removal And Installationp. 193
Identification Chartp. 194
Lift Load Check Valve Removal And Installationp. 195
Load Check Valve Removal And Installation (Tilt And Auxiliary)p. 196
Anti-Cavitation Valve Removal And Installation (Lift, Rod End)p. 197
Port Relief / Anti-Cavitation Valve Removal And Installation (Lift, Base End)p. 197
Port Relief / Anti-Cavitation Valve Removal And Installation (Tilt, Base End)p. 198
Port Relief / Anti-Cavitation Valve Removal And Installation (Tilt, Rod End)p. 198
Port Relief Valve Removal And Installationp. 199
Plug Removal And Installationp. 201
Rubber Boot Removal And Installationp. 202
End Cap Block Removal And Installationp. 202
Lift Spool And Detent Removal And Installationp. 203
Tilt Spool Removal And Installationp. 211
Auxiliary Spool Removal And Installationp. 213
Auxiliary Solenoid Removal And Installationp. 214
Solenoid Removal And Installationp. 215
Lock Valve Removal And Installationp. 216
Lift Arm Bypass Orifice Removal And Installationp. 218
Main Relief Valve Removal And Installationp. 218
Check Valve Removal And Installationp. 219
+HYDRAULIC CONTROL VALVE (ACS) OR (SJC)p. 221
Descriptionp. 221
Removal And Installationp. 221
Actuator Removal And Installation (In Loader)p. 225
Actuator Removal And Installation (Out Of Loader)p. 226
Identification Chartp. 229
Mount Bracket Removal And Installationp. 230
Lift Load Check Valve Removal And Installationp. 230
Load Check Valve Removal And Installation (Tilt And Auxiliary)p. 231
Anti-Cavitation Valve Removal And Installation (Lift, Rod End)p. 232
Port Relief / Anti-Cavitation Valve Removal And Installation (Lift, Base End)p. 232
Port Relief / Anti-Cavitation Valve Removal And Installation (Tilt, Base End)p. 233
Port Relief / Anti-Cavitation Valve Removal And Installation (Tilt, Rod End)p. 233
Port Relief Valve Removal And Installationp. 234
Plug Removal And Installationp. 236
End Cap Block Removal And Installationp. 237
Lift Spool Removal And Installationp. 237
Lift Spool Disassembly And Assemblyp. 239
Tilt Spool Removal And Installationp. 240
Auxiliary Spool Removal And Installationp. 242
Auxiliary Solenoid Removal And Installationp. 243
Solenoid Removal And Installationp. 244
Lock Valve Removal And Installationp. 245
Lift Arm Bypass Orifice Removal And Installationp. 247
Main Relief Valve Removal And Installationp. 247
Check Valve Removal And Installationp. 248
+LIFT ARM BYPASS CONTROL VALVEp. 249
Descriptionp. 249
Testingp. 249
Removal And Installationp. 250
Bracket Removal And Installationp. 251
Disassembly And Assemblyp. 251
+HYDRAULIC PUMPp. 253
Descriptionp. 253
Pump Test At Quick Couplersp. 254
Direct Pump Test (Standard Section)p. 256
Direct Pump Test (Charge Section)p. 258
Removal And Installationp. 260
Hydraulic Pump Startupp. 262
Parts Identificationp. 263
Disassembly And Assemblyp. 264
+HYDRAULIC PUMP (HIGH FLOW)p. 265
Descriptionp. 265
Pump Test At Quick Couplersp. 266
Direct Pump Test (Standard Section)p. 268
Direct Pump Test (Charge Section)p. 270
Direct Pump Test (High Flow Section)p. 272
High Flow Relief Valve Adjustmentp. 274
High Flow Relief Valve Removal And Installationp. 276
Solenoid Removal And Installationp. 277
Removal And Installationp. 278
Hydraulic Pump Startupp. 280
Parts Identificationp. 281
Disassembly And Assemblyp. 282
+HYDRAULIC / HYDROSTATIC FILTERSp. 283
Descriptionp. 283
Housing Removal And Installationp. 283
+HYDRAULIC FLUID RESERVOIRp. 285
Descriptionp. 285
Removal And Installationp. 285
Hydraulic Fluid Screenp. 286
+OIL COOLERp. 287
Removal And Installationp. 287
+BUCKET POSITION VALVEp. 289
Descriptionp. 289
Solenoid Removal And Installationp. 290
Solenoid Testingp. 292
Removal And Installationp. 292
Disassembly And Assemblyp. 294
+REAR AUXILIARY DIVERTER VALVEp. 295
Descriptionp. 295
Solenoid Testingp. 295
Removal And Installationp. 296
Disassembly And Assemblyp. 297
+BOB-TACH (POWER) BLOCK (S/N AHGM11001 – AHGM11756)p. 303
Descriptionp. 303
Removal And Installationp. 303
Disassembly And Assemblyp. 305
+BOB-TACH (POWER) BLOCK (S/N AHGM11757 & ABOVE)p. 313
Descriptionp. 313
Testing Relief Valvep. 314
Removal And Installationp. 316
Disassembly And Assemblyp. 318
+FRONT AUXILIARY HYDRAULIC COUPLER BLOCKp. 323
Descriptionp. 323
Removal And Installationp. 324
Disassembly And Assembly (FFI/FI)p. 324
Disassembly And Assembly (FFH/FH)p. 326
+AUTOMATIC RIDE CONTROLp. 329
Descriptionp. 329
Removal And Installationp. 330
Checking The Pressure In The Accumulatorp. 333
Adding Nitrogen To The Accumulatorp. 335
+HYDROSTATIC SYSTEMp. 337
+HYDROSTATIC SYSTEM INFORMATIONp. 339
Descriptionp. 339
Troubleshootingp. 340
+HYDROSTATIC DRIVE MOTORp. 341
Descriptionp. 341
Removal And Installationp. 341
Parts Identificationp. 344
Disassembly And Assemblyp. 345
+HYDROSTATIC DRIVE MOTOR (TWO-SPEED)p. 349
Descriptionp. 349
Removal And Installation (Left Side)p. 350
Removal And Installation (Right Side)p. 353
Parts Identificationp. 356
Disassemblyp. 357
Assemblyp. 369
+HYDROSTATIC MOTOR CARRIERp. 383
Descriptionp. 383
Shaft Seal Removal And Installationp. 384
Removal And Installationp. 386
Parts Identificationp. 388
Disassemblyp. 389
Assemblyp. 391
+HYDROSTATIC MOTOR CARRIER (TWO-SPEED)p. 395
Descriptionp. 395
Shaft Seal Removal And Installationp. 396
Removal And Installationp. 398
Parts Identificationp. 400
Disassemblyp. 401
Assemblyp. 403
+CHARGE PRESSUREp. 407
Descriptionp. 407
Testingp. 408
Adjustingp. 410
Sender Removal And Installation (Earlier Models)p. 412
Sender Removal And Installation (Later Models)p. 412
+HYDROSTATIC PUMPp. 413
Descriptionp. 413
Removal And Installationp. 414
Hydrostatic Pump Startupp. 415
Replenishing / High Pressure Relief Valve Removal And Installationp. 416
Parts Identification (Left Half)p. 417
Parts Identification (Right Half)p. 418
Disassemblyp. 419
Assemblyp. 426
+HYDROSTATIC PUMP (SJC)p. 433
Descriptionp. 433
Hydraulic Controller Removal And Installationp. 434
Removal And Installationp. 436
Hydrostatic Pump Startupp. 438
Parts Identificationp. 439
High Pressure Relief And Bypass Valvep. 440
Charge Relief Valvep. 441
Disassembly And Assemblyp. 442
Mechanical Neutral Adjustmentp. 455
Hydraulic Controller Neutral Adjustmentp. 459
+HYDROSTATIC PUMP (SJC) (S/N AHGM18001 & ABOVE)p. 463
Descriptionp. 463
Port Locations And Gauge Installationp. 464
Removal And Installationp. 465
Hydrostatic Pump Startupp. 467
Parts Identificationp. 468
High Pressure Relief And Bypass Valvep. 471
Charge Pressure Relief Valvep. 472
Disassembly And Assemblyp. 473
Mechanical Neutral Adjustmentp. 485
Hydraulic Controller Neutral Adjustmentp. 487
+DRIVE BELTp. 489
Belt Adjustmentp. 489
Stop Adjustmentp. 489
Belt Replacementp. 490
Tensioner Removal And Installation (Earlier Models)p. 492
Tensioner Disassembly And Assemblyp. 492
Tensioner Pulley Removal And Installation (Later Models)p. 493
Tensioner Pulley Disassembly And Assemblyp. 493
+TWO-SPEEDp. 495
Valve Block Removal And Installationp. 495
Valve Block Disassembly And Assemblyp. 496
+DRAIN MANIFOLDp. 497
Descriptionp. 497
Drain Manifold Removal And Installationp. 497
+DRIVE SYSTEMp. 499
+BRAKEp. 501
Descriptionp. 501
Disc Removal And Installationp. 501
+DRIVE COMPONENTSp. 503
Descriptionp. 503
Axle Seal Removal And Installationp. 504
Axle, Sprocket And Bearings Removal And Installationp. 506
Chain Removal And Installationp. 511
+CHAINCASEp. 513
Descriptionp. 513
Front Cover Removal And Installationp. 513
Center Cover Removal And Installationp. 514
Rear Cover Removal And Installationp. 515
+MAINFRAMEp. 517
+SEAT BARp. 521
Descriptionp. 521
Removal And Installationp. 521
Disassembly And Assemblyp. 522
Compression Spring Disassembly And Assemblyp. 523
+OPERATOR CABp. 525
Gas Spring Removal And Installationp. 525
Gas Spring Bracket Disassembly And Assemblyp. 526
Removal And Installationp. 527
+OPERATOR SEATp. 529
Removal And Installationp. 529
Seat Belt Removal And Installation (Retractable)p. 529
Seat Belt And Bracket Removal And Installation (Standard)p. 530
Seat Belt Bracket Removal And Installationp. 530
+OPERATOR SEAT (SUSPENSION)p. 531
Removal And Installationp. 531
Slide Rail Removal And Installationp. 531
Seat Belt Removal And Installationp. 532
Lower Cushion Removalp. 532
Lower Cushion Installationp. 533
Back Cushion Removal And Installationp. 533
Shock Removal And Installationp. 534
3-Point Seat Belt Removal And Installationp. 534
+BOB-TACH (HAND LEVER)p. 537
Descriptionp. 537
Removal And Installationp. 538
Lever And Wedge Disassembly And Assemblyp. 540
Pivot Pin Bushing And Seal Removal And Installationp. 542
+BOB-TACH (POWER)p. 543
Descriptionp. 543
Removal And Installationp. 544
Lever And Wedge Disassembly And Assemblyp. 547
Pivot Pin Bushing And Seal Removal And Installationp. 549
+LIFT ARMSp. 551
Removal And Installationp. 551
+REAR GRILLEp. 553
Removingp. 553
Installingp. 553
Shield Removal And Installationp. 554
+REAR DOOR (TAILGATE)p. 555
Removal And Installationp. 555
Striker Removal And Installationp. 556
Striker Disassembly And Assemblyp. 556
Striker Adjustingp. 556
Latch Removal And Installationp. 557
+FUEL TANKp. 559
Removal And Installationp. 559
Fuel Level Sender Removal And Installationp. 561
Fuel Fill Screen Removal And Installationp. 561
+CONTROL PEDALS AND LINKAGESp. 563
Descriptionp. 563
Pedal Removal And Installationp. 563
Linkage Removal And Installationp. 564
Pedal (Adjusting)p. 565
Floor Pan Removal And Installationp. 566
+CONTROL PEDALS AND LINKAGES (ACS)p. 567
Descriptionp. 567
Pedal Removal And Installationp. 567
Linkage Removal And Installationp. 568
Pedal (Adjusting)p. 568
Floor Pan Removal And Installationp. 569
+CONTROL PANELp. 571
Descriptionp. 571
Removal And Installationp. 572
Disassembly And Assemblyp. 574
Linkage Removal And Installationp. 578
Pintle Arm Disassembly And Assemblyp. 581
Linkage Neutral (Adjusting)p. 582
Linkage Travel (Adjusting)p. 586
Shock Removal And Installationp. 590
+CONTROL PANEL (SJC)p. 591
Descriptionp. 591
Removal And Installationp. 591
+CONTROL HANDLE / LEVERp. 593
Descriptionp. 593
Lever Removal And Installationp. 593
Boot Removal And Installationp. 594
+CONTROL HANDLE / LEVER (ACS)p. 595
Descriptionp. 595
Handle Sensor Removal And Installationp. 595
Handle Removal And Installationp. 598
Handle Disassembly And Assemblyp. 599
Lever Removal And Installationp. 599
Boot Removal And Installationp. 600
+CONTROL HANDLE / LEVER (SJC)p. 601
Descriptionp. 601
Joystick Testingp. 601
Joystick Removal And Installationp. 602
+ACCESS PANEL (INSIDE)p. 603
Removal And Installation (Left)p. 603
Removal And Installation (Right)p. 603
+ACCESS PANEL (INSIDE) (SJC)p. 605
Removal And Installation (Left)p. 605
Removal And Installation (Right)p. 605
+WINDOW (REAR)p. 607
Rear Window Identificationp. 607
Rear Window Removal (Latches)p. 607
Rear Window Removal (Rubber Cord)p. 607
External Access (Rear Window With Latches)p. 608
External Access (Rear Window With Rubber Cord)p. 608
Disassembly And Assembly (Latches)p. 609
+WINDOW (TOP)p. 611
Removal And Installationp. 611
+WINDOW (SIDE)p. 613
Removal And Installationp. 613
+CAB DOORp. 615
Descriptionp. 615
Removal And Installationp. 615
Disassembly And Assemblyp. 616
Aligningp. 617
Adjustingp. 618
Checking Operationp. 618
+ARMRESTp. 619
Descriptionp. 619
Removal And Installationp. 620
Disassembly And Assemblyp. 621
+LEFT SIDE LOWER PANELp. 623
Removal And Installationp. 623
Disassembly And Assemblyp. 625
+RIGHT SIDE LOWER PANELp. 627
Removal And Installationp. 627
Disassembly And Assemblyp. 629
+HEADLINERp. 631
Removal And Installationp. 631
+FAN DUCT PANELSp. 633
Removal And Installationp. 633
+ELECTRICAL SYSTEMp. 635
ELECTRICAL SCHEMATICSp. 641
+ELECTRICAL SYSTEM INFORMATIONp. 883
Glossary Of Electrical Symbolsp. 883
Standard Cab Harness Connectorsp. 886
Deluxe Cab Harness Connectorsp. 887
Mainframe Harness Connectors – Manual Controlsp. 888
Mainframe Harness Connectors – SJCp. 889
Engine Harness Connectorsp. 890
Descriptionp. 891
Troubleshootingp. 892
Fuse And Relay Location / Identificationp. 893
Solenoid Testingp. 898
+BATTERYp. 899
Removal And Installationp. 899
Battery Maintenancep. 900
Maintaining Battery Charge Levelp. 900
Battery Service During Machine Storagep. 900
Battery Testingp. 901
Battery Chargingp. 901
Using A Booster Battery (Jump Starting)p. 902
+ALTERNATORp. 903
Belt Adjustmentp. 903
Belt Replacementp. 904
Charging System Inspectionp. 905
Alternator Voltage Testingp. 906
Low Voltage Testingp. 906
High Voltage Testingp. 907
Removal And Installationp. 908
Parts Identificationp. 910
+STARTERp. 911
Testingp. 911
Removal And Installationp. 911
Parts Identificationp. 912
+INSTRUMENT PANELSp. 913
Left Panelp. 913
Display Screenp. 915
Right Panel (Standard Key Panel)p. 916
Right Panel (Keyless Start Panel)p. 917
Right Panel (Deluxe Instrumentation Panel)p. 918
Left Switch Panelp. 920
Right Switch Panelp. 920
Left Side Lower Panelp. 921
Right Side Lower Panelp. 921
Left Panel Removal And Installationp. 922
Right Panel (Standard Key Panel) Removal And Installationp. 922
Right Panel (Keyless Start Panel) Removal And Installationp. 923
Right Panel (Deluxe Instrumentation Panel) Removal And Installationp. 923
Key Switch Disassembly And Assemblyp. 924
Alarm Disassembly And Assemblyp. 924
Left Switch Panel Removal And Installationp. 925
Right Switch Panel Removal And Installationp. 925
+LIGHTSp. 927
Front Removal And Installationp. 927
Rear Removal And Installationp. 928
Cab Light Removal And Installation (Earlier Models)p. 928
Cab Light Removal And Installation (Later Models)p. 929
+BOBCAT CONTROLLERS (GATEWAY AND AUXILIARY)p. 931
Descriptionp. 931
Connector Identificationp. 932
Removal And Installationp. 938
+BOBCAT CONTROLLER (ACS)p. 939
Descriptionp. 939
Connector And Wire Identificationp. 940
Removal And Installationp. 941
+BOBCAT CONTROLLER (SJC) (DRIVE)p. 943
Descriptionp. 943
Connector Identificationp. 944
Removal And Installationp. 946
+ENGINE CONTROL UNIT (ECU)p. 947
Descriptionp. 947
Cleaningp. 948
Removal And Installationp. 949
+DIAGNOSTIC SERVICE CODESp. 951
Viewing Service Codesp. 951
Service Codes Listp. 952
+BOBCAT INTERLOCK CONTROL SYSTEM (BICS™)p. 961
Descriptionp. 961
Inspecting The BICS™ (Engine STOPPED – Key ON)p. 962
Inspecting Deactivation Of The Auxiliary Hydraulics System (Engine STOPPED – Key ON)p. 962
Inspecting The Seat Bar Sensor (Engine RUNNING)p. 962
Inspecting The Traction Lock And The Parking Brake (Engine RUNNING)p. 962
Inspecting The Lift Arm Bypass Controlp. 962
Inspecting Deactivation Of Lift And Tilt Functions (ACS And SJC)p. 962
Troubleshootingp. 963
+SEAT BAR SENSORp. 965
Descriptionp. 965
Troubleshootingp. 965
Testingp. 966
Removalp. 967
Installationp. 969
Bobcat Interlock Control System (BICS™) Circuit Testp. 970
+TRACTION LOCKp. 973
Descriptionp. 973
Troubleshootingp. 974
Inspectingp. 975
+CONTROL SYSTEM (ACS)p. 977
Descriptionp. 977
Troubleshootingp. 978
Handle Sensor Connector Disassembly And Assemblyp. 979
Switch Handle Removalp. 980
Switch Handle Installationp. 982
Actuator Connector Disassembly And Assemblyp. 985
Handle Lock Solenoid Removal And Installationp. 986
Handle Lock Solenoid Disassembly And Assemblyp. 986
Foot Sensor Removal And Installationp. 987
Foot Sensor Disassembly And Assemblyp. 988
Foot Sensor Lock Solenoid Removal And Installationp. 988
+ELECTRICAL / HYDRAULIC CONTROLSp. 989
Identification Chartp. 989
Descriptionp. 990
Identification Chart ACD Group 0p. 991
Identification Chart ACD Group 1p. 992
Identification Chart ACD Group 2p. 993
Identification Chart ACD Group 3p. 994
+ELECTRICAL / HYDRAULIC CONTROLS (ACS)p. 995
Identification Chartp. 995
Descriptionp. 996
Identification Chart ACD Group 0p. 997
Identification Chart ACD Group 1p. 998
Identification Chart ACD Group 2p. 999
Identification Chart ACD Group 3p. 1000
+ELECTRICAL / HYDRAULIC CONTROLS (SJC)p. 1001
Identification Chartp. 1001
Descriptionp. 1002
Identification Chart ACD Group 0p. 1003
Identification Chart ACD Group 1p. 1004
Identification Chart ACD Group 2p. 1005
Identification Chart ACD Group 3p. 1006
+SERVICE PC (LAPTOP COMPUTER)p. 1007
Connecting Remote Start Toolp. 1007
Connecting Remote Start Tool (Service Tool)p. 1007
+CALIBRATIONp. 1009
Descriptionp. 1009
Actuator Testingp. 1009
Lift And Tilt Calibration (SJC)p. 1012
Hydrostatic Pump Calibration (SJC)p. 1014
Lift And Tilt Calibration (ACS)p. 1019
+STEERING DRIFT COMPENSATION (OPERATOR MODE)p. 1021
Descriptionp. 1021
Operationp. 1021
+STEERING DRIFT COMPENSATION (SERVICE MODE)p. 1023
Descriptionp. 1023
Operationp. 1023
+CONTROL PANEL SETUPp. 1025
Right Panel Setup (Deluxe Instrumentation Panel)p. 1025
+PASSWORD SETUP (DELUXE INSTRUMENTATION PANEL)p. 1029
Password Descriptionp. 1029
Changing The Owner Passwordp. 1029
Changing The User Passwordsp. 1030
Password Lockout Featurep. 1030
+PASSWORD SETUP (KEYLESS START PANEL)p. 1031
Password Descriptionp. 1031
Changing The Owner Passwordp. 1031
Password Lockout Featurep. 1031
+MAINTENANCE CLOCKp. 1033
Descriptionp. 1033
Setupp. 1034
Resetp. 1037
+BACK-UP ALARM SYSTEMp. 1039
Descriptionp. 1039
Inspectingp. 1039
Adjusting Switch Positionp. 1040
Troubleshooting (Standard And ACS)p. 1041
Troubleshooting (Joystick)p. 1042
Alarm Removal And Installationp. 1043
Switch Removal And Installationp. 1043
+FRONT HORNp. 1045
Removal And Installationp. 1045
Troubleshootingp. 1046
Troubleshooting (Joystick)p. 1047
+ENGINE SPEED CONTROL (HAND)p. 1049
Removal And Installationp. 1049
+ENGINE SPEED CONTROL (FOOT)p. 1051
Removal And Installationp. 1051
Disassembly And Assemblyp. 1052
Foot Throttle Calibrationp. 1054
+CAMSHAFT AND CRANKSHAFT POSITION SENSORp. 1057
Removal And Installationp. 1057
+TELEMATICSp. 1059
Descriptionp. 1059
Removal And Installationp. 1059
Procedurep. 1060
+ENGINE SERVICEp. 1061
+ENGINE INFORMATIONp. 1065
Descriptionp. 1065
Specificationsp. 1066
Sensor Locationp. 1068
Torque Valuesp. 1074
Troubleshootingp. 1076
Engine Removal And Installationp. 1078
Engine Mount Replacementp. 1087
Compression – Testingp. 1089
Injector Signal – Testingp. 1091
Injector Signal – Testing (In-Line)p. 1093
Oil Pressure Testing (At Oil Sensor On Block)p. 1095
Oil Pressure Testing (At Turbocharger Oil Inlet)p. 1097
+DIESEL OXIDATION CATALYST (DOC)p. 1099
Removal And Installationp. 1099
+AIR CLEANERp. 1101
Housing Removal And Installationp. 1101
+ENGINE COOLING SYSTEM (EARLIER MODELS)p. 1103
Radiator / Oil Cooler Removal And Installationp. 1103
Hydraulic Fan Descriptionp. 1106
Fan Duct Removal And Installationp. 1106
Hydraulic Fan Motor Assembly Removal And Installationp. 1107
Hydraulic Fan Motor Removal And Installationp. 1108
Hydraulic Fan Motor Disassembly And Assemblyp. 1110
Blower Housing Removal And Installationp. 1111
Water Pump Removal And Installationp. 1112
Thermostat Housing Removal And Installationp. 1113
Testing The Thermostatp. 1114
+ENGINE COOLING SYSTEM (LATER MODELS)p. 1115
Radiator / Oil Cooler Removal And Installationp. 1115
Hydraulic Fan Descriptionp. 1118
Reversible Hydraulic Fan Descriptionp. 1118
Fan Duct Removal And Installationp. 1118
Hydraulic Fan Motor Assembly Removal And Installationp. 1119
Hydraulic Fan Motor Removal And Installationp. 1120
Hydraulic Fan Motor Disassembly And Assemblyp. 1122
Hydraulic Fan Motor Assembly Removal And Installationp. 1130
Blower Housing Removal And Installationp. 1130
Water Pump Removal And Installationp. 1131
Thermostat Housing Removal And Installationp. 1132
Testing The Thermostatp. 1133
+LUBRICATION SYSTEMp. 1135
Descriptionp. 1135
Oil Pan Removal And Installationp. 1136
Oil Pump Removal And Installationp. 1137
Oil Pump Relief Valve Descriptionp. 1138
Oil Pump Relief Valve Removal And Installationp. 1138
Oil Cooler Removal And Installationp. 1139
Oil Filter Head Removal And Installationp. 1140
Oil Cooler Bypass Descriptionp. 1141
Oil Cooler Bypass Removal And Installationp. 1141
+FUEL SYSTEMp. 1143
Descriptionp. 1143
Transfer Pump / High Pressure Pump Removal And Installationp. 1144
Fuel Temperature Sensor Removal And Installationp. 1146
Fuel Cooler Removal And Installationp. 1147
Fuel Bypass Valve Removal And Installationp. 1147
Fuel Recirculation Valve Removal And Installationp. 1148
Fuel Rail Assembly Removal And Installationp. 1149
Fuel Injector Removal And Installationp. 1150
Injector Codingp. 1152
Removing Air From The Fuel Systemp. 1154
+CYLINDER HEADp. 1157
Glow Plugs Testingp. 1157
Glow Plug Removal And Installationp. 1158
Valve Clearance Adjustmentp. 1159
Cylinder Head Removal And Installationp. 1161
Cylinder Head Disassembly And Assemblyp. 1165
Cylinder Head Inspectionp. 1166
Cylinder Head Top Clearancep. 1167
Valve Step Heightp. 1168
Valve Stem Heightp. 1168
Valve Guidep. 1169
Valvep. 1169
Valve Springp. 1170
Rocker Arm Shaft Disassembly And Assemblyp. 1171
Rocker Arm Shaft Inspectionp. 1172
Push Rod Inspectionp. 1172
+CRANKSHAFT AND PISTONSp. 1173
Piston And Connecting Rod Removal And Installationp. 1173
Piston And Connecting Rod Inspectionp. 1174
Crankshaft Removal And Installationp. 1176
Cylinder Block Inspectionp. 1179
Crankshaft Inspectionp. 1181
Connecting Rod Inspectionp. 1181
Engine Component Classp. 1182
+CAMSHAFTp. 1185
Removal And Installationp. 1185
Inspectingp. 1186
+GEARCASEp. 1189
Gearcase Cover Removal And Installationp. 1189
Gear Backlashp. 1190
Gear Timingp. 1191
Idle Gear Removal And Installationp. 1192
Idle Gear Inspectionp. 1192
+TURBOCHARGERp. 1193
Descriptionp. 1193
Removal And Installationp. 1193
Inspectionp. 1196
+FLYWHEEL AND HOUSINGp. 1197
Flywheel Removal And Installationp. 1197
Ring Gear Removal And Installationp. 1198
Housing Removal And Installationp. 1198
+EXHAUST GAS RECIRCULATION (EGR) SYSTEMp. 1199
Descriptionp. 1199
Removal And Installationp. 1200
Disassembly And Assemblyp. 1204
+HEATING, VENTILATION AND AIR CONDITIONING (HVAC)p. 1207
+AIR CONDITIONING SYSTEM FLOWp. 1209
Descriptionp. 1209
Chartp. 1210
Componentsp. 1211
Safety Equipmentp. 1214
+REGULAR MAINTENANCEp. 1215
Filtersp. 1215
Belt Adjustmentp. 1216
Belt Replacementp. 1216
Air Conditioning Condenserp. 1216
Air Conditioning Lubricationp. 1216
Air Conditioning Service Chartp. 1217
Evaporator / Heater Coilp. 1218
+TROUBLESHOOTINGp. 1221
Blower Motor Does Not Operatep. 1221
Blower Motor Operates Normally, But Air Flow Is Insufficientp. 1221
Insufficient Cooling Although Air Flow And Compressor Operation Are Normalp. 1221
The Compressor Does Not Operate At All, Or Operates Improperlyp. 1221
Gauge Pressure Related Troubleshootingp. 1222
Troubleshooting Treep. 1224
Temperature / Pressure Chartp. 1228
Poor A/C Performancep. 1230
HVAC Repair And Leaksp. 1231
Electrical Systemp. 1232
Engine Coolant Bypassing The Heater Valvep. 1238
Heater Valve Not Opening Or Closingp. 1239
+SYSTEM CHARGING AND RECLAMATIONp. 1241
Refrigerant Identificationp. 1241
Reclamation And Charging With Recovery / Charging Unitp. 1242
+COMPRESSORp. 1245
Removal And Installationp. 1245
Oilp. 1246
Oil Checkp. 1247
+CONDENSERp. 1249
Removal And Installationp. 1249
+RECEIVER / DRIERp. 1251
Receiver / Drier Removal And Installationp. 1251
Pressure Switch Removal And Installationp. 1253
Schrader® Valve Removal And Installationp. 1254
+EVAPORATOR / HEATER UNITp. 1255
Removal And Installationp. 1255
+THERMOSTATp. 1257
Descriptionp. 1257
Removal And Installationp. 1258
+EXPANSION VALVEp. 1259
Removal And Installationp. 1259
+EVAPORATOR COILp. 1261
Removal And Installationp. 1261
+HEATER COILp. 1263
Removal And Installationp. 1263
+BLOWER FANp. 1265
Removal And Installationp. 1265
Disassembly And Assemblyp. 1265
+HEATER VALVEp. 1269
Removal And Installationp. 1269
+EVAPORATOR / HEATER COVERp. 1271
Removingp. 1271
Installingp. 1271
+SPECIFICATIONSp. 1273
+(S550) LOADER SPECIFICATIONSp. 1275
Machine Dimensionsp. 1275
Performancep. 1276
Enginep. 1276
Drive Systemp. 1277
Controlsp. 1277
Hydraulic Systemp. 1278
Electrical Systemp. 1279
Capacitiesp. 1279
Tiresp. 1280
+TECHINCAL SERVICE GUIDE SPECIFICATIONSp. 1281
Enginep. 1281
Engine Torquesp. 1281
Cooling Systemp. 1281
Loader Torquesp. 1282
Hydraulic / Hydrostatic Systemp. 1282
Fuel Consumptionp. 1282
+TORQUE SPECIFICATIONS FOR BOLTSp. 1283
Torque For General SAE Boltsp. 1283
Torque For General Metric Boltsp. 1284
+HYDRAULIC CONNECTION SPECIFICATIONSp. 1285
Straight Thread O-ring Fittingp. 1285
Flare Fittingp. 1286
Tubelines And Hosesp. 1286
+HYDRAULIC / HYDROSTATIC FLUID SPECIFICATIONSp. 1287
+CONVERSIONSp. 1289
Decimal And Millimeter Equivalent Chartp. 1289
U.S. To Metric Conversion Chartp. 1289
+SERVICE TOOLS REQUIREDp. 1291
Remote Start Toolsp. 1291
Hydraulic Toolsp. 1292
Mainframe And Drive Toolsp. 1295
Electrical Toolsp. 1298
Engine Toolsp. 1299
HVAC Toolsp. 1304
ALPHABETICAL INDEXp. 1305
The specification chapters collect values that are needed during service rather than leaving them scattered through procedures. They include engine data, machine performance, hydraulic pump capacities and pressures, electrical-system information, fluid capacities, tire information and torque specifications. Individual repair procedures also state tightening torques, test conditions, clearances and limits where required. Using the stated values is important when a repair depends on correct adjustment rather than simple parts replacement.
Maintenance and Repair Procedures
Routine and periodic service information is integrated with deeper repair content. The service schedule lays out work at 10-hour, 50-hour, 100-hour, 250-hour / 12-month, 500-hour / 12-month, 1000-hour / 12-month and 1500-hour / 24-month intervals. Procedures cover items such as engine oil and filters, cooling system service, fuel filter work, hydraulic fluid and filters, chaincase fluid, lubrication points, tire inspection and wheel-nut torque. The manual then continues into component-level procedures for cylinders, pumps, valves, drive components, electrical parts, engine systems and HVAC assemblies.
Illustrations and photographs are used throughout to identify service locations, fasteners, connectors, hose routing, tools and component orientation. Parts-identification views support disassembly and assembly, while machine diagrams help locate major assemblies before work begins. Safety instructions are integrated into procedures involving raised lift arms, pressurized hydraulic or fuel systems, electrical work, hot cooling systems and other service hazards.
Get the S550 Service Information You Need
The Bobcat S550 Skid-Steer Loader Service Manual 6990677enUS – July 2019 PDF is suited to technicians and experienced owners carrying out diagnosis, adjustment, scheduled service and component repair on covered S550 loaders. It can support jobs ranging from fluid and filter service to hydraulic pressure testing, hydrostatic drive diagnosis, electrical fault tracing, engine fuel-system work, HVAC troubleshooting, cylinder service and major component removal and installation. Following the correct procedure, serial-number applicability, torque value, pressure specification or service limit helps reduce guesswork and makes it easier to return the machine to proper working condition after repair. Delivery is instant as a PDF after payment, with no shipping required. Open it on a compatible phone, tablet or computer, and print the pages you need for workshop use.





Reviews
There are no reviews yet.