★ TRUSTED BY 321,897+ PROFESSIONALS WORLDWIDE
🏢
Trusted Business
Verified & Licensed
🛡️
Virus Free Files
100% Safe Downloads
🔒
Secure Payment
SSL Protected
Instant Delivery
Available Immediately
Sale!

Bomag BF300 P Road Finisher Service Manual 00891745

Original price was: $44.95.Current price is: $27.95.

Comprehensive factory workshop service manual for the Bomag BF300 P Road Finisher (S/N 821837681001 and S/N 821837811001). Covers complete mechanical overhaul, Kubota V 3307 T diesel engine maintenance, electronic ESX controller input codes, closed-loop hydraulics, S340 screed servicing, and full electrical wiring schematics.

Instant PDF Download
Available immediately
💾
Save to Your Device
Download & keep forever
🛡️
Antivirus Scanned
100% virus-free
🌍
Trusted Worldwide
175,000+ customers

Description

Complete Workshop Service & Repair Documentation for Bomag BF300 P Road Finisher

The Bomag BF300 P Road Finisher Service Manual 00891745 provides professional heavy equipment technicians, plant maintenance workshops, and paving field mechanics with an exhaustive, 756-page technical reference. Specifically compiled by BOMAG for wheeled asphalt pavers operating under serial numbers S/N 821 837 68 1001 …. and S/N 821 837 81 1001 …., this manual delivers complete factory-level procedures for machine dismantling, component rebuilding, hydraulic system calibration, electrical troubleshooting, and electronic controller teaching. From testing high-pressure Bosch-Rexroth hydrostatic travel circuits to re-pinning Deutsch electrical connectors and teaching the electronic throttle via dashboard service codes, every mechanical and automated subsystem of the Bomag BF300 P is thoroughly documented.

File Details

  • Manual Type: Factory Service Manual
  • Machine Brand: BOMAG (Fayat Group)
  • Model Coverage: BF 300 P / BF 300_P Road Finisher (equipped with S340 screed variants including S340 VE and S340 TVE)
  • Serial Number Compatibility: S/N 821 837 68 1001 …. and S/N 821 837 81 1001 ….
  • Engine Covered: Kubota V 3307 T 4-cylinder water-cooled turbocharged diesel engine
  • Document / Catalogue Number: 008 917 45
  • Publication Edition: 08/2012
  • Language: English
  • Page Count: 756 pages
  • File Format: Portable Document Format (PDF)

Chapters Covered

  • 1 General – 1.1 Introduction; 1.2 Safety regulations; 1.3 General repair instructions; 1.4 Tightening torques
  • 2 Technical data – 2.1 Technical data (machine dimensions, weights, operating speeds, hydraulic pump and motor ratings, engine data, capacities)
  • 3 Maintenance – 3.1 General notes on maintenance; 3.2 Fuels and lubricants; 3.3 Running-in instructions
  • 4 E-Plan wiring diagrams – 4.1 Understanding wiring diagrams; 4.2 Circuit symbols in the circuit diagram; 4.3 Identification of switch blocks in the wiring diagram; 4.4 Designation of components in the wiring diagram; 4.5 Terminal designations in wiring diagram
  • 5 Electrics – 5.1 Designation of components; 5.2 Terminal designations; 5.3 Battery ground and analog ground; 5.4 Current and voltage; 5.5 Pulse Width Modulation (PWM); 5.6 Logical base gates; 5.7 Resistance; 5.8 Series/parallel connection; 5.9 Ohm’s law; 5.10 Electrical energy; 5.11 Formula diagram; 5.12 Metrology; 5.13 Diodes, relays, fuses; 5.14 Telemecanique switch; 5.15 Plug connectors; 5.16 Magnetic coil plug; 5.17 Deutsch plug, series DT and DTM; 5.18 Plugs and terminals in spring clamping technology; 5.19 Inductive proximity switches; 5.20 Batteries; 5.21 Battery service, check the main battery switch; 5.22 Starting with jump wires; 5.23 Generator; 5.24 Generator repair; 5.25 Electric starter; 5.26 Repair of starter; 5.27 Engine shut-down solenoid, Y58; 5.28 Camshaft sensor, B92; 5.29 ECOMODE; 5.30 Glow plugs, R81-R84; 5.31 Oil pressure switch (B06); 5.32 Coolant temperature switch (B53); 5.33 Air filter vacuum switch (B03); 5.34 Coolant float switch (B55); 5.35 Charge control light; 5.36 Glow plugs; 5.37 Water separator in fuel filter (B124); 5.38 Level sensor in diesel tank (R03); 5.39 Fuses; 5.40 Component overview; 5.41 Overview of wiring looms; 5.42 Control elements; 5.43 View of operator’s stand; 5.44 Monitoring modules; 5.45 View of outside control stand; 5.46 View of screed control; 5.47 View of electric heating control panel; 5.48 Functional block diagram overview of functions; 5.49 Block diagram components on CAN; 5.50 Block diagram CAN with control elements; 5.51 Block diagram of travel circuit; 5.52 Block diagram material feed; 5.53 Block diagram screed; 5.54 Block diagram screed levelling; 5.55 Block diagram screed heating; 5.56 Functional block diagram monitoring functions; 5.57 Functional block diagram Emergency Stop function; 5.58 Electronic control units; 5.59 Checking the voltage supply for the control unit; 5.60 Diagnostics concept
  • 6 Input codes – 6.1 Input codes – display: Functions and operation; 6.2 Teaching the E-throttle function; 6.3 Teaching the L.C.S. function; 6.4 Travel signal by button for max. screed relief; 6.5 Resetting to factory settings; 6.6 Showing stored faults; 6.7 Showing saved faults with operating hours; 6.8 Deleting the fault log; 6.9 Driving against the closed brake; 6.10 Adapting the engine speed; 6.11 Deactivating / activating the front drive; 6.12 Deactivating / activating the brake pedal switch
  • 7 Replacement of components – 7.1 How to proceed when replacing components (ESX controller, travel pump, E-throttle actuator)
  • 8 Engine – 8.1 Features; 8.2 Cooling system; 8.3 Removing and installing the thermostat; 8.4 Checking the thermostat in disassembled state; 8.5 Check the coolant level; 8.6 Check the anti-freeze concentration; 8.7 Change the coolant; 8.8 Checking radiator hoses and clamps; 8.9 Clean cooling fins; 8.10 Check engine oil level; 8.11 Change engine oil and filter; 8.12 Fuel system; 8.13 Replace fuel filter cartridge; 8.14 Check, clean water separator; 8.15 Replace fuel pre-filter, bleed fuel system; 8.16 Checking fuel lines; 8.17 Checking injection nozzles; 8.18 Check fuel injection timing; 8.19 Check fuel injection pump; 8.20 Checking and tensioning generator V-belt; 8.21 Service combustion air filter; 8.22 Check engine mounts; 8.23 Engine conservation; 8.24 Checking, adjusting valve clearance; 8.25 Engine problems & troubleshooting
  • 9 Material hopper, description – 9.1 Material hopper and transport (hopper wings, folding locks, material flow)
  • 10 Vibrating screed, description – 10.1 Screed (drawing arms, angle of attack, base plates, vibration units, tamper units)
  • 11 Screed heating, repair – 11.1 Removing the screed heating generator; 11.2 Installation of screed heating generator; 11.3 Replace heating elements (base plate and tamper bars)
  • 12 Travel drive, description – 12.1 Travel system
  • 13 Travel drive, repair – 13.1 Check tire pressure; 13.2 Oil level check in front wheel hubs; 13.3 Oil level check in rear differential; 13.4 Oil level check in rear reduction gear; 13.5 Tighten wheel nuts
  • 14 Cleaning kit, description – 14.1 Cleaning kit (Flowjet duplex diaphragm pump, spray lance)
  • 15 Hydraulics – 15.1 Hydraulic circuit; 15.2 Travel pump, A10VG45 EP; 15.3 Service pump, A10VO28; 15.4 Troubleshooting axial piston pumps; 15.5 Vibration and tamper pump, Haldex WP09; 15.6 Vibration and tamper motor, Sauer SNM2; 15.7 Component overview – hydraulics; 15.8 Travel circuit; 15.9 Vibration and tamper drive; 15.10 Scraper belt drive; 15.11 Auger drive; 15.12 Cylinder functions; 15.13 Checking hydraulic oil level; 15.14 Changing hydraulic oil and filter
  • 16 Tests and adjustments – 16.1 Special tools, tests and adjustments; 16.2 Checking and adjusting vibration; 16.3 Checking/adjusting tamping; 16.4 Checking/adjusting scraper belts; 16.5 Checking/adjusting augers; 16.6 Checking/adjusting main screed; 16.7 Checking/adjusting screed levelling; 16.8 Checking/adjusting hopper wings; 16.9 Checking/adjusting mobile screed
  • 17 Central lubrication system – 17.1 BF 300P lubrication plan; 17.2 Filling lubricant container; 17.3 Electric pump; 17.4 Integrated electronic control; 17.5 Progressive distributor; 17.6 Fault – Cause – Remedy; 17.7 Repair of a blocked distributor
  • 18 Suppliers documentation – 18.1 & 18.2 Travel pump; 18.3 Steering and working pump; 18.4 Travel motor; 18.5 & 18.6 Scraper belt / screw motor; 18.7 Steering valve
  • 19 Circuit diagrams – 19.1 Hydraulic diagram; 19.2 Electric circuit diagrams

By delivering the factory table of contents in full technical depth, this manual supplies field technicians and workshop specialists with an unbroken roadmap of all mechanical, fluid, and electronic systems. Rather than generic summaries, the Bomag BF300 P Road Finisher Service Manual equips service personnel with exact manufacturer tolerances, pressure relief settings, diagnostic test pinouts, and component overhaul instructions necessary to return the paver to original factory performance standards.

Complete PDF Bookmark Tree

Complete Bookmarks

The complete bookmarks in the “Bomag BF300 P Road Finisher Service Manual 00891745” are as follows:

BF 300_Pp. 1
BF 300_Pp. 1
BF 300_Pp. 1
S/N 821 837 68 1001 ….p. 1
S/N 821 837 81 1001 ….p. 1
Road Finisherp. 1
1 Generalp. 7
1 Generalp. 7
1.1 Introductionp. 8
This manual addresses the professionally qualified personnel or the after sales service of BOMAG, and should be of help and assistance in correct and efficient repair and maintenance work.p. 8
This manual describes the disassembly, dismantling, assembly, installation and repair of components and assemblies. The repair of components and assemblies is only described as this makes sense under due consideration of working means and spare parts…p. 8
Documentationp. 8
Documentationp. 8
For the BOMAG machines described in this manual the following documentation is additionally available:p. 8
1 Operating and maintenance instructionsp. 8
2 Spare parts cataloguep. 8
3 Service informationp. 8
Use only genuine BOMAG spare parts.p. 8
Spare parts needed for repairs can be taken from the spare parts catalogue for the machine.p. 8
This manual is not subject of an updating service; for this reason we would like to draw your attention to our additional "Technical Service Bulletins".p. 8
In case of a new release all necessary changes will be included.p. 8
In the course of technical development we reserve the right for technical modifications without prior notification.p. 8
Information and illustrations in this manual must not be reproduced and distributed, nor must they be used for the purpose of competition. All rights according to the copyright law remain expressly reserved.p. 8
These safety regulations must be read and applied by every person involved in the repair /maintenance of this machine. The applicable accident prevention instructions and the safety regulations in the operating and maintenance instructions must be ad…p. 8
BOMAG GmbHp. 8
Printed in Germanyp. 8
Copyright by BOMAGp. 8
Generalp. 9
Safety regulationsp. 9
Important notesp. 9
Important notesp. 9
These safety regulations must be read and applied by every person involved in the repair /maintenance of this machine. The applicable accident prevention instructions and the safety regulations in the operating and maintenance instructions must be ad…p. 9
Repair work shall only performed by appropriately trained personnel or by the after sales service of BOMAG.p. 9
Workshop equipment and facilities as well as the use and waste disposal of fuels and lubricants, cleaning agents and solvent as well as gases and chemicals are subject to legal regulations, which are intended to provide a minimum on safety. It is obv…p. 9
This manual contains headers like "Note", "Attention", "Danger" and "Environment", which must be strictly complied with in order to inform about and avoid dangers to persons, property and the environment.p. 9
Paragraphs marked like this contain technical information for the optimal economical use of the machine.p. 9
Paragraphs marked like this highlight possible dangers for machines or parts of the machine.p. 9
Paragraphs marked like this highlight possible dangers for persons.p. 9
Paragraphs marked like this point out practices for safe and environmental disposal of fuels and lubricants as well as replacement parts.p. 9
Observe the regulations for the protection of the environment.p. 9
Generalp. 9
Generalp. 9
For repair and maintenance work move the machine on a firm base and shut it down.p. 9
Always secure the machine against unintended rolling.p. 9
Secure the engine reliably against unintentional starting.p. 9
Mark a defective machine and a machine under repair by attaching a clearly visible warning label to the dashboard.p. 9
Block the articulated joint with the articulation lock.p. 9
Use protective clothes like hard hat, safety boots and gloves.p. 9
Keep unauthorized persons away from the machine during repair work.p. 9
Tools, lifting gear, lifting tackle, supports and other auxiliary equipment must be fully functional and in safe condition.p. 9
Use only safe and approved lifting gear of sufficient load bearing capacity to remove and install parts or components from and to the machine.p. 9
Do not use easily inflammable or harmful substances, such as gasoline or paint thinners for cleaning.p. 9
Do not smoke or use open fire and avoid sparks when cleaning or repairing a tank.p. 9
When performing welding work strictly comply with the respective welding instructions.p. 9
Transport work with cranes and lifting tacklep. 9
Cranes must only be operated by instructed persons who had been trained in handling cranes.p. 9
Follow the operating instructions of the manufacturer when working with cranes.p. 9
Follow the operating instructions of the operator when working with cranes.p. 9
Always comply with the applicable accident prevention instructions when working with cranes and lifting tackle.p. 9
Precautions and codes of conduct for welding workp. 9
Welding work must only be carried out by properly trained personnel.p. 9
Electric shock!p. 9
Electric shock!p. 9
Sparks, fire hazard, burning of skin!p. 9
Infrared or ultraviolet radiation (arc), flashing of eyes!p. 9
Health hazard caused by welding work on highly alloyed work pieces, metal coatings, paint coatings, plastic coatings, oil containing dirt deposits, grease or solvent residues, etc.!p. 9
Check welding equipment and cables for damage before use (also the validity of inspection stickers).p. 9
Ensure good conductivity between ground cable and workpiece, avoid joints and bearings.p. 9
Start the extraction fan before starting work and guide with the progressing work as required.p. 10
Always isolate the burner when laying it down (remove possible electrode residues).p. 10
Protect cables from being damaged, use cables with insulated couplings.p. 10
Ensure sufficient fire protection, keep a fire extinguisher at hand.p. 10
Welding work in areas where there is a risk of fire or explosion, must only be carried out with welding permission.p. 10
Remove any combustible materials from the welding area or cover such items appropriately.p. 10
Name a fire watch during and after welding work.p. 10
Place welding rod holders and inert gas welding guns only on properly insulated bases.p. 10
Place the inert gas bottles in a safe place and secure them against falling over.p. 10
Use a protective screen or hand shield with welding filter, wear welding gloves and clothes.p. 10
Switch the welding unit off before connecting welding cables.p. 10
Check electrode holders and electric cables at regular intervals.p. 10
Behaviour in case of faultsp. 10
In case of faults on the welding unit switch of the welding unit immediately and have it repaired by expert personnel.p. 10
In case of failure of the extraction system switch the system off and have it repaired by expert personnel.p. 10
Maintenance; waste disposalp. 10
Replace damaged insulating jaws and welding rod holders immediately.p. 10
Replace the welding wire reels only in de-energized state.p. 10
What to do in case of accidents; First Aidp. 10
Keep calm.p. 10
Keep calm.p. 10
Call first air helpers.p. 10
Report the accident.p. 10
In case of an electric accident: Interrupt the power supply and remove the injured person from the electric circuit. If breathing and heart have stopped apply reactivation measures and call for an emergency doctor.p. 10
Operation of high-voltage systemsp. 10
The rules and statutory regulations valid in the corresponding do apply in addition to the notes given here.p. 10
The high-voltage system must only be operated and serviced by qualified and authorized personnel.p. 10
Before starting operation the operator must check the proper condition of the system.p. 10
Possibility of injury or even death caused by electric shock:p. 10
if persons come into contact with live parts,p. 10
in case of faulty insulation of live parts,p. 10
inadequate, unsuitable insulation,p. 10
if melted parts flake off in case of short circuits.p. 10
Old oilsp. 10
Old oilsp. 10
Prolonged and repetitive contact with mineral oils will remove the natural greases from the skin and causes dryness, irritation and dermatitis. Moreover, used engine oils contain potentially hazardous contaminants, which could cause skin cancer. Appr…p. 10
Wear protective clothes and safety gloves, if possible.p. 10
If there is a risk of eye contact you should protect your eyes appropriately, e.g. chemistry goggles or full face visor; a facility suitable for rinsing the eyes should also be available.p. 10
Avoid longer and repetitive contacts with oils. In case of open incisions and injuries seek medical advice immediately.p. 10
Apply protective cream before starting work, so that oil can be easier removed from the skin.p. 10
Wash affected skin areas with water and soap (skin cleansers and nail brushes will help). Lanolin containing agents will replace natural skin oils that were lost.p. 10
Do not use gasoline, kerosene, diesel, thinner or solvents to wash the skin.p. 10
Do not put oil soaked cloths into your pockets.p. 10
Avoid clothes getting soiled by oil.p. 10
Overalls must be washed at regular intervals. Dispose of non-washable clothes environmentally.p. 10
If possible degrease components before handling.p. 10
It is strictly prohibited to drain off oil into the soil, the sewer system or into natural waters. Old oil must be disposed of according to applicable environmental regulations. If in doubt you should consult your local authorities.p. 11
Hydraulicsp. 11
Hydraulicsp. 11
Always relieve the pressure in the hydraulic system before disconnecting any lines. Hydraulic oil escaping under pressure can penetrate the skin and cause severe injury.p. 11
Always make sure that all screw fittings have been tightened properly and that hoses and pipes are in mint condition before pressurizing the system again.p. 11
Hydraulic oil leaking out of a small opening can hardly be noticed, therefore please use a piece of cardboard or wood when checking for leaks. When injured by hydraulic oil escaping under pressure consult a physician immediately, as otherwise this ma…p. 11
Do not step in front of or behind the drums, wheels or crawler tracks when performing adjustment work in the hydraulic system while the engine is running. Block drums, wheels or crawler tracks with wedges.p. 11
Reattach all guards and safety installations after all work has been completed.p. 11
It is strictly prohibited to drain off oil into the soil, the sewer system or into natural waters. Oil oil must be disposed of according to applicable environmental regulations. If in doubt you should consult your local authorities.p. 11
Fuelsp. 11
Fuelsp. 11
Repair work shall only performed by appropriately trained personnel or by the after sales service of BOMAG.p. 11
Follow the valid accident prevention instructions when handling fuels.p. 11
The following notes refer to general safety precautions for danger free handling of fuel.p. 11
Fuel vapours not only are easily inflammable, but also highly explosive inside closed rooms and toxic; dilution with air creates an easily inflammable mixture. The vapours are heavier than air and therefore sink down to the ground. Inside a workshop …p. 11
Fire extinguishers charged with FOAM, COp. 11
2p. 11
The vehicle battery must always be disconnected, BEFORE work in the fuel system is started. Do not disconnect the battery while working on the fuel system. Sparks could cause explosion of the fuel fumes.p. 11
Wherever fuel is stored, filled, drained off or where work on fuel systems is carried out, all potential ignition sources must be extinguished or removed. Search lights must be fire proof and well protected against possible contact with running out fuelp. 11
Hot fuelsp. 11
Hot fuelsp. 11
Please apply the following measures before draining of fuel to prepare for repair work:p. 11
Allow the fuel to cool down, to prevent any contact with a hot fluid.p. 11
Vent the system, by removing the filler cap in a well ventilated area. Screw the filler cap back on, until the tank is finally emptied.p. 11
Synthetic rubberp. 11
Many O-rings, hoses, etc. are made of synthetic material, a so-called fluorocarbon elastomer. Under normal operating conditions this material is safe and does not impose any danger to health.p. 11
However, if this material becomes damaged by fire or extreme heat, it may decompose and form highly caustic hydrofluoric acid, which can cause severe burns in contact with skin.p. 11
If the material is in such a state it must only be touched with special protective gloves. The protective gloves must be disposed of according to applicable environmental regulations immediately after use.p. 11
If the material has contacted the skin despite these measures, take off the soiled clothes and seek medical advice immediately. In the meantime cool and wash the affected area of skin over a sufficient time with cold water or lime water.p. 11
Poisonous substancesp. 11
Some of the fluids and substances used are toxic and must under no circumstances be consumed.p. 11
Skin contact, especially with open wounds, must be avoided.p. 11
These fluids and substances are, amongst others, anti-freeze agents, hydraulic oils, fuels, washing additives, refrigerants, lubricants and various bonding agents.p. 11
Enginep. 12
Enginep. 12
Do not work on the fuel system while the engine is running. (Danger to life!)p. 12
Once the engine has stopped wait approx. 1 minutes for the system to depressurize. The systems are under high pressure. (Danger to life!)p. 12
Keep out of the danger zone during the initial test rung. Danger caused by high pressure in case of leaks. (Danger to life!)p. 12
When performing work on the fuel system make sure that the engine cannot be started unintentionally during repair work. (Danger to life!)p. 12
Maintenance and cleaning work on the engine must only be performed with the engine stopped and cooled down. Make sure that the electric system is switched off and sufficiently secured against being switched on again (e.g. pull off ignition key, attac…p. 12
Observe the accident prevention regulations for electric systems (e.g. -VDE-0100/-0101/-0104/- 0105 Electric precautions against dangerous contact voltages).p. 12
Cover all electric components properly before wet cleaning.p. 12
Batteryp. 12
Batteryp. 12
Always wear goggles and protective clothing to service or clean batteries! Battery acid can cause severe injury by cauterization when coming in contact with skin.p. 12
Work only well ventilated rooms (formation of oxyhydrogen gas).p. 12
Do not lean over the battery while it is under load, being charged or tested (danger of explosion).p. 12
Keep ignition sources away from the battery. Burning cigarettes, flames or sparks can cause explosion of the batteryp. 12
Use battery chargers etc. only in strict compliance with the operating instructions.p. 12
After an accident with acid flush the skin with a sufficient amount of water and seek medical advice.p. 12
Do not allow children access to batteries.p. 12
When mixing battery fluid always pour acid into water, never vice-versa.p. 12
Special safety regulationsp. 12
Use only genuine BOMAG spare parts for repair and maintenance work. Genuine spare parts and original accessories were specially developed, tested and approved for the machine.p. 12
The installation and use of non-genuine spare parts or non-genuine accessories may therefore have an adverse effect on the specific characteristics of the machine and thereby impair the active and/or passive driving safety. The manufacturer explicitl…p. 12
Unauthorized changes to the machine are prohibited for safety reasons.p. 12
Do not perform any cleaning work while the engine is running.p. 12
If tests on the articulated joint need to be performed with the engine running, do not stand in the articulation area of the machine (danger of crushing!).p. 12
If tests must be performed with the engine running do not touch rotating parts of the engine (danger of injury!).p. 12
Always ensure an adequate supply of fresh air when starting in closed rooms. Exhaust gases are highly dangerous!p. 12
Refuel only with the engine shut down. Ensure strict cleanliness and do not spill any fuel.p. 12
Always ensure an adequate supply of fresh air when refuelling in closed rooms.p. 12
Dispose of used filters in accordance with applicable environmental regulations.p. 12
When performing repair and maintenance work collect oils and fuels in suitable containers and dispose of in compliance with applicable environmental regulations.p. 12
Do not heat up oils higher than 160 °C because they may ignite.p. 12
Wipe off spilled or overflown oil using suitable cleaning means and dispose of in accordance with applicable environmental regulations.p. 12
Dispose of old batteries according to applicable environmental regulations.p. 12
There is a danger of scalding when draining off engine or hydraulic oil at operating temperature! Allow engine and hydraulic system to cool down to a sufficient level.p. 12
Do not exceed the max. permissible tire pressure.p. 12
The values specified in the table apply for screws:p. 13
General repair instructionsp. 13
Generalp. 13
Generalp. 13
Before removing or disassembling parts, assemblies, components or hoses mark these parts for easier assembly.p. 13
Before assembling and installing parts, assemblies or components oil or grease all movable parts or surfaces as required and in compliance with the compatibility of materials.p. 13
The values specified in the table apply for screws:p. 13
Electricsp. 13
Generalp. 13
Generalp. 13
Due to the fast technical development electric and electronic vehicle systems become more intelligent and more comprehensive day by day, and can hardly be dispensed with in hydraulic and mechanical vehicle systems.p. 13
Diagnostics according to planp. 13
Well structured trouble shooting procedures can save time and money.p. 13
Random tests have revealed that purely electronic components or control units only very rarely are the actual cause of failures:p. 13
In approx. 10 % of the examined cases the problems were caused by control units.p. 13
In approx. 15 % sensors and actuators were the cause of the problems.p. 13
By far the highest proportion of all faults could be traced back to wiring and connections (plugs, etc.).p. 13
General:p. 13
Before changing any expensive components, such as control units, you should run a systematic trouble shooting session to eliminate any other possible fault sources. Knowledge in basic electrics is required for this purpose. If a fault was diagnosed w…p. 13
Check for good cable and ground contacts, therefore keep all mechanical transition points between electric conductors (terminals, plugs) free of oxide and dirt, as far as this is possible.p. 13
Always use the machine related wiring diagram for testing. If one or more faults were detected, these should be corrected immediately.p. 13
Do not disconnect or connect battery or generator while the engine is running.p. 13
Do not operate the main battery switch under load.p. 13
Do not use jump leads after the battery has been removed.p. 13
Sensors and electric actuators on control units must never be connected individually or between external power sources for the purpose of testing, but only in connection with the control unit in question.p. 13
It is not permitted to pull plugs off while the voltage supply is switched on (terminal 15 "ON")! Switch the voltage supply "OFF" first and pull out the plug.p. 13
Even with an existing polarity reversal protection incorrect polarity must be strictly avoided. Incorrect polarity can cause damage to control units!p. 13
Plug-in connectors on control units are only dust and water tight if the mating connector is plugged on! Control units must be protected against spray water, until the mating connector is finally plugged on!p. 14
Unauthorized opening of control electronics (Microcontroller MC), modifications or repairs in the wiring can cause severe malfunctions.p. 14
Do not use any radio equipment or mobile phones in the vehicle cab without a proper aerial or in the vicinity of the control electronics!p. 14
Electrics and weldingp. 14
Before starting welding work you should disconnect the negative battery pole or interrupt the electric circuit with the main battery switch, disconnect the generator and pull the plugs off all control units in order to protect the electrical system o…p. 14
Disconnect the minus pole of the battery or interrupt the electric circuit with the main battery switch.p. 14
Isolate the generator and all control units from the electric circuit.p. 14
Always fasten the earth clamp of the welding unit in the immediate vicinity of the welding location.p. 14
When choosing the location for the earth clamp make sure that the welding current will not pass through joints or bearings.p. 14
The values specified in the table apply for screws:p. 14
Batteryp. 14
Rules for the handling of batteriesp. 14
When removing a battery always disconnect the minus pole before the plus pole. When installing the battery connect the minus pole after the plus pole to avoid short circuits.p. 14
Fasten the terminal clamps with a little force as possible.p. 14
Always keep battery poles and terminal clams clean to avoid high transition resistances when starting and the related development of heat.p. 14
Make sure the battery is properly fastened in the vehicle.p. 14
The values specified in the table apply for screws:p. 15
Generatorp. 15
Before removing the generator you must disconnect the ground cable from the minus pole of the battery while the ignition is switched off. Do not disconnect the generator while the engine is running, because this may cause extremely high voltage peaks…p. 15
When disassembling the battery cable, the B+-nut underneath on the generator side may also be loosened. This nut must in this case be retightened.p. 15
When connecting e.g. the battery cable to the terminal of the generator you must make sure that the polarity is correct (generator B+ to the + pole of the battery). Mixing up the polarities by mistake causes short circuit and damage to the rectifier …p. 15
The generator can only be operated with the battery connected. Under special conditions emergency operation without battery is permitted, the lifetime of the generator is in such cases especially limited.p. 15
Plus and minus cables must be disconnected during rapid charging of the battery or electric welding on the vehicle.p. 15
When cleaning the generator with a steam or water jet make sure not to direct the steam or water jet directly on or into the generator openings or ball bearings. After cleaning the generator should be operated for about 1 – 2 minutes to remove any de…p. 15
The values specified in the table apply for screws:p. 15
Starter motorp. 15
So-called jump starting (using an additional external battery) without the battery connected is dangerous. When disconnecting the cables from the poles high inductivities (arcs, voltage peaks) may occur and destroy the electrical installation.p. 15
For purposes like e.g. purging the fuel systems, starters may be operated for maximum 1 minute without interruption. Then you should wait for at least 30 minutes (cooling down) until trying again. During the 1 minute starting period this process shou…p. 15
Starter motors must not be cleaned with high pressure steam cleaning equipment.p. 15
The contacts on starter terminals 30, 45, 50 must be protected against unintended shorting (jump protection).p. 15
When replacing the starter the ring gear on the engine flywheel must be checked for damage and its number of teeth – if necessary replace the ring gear.p. 15
Always disconnect the battery before starting assembly work in the starter area of the engine or on the starter itself.p. 15
The values specified in the table apply for screws:p. 16
Hydraulic systemp. 16
Repair work on hydraulic elements shall only performed by appropriately trained personnel or by the after sales service of BOMAG.p. 16
Please notep. 16
Please notep. 16
Cleanliness is of utmost importance. Dirt and other contaminations must strictly be kept out of the system.p. 16
Connections and screw fittings, filler neck covers and their immediate surrounding areas must be cleaned before removal.p. 16
Before loosening hoses, pipe lines etc. relieve all pressure from the system.p. 16
During repair work keep all openings closed with clean plastic plugs and caps.p. 16
Never run pumps, motors and engines without oil or hydraulic oil.p. 16
When cleaning hydraulic components take care not to damage any fine machine surfaces.p. 16
Chemical and rubber soluble cleansing agents may only be used to clean metal parts. Do not let such substances come in contact with rubber parts.p. 16
Rinse of cleaned parts thoroughly, dry them with compressed air and apply anti-corrosion oil immediately. Do not install parts that show traces of corrosion.p. 16
Avoid the formation of rust on fine machined caused by hand sweat.p. 16
Use new O-rings or seal rings for reassembly.p. 16
Use only hydraulic oil as sliding agent when reassembling. Do not use any grease!p. 16
Use only the specified pressure gauges. Risk of damaging the pressure gauges under too high pressure.p. 16
Check the hydraulic oil level before and after the work.p. 16
Fill in only clean oil as specified in the maintenance instructions.p. 16
Check the hydraulic system for leaks, if necessary find and rectify the cause.p. 16
Before taking new hydraulic components into operation fill these with hydraulic oil as specified in the operating and maintenance instructions.p. 16
After changing a hydraulic component thoroughly flush, refill and bleed the complete hydraulic system.p. 16
Perform measurements at operating temperature of the hydraulic oil (approx. 40 ¯C).p. 16
After changing a component perform a high and charge pressure test, if necessary check the speed of the exciter shaft.p. 16
The operating pressure of the exciter shaft to a great extent depends on the base under the vibrating drum. On hard ground place the drums on a suitable base and check the drum pressure. Do not activate the vibration on a hard, concreted base, danger…p. 16
After the completion of all tests perform a test run and then check all connections and fittings for leaks with the engine still stopped and the hydraulic system depressurized.p. 16
Before commissioningp. 16
Fill the housings of hydraulic pumps and motors with hydraulic oil. Use only hydraulic oils according to the specification in the maintenance instructions.p. 16
After changing a component flush the hydraulic system as described in the flushing instructions.p. 16
Taking into operationp. 16
Bleed the hydraulic circuits.p. 16
Start up the hydraulic system without load.p. 16
Check the hydraulic oil level in the tank, if necessary top up with hydraulic oil as specified in the operating and maintenance instructions or drain oil off into a suitable container.p. 16
After taking into operationp. 16
Check fittings and flanges for leaks.p. 16
After each repair check all adjustment data, system pressures, rotational speeds and nominal values in the hydraulic system, adjust if necessary.p. 16
Do not adjust pressure relief valves and control valves to values above their specified values.p. 16
The values specified in the table apply for screws:p. 17
Fuel hosesp. 17
Fig. 1p. 17
All fuel hoses have two layers of material, a reinforced rubber coating outside and an internal Viton hose. If a fuel hose has come loose one must make absolutely sure that the internal Viton layer has not been separated from the reinforced outer lay…p. 17
The values specified in the table apply for screws:p. 17
Gaskets and mating surfacesp. 17
Leaking sealing faces can mostly be traced back to incorrect assembly of seals and gaskets.p. 17
Before assembling a new seal or gasket make sure that the sealing surface is free of pitting, flutes, corrosion or other damage.p. 17
Inappropriately stored or handled seals (e.g. hanging from hooks or nails) must under no circumstances be used.p. 17
Assemble seals and gaskets only with sealing compound, grease or oil, if this is specifically specified in the repair instructions.p. 17
If necessary remove any old sealing compound before assembling. For this purpose do not use any tools that could damage the sealing surfaces.p. 17
Sealing compound must be applied thin and evenly on the corresponding surfaces; take care that the compound does not enter into oil galleries or blind threaded bores.p. 17
Examine the contact faces for scratches and burrs, remove these with a fine file or an oilstone; take care that no grinding dust and dirt enters into tapped bores or enclosed components.p. 17
Blow out lines, ducts and gaps with compressed air, replace any O-rings and seals that have been dislodged by the compressed air.p. 17
Assembly of radial sealsp. 17
Fig. 2p. 17
Lubricate the sealing lips (2)p. 17
(Fig. 2)p. 17
Slide the seal over the shaft, with the lip facing towards the fluid to be sealed.p. 17
If possible, use an assembly sleeve (1p. 17
(Fig. 2)p. 17
to protect the lip from being damaged by sharp edges, threads or splines.p. 17
Lubricate the outer rim (arrow 3p. 18
(Fig. 2)p. 18
Fig. 3p. 18
Press or knock the seal into the housing, until it is flush with the housing surface.p. 18
If possible, use a "bell" (1p. 18
(Fig. 3)p. 18
that the seal will not skew.p. 18
If you have no proper service tools at hand, use a suitable drift punch with a diameter which is about 0,4 mm smaller than the outer diameter of the seal. Use VERY LIGHT blows with the hammer if no press is available.p. 18
The values specified in the table apply for screws:p. 18
Feather keys and keywaysp. 18
Feather keys may only be reused if they are free of damage.p. 18
Fig. 4p. 18
Clean and thoroughly examine the feather key.p. 18
Deburr and thoroughly clean the edges of the keyway with a fine file before reassembling.p. 18
The values specified in the table apply for screws:p. 19
Ball and roller bearingsp. 19
Ball and roller bearings may only be reused if they are free of damage and do not show any signs of wear.p. 19
Fig. 5p. 19
If a ball or roller bearing of a bearing pair shows defects, both ball or roller bearings need to be replaced.p. 19
Remove any lubricant residues from the ball or roller bearing to be examined by washing it with gasoline or any other appropriate degreasing agent. Ensure strict cleanliness.p. 19
Check balls or rollers, running surfaces, outer faces of outer races and inner faces of inner races for visible damage. Replace the ball or roller bearing if necessary.p. 19
Check the ball or roller bearing for clearance and resistance between the inner and outer races, replace if necessary.p. 19
Lubricate the ball or roller bearing with the recommended type of grease before assembly or reassembly.p. 19
On greased bearings (e.g. wheel bearings) fill the space between ball or roller bearing and outer seal with the recommended type of grease before assembling the seal.p. 19
Check shaft and bearing housing for discolouration or other signs of movement between ball or roller bearing and seats.p. 19
Make sure that shaft and housing are free of burrs before assembling the ball or roller bearing.p. 19
Always mark the individual parts of separable ball or roller bearings (e.g. taper roller bearings) to enable correct reassembling. Never assemble the rollers to an outer race that has already been used, replace the complete ball or roller bearing ins…p. 19
Fig. 6p. 19
When assembling the ball or roller bearing to the shaft load must only be applied to the inner race 1p. 19
(Fig. 6)p. 19
When fitting the bearing into the housing load must only be applied to the outer race (2).p. 19
The values specified in the table apply for screws:p. 20
Screws and nutsp. 20
Tightening torquep. 20
Tighten nuts or screws with the tightening torques specified in the following tables of tightening torques. Tightening torques deviating from the ones in the table are specially mentioned in the repair instructions.p. 20
Damaged screws must under no circumstances be used any longer. Recutting threads with thread cutters or taps adversely affects the strength and leak tightness of the screw joint. Damaged or corroded thread pitches can cause incorrect torque value rea…p. 20
Self-locking nuts must generally be replaced after disassembly.p. 20
The use of screws with too high strength can cause damage!p. 20
Nut of a higher strength can generally be used instead of nuts of a lower strength classification.p. 20
When checking or retightening screw joints to the specified tightening torque you should first relieve by a quarter turn and then tighten to the correct torque.p. 20
Before tightening you should lightly oil the thread, in order to ensure low friction movement.p. 20
The same applies for self-locking nuts.p. 20
Make sure that no oil or grease will enter into blind tapped bores. The hydraulic power generated when turning in the screw could cause breakage of the effected part.p. 20
Strength classes, metric screwsp. 20
The strength classes (from 3.6 to 12.9) are specified for all strength classes from a nominal diameter of 5mm. The corresponding identification can be found where allowed for by the shape of the screw.p. 20
Fig. 7 Identification of screwsp. 20
Example: A screw is identified with 12.9.p. 20
The first number corresponds with 1/100 of the nominal tensile strength (minimum tensile strength) in N/ mmp. 20
2p. 20
The nominal tensile strength is 12 X 100 N/mmp. 20
2p. 20
2p. 20
The second number specifies 10-times the ration between lower yield point and nominal tensile strength (yield point ratio).p. 20
When exceeding the lower yield point, the material will return to its original shape when being relieved (plastic deformation).p. 20
When exceeding the upper yield point the material will not restore its original shape after being relieved.p. 20
The lower tensile strength is 9/10 X 1200 N/mmp. 20
2p. 20
2p. 20
However, these values are by no means identical with the tightening torques, which are to be set on a torque wrench. The corresponding calculation requires a higher effort and, in the end, depends on the materials to be bolted together.p. 20
Strength classes of metric nutsp. 21
Nuts are differentiated by three load groups. Each load group has a special designation system for the strength class assigned, so that the load group can be clearly identified.p. 21
Nuts for screw joints with full load capability (4, 5, 6, 8, 10, 12)p. 21
Fig. 8 Identification of nutsp. 21
In a connection with a screw, these nuts 1p. 21
(Fig. 8)p. 21
Nut height above 0.8 d (d = nominal dimension).p. 21
Strength class of nutp. 21
Strength class of associated screwp. 21
4p. 21
4p. 21
3.6, 4.6, 4.8p. 21
3.6, 4.6, 4.8p. 21
5p. 21
5p. 21
3.6, 4.6, 4.8p. 21
3.6, 4.6, 4.8p. 21
5.6, 5.8p. 21
6p. 21
6p. 21
6.8p. 21
6.8p. 21
8p. 21
8p. 21
8.8p. 21
8.8p. 21
9p. 21
9p. 21
9.8p. 21
9.8p. 21
10p. 21
10p. 21
10.8p. 21
10.8p. 21
12p. 21
12p. 21
12.8p. 21
12.8p. 21
Nuts for screw joints with limited load factor (04, 05)p. 21
The preceding "0" indicates that, due to their low height, nuts 2p. 21
(Fig. 8)p. 21
Nut height below 0,8 d (d = nominal dimension).p. 21
Nuts for screw joints without specified load factor (11H, 14H, 17H, 22H)p. 21
This standard contains strength classes (hardness classes) for nuts 3p. 21
(Fig. 8)p. 21
Nut height below 0,5 d (d = nominal dimension).p. 21
Identification in clock systemp. 21
Fig. 9 Identification of nuts in clock systemp. 21
For small nutsp. 21
(Fig. 9)p. 21
The 12 o'clock position is identified by a dot or the manufacturer's symbol.p. 21
The strength class is identified by a dash (b).p. 21
Identification of UNF-threadsp. 22
Fig. 10p. 22
Screwsp. 22
The screw head is marked with a stamped in, round cavity 3p. 22
(Fig. 10)p. 22
Nutsp. 22
An uninterrupted series of stamped in circles parallel to the axis of the nut on a hexagon area (2).p. 22
Studs and brake rodsp. 22
At the outmost end a short end of the component is reduced to its core diameter (1).p. 22
Cotter pinsp. 22
Fig. 11p. 22
In places where cotter pins are used, these must be reassembled. Cotter pins must generally be renewed after disassembly.p. 22
Cotter pins must be assembled as shown in the illustration, unless specified differently.p. 22
The values specified in the table apply for screws:p. 23
Tightening torquesp. 23
The values specified in the table apply for screws:p. 23
black oiledp. 23
black oiledp. 23
with surface protection A4Cp. 23
with surface protection DACROMETp. 23
DACROMET is a surface protection that mainly consists of zinc and aluminium in a chromium oxide matrix. DACROMETIZATION provides excellent corrosion protection for metal surfaces by applying a mineral coating with metallic-silver appearance.p. 23
Tightening torques for screws with metric unified threadp. 23
Coefficient of friction m tot. = 0,14p. 23
mp. 23
Screw dimensionp. 23
Tightening torques Nmp. 23
8.8p. 23
8.8p. 23
10.9p. 23
10.9p. 23
12.9p. 23
12.9p. 23
M4p. 23
M4p. 23
3p. 23
3p. 23
5p. 23
5p. 23
5p. 23
5p. 23
M5p. 23
M5p. 23
6p. 23
6p. 23
9p. 23
9p. 23
10p. 23
10p. 23
M6p. 23
M6p. 23
10p. 23
10p. 23
15p. 23
15p. 23
18p. 23
18p. 23
M8p. 23
M8p. 23
25p. 23
25p. 23
35p. 23
35p. 23
45p. 23
45p. 23
M10p. 23
M10p. 23
50p. 23
50p. 23
75p. 23
75p. 23
83p. 23
83p. 23
M12p. 23
M12p. 23
88p. 23
88p. 23
123p. 23
123p. 23
147p. 23
147p. 23
M14p. 23
M14p. 23
137p. 23
137p. 23
196p. 23
196p. 23
235p. 23
235p. 23
M16p. 23
M16p. 23
211p. 23
211p. 23
300p. 23
300p. 23
358p. 23
358p. 23
M18p. 23
M18p. 23
290p. 23
290p. 23
412p. 23
412p. 23
490p. 23
490p. 23
M20p. 23
M20p. 23
412p. 23
412p. 23
578p. 23
578p. 23
696p. 23
696p. 23
M22p. 23
M22p. 23
560p. 23
560p. 23
785p. 23
785p. 23
942p. 23
942p. 23
M24p. 23
M24p. 23
711p. 23
711p. 23
1000p. 23
1000p. 23
1200p. 23
1200p. 23
M27p. 23
M27p. 23
1050p. 23
1050p. 23
1480p. 23
1480p. 23
1774p. 23
1774p. 23
M30p. 23
M30p. 23
1420p. 23
1420p. 23
2010p. 23
2010p. 23
2400p. 23
2400p. 23
Tightening torques for screws with metric unified fine threadp. 23
Coefficient of friction m tot. = 0,14p. 23
mp. 23
Screw dimensionp. 23
Tightening torques Nmp. 23
8.8p. 23
8.8p. 23
10.9p. 23
10.9p. 23
12.9p. 23
12.9p. 23
M8 x 1p. 23
M8 x 1p. 23
26p. 23
26p. 23
37p. 23
37p. 23
48p. 23
48p. 23
M10 x 1.25p. 23
M10 x 1.25p. 23
52p. 23
52p. 23
76p. 23
76p. 23
88p. 23
88p. 23
M12 x 1,25p. 23
M12 x 1,25p. 23
98p. 23
98p. 23
137p. 23
137p. 23
126p. 23
126p. 23
M12 x 1.5p. 23
M12 x 1.5p. 23
93p. 23
93p. 23
127p. 23
127p. 23
152p. 23
152p. 23
M14 x 1.5p. 23
M14 x 1.5p. 23
152p. 23
152p. 23
216p. 23
216p. 23
255p. 23
255p. 23
M16 x 1.5p. 23
M16 x 1.5p. 23
225p. 23
225p. 23
318p. 23
318p. 23
383p. 23
383p. 23
M18 x 1.5p. 23
M18 x 1.5p. 23
324p. 23
324p. 23
466p. 23
466p. 23
554p. 23
554p. 23
M20 x 1.5p. 23
M20 x 1.5p. 23
461p. 23
461p. 23
628p. 23
628p. 23
775p. 23
775p. 23
M22 x 1.5p. 23
M22 x 1.5p. 23
618p. 23
618p. 23
863p. 23
863p. 23
1058p. 23
1058p. 23
M24 x 2p. 23
M24 x 2p. 23
780p. 23
780p. 23
1098p. 23
1098p. 23
1294p. 23
1294p. 23
M27 x2p. 23
M27 x2p. 23
1147p. 23
1147p. 23
1578p. 23
1578p. 23
1920p. 23
1920p. 23
M30 x 2p. 23
M30 x 2p. 23
1568p. 23
1568p. 23
2254p. 23
2254p. 23
2695p. 23
2695p. 23
Tightening torques for screws treated with anti-seizure paste OKS 240 (copper paste)p. 24
Tightening torques for screws treated with anti-seizure paste OKS 240p. 24
Anti-seizure paste (copper paste) is used for the assembly of screw connections, which are exposed to high temperatures and corrosive effects. Prevents seizure and corrosion.p. 24
Screw dimensionp. 24
Tightening torques Nmp. 24
8.8p. 24
8.8p. 24
10.9p. 24
10.9p. 24
12.9p. 24
12.9p. 24
M16p. 24
M16p. 24
169p. 24
169p. 24
240p. 24
240p. 24
287p. 24
287p. 24
M16 x 1.5p. 24
M16 x 1.5p. 24
180p. 24
180p. 24
255p. 24
255p. 24
307p. 24
307p. 24
M18p. 24
M18p. 24
232p. 24
232p. 24
330p. 24
330p. 24
392p. 24
392p. 24
M18 x 1.5p. 24
M18 x 1.5p. 24
260p. 24
260p. 24
373p. 24
373p. 24
444p. 24
444p. 24
M20p. 24
M20p. 24
330p. 24
330p. 24
463p. 24
463p. 24
557p. 24
557p. 24
M20 x 1.5p. 24
M20 x 1.5p. 24
369p. 24
369p. 24
502p. 24
502p. 24
620p. 24
620p. 24
M22p. 24
M22p. 24
448p. 24
448p. 24
628p. 24
628p. 24
754p. 24
754p. 24
M22 x 1.5p. 24
M22 x 1.5p. 24
495p. 24
495p. 24
691p. 24
691p. 24
847p. 24
847p. 24
M24p. 24
M24p. 24
569p. 24
569p. 24
800p. 24
800p. 24
960p. 24
960p. 24
M24 x 2p. 24
M24 x 2p. 24
624p. 24
624p. 24
879p. 24
879p. 24
1036p. 24
1036p. 24
M27p. 24
M27p. 24
840p. 24
840p. 24
1184p. 24
1184p. 24
1520p. 24
1520p. 24
M27 X 2p. 24
M27 X 2p. 24
918p. 24
918p. 24
1263p. 24
1263p. 24
1536p. 24
1536p. 24
M30p. 24
M30p. 24
1136p. 24
1136p. 24
1608p. 24
1608p. 24
1920p. 24
1920p. 24
M30 x 2p. 24
M30 x 2p. 24
1255p. 24
1255p. 24
1804p. 24
1804p. 24
2156p. 24
2156p. 24
3/4“ – 10 UNCp. 24
3/4“ – 10 UNCp. 24
276p. 24
276p. 24
388p. 24
388p. 24
464p. 24
464p. 24
3/4“ – 16 UNCp. 24
3/4“ – 16 UNCp. 24
308p. 24
308p. 24
432p. 24
432p. 24
520p. 24
520p. 24
Tightening torques for wheel nuts (fine thread)p. 24
Coefficient of friction m tot. = 0,14p. 24
mp. 24
These values result in a 90% utilization of the yield pointp. 24
Thread diameterp. 24
Tightening torques Nmp. 24
10.9p. 24
10.9p. 24
M12x1.5p. 24
M12x1.5p. 24
100p. 24
100p. 24
M14x1.5p. 24
M14x1.5p. 24
150p. 24
150p. 24
M18x1.5p. 24
M18x1.5p. 24
300 – 350p. 24
300 – 350p. 24
M20x1.5p. 24
M20x1.5p. 24
400 – 500p. 24
400 – 500p. 24
M22x1.5p. 24
M22x1.5p. 24
500 – 600p. 24
500 – 600p. 24
The values specified in the table apply for screws:p. 25
black oiledp. 25
black oiledp. 25
with surface protection A4Cp. 25
with surface protection DACROMETp. 25
The difference between Withworth and UNF/UNC threads is the fact that UNF and UNC threads have 60° flanks, as the metric ISO-thread, whereas Withworth has a flank of only 55°.p. 25
DACROMET is a surface protection that mainly consists of zinc and aluminium in a chromium oxide matrix. DACROMETIZATION provides excellent corrosion protection for metal surfaces by applying a mineral coating with metallic-silver appearance.p. 25
Tightening torques for screws with UNC thread, UNC Unified Coarse Thread Series, American Unified Coarse Threadp. 25
Tightening torques for screws with UNC thread,p. 25
Coefficient of friction m tot. = 0,14p. 25
mp. 25
UNC Unified Coarse Thread Series, American Unified Coarse Threadp. 25
Screw dimensionp. 25
Tightening torques Nmp. 25
8.8p. 25
8.8p. 25
10.9p. 25
10.9p. 25
12.9p. 25
12.9p. 25
1/4“ – 20p. 25
1/4“ – 20p. 25
11p. 25
11p. 25
15p. 25
15p. 25
19p. 25
19p. 25
5/16“ – 18p. 25
5/16“ – 18p. 25
23p. 25
23p. 25
32p. 25
32p. 25
39p. 25
39p. 25
3/8“ – 16p. 25
3/8“ – 16p. 25
39p. 25
39p. 25
55p. 25
55p. 25
66p. 25
66p. 25
7/16“ – 14p. 25
7/16“ – 14p. 25
62p. 25
62p. 25
87p. 25
87p. 25
105p. 25
105p. 25
1/2“ – 13p. 25
1/2“ – 13p. 25
96p. 25
96p. 25
135p. 25
135p. 25
160p. 25
160p. 25
9/16“ – 12p. 25
9/16“ – 12p. 25
140p. 25
140p. 25
200p. 25
200p. 25
235p. 25
235p. 25
5/8“ – 11p. 25
5/8“ – 11p. 25
195p. 25
195p. 25
275p. 25
275p. 25
330p. 25
330p. 25
3/4“ – 10p. 25
3/4“ – 10p. 25
345p. 25
345p. 25
485p. 25
485p. 25
580p. 25
580p. 25
7/8“ – 9p. 25
7/8“ – 9p. 25
560p. 25
560p. 25
770p. 25
770p. 25
940p. 25
940p. 25
1“ – 8p. 25
1“ – 8p. 25
850p. 25
850p. 25
1200p. 25
1200p. 25
1450p. 25
1450p. 25
1 1/8“ – 7p. 25
1 1/8“ – 7p. 25
1200p. 25
1200p. 25
1700p. 25
1700p. 25
2000p. 25
2000p. 25
1 1/4“ – 7p. 25
1 1/4“ – 7p. 25
1700p. 25
1700p. 25
2400p. 25
2400p. 25
2900p. 25
2900p. 25
1 3/8“ – 6p. 25
1 3/8“ – 6p. 25
2200p. 25
2200p. 25
3100p. 25
3100p. 25
3700p. 25
3700p. 25
1 1/2“ – 6p. 25
1 1/2“ – 6p. 25
3000p. 25
3000p. 25
4200p. 25
4200p. 25
5100p. 25
5100p. 25
Tightening torques for screws with UNF thread, UNF Unified National Fine Thread Series, American Unified Fine Threadp. 25
Tightening torques for screws with UNF thread,p. 25
Coefficient of friction m tot. = 0,14p. 26
mp. 26
UNF Unified National Fine Thread Series, American Unified Fine Threadp. 25
Screw dimensionp. 25
Tightening torques Nmp. 25
8.8p. 25
8.8p. 25
10.9p. 25
10.9p. 25
12.9p. 25
12.9p. 25
1/4“ – 28p. 25
1/4“ – 28p. 25
13p. 25
13p. 25
18p. 25
18p. 25
22p. 25
22p. 25
5/16“ – 24p. 25
5/16“ – 24p. 25
25p. 25
25p. 25
35p. 25
35p. 25
42p. 25
42p. 25
3/8“ – 24p. 25
3/8“ – 24p. 25
45p. 25
45p. 25
63p. 25
63p. 25
76p. 25
76p. 25
7/16“ – 20p. 25
7/16“ – 20p. 25
70p. 25
70p. 25
100p. 25
100p. 25
120p. 25
120p. 25
1/2“ – 20p. 25
1/2“ – 20p. 25
110p. 25
110p. 25
155p. 25
155p. 25
185p. 25
185p. 25
9/16“ – 18p. 25
9/16“ – 18p. 25
155p. 25
155p. 25
220p. 25
220p. 25
260p. 25
260p. 25
5/8“ – 18p. 25
5/8“ – 18p. 25
220p. 25
220p. 25
310p. 25
310p. 25
370p. 25
370p. 25
3/4“ – 16p. 25
3/4“ – 16p. 25
385p. 25
385p. 25
540p. 25
540p. 25
650p. 25
650p. 25
7/8“ -14p. 25
7/8“ -14p. 25
620p. 25
620p. 25
870p. 25
870p. 25
1050p. 25
1050p. 25
1“ – 12p. 26
1“ – 12p. 26
930p. 26
930p. 26
1300p. 26
1300p. 26
1600p. 26
1600p. 26
1 1/8“ – 12p. 26
1 1/8“ – 12p. 26
1350p. 26
1350p. 26
1900p. 26
1900p. 26
2300p. 26
2300p. 26
1 1/4“ – 12p. 26
1 1/4“ – 12p. 26
1900p. 26
1900p. 26
2700p. 26
2700p. 26
3200p. 26
3200p. 26
1 3/8“ – 12p. 26
1 3/8“ – 12p. 26
2600p. 26
2600p. 26
3700p. 26
3700p. 26
4400p. 26
4400p. 26
1 1/2“ – 12p. 26
1 1/2“ – 12p. 26
3300p. 26
3300p. 26
4600p. 26
4600p. 26
5600p. 26
5600p. 26
2 Technical datap. 27
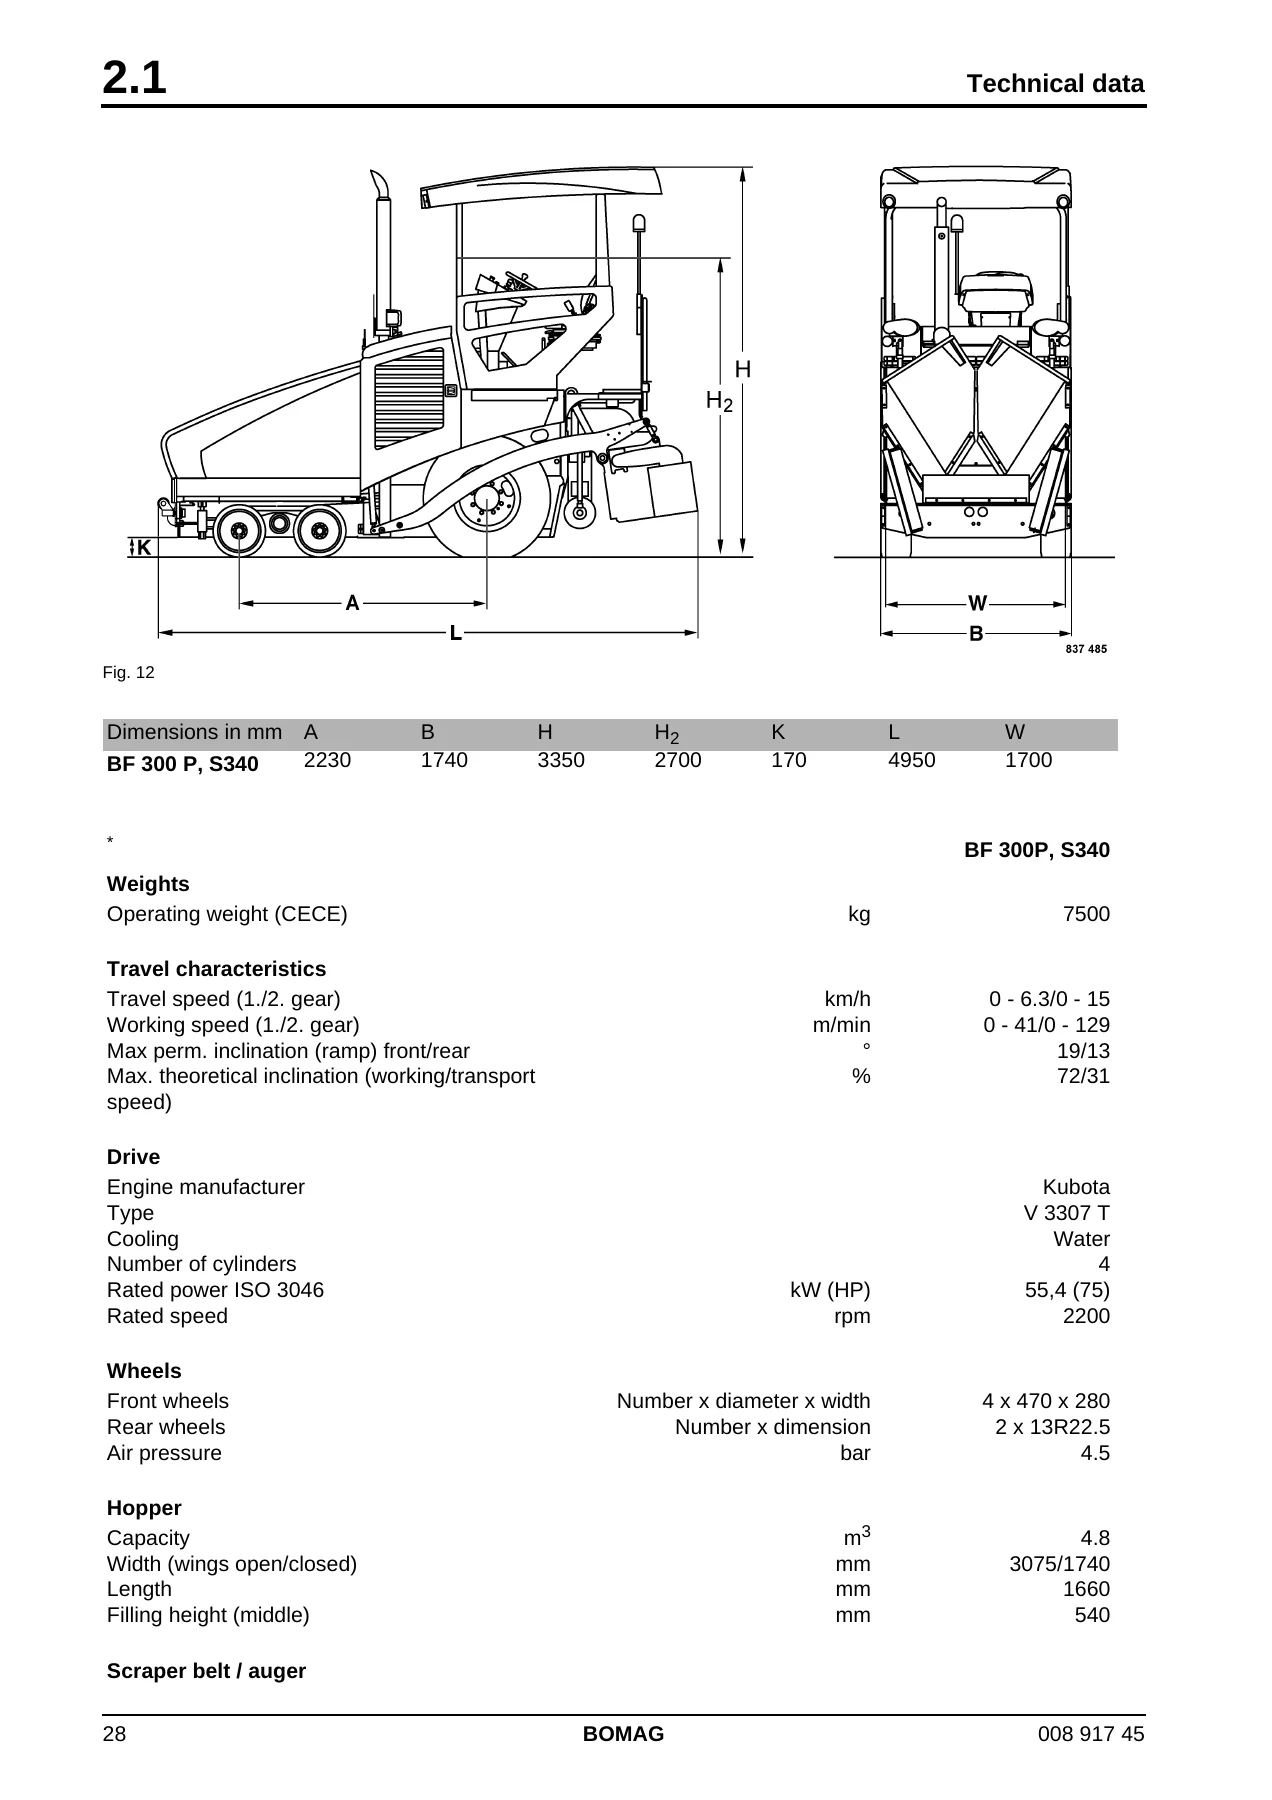
Technical datap. 28
Fig. 12p. 28
Dimensions in mmp. 28
Ap. 28
Ap. 28
Bp. 28
Bp. 28
Hp. 28
Hp. 28
H2p. 28
Hp. 28
2p. 28
Kp. 28
Kp. 28
Lp. 28
Lp. 28
Wp. 28
Wp. 28
BF 300 P, S340p. 28
BF 300 P, S340p. 28
2230p. 28
2230p. 28
1740p. 28
1740p. 28
3350p. 28
3350p. 28
2700p. 28
2700p. 28
170p. 28
170p. 28
4950p. 28
4950p. 28
1700p. 28
1700p. 28
The right for technical modifications remains reservedp. 28
The right for technical modifications remains reservedp. 29
BF 300P, S340p. 28
BF 300P, S340p. 28
Weightsp. 28
Weightsp. 28
Operating weight (CECE)p. 28
kgp. 28
kgp. 28
7500p. 28
7500p. 28
Travel characteristicsp. 28
Travel speed (1./2. gear)p. 28
km/hp. 28
km/hp. 28
0 – 6.3/0 – 15p. 28
0 – 6.3/0 – 15p. 28
Working speed (1./2. gear)p. 28
m/minp. 28
m/minp. 28
0 – 41/0 – 129p. 28
0 – 41/0 – 129p. 28
Max perm. inclination (ramp) front/rearp. 28
°p. 28
°p. 28
19/13p. 28
19/13p. 28
Max. theoretical inclination (working/transport speed)p. 28
%p. 28
%p. 28
72/31p. 28
72/31p. 28
Drivep. 28
Drivep. 28
Engine manufacturerp. 28
Kubotap. 28
Kubotap. 28
Typep. 28
Typep. 28
V 3307 Tp. 28
V 3307 Tp. 28
Coolingp. 28
Coolingp. 28
Waterp. 28
Waterp. 28
Number of cylindersp. 28
4p. 28
4p. 28
Rated power ISO 3046p. 28
kW (HP)p. 28
kW (HP)p. 28
55,4 (75)p. 28
55,4 (75)p. 28
Rated speedp. 28
Rated speedp. 28
rpmp. 28
rpmp. 28
2200p. 28
2200p. 28
Wheelsp. 28
Wheelsp. 28
Front wheelsp. 28
Front wheelsp. 28
Number x diameter x widthp. 28
4 x 470 x 280p. 28
4 x 470 x 280p. 28
Rear wheelsp. 28
Rear wheelsp. 28
Number x dimensionp. 28
2 x 13R22.5p. 28
2 x 13R22.5p. 28
Air pressurep. 28
Air pressurep. 28
barp. 28
barp. 28
4.5p. 28
4.5p. 28
Hopperp. 28
Hopperp. 28
Capacityp. 28
Capacityp. 28
m3p. 28
mp. 28
3p. 28
4.8p. 28
4.8p. 28
Width (wings open/closed)p. 28
mmp. 28
mmp. 28
3075/1740p. 28
3075/1740p. 28
Lengthp. 28
Lengthp. 28
mmp. 28
mmp. 28
1660p. 28
1660p. 28
Filling height (middle)p. 28
mmp. 28
mmp. 28
540p. 28
540p. 28
Scraper belt / augerp. 28
Quantityp. 29
Quantityp. 29
2p. 29
2p. 29
Widthp. 29
Widthp. 29
mmp. 29
mmp. 29
220p. 29
220p. 29
Rated speedp. 29
Rated speedp. 29
m/minp. 29
m/minp. 29
30p. 29
30p. 29
Conveyor augerp. 29
Conveyor augerp. 29
Quantityp. 29
Quantityp. 29
2p. 29
2p. 29
Auger diameterp. 29
Auger diameterp. 29
mmp. 29
mmp. 29
280p. 29
280p. 29
Rated speedp. 29
Rated speedp. 29
rpmp. 29
rpmp. 29
100p. 29
100p. 29
Screedp. 29
Screedp. 29
Width of screedp. 29
mmp. 29
mmp. 29
1700 – 3400p. 29
1700 – 3400p. 29
Max. working widthp. 29
mmp. 29
mmp. 29
4000p. 29
4000p. 29
Min. paving width with reducing skidsp. 29
mmp. 29
mmp. 29
750p. 29
750p. 29
Mat heightp. 29
Mat heightp. 29
mmp. 29
mmp. 29
250p. 29
250p. 29
Smooth plate depthp. 29
mmp. 29
mmp. 29
305p. 29
305p. 29
Smooth plate thicknessp. 29
mmp. 29
mmp. 29
12p. 29
12p. 29
Heatingp. 29
Heatingp. 29
electricp. 29
electricp. 29
Crownp. 29
Crownp. 29
%p. 29
%p. 29
-3 to +4.5p. 29
-3 to +4.5p. 29
Tamper frequencyp. 29
Hzp. 29
Hzp. 29
0 – 30p. 29
0 – 30p. 29
Vibration frequencyp. 29
Hzp. 29
Hzp. 29
20 – 50p. 29
20 – 50p. 29
Basic weightp. 29
Basic weightp. 29
kgp. 29
kgp. 29
1000p. 29
1000p. 29
Max. weightp. 29
Max. weightp. 29
kgp. 29
kgp. 29
1200p. 29
1200p. 29
Filling capacitiesp. 29
Fuelp. 29
Fuelp. 29
lp. 29
lp. 29
100p. 29
100p. 29
Hydraulic oilp. 29
Hydraulic oilp. 29
lp. 29
lp. 29
80p. 29
80p. 29
Engine oilp. 29
Engine oilp. 29
lp. 29
lp. 29
11.2p. 29
11.2p. 29
Additional engine datap. 30
Combustion principlep. 30
4-stroke dieselp. 30
Low idle speedp. 30
Low idle speedp. 30
rpmp. 30
rpmp. 30
900 ± 100p. 30
900 ± 100p. 30
High idle speedp. 30
rpmp. 30
rpmp. 30
2300 ± 50p. 30
2300 ± 50p. 30
Valve clearance intakep. 30
mmp. 30
mmp. 30
0.15 ± 0.02p. 30
0.15 ± 0.02p. 30
Valve clearance exhaustp. 30
mmp. 30
mmp. 30
0.15 ± 0.02p. 30
0.15 ± 0.02p. 30
Injection valves opening pressurep. 30
barp. 30
barp. 30
1. Phase 186 / 2. Phase 225p. 30
Valve seat leak tightness injection valvesp. 30
barp. 30
barp. 30
At a pressure of (166. bar, the valve seat must be fuel leak tightp. 30
Travel pumpp. 30
Travel pumpp. 30
Manufacturerp. 30
Manufacturerp. 30
Bosch-Rexrothp. 30
Bosch-Rexrothp. 30
Typep. 30
Typep. 30
A10VGp. 30
A10VGp. 30
Quantityp. 30
Quantityp. 30
1p. 30
1p. 30
Systemp. 30
Systemp. 30
Axial piston/swash platep. 30
Max. displacementp. 30
cm3/revp. 30
cmp. 30
3p. 30
45p. 30
45p. 30
Max. flow capacityp. 30
l/minp. 30
l/minp. 30
152p. 30
152p. 30
Maximum pressurep. 30
barp. 30
barp. 30
370 – 390p. 30
370 – 390p. 30
Charge pressurep. 30
barp. 30
barp. 30
24 – 26p. 30
24 – 26p. 30
High pressure limitationp. 30
Pressure override valvep. 30
Travel motor (rear wheel drive)p. 30
Manufacturerp. 30
Manufacturerp. 30
Sauer Danfossp. 30
Sauer Danfossp. 30
Typep. 30
Typep. 30
51Dp. 30
51Dp. 30
Quantityp. 30
Quantityp. 30
2p. 30
2p. 30
Systemp. 30
Systemp. 30
Axial piston/bent axlep. 30
Max. displacement (stage 1)p. 30
cm3/Up. 30
cmp. 30
3p. 30
110p. 30
110p. 30
Min. displacement (stage 2)p. 30
cm3/Up. 30
cmp. 30
3p. 30
69p. 30
69p. 30
Travel motor (front wheel drive)p. 30
Manufacturerp. 30
Manufacturerp. 30
SAI S.p.ap. 30
SAI S.p.ap. 30
Typep. 30
Typep. 30
BD1p. 30
BD1p. 30
Quantityp. 30
Quantityp. 30
2/4p. 30
2/4p. 30
Max. displacement (stage 1)p. 30
cm3/Up. 30
cmp. 30
3p. 30
61p. 30
61p. 30
Min. displacement (stage 2)p. 30
cm3/Up. 30
cmp. 30
3p. 30
0p. 30
0p. 30
Travel gearp. 30
Travel gearp. 30
Manufacturerp. 30
Manufacturerp. 30
Officine Mecc. s.r.l.p. 30
Typep. 30
Typep. 30
401-06466Cp. 30
401-06466Cp. 30
Systemp. 30
Systemp. 30
Spurwheel gear, shiftable (“high”, “low”)p. 30
Reduction (“high”)p. 30
3.103:1p. 30
3.103:1p. 30
Reduction (“low”)p. 30
8.052:1p. 30
8.052:1p. 30
Reduction gearp. 30
Reduction gearp. 30
Manufacturerp. 30
Manufacturerp. 30
Bondioli & Pavesip. 30
Typep. 30
Typep. 30
S 8341 008 001p. 30
S 8341 008 001p. 30
Quantityp. 30
Quantityp. 30
2p. 30
2p. 30
Systemp. 30
Systemp. 30
Three-stage spurwheel gear, spur toothedp. 30
Reduction ratiop. 30
11.908:1p. 30
11.908:1p. 30
Maximum input speedp. 30
rpmp. 30
rpmp. 30
179p. 30
179p. 30
Service pumpp. 30
Service pumpp. 30
Manufacturerp. 30
Manufacturerp. 30
Bosch-Rexrothp. 30
Bosch-Rexrothp. 30
Typep. 30
Typep. 30
A10VOp. 30
A10VOp. 30
Quantityp. 30
Quantityp. 30
1p. 30
1p. 30
Systemp. 30
Systemp. 30
Axial piston/swash platep. 30
Max. displacementp. 31
cm3/revp. 31
cmp. 31
3p. 31
28p. 31
28p. 31
Max. flow capacityp. 31
l/minp. 31
l/minp. 31
84p. 31
84p. 31
Maximum pressurep. 31
barp. 31
barp. 31
145 – 155p. 31
145 – 155p. 31
Charge pressurep. 31
barp. 31
barp. 31
24 – 26p. 31
24 – 26p. 31
High pressure limitationp. 31
Pressure override valvep. 31
Pump –> tamper and vibration (stage 1)p. 31
Manufacturerp. 31
Manufacturerp. 31
Haldexp. 31
Haldexp. 31
Typep. 31
Typep. 31
WP09p. 31
WP09p. 31
Systemp. 31
Systemp. 31
Gear pumpp. 31
Gear pumpp. 31
Quantityp. 31
Quantityp. 31
1p. 31
1p. 31
Displacementp. 31
Displacementp. 31
cm3/revp. 31
cmp. 31
3p. 31
190p. 31
190p. 31
Nominal pressurep. 31
barp. 31
barp. 31
276p. 31
276p. 31
Maximum speedp. 31
Maximum speedp. 31
rpmp. 31
rpmp. 31
3000p. 31
3000p. 31
Tamper motorp. 31
Tamper motorp. 31
Manufacturerp. 31
Manufacturerp. 31
Sauer Danfossp. 31
Sauer Danfossp. 31
Typep. 31
Typep. 31
SNM2p. 31
SNM2p. 31
Systemp. 31
Systemp. 31
Gear motorp. 31
Gear motorp. 31
Displacementp. 31
Displacementp. 31
cm3/Up. 31
cmp. 31
3p. 31
14.4p. 31
14.4p. 31
Maximum pressurep. 31
barp. 31
barp. 31
280p. 31
280p. 31
Nominal pressurep. 31
barp. 31
barp. 31
250p. 31
250p. 31
Rated speedp. 31
Rated speedp. 31
rpmp. 31
rpmp. 31
1800 – 2000p. 31
1800 – 2000p. 31
Vibration motorp. 31
Manufacturerp. 31
Manufacturerp. 31
Sauer Danfossp. 31
Sauer Danfossp. 31
Typep. 31
Typep. 31
SNM2p. 31
SNM2p. 31
Systemp. 31
Systemp. 31
Gear motorp. 31
Gear motorp. 31
Displacementp. 31
Displacementp. 31
cm3/Up. 31
cmp. 31
3p. 31
8.4p. 31
8.4p. 31
Maximum pressurep. 31
barp. 31
barp. 31
280p. 31
280p. 31
Nominal pressurep. 31
barp. 31
barp. 31
250p. 31
250p. 31
Rated speedp. 31
Rated speedp. 31
rpmp. 31
rpmp. 31
2650 – 2850p. 31
2650 – 2850p. 31
Pump –> auger drive left (stage 2)p. 31
Manufacturerp. 31
Manufacturerp. 31
Haldexp. 31
Haldexp. 31
Typep. 31
Typep. 31
WP09p. 31
WP09p. 31
Systemp. 31
Systemp. 31
Gear pumpp. 31
Gear pumpp. 31
Quantityp. 31
Quantityp. 31
1p. 31
1p. 31
Displacementp. 31
Displacementp. 31
cm3/revp. 31
cmp. 31
3p. 31
80p. 31
80p. 31
Pressurep. 31
Pressurep. 31
barp. 31
barp. 31
230 – 250p. 31
230 – 250p. 31
Maximum speedp. 31
Maximum speedp. 31
rpmp. 31
rpmp. 31
4000p. 31
4000p. 31
Motor for augersp. 31
Manufacturerp. 31
Manufacturerp. 31
Sauer Danfossp. 31
Sauer Danfossp. 31
Typep. 31
Typep. 31
OMS 160p. 31
OMS 160p. 31
Systemp. 31
Systemp. 31
Orbital motorp. 31
Orbital motorp. 31
Max. displacement.p. 31
cm3/revp. 31
cmp. 31
3p. 31
160p. 31
160p. 31
Rated speedp. 31
Rated speedp. 31
rpmp. 31
rpmp. 31
80 – 84p. 31
80 – 84p. 31
Quantityp. 31
Quantityp. 31
2p. 31
2p. 31
Pump 3-stage (drive of right auger, as well as conveyor belt left & right)p. 31
Manufacturerp. 31
Manufacturerp. 31
Haldexp. 31
Haldexp. 31
Typep. 31
Typep. 31
WP09p. 31
WP09p. 31
Systemp. 31
Systemp. 31
Gear pumpp. 31
Gear pumpp. 31
Quantityp. 31
Quantityp. 31
1p. 31
1p. 31
Displacementp. 31
Displacementp. 31
cm3/revp. 31
cmp. 31
3p. 31
80p. 31
80p. 31
Pressurep. 32
Pressurep. 32
barp. 32
barp. 32
230 – 250p. 32
230 – 250p. 32
Maximum speedp. 32
Maximum speedp. 32
rpmp. 32
rpmp. 32
4000p. 32
4000p. 32
Scraper belt motorsp. 32
Manufacturerp. 32
Manufacturerp. 32
Sauer Danfossp. 32
Sauer Danfossp. 32
Typep. 32
Typep. 32
OMS 160p. 32
OMS 160p. 32
Quantityp. 32
Quantityp. 32
2p. 32
2p. 32
Systemp. 32
Systemp. 32
Orbital motorp. 32
Orbital motorp. 32
Max. displacement.p. 32
cm3/revp. 32
cmp. 32
3p. 32
160p. 32
160p. 32
Rated speedp. 32
Rated speedp. 32
rpmp. 32
rpmp. 32
60 – 64p. 32
60 – 64p. 32
Pump for cleaning kitp. 32
Manufacturerp. 32
Manufacturerp. 32
Flowjetp. 32
Flowjetp. 32
Typep. 32
Typep. 32
Duplex 2 seriesp. 32
Systemp. 32
Systemp. 32
Dual piston pumpp. 32
Quantityp. 32
Quantityp. 32
1p. 32
1p. 32
Displacement (high pressure variant)p. 32
l/minp. 32
l/minp. 32
8.32p. 32
8.32p. 32
Displacement (medium and low pressure variant)p. 32
l/minp. 32
l/minp. 32
6.05p. 32
6.05p. 32
Maximum pressurep. 32
barp. 32
barp. 32
6.8p. 32
6.8p. 32
Tiresp. 32
Tiresp. 32
rearp. 32
rearp. 32
13R22.5p. 32
13R22.5p. 32
Quantityp. 32
Quantityp. 32
2p. 32
2p. 32
frontp. 32
frontp. 32
Solid rubberp. 32
Solid rubberp. 32
Quantityp. 32
Quantityp. 32
4p. 32
4p. 32
Diameterp. 32
Diameterp. 32
mmp. 32
mmp. 32
470p. 32
470p. 32
Widthp. 32
Widthp. 32
mmp. 32
mmp. 32
280p. 32
280p. 32
The following noise and vibration data acc. top. 33
– EC Machine Regulation edition 2006/42/ECp. 33
– the noise regulation 2000/14/EG, noise protection guideline 2003/10/ECp. 33
– Vibration Protection Regulation 2002/44/ECp. 33
were determined during conditions typical for this type of equipment and by application of harmonized standards.p. 33
During operation these values may vary because of the existing operating conditions.p. 33
Noise valuep. 33
Noise valuep. 33
Sound pressure level on the place of the operator:p. 33
Lp. 33
pAp. 33
Guaranteed sound power level:p. 33
Lp. 33
WAp. 33
Wear your personal noise protection means (ear defenders) before starting operation.p. 33
Vibration valuep. 33
Vibration of the entire body (driver’s seat)p. 33
The weighted effective acceleration value determined acc. to ISO 7096, isp. 33
£p. 33
2p. 33
Hand-arm vibration valuesp. 33
The weighted effective acceleration value, determined acc. to EN 500/ISO 5349, isp. 33
£p. 33
2p. 33
3 Maintenancep. 35
3 Maintenancep. 35
3.1 General notes on maintenancep. 36
When performing maintenance work always comply with the appropriate safety regulations.p. 36
Thorough maintenance of the machine guarantees far longer safe functioning of the machine and prolongs the lifetime of important components. The effort needed for this work is only little compared with the problems that may arise when not observing t…p. 36
The terms right/left correspond with travel direction forward.p. 36
Always clean machine and engine thoroughly before starting maintenance work.p. 36
For maintenance work stand the machine on level ground.p. 36
Always remove the main battery switch for all maintenance work.p. 36
Perform maintenance work only with the motor switched off.p. 36
Relieve hydraulic pressures before working on hydraulic lines.p. 36
Before working on electric parts of the machine disconnect the battery and cover it with insulation material.p. 36
Always ensure sufficient lighting when performing maintenance work.p. 36
During maintenance work catch all oils and fuels and do not let them seep into the ground or into the sewage system. Dispose of oils and fuels environmentally.p. 36
Keep used filters in a separate waste container and dispose of environmentally.p. 36
Catch biodegradable oils separately.p. 36
Notes on the fuel systemp. 36
The lifetime of the diesel engine depends to a great extent on the cleanliness of the fuel.p. 36
Keep fuel free of contaminants and water, since this will damage the injection elements of the engine.p. 36
Drums with inside zinc lining are not suitable to store fuel.p. 36
When choosing the storage place for fuel make sure that spilled fuel will not harm the environment.p. 36
Do not let the hose stir up the slurry at the bottom of the drum.p. 36
The fuel drum must rest for a longer period of time before drawing off fuel.p. 36
The rest in the drum is not suitable for the engine and should only be used for cleaning purposes.p. 36
Notes on the performance of the enginep. 36
On diesel engines both combustion air and fuel injection quantities are thoroughly adapted to each other and determine power, temperature level and exhaust gas quality of the engine.p. 36
If your engine has to work permanently in "thin air" (at higher altitudes) and under full load, you should consult the customer service of BOMAG or the customer service of the engine manufacturer.p. 36
Notes on the hydraulic systemp. 36
During maintenance work on the hydraulic system cleanliness is of major importance. Make sure that no dirt or other contaminating substances can enter into the system. Small particles can produce flutes in valves, cause pumps to seize, clog nozzles a…p. 36
If, during the daily inspection of the oil level the hydraulic oil level is found to have dropped, check all lines, hoses and components for leaks.p. 36
Seal external leaks immediately. If necessary inform the responsible customer service.p. 36
Do not store drums with hydraulic oil outdoors, or at least under a cover. Water can be drawn in through the bunghole when the weather changes.p. 36
Always use the BOMAG filling unit to fill the hydraulic system. This unit is fitted with a fine filter to clean the hydraulic oil, thereby prolonging the lifetime of the filter.p. 36
Clean fittings, filler covers and the area around such parts before disassembly to avoid entering of dirt.p. 36
Do not leave the tank opening unnecessarily open, but cover it so that nothing can fall in.p. 36
Notes on the cooling systemp. 36
Prepare and check coolant with highest care, since otherwise the engine may be damaged by corrosion, cavitation and freezing.p. 36
The coolant is prepared by mixing a cooling system protection agent (ethylene glycol) into the coolant.p. 36
Mixing with cooling system protection agent is necessary in all climatic zones. It prevents corrosion, lowers the freezing point and raises the boiling point of the coolant.p. 36
3.2 Fuels and lubricantsp. 37
Engine oilp. 37
Engine oilp. 37
Qualityp. 37
Lubrication oils are classified according to their performance and quality class. Oils according to other comparable specifications may be used.p. 37
Only engine oils of APIp. 37
American Petroleum Institutep. 37
Engine oils of API-classification CF-4, CG-4 and CH-4 must not be used.p. 37
Oil viscosityp. 37
Multi-purpose oils should be generally used.p. 37
Since lubrication oil changes its viscosity with the temperature, the ambient temperature at the operating location of the engine is of utmost importance when choosing the viscosity class (SAE-class) .p. 37
Optimal operating conditions can be achieved by using the following oil viscosity chart as a reference.p. 37
Ambient temperaturep. 37
Viscosityp. 37
Viscosityp. 37
Viscosityp. 37
over 25 °C!p. 37
over 25 °C!p. 37
SAE 30p. 37
SAE 30p. 37
SAE 10W-30p. 37
SAE 15W-40p. 37
0°C to 25°Cp. 37
0°C to 25°Cp. 37
SAE 20p. 37
SAE 20p. 37
SAE 10W-30p. 37
SAE 15W-40p. 37
below 0 °Cp. 37
below 0 °Cp. 37
SAE 10p. 37
SAE 10p. 37
SAE 10W-30p. 37
SAE 15W-40p. 37
Oil change intervalsp. 37
The longest permissible time a lubrication oil should remain in an engine is 1 year.p. 37
If the 500 operating hours are not reached over a period of 1 year, the oil change should be performed at least once per year, irrespective of the operating hours reached.p. 37
Fuelsp. 37
Fuelsp. 37
Qualityp. 37
Cetan index number: The recommended minimum index number for the Cetan value is 45. A Cetan index number higher than 50 should preferably be used, especially at ambient temperatures below -20 °C and when working at altitudes of 1500 m and more.p. 37
Diesel fuel specifications: With respect to the percentage (ppm) of sulphur the fuel used in the engine must comply with all relevant exhaust emission regulations in the are of use of the engine.p. 37
It is highly recommended to use a fuel with a sulphur content of less than 0,10 % (1000 ppm).p. 37
When using a diesel fuel with a high sulphur content of 0.50 % (5000 ppm) to 1.0 % (10.000 ppm), the engine oil change intervals must behalved.p. 37
Do not use any fuels with a sulphur content of more than 1,0 % (10000 ppm).p. 37
It is recommended to use diesel fuel that complies with the specifications EN590 or ASTM D975.p. 37
Diesel fuel with the designation no. 2-D is a destillate fuel with low volatility, which is especially suitable for industrial engines and heavy-duty commercial vehicles (SAE J313 JUN87).p. 37
As an alternative to no. 2-D you may also use diesel fuel no. 2-D S500 or S15; with ambient temperatures below -10 °C the diesel fuel no. 1-D S500 or S15 should be used fir no. 1-D.p. 37
The fuel level should always be topped up in due time so that the fuel tank is never run dry, as otherwise filter and injection lines need to be bled.p. 37
Winter fuelp. 37
Fire hazard!p. 37
Fire hazard!p. 37
Diesel fuels must never be mixed with gasoline.p. 37
For winter operation use only winter diesel fuel, to avoid clogging because of paraffin separation. At very low temperatures disturbing paraffin separation can also be expected when using winter diesel fuel.p. 37
Coolantp. 37
Coolantp. 37
Always use a mixture of anti-freeze agent and clean, dehardened water with a mixing ratio of 1:1.p. 37
Under particularly extreme temperature conditions you should consult the service representation of the engine manufacturer with respect to the anti-freeze agent to be used.p. 37
There are various types of anti-freeze agents available. For this engine you should use ethylene glycol.p. 37
Before filling in the coolant mixed with anti-freeze agent the radiator must be flushed with clean water. This procedure should be repeated two to three times to clean the inside of radiator and engine block.p. 37
Mixing the anti-freeze agent: Prepare a mixture of 50 % anti-freeze agent and 50 % low mineral, clean water. Stirr well before filling it into the radiator. The method for mixing water and anti-freeze agent depends on the brand of the anti-freeze age…p. 38
Add anti-freeze agent: If the coolant level drops because of evaporation,only clean water is to be used for topping up. In case of leakages you must always fill in anti-freeze agents of the same brand and the same mixing ratio.p. 38
Do not mix different coolants and additives of any other kind.p. 38
Do not use any radiator cleaning agent after the anti- freeze agent has been mixed in. The anti-freeze agent also contains a corrosion protection agent. If this mixes with cleaning agent it may cause the development of sludge, which could damage the …p. 38
Anti-freeze concentrationp. 38
50%p. 38
50%p. 38
-37 °Cp. 38
Coolant must be disposed of environmentally.p. 38
Mineral oil based hydraulic oilp. 38
The hydraulic system is operated with hydraulic oil HV 46 (ISO) with a kinematic viscosity of 46 mmp. 38
2p. 38
2p. 38
Gear oilp. 38
Gear oilp. 38
Qualityp. 38
For the gearboxes use only multi-purpose gear oils of API-GL5-class, SAE 80W- 90.p. 38
This is a hypoid lubricant of highest quality class for extremely loaded transmissions.p. 38
The additives in this oil ensure low wear lubrication under all operating conditions.p. 38
Lubrication greasep. 38
For lubrication use only EP-high pressure grease, lithium saponified (NLGI 3).p. 38
3.3 Running-in instructionsp. 39
The following maintenance work must be performed when running in new machines or overhauled engines:p. 39
Up to approx. 250 operating hours check the engine oil level twice every day.p. 39
Depending on the load the engine is subjected to, the oil consumption will drop to the normal level after approx. 100 to 250 operating hours.p. 39
After a running-in time of 30 minutesp. 39
Retighten the V-beltp. 39
After 50 operating hoursp. 39
Changing engine oil and oil filterp. 39
Check the tension of the fan V-beltp. 39
Retighten all wheel fastening screws with the specified tightening torque.p. 39
Oil change in front wheel drive hubsp. 39
Oil change in rear wheel drive differentialp. 39
Oil change in rear wheel drive reduction gearp. 39
Grease the auger drive chainp. 39
Hopper, check scrapers and rubber apronp. 39
After 250 operating hoursp. 39
Tighten all bolted connections on air intake, exhaust, oil sump and engine mountsp. 39
Retighten the bolted connections on the machine.p. 39
Retighten all wheel fastening screws with the specified tightening torque.p. 39
Oil change in front wheel drive hubsp. 39
Oil change in rear wheel drive differentialp. 39
Oil change in rear wheel drive reduction gearp. 39
Grease the auger drive chainp. 39
Hopper, check scrapers and rubber apronp. 39
4 E-Plan wiring diagramsp. 41
4.1 Understanding wiring diagramsp. 42
Electric circuit diagramsp. 42
Electric circuit diagrams are graphic presentations of control logical conditions in the electric system. They do not contain any information on the type of wiring, their purpose is solely the clarification of control logics.p. 42
The wiring diagram is indispensable for effective and systematic trouble shooting in the vehicle wiring system. This plan provides the following information:p. 42
Number and type of individual elements in the examined electric circuit, such as plug connectors, fuses, switches, consumers, relays, etc.p. 42
The sequence in which current flows through the individual elements in the electric circuit.p. 42
Connections between the examined electric circuit and other circuits in the vehicle wiring system.p. 42
Pin assignment of plug-and-socket connections.p. 42
Structure of a wiring diagramp. 42
Cover sheet, see section "Cover sheet"p. 42
Table of contents, see section "Table of contents"p. 42
Structuring symbol overview, see section "Structuring symbol overview"p. 42
The structuring symbol overview is NOT present in circuit diagrams, which are sorted by systems and local identification!p. 42
Sheets with illustration of function, see section"Sheets with illustration of function"p. 42
List of fuels and lubricants, see "List of fuels and lubricants"p. 42
Terminal strip overview, see section "Terminal strip overview"p. 42
Plug overview, see section "Plug overview"p. 42
Pin overview, see section "Pin overview"p. 42
Cover sheetp. 43
The cover sheet, see examplep. 43
(Fig. 13)p. 43
Fig. 13 Example: Cover sheetp. 43
Table of contentsp. 44
The table of contents, see examplep. 44
(Fig. 14)p. 44
Fig. 14 Example: Table of contentsp. 44
Sheets with representations of functionsp. 45
The main reading direction is sheet by sheet, from top to bottom and from left to right.p. 45
All sheets are successively numbered.p. 45
BOMAG used the resolved type of representation. In this case parts and components with different functions, which belong to the same components (e.g. relay coil and relay contact), can be represented on different sheets. Cross-references, which refer…p. 45
(Fig. 15)p. 45
Fig. 15 Example: Sheet with functionsp. 45
Current pathsp. 45
Current pathsp. 45
(Fig. 15)p. 45
Current paths are successively numbered from 0 to 9.p. 45
Potential cross referencesp. 45
(Fig. 15)p. 45
Potential cross references serve the purpose of tracking signals, which are transmitted from one representation of a function to another. Potential cross-references may additionally have structuring symbols assigned to them.p. 45
Example: Potential 15_54 +SEAT/16.1 (on sheet 4, current path 8) continues to the right on sheet 16, current path 1.p. 45
Example: Potential 15_54 +SEAT/16.1p. 45
+SEATp. 45
Relay cross referencesp. 46
(Fig. 15)p. 46
Relay cross references serve the tracking of signals, which need to be tracked for components with outgoing contacts. A mimic diagram with information about the contact types of a relay and their positions in the wiring diagram is additionally attach…p. 46
Example: The relay cross-reference (p. 46
Example:p. 46
-K61/4.2p. 46
List of componentp. 47
The list of components, see examplep. 47
(Fig. 16)p. 47
Fig. 16 Example: List of componentsp. 47
An electric component is a part, assembly or device in an electrical installation.p. 47
Components are marked with a combination of letters and numbers. The identification with letters follows the standard DIN – EN 61346 T1-T2. A component identification (BMK), e.g.: “S04“ always identifies the same component. In this context the te…p. 47
The component identifications are alphabetically sorted in the list of components. Each component has the corresponding cross-references assigned, identifying where it can be found in the wiring diagram, which installation location it is assigned to …p. 47
Component identifications are used in both the electrical and the hydraulic documentation and are identical.p. 47
Overview of terminal stripsp. 48
The overview of terminal strips, see axamplep. 48
(Fig. 17)p. 48
Fig. 17 Example: Terminal strip overview X1p. 48
Overview of plugsp. 49
The overview of plugs, see examplep. 49
(Fig. 18)p. 49
The following information is listed for each plug:p. 49
Contact numberingp. 49
Structuring symbolsp. 49
Function textp. 49
Use in wiring diagram.p. 49
Fig. 18 Example: Plug overview X0p. 49
Overview of pinsp. 50
The overview of pins, see examplep. 50
(Fig. 19)p. 50
Fig. 19 Example: Overview of pins, control A66p. 50
4.2 Circuit symbols in the circuit diagramp. 51
Circuit symbolsp. 51
Circuit symbols are standardized representations for electrical appliances. They serve the purpose of a simplified representation of complete systems, from which, however, the function can be clearly identified. This standardization is in compliance …p. 51
Fig. 20 Example: Circuit symbolp. 51
1 Current sourcep. 51
2 Conductorp. 51
3 Switchp. 51
4 Groundp. 51
5 Filament lampp. 51
6 Filament lamp with two luminous elementsp. 51
7 Voltmeterp. 51
8 Amperemeterp. 51
9 Resistancep. 51
10 Fusep. 51
11 Terminal stripp. 51
12 Plugp. 51
Different symbols are used to simplify the differentiation of terminal strips 11p. 51
(Fig. 20)p. 51
Plugs are mainly used to connect two wiring looms or to connect a wiring loom with a component with cable connection and mating plug.p. 51
Representation of electric devicesp. 52
Electronic devices and components are increasingly used in the construction equipment industry. Controls with software, control elements (e.g. joysticks and man/machine interface (e.g. screens, LC Displays) are frequently used to represent and contro…p. 52
Black-Box representationp. 52
(Fig. 21)p. 52
The Black-Box representation shows the device as a Box with the connections required for the machine function. Connections which are not needed do not need to be represented.p. 52
The Black-Box representation is mainly used when no differentiated information (e.g. signals on pins) is available.p. 52
Fig. 21 Example: Central lubrication systemp. 52
Identification of externally supplied documentationp. 52
(Fig. 22)p. 52
In industrial technology of today it is quite common to integrate externally supplied electric sub-systems into the projecting of machines. These systems may be composed of various components and wirings. For easier differentiation of BOMAG designati…p. 52
Fig. 22 Example: Identification of externally supplied documentationp. 52
PLC representationp. 52
(Fig. 23)p. 52
The PLC-Box representation of connecting pins uses a table with associated connecting plugs, which are used in connection with the machine functions. The table symbols can be arranged in a line, if necessary. Connections which are not needed do not n…p. 52
Fig. 23 PLC representationp. 53
The PLC-Box representation is mainly used for controls with BOMAG software, or for electronic devices which were specified accordingly, and where information on the assignment of signals is available.p. 53
Identification of similar, adjacent switching symbolsp. 53
In wiring diagrams you will frequently find the situation that symbols of the same type appear in a line or are arranged just next to each other. In such cases it is common practice to reduce the identification on the subsequent symbol to the criteri…p. 53
Example: -X0 36 and -X0 37p. 53
(Fig. 23)p. 53
In the example illustrated here the component identification "-X0" for the left plug symbol is also valid for the right plug symbol.p. 53
4.3 Identification of switch blocks in the wiring diagramp. 54
Switches of modular designp. 54
For normally open contacts the contact symbols "_3/_4" are used.p. 54
For normally closed contacts the contact symbols "_1/_2" are used.p. 54
In combination with the contact block numbering described above each individual connection is clearly defined.p. 54
Fig. 24p. 54
Example:p. 54
The contact block marked with the "circle" is referred to as "43"/ "44" if it is a normally open contact and "41" / "42" if it is a normally closed contact.p. 54
The contact block marked with "X" is referred to as "23"/ "24" if it is a normally open contact and "21" / "22" if it is a normally closed contact.p. 54
The contact block marked with "Z" is referred to as "13"/ "14" if it is a normally open contact and "11" / "12" if it is a normally closed contact.p. 54
The contact block marked with "Y" is referred to as "53"/ "54" if it is a normally open contact and "51" / "52" if it is a normally closed contact.p. 54
4.4 Designation of components in the wiring diagramp. 55
The designation of components in the wiring diagram groups several electrical parts of the machine in one group. The components can be identified by the following table.p. 55
Component designationp. 55
Meaningp. 55
Meaningp. 55
Ap. 55
Ap. 55
Interval switch, indicator relay, modules, electronic componentp. 55
Bp. 55
Bp. 55
Pressure, pressure differential, temperature switches and sensors, transducersp. 55
Cp. 55
Cp. 55
Capacitorp. 55
Capacitorp. 55
Ep. 55
Ep. 55
Headlights, heater, air conditioning condenserp. 55
Fp. 55
Fp. 55
Fusesp. 55
Fusesp. 55
Gp. 55
Gp. 55
Battery, generatorp. 55
Hp. 55
Hp. 55
Control lights, warning buzzer, warning lightp. 55
Kp. 55
Kp. 55
Relaysp. 55
Relaysp. 55
Mp. 55
Mp. 55
Starter, pumps, motorsp. 55
Pp. 55
Pp. 55
Operating hour meter, general gaugesp. 55
Rp. 55
Rp. 55
Transducers, resistorsp. 55
Sp. 55
Sp. 55
Switches, momentary contact switchesp. 55
Vp. 55
Vp. 55
Diodep. 55
Diodep. 55
Xp. 55
Xp. 55
Terminalp. 55
Terminalp. 55
Yp. 55
Yp. 55
Solenoid valvesp. 55
4.5 Terminal designations in wiring diagramp. 56
For easier connection work almost every connection on a consumer or switch used in a motor vehicle has a terminal designation. In Germany the designation of the individual connection terminals is determined by the standard DIN 72552. The following ta…p. 56
Terminal designationp. 56
Meaningp. 56
Meaningp. 56
15p. 56
15p. 56
Switch plus (after battery) : Output of ignition switchp. 56
15ap. 56
15ap. 56
Output from dropping resistor to ignition coil and starterp. 56
17p. 56
17p. 56
Preheating starter switch, preheatingp. 56
19p. 56
19p. 56
Preheating starter switch, startingp. 56
30p. 56
30p. 56
Battery plus directp. 56
30ap. 56
30ap. 56
Battery changeover relay 12V / 24V, input from battery 2 plusp. 56
31p. 56
31p. 56
Battery minus direct or groundp. 56
31ap. 56
31ap. 56
Battery changeover relay 12V / 24V return line to battery 2 minusp. 56
31bp. 56
31bp. 56
Return line to battery minus or ground via switch or relay (switched minus)p. 56
31cp. 56
31cp. 56
Battery changeover relay 12V / 24V return line to battery 1 minusp. 56
49p. 56
49p. 56
Input flasher relayp. 56
49ap. 56
49ap. 56
Output flasher relayp. 56
49bp. 56
49bp. 56
Flasher relay output 2nd flasher circuitp. 56
49cp. 56
49cp. 56
Flasher relay output 3rd flasher circuitp. 56
50p. 56
50p. 56
Starter, starter controlp. 56
50ap. 56
50ap. 56
Battery changeover relay, output for starter controlp. 56
53p. 56
53p. 56
Wiper motor input (+)p. 56
53ap. 56
53ap. 56
Wiper motor (+) end limit shut downp. 56
53bp. 56
53bp. 56
Wiper shunt windingp. 56
56p. 56
56p. 56
Head lightp. 56
Head lightp. 56
56ap. 56
56ap. 56
Head light, travel light and travel light controlp. 56
56bp. 56
56bp. 56
Head lights, dimmed head lightp. 56
56dp. 56
56dp. 56
Head lights, flash lightp. 56
57p. 56
57p. 56
Parking light for motor cycles (abroad also for cars and trucks)p. 56
57ap. 56
57ap. 56
Parking lightp. 56
Parking lightp. 56
57Lp. 56
57Lp. 56
Parking light leftp. 56
57Rp. 56
57Rp. 56
Parking light rightp. 56
58p. 56
58p. 56
Side lights, tail light, number plate light, dashboard lightp. 56
58bp. 56
58bp. 56
Tail light changeover for single axle trailersp. 56
58cp. 56
58cp. 56
Trailer plug for single core wired and trailer fused tail lightp. 56
58dp. 56
58dp. 56
Adjustable dashboard light, tail light and side lightp. 56
58Lp. 56
58Lp. 56
Side light, leftp. 56
58Rp. 56
58Rp. 56
Side light, rightp. 56
61p. 56
61p. 56
Generator controlp. 56
75p. 56
75p. 56
Radio, cigarette lighterp. 56
76p. 56
76p. 56
Loudspeakerp. 56
Loudspeakerp. 56
87p. 56
87p. 56
Relay contact on breaker and two-way contact, inputp. 56
87ap. 57
87ap. 57
Relay contact on breaker and two-way contact, output 1 (breaker side)p. 57
87bp. 57
87bp. 57
Relay contact on breaker and two-way contact, output 2p. 57
87cp. 57
87cp. 57
Relay contact on breaker and two-way contact, output 3p. 57
87zp. 57
87zp. 57
Relay contact on breaker and two-way contact, input 1p. 57
87yp. 57
87yp. 57
Relay contact on breaker and two-way contact, input 2p. 57
87xp. 57
87xp. 57
Relay contact on breaker and two-way contact, input 3p. 57
88p. 57
88p. 57
Relay contact for makerp. 57
88ap. 57
88ap. 57
Relay contact on maker and two-way contact, (maker side) output 1p. 57
88bp. 57
88bp. 57
Relay contact on maker and two-way contact, (maker side) output 2p. 57
88cp. 57
88cp. 57
Relay contact on maker and two-way contact, (maker side) output 3p. 57
88zp. 57
88zp. 57
Relay contact on maker, input 1p. 57
88yp. 57
88yp. 57
Relay contact on maker, input 2p. 57
88xp. 57
88xp. 57
Relay contact on maker, input 3p. 57
B+p. 57
B+p. 57
Battery positivep. 57
B-p. 57
B-p. 57
Battery minusp. 57
Battery minusp. 57
D+p. 57
D+p. 57
Dynamo Plusp. 57
Dynamo Plusp. 57
D-p. 57
D-p. 57
Dynamo Minusp. 57
Dynamo Minusp. 57
DFp. 57
DFp. 57
Dynamo field (generator excitation current)p. 57
DF1p. 57
DF1p. 57
Dynamo field 1 (generator excitation current)p. 57
DF2p. 57
DF2p. 57
Dynamo field 2 (generator excitation current)p. 57
5 Electricsp. 59
5 Electricsp. 59
5.1 Designation of components in the wiring diagramp. 60
The designation of components in the wiring diagram groups several electrical parts of the machine in one group. The components can be identified by the following table.p. 60
Component designationp. 60
Meaningp. 60
Meaningp. 60
Ap. 60
Ap. 60
Interval switch, indicator relay, modules, electronic componentp. 60
Bp. 60
Bp. 60
Pressure, pressure differential, temperature switches and sensors, transducersp. 60
Cp. 60
Cp. 60
Capacitorp. 60
Capacitorp. 60
Ep. 60
Ep. 60
Headlights, heater, air conditioning condenserp. 60
Fp. 60
Fp. 60
Fusesp. 60
Fusesp. 60
Gp. 60
Gp. 60
Battery, generatorp. 60
Hp. 60
Hp. 60
Control lights, warning buzzer, warning lightp. 60
Kp. 60
Kp. 60
Relaysp. 60
Relaysp. 60
Mp. 60
Mp. 60
Starter, pumps, motorsp. 60
Pp. 60
Pp. 60
Operating hour meter, general gaugesp. 60
Rp. 60
Rp. 60
Transducers, resistorsp. 60
Sp. 60
Sp. 60
Switches, momentary contact switchesp. 60
Vp. 60
Vp. 60
Diodep. 60
Diodep. 60
Xp. 60
Xp. 60
Terminalp. 60
Terminalp. 60
Yp. 60
Yp. 60
Solenoid valvesp. 60
5.2 Terminal designations in wiring diagramp. 61
For easier connection work almost every connection on a consumer or switch used in a motor vehicle has a terminal designation. In Germany the designation of the individual connection terminals is determined by the standard DIN 72552. The following ta…p. 61
Terminal designationp. 61
Meaningp. 61
Meaningp. 61
15p. 61
15p. 61
Switch plus (after battery) : Output of ignition switchp. 61
15ap. 61
15ap. 61
Output from dropping resistor to ignition coil and starterp. 61
17p. 61
17p. 61
Preheating starter switch, preheatingp. 61
19p. 61
19p. 61
Preheating starter switch, startingp. 61
30p. 61
30p. 61
Battery plus directp. 61
30ap. 61
30ap. 61
Battery changeover relay 12V / 24V, input from battery 2 plusp. 61
31p. 61
31p. 61
Battery minus direct or groundp. 61
31ap. 61
31ap. 61
Battery changeover relay 12V / 24V return line to battery 2 minusp. 61
31bp. 61
31bp. 61
Return line to battery minus or ground via switch or relay (switched minus)p. 61
31cp. 61
31cp. 61
Battery changeover relay 12V / 24V return line to battery 1 minusp. 61
49p. 61
49p. 61
Input flasher relayp. 61
49ap. 61
49ap. 61
Output flasher relayp. 61
49bp. 61
49bp. 61
Flasher relay output 2nd flasher circuitp. 61
49cp. 61
49cp. 61
Flasher relay output 3rd flasher circuitp. 61
50p. 61
50p. 61
Starter, starter controlp. 61
50ap. 61
50ap. 61
Battery changeover relay, output for starter controlp. 61
53p. 61
53p. 61
Wiper motor input (+)p. 61
53ap. 61
53ap. 61
Wiper motor (+) end limit shut downp. 61
53bp. 61
53bp. 61
Wiper shunt windingp. 61
56p. 61
56p. 61
Head lightp. 61
Head lightp. 61
56ap. 61
56ap. 61
Head light, travel light and travel light controlp. 61
56bp. 61
56bp. 61
Head lights, dimmed head lightp. 61
56dp. 61
56dp. 61
Head lights, flash lightp. 61
57p. 61
57p. 61
Parking light for motor cycles (abroad also for cars and trucks)p. 61
57ap. 61
57ap. 61
Parking lightp. 61
Parking lightp. 61
57Lp. 61
57Lp. 61
Parking light leftp. 61
57Rp. 61
57Rp. 61
Parking light rightp. 61
58p. 61
58p. 61
Side lights, tail light, number plate light, dashboard lightp. 61
58bp. 61
58bp. 61
Tail light changeover for single axle trailersp. 61
58cp. 61
58cp. 61
Trailer plug for single core wired and trailer fused tail lightp. 61
58dp. 61
58dp. 61
Adjustable dashboard light, tail light and side lightp. 61
58Lp. 61
58Lp. 61
Side light, leftp. 61
58Rp. 61
58Rp. 61
Side light, rightp. 61
61p. 61
61p. 61
Generator controlp. 61
75p. 61
75p. 61
Radio, cigarette lighterp. 61
76p. 61
76p. 61
Loudspeakerp. 61
Loudspeakerp. 61
87p. 61
87p. 61
Relay contact on breaker and two-way contact, inputp. 61
87ap. 62
87ap. 62
Relay contact on breaker and two-way contact, output 1 (breaker side)p. 62
87bp. 62
87bp. 62
Relay contact on breaker and two-way contact, output 2p. 62
87cp. 62
87cp. 62
Relay contact on breaker and two-way contact, output 3p. 62
87zp. 62
87zp. 62
Relay contact on breaker and two-way contact, input 1p. 62
87yp. 62
87yp. 62
Relay contact on breaker and two-way contact, input 2p. 62
87xp. 62
87xp. 62
Relay contact on breaker and two-way contact, input 3p. 62
88p. 62
88p. 62
Relay contact for makerp. 62
88ap. 62
88ap. 62
Relay contact on maker and two-way contact, (maker side) output 1p. 62
88bp. 62
88bp. 62
Relay contact on maker and two-way contact, (maker side) output 2p. 62
88cp. 62
88cp. 62
Relay contact on maker and two-way contact, (maker side) output 3p. 62
88zp. 62
88zp. 62
Relay contact on maker, input 1p. 62
88yp. 62
88yp. 62
Relay contact on maker, input 2p. 62
88xp. 62
88xp. 62
Relay contact on maker, input 3p. 62
B+p. 62
B+p. 62
Battery positivep. 62
B-p. 62
B-p. 62
Battery minusp. 62
Battery minusp. 62
D+p. 62
D+p. 62
Dynamo Plusp. 62
Dynamo Plusp. 62
D-p. 62
D-p. 62
Dynamo Minusp. 62
Dynamo Minusp. 62
DFp. 62
DFp. 62
Dynamo field (generator excitation current)p. 62
DF1p. 62
DF1p. 62
Dynamo field 1 (generator excitation current)p. 62
DF2p. 62
DF2p. 62
Dynamo field 2 (generator excitation current)p. 62
DTM Seriesp. 63
5.3 Battery ground and analog groundp. 63
GND, battery groundp. 63
The term "ground" (abbreviated GND) describes a conductive body which is normally defined with the potential of "Zero" Volt and represents the reference potential for operating voltages.p. 63
The positive pole of the supply voltage (symbol + ) and all other electric voltages and electical signals in an electrical circuitry refer to the ground potential.p. 63
On motor vehicles and also on motorbikes and bicycles the ground potential is represented by the chassis or the frame. As a conductive part, which covers the entire vehicle, it also serves a return conductor for the vehicle wiring system – the consum…p. 63
Terminal designation for GND = terminale 31p. 63
AGND, analog groundp. 63
Apart from the "normal" battery ground there is also the analog ground, which is solely reserved for sensors.p. 63
DTM Seriesp. 63
5.4 Current and voltagep. 63
Generalp. 63
Generalp. 63
If one wants to describe electric current, this can most simply be accomplished by means of a comparison:p. 63
One simply compares electric current with water.p. 63
Voltagep. 63
Voltagep. 63
Fig. 1p. 63
1 (Fig. 1) Chargep. 63
1 (Fig. 1)p. 63
2 Voltagep. 63
3 Currentp. 63
The equalization attempt between different electric charges is referred to as electric voltage.p. 63
Voltage sources have two poles of different charge. On the one side we have the plus pole with a lack of electrons, on the opposite side the minus pole with a surplus of electrons. This electric "pressure" is known as electric voltage.p. 63
Fig. 2p. 63
If there is a connection between these two poles a discharge will take place, resulting in the flow of an electric current.p. 63
Plus pole= lack of electronsp. 63
Minus pole = excess of electronsp. 63
The following statements concerning electric voltage can be madep. 64
electric voltage is the pressure or force applied to free electrons.p. 64
the electric voltage is the cause of electric currentp. 64
electric voltage is a result of the equalization attempt of electric charges.p. 64
Voltage is measured with a Voltmeter.p. 64
Unit, Voltp. 64
The electric voltage (U) is measured in Volt (V).p. 64
Currentp. 64
Electric current generally describes the directed movement of charge carriers.p. 64
The charge carriers may either be electrons or ions.p. 64
Electric current can only flow if there is a sufficient amount of free moving charge carriers.p. 64
The higher the number of electrons flowing through a conductor per second, the higher the amperage.p. 64
Current is measured with an ammeter.p. 64
Unit, Amperep. 64
The electric amperage (I) is measured in Ampere (A).p. 64
The technical flow direction is specified from PLUS to MINUS.p. 64
Current actually flows from minus to plus, because the current flow is made up of negatively charged electrons.p. 64
But since this was only discovered after the poles of a current source had already been designated, the assumption that current flows from plus to minus was maintained for historic reasons.p. 64
Circuitp. 64
Circuitp. 64
Fig. 3 Circuitp. 64
A simple circuit consists of a current source 1p. 64
(Fig. 3)p. 64
When the circuit is closed, current can flow.p. 64
The circuit can be interrupted or closed with a switch (2).p. 64
The system is protected by a fuse (4).p. 64
Types of currentp. 65
Direct current (D.C.)p. 65
Fig. 1 Direct current (D.C.)p. 65
Direct current flows with steady voltage and amperage from the plus to the minus pole.p. 65
Pure D.C.-voltages are only delivered by accumulators or batteries.p. 65
The voltage in the vehicle wiring system is no pure D.C.-voltage. Even without the generator running, but the consumers switched on, the voltage is not constant, but drops gradually according to the battery charge condition.p. 65
The internal resistance of the battery also causes permanent changes in the vehicle voltage, as soon as consumers are switched on or off.p. 65
Alternating current (A.C.)p. 65
Fig. 2 Alternating current (A.C.)p. 65
Alternating current not only changes its direction, but also its amperage.p. 65
DTM Seriesp. 66
5.5 Pulse Width Modulation (PWM)p. 66
Pulse width modulation (PWM)p. 66
PWM is the abbreviation for Pulse Width Modulation, frequently also referred to as "Pulse Pause Modulation" (PPM). It is used in the field of controls for mobile and robust applications, mainly to control proportional valves (PWM-valves).p. 66
The following applies:p. 66
The signal voltage cannot be measured.p. 66
The current can be measured.p. 66
PWM-solenoid valves must not be interference suppressed with suppressor diodes.p. 66
What does a PWM-output do?p. 66
Digital outputs normally deliver a fixed output voltage, as soon as they are switched on. The value of the output voltage can in this case not be changed. In contrast to this, PWM-outputs divide the voltage into a quick sequence of many square-wave p…p. 66
Fig. 1p. 66
(Fig. 1)Course of PWM-voltage U and coil current I at 10 % duty cycle The effective coil current Ieff is also 10 %.p. 66
(Fig. 1)p. 66
Fig. 1p. 66
(Fig. 1) Course of PWM-voltage U and coil current I at 50 % duty cycle The effective coil current Ieff is also 50 %.p. 66
(Fig. 1)p. 66
Fig. 1p. 67
(Fig. 1) Course of PWM-voltage U and coil current I at 100 % duty cycle The effective coil current Ieff is also 100 %.p. 67
(Fig. 1)p. 67
What does Dither mean?p. 67
When a proportional hydraulic valve is triggered, its spool will not move immediately and at the beginning it will also not move proportionally to the coil current. Due to this "Slip-Stick effect" – a kine of "breakaway torque" – the valve right at t…p. 67
Engineering tackles this problem by subjecting the valve spool to an almost insignificant shuttle movement (the dither). The piston thereby permanently performs a shuttle movement and can therefore not "stick". Even very small position changes now ta…p. 67
Advantage: The hydraulic cylinder actuated this way can be controlled with a much higher sensitivity.p. 67
Disadvantage: With dither the valves becomes noticeably warmer, because the valve spool is permanently in action.p. 67
DTM Seriesp. 68
5.6 Logical base gatesp. 68
Generalp. 68
Generalp. 68
In modern electronics links (logic base gates) are used for data processing and digitizing.p. 68
They arrange the vast variety of entered signals according to certain established mathematical rules. They thereby "set the points" for all incoming signals.p. 68
Links enable certain computing operations, such as addition, subtraction, multiplication, etc.p. 68
In digital technology circuits are today generally bulit up with electronic components: resistors, diodes, transistors, capacitors, etc.p. 68
This enables clear circuits with all components. Assemblies are also replaced by simplified circuit symbols.p. 68
Truth tablep. 68
Truth tablep. 68
The truth table is a tabular representation of events for logic links, as used in boolean algebra. Truth tables are created for the logic links AND gate, OR gate, NOT gate etc., for flip-flops and for extensive logic circuits, under due consideration…p. 68
AND / Conjunctionp. 68
AND is called a conjunction.p. 68
AND is a basic gate working on the principle that the result is true, if two states or statements are true:p. 68
If A and B, then…p. 68
Fig. 1 AND gatep. 68
Truth table AND gatep. 68
Output Q is always 1, if the inputs A and B are equal 1.p. 68
Ap. 68
Ap. 68
Bp. 68
Bp. 68
Qp. 68
Qp. 68
0p. 68
0p. 68
0p. 68
0p. 68
0p. 68
0p. 68
0p. 68
0p. 68
1p. 68
1p. 68
0p. 68
0p. 68
1p. 68
1p. 68
0p. 68
0p. 68
0p. 68
0p. 68
1p. 68
1p. 68
1p. 68
1p. 68
1p. 68
1p. 68
This logic gate is also known as AND gate. Any circuit corresponding with the truth table is an AND gate.p. 68
The following rules apply:p. 68
Output Q is only 1, if all inputs are 1.p. 68
Output Q is 0, if at least one input is 0.p. 68
Substitute circuit with relayp. 68
Fig. 2 AND relay circuitp. 68
OR / Disjunctionp. 68
OR is called a disjunction.p. 68
OR is a base gate working on the principle that the result is true, if one or the other condition or one or the other statement is true:p. 68
If A or B, then…p. 68
Fig. 3 OR gatep. 69
Truth table OR gatep. 69
Output Q is always 1, if the inputs A or B are equal 1.p. 69
Ap. 69
Ap. 69
Bp. 69
Bp. 69
Qp. 69
Qp. 69
0p. 69
0p. 69
0p. 69
0p. 69
0p. 69
0p. 69
0p. 69
0p. 69
1p. 69
1p. 69
1p. 69
1p. 69
1p. 69
1p. 69
0p. 69
0p. 69
1p. 69
1p. 69
1p. 69
1p. 69
1p. 69
1p. 69
1p. 69
1p. 69
This logic gate is also known as OR gate. Any circuit corresponding with the truth table is an OR gate.p. 69
The following rules apply:p. 69
Output Q is 1, if at least one input is 1.p. 69
Output Q is only 0, if all inputs are 0.p. 69
Substitute circuit with relayp. 69
Fig. 4 OR relay circuitp. 69
NOT / Negationp. 69
NOT / Negationp. 69
A negation or Not-function is given if one or several functions or conditions lead to the fact, that the result is NOT true. NOT is a base gate working on the principle that the result is NOT true, if one and/or several condition(s) or one/several st…p. 69
If A or B, then not…p. 69
The negation can obviously also be linked with an AND or OR gate. The results are then: NOT-, NAND- , NOR-Gate:p. 69
NOT-Gatep. 69
Fig. 5 NOT-Gatep. 69
Truth table NOT gatep. 69
Output Y is 0, if input A is equal 1.p. 69
Ap. 69
Ap. 69
Yp. 69
Yp. 69
1p. 69
1p. 69
0p. 69
0p. 69
0p. 69
0p. 69
1p. 69
1p. 69
Fig. 6 NOT relay circuitp. 69
NAND-Gatep. 70
Fig. 7 NAND-Gatep. 70
Truth table NAND gatep. 70
Output Y is 0, if the inputs A and B are equal 1.p. 70
Ap. 70
Ap. 70
Bp. 70
Bp. 70
Yp. 70
Yp. 70
0p. 70
0p. 70
0p. 70
0p. 70
1p. 70
1p. 70
0p. 70
0p. 70
1p. 70
1p. 70
1p. 70
1p. 70
1p. 70
1p. 70
0p. 70
0p. 70
1p. 70
1p. 70
1p. 70
1p. 70
1p. 70
1p. 70
0p. 70
0p. 70
Fig. 8 NAND-relay circuitp. 70
NOR-Gatep. 70
Fig. 9 NOR-Gatep. 70
Truth table NOR gatep. 70
Output Y is 0, if input A or input B is equal 1.p. 70
Ap. 70
Ap. 70
Bp. 70
Bp. 70
Yp. 70
Yp. 70
0p. 70
0p. 70
0p. 70
0p. 70
1p. 70
1p. 70
0p. 70
0p. 70
1p. 70
1p. 70
0p. 70
0p. 70
1p. 70
1p. 70
0p. 70
0p. 70
0p. 70
0p. 70
1p. 70
1p. 70
1p. 70
1p. 70
0p. 70
0p. 70
Substitute circuit with relayp. 70
Fig. 10 NOR-relay circuitp. 70
DTM Seriesp. 71
5.7 Resistancep. 71
Resistance and voltage dropp. 71
While current flows through a conductor the current flow is more or less inhibited by the conductor, this inhibitation is referred to as Resistance.p. 71
Fig. 1 Various size resistorsp. 71
Each conductor has its specific resistance, which is characteristic for the corresponding material. A good conductor has a low resistance, a poor conductor has a high resistance.p. 71
Fig. 2 Potentiometer, infinitely adjustable resistorp. 71
The resistance can only be measured with a Multimeter.p. 71
Symbol, Rp. 71
Unit, Ohmp. 71
Wp. 71
The electric resistance (R) is measured in Ohmp. 71
Wp. 71
Rule of thumb:p. 71
The thicker the cable cross-section, the lower the voltage loss.p. 71
The shorter the cable, the better the current.p. 71
The cleaner the contacts, the better the current.p. 71
The quality of the ground cable is of the same importance as the supply line.p. 71
Unnecessary resistancesp. 71
Unnecessary resistances are frequently caused by mechanical connections, even clean ones, but mainly soiled and oxidizes terminals, too thin cables, material with poor conductivity or bent open cable lugs.p. 71
Badp. 71
Fig. 1 Screw-type terminalsp. 71
Copper wires are squashed and thus become faulty.p. 71
Betterp. 71
Betterp. 71
Fig. 2 Spring clampsp. 71
Connecting clamps for flexible conductorsp. 71
BOMAG No. 057 565 72p. 71
Ampacity up to 20 Amp.p. 71
Cable cross-section 0.08 to 2.5 qmmp. 71
Fig. 3p. 72
In many cases it is better to replace the contact. Soiled or oxidized contacts should be cleaned with Ballistolp. 72
(Fig. 4)p. 72
Copper paste is a heat resistant grease, which has been mixed with copper powder. The paste protects electric contacts against oxidation. Copper paste keeps water away.p. 72
Fig. 4 Balistol oilp. 72
Sometimes the flanks of flat plugs bend open. If these are closed again with the help of pliers the flanks will be excessively strained at the bend and will definitely break sooner or later. It is better to place a small nail under the bottom of the …p. 72
Fig. 5p. 72
Hint for practice:p. 72
A tool you cannot buy. The pliers were converted, the nail is permanently present.p. 72
DTM Seriesp. 73
5.8 Series / parallel connectionp. 73
Series connectionp. 73
In a series circuit the resistors (consumers) are lined up one after the other and the same current (I) passes through each of the consumers However, series connection of consumers is not suitable in practice, as each resistance causes a voltage drop…p. 73
Fig. 1 Series connectionp. 73
Currentp. 73
In series connection the current is identical at every point.p. 73
Itotal = I1 = I2 = I3p. 73
Voltagep. 73
The sum of all partial voltages is identical with the total voltage.p. 73
Utotal = U1 + U2 + U3p. 73
Resistancep. 73
The sum of all partial resistances is identical with the total resistance.p. 73
Rtotal = R1 + R2 + R3p. 73
Series connection of batteriesp. 73
Fig. 2p. 73
In order to achieve a vehicle voltage of 24 V two batteries of the same type and capacity must be connected in series mode.p. 73
In series connection the plus pole of the first battery must be connected with the minus pole of the second battery.p. 73
The sum of all individual voltages is applied to the free poles.p. 73
The total capacity (Ah) is identical with the capacity of the individual battery.p. 73
Parallel connection of batteriesp. 74
Parallel connectionp. 74
In parallel connection all resistances (consumers) are connected between feed and return line.p. 74
All resistances (consumers) are supplied with the same voltage.p. 74
Each of the resistances (consumers) draws as much current as required.p. 74
Fig. 3 Parallel connectionp. 74
Currentp. 74
The total current is the sum of all currents.p. 74
Itotal = I1 + I2 + I3p. 74
Voltagep. 74
The voltage values are identical at every resistance (consumer).p. 74
Utotal = U1 = U2 = U3p. 74
Resistancep. 74
The total resistance is less than the lowest individual resistance.p. 74
Parallel connection of batteriesp. 74
Fig. 4p. 74
By connecting 2 batteries of same type and capacity in parallel mode the capacity can be doubled, because the individual capacities add up to the total capacity.p. 74
In parallel connection the plus pole of the first battery is connected with the plus pole of the second battery and the minus pole of the first battery with the minus pole of the second battery.p. 74
Plus and minus poles have the voltage of the single battery applied.p. 74
The total capacity (Ah) is identical with the sum of all battery capacities.p. 74
The disadvantage of a parallel connection becomes apparent, by equalizing currents flowing between parallel batteries, if the batteries have different states of charging.p. 74
DTM Seriesp. 75
5.9 Ohm's lawp. 75
In a closed electric circuit voltage, current and resistance must always be considered in close relation. This relation is represented by Ohm's Law.p. 75
Fig. 1p. 75
According to this law a voltage of 1V is required to let 1A (ampere) flow through a conductor with a resistance of 1 (Ohmp. 75
Wp. 75
Advicep. 75
By means of this triangle the formula can be easily rearranged, the value you are looking form must just be blanked off with a finger.p. 75
Voltage U = I multiplied with Rp. 75
Resistance R = U divided by Ip. 75
Amperage I = U divided by Rp. 75
U = Voltage in Voltp. 75
I = Current in Amperep. 75
R = Resistance in OHMp. 75
Wp. 75
DTM Seriesp. 75
5.10 Electrical energyp. 75
Fig. 1p. 75
In a closed electric circuit current and voltage generate energy.p. 75
If a current of 1 Ampere flows at a voltage of 1 Volt, energy of 1 Watt is produced.p. 75
Advicep. 75
By means of this triangle the formula can be easily rearranged, the value you are looking form must just be blanked off with a finger.p. 75
Energy P = I multiplied with Up. 75
Amperage I = P divided by Up. 75
Voltage U = P divided by Ip. 75
U = Voltage in Voltp. 75
I = Current in Amperep. 75
P = Power in Wattp. 75
DTM Seriesp. 76
5.11 Formula diagramp. 76
Description:p. 76
Description:p. 76
Select the desired value from the inner circle.p. 76
Determine the formula variables in the quarter circlep. 76
Calculatep. 76
Example:p. 76
P = 150 Wattp. 76
U = 24 Voltp. 76
Sought for = Current in Amperep. 76
I = P : U = 150 W : 24 Volt = 6.25 Amperep. 76
Fig. 1 Formula diagramp. 76
Resistance, R Ohmp. 76
Wp. 76
Voltage, U Voltp. 76
Current, I Amperep. 76
Power, P Wattp. 76
DTM Seriesp. 77
5.12 Metrologyp. 77
Test lampsp. 77
Test lampsp. 77
Test lampp. 77
Test lampp. 77
Fig. 1 Test lampp. 77
This type of tester must not be used for testing on electronic components. The high power consumption of the test lamp may destroy electronic components in the control units.p. 77
Diode test lampp. 77
This instrument is used for simple voltage measurements. The test lamp consists of two test points. The negative measuring cable is connected to ground and the positive measuring cable to the corresponding measuring location.p. 77
Fig. 2 Diode test lampp. 77
If voltage is present, the corresponding light emitting diode will light up.p. 77
Multimeterp. 77
This tester is a multimeter and can be used to measure e.g. current, voltage and resistance. Depending on the design it may also be suitable for transistor and frequency.p. 77
Fig. 1 Multimeterp. 77
In order to avoid damage:p. 77
the range selector switch must be correctly set for the corresponding measurement.p. 77
the test cable must be plugged into the correct socket.p. 77
the voltage type (AC/DC) must be set.p. 77
In case of direct voltage the correct polarity must be assured.p. 77
the measuring range should be chosen higher at the beginning of the test.p. 77
In order to avoid any influence on the circuitry to be measured, the internal resistance of the voltage tester should be as high as possible.p. 77
Resistance and continuity measurement with multimeterp. 78
Fig. 2p. 78
The continuity tester of the multimeter can be used to measure whether there is a connection between 2 measuring points.p. 78
Fig. 3p. 78
The following information should be observed when measuring resistance and continuity:p. 78
The component to be measured must not be connected to the power supply during the measurement.p. 78
At least one side of the component to be measured must be disconnected from the circuitry, as otherwise the measuring result may be influenced by parallel components.p. 78
Polarity is of no significance.p. 78
Voltage and voltage drop measurement with multimeterp. 78
Fig. 4 Measuring voltagep. 78
Measurement at the voltage source measures the currently available Voltage.p. 78
The meter is always connected parallel to consumer, component or power source.p. 78
Fig. 5 Voltage measurementp. 78
A measurement at the consumer measures the voltage drop at this component.p. 78
Current measurement with the multimeterp. 79
Fig. 6 Measuring currentp. 79
The meter is connected in series with the consumer.p. 79
During the measurement the current must be able to flow through the meter, i.e. the electric circuit must be opened.p. 79
Fig. 7 Current measurementp. 79
Advicep. 79
If the electric circuit is difficult to access and the internal resistance of the consumer is known, the voltage may also be measured at the consumer.p. 79
The current value can then be calculated with the help of Ohm's law.p. 79
Clip-on measuring instrumentp. 79
The clip-on measuring instrument can be used to measure current, voltage and resistance.p. 79
Fig. 1 Clip-on measuring instrumentp. 79
Fig. 2p. 79
For measuring current the individual conductor must be fully enclosed by the measuring tongs, the actual measurement takes place without contact.p. 79
Magnet testerp. 80
Fig. 1 Magnet testerp. 80
The magnet tester is used to test solenoid valves and magnetic coils.p. 80
The test lamp responds to the magnetic fields of A.C- voltage, D.C.-voltage and permanent magnets.p. 80
The component to be tested does not need to be removed.p. 80
The magnetic coil can also be tested under a protective cap.p. 80
Power measurementp. 80
The electric power of a module within a circuit can be indirectly determined (calculated) by separate measuring of current and voltage.p. 80
However, there are also pure power meters with 4 connections available. The power meter has a electro- dynamic measuring mechanism. The current circuit must be opened for measuring. Take care when performing power measurements: Voltage or current pat…p. 80
Fig. 2p. 80
DTM Seriesp. 81
5.13 Diodes, relays, fusesp. 81
Diodesp. 81
Diodesp. 81
Fig. 1p. 81
A diode consists of two different semi-conductors, which are connected by a separating layer. The max. conducting state current must not be exceeded.p. 81
Plus-voltage on diode:p. 81
At 0.6 – 0.7 Volt (silicium diode) the diode becomes conductive.p. 81
Negative voltage on diode:p. 81
The diode does not allow current to pass through.p. 81
Fig. 2 Marking of the cathodep. 81
Diodes are used:p. 81
For rectifying A.C. voltage.p. 81
For absorbing voltage peaks (free-wheeling diode).p. 81
For construction of logical circuits.p. 81
Diode logics and free-wheeling diodep. 81
Fig. 3 Diode circuitryp. 81
The solenoid valve Y48p. 81
(Fig. 3)p. 81
Solenoid valve Y20 is supplied, if the switch is in position "1".p. 81
Solenoid valve Y21 is supplied, if the switch is in position "2".p. 81
The three diodes V02 serve as free-wheeling diodes with the function of of eliminating voltage peaks.p. 81
Light emitting diodesp. 82
Fig. 4 LEDp. 82
The light emitting diode, also referred to as LED, is a semi-conductor diode, which generates (emits) light during operation in forward direction. A semi-conductor crystal thereby emits a light signal, which is converged or scattered by the lenticula…p. 82
Relaysp. 82
Fig. 1 Relaysp. 82
Relays are commonly used to realize switching processes.p. 82
A free-wheeling diode prevents induction voltage from flowing back from the coil into the vehicle wiring system, which would cause interference with electronic components (control units).p. 82
With the possibility of using breaker – maker contacts the effect of an information can be reversed.p. 82
Fig. 2 Relay circuitryp. 82
The windscreen wiper and washer motors can only be operated via switches S20 and S21, when relay K32 is supplied with electric currentp. 82
(Fig. 2)p. 82
86 = Positive supply for coilp. 82
85 = Ground supply for coilp. 83
30 = Supply voltagep. 83
87 = Normally open contactp. 83
87a= Normally closed contactp. 83
Fusesp. 83
Fig. 1p. 83
Fuses are used to protect lines and equipment against overloads and short circuit. If the fuse is overloaded the fusible wire heats up with increasing current, until it finally melts.p. 83
Fuses must not be repaired or bridged.p. 83
The melting time at 23 °C is:p. 83
approx. 1 hour with 1.5 times the rated currentp. 83
approx. 1 minute with 2.5 times the rated current.p. 83
A 5 Amp fuse loaded with 1.5 times the rated current (7.5 Amp) will finally melt after approx. 1.5 hours.p. 83
Yellow = 5 Ap. 83
Brown = 7.5 Ap. 83
White = 8 Ap. 83
Red = 16 Ap. 83
Blue = 25 Ap. 83
DTM Seriesp. 84
5.14 Telemecanique switchp. 84
Disassemblyp. 84
Disassemblyp. 84
Fig. 1 Disassemblyp. 84
Lift up the interlock (5).p. 84
Fig. 2 Folding down the switch blockp. 84
Fold down the switch block (4).p. 84
Loosen screw (1).p. 84
Fig. 3 Pulling out the front elementp. 84
Lift up the interlock (2) and pull out the front element (3).p. 84
Assemblyp. 85
Fig. 4 Assemblyp. 85
Insert the front element (3) into the bore in the control panel.p. 85
Fig. 5 Observe the marks.p. 85
Clip the fastening adapter (6) onto the front element (3).p. 85
Watch the marls on front elementp. 85
(Fig. 5)p. 85
Tighten the screw (1) with a tightening torque of 0.6 Nm.p. 85
Fig. 6 Assemble the switch blockp. 85
Clip on the switch block (4).p. 85
Hook in the switch block at the bottom firstp. 85
(Fig. 6)p. 85
DTM Seriesp. 86
5.15 Plug connectorsp. 86
Duties and requirementsp. 86
Electric plug connectors must provide a reliable connection between different system components and thus ensure the safe function of the systems under any operating condition. There design ensures that they will withstand the applied loads throughout…p. 86
Examples for these loads are:p. 86
Vibration accelerationp. 86
Temperature fluctuations, high and low temperaturesp. 86
Dampnessp. 86
Micro movements of the contact with resulting friction corrosion.p. 86
These loads may increase the transition resistances of the contacts, up to total interruption. Even the insulation resistances may drop and thus cause short circuits in neighbouring lines. Electric plug connectors must therefore have the following pr…p. 86
Low transition resistances of the conductive parts.p. 86
High insulation strength between conductive parts with different voltage potentials.p. 86
Excellent leak tightness against water and moisture.p. 86
DTM Seriesp. 86
5.16 Magnetic coil plugp. 86
Magnetic coil plug with LED and suppressor diodep. 86
The plug is equipped with a polarized function display and a suppressor diode as protection against overvoltages.p. 86
Fig. 7p. 86
The plug is reverse polarity protected, it does not matter whether Pin1 or Pin 2 is supplied with current, Pin 3 is not used. The LED lights if voltage is applied to the solenoid valve.p. 86
Fig. 8p. 86
Fig. 9 Switching symbol in circuit diagramp. 86
Magnetic coil plug without LED and without supressor diodep. 86
The plug has no LED and no suppressor diode as protection against overvoltages.p. 86
Assembly of magnetic coil plugsp. 87
These instructions are intended to explain the correct installation of the magnetic coil plug. The objective of the instructions is the correct installation of the plug and to avoid malfunctions in the field caused by moisture and any related corrosi…p. 87
Fig. 10 Solenoid valve plug with pointed cablep. 87
Fig. 11p. 87
Connect the plug with the coil connection and press it firmly onto the connecting housing.p. 87
Fig. 12p. 87
Fasten the screw with a suitable screwdriver.p. 87
Fig. 13p. 87
Press the plug firmly on again.p. 87
Fig. 14p. 87
Retighten the screw.p. 87
Fig. 15p. 88
There should be no gap between plug and solenoid coil!p. 88
Fig. 16 Correctly installed plug without gapp. 88
DTM Seriesp. 88
5.17 Deutsch plug, series DT and DTMp. 88
Generalp. 88
Generalp. 88
Plug connectors DT and DTM have a wedge to hold the pins and sockets in their position. This wedge can be removed and replaced, without having to cut any leads.p. 88
Fig. 17 Crimp connectionsp. 88
Do not crimp more than one lead per pin or per socket.p. 88
Sockets and pins must not be soldered to leads, they may only be crimped (see special tools for electrics).p. 88
When connecting sockets and plugs these must engage with a noticeable click when both halves interlock.p. 88
The plug connection should not be separable (without loosening the interlock).p. 88
Pulling testp. 88
This pulling test ensures that the lead is perfectly crimped and the contact has correctly engaged in the housing.p. 88
Perform a pull test on each lead, each of the terminals and connections must withstand a pulling force of 45 N without any difficulties.p. 88
DT Seriesp. 89
DT Seriesp. 89
Fig. 1 DT plug connectionp. 89
Fig. 2 DT Seriesp. 89
Fig. 3 Sectional drawingp. 89
DTM Seriesp. 90
DT Seriesp. 90
Installing DT contactsp. 90
Fig. 4p. 90
Insert the contacts through the rubber grommet until they click into place.p. 90
Insert the orange wedge in direction of arrow.p. 90
Perform a pull test on each lead, each of the terminals and connections must withstand a pulling force of 45 N without any difficulties.p. 90
Use the same method when assembling the socket.p. 90
Disassembling DT contactsp. 90
Fig. 5p. 90
Pull the orange wedge out with long nose pliers.p. 90
Slightly pull the lead and unlock the interlocking hook with a screw driver.p. 90
Pull the contact out of the socket.p. 90
Use the same method when assembling the socket.p. 90
In this case the interlock disassembly tool (see special tools for electrics) serves as an aid to remove the wedges.p. 90
DTM Seriesp. 91
DTM Seriesp. 91
Fig. 6 DTM Seriesp. 91
Fig. 7 Sectional drawingp. 91
Installing DTM contactsp. 91
Fig. 8p. 91
Insert the contacts through the rubber grommet until they click into place.p. 91
Insert the orange wedge, until it clicks into place.p. 91
Perform a pull test on each lead, each of the terminals and connections must withstand a pulling force of 45 N without any difficulties.p. 92
Use the same method when assembling the socket.p. 92
Removing DTM contactsp. 92
Fig. 9p. 92
Pull the orange wedge (interlock) out with long nose pliers.p. 92
Slightly pull the lead and unlock the interlocking hook with a screw driver.p. 92
Pull the contact out of the socket.p. 92
Use the same method when assembling the socket.p. 92
In this case the interlock disassembly tool (see special tools for electrics) serves as an aid to remove the wedges.p. 92
5.21 Battery service, check the main battery switchp. 93
5.18 Plugs and terminals in spring clamping technologyp. 93
Generalp. 93
Generalp. 93
Fig. 1p. 93
The spring clamp technology is not suitable for extra fine conductors. Extra fine conductors can be easily pulled out of the spring clamp!p. 93
Spring clamp technologyp. 93
(Fig. 1)p. 93
Connecting terminal for quick repairsp. 93
Fig. 2 That's how it worksp. 93
BOMAG part-no.: 057 565 72p. 93
The connecting clamp clamps up to 3 or 5 stripped fine conductors of 0.08 mmp. 93
2p. 93
2p. 93
2p. 93
(Fig. 2)p. 93
That's how it worksp. 93
Strip 9-10 mm of the lead.p. 93
Open the actuating lever and insert the strand.p. 93
Return the actuating lever to initial position.p. 93
Perform a pull test on each lead, each of the terminals must withstand a pulling force of 45 N without any difficulties.p. 93
X-COM plug clampp. 94
Series clampp. 94
Fig. 3 That's how it worksp. 94
That's how it worksp. 94
Insert a screw driver into the actuating opening until it bottoms.p. 94
Strip 9-10 mm of the lead and insert it into the clamp.p. 94
Pull out the screw driver.p. 94
Perform a pull test on each lead, each of the terminals must withstand a pulling force of 45 N without any difficulties.p. 94
Measuring signalsp. 94
On these terminal blocks the bridge slot is most suitable for tapping off and measuring signals. Here you may directly insert a 4 mm test adapter (see special tools for electrics) for connecting a measuring lead. This test adapter is standard in the …p. 94
Fig. 4 Test adapterp. 94
X-COM plug clampp. 95
X-COM Systemp. 95
The X-COM-SYSTEM, a synthesis of plug connector and series clamp, has grown up to a construction kit for universal system wiring, ever since it was introduced in 1997. All the familiar series clamping functions have thus become pluggable.p. 95
X-COM plug clampp. 95
Fig. 5 That's how it worksp. 95
That's how it worksp. 95
Insert a screw driver into the actuating opening until it bottoms.p. 95
Strip 9-10 mm of the lead and insert it into the plug.p. 95
Pull out the screw driver.p. 95
Perform a pull test on each lead, each of the terminals must withstand a pulling force of 45 N without any difficulties.p. 95
Fig. 6 X-COM plug with measuring cablep. 95
The most reliable measurements on the plug can be made when using the measuring and connecting cable with 2mm plug (see special tools for electrics).p. 95
Measuring signalsp. 96
Fig. 7 X-COM plug plugged onto the series clampp. 96
5.21 Battery service, check the main battery switchp. 97
5.19 Inductive proximity switchesp. 97
Generalp. 97
Generalp. 97
In all automated sequences the use of sensors as a source of information for the electronic control is indispensable. The sensors deliver the necessary signals about positions, end positions, filling levels or serve as pulse transducers for counting …p. 97
Working principlep. 97
Fig. 8p. 97
The working principle is based on the principle of the dampened LC-oscillator. The coil of the oscillation circuit forms a high-frequency magnetic stray field.p. 97
This stray field leaks out from the active area of the proximity switch. If metal or non-ferrous metal enters into the response range energy is absorbed. The oscillator is thus dampened and the resulting change in current consumption is evaluated.p. 97
PNP circuitryp. 97
PNP circuitryp. 97
Fig. 9 PNP circuitryp. 97
On sensors with PNP-circuitry the output stage contains a PNP-transistor, which switches the load against the positive operating voltage. The load is connected between the output and the negative operating voltage. The switch is designed with a norma…p. 97
NPN circuitryp. 97
NPN circuitryp. 97
Fig. 10 NPN circuitryp. 97
On sensors with NPN-circuitry the output stage contains a NPN-transistor, which switches the load against the negative operating voltage. The load is connected between the output and the positive operating voltage.p. 97
Breaking and making contactsp. 97
Fig. 11p. 97
Proximity switches are used as breaking or making contacts. Depending on the design the switching distances are 2 or 4 mm. The maximum amperage is 300 mA.p. 97
The LEDp. 97
(Fig. 11)p. 97
Fig. 12 Circuit diagram, making contactp. 98
The circuit diagramp. 98
(Fig. 12)p. 98
Brown = voltage supplyp. 98
Blue = ground supplyp. 98
Black = switching outputp. 98
The initiator switches the relay (K05)p. 98
5.21 Battery service, check the main battery switchp. 98
5.20 Batteriesp. 98
Battery – accumulatorp. 98
Fig. 1p. 98
In vehicles batteries are used to start the engine. The ability to start the engine depends on the charge condition of the batteries.p. 98
Lead collectors or accumulators are secondary elements, i.e they can be recharged after discharging electric current.p. 98
The basic element of a lead accumulator is the cell. It contains the plate blocks consisting of positive and negative plates. These plates are separated from each other by separators.p. 98
All positive plates are arranged parallel to the plus pole, the negative plates parallel to the minus pole of the cells.p. 98
Fig. 2p. 98
All cells are filled with a conductive fluid, the electrolyte. For a 12 Volt battery 6 cells are connected in series.p. 98
Capacityp. 98
is a synonym for the amount of current taken up and discharged by a battery over a specified period of time.p. 98
Battery maintenancep. 99
Maintenance free batteries are gaining more and more significance, this freedom from maintenance, however, is only limited to the fact that no water needs to be added.p. 99
If the battery is not charged and discharged over a longer period of time, the battery will slowly discharge by itself.p. 99
The accumulator may only be discharged down to a final discharging voltage of 10.5 Volt, as otherwise there is a risk of sulphation, i.e. the generated lead sulphate forms increasingly coarser crystals, which will finally not react at all or only ver…p. 99
In the worst case the accumulator can only be disposed of after such an exhaustive discharge.p. 99
The following therefore applies for longer downtimes:p. 99
Remove the battery and store it in a cool, dry and frost protected room.p. 99
Check the open circuit voltage on the battery at regular intervals (at least once every month).p. 99
Recharge immediately if the open circuit voltage has dropped to 12.25 Volt (no rapid charging).p. 99
The open circuit voltage of batteries occurs approx. 10 h after the last charging or approx. 1 h after the last discharge.p. 99
Battery test in generalp. 99
Is the battery leaking? Can traces of impact, shock or compression be found in the leaking area?p. 99
Check for e.g. incorrect fastening, foreign bodies on the battery mounting surface and similar.p. 99
5.21 Battery service, check the main battery switchp. 99
Batteries with screw plugsp. 99
Checking the electrolyte levelp. 99
Fig. 3p. 99
1 Upper filling level markp. 99
2 Lower filling level markp. 99
If the electrolyte level only reaches up to the lower filling level mark (2), fill distilled water into the corresponding cells.p. 99
Checking the electrolyte densityp. 100
Fig. 4p. 100
The cells are filled with diluted sulphuric acid as electrolyte (approx. 25 Vol% sulphuric acid in distilled water), also referred to as accumulator acid, which has a density of 1.285 kg/dmp. 100
3p. 100
3p. 100
With a lead cell the acid density is therefore a measure for the charge condition. This characteristic is used to determine the charge condition of a lead battery. The so-called electrolyte tester (densimeter) is used for this purpose.p. 100
Fig. 5 Checking the electrolyte density:p. 100
1) correctp. 100
2) poorp. 100
3) poorp. 100
(Hold the pipe of the electrolyte tester vertically, without taking it out of the electrolyte.p. 100
Do not draw too much electrolyte into the pipe.p. 100
Make sure that the float is not obstructed in its movement and hold the electrolyte tester at eye level.p. 100
The electrolyte tester must be read at the highest electrolyte level.p. 100
If the electrolyte temperature deviates from the electrolyte tester calibration temperature, the indicated value for the specific electrolyte weight must be corrected acc. to the formulap. 100
(reference)p. 100
Referencep. 100
The specific weight varies slightly with temperature. To be exact, the specific weight drops by 0.0007 per 1 °C temperature increase (by 0.0004 per 1 °F) and increases by 0,0007 per 1 °C temperature reduction (by 0,0004 per 1 °F) . If e.g. a temp…p. 100
Specific weight at 20 °C = measuring value + 0,0007 × (electrolyte temperature: 20 °C)p. 100
Specific weight at 68 °F = measuring value + 0,0004 × (electrolyte temperature: 68 °F)p. 100
Acid density at 27 °C in kg/dmp. 100
3p. 100
1.25 -1.28, open-circuit voltage approx. 12.7 Volt. Battery is charged.p. 100
1.20 -1.24, open circuit voltage approx.12.4 to 12.5 Volt, is 50% discharged. Charging is necessary.p. 100
1.19 and less, open circuit voltage less than 12.3 Volt. Battery is insufficiently charged. The battery needs to be recharged immediately.p. 100
If there is a deviation of the specific weight of more than 0.05 between any of the cells, the battery needs to be replaced.p. 100
If the current consumption during charging is not 1/ 20 of the nominal capacity (example 100 Ah battery: 100Ah x 1/20 = 5 A) or full recharging of the battery results in a final electrolyte density of only 1.24 kg/ dm3 or less, the battery shows norm…p. 100
5.21 Battery service, check the main battery switchp. 101
Testing batteries without screw plugsp. 101
On closed batteries the acid density cannot be measured, we therefore recommend testing with the following mobile tester:p. 101
Fig. 6 Battery and generator testerp. 101
The battery and generator tester comes with an 8-line LC display with background illumination and is able to print out test results via an (optional) integrated thermal printer.p. 101
Before testing clean the poles and ensure good connection between clamps and poles.p. 101
The test program calculates the text messages "good" or "replace" on the basis of the charge condition (derived from the battery voltage) and the currently available starting power of the battery. A battery with 45% starting power may thus be rated g…p. 101
The starting power can exceed 100%.p. 101
5.21 Battery service, check the main battery switchp. 101
5.21 Battery service, check the main battery switchp. 102
Danger of cauterisation ! Danger of explosion!p. 102
When working on the battery do not use open fire, do not smoke!p. 102
The battery contains acid. Do not let acid come in contact with skin or clothes!p. 102
Wear protective clothing!p. 102
Do not lay any tools on the battery!p. 102
For recharging remove the plugs from the battery to avoid the accumulation of highly explosive gases.p. 102
Dispose of the old batteries environmentally.p. 102
Maintenance free batteries also need care. Maintenance free only means that the fluid level does not need to be checked. Each battery suffers under self- discharge, which may, in not checked occasionally, even cause damage to the battery as a result …p. 102
The following therefore applies for the service life:p. 102
Switch off all consumers (e.g. ignition, light, inside light, radio).p. 102
Check open-circuit voltage of the battery at regular intervals. At least once per month.p. 102
Reference values: 12.6 V = fully charged; 12.3 V = 50% discharged.p. 102
Recharge the battery immediately after an open-circuit voltage of 12.25 V or less is reached. Do not perform quick charging.p. 102
The open-circuit voltage of the battery occurs approx. 10 hours after the last charging process or one hour after the last discharge.p. 102
After each charging process allow the battery to rest for one hour before taking it into service.p. 102
For resting periods of more than one month you should always disconnect the battery. Do not forget to perform regular open-circuit voltage measurements.p. 102
Exhausted batteries (batteries with formation of sulphate on the plates) are not covered under warranty!p. 102
Move the driver's platform fully to the right and open the cover.p. 102
Fig. 7p. 102
Remove the batteryp. 102
(Fig. 7)p. 102
Clean the outside of the battery.p. 102
Clean battery poles and pole clamps and grease them with pole grease (Vaseline).p. 102
Check the fastening of the battery.p. 102
On serviceable batteries check the acid level, if necessary top up to the filling mark with distilled water.p. 102
Checking the main battery switchp. 102
Fig. 8p. 102
Turn the main battery switchp. 102
(Fig. 8)p. 102
5.22 Starting with jump wiresp. 103
A wrong connection will cause severe damage in the electric system.p. 103
Only use a 12 V battery to bridge the machine.p. 103
Fig. 9p. 103
When jump starting with an external battery connect both plus poles first.p. 103
Then connect the ground cable first to the minus pole of the current supplying auxiliary battery and then to engine or chassis ground, as far away from the battery as possiblep. 103
(Fig. 9)p. 103
Start as described under "Starting the engine".p. 103
Once the engine is running switch on a powerful consumer (working light, etc.).p. 103
If no powerful consumer is switched on voltage peaks may occur when separating the connecting cables between the batteries, which could damage electrical components.p. 103
After starting disconnect the negative poles (ground cable) first and the positive poles after.p. 103
Switch off the consumer.p. 103
5.23 Generatorp. 103
Generalp. 103
Generalp. 103
The generator should be of light weight, have a high rate of efficiency and supply all consumers in the vehicle with electric current at a steady voltage already at idling speed.p. 103
Terminal designationsp. 103
B61, L = charge controlp. 103
B+, B = battery plus, also with the designation "30"p. 103
B- = battery minus, also with the designation "31"p. 103
D+ = dynamo plus corresponds with terminal "61" and "L"p. 103
D- = dynamo minus (this designation is only found on D.C. generators or A.C. generators with regulator removed)p. 103
DF = dynamo field (this designation is only found on D.C. generators or A.C. generators with regulator removed). Note: The designation DF is also found on older alternators with externally arranged regulator on the connection of the exciting coil to …p. 103
DF1 = dynamo field 1p. 103
DF2 = dynamo field 2p. 103
IG = "15" ignition switchp. 103
Three-phase generatorp. 104
The AC-generator first of all produces AC-voltage / AC-current.p. 104
Why does AC-current need to be rectified?p. 104
There are a few components for which can either be operated with alternating current or direct current, because they work independently from the current flow direction.p. 104
This includes :p. 104
Incandescent lampsp. 104
Fluorescent lampsp. 104
Glow lampsp. 104
Electric heating elements.p. 104
There are also a few components that could be operated either with alternating current, direct current or three-phase current, if the components were designed accordingly.p. 104
This includes :p. 104
Electric motorsp. 104
Relays.p. 104
Finally, a variety of important components solely require direct current. These will under no circumstances work with alternating or three-phase current.p. 104
This includes :p. 104
Accumulatorsp. 104
Accumulatorsp. 104
Control unitsp. 104
All electronicsp. 104
Communication equipment.p. 104
Design and functionp. 104
Fig. 10p. 104
1 Fanp. 104
1 Fanp. 104
2 Holding platep. 104
3 Stator corep. 104
4 Stator windingp. 104
5 Brushp. 104
6 Brush holderp. 104
7 Rectifierp. 104
8 Bearing coverp. 104
9 Rotor windingp. 104
10 Rotorp. 104
11 V-belt pulleyp. 104
Fig. 11 Rotor with claw polesp. 104
In the generator the armature windings are located inside the stationary statorp. 104
(Fig. 12)p. 104
(Fig. 11)p. 104
Fig. 12 Statorp. 104
The three stator windingsp. 104
(Fig. 12)p. 104
Fig. 13 3-phase currentp. 105
The wiring diagramp. 105
(Fig. 13)p. 105
The diodes D1, D2, D3 are also referred to as minus diodes, because they have B- as common connection (minus plate). The other diodes are the plus diodes.p. 105
The rectifier diodes have the effect that the negative half-wave is suppressed and only the positive section of the wave is allowed to pass, resulting in a pulsating D.C. voltage.p. 105
Charge control lightp. 105
The charge control light has two duties:p. 105
Indication of the correct generator functionp. 105
External excitation of the generator during the starting phasep. 105
Fig. 14 plus controlled charging regulatorp. 105
(Fig. 14) shows the current flow with the ignition switched on, engine stopped.p. 105
(Fig. 14)p. 105
Fig. 15 plus controlled charging regulatorp. 105
(Fig. 15) shows the current flow with the ignition switched on, engine running.p. 105
(Fig. 15)p. 105
1 Batteryp. 105
1 Batteryp. 105
2 Charge controllerp. 105
3 Ignition switchp. 105
4 Charge control lightp. 105
5 Rectifierp. 105
6 Rotorp. 105
7 Sliprings / carbon brushp. 105
8 Auxiliary rectifierp. 105
Normally the charge control light lights with the engine stopped and the ignition switched on and goes out at low engine speed, but at the latest after a single, short-term increase in engine speed from idle speed, because there is no longer a voltag…p. 105
Any other behaviour would indicate a defect on the generator (rectifier, carbon brushes, regulator) or a defect on the lamp, presumed the on-board battery is not discharged.p. 106
A far more important function of the lamp is the transition and provision of field current. At standstill there is no magnetic field in the de-energized generator. Since this is necessary for the generation of electric current, the rotor must be supp…p. 106
The current flows from the ignition switch via the charge control light through the generator winding against ground (terminal 31) and is limited to approx. 300 mA by the light bulb (4 W) (without the lamp the current flow would be 2 to 5 A). While t…p. 106
With used, older generators a weak permanent magnetic field may have developed over the lifetime, which does even exist when no voltage is applied. This type of machines can even start without charge control light and produce current during operation…p. 106
Charge controllerp. 106
The charge controller has the following functionsp. 106
To regulate the voltage generated by the generatorp. 106
To protect against overloads caused by too high output currentp. 106
Protection against reverse currentp. 106
If the output voltage or the output current of the generator exceeds the determined maximum values, the field current and thus the electric power is reduced.p. 106
Electronic charge regulatorp. 106
Fig. 16 Regulator, Kubota enginep. 106
In AC-generators the electrically generated exciter field of the generator rotor is influenced by an attached electronic charge regulator. Together with the holder for the carbon brushes this regulator forms a unit, which transfers the field current …p. 106
Checking the generatorp. 107
Before removing the generator you must disconnect the ground cable from the minus pole of the battery while the ignition is switched off. Do not disconnect the generator while the engine is running, because this may cause extremely high voltage peaks…p. 107
When disassembling the battery cable, the B+-nut underneath on the generator side may also be loosened. This nut must in this case be retightened.p. 107
When connecting e.g. the battery cable to the terminal of the generator you must make sure that the polarity is correct (generator B+ to the + pole of the battery). Mixing up the polarities by mistake causes short circuit and damage to the rectifier …p. 107
The generator can only be operated with the battery connected. Under special conditions emergency operation without battery is permitted, the lifetime of the generator is in such cases especially limited.p. 107
Plus and minus cables must be disconnected during rapid charging of the battery or electric welding on the vehicle.p. 107
When cleaning the generator with a steam or water jet make sure not to direct the steam or water jet directly on or into the generator openings or ball bearings. After cleaning the generator should be operated for about 1 – 2 minutes to remove any de…p. 107
First one must check whether the generator is actually defective.p. 107
This can be easily found out by checking whether the charge control light in the dashboard lights up. If the light does not go out, even at higher speeds, there must be a defect on the generator, the regulator, the wiring or the V-belt.p. 107
When the engine is at rest, the charge control light must light up. If not, the lamp may probably be defective. Defects on generator or wiring are obviously also possible.p. 107
The following points allow to contain faults in the voltage supply within certain limits.p. 107
Cable connections on the generator OK?p. 107
V-belt OK?p. 107
Generator ground (engine ground) OK?p. 107
Pre-excitation from vehicle electronics OK?p. 107
Only if all criteria mentioned above are OK, the fault must be in the generator itself. In this case it must be replaced or the following trouble shooting procedure must be performed.p. 107
5.24 Generator repairp. 108
Dismantling and assemblingp. 108
Front housing flangep. 108
Fig. 1p. 108
1 Front housing flangep. 108
2 Rear housing flangep. 108
3 (Screwp. 108
Unscrew screws (3).p. 108
Separate front (1) and rear housing flanges (2).p. 108
V-belt pulleyp. 108
V-belt pulleyp. 108
Fig. 2p. 108
Carefully clamp the claw-type rotor in a vice.p. 108
Loosen the nut with a size 24 ring spanner.p. 108
V-belt pulley tightening torque 58.4 to 78.9 Nm.p. 108
Rotorp. 108
Rotorp. 108
Fig. 3p. 108
Unscrew 4 screws and take off the bearing cover.p. 108
Temporarily screw the V-belt pulley nut on the rotor shaft and knock the rotor out.p. 108
Brushesp. 108
Brushesp. 108
Fig. 4p. 108
After the rotor has been taken out one can see 2 carbon brushes protruding into the shaft bore.p. 108
Assembling the brushesp. 108
Fig. 5p. 108
Insert the brushes with their sliding side in clockwise direction when viewed from the front.p. 108
Fig. 6p. 109
Both brushes must be deep in the brush holder. Otherwise both rotor and rear housing flange cannot be correctly positioned.p. 109
Use a hexagon key (4.0 mm) to push the brushes to furthest rear position.p. 109
Use a pointed (2.0 mm) punch or nail to secure the brushes against popping out, as shown in the illustration.p. 109
Fig. 7p. 109
Align the marking lines (arrows) on front and rear housing flange to each other.p. 109
Tighten 4 screws and pull the pointed punch out of the brush holder.p. 109
Bearing on slipring sidep. 109
Fig. 8p. 109
1 Rotorp. 109
1 Rotorp. 109
2 Bearingp. 109
3 Pullerp. 109
Slightly clamp the rotors (1) in a vice to protect it against being damaged and disassemble the bearing (2) with a puller (3).p. 109
Checkp. 110
Bearingp. 110
Bearingp. 110
Fig. 1p. 110
Check whether the bearing rotates without obstruction.p. 110
Replace the bearing if it does not rotate properly.p. 110
Statorp. 110
Fig. 2p. 110
Use the resistance range of the continuity tester to measure the resistance between the individual lines of the stator winding.p. 110
If the measuring value does not comply with the factory specification, replace the stator.p. 110
Use the resistance range of the continuity tester to check the continuity between the individual stator windings and the core.p. 110
Replace the stator if no infinite value is indicated.p. 110
Factory specification for resistance: Less than 1p. 110
Wp. 110
Rotorp. 111
Fig. 3p. 111
Measure the resistance between the sliprings.p. 111
If the resistance does not comply with the factory specification, replace the rotor.p. 111
Use the resistance range of the continuity tester to check the continuity between slipring and core.p. 111
Replace the rotor if no infinite value is indicated.p. 111
Factory specification for resistance: 2.8 to 3.3p. 111
Wp. 111
Slipringp. 111
Fig. 4p. 111
Check the slipring for score marks.p. 111
If score marks are found rework the slipring with emery cloth or on a lathe.p. 111
Measure the outer diameter of the slipring with a vernier caliper.p. 111
Replace if the measuring value is below the permissible limit.p. 111
Outer slipring diameter: 22.7 mm.p. 111
Permissible limit: 22.1 mm.p. 111
Wear on carbon brushesp. 112
Fig. 5p. 112
Measure the brush length with a vernier caliper.p. 112
Replace if the measuring value is below the permissible limit.p. 112
Make sure that the brush is light moving.p. 112
A defective carbon brush must be replaced.p. 112
Brush: 18.5 mm.p. 112
Permissible limit: 5.0 mm.p. 112
5.25 Electric starterp. 112
Generalp. 112
Generalp. 112
Combustion engines need to be started by means of a special device, because they are not able to start by themselves. Considerable resistances caused by compression and friction must thereby be overcome.p. 112
The starter converts the electric energy stored in the battery into mechanical energy. The starter can only generate its power when a battery with appropriate capacity is available.p. 112
Duties of the starter:p. 112
to accelerate the combustion engine to start speed with lowest possible current consumption.p. 112
establish the gear connection between starter and combustion engine.p. 112
to maintain this connection.p. 112
to switch on the starter current.p. 112
After starting the engine:p. 112
to return the starter pinion to initial position.p. 112
to switch off the starter current.p. 112
Directly acting electric starterp. 113
This shows the design of this starter. It consists of a starter motor and a magnetic switch.p. 113
Fig. 6p. 113
1 Magnetic switchp. 113
2 Armaturep. 113
3 Actuating leverp. 113
4 Freewheeling clutchp. 113
5 Resetting springp. 113
6 Brushp. 113
7 Exciting windingp. 113
8 Armaturep. 113
9 Collectorp. 113
Ignition switch in position "START"p. 113
Fig. 7 Magnetic switch openp. 113
With the ignition switch (5) in "START" position current flows from the battery (10) through the holding winding (2) and the pick-up winding (3).p. 113
The armature (1) is magnetically picked up and forces the pinion (8) with the actuating lever (6) to engage with the ring gear (7).p. 113
1 Armaturep. 113
1 Armaturep. 113
2 Holding windingp. 113
3 Pick-up windingp. 113
4 Magnetic switchp. 113
5 Ignition switchp. 113
6 Actuating leverp. 113
7 Ring gearp. 113
8 Pinionp. 113
9 Freewheeling clutchp. 113
10 (Batteryp. 113
Pinion meshes with the ring gearp. 113
Fig. 8 Magnetic switch closedp. 113
When the pinion (3) meshes with the flywheel mounted ring gear (4) and the magnetic switch (2) is closed, a strong current flows from the battery (7) directly into the exciting winding (6) and the armature winding, but not into the pick-up winding.p. 113
This causes the armature (5) to rotate with high speed and drives the pinion, which in turn drives the ring gear (4) with a speed of 200 to 300 rpmp. 113
1 Pick-up windingp. 113
2 Magnetic switchp. 113
3 Pinionp. 113
4 Ring gearp. 113
5 Armaturep. 113
6 Exciting windingp. 113
7 Batteryp. 113
Engine runningp. 114
Fig. 9p. 114
Once the engine is running and drives the pinion (1) via the ring gear (2), the freewheeling clutch (3) will open and prevent the armature (4) from being driven by the engine.p. 114
1 Pinionp. 114
1 Pinionp. 114
2 (Ring gearp. 114
3 Freewheeling clutchp. 114
4 Armaturep. 114
Ignition switch releasedp. 114
Fig. 10p. 114
When releasing the ignition switch (6) it will return from position "START" to "ON" and interrupt the starter current circuit. Current will now flow from the battery (9) through the contact plate in the pick-up winding (3) and the holding winding (2)…p. 114
This opens the current circuit on the contact plate and the pinion (7) is pulled back from the ring gear (8) and stops.p. 114
1 Armaturep. 114
1 Armaturep. 114
2 Holding windingp. 114
3 Pick-up windingp. 114
4 Resetting springp. 114
5 Magnetic switchp. 114
6 Ignition switchp. 114
7 Pinionp. 114
8 Ring gearp. 114
9 Batteryp. 114
Starter with planetary gearp. 115
The reduction gear is a planetary gear which reduces the speed of the armature shaft (9) at the drive shaft in the ratio of approx. 1:5.p. 115
The actuator lever (2) forces the pinion (4) with the freewheeling clutch (5) against the ring gear.p. 115
Fig. 11 with planetary gearp. 115
The working principle of this starter is the same as with the "direct acting electric starter".p. 115
1 Holding platep. 115
2 Actuating leverp. 115
3 Magnetic switchp. 115
4 Pinionp. 115
5 Freewheeling clutchp. 115
6 Output shaftp. 115
7 Transmissionp. 115
8 (8) Pinionp. 115
9 (9) Armature shaftp. 115
Magnetic switchp. 115
Fig. 12 Direct acting electric motorp. 115
Fig. 13 Geared motorp. 115
Armature (4), contact plate (3) and armature guide (6) form a closed unit. When the ignition switch is turned to "START", the armature is picked up and causes the pinion of the clutch to disengage.p. 115
This causes the pinion and the ring gear to mesh, while the contact plate establishes a connection between the contacts, which enable the main current to flow into the armature. Once the ignition switch is opened, the resetting spring (5) will pull t…p. 115
1 Holding windingp. 115
2 Pick-up windingp. 115
3 Contact platep. 115
4 Armaturep. 115
5 Resetting springp. 115
6 Armature guidep. 115
Freewheeling clutchp. 116
Fig. 14 Freewheeling clutchp. 116
The freewheeling clutch is designed in such a way, that the flow of force is automatically interrupted if the pinion (5) of the clutch rotates faster than the freewheeling ring (1) at higher engine speeds.p. 116
This makes sure that the armature will only drive the ring gear, but can never be driven by the engine.p. 116
1 Freewheeling ringp. 116
2 Rollerp. 116
3 Roller springp. 116
4 Splined shaftp. 116
5 Pinionp. 116
6 Pinionp. 116
Trouble shooting "Starter"p. 116
The most frequent fault is definitely a fully discharged battery.p. 116
If the starter rotates too slowly, either the brushes are partly worn off, or parts of the exciter or armature winding is shorted. In some cases oxidized electric contacts or a soiled ground connection causing extremely high voltage losses in the overalp. 116
If the starter rotates too slowlyp. 116
If the starter only emits a clicking sound,- either the magnetic switch is defect / soiled (dismantle and clean))- the main contacts on the magnetic switch are worn off / soiled (scrape off carefully with a file and clean)- the starter motor is defectivp. 116
If the starter only emits a clicking soundp. 116
Frequently a jammed return mechanism is the reason for a starter failure.p. 116
Occasionally worn contacts are found on the magnetic return switchp. 116
Defects on the actual starter motor including pinion and carbon brushes are very rare.p. 116
With a trouble shooting chart the faults in the starter system can be narrowed down. The starter system can only work when many conditions are fulfilled at the same time.p. 116
Immobilizer deactivated?p. 116
Ignition switch OK?p. 116
Travel lever in correct position?p. 116
Emergency stop not actuated?p. 116
Battery sufficiently charged?p. 116
Battery poles OK?p. 116
Main battery fuse OK?p. 116
Main battery switch closed?p. 116
Main starter cable (terminal 30) OK?p. 116
Starter control cable (terminal 50) OK, voltage drop?p. 116
Ground cable OK?p. 116
Switching of magnetic switches OK?p. 116
The sequence of these tests is generally of no significance. It mainly depends on:p. 116
the experience of the specialistp. 116
the failure probability of the component to be tested and the testing effort for the respective part.p. 116
Only if all criteria mentioned above are OK, the fault must be in the starter itself. In this case it can be repaired or replaced.p. 116
Testing and measuring the starterp. 117
Function control with the starter removedp. 117
Fasten the starter to make sure that it will not come loose during the test.p. 117
Fig. 15p. 117
Connect a jumper lead between start terminal (1) and battery plus (2).p. 117
Connect a jumper cable instantaneously between starter housing and battery minus (3).p. 117
If the motor does not start, the starter is defective. Repair or replace the starter.p. 117
Checking the magnetic switchp. 117
Fig. 16p. 117
Connect a jumper lead between start terminal (1) and battery plus (2).p. 117
Connect a jumper cable instantaneously between starter housing and battery minus (3).p. 117
If the pinion does not disengage, the magnetic switch is defective. Repair or replace the starter.p. 117
Continuity test for the magnetic switchp. 117
Fig. 17p. 117
Use a continuity tester to check for continuity between terminal (1) and terminal (29 while holding the pin depressed.p. 117
Replace the magnetic switch if no continuity is detected.p. 117
Repair of starterp. 118
Dismantling and assemblingp. 118
Fig. 1p. 118
1 Gearp. 118
1 Gearp. 118
1 Gearp. 118
2 Front bracketp. 118
3 Magnetic switchp. 118
4 Freewheeling clutchp. 118
5 Inner gearp. 118
6 Planet gearsp. 118
7 Ball bearingp. 118
8 Seal kitp. 118
9 Through boltp. 118
10 Armaturep. 118
11 Standp. 118
12 Brush holderp. 118
13 Rear bearing platep. 118
Dismantlingp. 118
Disconnect the magnetic switch (3).p. 118
Remove both through bolts (9) and 2 brush holder fastening screws. Remove the rear bearing plate (13) and take out the brush holder (12).p. 118
Separate the armature (10) from the frame (11). Remove also the ball bearing (7) from the tip of the armature.p. 118
Remove seal kit (8), 4 planet wheels (6) and the other seal.p. 118
Take out the shaft assembly. Make a note of the lever position.p. 118
Before separating the frame (11) mark both the frame (11) and the front bracket (2).p. 118
Record the position of the seal kit (8) and the screw.p. 118
Do not damage carbon bushes or collector.p. 118
Assemblyp. 118
Apply some grease to the parts marked in the illustration.p. 118
Tightening torque fastening nut for starter terminal B: 9.8 to 11.0 Nmp. 118
Checkp. 119
Freewheelp. 119
Freewheelp. 119
Fig. 1p. 119
Check the pinion for wear or damage.p. 119
Replace the freewheeling assembly if found defectivep. 119
Make sure that the pinion rotates freely in the freewheeling direction and does not slip in starting direction.p. 119
If the pinion slips or does not rotate to both directions, replace the freewheel assembly.p. 119
Do not wash the grease in the freewheel out with chemicals or oils.p. 119
Collector and mica capacitorp. 119
Fig. 2p. 119
Check the contact surface of the collector for wear and rework it with sanding paper if it is slightly worn.p. 119
Fig. 3p. 119
Measure the outer diameter of the collector at several points with an outside micrometer.p. 119
If the smallest outside diameter is below the permissible limit, the rotor must be replaced.p. 119
Factory specification, collector outside diameter: 32.0 mm.p. 119
Permissible limit: 31.4 mm.p. 119
Fig. 4p. 119
1 Segmentp. 119
1 Segmentp. 119
2 Counterdraftp. 119
3 Mica capacitorp. 120
a) correctp. 120
b) not correctp. 120
Measure the counterdraft on the collector.p. 120
If the counterdraft falls short of the lower limit value, correct it with a saw blade and bevel the segment edges.p. 120
Factory specification, collector counterdraft: 0.5 mm.p. 120
Permissible limit: 0.2 mm.p. 120
Wear on carbon brushesp. 120
Fig. 5p. 120
If the contact area of the carbon brush is dirty or dusty, clean it with emery cloth.p. 120
Measure the brush length (A) with a vernier caliper.p. 120
If the length is shorter than the permissible limit, the brush holder must be replaced.p. 120
Factory specification, brush length: 18.0 mm.p. 120
Permissible limit: 11.0 mm.p. 120
Brush holderp. 121
Fig. 6p. 121
Use a continuity tester to check the continuity between brush holder and holder carrier.p. 121
If continuity is found replace the brush holder.p. 121
Armature coilp. 121
Fig. 7p. 121
Use the resistance range of the continuity tester to check the continuity between collector and armature coil.p. 121
If continuity is found replace the armature.p. 121
Fig. 8p. 121
Use the resistance range of the continuity tester to check the continuity between the collector segments.p. 121
If no continuity is found replace the armature.p. 121
Field coilp. 122
Fig. 9p. 122
1 Replace thep. 122
1 Replace thep. 122
2 Brushp. 122
3 Statorp. 122
Use the continuity tester to check the continuity between line (1) and brush (2).p. 122
If no continuity is found replace the stator frame.p. 122
Fig. 10p. 122
Use the continuity tester to check the continuity between brush (2) and stator (3).p. 122
If continuity is found replace the stator frame.p. 122
Engine shut-down solenoid, Y58p. 123
Shut-down magnetp. 123
Fig. 11 Engine shut-down solenoid on ijection pump, Y58p. 123
Testing the shut-off solenoidp. 123
Fig. 12p. 123
1 Plugp. 123
1 Plugp. 123
2 Batteryp. 123
3 Switch for holding winding (H)p. 123
4 Switch for pick-up winding (P)p. 123
Testing the functionp. 124
Danger of burning!p. 124
The shut-down solenoid gets very hot during the stating process.p. 124
For inspection do not apply current to the pick-up winding for longer than two seconds.p. 124
Fig. 13p. 124
Remove the shut-down solenoid, leave the plug on the solenoid.p. 124
Connect the housing of the solenoid to engine ground (ground supply).p. 124
Start the engine for a moment.p. 124
During the starting process the pin is retracted and it extends again when the ignition is switched off.p. 124
P: Terminal for pick-up winding, resistance approx. 0.38p. 124
Wp. 124
H: Terminal for holding winding, resistance approx. 16p. 124
Wp. 124
Disassemble the shut-down solenoid.p. 124
Connect bridging cables between terminal P of the pick-up winding and switch 4p. 124
(Fig. 11)p. 124
Connect bridging cables between terminal H of the holding winding and switch (3), as well as between switch (3) and battery plus.p. 124
Connect a bridging cable between the housing of the shut-off solenoid and battery minus (ground supply).p. 124
Switch the switch (4) on and off.p. 124
When switching the switch (4) on the pin is retracted and it moves out again when the switch (4) is switched off.p. 124
Switch the switch (3) on first and switch (4) after -the pin is retracted into the body of the solenoid and remains in this position when switch (4) is switched off.p. 124
Camshaft sensor, B92
Fig. 1p. 125
Fig. 2p. 125
The camshaft sensor 1p. 125
(Fig. 2)p. 125
ECOMODE
Fig. 1p. 126
The standard BOMAG ECOMODE ensures a clean environmental balance. Due to the active engine management power is made available for the driver when it is needed and is reduced again when permitted by the application. Intelligent sensors in connection w…p. 126
Fig. 2p. 127
The actuating mechanism must be set to the correct end stops before initial start-up of the engine. See chapter "Electrics finisher input codes" section "Input codes E-throttle teaching"p. 127
The actuator M39 acts directly on the motor power leverp. 127
(Fig. 1)p. 127
The motor is a permanently controlled DC-motor, which is triggered by the ESX-control A34 via the changeover relay K176 (1)p. 127
(Fig. 3)p. 127
The position of the drive axle is detected by an integrated potentiometer. The potentiometer is positively connected with the drive shaft of the control element and serves the purpose of feeding back the output shaft position.p. 127
The gearbox has been designed with three stages. Internal stops protect the gearbox against damage. The gear on the drive shaft is a toothed segment which determines the internal mechanical stops. The defined limitation of adjusting speed contributes…p. 127
Functional principle of ECO modep. 127
The ESX-control (A34) regulates the control command in dependence onp. 127
travel pressure (travel pressure sensor B112)p. 127
(Fig. 4)p. 127
selected working powerp. 127
The following settings result in an increase in engine speed:p. 127
Switching on the screed heatingp. 127
Activating the load functionp. 127
Extending/retracting the extendable screed left/ rightp. 127
Manual operation of the scraper belt left/right in forwardp. 127
Manual operation of the auger left/right in forwardp. 127
Opening/closing the hopper wings left/right.p. 127
Fig. 3p. 128
Fig. 4p. 128
5.30 Glow plugs, R81-R84p. 129
During the pre-heating and starting process the glow plugs are energized through relay K14.p. 129
During the preheating process the control lamp is switched on for 10 seconds and switched off again when starting.p. 129
Fig. 5p. 129
1 Glow plugsp. 129
1 Glow plugsp. 129
2 Glow plug cablep. 129
Use a continuity tester to measure the resistance between glow plug connection and glow plug housing.p. 129
Continuity testp. 129
Remove the glow plug.p. 129
Fig. 6p. 129
Use a continuity tester to measure the resistance between glow plug connection and glow plug housing.p. 129
If the measured value does not correspond with the factory specification, the glow plug (29p. 129
(Fig. 6)p. 129
Factory specification for resistance approx. 0.95 Ohm in cold condition.p. 129
Assemblyp. 129
Align the recess to the connecting side when assembling the seal (1)p. 129
(Fig. 6)p. 129
Tightening torque: 7.7 to 9.3 Nm.p. 129
5.31 Oil pressure switch (B06)p. 130
Fig. 1p. 130
The oil pressure switch is mounted on the cylinder block and is connected to the lubrication oil channel.p. 130
At a pressure of less than 0.4 bar the oil pressure switch switches to motor ground.p. 130
Fig. 1p. 130
n redp. 130
n redp. 130
np. 130
Engine oil pressure too low, engine is shut down after 10 seconds.p. 130
5.32 Coolant temperature switch (B53)p. 130
Fig. 1p. 130
The temperature switch is arranged in the coolant circuit of the engine in such a way, that its tip is surrounded by coolant.p. 130
Should the engine overheat, the temperature switch will switch to engine ground.p. 130
Fig. 1p. 130
b redp. 130
b redp. 130
bp. 130
lights if engine overheats. After 8 seconds the warning buzzer will sound, vibration will be switched off and the travel speed reduced.p. 130
5.33 Air filter vacuum switch (B03)p. 131
Fig. 1 Vacuum switchp. 131
The vacuum switch 1p. 131
(Fig. 1)p. 131
Fig. 1p. 131
a yellowp. 131
a yellowp. 131
ap. 131
lights if combustion air filter cartridge is soiled, clean or replace if necessary.p. 131
5.34 Coolant float switch (B55)p. 131
Fig. 1p. 131
In case of a too low coolant level the float switch will switch to ground.p. 131
Fig. 1p. 131
o redp. 131
o redp. 131
op. 131
flashes when the coolant (filling) level is too low. Engine is shut down after 10 seconds.p. 131
5.35 Charge control lightp. 132
Fig. 1p. 132
The control lamp lights up if a ground signal is applied to the generator terminal (L).p. 132
Fig. 1p. 132
p yellowp. 132
p yellowp. 132
pp. 132
Charge control lamp, lights if the battery is not being charged. Check the V-belt, if necessary repair the generator.p. 132
5.36 Glow plugsp. 132
Fig. 1p. 132
During the preheating process the control lamp is switched on for 10 seconds and switched off again when starting.p. 132
Fig. 1p. 132
l yellowp. 132
l yellowp. 132
lp. 132
lights during preheating (for cold starting).p. 132
5.37 Water separator in fuel filter (B124))p. 133
Fig. 1p. 133
With water in the filter the sensor will switch to ground.p. 133
Fig. 1p. 133
k yellowp. 133
k yellowp. 133
kp. 133
lights when the water proportion in the transparent section of the fuel pre-filter reaches the contacts.p. 133
5.38 Level sensor in diesel tank (R03)p. 133
Fig. 1p. 133
The analog level switch is a variable resistance to ground.p. 133
Fig. 1p. 133
sp. 133
sp. 133
sp. 133
Fuel level gaugep. 133
Fig. 2p. 133
Main battery switchp. 133
Position "I"p. 133
Position "I"p. 133
Normal position, operationp. 133
Position "II"p. 134
Separates batteries from the on- board electrics in case of cable fire and fire in the engine compartment as well as protection against unauthorized use.p. 134
Pull out the main battery switch at the earliest 40 seconds after switching off the ignition, except in cases of emergency.p. 134
5.39 Fusesp. 134
Fig. 3p. 134
No. 1 = Fusesp. 134
No. 1 = Fusesp. 134
Fire hazard!p. 134
Fire hazard!p. 134
Do not use fuses with higher ampere ratings and do not bridge fuses.p. 134
The fuse box is located on the right hand side under the driver's platform.p. 134
Move the driver's platform fully to the left to access the fuse box. Remove the cover from the fuse box.p. 134
5.40 Component overviewp. 135
Fig. 4p. 135
Pos.p. 135
Pos.p. 135
Descriptionp. 135
Descriptionp. 135
1p. 135
1p. 135
E-throttle actuatorp. 135
2p. 135
2p. 135
Charge pressure filterp. 135
3p. 135
3p. 135
Main fusesp. 135
Main fusesp. 135
4p. 135
4p. 135
Batteriesp. 135
Batteriesp. 135
5p. 135
5p. 135
Control panel with switches, warning lights, potentiometers, travel lever and multi-function displaysp. 135
6p. 135
6p. 135
Brake releasing valvep. 135
7p. 135
7p. 135
Generatorp. 135
Generatorp. 135
Fig. 5p. 136
Pos.p. 136
Pos.p. 136
Descriptionp. 136
Descriptionp. 136
8p. 136
8p. 136
Screed heating control panel and Load Control System (LCS)p. 136
9p. 136
9p. 136
Working hydraulics (valves, etc.)p. 136
10p. 136
10p. 136
Fuel pre-filterp. 136
11p. 136
11p. 136
Water separatorp. 136
12p. 136
12p. 136
Fuel pumpp. 136
Fuel pumpp. 136
13p. 136
13p. 136
Hydraulic oil tankp. 136
14p. 136
14p. 136
Travel pumpsp. 136
Travel pumpsp. 136
15p. 136
15p. 136
Service pumpp. 136
Service pumpp. 136
16p. 136
16p. 136
Central electrics with fuse boxp. 136
17p. 136
17p. 136
Travel motorp. 136
Travel motorp. 136
18p. 136
18p. 136
Valve block for hydraulic crown adjustmentp. 136
19p. 136
19p. 136
Valve block for vibrationp. 136
20p. 136
20p. 136
Valve block for tampingp. 136
21p. 136
21p. 136
Valve block to extend and retract the mobile sectionsp. 136
5.43 View of operator's standp. 138
Overview of wiring loomsp. 138
1 Wiring loom, engine BF300p. 138
1 Battery cable, red 35mmp. 139
2p. 139
2 Battery cable, black 70mmp. 139
2p. 139
3 Battery cable, red 70mmp. 139
2p. 139
1 Wiring loom BF300 — pre-heating systemp. 140
1 Battery cable, red 35mmp. 141
2p. 141
2 Battery cable, black 35mmp. 141
2p. 141
3 Battery cable, red 70mmp. 141
2p. 141
4 Battery cable, black 70mmp. 141
2p. 141
5 Battery cable, black 70mmp. 141
2p. 141
1 Wiring loom BF300p. 142
1 Wiring loom BF300, hydraulic valvesp. 143
1 Wiring loom BF300, hydraulic valves on screedp. 144
1 Wiring loom BF300, screed control panelsp. 145
5.43 View of operator's standp. 146
5.42 Control elementsp. 146
5.43 View of operator's standp. 147
Fig. 6p. 147
1p. 147
1p. 147
A15 Instrument clusterp. 147
A15p. 147
16p. 147
16p. 147
S225, S226, S227Conveyor belt control panelp. 147
S225, S226, S227p. 147
2p. 147
2p. 147
Tire spraying unitp. 147
Optional equipmentp. 147
17p. 147
17p. 147
S222, S223 Material hopper control panelp. 147
S222, S223p. 147
3p. 147
3p. 147
S197 Asphalt fume extractionp. 147
S197p. 147
Optional equipmentp. 147
18p. 147
18p. 147
R07 Rotary switch for working speedp. 147
R07p. 147
4p. 147
4p. 147
S225 Switch to reverse the conveyor beltp. 147
S225p. 147
19p. 147
19p. 147
S217 Operating mode switch transport/workp. 147
S217p. 147
5p. 147
5p. 147
A81 Display and warning elementsp. 147
A81p. 147
20p. 147
20p. 147
S03 Warning hornp. 147
S03p. 147
6p. 147
6p. 147
S236 Switch for auger height adjustmentp. 147
S236p. 147
21p. 147
21p. 147
S14 Hazard light switchp. 147
S14p. 147
7p. 147
7p. 147
S15 StVZO lightingp. 147
S15p. 147
22p. 147
22p. 147
S04, Push button for parking brakep. 147
S04p. 147
8p. 147
8p. 147
S16 Rotary switch for working lights, frontp. 147
S16p. 147
23p. 147
23p. 147
S120 Rotary switch for engine speed/ ECO-modep. 147
S120p. 147
9p. 147
9p. 147
S26 Rear working lightp. 147
S26p. 147
24p. 147
24p. 147
S216, S219, S220 Travel system control panelp. 147
S216, S219, S220p. 147
10p. 147
10p. 147
S37 Travel direction indicator (flasher)p. 147
S37p. 147
25p. 147
25p. 147
S243, S244 Control panel for levellingp. 147
S243, S244p. 147
11p. 147
11p. 147
Push button for electro-hydraulicsp. 147
26p. 147
26p. 147
S215 Front wheel drive control panelp. 147
S215p. 147
12p. 147
12p. 147
S01 Emergency stop switchp. 147
S01p. 147
27p. 147
27p. 147
Dashboard lightp. 147
13p. 147
13p. 147
S250 Push button for partial screed load reliefp. 147
S250p. 147
28p. 147
28p. 147
S237, S238, S239, S240 Screed width control panelp. 147
S237, S238, S239, S240p. 147
14p. 147
14p. 147
S230, S231, S232, S233Control panel auger left/rightp. 147
S230, S231, S232, S233p. 147
29p. 147
29p. 147
S247, S248 Control panel for compactionp. 147
S247, S248p. 147
15p. 147
15p. 147
S221 Travel leverp. 147
S221p. 147
30p. 147
30p. 147
S249 Control panel for screed height adjustmentp. 147
S249p. 147
5.44 Monitoring modulesp. 148
Fig. 7 Monitoring module 1p. 148
Pos.p. 148
Pos.p. 148
Benennungp. 148
Benennungp. 148
ap. 148
ap. 148
Display: Clean the combustion air filterp. 148
bp. 148
bp. 148
Warning lamp red engine temperaturep. 148
Warning lampp. 148
redp. 148
cp. 148
cp. 148
Warning lamp red parking brake closedp. 148
Warning lampp. 148
redp. 148
dp. 148
dp. 148
Display travel direction "Neutral"p. 148
ep. 148
ep. 148
Display to replace hydraulic oil filter IIp. 148
fp. 148
fp. 148
Warning lamp red hydraulic oil temperaturep. 148
Warning lampp. 148
redp. 148
gp. 148
gp. 148
Warning lamp red hydraulic oil levelp. 148
Warning lampp. 148
redp. 148
hp. 148
hp. 148
Warning lamp red malfunction ESXp. 148
Warning lampp. 148
redp. 148
ip. 148
ip. 148
Display engine malfunctionp. 148
jp. 148
jp. 148
Display too low fuel levelp. 148
kp. 148
kp. 148
Warning lamp water in fuelp. 148
lp. 148
lp. 148
Display engine preheatingp. 148
mp. 148
mp. 148
Display replace hydraulic oil filter Ip. 148
np. 148
np. 148
Warning lamp red low engine oil pressurep. 148
Warning lampp. 148
redp. 148
op. 148
op. 148
Warning lamp red coolant levelp. 148
Warning lampp. 148
redp. 148
pp. 148
pp. 148
Charge control lightp. 148
qp. 148
qp. 148
Engine RPM-meterp. 148
rp. 148
rp. 148
Operating hour meter/fault codesp. 148
sp. 148
sp. 148
Display of fuel tank filling levelp. 148
Fig. 8 Monitoring module 2p. 149
Pos.p. 149
Pos.p. 149
Benennungp. 149
Benennungp. 149
ap. 149
ap. 149
not usedp. 149
not usedp. 149
bp. 149
bp. 149
Gearbox 2. gear, mechanicalp. 149
cp. 149
cp. 149
Gearbox 1.st gear, mechanicalp. 149
dp. 149
dp. 149
right hand conveyor beltp. 149
ep. 149
ep. 149
right hand augerp. 149
fp. 149
fp. 149
Working modep. 149
Working modep. 149
gp. 149
gp. 149
Differential lock enabledp. 149
hp. 149
hp. 149
Front wheel drive switched onp. 149
ip. 149
ip. 149
Front wheel drive switched offp. 149
jp. 149
jp. 149
Transport modep. 149
kp. 149
kp. 149
left hand augerp. 149
lp. 149
lp. 149
left hand conveyor beltp. 149
mp. 149
mp. 149
Working speed rangep. 149
np. 149
np. 149
Transport speed rangep. 149
op. 149
op. 149
not usedp. 149
not usedp. 149
pp. 149
pp. 149
Warning light parking brake closedp. 149
1 Pressure gauge for relief pressurep. 150
5.45 View of outside control standp. 150
Outside control stand right shown. Left side identical.p. 150
Fig. 9p. 150
1 Pressure gauge for relief pressurep. 151
Left outside control standp. 151
1 S125 Emergency stop push buttonp. 151
1 S125p. 151
2 R96 Rotary switch ultrasonic sensor for conveyor beltp. 151
2 R96p. 151
Optional equipmentp. 151
3 S228 Switch for conveyor beltp. 151
3 S228p. 151
4 S245 Switch, levelling/mat heightp. 151
4 S245p. 151
5 Bracket for MOBA control unitp. 151
6 S241 Switch, screed width left/rightp. 151
6 S241p. 151
7 S234 Switch, auger left / rightp. 151
7 S234p. 151
8 Rotary knob for ultrasonic sensor, augerp. 151
9 S213 Warning hornp. 151
9 S213p. 151
10 Connection, mat thickness controlp. 151
11 Warning lightp. 151
12 Connection, auger sensorp. 151
Right outside control stand:p. 151
1 S126 Emergency stop push buttonp. 151
1 S126p. 151
2 R97 Rotary switch ultrasonic sensor for conveyor beltp. 151
2 R97p. 151
Optional equipmentp. 151
3 S229 Switch for conveyor beltp. 151
3 S229p. 151
4 S246 Switch, levelling/mat heightp. 151
4 S246p. 151
5 Bracket for MOBA control unitp. 151
6 S242 Switch, screed width left/rightp. 151
6 S242p. 151
7 S235 Switch, auger left / rightp. 151
7 S235p. 151
8 Rotary knob for ultrasonic sensor, augerp. 151
9 S214 Warning hornp. 151
9 S214p. 151
10 Connection, mat thickness controlp. 151
11 Warning lightp. 151
12 Connection, auger sensorp. 151
1 Pressure gauge for relief pressurep. 152
5.46 View of screed controlp. 152
Fig. 10p. 152
1 Pressure gauge for relief pressurep. 152
2 R100 Adjustment knob to relieve the screed while the machine is travellingp. 152
2 R100p. 152
3 R101 Adjustment knob to relieve the screed with the machine stoppedp. 152
3 R101p. 152
4 R102 Timerp. 152
4 R102p. 152
5 Switch for crown profile adjustmentp. 152
Optional equipmentp. 152
6 Vibration speed valvep. 152
7 Tamper speed valvep. 152
5.47 View of electric heating control panelp. 153
Optional equipmentp. 153
Fig. 11p. 153
1 Heating control lampsp. 153
2 Push button generator on/offp. 153
3 Temperature gauge actual valuep. 153
4 Push button temperature gauge screed left/middle/ rightp. 153
5 Temperature gauge nominal valuep. 153
6 Temperature adjustment push buttonp. 153
7 Function key for fault rectificationp. 153
8 Display switching °C/°Fp. 153
9 Rotary switch, temperature control on/offp. 153
10 Control lamps, heating switched onp. 153
11 Heating rod control lampp. 153
12 Push button electric fault screed heatingp. 153
Functional block diagram overview of functions, completep. 154
Block diagram components on CANp. 155
Block diagram CAN with control elementsp. 156
Block diagram of travel circuitp. 157
Block diagram material feedp. 158
Block diagram screedp. 159
Block diagram screed levellingp. 160
Block diagram screed heatingp. 161
Functional block diagram monitoring functionsp. 162
Functional block diagram Emergency Stop functionp. 163
5.58 Electronic control unitsp. 164
Control unitsp. 164
Control unitsp. 164
Control units (ECU = electronic control unit or ECM = electronic control module) are electronic modules which are mainly installed in places where something needs to be controlled or regulated. Control units are used in almost any electronic sector i…p. 164
Control units generally work according to the IPO- principle. IPO stands for Input-Processing-Output. Sensors are available for input. Sensors determine a physical characteristic like e.g. rotary speed, pressure, temperature, etc. This value is compa…p. 164
Fig. 1 Electronic control (ESX)p. 164
In current vehicles control units are linked via various system buses (CAN, LIN, MOST, Flexray). The units exchange information about operating states and other relevant data in vehicle across the system. Furthermore, the on-board diagnostic or the d…p. 164
Modulesp. 164
In the latest generation of machines BOMAG uses machine programmable modules. A module mainly consists of a programmable microprocessor with additional circuitry for inputs and outputs.p. 164
Fig. 2 Modulep. 164
The modules have control lights on inputs and outputs to monitor the applied signals.p. 164
Signalsp. 165
Analog signalsp. 165
Process states are continuous (analog) when they can be mapped by means of a real number, e.g. temperature = 65.5 °C. The sensor converts a continuous process status into an analog signal. If the control unit needs the numerical value of the analog …p. 165
Binary signalsp. 165
Process states are bivalent (binary) if they have only 2 possible states of truth, such as e.g. button pressed/ not pressed, object present/not present. The two states of truth are mapped by means of defined states of an information carrier, e.g. 'no…p. 165
CAN-bus, Controller Area Networkp. 165
created by Bosch at the end of the eighties for automobile applications.p. 165
Development objectives:p. 165
Real-time critical, robust and low price communication of control units, such as transmission and engine control, but also less time critical applications in the field of convenience electronics, such as air conditioning.p. 165
Fig. 3p. 165
Why CAN?p. 165
Networking of control units for the realization of complex functions.p. 165
Reduction of the extend of wiring and plug connections.p. 165
Better diagnostic possibilities (central diagnostics socket).p. 165
Characteristics of CANp. 165
It is a kind of serial data transmission. The individual bits are transmitted one after the other, only 2 lines are required.p. 165
CAN lines are twisted together 30 to 40 times per metre. Electromagnetic interferences therefore always occur simultaneously in both lines, the software is thus able to filter out interfering signals more easily.p. 165
Wire (+) = cable colour bluep. 165
Wire (-) = cable colour yellowp. 165
Measuring on the CANp. 165
Signals transmitted through the bus line can generally not be measured with simple measuring instruments. Testing is therefore quite complicated for the user. Correct connection of lines can only be checked by means of a continuity test. BOMAG displa…p. 165
5.59 Checking the voltage supply for the control unitp. 166
Power supply for a control unit, generalp. 166
All electronic switching and control units require an electric power supply to be able to work. If the plus or minus supply is faulty, the control unit will work incorrectly or fail.p. 166
The following describes the electric power supply for the ESX-control.p. 166
(Fig. 4) shows a simplified representation of how the control unit (ESX, 68 pole) is connected. The complete representation can be found in the wiring diagram of the machine.p. 166
(Fig. 4)p. 166
The procedure can also be used for other controls. Pin assignment and voltage supply may be different, but the procedures for line testing are generally the same.p. 166
Fig. 4 Circuitry examplep. 166
1p. 166
1p. 166
Engine blockp. 166
ESXp. 166
ESXp. 166
Control unitp. 166
F00p. 166
F00p. 166
Main fusep. 166
Fx,Fxxp. 166
Fx,Fxxp. 166
Fuses potential 30p. 166
Fxxxp. 166
Fxxxp. 166
Fuses potential 15p. 166
Gp. 166
Gp. 166
Generatorp. 166
G01p. 166
G01p. 166
Batteryp. 166
GNDp. 166
GNDp. 166
Housing earthp. 166
H08p. 166
H08p. 166
Charge control lightp. 166
S00p. 166
S00p. 166
Ignition switchp. 166
S01p. 166
S01p. 166
Emergency stop switchp. 166
Pin 28p. 166
Pin 28p. 166
Voltage supply for controlp. 166
Pin 54p. 166
Pin 54p. 166
if the signal (12/24 Volt) is applied, the control is switched onp. 166
Pin 55p. 166
Pin 55p. 166
Ground supply for controlp. 166
Pin 56 to 60p. 166
Pin 56 to 60p. 166
Voltage supply for outputsp. 166
GNDp. 166
GNDp. 166
Housing earthp. 166
Fault in current supply, generalp. 167
Clear interruptions in the plus or minus supply are relatively easy to detect. However, the plus and minus sides of control units are in most cases connected to the vehicle mains supply via several cables, so that several parallel current branches ex…p. 167
Fig. 5 Circuitry examplep. 167
The arrows point to the contact locations, which may be the cause if a control unit only receives a reduced supply voltage.p. 167
The following faults may occur:p. 167
Line interruption in a plus supply linep. 167
high voltage drop in a plus supply linep. 167
line interruption on the minus sidep. 167
Measuring principle for line testingp. 168
When a line conducts an electric current, a voltage drop will occur in the line (Up. 168
Vp. 168
Vp. 168
the available amperage (I) andp. 168
the electric resistance (Rp. 168
linep. 168
In order to have reliable comparison possibilities at hand one should always work with the same amperage. Identical marginal conditions are therefore used in all of the following examples:p. 168
12 Volt – vehicle battery as voltage source or 24 Volt in a 24 Volt vehicle network.p. 168
12 V / 21 W – lamp as load in a 12 Volt vehicle network.p. 168
24 V / 21 W – lamp as load in a 24 Volt vehicle network.p. 168
Test stepsp. 168
Test stepsp. 168
1. Switch off the ignition.p. 168
2. Unplug the control unit from wiring loom.p. 168
3. If available connect the Pinboxp. 168
(Fig. 6)p. 168
4. Check with multimeter. If a setpoint is not reached, proceed step by step to identify the weak spot. Repair as necessary. Repeat the measurement.p. 168
The plug must not be pulled off or plugged on while the ignition is switched on. Switch off the ignition first and then pull off or plug on the plug.p. 168
Only plug the wiring loom onto the control unit, when the actual value corresponds with the setpoint.p. 168
Fig. 6 Pinbox for 68 pole ESX controlp. 168
General measuring setup to check a supply line (plus side)p. 169
Fig. 7 Measuring arrangement 12 Voltp. 169
1p. 169
1p. 169
Supply line, plus sidep. 169
2p. 169
2p. 169
Plug contact in wiring loom plug on control or Pinboxp. 169
(Fig. 6)p. 169
Ep. 169
Ep. 169
Lamp, 12V / 21 Wattp. 169
Pp. 169
Pp. 169
Multimeterp. 169
G01p. 169
G01p. 169
Battery as voltage source, 12Vp. 169
Up. 169
Up. 169
Vp. 169
Voltage drop caused by the lamp currentp. 169
Setpointp. 169
The voltage drop Up. 169
Vp. 169
Setpointp. 169
£p. 169
General measuring setup to check a return line (minus side)p. 170
Fig. 8 Measuring arrangement 12 Voltp. 170
1p. 170
1p. 170
Return line, minus sidep. 170
2p. 170
2p. 170
Plug contact in wiring loom plug on control or Pinboxp. 170
(Fig. 6)p. 170
Ep. 170
Ep. 170
Lamp, 12V / 21 Wattp. 170
Pp. 170
Pp. 170
Multimeterp. 170
G01p. 170
G01p. 170
Battery as voltage source, 12Vp. 170
Up. 170
Up. 170
Vp. 170
Voltage drop caused by the lamp currentp. 170
Setpointp. 170
The voltage drop Up. 170
Vp. 170
Setpointp. 170
£p. 170
Connection example to check the plus line between battery and plug pin 28p. 171
Fig. 9p. 171
Xp. 171
Xp. 171
Wiring loom plug disconnected from control unit or Pinboxp. 171
(Fig. 6)p. 171
Pp. 171
Pp. 171
Multimeterp. 171
S00p. 171
S00p. 171
Ignition switched on. Setpoint : E is bright. Up. 171
Vp. 171
S00p. 171
S00p. 171
Ignition switched off. Setpoint : E is dark. Up. 171
Vp. 171
Connection example to check the minus line between battery and plug pin 55p. 172
Fig. 10p. 172
Pp. 172
Pp. 172
Multimeterp. 172
Xp. 172
Xp. 172
Wiring loom plug disconnected from control unit or Pinboxp. 172
(Fig. 6)p. 172
Ep. 172
Ep. 172
Setpoint : E is bright. Up. 172
Vp. 172
Test protocol for ESXp. 173
E lamp 12V / 21W in 12V vehicle network, to load the current branches.p. 173
E lamp 24V / 21W in 24V vehicle network, to load the current branches.p. 173
G01, batteryp. 173
P multimeter, measuring range: DCp. 173
Plug pinp. 173
Plug pinp. 173
Notep. 173
Notep. 173
Setpointsp. 173
Setpointsp. 173
28p. 173
28p. 173
Ignition ONp. 173
Ignition ONp. 173
E between plug pin 28 and battery minusp. 173
P between battery plus and plug pin 28p. 173
E is bright,p. 173
Up. 173
Vp. 173
28p. 173
28p. 173
Ignition OFFp. 173
Ignition OFFp. 173
E between plug pin 28 and battery plusp. 173
P between battery minus and plug pin 28p. 173
E is dark,p. 173
Up. 173
Vp. 173
54p. 173
54p. 173
Ignition OFF, emergency stop not operatedp. 173
E between plug pin 54 and battery minusp. 173
P between battery plus and plug pin 54p. 173
E is bright,p. 173
Up. 173
Vp. 173
54p. 173
54p. 173
Ignition OFF, emergency stop operatedp. 173
E between plug pin 54 and battery minusp. 173
P between battery plus and plug pin 54p. 173
E is dark,p. 173
Up. 173
Vp. 173
55p. 173
55p. 173
Ignition OFFp. 173
Ignition OFFp. 173
E between plug pin 55 and battery minusp. 173
P between battery plus and plug pin 55p. 173
E is bright,p. 173
Up. 173
Vp. 173
56, 57, 58, 59, 60p. 173
Ignition OFFp. 173
Ignition OFFp. 173
E between plug pin 56, 57, 58, 59, 60 and battery minusp. 173
P between battery plus and plug pin 56, 57, 58, 59, 60p. 173
E is bright,p. 173
Up. 173
Vp. 173
If one or several setpoint(s) is (are) exceeded, one must make considerations which are related to the wiring diagram.p. 173
Example 1:p. 173
In all supply lines to the pins 56, 57, 58, 59 and 60 the voltage drop is too high. There are two possible reasons. Either all contacts are corroded, or the supply line between battery and fuse Fxx has poor contact.p. 173
Example 2:p. 173
Only one measuring value exceeds the setpoint. In this case the fault must be located between the last branch and the corresponding plug pin.p. 173
5.60 Diagnostics conceptp. 174
Introductionp. 174
Introductionp. 174
A correct and reliable diagnose is a general prerequisite for the detection of faults in system. For this to count as a rule several points must be fulfilled. One of these points is the ability of the engine to run a systematic trouble shooting proce…p. 174
Fault description and questioning of the customerp. 174
After the customer has explained his complaint(s) the engineer has to ask further questions to track down the cause of the fault. If the complaint is additionally related to electric/electronic components, the visual examination and a possible test d…p. 174
Fig. 11p. 174
(1) Fault memorized in error logp. 174
Clear cause?p. 174
Clear cause?p. 174
If the fault message leaves no doubt, repair work may be started immediately.p. 174
(2) No fault memorized in the error log at the time of initial questioningp. 174
Even if the fault is in the electric/electronic part of the vehicle, a control unit will very often not detect a fault. Right from the start you should be aware of the fact that a high proportion of faults is caused by contacts. This even gets worse …p. 174
In order to examine the electric/electronic part of an electronic system it is recommended to check the incoming sensor information and outgoing command values on a control unit. This requires profound knowledge of system and components.p. 174
Consideration, if the error log has not recorded a faultp. 174
What could be the cause of the complaint?p. 174
Which measuring possibilities are available?p. 174
Localizing faultsp. 175
Line or component?p. 175
Fig. 12p. 175
In most cases the fault message does not clarify whether the fault is in the sensor or actor, or in one of the connecting lines (2) between control unit and the mentioned component (1). For this purpose it makes sense to check the component and the c…p. 175
Checking the voltage supply for the control unitp. 175
Checking the sensor linesp. 175
Checking the actor linesp. 175
Sequence after the fault is foundp. 176
Fig. 13p. 176
6 Input codesp. 177
6 Input codesp. 177
Input codes — display: Functions and operationp. 178
Display functions and operationp. 178
The main LC-displayp. 178
(Fig. 14)p. 178
Display of operating hours as well as error and input codes (1)p. 178
Button right (2)p. 178
Button left (3)p. 178
Tool symbol (4) (only visible in Service mode)p. 178
Fig. 14 LC-Displayp. 178
Input of codes (input codes)p. 178
The brake needs to be activated to be able to access input mode!p. 178
Calling up input modep. 178
Actionp. 178
Actionp. 178
Resultp. 178
Resultp. 178
— Press button left and button right at the same time for at least two seconds.p. 178
— Press button left and button rightp. 178
at the same timep. 178
twop. 178
— The display shows "0000"p. 178
— The display showsp. 178
"0000"p. 178
— The leftp. 178
"0"p. 178
One can change the numerical value of the display by using the buttons one after the other:p. 178
The left hand button to change the numbers in ascending mode (0, 1, 2, 3, 4, 5, 6, 7, 8, 9, 0, …).p. 178
The right hand button to move on to the next digit (p. 178
0p. 178
0p. 178
0p. 178
0p. 178
0p. 178
Calling up service modep. 178
Actionp. 178
Actionp. 178
Resultp. 178
Resultp. 178
— Enter code 0001.p. 178
— Enter codep. 178
0001p. 178
— The system changes to service mode.p. 178
— The display shows the tool symbol.p. 178
6.2 Teaching the E-throttle function:p. 179
Teaching the E-throttle functionp. 179
Take notice of the section "Input codes Display General"!p. 179
Teaching the E-throttle function:p. 179
Actionp. 179
Actionp. 179
Actionp. 179
Resultp. 179
Resultp. 179
Resultp. 179
— Switch on the ignition.p. 179
Note: Dop. 179
Note:p. 179
notp. 179
— Enter code 0001.p. 179
— Enter codep. 179
0001p. 179
— The system changes to service mode.p. 179
— The display shows the tool symbol.p. 179
— Enter code 5038.p. 179
— Enter codep. 179
5038p. 179
— The teach function "Teach E-throttle function" is activated.p. 179
— Enter code 5039.p. 179
— Enter codep. 179
5039p. 179
— The function E-throttle lower value is activated.p. 179
— The function E-throttlep. 179
lower valuep. 179
— The E-throttle actuator in the engine compartmentp. 179
clicksp. 179
Note: This clicking sound indicates that the coupling of the actuator has been opened.p. 179
Note:p. 179
— The corresponding position value appears in the display.p. 179
Note: The value must be lower than 500. Otherwise you must adjust the lever of the `E-throttle actuator.p. 179
Note:p. 179
— Shift the lever of the injection pump fully to min (idle speed) and hold it in this position.p. 179
— Shift the lever of the injection pump fully top. 179
min (idle speed)p. 179
Note: This makes sure that the lever is actually in position "min".p. 179
Note:p. 179
— The E-throttle actuator in the engine compartment clicks.p. 179
— The E-throttle actuator in the engine compartmentp. 179
clicksp. 179
— A valid value has been taught.p. 179
— Enter code 5040.p. 179
— Enter codep. 179
5040p. 179
— The function E-throttle upper value is activated.p. 179
— The function E-throttlep. 179
upper valuep. 179
— The E-throttle actuator in the engine compartmentp. 179
clicksp. 179
Note: This clicking sound indicates that the coupling of the actuator has been opened.p. 179
Note:p. 179
— The corresponding position value appears in the display.p. 179
— Shift the lever of the injection pump fully to maximum (full speed) and hold it in this position.p. 179
— Shift the lever of the injection pump fully top. 179
maximum (full speed)p. 179
— The E-throttle actuator in the engine compartment clicks.p. 179
— The E-throttle actuator in the engine compartmentp. 179
clicksp. 179
— A valid value has been taught.p. 179
— Enter code 5041.p. 179
— Enter codep. 179
5041p. 179
— The E-throttle function is terminated.p. 179
— END.p. 179
6.3 Teaching the L.C.S. functionp. 180
Teaching the LCS functionp. 180
The L.C.S. Control panelp. 180
(Fig. 15)p. 180
Work potentiometer (1)p. 180
Stop potentiometer (2)p. 180
Timer potentiometer (3)p. 180
Fig. 15 LCS operationp. 180
Fig. 16 Screed adjustmentp. 180
Lower the screed to be able to teach the L.C.S. function.p. 180
The switch “a”p. 180
(Fig. 16)p. 180
Take notice of the section "Input codes Display General"!p. 180
During this teach function the travel lever mustp. 180
alwaysp. 180
Teaching the LCS function:p. 181
Actionp. 181
Actionp. 181
Actionp. 181
Resultp. 181
Resultp. 181
Resultp. 181
— Start the engine.p. 181
— Turn all potentiometers on the LCS control panel to "min".p. 181
— Enter code 0001.p. 181
— Enter codep. 181
0001p. 181
— The system changes to service mode.p. 181
— The display shows the tool symbol.p. 181
— Enter code 3006.p. 181
— Enter codep. 181
3006p. 181
— The teach function "Teach LCS" is activated.p. 181
— The display shows "0 0 0 0".p. 181
— Enter code 3007.p. 181
— Enter codep. 181
3007p. 181
— The function LCS maximum work pressure is activated.p. 181
— The function LCSp. 181
maximum work pressurep. 181
— The display shows "4 4 4 4 4".p. 181
— Set the work potentiometer to the desired pressure (read pressure on pressure gauge of LCS control panel).p. 181
— The display shows the current position of the potentiometer for informative reasons (value between "0" and "1000").p. 181
— Turn the timer potentiometer from "min" to "max" and back to "min".p. 181
— The display shows "1 1 1 1 1".p. 181
— This is followed by "3 3 3 3 3".p. 181
— Turn the work potentiometer to "min".p. 181
— The display shows "2 2 2 2 2".p. 181
— This is followed by "0 0 0 0".p. 181
— Enter code 3008.p. 181
— Enter codep. 181
3008p. 181
— The function LCS maximum stop pressure is activated.p. 181
— The function LCSp. 181
maximum stop pressurep. 181
— Set the stop potentiometer to the desired pressure (read pressure on pressure gauge of LCS control panel).p. 181
— The display shows the current position of the potentiometer for informative reasons (value between "0" and "1000").p. 181
— Turn the timer potentiometer from "min" to "max" and back to "min".p. 181
— The display shows "1 1 1 1 1".p. 181
— This is followed by "3 3 3 3 3".p. 181
— Turn the stop potentiometer to "min".p. 181
— The display shows "2 2 2 2 2".p. 181
— This is followed by "0 0 0 0".p. 181
— Enter code 0000.p. 181
— Enter codep. 181
0000p. 181
— This quits the service mode.p. 181
— END.p. 181
6.4 Travel signal by button for max. screed reliefp. 182
This function is a so-calledp. 182
limp home functionp. 182
As long as the function "Travel signal by push button for maximum screed relief" is activated, the button for maximum screed relief is not available to the operator! However, the Load Control System (LCS) does still work.p. 182
Fig. 17 Push button for maximum screed reliefp. 182
Take notice of the section "Input codes Display General"!p. 182
Activation of the function "Travel signal by push button for maximum screed relief":p. 182
Actionp. 182
Actionp. 182
Actionp. 182
Resultp. 182
Resultp. 182
Resultp. 182
— Switch on the ignition.p. 182
Note: Dop. 182
Note:p. 182
notp. 182
— Enter code 0001.p. 182
— Enter codep. 182
0001p. 182
— The system changes to service mode.p. 182
— The display shows the tool symbol.p. 182
— Enter code 1100.p. 182
— Enter codep. 182
1100p. 182
— Changes to the travel system parameters are now possible.p. 182
— Enter code 1121.p. 182
— Enter codep. 182
1121p. 182
— The function "Travel signal by push button for maximum screed relief" is activated.p. 182
To drive the machine the operator must now:p. 182
– Shift both travel control lever forward (or backward).p. 182
p. 182
At the same timep. 182
(Fig. 17)p. 182
– Travel lever in "Neutral" stops the machine.p. 183
Once the fault(s) no longer exist (e.g. after a repair) this functionp. 183
deactivatesp. 183
automaticallyp. 183
There is also the possibility to switch off this function manually.p. 183
Deactivation of the function "Travel signal by push button for maximum screed relief":p. 183
Actionp. 183
Actionp. 183
Actionp. 183
Resultp. 183
Resultp. 183
Resultp. 183
— Switch on the ignition.p. 183
Note: Dop. 183
Note:p. 183
notp. 183
— Enter code 0001.p. 183
— Enter codep. 183
0001p. 183
— The system changes to service mode.p. 183
— The display shows the tool symbol.p. 183
— Enter code 1100.p. 183
— Enter codep. 183
1100p. 183
— Changes to the travel system parameters are now possible.p. 183
— Enter code 1122.p. 183
— Enter codep. 183
1122p. 183
— The function "Travel signal by push button for maximum screed relief" is deactivated.p. 183
6.5 Resetting to factory settingsp. 184
Take notice of the section "Input codes Display General"!p. 184
The machine will not move as long as the code "7860" is displayed.p. 184
Resetting to factory settings:p. 184
Actionp. 184
Actionp. 184
Actionp. 184
Resultp. 184
Resultp. 184
Resultp. 184
— Switch on the ignition.p. 184
Note: Dop. 184
Note:p. 184
notp. 184
— Enter code 0001.p. 184
— Enter codep. 184
0001p. 184
— The system changes to service mode.p. 184
— The display shows the tool symbol.p. 184
— Enter code 7010.p. 184
— Enter codep. 184
7010p. 184
— The display shows "7 8 6 0".p. 184
— Press the right button to confirm "7860".p. 184
— The ESX runs a reset.p. 184
— Switch off the ignition.p. 184
— Switch on the ignition.p. 184
— The display shows "7 8 6 0".p. 184
— Enter code 0001.p. 184
— Enter codep. 184
0001p. 184
— The system changes to service mode.p. 184
— The display shows the tool symbol.p. 184
— Enter code 7010.p. 184
— Enter codep. 184
7010p. 184
— Use the left hand button to select code 7861.p. 184
— Use the left hand button to select codep. 184
7861p. 184
— Press the right button to confirm.p. 184
— The ESX runs another reset.p. 184
— Switch off the ignition.p. 184
— Switch on the ignition.p. 184
— The display shows "7 8 6 1".p. 184
— Enter code 0000.p. 184
— Enter codep. 184
0000p. 184
— This quits the service mode.p. 184
— END.p. 184
6.6 Showing stored faultsp. 185
This function can only be activated / deactivated if the parking brake has been activated!p. 185
Dop. 185
notp. 185
Display of logged errors:p. 185
Actionp. 185
Actionp. 185
Actionp. 185
Resultp. 185
Resultp. 185
Resultp. 185
— Switch on the ignition.p. 185
Note: Dop. 185
Note:p. 185
notp. 185
— Enter code 0700.p. 185
— Enter codep. 185
0700p. 185
— The system changes to the mode "Show logged errors".p. 185
— The error codes logged in the ESX appear flashing in the display.p. 185
Note:p. 185
If more than only one error codes has been logged, these codes are displayed inp. 185
three secondp. 185
If there arep. 185
nop. 185
– – – – –p. 185
— Enter code 0701.p. 185
— Enter codep. 185
0701p. 185
— The mode "Show logged errors" is terminated.p. 185
Apart from the logged error codes the current faults (if present) are also displayed.p. 185
6.7 Showing saved faults with operating hoursp. 186
This function can only be activated / deactivated if the parking brake has been activated!p. 186
Dop. 186
notp. 186
Display of logged errors:p. 186
Actionp. 186
Actionp. 186
Actionp. 186
Resultp. 186
Resultp. 186
Resultp. 186
— Switch on the ignition.p. 186
Note: Dop. 186
Note:p. 186
notp. 186
— Enter code 0705.p. 186
— Enter codep. 186
0705p. 186
— The system changes to the mode "Show logged errors with operating hours".p. 186
— The error codes logged in the ESX appear flashing in the display.p. 186
— Press the left hand button.p. 186
Attention: three possible options!p. 186
— Option 1: No error code logged in the ESX:p. 186
p. 186
Option 1p. 186
–> The display shows "p. 186
– – – – –p. 186
p. 186
Option 2p. 186
–> The display shows the error code. Continue with "One error code".p. 186
p. 186
Option 3p. 186
–> The display first shows only one error code. Continue with "Several error codes".p. 186
One error code:p. 186
— Press the left hand button again.p. 186
— The display does not change, the logged error code flashes. Continue with "Show operating hours of error code".p. 186
Several error codes:p. 186
— Press the left hand button again.p. 186
— The display changes. Each actuation of the left hand button brings you to the next error code, until the first one appears again. Continue with "Show operating hours of error code".p. 186
Showing the operating hours for the error code:p. 186
— Press the right hand button.p. 186
— The operating hours at which the corresponding error code has been logged are displayed. ("When did the error occur the last time?")p. 186
Showing the number of occurrence of this error:p. 186
— Press the right hand button again.p. 186
The display shows the number of occurrence of the corresponding error since the error log had been deleted the last time. ("How often has the error been detected?")p. 186
— Enter code 0706.p. 186
— Enter codep. 186
0706p. 186
— The mode "Show logged errors with operating hours" is terminated.p. 186
Apart from the logged error codes the current faults (if present) are also displayed.p. 186
6.8 Deleting the fault logp. 187
This function can only be activated / deactivated if the parking brake has been activated!p. 187
Dop. 187
notp. 187
Deleting logged errors:p. 187
Actionp. 187
Actionp. 187
Actionp. 187
Resultp. 187
Resultp. 187
Resultp. 187
— Switch on the ignition.p. 187
Note: Dop. 187
Note:p. 187
notp. 187
— Enter code 0710.p. 187
— Enter codep. 187
0710p. 187
— Switch off the ignition.p. 187
— Switch on the ignition.p. 187
— All logged error codes have been deleted.p. 187
6.9 Driving against the closed brakep. 188
Activation of this mode is only possible from software version 0.21!p. 188
Activate function "Driving against the closed brake":p. 188
Actionp. 188
Actionp. 188
Actionp. 188
Resultp. 188
Resultp. 188
Resultp. 188
— Start the engine.p. 188
— Shift the travel lever to "Neutral"p. 188
— Enter code 0001.p. 188
— Enter codep. 188
0001p. 188
— The system changes to service mode.p. 188
— The display shows the tool symbol.p. 188
— Enter code 0500.p. 188
— Enter codep. 188
0500p. 188
— The mode "Driving against the closed brake" is activated.p. 188
— The LED for brakep. 188
flashesp. 188
— Shift the travel lever to "forward" ("reverse").p. 188
— Set the speed potentiometer to "> 0".p. 188
— The display shows "0 0 0 0".p. 188
— Shift the travel lever to "Neutral"p. 188
— Set the speed potentiometer to "> 0".p. 188
— The display shows "0 0 0 0".p. 188
— Enter code 0501.p. 188
— Enter codep. 188
0501p. 188
— The mode "Driving against the closed brake" is deactivated.p. 188
— The LED for brakep. 188
lightsp. 188
— The display shows "0 0 0 0".p. 188
— Enter code 0000.p. 188
— Enter codep. 188
0000p. 188
— This quits the service mode.p. 188
— END.p. 188
6.10 Adapting the engine speedp. 189
On the finisher BF300 the transmission ratio of the belt drive for the generator (power generation for screed heating) was adapted from a certain serial number. The diameter of the generator V-belt pulley was thereby changed. In the software versionp. 189
v0.27p. 189
Serial numbers, from which the changed V-belt drive has been installed:p. 189
BF300_P – S340 VE : 821837681008 – …p. 189
BF300_P – S340 TVE : 821837811013 – …p. 189
BF300_C – S340 TVE : 821837821017 – …p. 189
The engine speedp. 189
mustp. 189
v0.27p. 189
Take notice of the section "Input codes Display General"!p. 189
Adapting the engine speed:p. 189
Actionp. 189
Actionp. 189
Actionp. 189
Resultp. 189
Resultp. 189
Resultp. 189
— Switch on the ignition.p. 189
Note: Dop. 189
Note:p. 189
notp. 189
— Enter code 0001.p. 189
— Enter codep. 189
0001p. 189
— The system changes to service mode.p. 189
— The display shows the tool symbol.p. 189
— Enter code 5046.p. 189
— Enter codep. 189
5046p. 189
— The engine speed is adapted to the original settings (old generator).p. 189
— Enter code 0000.p. 189
— Enter codep. 189
0000p. 189
— This quits the service mode.p. 189
— END.p. 189
6.11 Deactivating / activating the front drivep. 190
The front drive is a special feature available for the wheel version of the BF300 finisher.p. 190
On machines which are only equipped with rear wheel drive, the front drive must bep. 190
deactivatedp. 190
If the front drive isp. 190
notp. 190
1029p. 190
1029p. 190
1030p. 190
1140p. 190
1143p. 190
1150p. 190
Take notice of the section "Input codes Display General"!p. 190
Deactivating the front drive:p. 190
Actionp. 190
Actionp. 190
Actionp. 190
Resultp. 190
Resultp. 190
Resultp. 190
— Switch on the ignition.p. 190
Note: Dop. 190
Note:p. 190
notp. 190
— Enter code 0001.p. 190
— Enter codep. 190
0001p. 190
— The system changes to service mode.p. 190
— The display shows the tool symbol.p. 190
— Enter code 1100.p. 190
— Enter codep. 190
1100p. 190
— The function "Setting the machine type code" is activated.p. 190
— Enter code 1102.p. 190
— Enter codep. 190
1102p. 190
— The front drive is deactivated.p. 190
— The front drive isp. 190
deactivatedp. 190
— Switch off the ignition.p. 190
— END.p. 190
— END.p. 190
Activating the front drive:p. 190
Actionp. 190
Actionp. 190
Actionp. 190
Resultp. 190
Resultp. 190
Resultp. 190
— Switch on the ignition.p. 190
Note: Dop. 190
Note:p. 190
notp. 190
— Enter code 0001.p. 190
— Enter codep. 190
0001p. 190
— The system changes to service mode.p. 190
— The display shows the tool symbol.p. 190
— Enter code 1100.p. 190
— Enter codep. 190
1100p. 190
— The function "Setting the machine type code" is activated.p. 190
— Enter code 1101.p. 190
— Enter codep. 190
1101p. 190
— The front drive is activated.p. 190
— The front drive isp. 190
activatedp. 190
— Switch off the ignition.p. 190
— END.p. 190
— END.p. 190
6.12 Deactivating / activating the brake pedal switchp. 191
With a defective brake pedal switch the machine can no longer be moved correctly.p. 191
The brake pedal switch can therefore be deactivated.p. 191
With a deactivated brake pedal switch the braking effect kicks in with a delay. Adapt your travel performance!p. 191
The display shows the error code 1005.p. 191
Take notice of the section "Input codes Display General"!p. 191
Deactivating the brake pedal switch:p. 191
Actionp. 191
Actionp. 191
Actionp. 191
Resultp. 191
Resultp. 191
Resultp. 191
— Switch on the ignition.p. 191
Note: Dop. 191
Note:p. 191
notp. 191
— Enter code 0001.p. 191
— Enter codep. 191
0001p. 191
— The system changes to service mode.p. 191
— The display shows the tool symbol.p. 191
— Enter code 1100.p. 191
— Enter codep. 191
1100p. 191
— The function "Setting the machine type code" is activated.p. 191
— Enter code 1104.p. 191
— Enter codep. 191
1104p. 191
— The brake pedal switch is deactivated.p. 191
— The brake pedal switch isp. 191
deactivatedp. 191
— Switch off the ignition.p. 191
— END.p. 191
— END.p. 191
Once the brake pedal switch has been repaired, it must be activated again.p. 191
Activating the brake pedal switch:p. 191
Actionp. 191
Actionp. 191
Actionp. 191
Resultp. 191
Resultp. 191
Resultp. 191
— Switch on the ignition.p. 191
Note: Dop. 191
Note:p. 191
notp. 191
— Enter code 0001.p. 191
— Enter codep. 191
0001p. 191
— The system changes to service mode.p. 191
— The display shows the tool symbol.p. 191
— Enter code 1100.p. 191
— Enter codep. 191
1100p. 191
— The function "Setting the machine type code" is activated.p. 191
— Enter code 1103.p. 191
— Enter codep. 191
1103p. 191
— The brake pedal switch is activated.p. 191
— The brake pedal switch isp. 191
activatedp. 191
— Switch off the ignition.p. 191
— END.p. 191
— END.p. 191
7 Replacement of componentsp. 193
How to proceed when replacing components?p. 194
Forewordp. 194
Forewordp. 194
Each machine is adjusted individually ex factory. Should the replacement of machine parts become necessary during the operating period of the machine, there is always a possibility to repeat these adjustments.p. 194
BOMAG thereby does without any expensive special tools, but gives the service personnel the possibility tom make adjustments and settings easily and simply by just using the display on the machine. The chapter "Electrics finisher input codes" contain…p. 194
Replacing the contgrol (ESX)p. 194
Since the central control (ESX) saves all data and values, all teach procedures listed in the chapter "Electrics finisher input codes" must be carried out.p. 194
Compliance with the specified sequence of procedures is mandatory!p. 194
Carry out the following teach procedure(s):p. 194
Input codes — reset to factory settings (Code:p. 194
7861p. 194
Pp. 194
7865p. 194
Cp. 194
Input codes – automatic calibration of currents for travel system (p. 194
onlyp. 194
Cp. 194
If necessary: Input codes – manual calibration of currents for travel system (p. 194
onlyp. 194
Cp. 194
Input codes — teaching E-throttle functionp. 194
If necessary: Input codes – adapt engine speed.p. 194
Replacement of travel pump(s)p. 194
Carry out the following teach procedure(s):p. 194
Input codes – automatic calibration of currents for travel system (p. 194
onlyp. 194
Cp. 194
If necessary: Input codes – manual calibration of currents for travel system (p. 194
onlyp. 194
Cp. 194
Replacement of E-throttle actuatorp. 194
Carry out the following teach procedure(s):p. 194
Input codes — teaching E-throttle functionp. 194
The following components can be replaced without a subsequent teach procedure:p. 194
The displayp. 194
The displayp. 194
The diesel engine (p. 194
Attention:p. 194
All switches in the instrument panel and the lateral contro, panels.p. 194
8 Enginep. 195
8 Enginep. 195
8.5 Check the coolant levelp. 196
8.1 Featuresp. 196
Generalp. 196
Generalp. 196
All BOMAG finishers BF300 are powered by powerful 4-cylinder KUBOTA engines with direct fuel injection, turbocharger and 4-valve technology. Engines which impress by their homogeneous development of power with low fuel consumption and low CO2 emissio…p. 196
Fig. 18p. 196
The standard BOMAG ECOMODE ensures a clean environmental balance. Due to the active engine management power is made available for the driver when it is needed and is reduced again when permitted by the application. Intelligent sensors in connection w…p. 196
Engine blockp. 196
Fig. 19 Engine blockp. 196
1 Crankcase 1p. 196
1 Crankcase 1p. 196
2 Crankcase 2p. 196
The engine has two separate crankcases – crankcase 1p. 196
(Fig. 19)p. 196
The cylinders are designed without liners, which ensures excellent cooling, lower tensions and good abrasion resistance.p. 196
Semi-floating valve coverp. 197
A recessed rubber seal ensures a distance of approx. 0.5 mm between valve cover and cylinder head. This reduces the development of noise on the cylinder head.p. 197
Fig. 20p. 197
1 Valve coverp. 197
1 Valve coverp. 197
2 Rubber sealp. 197
Cylinder headp. 197
The engine has a 4-valve system with one cylinder head, which is designed with dual intake channels.p. 197
Fig. 21p. 197
1 Intakep. 197
1 Intakep. 197
2 Exhaustp. 197
Central Direct Injection System (E-CDIS)p. 198
The engines are equipped with the central direct injection system (E-CDIS = Center Direct Injection System) with the injection nozzle arranged vertically in the centre of the cylinder.p. 198
The system injects the fuel directly into the centre of the cylinder.p. 198
Fig. 22p. 198
1 Exhaust valvesp. 198
2 Pistonp. 198
3 Injection nozzlep. 198
4 Intake valvesp. 198
8.5 Check the coolant levelp. 198
8.2 Cooling systemp. 198
Thermostatp. 198
Thermostatp. 198
Conventional thermostat valves (type outlet water temperature) open against the coolant flow. In this design the pressure (steam pressure + water pump output pressure) influences the opening/closing performance of the valve.p. 198
The valve could thus be delayed at a specified opening temperature and then suddenly open above the specified temperature. This is referred to as overshoot phenomenon. The overshoot problem also leads to a subharmonic phenomenon. Too much water coole…p. 198
A repetitive cycle of such overshoot and subharmonic phenomena is referred to as water temperature hunting. This overshoot problem not only adversely affects the cooling system components, but also the engine and related components.p. 198
In order to tackle this problem the V3 is equipped with a flow control thermostat. The valve is provided with a recess 4p. 198
(Fig. 24)p. 198
Fig. 23p. 198
1 Coolant temperaturep. 198
2 Timep. 198
3 Overshootingp. 198
4 (Fig. 24) Recessp. 198
4 (Fig. 24)p. 198
Fig. 24p. 199
Lower bypassp. 199
The engines of series V3 are designed with lower bypass, which ensures better cooling performance of the radiator. At low coolant temperature in the engine the thermostat 1p. 199
(Fig. 25)p. 199
Fig. 25 Bypass closedp. 199
If the temperature exceeds the thermostat opening temperature, the thermostat 1p. 199
(Fig. 26)p. 199
This enhances the cooling power of the radiator.p. 199
Fig. 26 Bypass openp. 199
8.5 Check the coolant levelp. 200
8.3 Removing and installing the thermostatp. 200
Fig. 1p. 200
1 Thermostat coverp. 200
2 Thermostat cover sealp. 200
3 Thermostatp. 200
4 Borep. 200
Unscrew the thermostat cover fastening screws and take off the thermostat cover (1)p. 200
(Fig. 1)p. 200
Remove the thermostat (3).p. 200
For assemblyp. 200
Assemble the thermostat cover (3) with the hole (4) facing towards the front cover side.p. 200
8.5 Check the coolant levelp. 200
8.4 Checking the thermostat in disassembled statep. 200
The thermostat serves the optimal temperature control of the coolant, in order to promote efficient combustion and to bring the engine quickly to operating temperature after starting. At temperatures below approx. 74,5°C to 78,5°C the thermostat is…p. 200
Fig. 1p. 200
Measure and write down the measurement "a" on the thermostatp. 200
(Fig. 1)p. 200
"a" = beginning of stroke at approx. 74.5°C to 78.5°C (T1)p. 200
"b" = end of stroke at approx. 90 °C (T2)p. 200
Fig. 2p. 200
Warm up the thermostat in a water bathp. 200
(Fig. 2)p. 200
In order to determine the exact start of opening the temperature should be measured as close to the thermostat as possible, but without touching it.p. 200
The water must thereby be stirred continuously, to ensure even temperature distribution.p. 200
The temperature increase should not exceed 1°C/ min, as otherwise the start of opening will be delayed accordingly.p. 201
Fig. 3p. 201
Measure and write down the measurement "b" on the thermostat .p. 201
(Fig. 3)p. 201
Calculate the stroke.p. 201
Stroke = b – ap. 201
The stroke at the given temperature (T2) should be approx. 8 mm.p. 201
8.5 Check the coolant levelp. 201
Danger of scalding!p. 201
Fill up coolant only when the engine is cold.p. 201
If, during the daily inspection the coolant level is found to have dropped, check all lines, hoses and engine for leaks.p. 201
Open the engine flap and secure it.p. 201
Fig. 4p. 201
Check the coolant levelp. 201
(Fig. 4)p. 201
Top up coolant, if necessary.p. 201
For quality of coolant refer to the chapter 5.2, fuels and lubricants.p. 201
8.6 Check the anti-freeze concentration and the condition of the coolantp. 202
Danger of scalding!p. 202
Check the anti-freeze concentration only when the engine is cold.p. 202
In order to avoid damage to the engine (e.g. by corrosion, cavitation and freezing), particular attention must be paid to the inspection of the coolant.p. 202
For coolant quality refer to the "table of fuels and lubricants".p. 202
Do not mix different coolants and additives, see section "Fuelds and Lubricants – Coolant".p. 202
If the coolant is contaminated by corrosion residues or other suspended matter, flush the cooling system, see section "Changing the coolant".p. 202
Catch coolant and dispose of environmentally.p. 202
Fig. 5p. 202
Unscrew the radiator capp. 202
(Fig. 5)p. 202
Check the condition of the coolant.p. 202
Screw the cover back on again.p. 202
8.7 Change the coolantp. 202
Danger of scalding!p. 202
Do not remove the cap from the compensation tank when the engine is still hot.p. 202
Change the coolant only when the engine is cold.p. 202
Do not start the engine after draining off the coolant.p. 202
Thoroughly flush the engine if the coolant is contaminated by corrosion residues or other suspended matter.p. 202
When changing the coolant without any signs of contamination, cleaning of the cooling system is not necessary.p. 202
Do not mix different coolants and additives of any other kind.p. 202
Change the coolant at the latest after two years.p. 202
For quality and quantity of coolant refer to the "table of fuels and lubricants".p. 202
Catch coolant and dispose of environmentally.p. 202
Fig. 6p. 202
Unscrew the capp. 202
(Fig. 6)p. 202
Fig. 7p. 203
Unscrew the plug, let the coolant run out and catch itp. 203
(Fig. 7)p. 203
Screw the plug back in once all coolant has run out.p. 203
Check the condition of the coolant.p. 203
Thoroughly flush the engine if the coolant is contaminated by corrosion residues or other suspended matter.p. 203
Fill in clean water.p. 203
Start the engine and flush the cooling system out for a short while.p. 203
Drain all water off.p. 203
Fig. 8p. 203
Fill in coolant up to theMAX markp. 203
(Fig. 8)p. 203
Start the diesel engine and run it warm to operating temperature.p. 203
Let the engine cool down and check the coolant level again, top up if necessary.p. 203
8.8 Checking radiator hoses and hose clampsp. 203
Danger of burning!p. 203
Perform inspection work only after the engine has cooled down and with the engine stopped.p. 203
If a radiator hose is swollen, hardened or cracked, both hose and hose clamp must be replaced immediately.p. 203
Take care that no contaminants enter into the air intake system, since this could damage the engine!p. 203
Fig. 9p. 203
Check the condition and tight fit of all radiator hoses and hose clampsp. 203
(Fig. 9)p. 203
Check the condition and tight fit of all air intake lines and hose clamps.p. 203
8.9 Clean the cooling fins on engine and hydraulic oil coolerp. 204
Danger of injury!p. 204
Perform cleaning work only after the engine has cooled down and with the engine stopped.p. 204
Do not damage any cooling fins on the cooler core when cleaning.p. 204
Dirt on fan blades and oil cooler reduce the cooling effect. Dirt deposits in these areas are substantially supported by oil and fuel on these surfaces. For this reason you should always seal any oil or fuel leaks in the vicinity of the cooling fan o…p. 204
Cleaning with compressed airp. 204
Start to blow out from the exhaust side.p. 204
Fig. 10p. 204
Blow the coolerp. 204
(Fig. 10)p. 204
Cleaning with cold cleansing agentp. 204
Protect electrical equipment such as generator, regulator and starter against the direct water jet.p. 204
Spray the engine with a suitable cleansing agent, e.g. cold cleanser, let it soak in for a while and spray it off with a strong water jet.p. 204
Run the engine warm for a while to avoid corrosion.p. 204
8.10 Check the engine oil levelp. 204
The machine must be in horizontal position. When the engine is warm, shut it down and check the oil level after five minutes. With a cold engine the oil level can be checked immediately.p. 204
Danger of squashing!p. 204
Always support the engine hood when it is open.p. 204
Open and support the engine hood.p. 204
Fig. 11p. 204
Pull the dipstickp. 204
(Fig. 11)p. 204
Pull the dipstick back out.p. 204
The oil level must always be between the "MIN"- and "MAX"-marks.p. 204
If the oil level is too low top up oil immediately.p. 204
If the oil level is too high, determine the cause and drain the oil off.p. 204
For quality and quantity of oil refer to the "table of fuels and lubricants".p. 204
8.11 Change engine oil and oil filter cartridgep. 205
Danger of scalding!p. 205
When draining off hot oil.p. 205
By hot oil when unscrewing the engine oil filter.p. 205
Drain the engine oil only when the engine is warm.p. 205
Catch running out oil and dispose of environmentally together with the oil filter cartridge.p. 205
Fig. 12p. 205
Unscrew the drain hosep. 205
(Fig. 12)p. 205
Reassemble the drain hose.p. 205
Fig. 13p. 205
Unscrew the filter cartridge 1p. 205
(Fig. 13)p. 205
Wipe the sealing face clean.p. 205
Cover the rubber seal of the new engine oil filter slightly with clean oil.p. 205
Spin the new engine oil filter cartridge on and tighten it hand tight.p. 205
Fill in new engine oil through the oil filler neck (2).p. 205
For quality and quantity of oil refer to the "table of fuels and lubricants".p. 205
Tighten the oil filler cap properly.p. 205
Fig. 14p. 205
After a short test run check for leaks.p. 205
Check the oil level on the dipstickp. 205
(Fig. 14)p. 205
8.13 Replace the fuel filter cartridgep. 206
8.12 Fuel systemp. 206
Regulatorp. 206
Regulatorp. 206
Fig. 15 Regulatorp. 206
The engine is equipped with a separate injection pump, combined with the small mechanical multi- function governor from Kubota. It also contains a torque limitation mechanism to control the maximum peak torque. This mechanism maintains the engine spe…p. 206
The governor is a mechanical governor which controls the fuel injection quantity over all speed ranges from idle speed to maximum speed by using spring force to simply compensate the centrifugal force of the governor weights.p. 206
Governor during startingp. 206
If no centrifugal force acts on the governor weights (2)p. 206
(Fig. 16)p. 206
Fig. 16 Governor during startingp. 206
1 Start springp. 206
2 Governor weightp. 206
Governor at idle speedp. 207
The throttle lever (2)p. 207
(Fig. 17)p. 207
When the fork lever (1) is tensioned, both the spring bolt (3) and the for lever (5) will move in direction of arrow A to hold back the governor weights (6). The centrifugal force of the governor weights (6) is compensated in combination with the sta…p. 207
Fig. 17 Governor at idle speedp. 207
1 Fork leverp. 207
1 Fork leverp. 207
2 Throttle leverp. 207
3 Spring boltp. 207
4 Start springp. 207
5 Fork leverp. 207
6 Governor weightp. 207
7 Governor springp. 207
Governor at nominal speedp. 207
When the throttle control lever (2)p. 207
(Fig. 17)p. 207
(Fig. 17)p. 207
(Fig. 17)p. 207
(Fig. 18)p. 207
When the engine is overloaded the engine speed will drop together with the centrifugal force of the governor weights (6)p. 207
(Fig. 17)p. 207
(Fig. 17)p. 207
Fig. 18 Governor at nominal speedp. 207
1 Maximum speed without loadp. 207
2 Output power limitation screwp. 207
3 Torque limitation screwp. 207
Governor when shutting down the enginep. 208
Interrupting the electric power to the shut-down solenoid (1) will release the centrifugal force of the solenoid, whereby the solenoid armature is ejected and moves the governor rack to position Bp. 208
(Fig. 19)p. 208
In order to shut down the engine manually, the shut- down lever must be shifted to the left.p. 208
Fig. 19 Governor when shutting down the enginep. 208
1 Shut-down solenoidp. 208
2 Stop lever axlep. 208
2-stage nozzlep. 208
The nozzle holder, which is fitted with two springs, was designed for the reduction of nitrogen oxide and particle emissions.p. 208
Fig. 20p. 208
1 Nozzle holder bodyp. 208
2 1. stage injection pressure adjustment washerp. 208
3 First springp. 208
4 Contact pinp. 208
5 Spring seatp. 208
6 2. stage injection pressure adjustment washerp. 208
7 Second springp. 208
8 Pre-stroke adjustment spring seatp. 208
9 Chip packp. 208
10 Maximum stroke adjustment washerp. 208
11 Locking nutp. 208
12 Nozzlep. 208
Characteristicsp. 208
The nozzle holder with two springs limits the valve stroke during initial opening of the valve in order to throttle the injection quantity. Main injection takes place when the line pressure has sufficiently increased and is able to open the needle va…p. 208
This results in the following characteristics.p. 209
Improved engine stability at low and medium speeds.p. 209
Reduced speed oscillations and speed jumps.p. 209
Reduced noise development at idle speed.p. 209
Reduced idle speed due to improved engine stability.p. 209
Stabilized fuel injection characteristics of injection pump and nozzle system and simplified adaptation of the governor characteristics to the engine requirements.p. 209
Initial opening pressurep. 209
The force generated by the high pressure of the fuel supplied by the injection pump presses the needle valve up. Once this force exceeds the rated force of the first spring the needle valve in the nozzle will move the first push rod up and open the v…p. 209
Second opening pressurep. 209
Once the first push rod has been lifted in the pre- stroke, it will touch the second push rod. Since the rated force of the second spring acts on the second push rod, the combined forces of the first and second springs will act on the needle valve, w…p. 209
8.13 Replace the fuel filter cartridgep. 209
Fire hazard!p. 209
Fire hazard!p. 209
Fire hazard!p. 209
When working on the fuel system do not use open fire, do not smoke and do not spill any fuel.p. 209
Catch running out fuel, do not let it seep into the ground.p. 209
Do not inhale any fuel fumes.p. 209
Fig. 21p. 209
Loosen and unscrew fuel filter cartridge 1p. 209
(Fig. 21)p. 209
Clean the sealing face on the filter carrier from any dirt.p. 209
Slightly oil the rubber seal on the new filter cartridge.p. 209
Turn the new filter cartridges on by hand, until the seal contacts.p. 209
Tighten the filter cartridges for another half turn.p. 209
Check the filter cartridge for leaks after a short test run.p. 209
8.14 Check, clean the water separatorp. 210
Danger of injury!p. 210
Support the engine hood for all maintenance and repair work.p. 210
The service intervals for the water separator depend on the water content in the fuel and can therefore not be determined precisely. After taking the engine into operation you should therefore check the water separator every day for signs of water.p. 210
If a to high quantity is drained off, the filter must be refilled with fuel. See chapter "maintenance as required", bleeding the fuel system.p. 210
Catch running out fuel and dispose of environmentally.p. 210
Open the access door on the right side of the vehicle.p. 210
Fig. 22p. 210
Slacken the drain plugp. 210
(Fig. 22)p. 210
Tighten the drain plug again and check for leaks, if necessary replace the seal ring.p. 210
8.15 Replace the fuel pre-filter, bleed the fuel systemp. 210
Fire hazard!p. 210
Fire hazard!p. 210
Fire hazard!p. 210
When working on the fuel system do not use open fire, do not smoke and do not spill any fuel.p. 210
Health hazard!p. 210
Do not inhale any fuel fumes.p. 210
Ensure strict cleanliness! Thoroughly clean the area around the fuel filters.p. 210
After work on the fuel system bleed the system, perform a test run and check for leaks.p. 210
Additional bleeding of the fuel system by a 5 minute test run in idle speed or low load is mandatory.p. 210
Any fuel must be caught and disposed of in an environmentally friendly manner.p. 210
Change the fuel pre-filter cartridgep. 210
Fig. 23p. 210
Tighten the cable on the water separatorp. 210
(Fig. 23)p. 210
(1) Loosen the bleeding screw and drain off fuel from the bleeding screw.p. 210
(2) Loosen and unscrew the fuel pre-filter cartridge using an appropriate filter wrench.p. 210
(3) Unscrew the water separator from the filter cartridge.p. 210
(4) Apply a thin coat of oil to the rubber seal of the water separator.p. 210
(5) Turn the water separator on by hand, until the seal contacts, then tighten hand-tight.p. 211
(6) Apply a thin coat of oil to the rubber seal of the filter element (5).p. 211
(7) Turn the filter cartridge on by hand, until the seal contacts, then tighten hand-tight.p. 211
Plug the water sensor cable back on.p. 211
Bleed the fuel systemp. 211
The fuel system is equipped with an electric fuel pump. Tom purge the system switch on the ignition and wait about 15 seconds before starting the engine.p. 211
8.16 Checking fuel lines and clampsp. 211
Danger of burning!p. 211
Perform inspection work only after the engine has cooled down and with the engine stopped.p. 211
If fuel lines or hose clamps are found to be damaged, the corresponding parts must be immediately repaired or replaced.p. 211
After replacing lines or hose clamps the fuel system needs to be bled.p. 211
Disassembled or new fuel lines must be closed with clean cloths on both ends, to make sure that no dirt will enter into the fuel system. Dirt particles can destroy the injection pump.p. 211
Fig. 24p. 211
Check the condition and tight fit of all hose clamps (1)p. 211
(Fig. 24)p. 211
8.17 Checking the fuel injection nozzlesp. 212
This work must only be performed by authorized service personnel.p. 212
8.18 Check the fuel injection timingp. 212
This work must only be performed by authorized service personnel.p. 212
8.19 Check the fuel injection pumpp. 213
This work must only be performed by authorized service personnel.p. 213
8.20 Checking the condition and tightness of the generator V- beltp. 213
Fig. 25p. 213
Check the entire circumference of the V-beltp. 213
(Fig. 25)p. 213
Check with thumb pressure (2) whether the V-belt can be depressed more than 10 to 12 mm between the V-belt pulleys, retighten if necessary.p. 213
To retighten loosen the fastening screws (1) and move the generator to adjust the V-belt tension.p. 213
Finally tighten the fastening screws again.p. 213
8.21 Service the combustion air filterp. 214
Perform cleaning, maintenance and repair work only with the engine shut down. Do not start the engine after removing the filter element.p. 214
Fig. 26p. 214
Maintenance of the dry air filter is due when control light ap. 214
(Fig. 26)p. 214
However, the filter cartridge must be replaced at the latest after two years.p. 214
After completion of the filter service reset the indicator piston back to "Zero" by pressing the button.p. 214
Open the engine hood completely and secure it.p. 214
Removing the main filter elementp. 214
Fig. 27p. 214
Loosen both locking hooksp. 214
(Fig. 27)p. 214
Fig. 28p. 214
Pull the main filter elementp. 214
(Fig. 28)p. 214
Cleaning the main filter elementp. 214
If necessary, the main filter element may be cleaned up to five times. It must be renewed at the latest after a maximum utilization period of two years.p. 214
The number of cleaning intervals of the main filter element can be marked on the safety element with a ball pen or a felt pen.p. 214
Cleaning does not make sense if the main filter element is covered with a sooty deposit. Use a new filter cartridge.p. 214
Incorrectly handled inserts may be ineffective because of damage (e.g. cracks) and cause damage to the engine.p. 214
Replace the safety cartridge if the main filter element is defective!p. 214
Additional cleaning intervals between two filter services signalized by the fault monitoring board are not necessary.p. 214
Fig. 29p. 214
Blow the cartridgep. 214
(Fig. 29)p. 214
Fig. 30p. 215
Examine the filter cartridge with a torch for cracks and holes in the paper bellowsp. 215
(Fig. 30)p. 215
Do not continue to run the machine with a damaged main filter element. If in doubt use a new main filter element.p. 215
Installing the main filter elementp. 215
Slide the main filter element carefully into the housing.p. 215
When closing the housing cover the main filter element is automatically forced in the correct position.p. 215
Changing the safety filter elementp. 215
The safety filter element must not be cleaned and should not be used again after it has been removed.p. 215
Break the seal only to replace the safety filter element.p. 215
The safety filter element must be replaced:p. 215
If the main filter element is defective.p. 215
after five service intervals of the filter cartridge,p. 215
at the latest after 2 years,p. 215
if the warning light comes on again after servicing the main filter cartridge.p. 215
Remove the housing cover and pull the main filter element off.p. 215
Fig. 31p. 215
Pull the safety elementp. 215
(Fig. 31)p. 215
Push in a new safety filter element.p. 215
Reassemble main filter element and cover.p. 215
Make sure that the cover locks engage correctly.p. 215
8.22 Check the engine mountsp. 216
Fig. 32p. 216
Check the fastening of intake and exhaust tubesp. 216
(Fig. 32)p. 216
Check sockets and clamps between air filter, exhaust turbocharger and charge air line as well as the lubrication air line for tight fit and leaks.p. 216
Check fastening screws on oil sump and engine mounts for tight fit.p. 216
Check condition and tight fit of engine pillow blocks.p. 216
8.23 Engine conservationp. 216
If the engine is to be shut down for a longer period of time (e.g. over winter), please consult the service department of the engine manufacturer for further details.p. 216
8.24 Checking, adjusting the valve clearancep. 217
We recommend to have this work carried out by trained personnel or our after sales service.p. 217
Check the valve clearance only when the engine is cold.p. 217
Fig. 33p. 217
Loosen the plug connections (4)p. 217
(Fig. 33)p. 217
Unscrew and take off the injection lines (1).p. 217
Unscrew and take off the valve cover (2).p. 217
Adjustment value for intake and exhaust valves: 0.15/0.02 mmp. 217
Adjustment schematicp. 217
Cylinderp. 217
Cylinderp. 217
Intakep. 217
Intakep. 217
Exhaustp. 217
Exhaustp. 217
Cylinder 1 in TDCp. 217
1p. 217
1p. 217
xp. 217
xp. 217
xp. 217
xp. 217
2p. 217
2p. 217
xp. 217
xp. 217
3p. 217
3p. 217
xp. 217
xp. 217
4p. 217
4p. 217
Cylinder 1 overlappingp. 217
1p. 217
1p. 217
2p. 217
2p. 217
xp. 217
xp. 217
3p. 217
3p. 217
xp. 217
xp. 217
4p. 217
4p. 217
xp. 217
xp. 217
xp. 217
xp. 217
Fig. 34p. 217
Set cylinder 1 to TDCp. 217
(Fig. 34)p. 217
Fig. 35p. 217
A feeler gauge of appropriate thickness (A) must fit with little resistance between rocker armp. 217
(Fig. 35)p. 217
If the gap is too narrow or too wide for the feeler gauge, the valve must be adjusted.p. 217
Fig. 36p. 217
Loosen the counter nut (4)p. 217
(Fig. 36)p. 217
Adjust the valve clearance by the adjustment screw (3) and tighten the counter nut.p. 217
Set cylinder 1 to overlapping and check the valve clearance as per adjustment schematic, adjust if necessary.p. 217
Fig. 37p. 218
Check the valve cover gasket for damage, change if necessary.p. 218
Assemble the valve cover (2)p. 218
(Fig. 37)p. 218
Fig. 38p. 218
Reinstall the injection lines (1)p. 218
(Fig. 38)p. 218
Make sure that the clamps (5) are correctly positioned.p. 218
Screw in the preheating plugs, tightening torque: 8 Nm.p. 218
Plug in the plug connections.p. 218
8.25 Engine problemsp. 219
Faultp. 219
Faultp. 219
Possible causep. 219
Remedyp. 219
Remedyp. 219
Engine does not startp. 219
Starter defective or pinion does not engagep. 219
Have examined by a specialistp. 219
Fuel tank emptyp. 219
Fill tank and bleedp. 219
Temperature below starting limitp. 219
Choose winter fuel and engine oil according to ambient temperatures.p. 219
Fuel filter clogged, in winter due to paraffin separationp. 219
Change the filter, use winter fuelp. 219
Fuel lines leakingp. 219
Check all line connections for leaks and tighten the fittingsp. 219
Battery not charged or not connectedp. 219
Tighten the terminal clamps on the battery, check all cable connectionsp. 219
Injection valves or injection pump defectivep. 219
Have examined by a specialistp. 219
Poor starting of engine or engine works irregularly with poor powerp. 219
Battery power too low, terminal clamps loose or oxidized causing the starter to turn too slowly.p. 219
Have the battery tested, clean the terminal clamps, tighten and cover them with acid-free greasep. 219
Especially during winter: use of too viscous engine oilp. 219
Use an engine oil complying with the ambient temperaturesp. 219
Fuel supply too low, fuel system clogged by paraffin separation during winterp. 219
Change the fuel filter. Check the line connections for leaks and tighten the fittings. Use winter fuel under cold conditionsp. 219
The specified valve clearance is not correctp. 219
Adjusting the valve clearancep. 219
Injection valve defectivep. 219
Have examined by a specialistp. 219
Injection lines leakingp. 219
Check lines for leaksp. 219
Dry air filter cartridge soiledp. 219
clean, if necessary use a new onep. 219
Excessive play in throttle cablep. 219
Adjust the throttle cable, replace if necessaryp. 219
Excessive exhaust smokep. 219
Engine oil level too highp. 219
Drain the oil down to the top dipstick markp. 219
Dry air filter soiledp. 219
clean, if necessary use a new onep. 219
Poor compression due to burned or broken compression rings or incorrect valve clearancep. 219
Have compression rings and pistons examined by a specialist, adjust the valve clearancep. 219
The specified valve clearance is not correctp. 219
Adjusting the valve clearancep. 219
Engine overheating, engine must be shut down immediately!p. 220
Cooling fins on radiator extremely dirty (the warning light "Engine oil temperature" lights)p. 220
Clean the cooling finsp. 220
Injection valve defectivep. 220
Have examined by a specialistp. 220
Engine oil level too lowp. 220
Top up engine oil up to the top dipstick markp. 220
Injection pump displacement not correctly adjustedp. 220
Have corrected by a specialistp. 220
Insufficient cooling air supply to the cooling fanp. 220
Remove any clogging from the cooling air ductp. 220
V-belt loose or brokenp. 220
Tension or replace the V-beltp. 220
Insufficient engine powerp. 220
Engine oil level too highp. 220
Drain the engine oil down to the top dipstick markp. 220
Dry air filter soiledp. 220
clean, if necessary use a new onep. 220
Charge air pipe leakingp. 220
Check fastening and connectionsp. 220
Incorrect valve clearancep. 220
Adjusting the valve clearancep. 220
Injection valve defectivep. 220
Have inspected by a specialistp. 220
Engine oil pressure too lowp. 220
Engine oil level too low (control light "Engine oil pressure" lights, warning buzzer sounds)p. 220
Top up oilp. 220
Top up oilp. 220
Leaks in the lubrication systemp. 220
Shut the engine down immediately, check fittings on oil lines, lubrication oil filter and oil cooler for leaks, if necessary tighten all fittingsp. 220
The charge control light lights during operation, the warning buzzer soundsp. 220
Generator speed too lowp. 220
Check the V-belt tension, if necessary replace the V-beltp. 220
The generator does not charge the battery, because of defect on generator or regularp. 220
Have examined by a specialistp. 220
9 Material hopper, descriptionp. 221
Material hopper and transportp. 222
Material flow — overviewp. 222
The material is mainly conveyed by the following componentsp. 222
(Fig. 39)p. 222
The material hopper (1)p. 222
The scraper belts (2)p. 222
The augers (3)p. 222
Fig. 39 Material flow — overviewp. 222
Material hopperp. 223
Fig. 40 Material hopperp. 223
1 Material hopperp. 223
2 Locking systemp. 223
3 Hydraulic cylinderp. 223
Description of functionp. 223
The material hopper (1)p. 223
(Fig. 40)p. 223
3p. 223
The hydraulic cylinders (3) move the wings of the hopper (1) upwards, so that a sufficient amount of material is fed to the scraper belts at any time. Each wing can be moved independently from the other wing.p. 223
Each of the hydraulic cylinders (3) is equipped with locking systems (2) for transporting the finisher. With the cylinder (3) extended these are folded down and thus protect the piston rod during transport. Moreover, the locks (2) also make sure that…p. 223
Scraper beltsp. 224
Scraper beltsp. 224
Fig. 41 Scraper beltsp. 224
1 Chain tensioner for scraper belt drivep. 224
2 Hydraulic motorp. 224
3 Chainp. 224
4 Drive gear for scraper beltp. 224
5 Scraper belt rightp. 224
6 Scraper belt leftp. 224
7 Scraper belt tensionerp. 224
Description of functionp. 224
The scraper belts (5) & (6)p. 224
(Fig. 41)p. 224
The two scraper belts (5) & (6) made of high-tenacity steel work independently from one another an independently from the travel speed of the machine.p. 224
Two sensors (mechanically (as so-called "Paddles") or ultrasonicp. 224
Optionp. 224
The tension of the scraper belts is adjusted with the tensioners (7) at the front of the frame.p. 224
Each scraper belt is driven by a hydraulic motor (2). The torque of the hydraulic motor is transferred with the help of a chaion, which is tensioned by a chain tensioner (1). The chain (3) runs over the drive gear (4), which drives the scraper belt.p. 224
Augersp. 225
Augersp. 225
Fig. 42 Augersp. 225
1 Hydraulic motorsp. 225
2 Hydraulic cylinderp. 225
3 Guide rodp. 225
4 Mounting rodp. 225
5 Augerp. 225
Description of functionp. 225
The augers (5)p. 225
(Fig. 42)p. 225
The augers (5) work independently from one another an independently from the travel speed of the machine. They are hydraulically operated via adjustable mechanical or ultrasonic sensors, by On/Off switches or proportional controls. Each auger (5) is …p. 225
The augers (5) can be adjusted in height with the hydraulic cylinders (2). The augers must be adjusted one step higher than the front edge of the screed plate (approx. 30-60 mm higher. This depends on the particle size of the material.)p. 225
The assembly flaps (4) prevent material being conveyed beyond the width of the screed.p. 225
Care and maintenance workp. 225
All parts of the machine that have or had contact with material must be sprayed with a release agent (e.g. "Bitu- Trennkonzentrat, green")p. 225
before and afterp. 225
10 Vibrating screed, descriptionp. 227
Screedp. 228
Screed — overviewp. 228
The screedp. 228
(Fig. 43)p. 228
The drawing arms (1)p. 228
The screed (2)p. 228
Fig. 43 Screed — overviewp. 228
Drawing armsp. 229
Drawing armsp. 229
Fig. 44 Drawing armsp. 229
1 Scalep. 229
1 Scalep. 229
2 Drawing armp. 229
3 Hydraulic cylinder (lift-out cylinder)p. 229
4 Fastening points of the screedp. 229
5 Hydraulic cylinder (levelling cylinder)p. 229
6 Hook-in pointp. 229
Description of functionp. 229
The drawing arms (2)p. 229
(Fig. 44)p. 229
The hook-in point (6) of the drawing arm (2) can be hydraulically adjusted in height. This provides a possibility to influence the layer thickness (angle of attack). The scale (1) at the upper end of the hydraulic cylinder (5), which is responsible f…p. 229
The complete screed can be lifted with the help of the hydraulic cylinders (3).p. 229
Adjusting bolts can be found at the rear fastening point of the screed (4). These can be used to preset the angle of attack, if the angle to be adjusted can not be achieved via the hydraulic cylinders (5).p. 229
Screedp. 230
Screedp. 230
Fig. 45 Screedp. 230
1 Screedp. 230
1 Screedp. 230
2 Exit flapp. 230
3 Heating rodp. 230
Optionp. 230
4 Outside control standp. 230
5 Control element for electric heatingp. 230
6 Vibrator unit central screedp. 230
7 Vibrator unit extendable screedp. 230
8 Tamper unitp. 230
Optionp. 230
9 Tamper unitp. 230
Optionp. 230
10 Base plate central screedp. 230
11 Base plate extendable screedp. 230
Description of functionp. 230
The screed (1)p. 230
(Fig. 45)p. 230
High initial compaction by the finisher has a favourable effect on the evenness of the layer and, at the same time, enables an early start of compaction, while the mix temperatures are still high. This favourably supports the compaction effect of the…p. 230
Once the augers have distributed material in front of the screed, the material is pre-compacted by tamper elements (8), (9). The exit flaps (2) make sure that the material will not flow too far towards the outside. The exit flaps (2) can be heated by…p. 231
The crown profile of the screed can also be adjusted, in addition to the angle of attack (see section "Drawing arms"). This is possible in positive, but also in negative direction. The adjustment is made manually on the screed itself, or hydraulicall…p. 231
The base plate (10), (11) skid along the material and compact it again. The base plates (10), (11) carry the vibrator units (6), (7). Their vibration causes further compaction of the material. The heating is also mounted on the base plates (10), (11)…p. 231
From the outside control stand (4) the screed personnel is able to control the auger sensor for mix quantity regulation via a potentiometer. Moreover, the optionally available ultrasonic sensors for the scraper belts, which are also used to regulate …p. 231
Care and maintenance workp. 231
All parts of the machine that have or had contact with material must be sprayed with a release agent (e.g. "Bitu- Trennkonzentrat, geen")p. 231
before and afterp. 231
11 Screed heating, repairp. 233
11.3 Replace heating elementsp. 234
11.1 Removing the screed heating generatorp. 234
Danger of injury!p. 234
This work must not be carried out by the operator, but only by qualified personnel who has been specially instructed to do so.p. 234
Always use appropriate lifting gear to lift the generator, weight of generator: approx. 65 kg.p. 234
Preparationsp. 234
Fig. 1p. 234
Fig. 1p. 234
1. Open the hopper wings.p. 234
2. Shut down the engine.p. 234
3. Switch the main battery switch to position "II" and pull it outp. 234
(Fig. 1)p. 234
Fig. 2p. 234
Fig. 2p. 234
4. Unscrew the fastening screws from the engine compartment doorp. 234
(Fig. 2)p. 234
5. Open the engine compartment door.p. 234
Removing the screed heating generatorp. 235
Fig. 3p. 235
Fig. 3p. 235
1. Unscrew four screws from the cover of the electric junction box and take off the coverp. 235
(Fig. 3)p. 235
Fig. 4p. 235
Fig. 4p. 235
2. Disconnect the electric supply, remove the cable and lay it to the sidep. 235
(Fig. 4)p. 235
3. Unscrew the cable gland (arrow).p. 235
Fig. 5p. 235
Fig. 5p. 235
4. Looasen in four fastening screws (1) on both sides, but do not unscrew completelyp. 235
(Fig. 5)p. 235
5. Loosen the counter nuts (3).p. 235
6. Loosen the V-belt with the screws (2), so that it can be removed.p. 235
7. Take off the V-belt and check for wear. If necessary replace the used V-belt with a new one.p. 235
8. Unscrew both fastening screws (1).p. 235
Fig. 6p. 236
Fig. 6p. 236
Danger of injury!p. 236
Always use appropriate lifting gear to lift the generator, weight of generator: approx. 65 kg.p. 236
9. Pick up the generator with the workshop crane by attaching appropriate lifting tackle to the lifting eyes (1)p. 236
(Fig. 6)p. 236
10. Place suitable wooden blocks (2) under the generator.p. 236
The wooden block should be so long, that the generator can be pushed out of the engine compartment along these blocks after it has been loosened.p. 236
11. Unscrew both upper fastening screws (1)p. 236
(Fig. 5)p. 236
12. Pull the generator along the wooden blocks out of the engine compartment.p. 236
13. Lift out the generator.p. 236
11.3 Replace heating elementsp. 237
11.2 Installation of screed heating generatorp. 237
Danger of injury!p. 237
Always use appropriate lifting gear to lift the generator, weight of generator: approx. 65 kg.p. 237
Installation of screed heating generatorp. 237
Fig. 1p. 237
Fig. 1p. 237
1. Pick up the generator with the workshop crane by attaching appropriate lifting tackle to the lifting eyes (1)p. 237
(Fig. 1)p. 237
2. Place suitable wooden blocks (2) under the generator.p. 237
3. Push the generator along the wooden blocks into the engine compartment.p. 237
4. Screw in four fastening screws (1)p. 237
(Fig. 2)p. 237
5. Remove the wooden blocks, take off the chains.p. 237
Fig. 2p. 237
Fig. 2p. 237
6. Assemble the V-beltp. 237
(Fig. 2)p. 237
7. Tighten the V-belt evenly with the two screws (2) on the right and left hand side,p. 237
8. Retighten the counter nuts (3) and the fastening screws (1).p. 237
Fig. 3p. 237
Fig. 3p. 237
Danger of injury!p. 237
This work must not be carried out by the operator, but only by qualified personnel who has been specially instructed to do so.p. 238
9. Route the cable into the electric junction box and connect itp. 238
(Fig. 3)p. 238
10. Screw on the cable gland (arrow) 12. .p. 238
Fig. 4p. 238
Fig. 4p. 238
13. Attach and fasten the cover of the electric junction boxp. 238
(Fig. 4)p. 238
Fig. 5p. 238
Fig. 5p. 238
14. Close the engine compartment doorp. 238
(Fig. 5)p. 238
15. Assemble the fastening screws.p. 238
11.3 Replace heating elementsp. 239
Life hazard!p. 239
Life hazard!p. 239
Life hazard!p. 239
High voltage 230/400 Voltp. 239
Work on the electric heating system must only be performed by electrically trained personnel.p. 239
Heating elements must only be changed with the engine shut down and the main battery switch pulled out.p. 239
Danger of burning!p. 239
The heating elements become bvery hot during operation.p. 239
Always allow ample time for cooling down and wear heat insulated gloves to change heating elements.p. 239
Shut down the engine.p. 239
Fig. 6p. 239
Switch the main battery switchp. 239
(Fig. 6)p. 239
Replacing the heating elements for the base platep. 239
Fig. 7p. 239
Unscrew the fastening screwsp. 239
(Fig. 7)p. 239
Fig. 8p. 239
Disconnect the connecting cable of the defective heating element at the plugp. 239
(Fig. 8)p. 239
Fig. 9p. 239
Loosen the four clamping screwsp. 239
(Fig. 9)p. 239
Fig. 10p. 240
Pull out the defective heating elementp. 240
(Fig. 10)p. 240
Install the new heating element and connect the plug.p. 240
Tighten the clamping screws of the heating element and reassemble the protective covering.p. 240
Replacing the heating element for the tamperp. 240
Fig. 11p. 240
Unscrew the fastening screws from the coverp. 240
(Fig. 11)p. 240
Fig. 12p. 240
Loosen counter nuts 1p. 240
(Fig. 12)p. 240
Unscrew setscrew (2).p. 240
Repeat this measure on the opposite side.p. 240
Unhook and remove the coveringp. 240
(Fig. 11)p. 240
Fig. 13p. 240
Loosen the fastening screwsp. 240
(Fig. 13)p. 240
Fig. 14p. 241
Disconnect the connecting cable of the defective heating element at the plugp. 241
(Fig. 14)p. 241
Loosen the fastening screws of the holder and pull out the heating element.p. 241
Slide in, fasten and connect a new heating element.p. 241
Re-engage the adjusting screwsp. 241
(Fig. 12)p. 241
(Fig. 11)p. 241
Check and, if necessary, adjust the play between inner bar and taper bar (see corresponding chapter in this manual).p. 241
12 Travel drive, descriptionp. 243
Travel systemp. 244
Travel system — overviewp. 244
The travel systemp. 244
(Fig. 15)p. 244
the rear wheel drivep. 244
the front wheel drivep. 244
Fig. 15 Travel systemp. 244
Rear wheel drivep. 245
The rear wheel drivep. 245
(Fig. 16)p. 245
the travel motorp. 245
the travel gearp. 245
the brakesp. 245
the reduction gearsp. 245
the rear wheelsp. 245
Fig. 16 Rear wheel drivep. 245
1 Travel motorp. 245
2 Travel gearp. 245
3 Brakesp. 245
4 Reduction gearp. 245
5 Wheelsp. 245
This applies for all following points: Further information, see chapter "Technical data".p. 245
Travel motorp. 245
The travel pump supplies the travel motor (1) with hydraulic oil and thereby drives the travel gear (2).p. 245
Travel gearp. 245
The travel gear (2) converts the torque of the travel motor (1) and passes it on to the reduction gear (4). The travel gear (2) is shiftable and thus enables two different travel speeds (“High” and “Low”).p. 245
Brakesp. 245
The brakes (3) are installed between travel gear (2) and reduction gear (4). The brakes are hydraulically released spring pressure applied multi-disc brakes. By operating the brake pedal the finisher can be additionally braked, if the braking distanc…p. 245
Under “Normal conditions” it is quite sufficient ton return the travel lever to position “0”. The closed hydraulic circuit will in this case brake the machine automatically to standstill.p. 245
Reduction gearp. 246
The reduction gear (4) converts the torque of the travel gear and passes it on to the rear wheels (5). The reduction gear increases the torque, making sure that the machine has sufficient power reserves.p. 246
Rear wheelsp. 246
The rear wheels (5) are air filled tires, which can additionally be filled with water in order to increase the weight and enhance the traction of the finisher.p. 246
Front wheel drivep. 247
The front wheel drivep. 247
(Fig. 17)p. 247
the steeringp. 247
the steeringp. 247
the pivotsp. 247
the wheelsp. 247
Fig. 17 Front axlep. 247
1 Hydraulic cylinderp. 247
2 Connecting rod, transversep. 247
3 Wheelp. 247
4 Connecting armp. 247
5 Pivotp. 247
6 Arm to take up the wheelp. 247
7 Fastening point on framep. 247
Steeringp. 247
The steering system works with a hydraulic cylinder (1). The force is introduced via connecting arms (4) and connecting rod (2) into the arms (6) which then swivel the wheels (3). The connecting rod (2) can be adjusted in length, so that the steering…p. 247
Pivotp. 247
The pivots (5) are the connection between wheels and frame. The pivots (5) are fastened to the frame via fixing points (7). The pivots (5) carry the arms (6) which in turn take up the wheels (3).p. 247
Wheelsp. 247
The wheels (3) are solid rubber wheels. Depending on the equipment, only the rear front wheels are driven (4×67) or all front wheels (6×6)p. 247
Care and maintenance workp. 248
All parts of the machine that have or had contact with material must be sprayed with a release agentp. 248
before and afterp. 248
13 Travel drive, repairp. 249
13.1 Check the tire pressurep. 250
Because of the water filling in the tires, you should always check the tire pressure with the tire valve in top position!p. 250
Always close the valves with their dust caps.p. 250
Fig. 18p. 250
With the tire inflation valve in highest position check the air pressure on tire inflation valve 1p. 250
(Fig. 18)p. 250
Nominal value, see "technical data".p. 250
Ensure equal pressure in all rubber tires!p. 250
Screw the valve caps back on again.p. 250
13.2 Check the oil level in the front wheel hubsp. 251
For quality of oil refer to the "table of fuels and lubricants".p. 251
Check the oil level in both wheel hubs.p. 251
Fig. 19p. 251
Remove the coverp. 251
(Fig. 19)p. 251
Fig. 20p. 251
Move the drive wheel so that the opening is in line with the lateral oil control plug (1)p. 251
(Fig. 20)p. 251
Unscrew the level inspection plug .p. 251
The oil level must reach up to the lower edge of the bore, top up oil if necessary.p. 251
Screw the level control plug tightly back in and reassemble the cover.p. 251
13.3 Oil level check in rear wheel drive differentialp. 252
Park the machine on level ground.p. 252
Fig. 21p. 252
Unscrew the level inspection plugp. 252
(Fig. 21)p. 252
The oil level must reach the bottom edge of the bore.p. 252
Fig. 22p. 252
If necessary unscrew the oil filling plugp. 252
(Fig. 22)p. 252
For quality of oil refer to the table of fuels and lubricants.p. 252
Retighten level inspection and filler plugs.p. 252
13.4 Oil level check in rear wheel drive reduction gearp. 253
Park the machine on level ground.p. 253
Fig. 23p. 253
Unscrew the level inspection plug 1p. 253
(Fig. 23)p. 253
The oil level must reach the bottom edge of the bore.p. 253
If necessary fill in oil through the inspection bore.p. 253
For quality of oil refer to the table of fuels and lubricants.p. 253
Turn the level inspection plug tightly back in.p. 253
Repeat the oil level check on the opposite side.p. 253
13.5 Tighten the wheel nutsp. 254
Fig. 24p. 254
Tighten the wheel nutsp. 254
(Fig. 24)p. 254
Tightening torques: 390 Nm (288 ft-lb) (M20x1,5)p. 254
14 Cleaning kit, descriptionp. 255
Cleaning kitp. 256
Cleaning kit — overviewp. 256
The cleaning kitp. 256
(Fig. 25)p. 256
the provision container (1)p. 256
the filter (4)p. 256
the pump (2)p. 256
the hose reel (6)p. 256
the spray gun (5)p. 256
the control board (3)p. 256
Fig. 25 Cleaning kitp. 256
Filterp. 257
Provision containerp. 257
The provision container takes up the cleaning agent. It has a capacity of 25 litres. For filling the cleaning container the driver's stand must be moved fully to the right, so that the filler neck can be accessed.p. 257
Filterp. 257
Filterp. 257
The filter protects the spray gun against contamination. It is a wire mesh pre-filter.p. 257
Pumpp. 257
Pumpp. 257
The pump delivers the cleaning agent from the provision container through the filter to the spray gun. The pump is an electrically driven two-piston pump, which is able to generate a maximum pressure of approx. 6.9 bar.p. 257
Further information about the pump, see chapter "Technical data".p. 257
Hose reelp. 257
Hose reelp. 257
The hose reel holds the hose that leads to the spray gun. After cleaning the reel wind the hose up again. Just pull the hose to unwind.p. 257
Spray gunp. 257
Spray gunp. 257
The spray gun serves the purpose of cleaning the machine after finishing work, but also as an aid to apply cleaning/release agentp. 257
beforep. 257
Control panelp. 257
Control panelp. 257
The cleaning system is switched on and off by the control panel. At the same time one can use the timer to pre- select a time for the active period of the cleaning system. Once this time has expired, the cleaning system will switch off. The max. adju…p. 257
15 Hydraulicsp. 259
15 Hydraulicsp. 259
Variable displacement pumps, A10VG28/45/56 EPp. 260
15.1 Hydraulic circuitp. 260
Open circuitp. 260
Open circuitp. 260
Fig. 1 Open circuitp. 260
Open in this case means that the suction line of ap. 260
pumpp. 260
(Fig. 1)p. 260
In an open circuit the hydraulic fluid is fed to thep. 260
consumerp. 260
Closed circuitp. 261
Fig. 2 Closed circuitp. 261
One talks about a closed hydraulic system, when the hydraulic oil flows from thep. 261
consumerp. 261
(Fig. 2)p. 261
pumpp. 261
The closed circuit consists of a high and a low pressure side, depending on the load direction (take-off moment on the consumer).p. 261
The high pressure side is protected byp. 261
pressure relief valvesp. 261
Only the permanent leakage on pump and motor needs to be replenished. This is accomplished by ap. 261
charge pumpp. 261
check valvep. 261
charge pressure relief valvep. 261
pumpp. 261
Variable displacement pumps, A10VG28/45/56 EPp. 262
Travel pump, A10VG45 EPp. 262
Variable displacement pumps, A10VG28/45/56 EPp. 262
EP control with proportional solenoidp. 262
The variable displacement axial piston pump generates, controls and regulates a volumetric pressure fluid flow. It has been designed for mobile applications, e.g. in construction equipment.p. 262
The 10VG is a variable displacement axial piston pump in swash plate design for hydrostatic drives in closed circuits. The volumetric flow is proportional to the drive speed and the displacement.p. 262
Fig. 3 A10VGp. 262
1p. 262
1p. 262
Drive shaftp. 262
Drive shaftp. 262
8p. 262
8p. 262
Valve platep. 262
Valve platep. 262
2p. 262
2p. 262
Retracting platep. 262
9p. 262
9p. 262
Suction portp. 262
Suction portp. 262
3p. 262
3p. 262
Control pistonp. 262
10p. 262
10p. 262
High pressure sidep. 262
4p. 262
4p. 262
Control unitp. 262
Control unitp. 262
11p. 262
11p. 262
Cylinderp. 262
Cylinderp. 262
5p. 262
5p. 262
Pressure override (optional)p. 262
12p. 262
12p. 262
Pistonp. 262
Pistonp. 262
6p. 262
6p. 262
Low pressure sidep. 262
13p. 262
13p. 262
Slipper padp. 262
Slipper padp. 262
7p. 262
7p. 262
Auxiliary pump (optional)p. 262
14p. 262
14p. 262
Swashing cradlep. 262
The variable displacement axial piston pump must be filled with pressure fluid and purged during start- up and operation. This must also be considered for longer periods of rest, because the system may run empty through the hydraulic lines.p. 262
Hydraulic diagramp. 263
Fig. 4 Hydraulic diagram, A10VG EPp. 263
Ap. 263
Ap. 263
Work connectionp. 263
PSp. 263
Pp. 263
Sp. 263
Control pressure inletp. 263
Bp. 263
Bp. 263
Work connectionp. 263
Rp. 263
Rp. 263
Ventilationp. 263
Ventilationp. 263
Gp. 263
Gp. 263
Pressure port for charge circuitp. 263
T1p. 263
Tp. 263
1p. 263
Leak oilp. 263
Leak oilp. 263
MAp. 263
Mp. 263
Ap. 263
Pressure test port, pressure Ap. 263
T2p. 263
Tp. 263
2p. 263
Leak oilp. 263
Leak oilp. 263
MBp. 263
Mp. 263
Bp. 263
Pressure test port, pressure Bp. 263
X1 X2p. 263
Xp. 263
1p. 263
2p. 263
Port for control pressures, pressure in front of nozzlep. 263
Connection overviewp. 264
Fig. 5p. 264
High pressure relief and charge pressure valvep. 264
Fig. 6 Valve platep. 264
High pressure relief valves with integrated boost check valves and bypass (only travel pump / for towing)p. 264
Pressure peaks occurring during very fast swashing processes, as well as the maximum pressures are safeguarded by superordinate high pressure relief valves, which open when the adjusted value is exceeded and relieve oil into the low pressure side. Th…p. 264
HP-valves are always adjusted 10% higher than the pressure override.p. 264
The boost check valves are integrated in the high pressure relief valves. These valves open to the low pressure side and let cool and filtered oil flow from the charge oil circuit into the closed hydraulic circuit, in order to compensate leaks and fl…p. 264
Bypass controlp. 265
In this case the travel system is switched to free circulation. For this purpose the high pressure relief valves integrated in the variable displacement pump have a so-called bypass function. This means that by turning the screw (1)p. 265
(Fig. 7)p. 265
Fig. 7 Bypass controlp. 265
Shut down the engine.p. 265
Loosen the counter nuts by turning them with a hexagon spanner (SW 134) half a turn in anti-clockwise direction.p. 265
Use an Allen key (SW 4) to turn the screws clockwise, until the screw touches the spring cup, which can be noticed by the increasing resistance.p. 265
Turn the screw half a turn into the spring cup.p. 265
Towing finishedp. 265
After towing back the screw out again. This resets the high pressure valves to their original setting.p. 265
Tightening torque for counter nut 22 Nm.p. 265
Charge pressure relief valvep. 265
The charge pressure valve belongs to the group of safety elements in a closed hydraulic circuit. This valve limits the pressure in the charge circuit to the pre-adjusted value.p. 265
Pressure override valvep. 265
The pressure override limits the operating pressure. The pressure override is a kind of pressure regulation, which, when the adjusted nominal pressure is reached, reduces the displacement of the pump to such an extent, that the adjusted pressure is j…p. 265
EP – controlp. 266
EP – controlp. 266
Fig. 8 EP – controlp. 266
1p. 266
1p. 266
Setscrew for mechanical neutral positionp. 266
5p. 266
5p. 266
Proportional solenoid valvep. 266
2p. 266
2p. 266
Neutral setting springp. 266
6p. 266
6p. 266
Valve spoolp. 266
Valve spoolp. 266
3p. 266
3p. 266
Control pistonp. 266
7p. 266
7p. 266
Feedback leverp. 266
4p. 266
4p. 266
Control chamberp. 266
Fig. 9 EP controlp. 266
Depending on the pre-selected ampacity "I" on the two proportional solenoids, the control cylinder on the pump is supplied with control pressure through the EP control unit. This way the swash plate and thus the displacement of the pump can be infini…p. 266
The spring reset in the control unit is no safety feature.p. 266
Internal contamination – like e.g. contaminated hydraulic fluid, abrasion or dirt residues from system components – can cause blockage of the spool valve in the control unit. The flow volume from the variable displacement pump will in this case n…p. 266
Axial piston pumps, A10VO/VSO 18 to 100 DFR1p. 267
Travel pump, A10VO28p. 267
Axial piston pumps, A10VO/VSO 18 to 100 DFR1p. 267
This document is valid for pump typesp. 267
VOp. 267
VSOp. 267
The pump delivers oil only to one direction, i.e. the swash plate moves out of neutral position only to one direction. It is therefore particularly suitable for the use in open hydraulic circuits.p. 267
The axial piston pump must be filled with pressure fluid and purged during start-up and operation. This must also be considered for longer periods of rest, because the system may run empty through the hydraulic lines.p. 267
Fig. 10p. 267
DFR1, pressure-flow controllerp. 267
Pressure regulatorp. 267
The pressure control valve keeps the pressure in an hydraulic system at a constant level within the control range of the pump. This way the pump will only deliver as much hydraulic fluid as can be absorbed by the hydraulic consumers. The pressure can…p. 267
DFR1 – pressure and flow controllerp. 267
In addition to the function of a pressure controller an orifice records the differential pressure before and after the orifice, which then controls the flow rate of the pump. The pump delivers the pressure fluid quantity actually required by the cons…p. 267
The pressure controller is superimposed.p. 267
Fig. 11 Sectional drawingp. 268
Fig. 12 Hydraulic diagramp. 268
Bp. 268
Bp. 268
Working linep. 268
Working linep. 268
Sp. 268
Sp. 268
Suctionp. 268
Suctionp. 268
L / L1p. 268
L / L1p. 268
Leak oilp. 268
Leak oilp. 268
Xp. 268
Xp. 268
Pilot pressurep. 268
Working principlep. 269
Fig. 13p. 269
When thep. 269
When thep. 269
engine is not running (1)p. 269
(Fig. 13)p. 269
Whenp. 269
starting the enginep. 269
Fig. 14p. 269
If the system pressure increases because of active consumers (3) , the pressure depending on the so-called LS Load Sensing signal will displace the spool of the pressure controller. High pressure is thereby guided to the piston area of the control pi…p. 269
If the system pressure increases beyond the value set on the flow controller (4), the spool in the flow controller is pushed against the spring and max. high pressure acts on the resetting piston and the swash plate is set to minimum displacement.p. 270
If the pressure drops below the set value of the flow controller, the swash plate will again return to maximum displacement.p. 270
Swash plate principle, pumpp. 270
Fig. 15p. 270
The swash plate pump is a positive displacement machine with oil displacing pistons arranged axially to the drive shaft. The pistons are thereby supported by the swash plate.p. 270
Axial piston units based on the swash plate principle with fixed or variable displacement can be used as hydraulic pumps or hydraulic motors. In pump mode the mechanical energy is converted to hydrostatic energy, when used in motor mode the hydrostat…p. 270
Variable displacement pumps and motors can be change their displacement, i.e. the pump delivery rate or motor throughput, by simply changing the angle of the swash plate.p. 270
Description of functionp. 271
Fig. 16p. 271
1p. 271
1p. 271
Drive shaftp. 271
Drive shaftp. 271
8p. 271
8p. 271
Through drivep. 271
Through drivep. 271
2p. 271
2p. 271
Pistonp. 271
Pistonp. 271
9p. 271
9p. 271
Valve platep. 271
Valve platep. 271
3p. 271
3p. 271
Piston areap. 271
Piston areap. 271
10p. 271
10p. 271
Top dead centre TDCp. 271
4p. 271
4p. 271
Piston strokep. 271
Piston strokep. 271
11p. 271
11p. 271
Bottom dead centre BTCp. 271
5p. 271
5p. 271
Slipping discp. 271
Slipping discp. 271
12p. 271
12p. 271
Control slots in suction side of swash plate (for sense of rotation shown)p. 271
6p. 271
6p. 271
Adjusting anglep. 271
13p. 271
13p. 271
Control slot on pressure sidep. 271
7p. 271
7p. 271
Cylinderp. 271
Cylinderp. 271
Driven by the engine, the drive shaft rotates and drives the cylinder via a splined connection. The cylinder rotates with the drive shaft and drives the 9 pistons. The pistons rest with their slipper pads on the sliding face of the swashing cradle an…p. 271
15.4 Troubleshooting axial piston pumpsp. 272
The following table should be of help when performing troubleshooting This table is by no means complete.p. 272
In practice you may encounter problems that have not been listed here.p. 272
Procedurep. 272
Procedurep. 272
Always proceed systematically, even under time pressure. Indiscriminate, ill-considered disassembly and changing of settings can lead to a situation in which the original cause of a fault can no longer be detected.p. 272
Get an overview over the function of the product in connection with the overall system.p. 272
Try to clarify whether the product was able to deliver the required function within the overall system before the fault occurred.p. 272
Develop a clear understanding of the troubleshooting process. If necessary ask the direct operator or machine driver.p. 272
Try to detect changes to the overall system, the product is installed in:p. 272
Have conditions or area of application of the product been changed?p. 272
Were changes (e.g. changeovers) or repairs made to the overall system (machine/plant, electrics, control) or to the product? If yes: What kind?p. 272
Has the product or the machine been operated as intended?p. 272
How does the fault occur?p. 272
Faultp. 272
Faultp. 272
Possible causep. 272
Remedyp. 272
Remedyp. 272
Unusual noisesp. 272
Insufficient suction conditions, e.g. air in the suction line, inadequate diameter of the suction line, excessive viscosity of the pressure fluid, extreme suction height, too low suction pressure, foreign bodies in the suction line.p. 272
Machine or system manufacturer (e.g. optimize feed conditions, use suitable pressure fluid).p. 272
Completely purge the axial piston unit, fill the suction line with pressure fluid.p. 272
Remove foreign bodies from inside the suction line.p. 272
Inappropriate fastening of the axial piston unit.p. 272
Check the fastening of the axial piston unit as specified by the machine or plant manufacturer. Observe the tightening torques.p. 272
Inappropriate fastening of attachment parts, e.g. coupling and hydraulic lines.p. 272
Fasten attachment parts as specified by the coupling or fittings manufacturer.p. 272
Pressure relief valves of the axial piston unit (charge pressure, high pressure, pressure override).p. 272
Purge the axial piston unit, check the viscosity of the pressure fluid, consult the service department.p. 272
Mechanical damage to the axial piston unit.p. 272
Replace the axial piston unit, consult the service department.p. 272
No or insufficient volumetric flowp. 273
Faulty mechanical drive (e.g. defective coupling).p. 273
Check and repair the drive.p. 273
Drive speed too low.p. 273
Consult the service department.p. 273
Insufficient suction conditions, e.g. air in the suction line, inadequate diameter of the suction line, excessive viscosity of the pressure fluid, extreme suction height, too low suction pressure, foreign bodies in the suction line.p. 273
Completely purge the axial piston unit, fill the suction line with pressure fluid.p. 273
Remove foreign bodies from inside the suction line.p. 273
Pressure fluid not within the optimal viscosity range.p. 273
Use appropriate pressure fluid.p. 273
External control and setting facilities defective.p. 273
Check the external control.p. 273
Pilot or control pressure too low.p. 273
Check pilot and control pressure, consult the service department.p. 273
Functional disturbance in the control facility or the regulator on the axial piston unit.p. 273
Consult the service department.p. 273
Wear of the axial piston unit.p. 273
Replace the axial piston unit.p. 273
Mechanical damage to the axial piston unit.p. 273
Replace the axial piston unit.p. 273
No or insufficient pressurep. 274
Faulty mechanical drive (e.g. defective coupling).p. 274
Check and repair the drive.p. 274
Poor drive power.p. 274
Consult the service department.p. 274
Insufficient suction conditions, e.g. air in the suction line, inadequate diameter of the suction line, excessive viscosity of the pressure fluid, extreme suction height, too low suction pressure, foreign bodies in the suction line.p. 274
Completely purge the axial piston unit, fill the suction line with pressure fluid.p. 274
Remove foreign bodies from inside the suction line.p. 274
Pressure fluid not within the optimal viscosity range.p. 274
Use appropriate pressure fluid.p. 274
External control and setting facilities defective.p. 274
Check the external control.p. 274
Pilot or control pressure too low.p. 274
Check pilot and control pressure.p. 274
Functional disturbance in the control facility or the regulator on the axial piston unit.p. 274
Consult the service department.p. 274
Wear of the axial piston unit.p. 274
Replace the axial piston unit.p. 274
Mechanical damage to the axial piston unit.p. 274
Replace the axial piston unit.p. 274
Drive unit defective (e.g. hydraulic motor or cylinder).p. 274
Check the drive unit, replace if necessary.p. 274
Fluctuations in pressure/volumetric flowp. 274
Axial piston unit not or insufficiently purged.p. 274
Completely purge the axial piston unit.p. 274
Insufficient suction conditions, e.g. air in the suction line, inadequate diameter of the suction line, excessive viscosity of the pressure fluid, extreme suction height, too low suction pressure, foreign bodies in the suction line.p. 274
Completely purge the axial piston unit, fill the suction line with pressure fluid.p. 274
Remove foreign bodies from inside the suction line.p. 274
Pressure fluid too hot.p. 274
Excessive input temperature on axial piston unit.p. 274
Check the system, e.g. malfunction of the cooler, pressure fluid level in tank too low.p. 274
Malfunction of the pressure control valves (e.g. high pressure relief valve, pressure override, pressure controller).p. 274
Consult the service department.p. 274
Malfunction of the flushing valve (not for nominal size 18).p. 274
Consult the service department.p. 274
Wear of the axial piston unit.p. 274
Replace the axial piston unit.p. 274
Gear pump WP09p. 275
Vibration and tamper pump, HALDEX WP09 xxxp. 275
Gear pump WP09p. 275
Descriptionp. 275
Descriptionp. 275
WP09 pumps are available as single or multiple configurations with up to four stages.p. 275
The basic pump has a three-part modular design.p. 275
Fig. 17 Gear pump – WP09p. 275
Mounting flange and end cover are made of grey cast iron, the pump housing is made of a high-strength aluminium alloy.p. 275
Gears and shafts are made of one piece. The tooth geometry with 13 teeth ensures a low noise level.p. 275
The bearing faces are Teflon coated. The bearing faces are permanently cooled and lubricated by the targeted feed of fresh oil.p. 275
Connection overview (three-stage pump as an example)p. 276
Fig. 18 Pressure connectionsp. 276
Fig. 19 Suction connectionsp. 276
Vibration and tamper motor SNM2p. 277
Vibration and tamper motor, SAUER SNM2NNp. 277
Vibration and tamper motor SNM2p. 277
The vibration and tamper motor is a reversible gear motor with a displacement range from 6 to 25 cmp. 277
3p. 277
Function and designp. 277
The motors SNM2NN are characterized by a pressure-compensated design, which ensures a high rate of efficiency. The robust design of the shaft seal has a integrated stiffening and a sealing lip. The housing, which is most suitable for high operating p…p. 277
Fig. 20 SNM2p. 277
15.7 Component overview — hydraulicsp. 278
Tractorp. 278
Tractorp. 278
Fig. 21p. 278
Pos.p. 278
Pos.p. 278
Descriptionp. 278
Descriptionp. 278
1p. 278
1p. 278
Brake valvep. 278
Brake valvep. 278
2p. 278
2p. 278
Brake releasing valvep. 278
3p. 278
3p. 278
Valve – auger right forward/backwardp. 278
4p. 278
4p. 278
Valve – auger left forward/backwardp. 278
5p. 278
5p. 278
Valve – conveyor belt left forward/backwardp. 278
6p. 278
6p. 278
Valve – conveyor belt right forward/backwardp. 278
7p. 278
7p. 278
Valve – activation of hydraulic systemp. 278
8p. 278
8p. 278
Valve block – auger block up/down, hopper wings left/right open/close, screed left/right up/downp. 278
9p. 278
9p. 278
Valve block – screed up, floating position, Load Control System (LCS)p. 278
10p. 278
10p. 278
Manifold linep. 278
Manifold linep. 278
11p. 278
11p. 278
Manifold line with spring loaded boost check valve (non-return valve)p. 278
12p. 278
12p. 278
Valve block – differential lock on/off, first gear, second gearp. 278
Arrangement of hydraulic pumpsp. 279
Screedp. 279
Fig. 22p. 279
Pos.p. 279
Pos.p. 279
Descriptionp. 279
Descriptionp. 279
1p. 279
1p. 279
Valve block for vibrationp. 279
2p. 279
2p. 279
Valve block for tampingp. 279
3p. 279
3p. 279
Valve block to extend and retract the mobile sectionsp. 279
4p. 279
4p. 279
Valve block for hydraulic crown adjustmentp. 279
Arrangement of hydraulic pumpsp. 280
Fig. 23p. 280
Pos.p. 280
Pos.p. 280
Descriptionp. 280
Descriptionp. 280
1p. 280
1p. 280
Gear pump – screed rightp. 280
2p. 280
2p. 280
Gear pump – tamping and vibrationp. 280
3p. 280
3p. 280
Service pumpp. 280
Service pumpp. 280
4p. 280
4p. 280
Gear pump – screed leftp. 280
5p. 280
5p. 280
Gear pump – scraper belt rightp. 280
6p. 280
6p. 280
Gear pump – scraper belt leftp. 280
7p. 280
7p. 280
Travel pump – rear wheel drivep. 280
8p. 280
8p. 280
Travel pump – front wheel drivep. 280
Optional equipmentp. 280
15.13 Checking the hydraulic oil levelp. 281
Travel circuitp. 281
Travel drive – rear wheel drivep. 281
The travel system consists of a closed hydraulic circuit. The most important components are the travel pump with integrated safety elements and control and the travel motor.p. 281
Fig. 24 Travel system — excerpt from hydraulic diagramp. 281
1p. 281
1p. 281
Travel motorp. 281
Travel motorp. 281
2p. 281
2p. 281
Travel pumpp. 281
Travel pumpp. 281
Travel pumpp. 282
The travel pump is flanged to the flywheel side of the diesel engine.p. 282
The duties of the travel pump are:p. 282
the hydraulic oil supply for the travel circuitp. 282
the supply of the service brakep. 282
the supply of the differential lockp. 282
the supply of the hydraulically shiftable gear (1st gear, 2nd gear)p. 282
The oil is cleaned by a pressure filter, which is arranged directly in front of the travel pump.p. 282
A charge circuit supplies the closed circuits with cool and filtered hydraulic oil to compensate for leakage and flushing quantities. This hydraulic oil is additionally used to supply the travel system control, the hydraulically shiftable gears, the …p. 282
Brake controlp. 282
Brake controlp. 282
Engine startp. 282
Once the engine is running, the multi-disc brake will be opened by charge pressure. The closed hydrostatic travel circuit will also take care of the braking function.p. 282
Driving – brakingp. 282
When shifting the travel lever forward or back, the machine will start to drive. When the operator shifts the travel lever towards "Neutral", the displacement of the travel pump is adjusted towards zero accordingly and the machine is hydraulically br…p. 282
Should this “hydraulic brake” be insufficient, the machine can be stopped by the operator kicking down the brake pedal. This proportionally reduces the pressure applied to the multi-disc brakes (depending on the brake pressure position). The mach…p. 282
Releasing the brake mechanically, towing the machinep. 282
Fig. 25 Brake releasing valvep. 282
The pump lever extension is stored in the drivers stand, at the right in the frame.p. 282
Press the limp home buttonp. 282
(Fig. 25)p. 282
Release the brake by operating the hand pump.p. 282
After towingp. 282
Pull the emergency operation buttonp. 282
(Fig. 25)p. 282
After starting the engine the emergency operation button is pushed out by hydraulic pressure.p. 282
Travel drive – front wheel drivep. 283
Optional equipmentp. 283
The travel system consists of a closed hydraulic circuit. The most important components are the travel pump with integrated safety elements and control and the travel motor.p. 283
Fig. 26 Front wheel drive — excerpt from hydraulic diagramp. 283
1p. 283
1p. 283
Travel motors axle 1 (only with equipment 6×6)p. 283
2p. 283
2p. 283
Travel motors axle 2 (with equipment 4×6 and 6×6)p. 283
3p. 283
3p. 283
additional travel pump (for front wheel drive)p. 283
Travel pumpp. 284
The travel pump for front wheel drive is flanged to the travel pump for rear wheel drive.p. 284
The duties of thisp. 284
additionalp. 284
the hydraulic oil supply of the front wheel drive travel circuitp. 284
the supply of the traction controlp. 284
Filteringp. 284
The hydraulic oil is filtered by a pressure filter, which is arranged directly behind the travel pump.p. 284
Switching on the front wheel drivep. 284
When the operator switches on the front wheel drive, a solenoid valve directs charge pressure to the contgrol of the front travel motors. This charge pressure enables the motors to swash to maximum displacement (black/ white). The quantity of oil con…p. 284
Traction controlp. 284
Depending on the ground conditions and the load of the machine slippage of the front wheels may occur. As a measure to prevent this, the operator has the possibility to adjust the tractive force of the front wheels via a potentiometer on the control …p. 284
Rear axle travel motorsp. 285
The travel motors on the rear axle of the finisher are variable displacement swash plate motors.p. 285
Product descriptionp. 285
A plug-in fixed displacement motor converts the hydrostatic volumetric flow into mechanical rotary motion. It has mainly been designed for installation into mechanical gear drives.p. 285
Functionp. 285
Functionp. 285
The hydraulic oil flows under high pressure through the corresponding port to the back of the working pistons. Since the working pistons are arranged under an angle to the output shaft, the pressurized pistons will perform an axial stroke, thereby ca…p. 285
Once the respective piston has passed its dead centre (max. extended position), it will change to the low pressure side. As the rotation progresses, the piston will move back into the cylinder bore. Oil is thereby displaced out of the cylinder chambe…p. 285
The synchronizing shaft with roller surfaces ensures uniform rotation of output shaft and cylinder block. The ball joints of the pistons run in journal bearings, which are pressed into the outer shaft. For the connection between output shaft and pist…p. 285
Flushing valvep. 285
In a closed circuit the same pressure fluid keeps permanently circulating between pump and motor. This can cause overheating of the pressure fluid.p. 285
The flushing valve has the function to support cooling of the oil circuit by flushing the motor and thus to prolong the service life of the motor. If the hydraulic motor is operated under load, the flushing valve opens during clockwise and anti-clock…p. 285
Controlp. 285
Controlp. 285
The motor can be adjusted to two fixed displacements. This is accomplished by changing the angle between cylinder block and output shaft.p. 285
With a large angle position the motor works with maximum displacement, slow speed and high torque.p. 285
When changing the swash plate position to minimal angle the motor works with minimum displacement, high speed and low torque.p. 285
The displacement is changed by a control piston, which is tightly connected with the valve segment. The piston rod side (test port M4) is thereby permanently pressurized with the actual travel pressure. In 1st gear (solenoid de-energized) the piston …p. 285
minp. 285
Fig. 27p. 286
1p. 286
1p. 286
Control pistonp. 286
7p. 286
7p. 286
Taper roller bearingp. 286
2p. 286
2p. 286
4-way valvep. 286
4-way valvep. 286
8p. 286
8p. 286
SAE-flangep. 286
SAE-flangep. 286
3p. 286
3p. 286
Proportional valvep. 286
9p. 286
9p. 286
Synchronizing jointp. 286
4p. 286
4p. 286
Minimum swashing angle settingp. 286
10p. 286
10p. 286
Speed sensorp. 286
Speed sensorp. 286
5p. 286
5p. 286
Valve segmentp. 286
Valve segmentp. 286
11p. 286
11p. 286
Pistonp. 286
Pistonp. 286
6p. 286
6p. 286
Bearing platep. 286
Bearing platep. 286
12p. 286
12p. 286
Flushing pressure relief valvep. 286
Travel and reduction gearsp. 287
The travel gear is a two-stage spurwheel gear with two power outputs.p. 287
The reduction gears are also two-stage spurwheel gears, but with only one power output. The power inputs are equipped with the multi-disc brakes, the power outputs carry the rear wheels of the machine.p. 287
Function and designp. 287
Fig. 28p. 287
1p. 287
1p. 287
Travel gearp. 287
Travel gearp. 287
4p. 287
4p. 287
Reduction gearp. 287
2p. 287
2p. 287
Travel motorp. 287
Travel motorp. 287
5p. 287
5p. 287
Multi-disc brakesp. 287
3p. 287
3p. 287
Rear wheelp. 287
Rear wheelp. 287
The travel gear is driven by the travel motor. The travel gear transmits the torque generated by the travel motor to the reduction gears.p. 287
Hydraulically operated multi-disc brakes are installed between the travel gear and the reduction gear. Pressure is applied to the brake when the brake releasing valve is operated. This pressure works against the Belleville springs and opens the brake…p. 287
15.13 Checking the hydraulic oil levelp. 288
15.9 Vibration and tamper drivep. 288
The vibration and tamper drive has been designed as an open hydraulic circuit.p. 288
The most essential components are:p. 288
the hydraulic pumpp. 288
the valve block for vibration drivep. 288
the valve block for tamper operationp. 288
the vibration motorsp. 288
the tamper motorsp. 288
Fig. 29 Vibration and tamper drive – excerpt from hydraulic diagramp. 288
1p. 288
1p. 288
Vibration motors (two for the main screed and one each for the mobile screeds)p. 288
2p. 288
2p. 288
Tamper motors (two for the main screed and one each for the mobile screeds)p. 288
3p. 288
3p. 288
Valve block for tamper operationp. 288
4p. 288
4p. 288
Hydraulic pumpp. 288
5p. 288
5p. 288
Valve block for vibration drivep. 288
Vibration and tamper pumpp. 289
Fig. 30 Vibration and tamper pumpp. 289
The vibration and tamper pumpp. 289
(Fig. 30)p. 289
Valve blocksp. 289
This hydraulic oil supply runs through separate valve blocks for vibration drive (5)p. 289
(Fig. 29)p. 289
(Fig. 29)p. 289
Vibration motorp. 289
The vibration motors each engage directly into a flanged on exciter housing with exciter shaft (eccentric shaft). The eccentric arrangement of the weight of the exciter shaft causes a radial vibration, which works directly on the screed plates of scr…p. 289
Tamper motorp. 289
Optionp. 289
The tamper motors of screed and mobile screeds each drive a drive shaft which are connected with the corresponding tamper plate by eccentrically mounted connecting rods. This moves the conrods with the attached tamper plates up and down. This up and …p. 289
The vibration and tamper motors of the screed are additionally linked by a universal shaft, to ensure synchronization of amplitudes in vibration and tamping. This makes ure that there will be no undesired resonance vibrations or mutual elimination of…p. 289
15.13 Checking the hydraulic oil levelp. 290
Scraper belt drivep. 290
The scraper belt drive has been designed as an open hydraulic circuit.p. 290
The most essential components are:p. 290
the scraper belt pumpsp. 290
the scraper belt valve blocksp. 290
the scraper belt motorsp. 290
Fig. 31 Scraper belt drive – excerpt from hydraulic diagramp. 290
1p. 290
1p. 290
Scraper belt motor leftp. 290
4p. 290
4p. 290
Valve block for right hand motorp. 290
2p. 290
2p. 290
Scraper belt motor rightp. 290
5p. 290
5p. 290
Gear pump for scraper belt motor leftp. 290
3p. 290
3p. 290
Valve block for left hand motorp. 290
6p. 290
6p. 290
Gear pump for scraper belt motor rightp. 290
Scraper belt pump (gear pump)p. 291
Fig. 32 Gear pump for scraper belt drivep. 291
The pump for the scraper belt drivep. 291
(Fig. 32)p. 291
Valve blocksp. 291
The valve blocks for the scraper belt drive (3), (4)p. 291
(Fig. 31)p. 291
The solenoid valve attached to the valve block enables the user to run the scraper belts individually in forward or reverse mode, depending on the requirements when paving.p. 291
Scraper belt motorp. 291
The scraper belt motors both drive the scraper belts via a chain drive. Using an intermediate chain drive increases the torque.p. 291
Paddlep. 291
The end of the scraper belts is equipped with paddles. These touch the material and are thereby moved. If there is too much material on the scraper belt, the paddle sends a signal through an attached sensor, which forces the electronics to stop the c…p. 291
Ultrasonic sensorp. 291
optionalp. 291
The material flow on the scraper belt is detected by an ultrasonic sensor. If there is too much material on the scraper belt, the ultrasonic sensor will generate a signal through an attached sensor, which forces the electronics to stop the correspond…p. 291
15.13 Checking the hydraulic oil levelp. 292
Auger drivep. 292
Auger drivep. 292
Auger drivep. 292
The auger drive has been designed as an open hydraulic circuit.p. 292
The most essential components are:p. 292
the hydraulic pumpsp. 292
the valve blocksp. 292
the auger motorsp. 292
Fig. 33 Auger drive – excerpt from hydraulic diagramp. 292
1p. 292
1p. 292
Auger motor leftp. 292
4p. 292
4p. 292
Valve block for right hand motorp. 292
2p. 292
2p. 292
Auger motor rightp. 292
5p. 292
5p. 292
Gear pump for auger motor leftp. 292
3p. 292
3p. 292
Valve block for left hand motorp. 292
6p. 292
6p. 292
Gear pump for auger motor rightp. 292
Pump for auger drive (gear pump)p. 293
Fig. 34 Gear pump for auger drivep. 293
The auger drive pumpp. 293
(Fig. 34)p. 293
Valve blocksp. 293
The valve blocks for the auger drive (3), (4)p. 293
(Fig. 33)p. 293
The solenoid valve attached to the valve block enables the user to run the augers individually in forward or reverse mode, depending on the requirements when paving.p. 293
Auger motorp. 293
The auger motors both drive the auger shafts via a chain drive. Using an intermediate chain drive increases the torque.p. 293
15.13 Checking the hydraulic oil levelp. 294
Cylinder functionsp. 294
The cylinder functions can be sub-divided into the following sections:p. 294
Hopper functionsp. 294
Hopperp. 294
Screed functionsp. 294
Screedp. 294
Auger functionsp. 294
Augerp. 294
All cylinders are supplied by the working pumpp. 294
(Fig. 35)p. 294
Fig. 35 Work pump – excerpt from hydraulic diagramp. 294
Hopperp. 295
The hopper functions can be sub-divided into two sections:p. 295
Lift/lower left hand hopper wingp. 295
Lift/lower right hand hopper wingp. 295
Fig. 36 Hopper functions — excerpt from hydraulic diagramp. 295
1p. 295
1p. 295
Lift/lower left hand wingp. 295
2p. 295
2p. 295
Lift/lower right hand wingp. 295
Opening / closing the hopper wingsp. 296
The hopper wings can be adjusted in height. This changes the volume of the material hopper. This adjustment is accomplished by hydraulic cylinders, which are fastened to the outside of the wings. When paving the hopper has to take up the material. Fo…p. 296
Screedp. 297
The screed functions can be sub-divided into the following sections:p. 297
Lifting/lowering the left/right hook-in pointp. 297
Lifting/lowering the complete screedp. 297
Extending/retracting the extendable screed left/rightp. 297
Fig. 37 Cylinder functions screed – excerpt from hydraulic diagramp. 298
1p. 298
1p. 298
Lifting/lowering the screed Load Control System (LCS)p. 298
3p. 298
3p. 298
Extending/retracting the extendable screedp. 298
2p. 298
2p. 298
Lifting / lowering the hook in pointsp. 298
4p. 298
4p. 298
Crown adjustmentp. 298
Lifting/lowering the left/right hook-in pointp. 299
With their height the hook-in points directly influence the thickness of the material to be applied. For this reason they are adjustable in height. This is accomplished with hydraulic cylinders mounted at the front end of the drawing arms. These cyli…p. 299
Lifting/lowering the complete screedp. 299
Lifting/lowering the screed is accomplished by two hydraulic cylinders at the rear ends of both side arms. These cylinders lift/lower or release the screed by means of the screed load control system (L.C.S.) intervening in the hydraulic circuit. This…p. 299
Extending/retracting the extendable screed left/rightp. 299
Extending and retracting the extendable screed is accomplished by two hydraulic cylinders in the centre of the screed. The extendable screeds can thereby by infinitely extended or retracted independently from one another.p. 299
Augersp. 300
The auger functions can be sub-divided into two sections:p. 300
Augers upp. 300
Augers upp. 300
Augers downp. 300
Fig. 38 Auger functionsp. 301
1p. 301
1p. 301
Lifting / lowering the augersp. 301
Lifting / lowering the augersp. 302
The augers can be adjusted in height. This adjustment is accomplished by hydraulic cylinders, which are fastened to the auger unit. The auger can be adjusted in height to make sure that a sufficient amount of material is placed in front of the screed…p. 302
15.13 Checking the hydraulic oil levelp. 303
Risk of overfilling!p. 303
Fully open the hopper.p. 303
Completely retract the screed extension.p. 303
Raise the screed to half height.p. 303
Fig. 39p. 303
Check the hydraulic oil level in the inspection glassp. 303
(Fig. 39)p. 303
Normal levelp. 303
approx. 3 cm below the top edge of the inspection glass.p. 303
Minimum levelp. 303
Middle of inspection glass.p. 303
If, during the daily inspection of the oil level the hydraulic oil level is found to have dropped, check all lines, hoses and components for leaks.p. 303
If necessary fill in hydraulic oil through the filler neck.p. 303
For quality and quantity of oil refer to the table of fuels and lubricants.p. 303
15.14 Changing hydraulic oil and hydraulic oil filterp. 303
See also the notes on the hydraulic system in the chapter "General notes on maintenance".p. 303
Danger of scalding!p. 303
When draining off hot hydraulic oil!p. 303
The hydraulic oil must also be changed after major repairs in the hydraulic system.p. 303
Perform the oil change when the hydraulic oil is warm.p. 303
Replace the hydraulic oil filter element with every hydraulic oil change.p. 303
Change the filter only after the hydraulic oil change and after the test run.p. 303
Clean the area round hydraulic oil tank, filler opening and breather filter.p. 303
Do not start the engine after draining the hydraulic oil.p. 303
Do not use any detergents to clean the system.p. 303
For quality and quantity of oil refer to the "table of fuels and lubricants".p. 303
Catch running out oil and dispose of environmentally.p. 303
Fig. 40p. 303
Unscrew the plugp. 303
(Fig. 40)p. 303
Turn the plug tightly back in.p. 303
Remove the filler cap.p. 303
Fill in new hydraulic oil through the screen.p. 303
We recommend to use our filling and filtering unit with fine filter to fill the system. This ensures finest filtration of the hydraulic oil, prolongs the lifetime of the hydraulic oil filter and protects the hydraulic system.p. 304
Fig. 41p. 304
Check the oil level in the inspection glassp. 304
(Fig. 41)p. 304
Nominal value:p. 304
approx. 3 cm below the upper edge of the inspection glassp. 304
The breather filter for the hydraulic oil tank is integrated in the filler cap, you must therefore replace the complete filler cap.p. 304
Close the tank with a new cover.p. 304
Open the hopper wings and remove the cover to the engine compartment.p. 304
Fig. 42p. 304
Unscrew spigot nut 4p. 304
(Fig. 42)p. 304
Examine the surface of the filter element thoroughly for any visible dirt.p. 304
Visible dirt may be an early sign for the failure of system components and indicate the possible failure of components. In this case determine the cause and replace or repair the defective components, if necessary. Negligence may cause destruction to…p. 304
Do not clean or reuse the filter element.p. 304
Take the old filter element (3) out, clean the filter bowl and thread.p. 304
Install the filter bowl with new filter element, check the condition of O-rings (1) and (2), if necessary use new ones.p. 304
After a short test run check the filter for leaks.p. 304
16 Tests and adjustmentsp. 305
16.2 Checking and adjusting the vibrationp. 306
16.1 Special tools, tests and adjustmentsp. 306
The following list informs about special tools for testing and adjustment work. You should choose the corresponding tool for the work to be carried out.p. 306
Fig. 1p. 306
Fig. 1p. 306
16. Vibration reed frequency meterp. 306
1000 – 4.000 rpmp. 306
17 – 67 Hzp. 306
17 – 67 Hzp. 306
BOMAG part-no.: 300 120 80p. 306
Fig. 2p. 306
Fig. 2p. 306
17. Sirometer (frequency meter)p. 306
800 – 50.000 rpmp. 306
14 – 750 Hzp. 306
14 – 750 Hzp. 306
BOMAG part-no.: 059 710 02p. 306
Fig. 3p. 306
Fig. 3p. 306
18. Anti-freeze tester, quick and accurate measuring, sturdy plastic housing, automatic temperature correction, no after-dripping, instructions for use on unit, reading down to -40 °C. Plastic, temperature range: down to -40 °Cp. 306
BOMAG part-no.: 050 100 75p. 306
Fig. 4p. 307
Fig. 4p. 307
19. Digital rpm-meter for petrol enginesp. 307
BOMAG part-no.: 079 948 99p. 307
Fig. 5p. 307
Fig. 5p. 307
20. Digital rpm-meter for petrol enginesp. 307
BOMAG part-no.: 059 711 12p. 307
Fig. 6p. 307
Fig. 6p. 307
21. Digital rpm-meter, optical/mechanical, universal usep. 307
BOMAG part-no.: 079 948 98p. 307
Fig. 7p. 307
Fig. 7p. 307
22. Infrared hand-held thermometer, -18 to 275°Cp. 307
BOMAG part-no.: 057 668 06p. 307
Fig. 8p. 308
Fig. 8p. 308
23. Hydraulic test case, largep. 308
BOMAG part-no.: 007 610 03p. 308
4 X 600 bar pressure gaugesp. 308
4 X 60 bar pressure gaugesp. 308
8 pressure test hosesp. 308
Fig. 9p. 308
Fig. 9p. 308
24. Hydraulic test case, smallp. 308
BOMAG part-no.: 079 930 01p. 308
2X 60 bar pressure gaugesp. 308
2X 600 bar pressure gaugesp. 308
4 pressure test hosesp. 308
Fig. 10p. 308
Fig. 10p. 308
25. Pressure test hosesp. 308
1000 mm BOMAG part-no.: 079 930 02p. 308
2500 mm BOMAG part-no.: 079 930 03p. 308
Fig. 11p. 308
Fig. 11p. 308
26. Pressure gaugep. 308
60 bar BOMAG part-no.: 059 721 07p. 308
600 bar BOMAG part-no.: 059 721 04p. 308
Fig. 12p. 309
Fig. 12p. 309
27. Adapter for pressure test hosep. 309
BOMAG part-no.: 055 439 02p. 309
Fig. 13p. 309
Fig. 13p. 309
28. Gear pump testing devicep. 309
BOMAG part-no.: 007 610 05p. 309
Fig. 14p. 309
Fig. 14p. 309
29. Vacuum pump for hydraulic oil tankp. 309
BOMAG part-no.: 007 610 04 (12 Volt)p. 309
BOMAG part-no.: 007 610 24 (24 Volt)p. 309
16.2 Checking and adjusting the vibrationp. 310
Perform measurements at operating temperature of the hydraulic oil (40 °C).p. 310
Special toolsp. 310
Special toolsp. 310
Hydraulic test casep. 310
[BOMAG Part-No.: 079 930 01]p. 310
Digital rpm-meter, optical/mechanical, universal usep. 310
[BOMAG Part-No.: 079 948 98]p. 310
Pressure test vibrationp. 310
Fig. 1p. 310
Fig. 1p. 310
1. Raise and lock the screedp. 310
(Fig. 1)p. 310
2. Fully extend right and left hand mobile screeds.p. 310
3. Shut down the engine.p. 310
Fig. 2p. 310
Fig. 2p. 310
Danger of injury!p. 310
Before connecting the pressure gauge make sure that the engine has been shut down!p. 310
4. Connect a high pressure gauge (600 bar) to pressure test port "M" on the pumpp. 310
(Fig. 2)p. 310
The arrangement of hydraulic components is shown in chapter "Hydraulics" under section "Hydraulics overview of components".p. 310
Fig. 3p. 310
Fig. 3p. 310
5. Block the propshaft of the vibration drive with suitable means (e.g.: steel bar)p. 310
(Fig. 3)p. 310
Rest the steel bar against the screed frame so that it will not hit the frame when vibration is switched on!p. 310
Fig. 4p. 311
Fig. 4p. 311
6. Start the engine and set the switch to position "MAX"p. 311
(Fig. 4)p. 311
Fig. 5p. 311
Fig. 5p. 311
7. Activate the hydraulic systemp. 311
(Fig. 5)p. 311
Fig. 6p. 311
Fig. 6p. 311
8. Activate the parking brakep. 311
(Fig. 6)p. 311
Fig. 7p. 311
Fig. 7p. 311
9. Select "Work"-modep. 311
(Fig. 7)p. 311
Fig. 8p. 312
Fig. 8p. 312
Run the following pressure test only for max. 5 seconds.p. 312
10. Switch the vibration onp. 312
(Fig. 8)p. 312
Fig. 9p. 312
Fig. 9p. 312
11. Shift the travel lever to "forward" positionp. 312
(Fig. 9)p. 312
12. Read the hydraulic oil pressure in the pressure gauge.p. 312
13. Return the travel lever to "Neutral".p. 312
Fig. 10p. 312
Fig. 10p. 312
14. Switch the vibration offp. 312
(Fig. 10)p. 312
Nominal valuep. 312
Nominal valuep. 312
See chapter "Technical Data".p. 312
If the nominal pressure relief value is not reached, adjust the solenoid valvep. 312
(Fig. 11)p. 312
Fig. 11p. 312
Fig. 11p. 312
15. Remove the cap (1) form the pressure relief valve (PRV) (2)p. 312
(Fig. 11)p. 312
16. Loosen the counter nut (4) and turn the setscrew (3) in or out, until the nominal value is reached.p. 312
Turning clockwisep. 312
increasesp. 312
reducesp. 312
17. Check the pressure once again (see above).p. 312
18. Retighten the counter nut (4) and replace the cap (1).p. 312
Fig. 12p. 313
Fig. 12p. 313
19. Turn the switch to position "MIN" and shut down the enginep. 313
(Fig. 12)p. 313
Danger of injury!p. 313
Before disconnecting the pressure gauge make sure that the engine has been shut down!p. 313
20. Disconnect the pressure gauge.p. 313
Rotary speed measurement vibrationp. 314
Fig. 13p. 314
Fig. 13p. 314
1. Raise and lock the screedp. 314
(Fig. 1)p. 314
2. Fully extend right and left hand mobile screeds.p. 314
3. Shut down the engine.p. 314
Fig. 14p. 314
Fig. 14p. 314
1. Fasten a reflex mark (2) on the shaft (1)p. 314
(Fig. 14)p. 314
Fig. 15p. 314
Fig. 15p. 314
2. Completely close the hand wheel for vibration speedp. 314
(Fig. 15)p. 314
Fig. 16p. 314
Fig. 16p. 314
3. Start the engine and set the switch to position "MAX"p. 314
(Fig. 16)p. 314
Fig. 17p. 315
Fig. 17p. 315
4. Activate the hydraulic systemp. 315
(Fig. 17)p. 315
Fig. 18p. 315
Fig. 18p. 315
5. Activate the parking brakep. 315
(Fig. 18)p. 315
Fig. 19p. 315
Fig. 19p. 315
6. Select "Work"-modep. 315
(Fig. 19)p. 315
Fig. 20p. 315
Fig. 20p. 315
7. Switch the vibration onp. 315
(Fig. 20)p. 315
Fig. 21p. 316
Fig. 21p. 316
8. Shift the travel lever to "forward" positionp. 316
(Fig. 21)p. 316
9. Read the shaft speed.p. 316
Nominal valuep. 316
Nominal valuep. 316
See chapter "Technical Data".p. 316
10. Shift the travel lever to "Neutral" position.p. 316
Fig. 22p. 316
Fig. 22p. 316
11. Switch the vibration offp. 316
(Fig. 22)p. 316
If the nominal value is not reached, you must:p. 316
1. The vibration pumpp. 316
2. The vibration motor(s)p. 316
.p. 316
The arrangement of hydraulic components is shown in chapter "Hydraulics" under section "Hydraulics overview of components".p. 316
Fig. 23p. 316
Fig. 23p. 316
12. Turn the switch to position "MIN" and shut down the enginep. 316
(Fig. 23)p. 316
13. Disconnect the pressure gauge.p. 316
16.3 Checking/adjusting tampingp. 317
Perform measurements at operating temperature of the hydraulic oil (40 °C).p. 317
Special toolsp. 317
Special toolsp. 317
Hydraulic test casep. 317
[BOMAG Part-No.: 079 930 01]p. 317
Digital rpm-meter, optical/mechanical, universal usep. 317
[BOMAG Part-No.: 079 948 98]p. 317
Pressure test 1/3 tamper systemp. 317
The correct order of the test steps is mandatory, because otherwise incorrect measuring values may be obtained!p. 317
All test steps must be performed one after the other!p. 317
Fig. 1p. 317
Fig. 1p. 317
1. Raise and lock the screedp. 317
(Fig. 1)p. 317
2. Fully extend right and left hand screeds.p. 317
3. Shut down the engine.p. 317
Fig. 2p. 317
Fig. 2p. 317
Danger of injury!p. 317
Before connecting the pressure gauge make sure that the engine has been shut down!p. 317
4. Connect a high pressure gauge (600 bar) to pressure test port "M" on the pumpp. 317
(Fig. 2)p. 317
The arrangement of hydraulic components is shown in chapter "Hydraulics" under section "Hydraulics overview of components".p. 317
Fig. 3p. 318
Fig. 3p. 318
The pressure relief valve (PRV) is located at the underside of the solenoid valve, which in turn is mounted to the main screedp. 318
(Fig. 3)p. 318
Write down the number of revolutions when turning in the setscrew. This turning in must be reversed later during this procedure.p. 318
5. On the pressure relief valve loosen the counter nut (1) and turn the setscrew (2) completely inp. 318
(Fig. 3)p. 318
Fig. 4p. 318
Fig. 4p. 318
6. Block the propshaft (1) of the tamper motors with a suitable object (e.g. a prybar)p. 318
(Fig. 4)p. 318
Rest the prybar against the screed frame so that it will not hit the frame when tamper operation is switched on!p. 318
Fig. 5p. 318
Fig. 5p. 318
7. Start the engine and set the switch to position "MAX"p. 318
(Fig. 5)p. 318
Fig. 6p. 318
Fig. 6p. 318
8. Activate the hydraulic systemp. 318
(Fig. 6)p. 318
Fig. 7p. 319
Fig. 7p. 319
9. Activate the parking brakep. 319
(Fig. 7)p. 319
Fig. 8p. 319
Fig. 8p. 319
10. Select "Work"-modep. 319
(Fig. 8)p. 319
Fig. 9p. 319
Fig. 9p. 319
Run the following pressure test only for max. 5 seconds.p. 319
11. Switch on the tamperp. 319
(Fig. 9)p. 319
Fig. 10p. 319
Fig. 10p. 319
12. Shift the travel lever to "forward" positionp. 319
(Fig. 10)p. 319
13. Read the hydraulic oil pressure in the pressure gauge.p. 319
14. Shift the travel lever to "Neutral" position.p. 319
Fig. 11p. 320
Fig. 11p. 320
15. Switch of the tamperp. 320
(Fig. 11)p. 320
Fig. 12p. 320
Fig. 12p. 320
Nominal valuep. 320
Nominal valuep. 320
See chapter "Technical Data".p. 320
If the nominal pressure of the pressure relief valve is not reached:p. 320
Adjust the PRV on the tamper motorp. 320
(Fig. 12)p. 320
16. Loosen the counter nut and turn the setscrew in or out, until the nominal value is reachedp. 320
(Fig. 12)p. 320
Turning clockwisep. 320
increasesp. 320
reducesp. 320
17. Check the pressure once again (see above).p. 320
18. Retighten the counter nut.p. 320
Fig. 13p. 320
Fig. 13p. 320
19. Turn the switch to position "MIN" and shut down the enginep. 320
(Fig. 13)p. 320
Danger of injury!p. 320
Before disconnecting the pressure gauge make sure that the engine has been shut down!p. 320
20. Disconnect the pressure gauge.p. 320
21. Remove the blockage (prybar) from the shaft.p. 320
Pressure test 2/3 tamper mobile sectionp. 321
The correct order of the test steps is mandatory, because otherwise incorrect measuring values may be obtained!p. 321
Fig. 14p. 321
Fig. 14p. 321
Danger of injury!p. 321
Before connecting the pressure gauge make sure that the engine has been shut down!p. 321
1. Connect a high pressure gauge (600 bar) to pressure test port "M" on the pumpp. 321
(Fig. 14)p. 321
Fig. 15p. 321
Fig. 15p. 321
2. Pressure relief valvep. 321
(Fig. 15)p. 321
Fig. 16p. 321
Fig. 16p. 321
3. Loosen the counter nut (1) and back out the setscrew (2) by the same amount of turns that you turned it in before (see your own notes)p. 321
(Fig. 16)p. 321
Fig. 17p. 322
Fig. 17p. 322
4. Remove the front covering plate (security) of the mobile section (se chapter: "Screed repair" section: "Disassembling tamper blades").p. 322
5. Block the propshaft (1) of the tamper motors with a suitable object (e.g. a wooden block)p. 322
(Fig. 17)p. 322
Fig. 18p. 322
Fig. 18p. 322
6. Start the engine and set the switch to position "MAX"p. 322
(Fig. 18)p. 322
Fig. 19p. 322
Fig. 19p. 322
7. Activate the hydraulic systemp. 322
(Fig. 19)p. 322
Fig. 20p. 322
Fig. 20p. 322
8. Raise and lock the screedp. 322
(Fig. 20)p. 322
Fig. 21p. 323
Fig. 21p. 323
9. Select "Work"-modep. 323
(Fig. 21)p. 323
Fig. 22p. 323
Fig. 22p. 323
Run the following pressure test only for max. 5 seconds.p. 323
10. Switch on the tamperp. 323
(Fig. 22)p. 323
Fig. 23p. 323
Fig. 23p. 323
11. Shift the travel lever to "forward" positionp. 323
(Fig. 23)p. 323
12. Read the hydraulic oil pressure in the pressure gauge.p. 323
13. Shift the travel lever to "Neutral" position .p. 323
Fig. 24p. 323
Fig. 24p. 323
14. Switch of the tamperp. 323
(Fig. 24)p. 323
Fig. 25p. 324
Fig. 25p. 324
Nominal valuep. 324
Nominal valuep. 324
See chapter "Technical Data".p. 324
If the nominal pressure of the pressure relief valve is not reached:p. 324
Adjust the PRV on the tamper motorp. 324
(Fig. 25)p. 324
15. Loosen the counter nut and turn the setscrew in or out, until the nominal value is reached.p. 324
Turning clockwisep. 324
increasesp. 324
reducesp. 324
16. Check the pressure once again (see above).p. 324
17. Retighten the counter nut.p. 324
Fig. 26p. 324
Fig. 26p. 324
18. Turn the switch to position "MIN" and shut down the enginep. 324
(Fig. 26)p. 324
Danger of injury!p. 324
Before disconnecting the pressure gauge make sure that the engine has been shut down!p. 324
19. Disconnect the pressure gauge.p. 324
20. Remove the blockage (wooden block) from the shaft.p. 324
21. Reinstall the guard (see chapter: “Screed repair”, section: “Installing tanper blades”).p. 324
Pressure test 3/3 tamper main protection (200 bar)p. 325
The correct order of the test steps is mandatory, because otherwise incorrect measuring values may be obtained!p. 325
Fig. 27p. 325
Fig. 27p. 325
Danger of injury!p. 325
Before connecting the pressure gauge make sure that the engine has been shut down!p. 325
1. Connect a high pressure gauge (600 bar) to pressure test port "M" on the pumpp. 325
(Fig. 27)p. 325
Fig. 28p. 325
Fig. 28p. 325
2. Block the propshaft (1) of the tamper motors with a suitable object (e.g. a prybar)p. 325
(Fig. 28)p. 325
Rest the prybar against the screed frame so that it will not hit the frame when tamper operation is switched on!p. 325
Fig. 29p. 325
Fig. 29p. 325
3. Start the engine and set the switch to position "MAX"p. 325
(Fig. 29)p. 325
Fig. 30p. 326
Fig. 30p. 326
4. Activate the hydraulic systemp. 326
(Fig. 30)p. 326
Fig. 31p. 326
Fig. 31p. 326
5. Activate the parking brakep. 326
(Fig. 31)p. 326
Fig. 32p. 326
Fig. 32p. 326
6. Fully extend right and left hand screedsp. 326
(Fig. 32)p. 326
Fig. 33p. 326
Fig. 33p. 326
7. Select "Work"-modep. 326
(Fig. 33)p. 326
Fig. 34p. 327
Fig. 34p. 327
Run the following pressure test only for max. 5 seconds.p. 327
8. Switch on the tamperp. 327
(Fig. 34)p. 327
Fig. 35p. 327
Fig. 35p. 327
9. Shift the travel lever to "forward" positionp. 327
(Fig. 35)p. 327
10. Read the hydraulic oil pressure in the pressure gauge.p. 327
11. Shift the travel lever to "Neutral" position .p. 327
Fig. 36p. 327
Fig. 36p. 327
12. Switch of the tamperp. 327
(Fig. 36)p. 327
Fig. 37p. 327
Fig. 37p. 327
Nominal valuep. 327
Nominal valuep. 327
See chapter "Technical Data".p. 327
If the nominal pressure of the pressure relief valve is not reached:p. 327
Adjust the PRV on the "tamper" valve blockp. 327
(Fig. 37)p. 327
13. Loosen the counter nut (4) and turn the setscrew (3) in or out, until the nominal value is reached.p. 327
Turning clockwisep. 328
increasesp. 328
reducesp. 328
14. Check the pressure once again (see above).p. 328
15. Retighten the counter nut (4).p. 328
Fig. 38p. 328
Fig. 38p. 328
16. Turn the switch to position "MIN" and shut down the enginep. 328
(Fig. 38)p. 328
Danger of injury!p. 328
Before disconnecting the pressure gauge make sure that the engine has been shut down!p. 328
17. Disconnect the pressure gauge.p. 328
18. Remove the blockage (prybar) from the shaft.p. 328
Tamper speed measurementp. 329
Fig. 39p. 329
Fig. 39p. 329
1. Raise and lock the screedp. 329
(Fig. 39)p. 329
2. Fully extend right and left hand screeds.p. 329
3. Shut down the engine.p. 329
Fig. 40p. 329
Fig. 40p. 329
4. Fasten a reflex mark (2) on the shaft (1)p. 329
(Fig. 40)p. 329
Fig. 41p. 329
Fig. 41p. 329
5. Completely close the hand wheel for tamper speedp. 329
(Fig. 41)p. 329
Fig. 42p. 329
Fig. 42p. 329
6. Start the engine and set the switch to position "MAX"p. 329
(Fig. 42)p. 329
Fig. 43p. 330
Fig. 43p. 330
7. Activate the hydraulic systemp. 330
(Fig. 43)p. 330
Fig. 44p. 330
Fig. 44p. 330
8. Activate the parking brakep. 330
(Fig. 44)p. 330
Fig. 45p. 330
Fig. 45p. 330
9. Select "Work"-modep. 330
(Fig. 45)p. 330
Fig. 46p. 330
Fig. 46p. 330
10. Switch on the tamperp. 330
(Fig. 46)p. 330
Fig. 47p. 331
Fig. 47p. 331
11. Shift the travel lever to "forward" positionp. 331
(Fig. 47)p. 331
12. Read the shaft speed.p. 331
Nominal valuep. 331
Nominal valuep. 331
See chapter "Technical Data".p. 331
13. Shift the travel lever to "Neutral" position.p. 331
Fig. 48p. 331
Fig. 48p. 331
14. Switch of the tamperp. 331
(Fig. 48)p. 331
If the nominal value is not reached, you must:p. 331
1. check the tamper pumpp. 331
2. the tamper motorsp. 331
.p. 331
Fig. 49p. 331
Fig. 49p. 331
15. Turn the switch to position "MIN" and shut down the enginep. 331
(Fig. 49)p. 331
16.4 Checking/adjusting the scraper beltsp. 332
Perform measurements at operating temperature of the hydraulic oil (40 °C).p. 332
Special toolsp. 332
Special toolsp. 332
Hydraulic test casep. 332
[BOMAG Part-No.: 079 930 01]p. 332
Digital rpm-meter, optical/mechanical, universal usep. 332
[BOMAG Part-No.: 079 948 98]p. 332
Pressure test scraper beltp. 332
The following section describes the test for thep. 332
leftp. 332
Fig. 1p. 332
Fig. 1p. 332
Danger of injury!p. 332
Before connecting the pressure gauge make sure that the engine has been shut down!p. 332
1. Connect a high pressure gauge (600 bar) to the pressure test port (1) [right: (2)] on the pumpp. 332
(Fig. 1)p. 332
The arrangement of hydraulic components is shown in chapter "Hydraulics" under section "Hydraulics overview of components".p. 332
2. Block the scraper belt with suitable means.p. 332
Fig. 2p. 332
Fig. 2p. 332
3. Start the engine and set the switch to position "MAX"p. 332
(Fig. 2)p. 332
Fig. 3p. 333
Fig. 3p. 333
4. Activate the hydraulic systemp. 333
(Fig. 3)p. 333
Fig. 4p. 333
Fig. 4p. 333
5. Activate the parking brakep. 333
(Fig. 4)p. 333
Fig. 5p. 333
Fig. 5p. 333
6. Select "Work"-modep. 333
(Fig. 5)p. 333
Fig. 6p. 333
Fig. 6p. 333
Run the following pressure test only for max. 5 seconds.p. 333
7. Push the button "a" ("c") downwards and hold it.p. 333
(Fig. 6)p. 333
8. Read the hydraulic oil pressure in the pressure gauge.p. 333
9. Release button "a" ("c").p. 333
Fig. 7p. 334
Fig. 7p. 334
Nominal valuep. 334
Nominal valuep. 334
See chapter "Technical Data".p. 334
If the nominal pressure of the pressure relief valve is not reached:p. 334
1. Adjust the pressure relief valve (PRV) on the "Scraper belt" valve block (see next step).p. 334
2. Solenoid valve (Y206, Y207 (Y208, Y209)) —- —- Check electric power supply and mechanical function.p. 334
3. Check the gear pump ("defect?").p. 334
4. Check the scraper belt motor ("defect?").p. 334
The arrangement of hydraulic components is shown in chapter "Hydraulics" under section "Hydraulics overview of components".p. 334
10. Remove the cap from the PRVp. 334
(Fig. 7)p. 334
11. Loosen the counter nut (1) and turn the setscrew (2) in or out, until the nominal value is reached.p. 334
Turning clockwisep. 334
increasesp. 334
reducesp. 334
12. Check the pressure once again (see above).p. 334
13. Retighten the counter nut (1) and replace the cap.p. 334
Fig. 8p. 334
Fig. 8p. 334
14. Turn the switch to position "MIN" and shut down the enginep. 334
(Fig. 8)p. 334
Danger of injury!p. 334
Before disconnecting the pressure gauge make sure that the engine has been shut down!p. 334
15. Disconnect the pressure gauge.p. 334
16. Remove the blockage from the scraper belt.p. 334
Speed measurement on scraper beltp. 335
The following section describes the test for thep. 335
leftp. 335
Fig. 9p. 335
Fig. 9p. 335
1. Fasten a reflex mark (1) on the shaft (2)p. 335
(Fig. 9)p. 335
Fig. 10p. 335
Fig. 10p. 335
2. Start the engine and set the switch to position "MAX"p. 335
(Fig. 10)p. 335
Fig. 11p. 335
Fig. 11p. 335
3. Activate the hydraulic systemp. 335
(Fig. 11)p. 335
Fig. 12p. 336
Fig. 12p. 336
4. Activate the parking brakep. 336
(Fig. 12)p. 336
Fig. 13p. 336
Fig. 13p. 336
5. Select "Work"-modep. 336
(Fig. 13)p. 336
Fig. 14p. 336
Fig. 14p. 336
6. Push the button "a" ("c") downwards and hold it.p. 336
(Fig. 14)p. 336
Fig. 15p. 336
Fig. 15p. 336
7. Shift the travel lever to "forward" positionp. 336
(Fig. 15)p. 336
8. Read the shaft speed.p. 336
Nominal valuep. 336
Nominal valuep. 336
See chapter "Technical Data".p. 336
9. Shift the travel lever to "Neutral" position.p. 336
10. Release button "a" ("c")p. 336
(Fig. 14)p. 336
If the nominal value is not reached, check the following:p. 336
1. PRV ("defect?")p. 336
2. Solenoid valve (Y206, Y207 (Y208, Y209)) (Check electric power supply and mechanical function)p. 337
3. The gear pump ("defect?").p. 337
4. The scraper belt motor ("defect?").p. 337
The arrangement of hydraulic components is shown in chapter "Hydraulics" under section "Hydraulics overview of components".p. 337
Fig. 16p. 337
Fig. 16p. 337
11. Turn the switch to position "MIN" and shut down the enginep. 337
(Fig. 16)p. 337
16.5 Checking/adjusting the augersp. 338
Perform measurements at operating temperature of the hydraulic oil (40 °C).p. 338
Special toolsp. 338
Special toolsp. 338
Hydraulic test casep. 338
[BOMAG Part-No.: 079 930 01]p. 338
Digital rpm-meter, optical/mechanical, universal usep. 338
[BOMAG Part-No.: 079 948 98]p. 338
Pressure test augersp. 338
The following section describes the test for thep. 338
leftp. 338
Fig. 1p. 338
Fig. 1p. 338
Danger of injury!p. 338
Before connecting the pressure gauge make sure that the engine has been shut down!p. 338
1. Connect a high pressure gauge (600 bar) to pressure test port (1) on the pumpp. 338
(Fig. 1)p. 338
The arrangement of hydraulic components is shown in chapter "Hydraulics" under section "Hydraulics overview of components".p. 338
2. Block the auger with suitable means.p. 338
Fig. 2p. 338
Fig. 2p. 338
3. Start the engine and set the switch to position "MAX"p. 338
(Fig. 2)p. 338
Fig. 3p. 339
Fig. 3p. 339
4. Activate the hydraulic systemp. 339
(Fig. 3)p. 339
Fig. 4p. 339
Fig. 4p. 339
5. Activate the parking brakep. 339
(Fig. 4)p. 339
Fig. 5p. 339
Fig. 5p. 339
6. Select "Work"-modep. 339
(Fig. 5)p. 339
Fig. 6p. 339
Fig. 6p. 339
Run the following pressure test only for max. 5 seconds.p. 339
7. Set the switch “b” (right auger : “c”) downwards.p. 339
(Fig. 6)p. 339
8. Read the hydraulic oil pressure in the pressure gauge.p. 339
9. Turn switch "b" ("c") to position "0".p. 339
Fig. 7p. 340
Fig. 7p. 340
Nominal valuep. 340
Nominal valuep. 340
See chapter "Technical Data".p. 340
If the nominal pressure of the pressure relief valve is not reached:p. 340
1. Adjust the pressure relief valve (PRV) on the "Auger drive" valve block (see next step).p. 340
2. Solenoid valve (Y210, Y211 (right auger: Y212, Y213)) – check electrical control and mechanical function.p. 340
3. Check the gear pump ("defect?").p. 340
4. Check the auger motor ("defect?").p. 340
The arrangement of hydraulic components is shown in chapter "Hydraulics" under section "Hydraulics overview of components".p. 340
10. Remove the cap from the PRVp. 340
(Fig. 7)p. 340
11. Loosen the counter nut (1) and turn the setscrew (2) in or out, until the nominal value is reached.p. 340
Turning clockwisep. 340
increasesp. 340
reducesp. 340
12. Check the pressure once again (see above).p. 340
13. Retighten the counter nut (1) and replace the cap.p. 340
Fig. 8p. 340
Fig. 8p. 340
14. Turn the switch to position "MIN" and shut down the enginep. 340
(Fig. 8)p. 340
Danger of injury!p. 340
Before disconnecting the pressure gauge make sure that the engine has been shut down!p. 340
15. Disconnect the pressure gauge.p. 340
16. Remove the blockage from the auger.p. 340
Rotary speed test augerp. 341
The following section describes the test for one side. The other side must be checked accordingly.p. 341
Fig. 9p. 341
Fig. 9p. 341
1. Fasten a reflex mark (2) on the auger (1)p. 341
(Fig. 9)p. 341
Fig. 10p. 341
Fig. 10p. 341
2. Start the engine and set the switch to position "MAX"p. 341
(Fig. 10)p. 341
Fig. 11p. 341
Fig. 11p. 341
3. Activate the hydraulic systemp. 341
(Fig. 11)p. 341
Fig. 12p. 342
Fig. 12p. 342
4. Activate the parking brakep. 342
(Fig. 12)p. 342
Fig. 13p. 342
Fig. 13p. 342
5. Select "Work"-modep. 342
(Fig. 13)p. 342
Fig. 14p. 342
Fig. 14p. 342
6. Set the switch “b” (right auger : “c”) downwards.p. 342
(Fig. 14)p. 342
Fig. 15p. 342
Fig. 15p. 342
7. Shift the travel lever to "forward" positionp. 342
(Fig. 15)p. 342
8. Read the shaft speed.p. 342
Nominal valuep. 342
Nominal valuep. 342
See chapter "Technical Data".p. 342
9. Shift the travel lever to "Neutral" position.p. 342
10. Turn switch "b" ("c") to position "0".p. 342
If the nominal pressure of the pressure relief valve is not reached:p. 342
1. Check the PRV ("defect?").p. 342
2. Solenoid valve (Y210, Y211 (right auger: Y212, Y213)) – check electrical control and mechanical function.p. 343
3. Check the gear pump ("defect?").p. 343
The arrangement of hydraulic components is shown in chapter "Hydraulics" under section "Hydraulics overview of components".p. 343
Fig. 16p. 343
Fig. 16p. 343
11. Turn the switch to position "MIN" and shut down the enginep. 343
(Fig. 16)p. 343
16.6 Checking/adjusting the main screedp. 344
Perform measurements at operating temperature of the hydraulic oil (40 °C).p. 344
Special toolsp. 344
Special toolsp. 344
Hydraulic test casep. 344
[BOMAG Part-No.: 079 930 01]p. 344
Pressure limitation main screedsp. 344
Fig. 1p. 344
Fig. 1p. 344
Danger of injury!p. 344
Before connecting the pressure gauge make sure that the engine has been shut down!p. 344
1. Connect a high pressure gauge (600 bar) to the pressure test port on the service pumpp. 344
(Fig. 1)p. 344
The arrangement of hydraulic components is shown in chapter "Hydraulics" under section "Hydraulics overview of components".p. 344
Fig. 2p. 344
Fig. 2p. 344
2. Start the engine and set the switch to position "MAX"p. 344
(Fig. 2)p. 344
Fig. 3p. 344
Fig. 3p. 344
3. Activate the hydraulic systemp. 344
(Fig. 3)p. 344
Fig. 4p. 345
Fig. 4p. 345
4. Select "Work"-modep. 345
(Fig. 4)p. 345
Fig. 5p. 345
Fig. 5p. 345
For the following pressure test drive the screed max. 5 seconds against block.p. 345
5. Lift the screed completely and read the pressure gaugep. 345
(Fig. 5)p. 345
Nominal valuep. 345
Nominal valuep. 345
See chapter "Technical Data".p. 345
Fig. 6p. 345
Fig. 6p. 345
If the nominal value of the pressure limitation is not reached, this may have one of the following causes:p. 345
– Pressure relief setting on the service pump not correct –> Adjust the pressure relief valve (PRV) on the service pump.p. 345
– Solenoid valve Y194 dirty or defective –> clean or replacep. 345
(Fig. 6)p. 345
The arrangement of hydraulic components is shown in chapter "Hydraulics" under section "Hydraulics overview of components".p. 345
Fig. 7p. 345
Fig. 7p. 345
6. Loosen the counter nut (2) and turn the setscrew (1) in or out, until the nominal value is reachedp. 345
(Fig. 7)p. 345
Turning clockwisep. 345
increasesp. 345
reducesp. 345
7. Check the pressure once again (see above).p. 345
8. Retighten the counter nut (2).p. 345
Fig. 8p. 346
Fig. 8p. 346
9. Deactivate the hydraulic systemp. 346
(Fig. 8)p. 346
Fig. 9p. 346
Fig. 9p. 346
10. Turn the switch to position "MIN" and shut down the enginep. 346
(Fig. 9)p. 346
Danger of injury!p. 346
Before disconnecting the pressure gauge make sure that the engine has been shut down!p. 346
11. Disconnect the pressure gauge.p. 346
Time measurement for lifting and lowering the main screedp. 347
Fig. 10p. 347
Fig. 10p. 347
1. Start the engine and set the switch to position "MAX"p. 347
(Fig. 10)p. 347
Fig. 11p. 347
Fig. 11p. 347
2. Activate the hydraulic systemp. 347
(Fig. 11)p. 347
Fig. 12p. 347
Fig. 12p. 347
3. Select "Work"-modep. 347
(Fig. 12)p. 347
Fig. 13p. 348
Fig. 13p. 348
4. If necessary lower the screed (1) completelyp. 348
(Fig. 13)p. 348
5. Lift the screed completely and measure the required time.p. 348
5. Liftp. 348
Nominal valuep. 348
Nominal valuep. 348
3-5 secondsp. 348
3-5 secondsp. 348
6. Lower the screed completely and measure the required time.p. 348
6. Lowerp. 348
Nominal valuep. 348
Nominal valuep. 348
3-5 secondsp. 348
3-5 secondsp. 348
If the nominal value is not reached, this may have one of the following causes:p. 348
– Throttle (see hydraulic diagram) dirty –> cleanp. 348
– Valves Y226, Y237, Y228 dirty or defective –> clean as necessary, check electric power supply. Replace if defective.p. 348
– Valve Y194 dirty or defective –> clean if necessary, check electric power supply. Replace if defective.p. 348
– Flow volume from service pump too low –> check the pumpp. 348
The arrangement of hydraulic components is shown in chapter "Hydraulics" under section "Hydraulics overview of components".p. 348
If the nominal value is still not reached despite these measures you may change the size of the throttle:p. 348
– Bigger throttle: The screed movesp. 348
fasterp. 348
– Smaller throttle: The screed movesp. 348
slowerp. 348
Fig. 14p. 348
Fig. 14p. 348
7. Deactivate the hydraulic systemp. 348
(Fig. 14)p. 348
Fig. 15p. 349
Fig. 15p. 349
8. Turn the switch to position "MIN" and shut down the enginep. 349
(Fig. 15)p. 349
16.7 Checking/adjusting the screed levellingp. 350
Perform measurements at operating temperature of the hydraulic oil (40 °C).p. 350
Special toolsp. 350
Special toolsp. 350
Hydraulic test casep. 350
[BOMAG Part-No.: 079 930 01]p. 350
Pressure test screed levellingp. 350
Fig. 1p. 350
Fig. 1p. 350
Danger of injury!p. 350
Before connecting the pressure gauge make sure that the engine has been shut down!p. 350
1. Connect a high pressure gauge (600 bar) to the pressure test port on the service pumpp. 350
(Fig. 1)p. 350
The arrangement of hydraulic components is shown in chapter "Hydraulics" under section "Hydraulics overview of components".p. 350
Fig. 2p. 350
Fig. 2p. 350
2. Start the engine and set the switch to position "MAX"p. 350
(Fig. 2)p. 350
Fig. 3p. 350
Fig. 3p. 350
3. Activate the hydraulic systemp. 350
(Fig. 3)p. 350
Fig. 4p. 351
Fig. 4p. 351
4. Select "Work"-modep. 351
(Fig. 4)p. 351
Fig. 5p. 351
Fig. 5p. 351
For the following pressure test move the screed levelling max. 5 seconds against block.p. 351
5. Lift the screed levelling completely and read the pressure gaugep. 351
(Fig. 5)p. 351
Nominal valuep. 351
Nominal valuep. 351
See chapter "Technical Data".p. 351
Fig. 6p. 351
Fig. 6p. 351
If the nominal value of the pressure limitation is not reached, this may have one of the following causes:p. 351
– Pressure relief setting on the service pump not correct –> Adjust the pressure relief valve (PRV) on the service pump.p. 351
– Solenoid valve Y194 dirty or defective –> clean or replacep. 351
(Fig. 6)p. 351
The arrangement of hydraulic components is shown in chapter "Hydraulics" under section "Hydraulics overview of components".p. 351
Fig. 7p. 351
Fig. 7p. 351
6. Loosen the counter nut (2) and turn the setscrew (1) in or out, until the nominal value is reachedp. 351
(Fig. 7)p. 351
Turning clockwisep. 351
increasesp. 351
reducesp. 351
7. Check the pressure once again (see above).p. 351
8. Retighten the counter nut (2).p. 351
Fig. 8p. 352
Fig. 8p. 352
9. Deactivate the hydraulic systemp. 352
(Fig. 8)p. 352
Fig. 9p. 352
Fig. 9p. 352
10. Turn the switch to position "MIN" and shut down the enginep. 352
(Fig. 9)p. 352
Danger of injury!p. 352
Before disconnecting the pressure gauge make sure that the engine has been shut down!p. 352
11. Disconnect the pressure gauge.p. 352
Time measurement screed levellingp. 353
Fig. 10p. 353
Fig. 10p. 353
1. Start the engine and set the switch to position "MAX"p. 353
(Fig. 10)p. 353
Fig. 11p. 353
Fig. 11p. 353
2. Activate the hydraulic systemp. 353
(Fig. 11)p. 353
Fig. 12p. 353
Fig. 12p. 353
3. Select "Work"-modep. 353
(Fig. 12)p. 353
Fig. 13p. 353
Fig. 13p. 353
4. If necessary lower the drawing arms completelyp. 353
(Fig. 13)p. 353
5. Lift the drawing arms completely and measure the required time.p. 353
5. Liftp. 353
Nominal valuep. 353
Nominal valuep. 353
27-29 secondsp. 353
27-29 secondsp. 353
6. Lower the drawing arms completely and measure the required time.p. 353
6. Lowerp. 353
Nominal valuep. 353
Nominal valuep. 353
23-25 secondsp. 353
23-25 secondsp. 353
If the nominal value is not reached, this may have one of the following causes:p. 354
– Throttle (see hydraulic diagram) dirty –> cleanp. 354
– Valves Y220, Y221, Y222, Y223 dirty or defective –> clean as necessary, check electric power supply. Replace if defective.p. 354
– Valve Y194 dirty or defective –> clean if necessary, check electric power supply. Replace if defective.p. 354
– Flow volume from service pump too low –> check the pumpp. 354
The arrangement of hydraulic components is shown in chapter "Hydraulics" under section "Hydraulics overview of components".p. 354
If the nominal value is still not reached despite these measures you may change the size of the throttle:p. 354
– Bigger throttle: The levelling cylinder movesp. 354
fasterp. 354
– Smaller throttle: The levelling cylinder movesp. 354
slowerp. 354
Fig. 14p. 354
Fig. 14p. 354
7. Deactivate the hydraulic systemp. 354
(Fig. 14)p. 354
Fig. 15p. 355
Fig. 15p. 355
8. Turn the switch to position "MIN" and shut down the enginep. 355
(Fig. 15)p. 355
16.8 Checking/adjusting the hopper wingsp. 356
Perform measurements at operating temperature of the hydraulic oil (40 °C).p. 356
Special toolsp. 356
Special toolsp. 356
Hydraulic test casep. 356
[BOMAG Part-No.: 079 930 01]p. 356
Pressure test for hopper wingsp. 356
Fig. 1p. 356
Fig. 1p. 356
Danger of injury!p. 356
Before connecting the pressure gauge make sure that the engine has been shut down!p. 356
1. Connect a high pressure gauge (600 bar) to the pressure test port on the service pumpp. 356
(Fig. 1)p. 356
The arrangement of hydraulic components is shown in chapter "Hydraulics" under section "Hydraulics overview of components".p. 356
Fig. 2p. 356
Fig. 2p. 356
2. Start the engine and set the switch to position "MAX"p. 356
(Fig. 2)p. 356
Fig. 3p. 356
Fig. 3p. 356
3. Activate the hydraulic systemp. 356
(Fig. 3)p. 356
Fig. 4p. 357
Fig. 4p. 357
4. Select "Work"-modep. 357
(Fig. 4)p. 357
Fig. 5p. 357
Fig. 5p. 357
For the following pressure test move the hopper wings max. 5 seconds against block.p. 357
5. Close the hopper wings completely and read the pressure gaugep. 357
(Fig. 5)p. 357
Nominal valuep. 357
Nominal valuep. 357
See chapter "Technical Data".p. 357
Fig. 6p. 357
Fig. 6p. 357
If the nominal value of the pressure limitation is not reached, this may have one of the following causes:p. 357
– Pressure relief setting on the service pump not correct –> Adjust the pressure relief valve (PRV) on the service pump.p. 357
– Solenoid valve Y194 dirty or defective –> clean or replacep. 357
(Fig. 6)p. 357
The arrangement of hydraulic components is shown in chapter "Hydraulics" under section "Hydraulics overview of components".p. 357
Fig. 7p. 357
Fig. 7p. 357
6. Loosen the counter nut (2) and turn the setscrew (1) in or out, until the nominal value is reachedp. 357
(Fig. 7)p. 357
Turning clockwisep. 357
increasesp. 357
reducesp. 357
7. Check the pressure once again (see above).p. 357
8. Retighten the counter nut (2).p. 357
Fig. 8p. 358
Fig. 8p. 358
9. Deactivate the hydraulic systemp. 358
(Fig. 8)p. 358
Fig. 9p. 358
Fig. 9p. 358
10. Turn the switch to position "MIN" and shut down the enginep. 358
(Fig. 9)p. 358
Danger of injury!p. 358
Before disconnecting the pressure gauge make sure that the engine has been shut down!p. 358
11. Disconnect the pressure gauge.p. 358
Testing the hopper wing movement timep. 359
Fig. 10p. 359
Fig. 10p. 359
1. Start the engine and set the switch to position "MAX"p. 359
(Fig. 10)p. 359
Fig. 11p. 359
Fig. 11p. 359
2. Activate the hydraulic systemp. 359
(Fig. 11)p. 359
Fig. 12p. 359
Fig. 12p. 359
3. Select "Work"-modep. 359
(Fig. 12)p. 359
Fig. 13p. 360
Fig. 13p. 360
4. If necessary open the hopper wings completelyp. 360
(Fig. 13)p. 360
5. Close the hopper wing completely and measure the required time.p. 360
5. Closep. 360
Nominal valuep. 360
Nominal valuep. 360
4-5 secondsp. 360
4-5 secondsp. 360
6. Open the hopper wing completely and measure the required time.p. 360
6. Openp. 360
Nominal valuep. 360
Nominal valuep. 360
5-6 secondsp. 360
5-6 secondsp. 360
If the nominal value is not reached, this may have one of the following causes:p. 360
– Throttles (see hydraulic diagram) dirty –> cleanp. 360
– Valves Y202, Y203, Y204, Y205 dirty or defective –> clean as necessary, check electric power supply. Replace if defective.p. 360
– Valve Y194 dirty or defective –> clean if necessary, check electric power supply. Replace if defective.p. 360
– Flow volume from service pump too low –> check the pumpp. 360
The arrangement of hydraulic components is shown in chapter "Hydraulics" under section "Hydraulics overview of components".p. 360
If the nominal value is still not reached despite these measures you may change the size of the throttles:p. 360
– Bigger throttle: The hopper wings movep. 360
fasterp. 360
– Smaller throttle: The hopper wings movep. 360
slowerp. 360
Fig. 14p. 360
Fig. 14p. 360
7. Deactivate the hydraulic systemp. 360
(Fig. 14)p. 360
Fig. 15p. 361
Fig. 15p. 361
8. Turn the switch to position "MIN" and shut down the enginep. 361
(Fig. 15)p. 361
16.9 Checking/adjusting the mobile screedp. 362
Perform measurements at operating temperature of the hydraulic oil (40 °C).p. 362
Special toolsp. 362
Special toolsp. 362
Hydraulic test casep. 362
[BOMAG Part-No.: 079 930 01]p. 362
Pressure limitation mobile screedsp. 362
Fig. 1p. 362
Fig. 1p. 362
Danger of injury!p. 362
Before connecting the pressure gauge make sure that the engine has been shut down!p. 362
1. Connect a high pressure gauge (600 bar) to the pressure test port on the service pumpp. 362
(Fig. 1)p. 362
The arrangement of hydraulic components is shown in chapter "Hydraulics" under section "Hydraulics overview of components".p. 362
Fig. 2p. 362
Fig. 2p. 362
2. Start the engine and set the switch to position "MAX"p. 362
(Fig. 2)p. 362
Fig. 3p. 362
Fig. 3p. 362
3. Activate the hydraulic systemp. 362
(Fig. 3)p. 362
Fig. 4p. 363
Fig. 4p. 363
4. Select "Work"-modep. 363
(Fig. 4)p. 363
Fig. 5p. 363
Fig. 5p. 363
For the following pressure test drive the mobile screeds max. 5 seconds against block.p. 363
Perform the pressure test by RETRACTING the mobile screed. In this case the bending forces acting on the screed are lower!p. 363
5. Completelyp. 363
5. Completelyp. 363
retractp. 363
(Fig. 5)p. 363
Nominal valuep. 363
Nominal valuep. 363
See chapter "Technical Data".p. 363
Fig. 6p. 363
Fig. 6p. 363
If the nominal value of the pressure limitation is not reached, this may have one of the following causes:p. 363
– Pressure relief setting on the service pump not correct –> Adjust the pressure relief valve (PRV) on the service pump.p. 363
– Solenoid valve Y194 dirty or defective –> clean or replacep. 363
(Fig. 6)p. 363
The arrangement of hydraulic components is shown in chapter "Hydraulics" under section "Hydraulics overview of components".p. 363
Fig. 7p. 364
Fig. 7p. 364
6. Loosen the counter nut (2) and turn the setscrew (1) in or out, until the nominal value is reachedp. 364
(Fig. 7)p. 364
Turning clockwisep. 364
increasesp. 364
reducesp. 364
7. Check the pressure once again (see above).p. 364
8. Retighten the counter nut (2).p. 364
Fig. 8p. 364
Fig. 8p. 364
9. Deactivate the hydraulic systemp. 364
(Fig. 8)p. 364
Fig. 9p. 364
Fig. 9p. 364
10. Turn the switch to position "MIN" and shut down the enginep. 364
(Fig. 9)p. 364
Danger of injury!p. 364
Before disconnecting the pressure gauge make sure that the engine has been shut down!p. 364
11. Disconnect the pressure gauge.p. 364
Time measurement for extension and retraction of mobile screedsp. 365
Fig. 10p. 365
Fig. 10p. 365
1. Start the engine and set the switch to position "MAX"p. 365
(Fig. 10)p. 365
Fig. 11p. 365
Fig. 11p. 365
2. Activate the hydraulic systemp. 365
(Fig. 11)p. 365
Fig. 12p. 365
Fig. 12p. 365
3. Select "Work"-modep. 365
(Fig. 12)p. 365
Fig. 13p. 366
Fig. 13p. 366
4. If necessary retract the mobile screed completelyp. 366
(Fig. 13)p. 366
5. Fullyp. 366
5. Fullyp. 366
extendp. 366
Nominal valuep. 366
Nominal valuep. 366
15-17 secondsp. 366
15-17 secondsp. 366
6. Fullyp. 366
6. Fullyp. 366
retractp. 366
Nominal valuep. 366
Nominal valuep. 366
12-14 secondsp. 366
12-14 secondsp. 366
If the nominal value is not reached, this may have one of the following causes:p. 366
– Throttle (see hydraulic diagram) dirty –> cleanp. 366
– Valves Y216, Y217, Y218, Y219 dirty or defective –> clean as necessary, check electric power supply. Replace if defective.p. 366
– Valve Y194 dirty or defective –> clean if necessary, check electric power supply. Replace if defective.p. 366
– Flow volume from service pump too low –> check the pumpp. 366
The arrangement of hydraulic components is shown in chapter "Hydraulics" under section "Hydraulics overview of components".p. 366
If the nominal value is still not reached despite these measures you may change the size of the throttle:p. 366
– Bigger throttle: The mobile screed movesp. 366
fasterp. 366
– Smaller throttle: The mobile screed movesp. 366
slowerp. 366
Fig. 14p. 366
Fig. 14p. 366
7. Deactivate the hydraulic systemp. 366
(Fig. 14)p. 366
Fig. 15p. 367
Fig. 15p. 367
8. Turn the switch to position "MIN" and shut down the enginep. 367
(Fig. 15)p. 367
17 Central lubrication systemp. 369
BF 300P lubrication planp. 370
BF 300P lubrication points on screed without tamperp. 370
BF 300P lubrication points on screed with tamperp. 371
After a running-in phase of 100 hours and after inspection of all lubrication points the lubrication intervals can be extended or reduced, as required.p. 372
The cycle time must not be changed.p. 372
Fig. 16p. 372
Pump revolutions:p. 372
60p. 372
Cycle timep. 372
0.5 hoursp. 372
Greasep. 372
lithium saponified multi-purpose grease, NLGI3p. 372
Filling the lubricant containerp. 373
Fig. 1 Filler couplingp. 373
(Fig. 1) Through filler coupling.p. 373
(Fig. 1)p. 373
Fig. 2 Grease gunp. 373
(Fig. 2) With grease gunp. 373
(Fig. 2)p. 373
Fig. 3 Grease nipplep. 373
(Fig. 3) Through grease nipple with hand-operated or pneumatic grease gunp. 373
(Fig. 3)p. 373
17.3 Electric pumpp. 374
Electric pump EP-1p. 374
The central lubrication grease pump is electrically driven. With a working pressure of max. 280 bar (setting of high pressure relief valve) this pump is suitable for pumping conventional greases up to NLGI-Kl. 2.p. 374
Fig. 4 EP-1 with 4 kg container and integrated electronic controlp. 374
Technical dadap. 374
Motor:p. 374
Operating voltagep. 374
12/24 V DCp. 374
Rated speedp. 374
15 rpmp. 374
Power consumption at idle speedp. 374
0.4 Ap. 374
Power consumption at full load speedp. 374
1.1 Ap. 374
Fusep. 374
3 Ap. 374
Pump:p. 374
Max. operating pressurep. 374
280 barp. 374
Permissible operating temperaturep. 374
-35°C to +80°Cp. 374
Container capacityp. 374
1.9 kg, 2.5 kg, 4 kg or 8 kgp. 374
Rotation of agitatorp. 374
counter-clockwisep. 374
Installation positionp. 374
Container vertically uprightp. 374
Protection classp. 374
IP5K9K acc. to DIN 40050p. 374
Working principlep. 375
Fig. 5p. 375
A DC-motor 10p. 375
(Fig. 5)p. 375
The agitator (2) forces the lubricant out of the provision container (1) through a screen plate (4 to the suction area in the pump housing (3), whereby air bubbles are eliminated A scraper on the agitator (2) enables visual inspection of the still av…p. 375
The pressure relief valve (9) is factory set to 280 bar.p. 375
Fig. 6 Pump element drawing in greasep. 375
Fig. 7 Pump element pumpingp. 375
Pump element PE-120Vp. 376
Max. flow capacityp. 376
Pump element factory set to full strokep. 376
max. flow capacity 0.12 cm with full strokep. 376
Reduction of 0.013 cm per detent = 1/2 revolutionp. 376
Flow capacity regulation:p. 376
Unscrew the plug 2p. 376
(Fig. 8)p. 376
The setscrew (3) is then regulated with a screwdriverp. 376
Turning clockwise reduces the flow capacityp. 376
Turn anti-clockwise increases the flow capacityp. 376
Max. stroke of setscrew is 2.4 mm = 6 detents.p. 376
1 turn of the setscrew is 0.8 mm = 2 detentsp. 376
Tighten the plug (2) with the seal ring.p. 376
Technical data:p. 376
Max. flow capacityp. 376
0.04 to 0.12 cmp. 376
3p. 376
Flow capacity regulationp. 376
6 detents per 1/2 turnp. 376
Reductionp. 376
0.013 cmp. 376
3p. 376
Piston returnp. 376
forcedp. 376
Fig. 8p. 376
Fig. 9p. 376
Installation of pump elementp. 377
Installation and removal only with the pump stopped.p. 377
Assembly of the pump element with the piston (4) partly pulled out, insert upwards under a slanted angle into the housing borep. 377
(Fig. 10)p. 377
Once the piston head touches the pressing ring – move the element to horizontal positionp. 377
(Fig. 11)p. 377
The piston head must run in the groove of the guide ring.p. 377
Tighten the pump element.p. 377
Disassemble in reverse order.p. 377
When disassembling the pump element make sure that the piston (4) does not remain in the pump housing.p. 377
Fig. 10p. 377
Fig. 11p. 377
17.4 Integrated electronic controlp. 378
The control unit is equipped with a data memory which logs the following values:p. 378
Control typep. 378
Control typep. 378
Version of control serial numberp. 378
Manufacturing datep. 378
Type of operation (time or speed control)p. 378
Settings (setting ranges).p. 378
Functional sequencep. 378
After switching on the ignition the green and red LEDs light up for 1.5 seconds to indicate readiness for operation (switch-on control), irrespective of the set program.p. 378
Each initial connection of the control triggers a lubrication process, the green LED 2p. 378
(Fig. 12)p. 378
The integrated electronic control unit BEKA-troniX1 is equipped with a data log. This, among other, serves the purpose of logging expired times. If the ignition is interrupted during a lubrication process or within a pause period, this time is stoppe…p. 378
With the ignition switched on intermediate lubrication can be triggered at any time by pressing the push button (1) on the side of the motor housing, this function also serve the purpose of function testing. The pump in this case immediately starts a…p. 378
Fig. 12p. 378
1 Push button to trigger intermediate lubricationp. 378
2 Green LED to indicate functionp. 378
3 Red LED to indicate faultsp. 378
Technical data:p. 378
Supply voltagep. 378
10 to 60 V DCp. 378
Current load max.p. 378
6.0 Ap. 378
Fuse (not contained in the unit)p. 378
6.3 Ap. 378
Output for signal lampp. 378
0.4 Ap. 378
Temperature rangep. 378
-35°C to +75°Cp. 378
Protection classp. 378
IP 65p. 378
Summary of signal displaysp. 379
Modes of operationp. 379
A) Timer controlp. 379
With time dependent control of a central lubrication system both the cycle time and the lubrication time can be adjusted. Cycle time means the time span between beginning of a lubrication process to the beginning of the next lubrication process.p. 379
Fig. 13p. 379
B) RPM-controlp. 379
With the integrated electronic control unit one can, e.g. in case of speed fluctuations caused by low temperatures or high torques, also determine the lubrication period on the basis of the number of revolutions of the pump motor.p. 379
A sliding contact connects the pump motor with the control. Each pump revolution sends a signal to the control, which in turn counts the number of arriving signals.p. 379
If no signals are received from the pump motor over an adjustable monitoring time (standard 30 sec.) after the beginning of the lubrication process, the control will indicate a fault.p. 379
The red LED in the inspection window in the bottom motor shell of the pump or an externally installed signal lamp (option) will start to flash.p. 379
Summary of signal displaysp. 379
Setting parametersp. 379
The cycle or lubrication times can be set with the help of maintained-contact switches in the inspection window of the control.p. 379
Fig. 14p. 379
For setting the time disassemble the red frame from the motor protection housing of the pump using a flat screwdriverp. 379
(Fig. 14)p. 379
The cycle or lubrication time can be set with a flat screwdriver.p. 379
The cycle time must not be changed.p. 379
In case of improper closing of the cover water will seep into the control and cause damage. In this case any warranty will become null and void.p. 379
Fig. 15p. 379
1 Connection of system diagnosep. 379
2 Maintained-contact switch to set the lubrication timep. 379
3 Maintained-contact switch to set the cycle timep. 379
Lubrication times:p. 380
1 to 16 min. (16 contacts for 1 min. each)p. 380
2 to 32 min. (16 contacts for 2 min. each)p. 380
2 to 32 sec. (16 contacts for 2 sec. each)p. 380
Cycle times:p. 380
0.5 to 8 h (16 contacts for 0.5 h each)p. 380
2 to 32 min. (16 contacts for 2 min. each)p. 380
2 to 32 h (16 contacts for 2 h each)p. 380
Pump revolutions:p. 380
1 to 16 revolutions (16 contacts for 1 revolution each)p. 380
10 to 160 revolutions (16 contacts for 10 revolution each)p. 380
170 to 320 revolutions (16 contacts for 10 revolution each)p. 380
Summary of signal displaysp. 380
Two control LEDs (green/red) in the inspection window of the motor shell show the functions of the pump, whereby the red LED always indicates a fault in the program sequence.p. 380
Fig. 1 Indication of functional readinessp. 380
1 Red LED to indicate faultsp. 380
2 Green LED to indicate functionp. 380
a) Functional readinessp. 380
Fig. 2 Indication of functional readinessp. 380
b) Lubrication activep. 380
Fig. 3 Lubrication sequencep. 380
c) Rotary speed faultp. 380
Fig. 4 Rotary speed fault on pump motorp. 380
d) Fault CPU/memoryp. 380
Fig. 5 Fault CPU/memoryp. 380
e) Test lubrication (permanent lubrication)p. 380
Fig. 6 Test lubricationp. 380
In order to be able to trigger permanent lubrication for service purposes in "Timer controlled" mode, the lubrication time must be set to a value that is higher than the cycle time.p. 380
Terminal diagramp. 381
Fig. 7p. 381
(No. …) = Cable no. for mono-colour cablep. 381
17.5 Progressive distributorp. 382
The progressive distributor can be employed as main or a secondary distributor.p. 382
Progressive piston distributors are distributor units with a hydraulic sequence control the pistons of which are controlled by the fed lubricant in such a way that the lubricant is forced successively to the individual outlets. In case of disturbance…p. 382
The progressive distributors are manufactured in a variable disc design. This has the advantage that the distributor can be extended or shortened, depending on the number of lubrication points. This disc design also provides the possibility to custom…p. 382
The different displacements per piston stroke are achieved by different piston diameters.p. 382
For correct functioning a progressive distributor requires at least three pistons, i.e. at lest three pumping elements.p. 382
Technical data:p. 382
Operating pressure at inletp. 382
max. 300 barp. 382
Temperature rangep. 382
-35°C to + 80°Cp. 382
Number of elementsp. 382
Min. 3 piston elements, Max. 12 piston elementsp. 382
Fig. 8 Example: 4 piston elements and 8 outletsp. 382
In detail the progressive distributor consists of a start element (without piston), a middle element ME and an end element EE, which are held together as distributor blocks by tie rods (socket head cap screws) with serrated washers. The individual el…p. 382
Element designationp. 382
Max. flow capacityp. 382
Pistonp. 382
Pistonp. 382
Æp. 382
Æp. 382
per outletp. 382
per outletp. 382
per elementp. 382
per elementp. 382
MX- F25p. 382
MX- F25p. 382
25 mm3p. 382
25 mmp. 382
3p. 382
50 mm3p. 382
50 mmp. 382
3p. 382
3 mmp. 382
3 mmp. 382
MX- F45p. 382
MX- F45p. 382
45 mm3p. 382
45 mmp. 382
3p. 382
90 mm3p. 382
90 mmp. 382
3p. 382
4 mmp. 382
4 mmp. 382
MX- F75p. 382
MX- F75p. 382
75 mm3p. 382
75 mmp. 382
3p. 382
150 mm3p. 382
150 mmp. 382
3p. 382
5 mmp. 382
5 mmp. 382
MX- F105p. 382
MX- F105p. 382
105 mm3p. 382
105 mmp. 382
3p. 382
210 mm3p. 382
210 mmp. 382
3p. 382
6 mmp. 382
6 mmp. 382
Description of functionp. 383
Lubricant flows into the distributor inlet port through all distributor discs to piston Ip. 383
(Fig. 1)p. 383
(Fig. 2)p. 383
Then the metering pistons (II) and (III) are displaced in succession and lubricant is delivered to outlets 2 and 3. After displacing piston (III) lubricant is delivered to the left side of pumping piston (I)p. 383
(Fig. 3)p. 383
Then the metering pistons (II) and (III) are displaced in succession and lubricant is pressed to outlets 5 and 6.p. 383
After the displacement of pumping piston (III) the lubricant is once again guided to the right side of the pumping pistonp. 383
(Fig. 1)p. 383
Fig. 1p. 383
Fig. 2p. 383
Fig. 3p. 383
Connection of 2 outletsp. 384
For large lubrication points it may be necessary to join two or more outlets on the progressive distributor together.p. 384
The individual discs of the progressive distributor have two outlets.p. 384
When connecting two outlets on the progressive distributor, both outlets of one disc are joined together. For this purpose the sealing screw, which separates both sides, is removed and a plug is screwed into the side to be closed. The metered quantit…p. 384
2 outlets per distributor elementp. 384
(Fig. 4)p. 384
Fig. 4 2 outletsp. 384
1 Sealing screwp. 384
1 outlet per distributor elementp. 384
(Fig. 5)p. 384
Fig. 5 1 outletp. 384
1 Plugp. 384
1 Plugp. 384
For connecting outlets, plugs are required.p. 384
Connection of several outletsp. 384
Connection of outlets with bridging pipes without outletp. 384
Should the total metering quantity exceed the capacity of the outlets connected in one disc of the progressive distributor, e.g. for extremely big lubrication points or for main distributors, there is a possibility to join the outlets of several dist…p. 384
(Fig. 6)p. 384
Fig. 6 Bridging pipep. 384
3 outlets joined togetherp. 384
(Fig. 7)p. 384
In this case two distributor discs are connected with a bridging pipe or a distributor bridge without outlet, as described hereunder. Depending on the element from which the sealing screw 1p. 384
(Fig. 7)p. 384
The metered quantity is calculated on the basis of the metering parameters for all joined piston sides.p. 384
Fig. 7 3 outletsp. 384
1 Sealing screwp. 384
4 outlets joined togetherp. 384
(Fig. 8)p. 384
With the help of a bridging pipe or a distributor bridge without outlet you can even join four outlets. For this purpose the sealing screws must be removed from both distributor discs and one of the two outlets opposite the bridging pipe or the distr…p. 384
Fig. 8 4 outletsp. 385
Distributor bridge without outletp. 385
Distributor bridge without check valvep. 385
(Fig. 9)p. 385
Fig. 9 without check valvep. 385
Distributor bridge with integrated check valvep. 385
In order to ensure proper functioning of a progressive distributor with three delivering elements but only two outletsp. 385
(Fig. 10)p. 385
(Fig. 11)p. 385
Fig. 10p. 385
Fig. 11 with check valvep. 385
Connection of outlets with distributor bridges with outletp. 386
Fig. 12 Distributor bridge with outletp. 386
2 outlets joined togetherp. 386
(Fig. 13)p. 386
If two outlets (on different, adjacent distributor discs) are to be joined together, the sealing screws must not be unscrewed from any of the affected distributor discs. The delivery from both outlets in this case emerges from the outlet on the distr…p. 386
Fig. 13 2 outletsp. 386
3 outlets joined togetherp. 386
(Fig. 14)p. 386
If three outlets are to be joined together, the sealing screw must be unscrewed from one of the two affected distributor discs and a plug must be screwed into the free outlet on this distributor disc. The delivery from all three outlets in this case …p. 386
Fig. 14 3 outletsp. 386
4 outlets joined togetherp. 386
(Fig. 15)p. 386
If four outlets are to be joined together, the sealing screws must be unscrewed from both distributor discs the plugs must be screwed into the outlets opposite the distribuitor bridge. The delivery from all four outlets in this case emerges from the …p. 386
Fig. 15 4 outletsp. 386
Check valvesp. 387
The check valves are used in combination with high pressure hoses, e.g. on lubrication points with high counter pressure or in main distributors.p. 387
There are two versions of check valves available, on which the pipe socket is screwed in.p. 387
Check valve for main distributorp. 387
(Fig. 16)p. 387
Fig. 16p. 387
1 Cap screwp. 387
1 Cap screwp. 387
2 Duplex ringp. 387
Check valve for secondary distributorp. 387
(Fig. 17)p. 387
Fig. 17p. 387
1 Cap nut and cutting ringp. 387
17.6 Fault – Cause – Remedyp. 388
Faultp. 388
Faultp. 388
Causep. 388
Causep. 388
Remedyp. 388
Remedyp. 388
Pump does not workp. 388
Integrated electronic control defectivep. 388
Replace the lower part of the motor protection housingp. 388
Electric line interruptedp. 388
Replace the electric linep. 388
Pump defectivep. 388
Replace the pumpp. 388
Pump works, but does not deliverp. 388
Air cushion in pumping pistonp. 388
Vent the pumpp. 388
Vent the pumpp. 388
Min. filling level fallen short ofp. 388
Fill up the provision containerp. 388
Pump element defectivep. 388
Replace the pump elementp. 388
No grease collar at the lubrication pointsp. 388
Pump does not workp. 388
See "Pump does not work"p. 388
Pause time too long or lubrication period too shortp. 388
Reduce pause time or extend lubrication timep. 388
System blockedp. 388
See "Grease emerging from pressure relief valve"p. 388
No grease collars at various lubrication pointsp. 388
Supply line to secondary distributor burst or leakingp. 388
Replace the linep. 388
Screw fittings leakingp. 388
Retighten or replace screw fittingp. 388
No grease collar on one lubrication pointp. 388
Corresponding grease line burst or leakingp. 388
Replace the linep. 388
Screw fitting leakingp. 388
Retighten or replace screw fittingp. 388
Pump speed too lowp. 388
High system pressure or low ambient temperaturep. 388
Check system / bearing pointp. 388
No damage (perform 1 or 2 intermediate lubrication cycles)p. 388
Grease emerging from pressure relief valvep. 388
System pressure too highp. 388
Check systemp. 388
Check systemp. 388
Progressive distributor blockedp. 388
Replace the distributorp. 388
System blockedp. 388
Repair blocked / seized bearing pointsp. 388
Valve spring defectivep. 388
Replace the pressure relief valvep. 388
LED-displayp. 388
LED-displayp. 388
The LED of the control flashes or is permanently onp. 388
See "Summary of signal displays"p. 388
Cause for a blockage in the systemp. 388
A crushed or blocked lubricant linep. 388
A bearing overfilled with lubricant or blockedp. 388
An unsuitable lubricant for central lubrication systemsp. 388
A blocked distributor outletp. 388
A blocked distributorp. 388
Indication of a blockagep. 388
Grease emerging from pressure relief valvep. 388
Identify the location of the blockagep. 389
All repair work must be carried out with utmost cleanliness.p. 389
Fig. 18p. 389
1.) Unscrew the main line from the main distributor, operate the pump and check whether lubricant is delivered properly.p. 389
2.) Unscrew the cap screws on the distributor one after the other and operate the pump each time a cap screw is removed. The line (cap screw) at which the pressure drops, is the blocked line or lubrication point.p. 389
3.) Follow the same principle when checking the associated secondary distributor all the way to the lubrication point.p. 389
Fig. 19 KIT to check central lubrication systemsp. 389
Repair of a blocked distributorp. 390
All repair work must be carried out with utmost cleanliness.p. 390
Fig. 20 Examplep. 390
Remove the distributor from the system. .p. 390
Note the sequence of distributor discs.p. 390
Remove the draw bars 1p. 390
(Fig. 20)p. 390
Take off the distributor disc(s).p. 390
Pistons are not exchangeable among each other .p. 390
If piston and bores in the distributor disc show deposits of hardened grease, these deposits must be removed by washing or blowing out. The bores in the distributor disc must be free of grease residues.p. 390
Grease getting hard indicates that the grease is not suitable for central lubrication systems.p. 390
Unscrew the plugs from the piston bores (2) and slide the pistons from side to side (do not push out).p. 390
Screw the plugs back in.p. 390
Check the next distributor disc, until the blocked piston is found.p. 390
the piston of the blocked distributor disc out and check the bore in the distributor disc and the surface of the piston for scratches and damage.p. 390
In case of severe damage replace the distributor disc.p. 390
Once all distributor discs have been checked reassemble the distributor in the recorded sequence.p. 390
To prevent jamming of the pistons tighten the draw bars with 12 Nm.p. 390
Check function of the distributor.p. 390
18 Suppliers documentationp. 391
18.1 Travel pumpp. 393
18.2 Travel pumpp. 423
18.3 Steering and working pumpp. 481
18.4 Travel motorp. 511
18.5 Scraper belt / screw motorp. 605
18.6 Scraper belt / screw motorp. 619
18.7 Steering valvep. 637
19 Circuit diagramsp. 653
2p. 654
2p. 655
2p. 655
19.1 Hydraulic diagramp. 655
2p. 669
2p. 669
19.2 Electric circuit diagramsp. 669

Kubota V 3307 T Diesel Engine Servicing & Governor Systems

The powertrain section provides deep diagnostic and repair coverage for the Kubota V 3307 T water-cooled, 4-cylinder turbocharged diesel engine rated at 55.4 kW (75 HP) at 2200 rpm. The text outlines the architectural characteristics of the dual crankcase design, linerless cylinder construction, semi-floating valve cover with vibration dampening seals, and the Center Direct Injection System (E-CDIS) featuring four valves per cylinder and vertically centered two-stage injection nozzles. Technicians are provided with complete maintenance procedures, including valve lash adjustment (intake and exhaust clearances specified at 0.15 ± 0.02 mm cold), injection nozzle pressure testing (Phase 1 opening at 186 bar, Phase 2 opening at 225 bar, and seat leak tightness testing at 166 bar), along with timing verification and injection pump service.

Special focus is placed on the cooling circuit’s flow-control thermostat engineered with an integrated bypass recess to eliminate temperature overshooting and water temperature hunting during variable paving loads. The manual details bench-testing the thermostat in an agitated water bath (stroke initiation at 74.5°C to 78.5°C, reaching full stroke of ~8 mm at 90°C), radiator fin cleaning, and anti-freeze formulation (50% ethylene glycol). In the fuel delivery system, the mechanical multi-function governor is broken down across all operational phases: cold starting spring enrichment, idle stabilization (900 ± 100 rpm), high idle regulation (2300 ± 50 rpm), peak torque control, and engine shut-down solenoid (Y58) dual-coil testing (pick-up winding at ~0.38 Ω and holding winding at ~16 Ω). A comprehensive engine troubleshooting table details causes and corrective actions for hard starting, irregular running, excessive exhaust smoke, low oil pressure, and overheating.

ESX Electronic Control Unit, CAN-Bus Architecture & Metrology

Modern road finishers rely heavily on digital network integration. This Bomag BF 300 P service manual details the electronic control architecture centered around the 68-pole ESX micro-controller module (MC). Technicians learn the exact separation between chassis battery ground (terminal 31) and sensitive analog sensor ground (AGND), Pulse Width Modulation (PWM) duty cycles for proportional solenoid valves, and the implementation of dither frequencies to prevent valve spool stick-slip friction. Clear wiring loom overviews detail engine harnesses, preheating circuits, hydraulic valve manifolds, operator station looms, and screed control consoles.

Crucial diagnostic methodology is outlined for the 68-pole ESX controller, including precise test protocols using dummy load lamps (12V/21W) and high-impedance multimeters to verify voltage drop limits (maximum allowable drop ≤ 0.5V) across power supply pins (Pin 28 ignition feed, Pin 54 emergency stop enable, Pin 55 ground, and output bank Pins 56 through 60). Component servicing sections guide mechanics through the repair and testing of the three-phase charging generator, electronic voltage regulator, planetary reduction starter motor (pinion wear limits, commutator minimum diameter of 31.4 mm, and brush minimum length of 11.0 mm), Telemecanique switch blocks, inductive proximity switches, and water-tight Deutsch DT/DTM plug pinning and terminal extraction.

Dashboard Input Codes, System Teaching & Calibration Routines

A standout technical feature of this Bomag 008 917 45 service manual is the complete documentation of instrument cluster input codes. Rather than requiring proprietary external dealer scan tools, the paver allows technicians to configure parameters, calibrate actuators, and interrogate faults directly via the operator display buttons:

  • Service Mode Activation: Accessing service parameters with code 0001 under engaged parking brake conditions.
  • E-Throttle Calibration: Teaching the rotary servo actuator (M39) mechanical stops and electronic stroke positions using codes 5038, 5039 (idle position verification < 500), 5040 (maximum full throttle position), and 5041 (routine termination).
  • Load Control System (LCS) Teaching: Calibrating maximum paving work pressure and stop pressure potentiometers using codes 3006, 3007, and 3008 in conjunction with hydraulic gauge verification.
  • Fault Log Management: Accessing logged fault codes (code 0700), viewing error occurrences paired with recorded operating hours (code 0705), and clearing the ESX memory log (code 0710).
  • System Configuration & Overrides: Enabling limp-home travel via screed relief push buttons (codes 1100 and 1121), resetting electronic control units to factory baselines (code 7010 with machine-specific profiles 7860/7861), activating/deactivating front-wheel drive assistance (codes 1101/1102), and bypassing a defective brake pedal switch (code 1104).
  • Engine Speed Adaptation: Harmonizing software version v0.27 with generator V-belt pulley ratios on early serial machines using code 5046.

Closed-Loop Hydrostatic Drive & Material Feed Hydraulics

The manual provides rigorous schematics and step-by-step servicing instructions for the machine’s extensive hydraulic systems. The travel circuit is powered by an axial-piston variable displacement Bosch-Rexroth A10VG45 pump (45 cm³/re, delivering up to 152 l/min at 370–390 bar operating pressure with 24–26 bar charge pressure), feeding dual Sauer Danfoss 51D variable-displacement bent-axis motors on the rear axle and SAI BD1 radial piston motors on the front wheels. Technicians are provided with complete instructions for troubleshooting axial piston swashplate mechanisms, checking charge pressure filters, testing the shiftable two-speed Officine Meccaniche spur gear transmission (3.103:1 high / 8.052:1 low), and inspecting Bondioli & Pavesi planetary wheel reduction hubs (11.908:1 ratio).

IMAGES PREVIEW

Bomag BF300 P Road Finisher Service Manual 00891745 — PDF page 1 preview
Bomag BF300 P Road Finisher Service Manual 00891745 — PDF page 28 preview
Bomag BF300 P Road Finisher Service Manual 00891745 — PDF page 135 preview

The working hydraulics are supplied by an open-loop Bosch-Rexroth A10VO28 pump (84 l/min, 145–155 bar) alongside multi-stage Haldex WP09 gear pumps. Detailed sub-sections cover the independent dual-motor scraper belt conveyors (Sauer Danfoss OMS 160 orbital motors running at 60–64 rpm), reversible material distribution augers (OMS 160 motors at 80–84 rpm), and hydraulic cylinders controlling hopper folding wings, auger height elevation, screed lift, and crown profile curving (-3% to +4.5%). Testing protocols provide specific setup procedures for checking scraper belt tension, conveyor chain slack, auger clearances, and hydraulic relief valve pressure thresholds.

S340 Screed Mechanics, Electric Heating & Automated Lubrication

Asphalt mat quality depends entirely on the condition and setup of the screed. This manual details the BOMAG S340 vibrating screed assembly (paving widths from 1.70 m to 3.40 m, expandable to 4.00 m with extensions or down to 0.75 m using reduction shoes). The guide explains drawing arm leveling cylinder geometry, mechanical angle-of-attack preset bolts, eccentric shaft vibrator drives (20–50 Hz driven by Sauer Danfoss SNM2 motors at 2650–2850 rpm), and tamper compaction bars (0–30 Hz driven by SNM2 motors at 1800–2000 rpm).

Complete repair procedures are documented for the 230V/400V three-phase screed electric heating system. Service personnel are guided through removing and installing the heavy 65 kg auxiliary heating generator, setting generator V-belt tension via dual adjusting bolts, troubleshooting the external temperature control console, and replacing high-voltage heating rods inside the main screed base plates, extendable mobile sections, tamper bars, and lateral exit flaps. In addition, Section 17 covers the automated Lincoln central lubrication system, detailing grease reservoir refilling (NLGI class 3 lithium EP grease), electronic cycle timer setup, progressive metering valve block operation, and hydraulic blockage clearance techniques.

Professional Workshop Capability & Instant PDF Delivery

Owning the Bomag BF300 P Road Finisher Service Manual 00891745 empowers fleet managers, road construction contractors, and heavy plant workshops to conduct extensive maintenance, component rebuilds, and electrical diagnostics entirely in-house. Relying on guesswork when adjusting hydraulic charge pressures, setting fuel injection timing, or rewiring complex CAN-bus nodes risks catastrophic component failure, uneven asphalt compaction, and expensive machine downtime during active paving contracts. Following BOMAG’s verified procedures, torque sequences, and diagnostic fault trees ensures your machinery operates safely, efficiently, and to exact factory specifications.

This manual is supplied as an instant, downloadable PDF document. There are no shipping wait times, customs delays, or fragile paper pages to get ruined by grease and hydraulic oil on the jobsite. Compatible with all modern operating systems— including Windows, macOS, Android, iOS, and Linux—the file can be stored on your workshop computer, loaded onto a ruggedized field tablet for on-site troubleshooting, or printed out in crisp, high-resolution pages whenever physical technical documentation is needed in the repair bay.


Reviews

There are no reviews yet.

Be the first to review “Bomag BF300 P Road Finisher Service Manual 00891745”

What Our Customers Say

★★★★★ Live reviews from customers
Loading customer reviews...
0
    0
    Your Cart
    Your cart is emptyReturn to Shop
    🛒
    Recently Purchased
    🕒 verified order