★ TRUSTED BY 321,897+ PROFESSIONALS WORLDWIDE
🏒
Trusted Business
Verified & Licensed
πŸ›‘οΈ
Virus Free Files
100% Safe Downloads
πŸ”’
Secure Payment
SSL Protected
⚑
Instant Delivery
Available Immediately
Sale!

Hitachi 4000ACI Rigid Dump Truck Workshop Manual W8R7-E-01 – PDF Download

Original price was: $44.95.Current price is: $26.95.

Complete 810-page workshop manual for the Hitachi 4000ACI Rigid Dump Truck. Covers engine, alternator, pump device, drive device, front axle, brakes, steering, hoist, and AC drive control systems with step-by-step disassembly, assembly, inspection, and maintenance procedures.

⚑
Instant PDF Download
Available immediately
πŸ’Ύ
Save to Your Device
Download & keep forever
πŸ›‘οΈ
Antivirus Scanned
100% virus-free
🌍
Trusted Worldwide
175,000+ customers

Description

Hitachi 4000ACI Rigid Dump Truck Workshop Manual W8R7-E-01

The Hitachi 4000ACI Rigid Dump Truck Workshop Manual is the complete service and repair guide for the 4000ACI AC drive rigid dump truck. Issued under document number W8R7-E-01, this 810-page workshop manual covers the full range of maintenance, disassembly, assembly, removal, installation, inspection, and adjustment procedures needed to keep this heavy hauler in production. Written for the experienced technician, it provides the technical information needed to maintain and repair this machine correctly, from engine and alternator service through to the AC drive control system and dump body.

File Details

  • Manual Type: Workshop Manual
  • Brand: Hitachi
  • Model: 4000ACI Rigid Dump Truck
  • Document Number: W8R7-E-01
  • Publication Date: 20160803
  • Language: English
  • Page Count: 810
  • File Format: PDF

Chapters Covered

The workshop manual is organised into four major sections, each covering a distinct area of the machine:

  • Section 1 β€” General: Precautions for Disassembling and Assembling, Tightening Torque Specifications, Torque Chart, Piping Joints, Periodic Replacement of Parts
  • Section 2 β€” Body: Cab (Removal and Installation, Air Conditioner), Engine/Alternator (Removal and Installation, Disassembly, Inspection, Assembly), Pump Device (Main Pump, Regulator, Gear Pump, Drive Shaft), Drive Device (Wheel Motor, Parking Brake, Wheel Reduction Device), Front Axle (Spindle Assembly, Trailing Arm, Front Wheel Adjustment), Tire/Rim/Air Pressure, Front Brake (Brake Head, Lining, Air Bleeding), Brake Valve (Disassembly, Inspection, Assembly, Cartridge Seal), Brake Accumulator (Rear and Front, Charging Nitrogen Gas), Steering System (Steering Column, Driveshaft, Steering Valve, Flow Amplifier, Steering Cylinder, Main Accumulator), Frame Suspension (Front and Rear Suspension Cylinders)
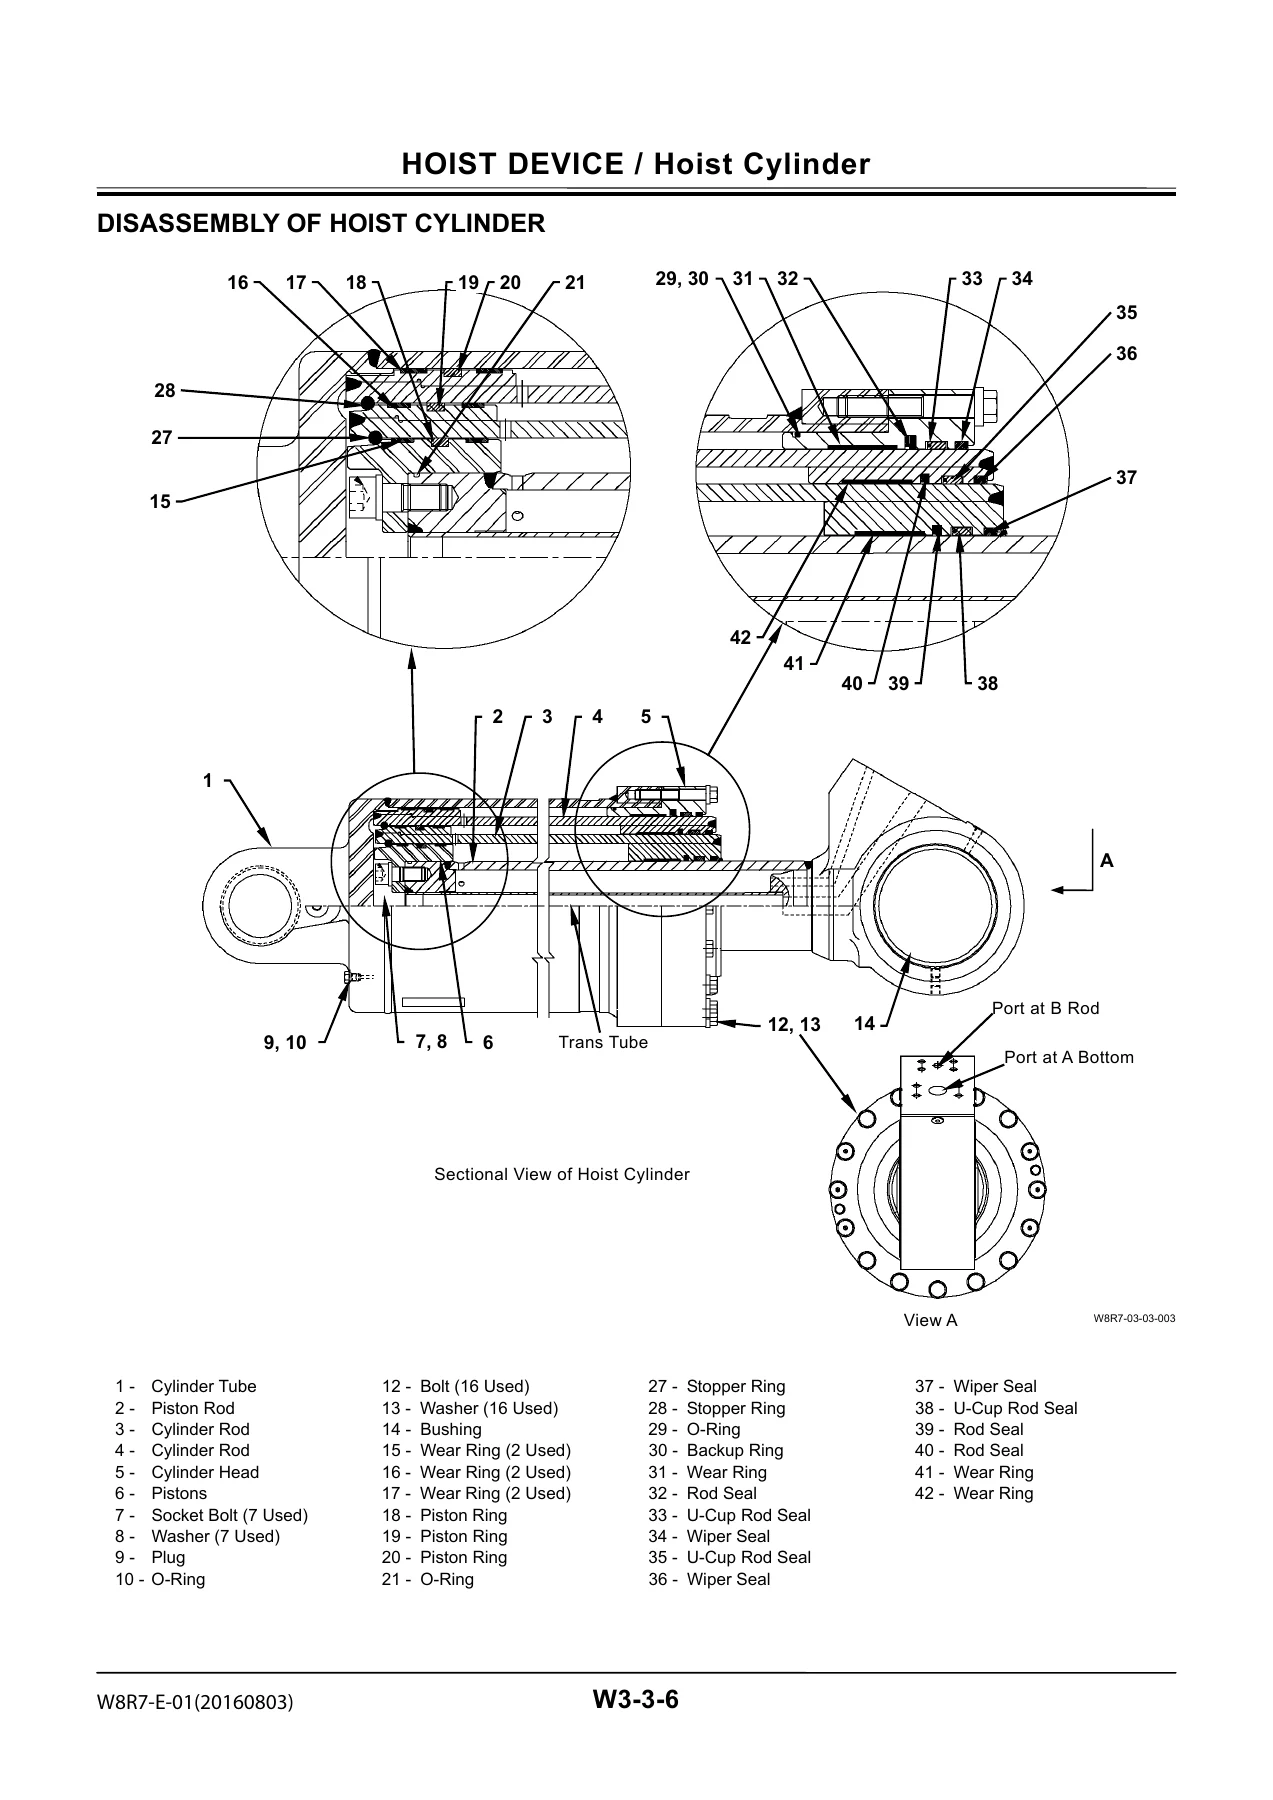
  • Section 3 β€” Hoist Device: Hoist Control Valve (Removal and Installation, Disassembly, Assembly, Overload Relief Valve, Make-Up Valve), 4-Unit Proportional Control Solenoid Valve, Hoist Cylinder (Disassembly, Inspection, Assembly), Dump Body (Removal and Installation)
  • Section 4 β€” AC Drive Control Device: Control Cabinet (REC Unit, INV Unit, MFR Unit, FAN Unit, DSC, DC/DC Converters, CS Unit, AFR Unit, Auxiliary Inverters, Relays, Coolant Level Sensor, Heaters, CT301, PUMP301, Coolant Change Procedures), Grid Box (Removal and Installation), Alternator Cooling Blower, Wheel Motor Cooling Blower

What sets this 4000ACI workshop manual apart is the depth of its component-level coverage. The drive device section walks through complete disassembly and assembly of the wheel motor, parking brake, and wheel reduction device, including first and second stage carrier assemblies, brake assembly, wheel bearing preload procedures, brake clearance adjustment, friction disc wear measurement, and break-in operation. The steering system section covers the steering valve, flow amplifier, steering cylinder, and main accumulator with disassembly, inspection, assembly, and test procedures. The AC drive control device section is equally comprehensive, covering the control cabinet and all its internal units down to individual board and component replacement.

The manual also includes a dedicated section on periodic replacement of parts, listing the components that must be replaced at set intervals regardless of apparent condition β€” including fuel hoses, brake hoses, steering hoses, pump suction and delivery hoses, hoist line hoses, and seat belts. Maintenance standards and allowable limits are provided throughout so you can judge whether a component can be reused or must be replaced.

What This Manual Enables You to Do

With the Hitachi 4000ACI Rigid Dump Truck Workshop Manual W8R7-E-01 on hand, a qualified technician can perform:

  • Complete engine and alternator removal, disassembly, inspection, and assembly
  • Main pump, regulator, gear pump, and drive shaft service
  • Wheel motor, parking brake, and wheel reduction device overhaul
  • Front axle spindle, trailing arm, and wheel bearing service
  • Front brake, brake valve, and brake accumulator repair and adjustment
  • Steering column, driveshaft, steering valve, flow amplifier, and steering cylinder service
  • Front and rear suspension cylinder disassembly, assembly, and charging procedures
  • Hoist control valve, proportional control solenoid valve, and hoist cylinder service
  • Dump body removal and installation, including hinge pin and body pad service
  • AC drive control cabinet, grid box, cooling blower, and all internal component replacement
  • Periodic replacement of critical parts including hoses, seals, and seat belts

Each procedure includes the tightening torques, clearances, wear limits, and adjustment values needed to meet Hitachi service standards. The manual also includes safety alerts, handling precautions for O-rings, backup rings, and floating seals, and procedures for bleeding air from hydraulic circuits.

Why This Manual Matters

Heavy haul trucks like the Hitachi 4000ACI operate under extreme loads in demanding environments. Incorrect assembly, wrong torque values, or missed wear limits can lead to premature component failure, unplanned downtime, and costly damage. This workshop manual gives you the exact procedures and specifications Hitachi engineers use when servicing these machines. From the correct tightening sequence for cab mounting bolts to the preload adjustment procedure for wheel bearings, every critical step is documented. The manual also includes maintenance standards and allowable limits so you can determine whether a component can be reused or must be replaced.

Complete PDF Bookmark Tree

Complete Bookmarks

The complete bookmarks in the β€œHitachi 4000ACI Rigid Dump Truck Workshop Manual W8R7-E-01 – PDF Download” are as follows:

W8R7-E-01p. 1
INTRODUCTIONp. 3
SAFETYp. 5
SECTION AND GROUP CONTENTSp. 31
SECTION 1 GENERALp. 33
Group 1 Precautions for Disassembling and Assemblingp. 35
Precautions for Disassembling and Assemblingp. 35
Maintenance Standard Terminologyp. 41
Group 2 Tighteningp. 43
Tightening Torque Specificationsp. 43
Torque Chartp. 44
Piping Jointp. 47
Group 3 Periodic Replacement of Partsp. 51
Periodic Replacement of Partsp. 51
SECTION 2 BODYp. 55
Group 1 Cabp. 59
Removal and Installation of Cabp. 59
Air Conditionerp. 67
Group 2 Engine/Alternatorp. 77
Removal and Installation of Enginep. 77
Removal and Installation of Alternatorp. 97
DISASSEMBLY OF ALTERNATORp. 109
INSPECTIONp. 119
ASSEMBLY OF ALTERNATORp. 125
Group 3 Pump Devicep. 137
Removal and Installation of Pump Devicep. 137
Disassembly of Main Pumpp. 144
Assembly of Main Pumpp. 150
Maintenance Standardp. 154
Disassembly of Regulator for Main Pumpp. 156
Assembly of Regulator for Main Pumpp. 158
Structure of Gear Pumpp. 160
Disassembly of Drive Shaftp. 162
Inspection of Drive Shaftp. 166
Assembly of Drive Shaftp. 170
Maintenance of Drive Shaftp. 174
Group 4 Drive Devicep. 175
Removal and Installation of Drive Devicep. 175
Removal and Installation of Wheel Motor Assemblyp. 184
Disassembly of Parking Brakep. 188
Inspection of Parking Brakep. 196
Assembly of Parking Brakep. 198
Procedures for the 500-Hour Maintenance Inspectionp. 208
Removal and Installation of Wheel Motor Assemblyp. 210
DISASSEMBLY OF WHEEL MOTORp. 218
INSPECTION OF WHEEL MOTORp. 226
ASSEMBLY OF WHEEL MOTORp. 228
Disassembly of Wheel Reduction Devicep. 240
Assembly of Wheel Reduction Devicep. 267
Disassembly of First Stage Carrier Assemblyp. 306
Assembly of First Stage Carrier Assemblyp. 310
Disassembly of Second Stage Carrier Assemblyp. 318
Assembly of Second Stage Carrier Assemblyp. 322
Disassembly of Brake Assemblyp. 330
Assembly of Brake Assemblyp. 334
Wheel Bearing Preload Operation Management Proceduresp. 340
Brake Clearance Adjustment Procedurep. 352
Friction Disc Wear Measurement Procedurep. 354
Break-in Operation of Wheel Reduction Devicep. 356
Group 5 Front Axlep. 357
Front Axlep. 357
Inspecting Front Axle Assembly Playp. 360
Removal and Installation of Spindle Assemblyp. 362
Removal and Installation of Trailing Armp. 374
Front Wheel Adjustmentp. 386
Removal and Installation of Front Wheelp. 390
Group 6 Tire and Rimp. 411
Tire / Rim / Air Pressurep. 411
Removal and Installation of Front Tire and Rimp. 412
Removal and Installation of Rear Tire and Rimp. 416
Tire Carep. 422
Tire Air Pressure Inspectionp. 422
Group 7 Front Brakep. 423
Removal and Installation of Front Brakep. 423
Disassembly of Brake Headp. 428
Inspection of Brake Head and Brake Discp. 430
Assembly of Brake Headp. 432
Removal and Installation of Liningp. 436
Air Bleeding of Front Brakep. 442
Group 8 Brake Valvep. 443
Removal and Installation of Brake Valvep. 443
Disassembly of Brake Valvep. 448
Inspection of Brake Valvep. 454
Assembly of Brake Valvep. 456
Replacement of Brake Cartridge Sealp. 462
Group 9 Brake Accumulatorp. 465
Removal and Installation of Rear Brake Accumulatorp. 465
Removal and Installation of Front Brake Accumulatorp. 467
Disassembly of Brake Accumulatorp. 470
Assembly of Brake Accumulatorp. 472
Charging Nitrogen Gasp. 476
Group 10 Steering Systemp. 479
REMOVAL AND INSTALLATION OFSTEERING COLUMN ASSEMBLYp. 479
DISASSEMBLY AND ASSEMBLY OFDRIVESHAFTp. 485
DISASSEMBLY AND ASSEMBLY OFSTEERING COLUMNp. 485
DISASSEMBLY, ASSEMBLY, ANDINSPECTION OF STEERING VALVEp. 486
REMOVAL AND INSTALLATION OF FLOWAMPLIFIERp. 488
DISASSEMBLY AND ASSEMBLY OF FLOWAMPLIFIERp. 493
REMOVAL AND INSTALLATION OFSTEERING CYLINDERp. 494
DISASSEMBLY OF STEERING CYLINDER(Serial No.: 010001 to 010016, 010018,010019)p. 498
INSPECTION OF STEERING CYLINDER(Serial No.: 010001 to 010016, 010018,010019)p. 502
ASSEMBLY OF STEERING CYLINDER(Serial No.: 010001 to 010016, 010018,010019)p. 504
TEST OF STEERING CYLINDER (SerialNo.: 010001 to 010016, 010018, 010019)p. 510
REMOVAL AND INSTALLATION OF MAINACCUMULATORp. 512
DISASSEMBLY AND ASSEMBLY OF MAIN ACCUMULATORp. 518
CHARGING NITROGEN GASp. 523
Disassembly and Assembly of SteeringCylinder (Serial No.: 010017, Up to 010020)p. 535
Group 11 Frame Suspensionp. 545
Removal and Installation of Front Suspension Cylinderp. 545
Disassembly of Front Suspension Cylinderp. 550
Inspection of Front Suspension Cylinderp. 552
Assembly of Front Suspension Cylinderp. 554
Charging Neocon Oilp. 558
Charging Helium Gasp. 560
Servicing Procedure of Front Suspension Cylinderp. 563
Suspension Cylinder Storagep. 563
Removal and Installation of Rear Suspension Cylinderp. 564
Disassembly of Rear Suspension Cylinderp. 570
Inspection of Rear Suspension Cylinderp. 572
Assembly of Rear Suspension Cylinderp. 574
Charging Neocon Oilp. 578
Charging Helium Gasp. 580
Servicing Procedure of Rear Suspension Cylinderp. 583
Suspension Cylinder Storagep. 583
SECTION 3 HOIST DEVICEp. 587
Group 1 Hoist Control Valvep. 589
Removal and Installation of Hoist Control Valvep. 589
Structure of Hoist Control Valve Assemblyp. 594
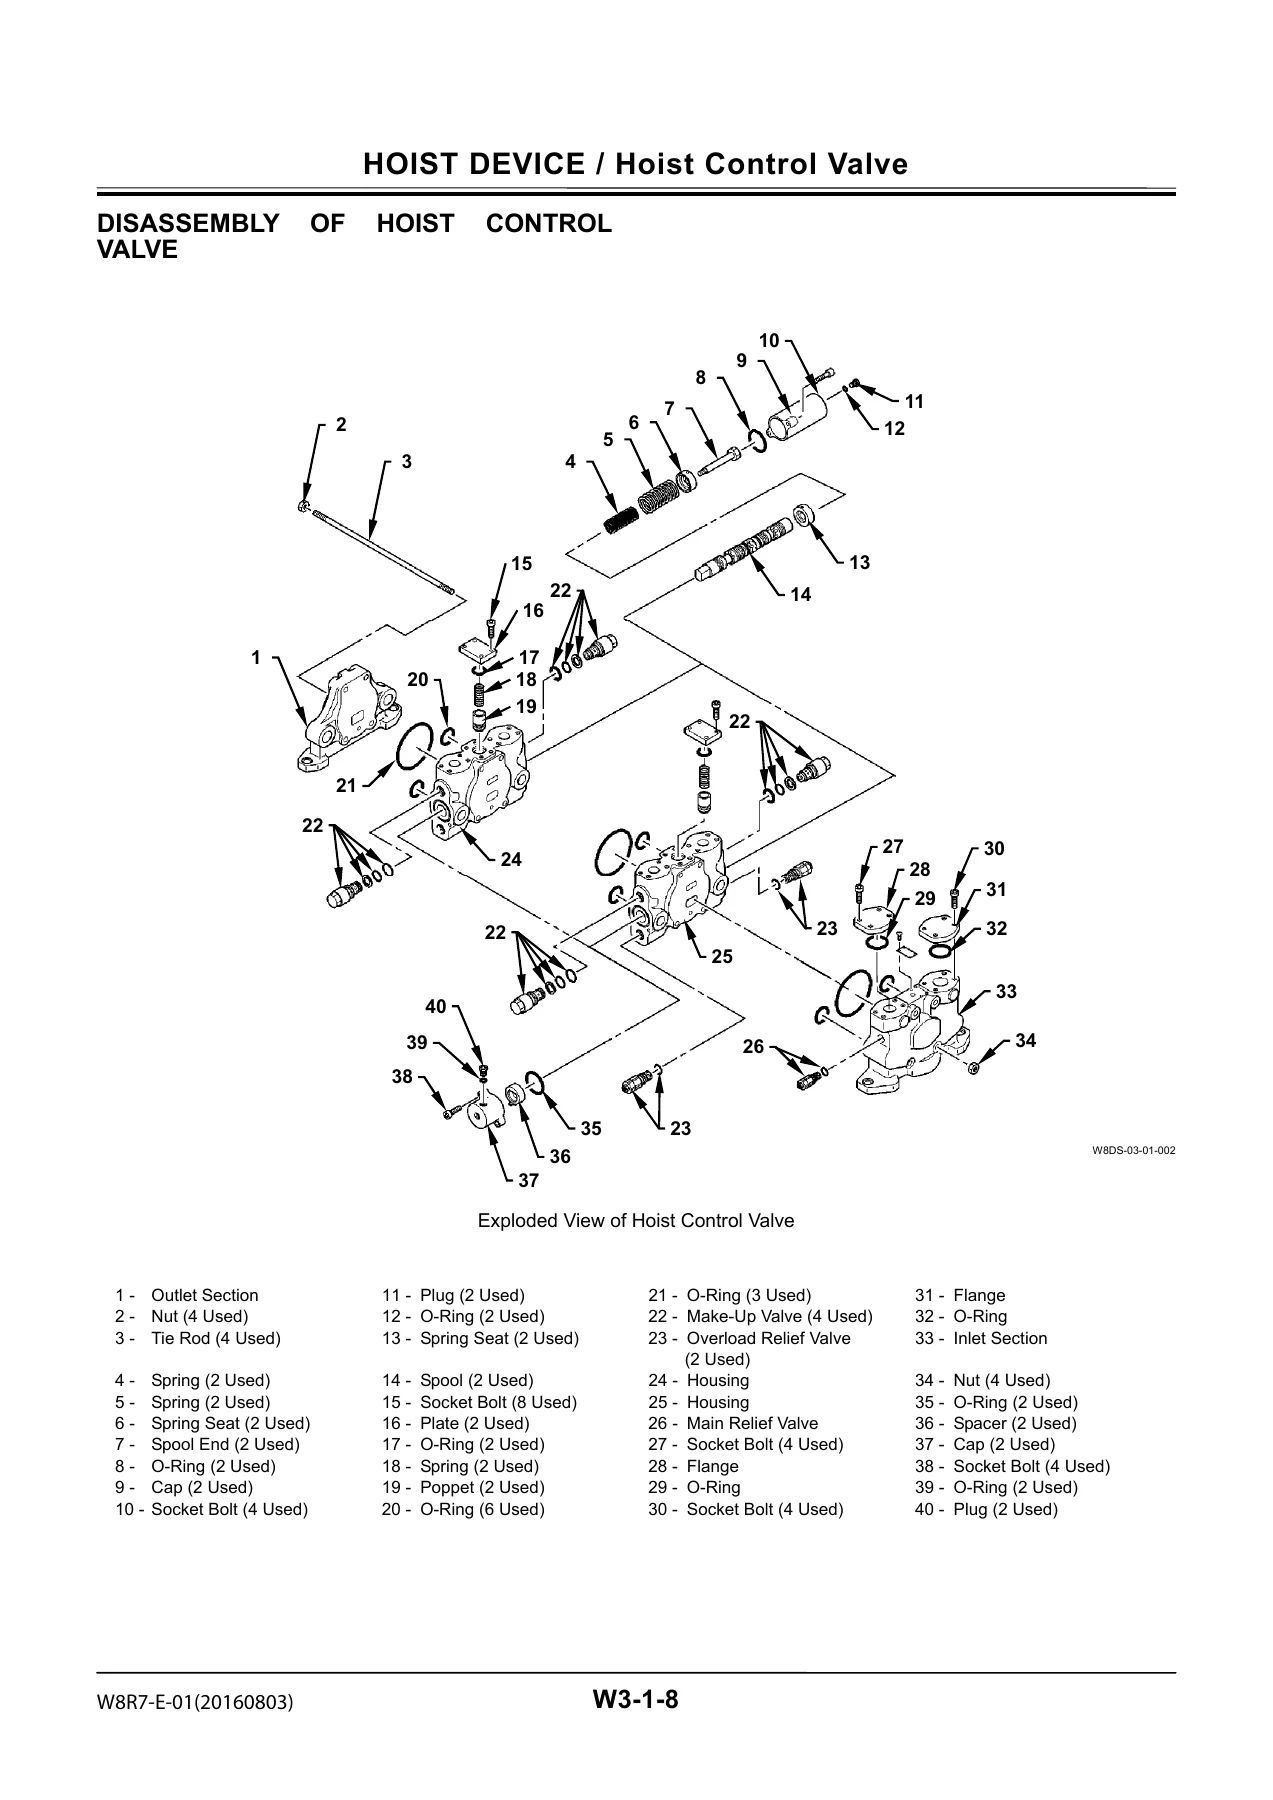
Disassembly of Hoist Control Valvep. 596
Assembly of Hoist Control Valvep. 600
Disassembly and Assembly of Overload Relief Valvep. 604
Structure of Make-Up Valvep. 606
Group 2 4-Unit Proportional Control Solenoid Valvep. 607
Removal and Installation of 4-Unit Proportional Control Solenoid Valvep. 607
Structure of 4-Unit Proportional Control Solenoid Valve Assemblyp. 609
Disassembly of Proportional Control Solenoid Valvep. 610
Assembly of Proportional Control Solenoid Valvep. 612
Group 3 Hoist Cylinderp. 615
Removal and Installation of Hoist Cylinderp. 615
Disassembly of Hoist Cylinderp. 620
Inspection of Hoist Cylinderp. 624
Assembly of Hoist Cylinderp. 626
Group 4 Dump Bodyp. 631
Removal and Installation of Dump Bodyp. 631
SECTION 4 AC DRIVE CONTROL DEVICEp. 643
Group 1 Control Cabinetp. 645
REMOVAL AND INSTALLATION OFCONTROL CABINETp. 645
REMOVAL AND INSTALLATION OF RECTIFIER (REC) UNITp. 655
REMOVAL AND INSTALLATION OF RECTIFIER (REC) UNIT INTERNAL PARTSp. 663
REMOVAL AND INSTALLATION OF INVERTER (INV) UNITp. 669
REMOVAL AND INSTALLATION OFINVERTER (INV) UNIT INTERNAL PARTSp. 677
REMOVAL AND INSTALLATION OF MAINALTERNATOR FIELD REGULATOR (MFR)UNITp. 689
REMOVAL AND INSTALLATION OF MAINALTERNATOR FIELD REGULATOR (MFR)UNIT INTERNAL PARTSp. 693
REMOVAL AND INSTALLATION OF FANUNITp. 699
REMOVAL AND INSTALLATION OF DRIVESYSTEM CONTROLLER (DSC)p. 701
REMOVAL AND INSTALLATION OF DSCDRIVE CONTROL BOARD VDC06p. 711
REMOVAL AND INSTALLATION OF DSCCOMMUNICATION CONTROL BOARDVDC07p. 715
REMOVAL AND INSTALLATION OF DSCINTERFACE BOARD VIO13p. 719
REMOVAL AND INSTALLATION OF DSCINTERFACE BOARD VIO14p. 723
REMOVAL AND INSTALLATION OF DSCINTERFACE BOARD VIO15p. 727
REMOVAL AND INSTALLATION OF DSCDC/DC CONVERTERS AVR302 ANDAVR303p. 731
REMOVAL AND INSTALLATION OF DSCDC/DC CONVERTER (HDR10)p. 741
REMOVAL AND INSTALLATION OF CONTROLPOWER (CS) UNITp. 747
REMOVAL AND INSTALLATION OF CONTROLPOWER (CS) UNIT INTERNALPARTSp. 751
REMOVAL AND INSTALLATION OF AUXILIARYALTERNATOR FIELD REGULATOR(AFR) UNITp. 759
REMOVAL AND INSTALLATION OF AUXILIARYALTERNATOR FIELD REGULATOR(AFR) UNIT INTERNAL PARTSp. 763
REMOVAL AND INSTALLATION OF AUXILIARYINVERTERS INV301 AND INV302p. 767
REMOVAL AND INSTALLATION OF RELAYSp. 771
REMOVAL AND INSTALLATION OFCOOLANT LEVEL SENSOR WS301p. 777
REMOVAL AND INSTALLATION OFHEATERSp. 779
REMOVAL AND INSTALLATION OF AUXILIARYEXCITATION UNIT CURRENTTRANSFORMER CT301p. 783
REMOVAL AND INSTALLATION OF PUMPPUMP301p. 785
COOLANT CHANGE PROCEDURESp. 789
Group 2 Grid Boxp. 791
Removal and Installation of Grid Boxp. 791
Group 3 Alternator Cooling Blowerp. 803
Removal and Installation of Alternator Cooling Blowerp. 803
Group 4 Wheel Motor Cooling Blowerp. 805
Removal and Installation of Wheel Motor Cooling Blowerp. 805
SERVICE MANUAL REVISION REQUEST FORMp. 809


IMAGES PREVIEW

Hitachi 4000ACI Rigid Dump Truck Workshop Manual W8R7-E-01 - PDF Download β€” PDF page 1 preview
Hitachi 4000ACI Rigid Dump Truck Workshop Manual W8R7-E-01 - PDF Download β€” PDF page 596 preview
Hitachi 4000ACI Rigid Dump Truck Workshop Manual W8R7-E-01 - PDF Download β€” PDF page 620 preview

Instant PDF Delivery

This Hitachi 4000ACI Rigid Dump Truck Workshop Manual W8R7-E-01 is delivered as an instant PDF download. There is no shipping, no waiting for a physical book, and no risk of a lost or damaged parcel. Once your order is complete, the file is available immediately. You can view it on any device β€” laptop, tablet, or smartphone β€” and print the pages you need for the workshop. Keep the full 810-page manual on a single device or print only the sections relevant to your current job. This is the complete workshop manual, not an excerpt or a training guide.
Reviews

There are no reviews yet.

Be the first to review “Hitachi 4000ACI Rigid Dump Truck Workshop Manual W8R7-E-01 – PDF Download”

What Our Customers Say

β˜…β˜…β˜…β˜…β˜… Live reviews from customers
Loading customer reviews...
0
    0
    Your Cart
    Your cart is emptyReturn to Shop
    πŸ›’
    Recently Purchased
    πŸ•’ verified order