Lexmark E230 E330 E232 E332 E340 E342 Laser Printer Service Manual Repair PDF
Original price was: $85.00.$16.95Current price is: $16.95.
Official Lexmark E23x/E33x series laser printer service manual for professional technicians. This comprehensive 161-page PDF covers complete diagnostics, troubleshooting, repair, and maintenance for E230, E232, E240, E330, E332, E340, and E342 models (4505-100, 200, 300, 310, 400, 410). Includes detailed operator panel codes, service checks, diagnostic aids, removal procedures, connector locations, wiring diagrams, preventive maintenance schedules, and complete parts catalog. Essential for printer repair shops and IT service departments.
Description
Lexmark E230 E330 E232 E332 E340 E342 Laser Printer Service Manual Repair PDF DOWNLOAD
DESCRIPTION
Lexmark E23x and E33x Laser Printer Service Manual – Complete Professional Printer Service Reference
This is the official factory service manual for the Lexmark E23x and E33x series laser printers. Published in July 2005 by Lexmark International, Inc., this professional-grade technical documentation is essential for qualified service technicians, printer repair specialists, and IT service departments who troubleshoot, maintain, and repair these reliable monochrome laser printers.
📋 FILE DETAILS
- Manual Name: Lexmark E23x, E33x Service Manual
- Printers Covered:
- Lexmark E230 (4505-100)
- Lexmark E232 (4505-200)
- Lexmark E240 (4505-300)
- Lexmark E330 (4505-310)
- Lexmark E332 (4505-400)
- Lexmark E340 (4505-410)
- Lexmark E342 (4505-410)
- Manufacturer: Lexmark International, Inc.
- Publication Date: July 12, 2005
- Edition: July 2005
- Document Part Number: U.S.A. P/N 12G9399
- Total Pages: 161 pages
- File Format: PDF
- PDF Quality: High-quality official manual with detailed diagrams
- Language: English
- Page Size: Custom format optimized for service manual use
🔧 COMPREHENSIVE COVERAGE INCLUDES:
Laser Notices (International Safety Compliance)
Laser Notice:
- U.S. Certification: DHHS 21 CFR Subchapter J – Class I (1) laser product
- International Certification: IEC 60825-1 – Class I laser product
- Internal Laser: Class IIIb (3b) gallium arsenide laser
- Laser Power: 5 milliwatt nominal
- Wavelength: 770-795 nanometers
- Safety: No human access to laser radiation above Class I level
- Safety Compliance: Normal operation, user maintenance, prescribed service
Multi-Language Safety Notices:
- English laser safety information
- German (Laser) notice
- French (Avis relatif à l’utilisation de laser)
- Italian (Avvertenze sui prodotti laser)
- Spanish (Avisos sobre el láser)
- Portuguese (Declaração sobre Laser)
- Finnish (Huomautus laserlaitteesta)
- Swedish (Laser-notis)
Safety Information
Safety Precautions:
- Service safety requirements
- High voltage warnings
- Hot surface warnings
- Proper handling procedures
- ESD protection requirements
- Electrical safety compliance
Preface
Definitions:
- Service terminology
- Technical abbreviations
- Component descriptions
Warranty Information:
- Publication disclaimer
- Limited warranty
- Manufacturer liability
- Product improvements notice
Contact Information:
- Service information
- Additional publications: 1-800-553-9727
- Lexmark International address
Trademarks:
- Lexmark and Lexmark with diamond design
- MarkVision
- Optra Forms
- PCL® (Hewlett-Packard)
- PostScript® (Adobe Systems)
Chapter 1: GENERAL INFORMATION
Overview of the Operator Panel:
- Operator panel layout
- LED indicators
- Button functions
- Display messages
- Status indicators
Paper Jams – How to Clear:
- Jam location identification
- Access procedures
- Jam clearing steps
- Component inspection
Tips on Preventing Jams:
- Media selection guidelines
- Paper quality requirements
- Humidity considerations
- Storage recommendations
- Loading procedures
Tools:
- Required tools list
- Specialized tools
- Test equipment
- Measurement devices
Types of Print Media:
- Supported paper types
- Paper weight specifications
- Size specifications
- Envelope specifications
- Label specifications
- Transparency specifications
Abbreviations:
- Technical abbreviations used
- Component abbreviations
- Service terminology
Chapter 2: DIAGNOSTIC INFORMATION
Start:
POST (Power-On Self Test):
- Boot sequence
- Initialization procedures
- Self-test routines
- Error detection
- Component verification
Overview of the Operator Panel:
Understanding the Operator Panel Lights:
- LED patterns
- Status indications
- Error indications
- Warning indicators
Common Light Sequences:
- Normal operation patterns
- Ready state
- Processing state
- Error state patterns
Secondary Errors:
- Secondary error identification
- Error priority
- Error combinations
Operator Panel Codes:
Primary Codes:
- Complete primary error code list
- Code descriptions
- Probable causes
- Corrective actions
- Troubleshooting procedures
Secondary Error Codes:
- Secondary error code list
- Error relationships
- Diagnostic procedures
Service Information with Secondary and Tertiary Light Patterns:
- Advanced diagnostic patterns
- Multiple error conditions
- Service-level diagnostics
Tertiary Service Error Codes:
- Advanced service codes
- Detailed fault isolation
- Component-level diagnosis
Symptom Tables:
POST Symptom Table:
- Power-on failure symptoms
- Boot failure symptoms
- Initialization errors
- Component failures
Printer Symptom Table:
- Print quality issues
- Paper handling problems
- Operational failures
- Communication errors
Service Checks:
Cold Fuser Service Check:
- Fuser temperature verification
- Cold start procedures
- Temperature rise testing
Cooling Fan Service Check:
- Fan operation verification
- Airflow testing
- Fan motor testing
Controller Card Service Check:
- Controller board testing
- Memory testing
- Interface testing
- Communication verification
Cover Interlock Switch Service Check:
- Safety interlock testing
- Switch functionality
- Wiring verification
Dead Machine Service Check:
- No power diagnosis
- Power supply testing
- Main board verification
Fuser Service Check:
- Fuser operation testing
- Temperature control
- Thermistor testing
- Heating element testing
Hot Fuser Service Check:
- Overheat conditions
- Temperature regulation
- Safety circuits
LVPS/HVPS Service Check:
- Low voltage power supply testing
- High voltage power supply testing
- Voltage measurements
- Load testing
Main Motor Service Check:
- Motor operation testing
- Drive train verification
- Speed testing
Operator Panel Service Check:
- Panel functionality
- LED testing
- Button response
- Communication testing
Printhead Service Check:
- Laser diode testing
- Scanning motor verification
- Mirror system testing
- Optical path verification
Paper Feed Service Checks:
- Pick roller testing
- Feed roller testing
- Registration testing
- Separation testing
- Transport testing
Parallel Port Service Check:
- Port functionality
- Communication testing
- Signal verification
Print Quality Service Checks:
- Print quality assessment
- Defect identification
- Component isolation
Using Print Quality Test Pages:
- Test page generation
- Test pattern interpretation
- Defect analysis
- Corrective actions
Transfer Roll Service Check:
- Transfer roller testing
- Voltage verification
- Contact pressure testing
Chapter 3: DIAGNOSTIC AIDS
Configuration and Diagnostic Groups:
Configuration:
- Menu access procedures
- Configuration options
- Setting adjustments
- Factory defaults
Diagnostic:
- Diagnostic menu access
- Test procedures
- Functional tests
Power-On Operations:
- Startup sequence
- Initialization process
- Self-test procedures
Configuration Menu Selections:
- Setup menu
- Printer settings
- Network settings
- Paper settings
- Print quality settings
- Maintenance settings
Diagnostics Menu Selections:
- Print quality pages
- Engine test
- Calibration procedures
- Component tests
- Sensor tests
- Network diagnostics
Chapter 4: REPAIR INFORMATION
Removals:
Complete disassembly procedures for:
Covers:
- Front cover removal
- Top cover removal
- Side cover removal
- Rear cover removal
- Access panel removal
Fan Removal:
- Cooling fan access
- Fan motor removal
- Reinstallation procedures
Feed Rollers (Auto Comp Tires) Removal:
- Pick roller removal
- Feed roller removal
- Separation pad removal
Fuser Idle Gear Links Removal:
- Drive train disassembly
- Gear removal procedures
Fuser Power Cable Removal:
- Cable disconnection
- Routing documentation
Fuser Removal:
- Fuser unit removal
- Precautions (hot surfaces)
- Reinstallation procedures
Input Roller Clutch and Lever Removal (ACM Clutch CBM):
- Clutch removal procedures
- Spring tension documentation
Input Sensor #1 Removal:
- Sensor access
- Connector removal
- Replacement procedures
Input Sensor #2 (Manual) Removal:
- Manual feed sensor
- Removal procedures
LVPS / HVPS Card Assembly Removal:
- Power supply board removal
- Safety precautions
- Cable documentation
LVPS / HVPS to Controller Card Cable Removal:
- Cable routing
- Connector identification
Manual Feed Clutch Assembly Removal:
- Clutch mechanism removal
- Adjustment notes
Operator Panel Removal:
- Panel removal procedures
- Cable routing
- Reinstallation
Paper Exit Guide Assembly Removal:
- Output assembly removal
- Component access
Printhead Removal:
- Laser scanner unit removal
- Optical precautions
- Alignment notes
Toner Level Sensor Cable Removal:
- Sensor cable routing
- Connector locations
Toner Level Sensor Removal:
- Sensor removal procedures
- Calibration notes
Transfer Roll Removal:
- Transfer roller removal
- Cleaning procedures
- Reinstallation
Transport Motor Cable Removal:
- Motor cable routing
- Connector identification
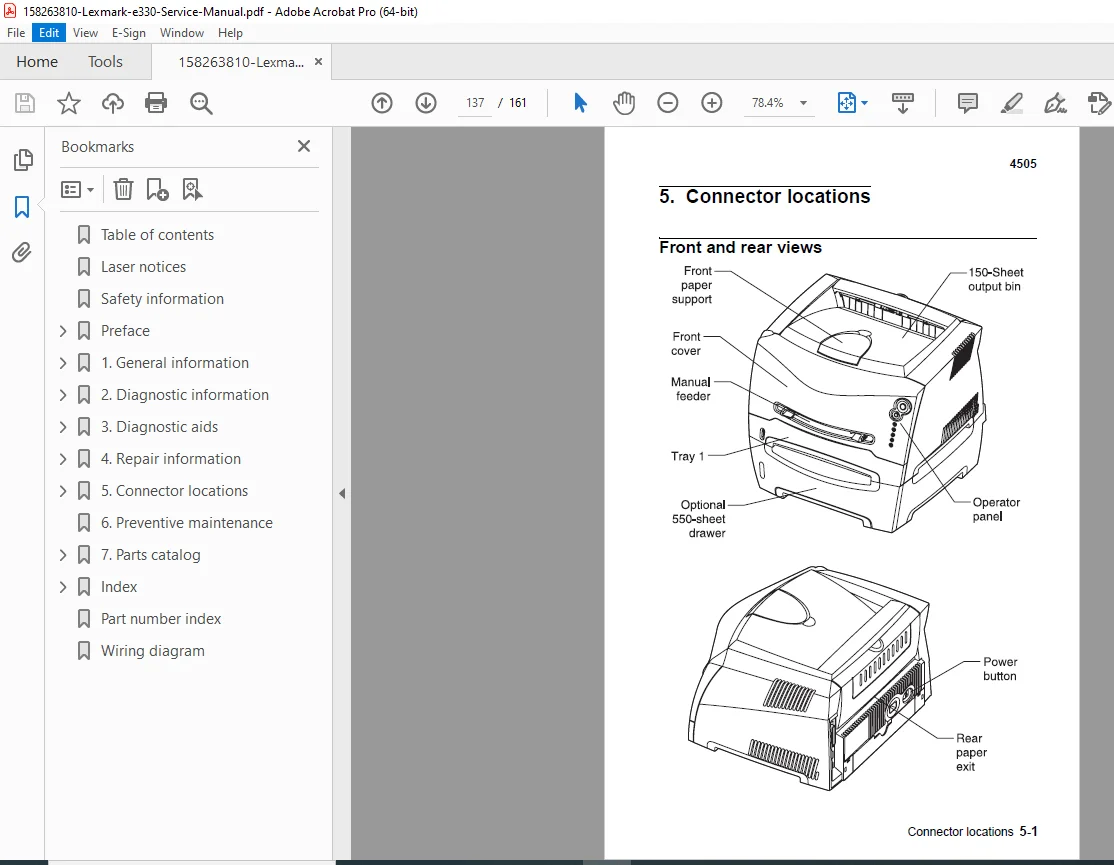
Chapter 5: CONNECTOR LOCATIONS
Front and Rear Views:
- Connector identification
- Cable routing
- Component locations
Power Supply Board:
- Board connector map
- Pin assignments
- Voltage specifications
Controller Board:
- Controller connector map
- Interface connections
- Communication ports
- Pin assignments
Wiring Diagram:
- Complete wiring schematic
- Power distribution
- Signal routing
- Ground connections
Chapter 6: PREVENTIVE MAINTENANCE
Preventive Maintenance Schedule:
- Maintenance intervals
- Recommended procedures
- Component replacement schedule
Cleaning Procedures:
- Optical system cleaning
- Corona wire cleaning
- Paper path cleaning
- Exterior cleaning
Lubrication:
- Lubrication points
- Lubricant specifications
- Application procedures
Inspection Procedures:
- Visual inspection checklist
- Component wear assessment
- Consumable monitoring
Chapter 7: PARTS CATALOG
How to Use This Parts Catalog:
- Parts ordering information
- Part number format
- Exploded view diagrams
- Assembly relationships
Complete Parts Lists:
- Mechanical assemblies
- Electrical components
- Circuit boards
- Cables and connectors
- Consumables
- Maintenance kits
Part Number Index:
- Alphabetical part listing
- Cross-reference information
- Supersession information
🎯 LEXMARK E23x/E33x SERIES SPECIFICATIONS:
Print Technology: ✅ Laser electrophotographic printing
✅ Monochrome (black and white)
✅ Single-pass printing
Models & Performance: ✅ E230: Basic model
✅ E232: Enhanced model
✅ E240: Performance model
✅ E330: Network-ready
✅ E332: Network enhanced
✅ E340: High-performance
✅ E342: High-performance network
Print Speed: ✅ Up to 28-34 ppm (pages per minute)
✅ First page out time: <10 seconds
Resolution: ✅ 600 x 600 dpi
✅ 1200 Image Quality (some models)
Paper Handling: ✅ 250-sheet input tray
✅ Optional 550-sheet drawer
✅ Manual feed slot
✅ Up to 150-sheet output bin
Connectivity: ✅ Parallel port
✅ USB 2.0
✅ Network (select models)
✅ PCL and PostScript emulation
💡 IDEAL FOR:
✅ Printer repair shops
✅ IT service departments
✅ Corporate IT support teams
✅ Office equipment service providers
✅ Independent service technicians
✅ Educational institution technical staff
✅ Managed print service providers
✅ Copier/printer service companies
✅ Anyone servicing Lexmark laser printers
🌟 KEY BENEFITS:
- Seven Models Covered: Complete documentation for entire E23x/E33x series
- Comprehensive 161 Pages: Extensive technical documentation
- Professional Laser Printers: Reliable office workgroup printers
- Detailed Operator Panel Codes: Primary, secondary, and tertiary error codes
- Complete Service Checks: Systematic diagnostic procedures
- Step-by-Step Removals: Component disassembly instructions
- Wiring Diagrams: Complete electrical schematics
- Parts Catalog: Full parts list with part numbers
- Preventive Maintenance: Scheduled maintenance procedures
- Official Lexmark Documentation: Factory service procedures
📊 TECHNICAL HIGHLIGHTS:
Laser Printing Technology:
- Gallium arsenide laser diode
- Polygon mirror scanner
- Organic photoconductor drum
- Single-component toner
- Corona charging
- Heated fuser assembly
Control Systems:
- Microprocessor control
- Real-time diagnostics
- POST (Power-On Self Test)
- Error logging
- Status monitoring
Paper Handling:
- Pick and feed system
- Registration system
- Duplex capability (some models)
- Multi-purpose feeder
- Output stacking
Power Management:
- Energy Star compliant
- Sleep mode
- Power saving features
⚙️ SERVICE CAPABILITIES:
Diagnostic Functions:
- Operator panel diagnostics
- Configuration menus
- Test page printing
- Engine tests
- Sensor verification
Adjustments:
- Print density
- Registration
- Transfer voltage
- Fuser temperature
Component Testing:
- Motor testing
- Sensor testing
- Power supply testing
- Controller board testing
- Communication testing
Print Quality:
- Test patterns
- Defect identification
- Correction procedures
📥 DOWNLOAD INFORMATION:
- Instant Download: Immediate access after purchase
- Format: PDF with bookmarks for easy navigation
- Compatibility: Works on PC, Mac, tablet, smartphone
- Searchable: Full-text search for quick reference
- Printable: Print entire manual or specific sections
- High Quality: Clear diagrams, schematics, and photographs
- Bookmarked: Navigate easily to any chapter
- Professional: Official Lexmark International documentation
⚠️ IMPORTANT NOTES:
- This is a professional service manual for qualified service technicians
- Contains Class I laser product with internal Class IIIb laser
- Official Lexmark International, Inc. documentation
- ESD precautions required when handling circuit boards
- Proper tools and test equipment necessary
- Safety procedures must be followed
- Electrical safety compliance essential
🔧 REQUIRED SERVICE EQUIPMENT:
- Digital Multimeter
- Oscilloscope (for advanced diagnostics)
- Print quality test equipment
- ESD protection equipment
- Standard hand tools
- Torx drivers
- Printer test software
- Cleaning supplies
- Calibration tools
🌟 WHY CHOOSE THIS MANUAL?
This is the authentic Lexmark factory service manual, not third-party documentation. It contains proprietary diagnostic procedures, operator panel code interpretations, service checks, disassembly instructions, and repair procedures developed by Lexmark engineers. The E23x and E33x series are professional workgroup laser printers requiring factory-level service procedures to maintain print quality and reliability.
The manual’s comprehensive coverage of seven different models makes it invaluable for service departments supporting diverse Lexmark printer installations.
Order now for immediate download access to complete Lexmark E23x/E33x laser printer service documentation!