Description
2009 Mitsubishi Fuso FE Workshop Manual
This comprehensive workshop manual covers the 2009 Model Year Mitsubishi Fuso FE series trucks, equipped with the 4M50T7 and 4M50T8 diesel engines. Published by Daimler Trucks North America LLC, this manual provides complete service, repair, and maintenance procedures used by professional technicians. Whether you are servicing a single vehicle or managing a fleet, this manual gives you the exact procedures, specifications, and troubleshooting guidance needed to keep these trucks running reliably.
File Details
- Manual Type: Factory Workshop Manual
- Brand: Mitsubishi Fuso
- Model: FE Series
- Year: 2009 Model Year
- Engines Covered: 4M50T7, 4M50T8
- Language: English
- Page Count: 2524 pages
- File Format: PDF
- Publisher: Daimler Trucks North America LLC
- Copyright: 2008
Chapters Covered
- General Information
- Maintenance Schedule
- Engine
- Lubrication
- Fuel and Engine Control
- Common Rail System
- Auto Cruise and Vehicle Speed Limitation System
- ECU Rewrite and Programming
- Cooling
- Intake and Exhaust
- Emission Control
- Automatic Transmission
- Propeller Shaft
- Front Axle
- Rear Axle
- Wheel and Tire
- Front Suspension
- Rear Suspension
- Brake System
- Anti-Lock Brake System (ABS)
- Parking Brake
- Steering
- Bumper and Frame
- Cab
- Door
- Exterior
- Interior
- Electrical System
- Heater, Air Conditioner, and Ventilation
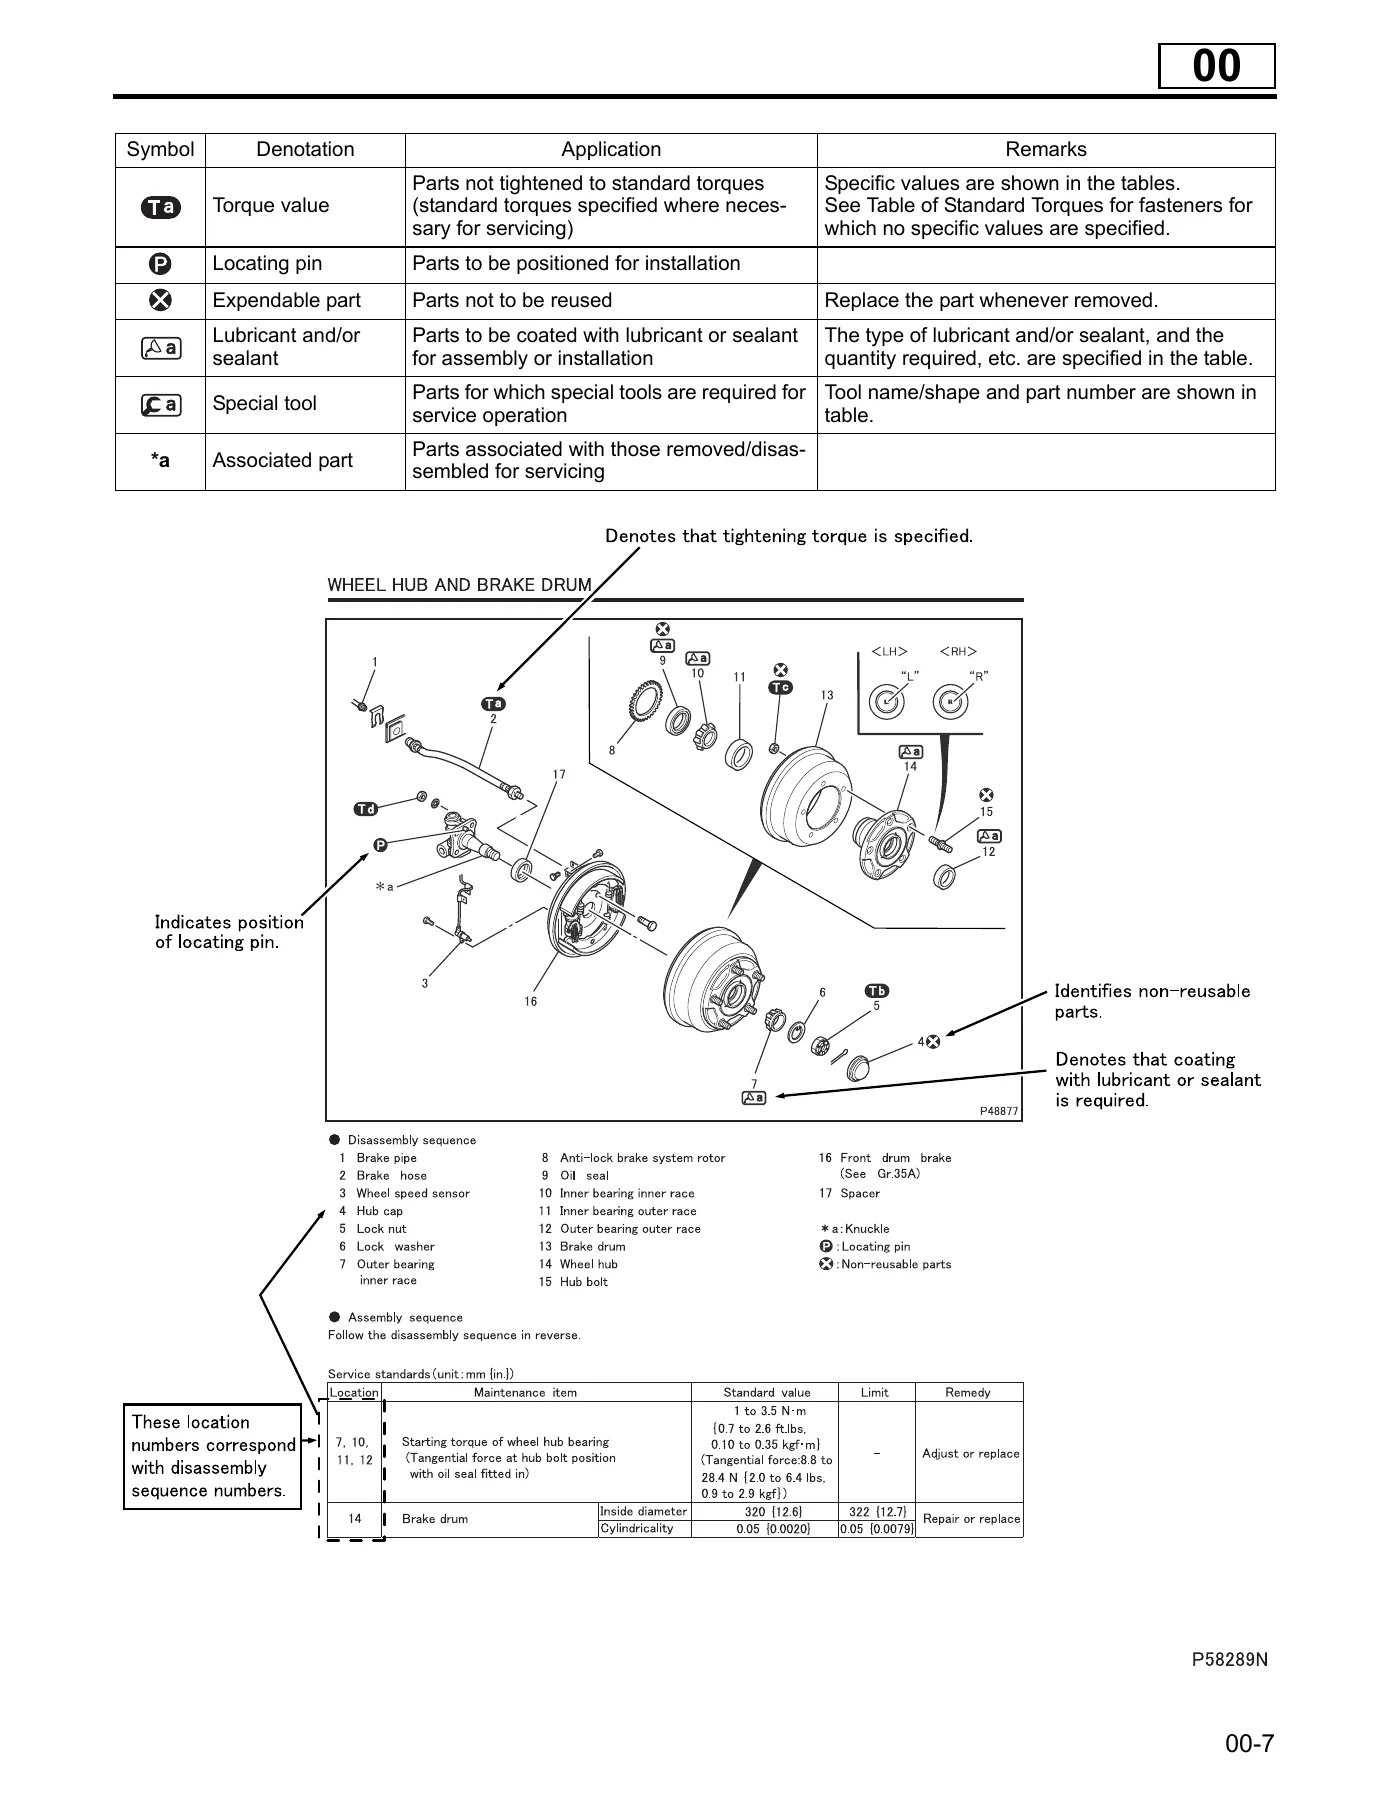
This manual covers every major system on the Fuso FE, from the 4M50 diesel engine and its common rail fuel system to the automatic transmission, brakes, suspension, and complete electrical wiring. Each section follows a logical structure: specifications, structure and operation, troubleshooting, on-vehicle inspection and adjustment, and detailed service procedures.
Complete PDF Bookmark Tree
Complete Bookmarks
The complete bookmarks in the “2009 Mitsubishi Fuso FE Workshop Manual – Complete Service & Repair Guide” are as follows:
+1. Lubrication Systemp. 142
1 Main oil galleryp. 142
2 Bypass valvep. 142
3 Bypass valvep. 142
4 Regulator valvep. 142
5 Engine oil pressure switchp. 142
6 Oil coolerp. 142
7 Full-flow filter elementp. 142
8 Bypass filter elementp. 142
9 Oil pumpp. 142
10 Oil strainerp. 142
11 Turbo chargerp. 142
12 Oil jet for gearp. 142
13 Vacuum pumpp. 142
14 Idler bushingp. 142
15 Timing gearp. 142
16 Balance shaft bushing LHp. 142
17 Crankshaft main bearingp. 142
18 Connecting rod bearingp. 142
19 Connecting rod bushingp. 142
20 Pistonp. 142
21 Balance shaft bushing RHp. 142
22 Supply pump gear bushingp. 142
23 Supply pump idler gear bushingp. 142
24 Supply pump idler gear shaftp. 142
25 Check valve for oil jetp. 142
26 Rocker bushingp. 142
27 Camshaft bushingp. 142
28 Rocker rollerp. 142
29 Oil panp. 142
2. Oil Pumpp. 143
+3. Oil Coolerp. 144
3.1 Bypass valvep. 144
3.2 Engine oil pressure switchp. 144
4. Oil Filterp. 145
+5. Lubrication of Engine Componentsp. 146
5.1 Main bearing and connecting rod bearingp. 146
5.2 Timing gearsp. 146
5.3 Valve mechanismp. 147
5.4 Check valves and oil jetsp. 147
5.5 Vacuum pumpp. 148
5.6 Turbochargerp. 148
+1. Oil Filter Replacementp. 151
+Lubricant and/or sealantp. 151
+2. Engine Oil Replacementp. 152
Tightening torque (Unit: N·m {ft.lbs, kgf·m})p. 152
Lubricant and/or sealantp. 152
3. Engine Oil Level Inspectionp. 153
+4. Oil Pressure Measurementp. 153
Service standardsp. 153
Tightening torque (Unit: N·m {ft.lbs, kgf·m})p. 153
+Lubricant and/or sealantp. 153
1 Drain plugp. 155
2 Stiffner RHp. 155
3 Stiffner LHp. 155
4 Oil panp. 155
5 Oil strainerp. 155
6 O-ringp. 155
7 Engine oil level sensorp. 155
8 O-ringp. 155
9 Check valvep. 155
10 Oil jetp. 155
Tightening torque (Unit: N·m {ft.lbs, kgf·m})p. 155
Lubricant and/or sealantp. 155
+Installation procedurep. 156
+Installation: Oil panp. 156
1 Oil pumpp. 157
2 Oil pump coverp. 157
3 Driven gearp. 157
4 Gear and case assemblyp. 157
5 O-ringp. 157
Service standards (Unit: mm {in.})p. 157
Tightening torque (Unit: N·m {ft.lbs, kgf·m})p. 157
Lubricant and/or sealantp. 157
Special tools (Unit: mm {in.})p. 158
+Inspection procedurep. 158
Inspection: Driven gear, drive gear and gear and case ass emblyp. 158
Inspection: Oil pump cover, driven gear, and gear and case assemblyp. 158
+Installation procedurep. 159
Installation: Oil pump cover and gear and case assemblyp. 159
+Installation: Oil pumpp. 159
1 Drain plugp. 161
2 Oil filterp. 161
3 Oil pipep. 161
4 O-ringp. 161
5 O-ringp. 161
6 Plugp. 161
7 Regulator valve springp. 161
8 Regulator valvep. 161
9 Oil filter headp. 161
10 Gasketp. 161
Service standards (Unit: mm {in.})p. 161
Tightening torque (Unit: N·m {ft.lbs, kgf·m})p. 161
Lubricant and/or sealantp. 161
Special toolsp. 162
+Removal procedurep. 162
Removal: Oil filterp. 162
+Installation procedurep. 162
Installation: Oil filterp. 162
1 Eyeboltp. 163
2 Oil pipep. 163
3 Plugp. 163
4 O-ringp. 163
5 Bypass valve springp. 163
6 Bypass valvep. 163
7 Oil cooler elementp. 163
8 Gasketp. 163
9 Water drain valvep. 163
10 Engine oil pressure switchp. 163
11 Coolant temperature sensor (for water temperature gage)p. 163
12 Coolant temperature sensor (for engine control)p. 163
13 Oil cooler bodyp. 163
14 Gasketp. 163
Service standards (Unit: mm {in.})p. 164
Tightening torque (Unit: N·m {ft.lbs, kgf·m})p. 164
Lubricant and/or sealantp. 164
+Inspection procedurep. 164
Inspection: Oil cooler elementp. 164
+INDEXp. 140
STRUCTURE AND OPERATIONp. 145
SPECIFICATIONSp. 141
STRUCTURE AND OPERATIONp. 143
STRUCTURE AND OPERATIONp. 147
TROUBLESHOOTINGp. 149
OIL PAN, OIL STRAINER AND OIL JETSp. 155
OIL PUMPp. 157
OIL PUMPp. 159
OIL FILTERp. 161
OIL COOLERp. 163
STRUCTURE AND OPERATIONp. 142
COMMON RAILp. 188
SUPPLY PUMPp. 190
TROUBLESHOOTINGp. 170
ON-VEHICLE INSPECTION AND ADJUSTMENTp. 172
INDEXp. 165
+1. Fuel System (Flow of Fuel)p. 167
2. Engine Controlp. 168
3. Fuel Filterp. 169
+1. Inspecting and Adjusting No-load Minimum and Maximum Speedsp. 172
[Work before inspection and adjustment]p. 172
[Inspection and adjustment]p. 172
2. Air-bleeding of Fuel Systemp. 173
+3. Fuel Filter Replacementp. 174
[Removal]p. 174
+[Installation]p. 174
1 Drain plugp. 176
2 Suction hosep. 176
3 Return hosep. 176
4 Fuel level sensorp. 176
5 Lock nutp. 176
6 Fuel tank bandp. 176
7 Fuel tankp. 176
8 Fuel tank bracketp. 176
1 Drain plugp. 178
2 Air vent tubep. 178
3 End fillerp. 178
4 Fuel hosep. 178
5 Fuel pipep. 178
6 Fuel hosep. 178
7 Suction hosep. 178
8 Return hosep. 178
9 Fuel lever sensorp. 178
+10 Gasketp. 178
Installation: Fuel tank bandp. 179
+Installation: End fillerp. 179
1 Fuel hosep. 180
2 Water separator sensorp. 180
3 O-ringp. 180
4 Casep. 180
5 O-ringp. 180
6 Filter elementp. 180
7 Plugp. 180
8 Fuel filter headp. 180
Removal: Casep. 181
+Installation: Casep. 181
1 Accelerator pedal (See later sections.)p. 182
2 Accelerator link (See later sections.)p. 182
Removal: Accelerator pedalp. 182
+Installation: Accelerator pedalp. 182
1 E-ringp. 183
2 Clevis pinp. 183
3 Accelerator pedalp. 183
4 Stopper boltp. 183
+5 Accelerator pedal bracketp. 183
2 Springp. 184
3 Washerp. 184
4 Bushingp. 184
5 Return springp. 184
6 Accelerator leverp. 184
7 Accelerator position sensor and accelerator switch assemblyp. 184
8 Lever stopperp. 184
9 Rubber stopperp. 184
10 Accelerator link bracketp. 184
1 Injection pipep. 186
2 Fuel pipep. 186
3 Eyeboltp. 186
4 Fuel return pipe Bp. 186
5 Common railp. 186
6 Fuel temperature sensorp. 186
7 O-ringp. 186
8 Eyeboltp. 186
9 Fuel suction pipe Bp. 186
10 Eyeboltp. 186
11 Fuel suction pipe Ap. 186
12 Eyeboltp. 186
13 Fuel return pipe Ap. 186
14 Eyeboltp. 186
15 Fuel return pipe Cp. 186
+16 Adaptorp. 186
Removal: Injection pipe and fuel pipep. 187
Installation: Injection pipe and fuel pipep. 188
1 Eyeboltp. 190
2 Oil pipep. 190
3 Eyeboltp. 190
4 Fuel return pipe Cp. 190
5 Fuel pipep. 190
6 Eyebolt (with gauze filter)p. 190
7 Fuel suction pipe Ap. 190
8 Supply pumpp. 190
+9 O-ringp. 190
Installation: Supply pumpp. 191
+SUPPLY PUMPp. 192
Installation: Fuel pipep. 192
+INJECTORp. 194
1 Snap ringp. 194
2 Fuel return hosep. 194
3 Injection pipep. 194
4 Bolt (with hexagonal hole)p. 194
5 Injectorp. 194
6 O-ringp. 194
7 Nozzle gasketp. 194
+INJECTORp. 196
Removal: Injection pipep. 196
Installation: Injection pipep. 196
SPECIFICATIONSp. 166
ON-VEHICLE INSPECTION AND ADJUSTMENTp. 174
STRUCTURE AND OPERATIONp. 167
FUEL TANKp. 178
STRUCTURE AND OPERATIONp. 168
FUEL TANKp. 176
FUEL FILTERp. 180
ENGINE CONTROLp. 182
ENGINE CONTROLp. 184
COMMON RAILp. 186
+4M5_Gr13EA_1_21.pdfp. 197
+1. Overviewp. 199
+1.1 Supply pumpp. 201
+(1) MPROP (rail pressure control valve)p. 203
(2) Zero delivery throttlep. 203
(3) Overflow valvep. 203
(4) Flow control valvep. 203
+1.2 Common railp. 204
+1.3 Injectorp. 205
(1) Operationp. 206
(1.1) Injection not taking placep. 206
(1.2) Start of injectionp. 206
(1.3) End of injectionp. 207
+2. Electronic Control Systemp. 208
2.1 System block diagramp. 208
+2.2 Fuel injection rate controlp. 212
+(1) Pilot injectionp. 212
(2) Split injection controlp. 212
+2.3 Fuel injection quantity controlp. 212
+(1) Fuel injection quantity during engine startupp. 212
(2) Basic fuel injection quantityp. 212
(3) Maximum injection quantityp. 212
(4) Injection quantity correctionp. 213
+2.4 Fuel injection timing controlp. 213
+(1) Main injection timingp. 213
(2) Pilot injection timing (pilot interval)p. 213
2.5 Fuel injection pressure controlp. 213
2.6 Fuel injection control for DPF regenerationp. 213
2.7 Auxiliary brake functionp. 214
Accelerator pedal position sensorp. 214
Clutch switchp. 214
Transmission neutral switchp. 214
Automatic transmission exhaust brake cut relayp. 214
+Exhaust brake switchp. 214
2.8 Idle-up functionp. 214
2.9 Alteration of electronic control unit data (coding function)p. 214
2.10 Resetting the diesel particulate filter related information (resetting electronic control unit )p. 214
+2.11 Diagnostic functionp. 215
+(1) Overviewp. 215
(2) Reading fault codep. 215
(3) Erasing of fault codep. 215
+3. Electronic Control Unit Connection Diagramp. 216
+INDEXp. 197
SPECIFICATIONSp. 198
STRUCTURE AND OPERATIONp. 199
STRUCTURE AND OPERATIONp. 200
STRUCTURE AND OPERATIONp. 202
STRUCTURE AND OPERATIONp. 216
STRUCTURE AND OPERATIONp. 204
STRUCTURE AND OPERATIONp. 206
STRUCTURE AND OPERATIONp. 208
STRUCTURE AND OPERATIONp. 210
STRUCTURE AND OPERATIONp. 212
STRUCTURE AND OPERATIONp. 214
4M5_Gr13EA_22_32.pdfp. 218
4M5_Gr13EA_33_126.pdfp. 229
4M5_Gr13EA_127_235.pdfp. 323
236-325.pdfp. 432
326-496.pdfp. 522
497_680.pdfp. 693
681_840.pdfp. 877
841-963.pdfp. 1037
964_973.pdfp. 1160
974_998..pdfp. 1170
INDEXp. 1195
1. General Descriptionp. 1196
+2. Electronic Control Systemp. 1196
2.1 System block diagramp. 1196
+2.2 Auto cruise functionp. 1197
+(1) Setting the auto cruise functionp. 1198
(1.1) Setting conditionp. 1198
(1.2) Set switch (“SET” side of the set and resume switch)p. 1198
(1.3) Resume switch (“RESUME” side of the set and resume switch)p. 1198
+(2) Disengaging the auto cruise controlp. 1199
2.3 Vehicle speed limiting (SLD) functionp. 1199
2.4 Trouble diagnosis functionp. 1199
3. Electronic Control Unit Connection Diagramp. 1200
1. Diagnosis Procedurep. 1202
2. Diagnostic Precautionsp. 1203
+3. Inspection Based on Diagnosis Codesp. 1204
3.1 List of diagnosis codesp. 1204
+3.2 Diagnosis code generation conditions and inspection itemsp. 1204
P0500: Vehicle Speed Sensor (Warning lamp: 06)p. 1204
P0504: Brake SW (warning lamp: 11)p. 1204
P1002: Battery Voltage (Warning lamp: 02)p. 1205
P1003: Battery Terminal (Warning lamp: 03)p. 1205
P1004: Main Voltage (Warning lamp: 04)p. 1205
P1007: MVCU (Warning lamp: 07)p. 1205
P1008: Vehicle Identification (Warning lamp: 08)p. 1205
P1009: Non Coding (Warning lamp: 09)p. 1206
P1016: Cruise Variation Identify (Warning lamp: 16)p. 1206
U0100: CAN Communication (Warning lamp: 05)p. 1206
U1013: Engine ECU Cruise Control (Warning lamp: 13)p. 1206
U1031: Engine ECU SPEED Limiting (Warning lamp: 31)p. 1207
4. Multi-Use Tester Service Datap. 1208
5. Actuator Tests Performed Using Multi-Use Testerp. 1209
6. Works Required When Replacing the Multifunction Vehicle Control Unit (MVCU)p. 1209
+7. Inspections Performed at Electronic Control Unit Connectorsp. 1210
7.1 Electronic control unit connector terminal arrangementp. 1210
+7.2 Inspection procedurep. 1210
#007 Cruise control main switch inspectionp. 1211
#042 Stop lamp switchp. 1211
#099 Set and resume switch inspectionp. 1211
#265 Vehicle speed sensor inspectionp. 1211
STRUCTURE AND OPERATIONp. 1196
TROUBLESHOOTINGp. 1202
TROUBLESHOOTINGp. 1204
TROUBLESHOOTINGp. 1206
INSPECTION OF ELECTRICAL EQUIPMENTp. 1210
ELECTRIC CIRCUIT DIAGRAMp. 1215
INSTALLED LOCATIONS OF PARTSp. 1212
STRUCTURE AND OPERATIONp. 1198
STRUCTURE AND OPERATIONp. 1200
TROUBLESHOOTINGp. 1208
TROUBLESHOOTINGp. 1867
WHEEL AND TIREp. 1868
WHEEL AND TIREp. 1870
+WHEEL AND TIREp. 1872
1 Wheel nut Wheel nut (outer)p. 1868
2 Tire (See later section.)p. 1868
3 Wheel nut (inner)p. 1868
4 Tire (See later section.)p. 1868
+Inspection procedurep. 1869
Inspection: Tirep. 1869
Correction: Tirep. 1869
+Installation procedurep. 1870
+Installation: Tirep. 1870
A: Threaded portion of hub boltp. 1870
B: Wheel mounting surface of hubp. 1870
C: Wheel alignment area of hubp. 1870
D: Mating surfaces of disc wheelp. 1870
E: Wheel nut mounting surface of disc wheelp. 1870
F: Threaded portion of wheel nutp. 1870
G: Spherical portion of wheel nutp. 1870
1 Tirep. 1870
2 Air valvep. 1870
3 Disc wheelp. 1870
+Inspection procedurep. 1871
+Inspection: Disc wheelp. 1871
+(1) Flatnessp. 1871
A: f170 mm, 270 mm {6.69, 10.6 in.} 16 ¥ 6K-127 16 ¥ 6K-135 f175 mm, 275 mm {6.89, 10.8 in.} 17.5 ¥ 6.00-127p. 1871
(2) Runoutp. 1871
+Installation procedurep. 1871
+Installation: Tirep. 1871
A: Front face of disc wheelp. 1871
B: Back face of disc wheelp. 1871
+Installation procedurep. 1872
Installation: Balance weightp. 1872
SPECIFICATIONSp. 1866
INDEXp. 1865
SPECIFICATIONSp. 2035
STRUCTURE AND OPERATIONp. 2037
STRUCTURE AND OPERATIONp. 2041
STEERING COLUMNp. 2055
TROUBLESHOOTINGp. 2043
STRUCTURE AND OPERATIONp. 2039
ON-VEHICLE INSPECTION AND ADJUSTMENTp. 2045
ON-VEHICLE INSPECTION AND ADJUSTMENTp. 2047
STEERING COLUMNp. 2049
POWER STEERING GEAR AND DRAG LINKp. 2059
STEERING COLUMNp. 2051
STEERING COLUMNp. 2053
POWER STEERING GEAR AND DRAG LINKp. 2057
+INDEXp. 2034
POWER STEERING GEAR AND DRAG LINKp. 2067
POWER STEERING GEAR AND DRAG LINKp. 2061
POWER STEERING GEAR AND DRAG LINKp. 2063
1. Steering Systemp. 2037
2. Oil Flowp. 2037
3. Power Steering Gear (Backlash Compensation Mechanism)p. 2038
+4. Power Steering Oil Pumpp. 2039
+4.1 Flow control valvep. 2040
+(1) Operation of flow control valvep. 2040
(1.1) When not functioning (oil pump in operation at low speed)p. 2040
(1.2) When functioning (oil pump in operation at middle to high speeds)p. 2040
(2) Operation of relief valvep. 2040
+5. Power Steering Oil Pumpp. 2041
+5.1 Control valvep. 2042
+(1) Operation of control valvep. 2042
(1.1) When not functioning (oil pump in operation at low speed)p. 2042
(1.2) When functioning (oil pump in operation at medium to high speeds)p. 2042
(2) Operation of relief valvep. 2042
+1. Change of Power Steering Fluidp. 2045
(1) Drainingp. 2045
(2) Fillingp. 2045
2. Bleeding of Power Steering Systemp. 2046
+3. Performance Verification Test of Power Steering Systemp. 2047
A: To hydraulic boosterp. 2047
B: From hydraulic boosterp. 2047
4. Steering Wheel Playp. 2048
5. Steering Column Loosenessp. 2048
+6. Inspection of Drag Link Ball Jointp. 2048
+(1) Back lashp. 2048
1 Horn padp. 2050
2 Steering wheelp. 2050
3 Front column coverp. 2050
4 Rear column coverp. 2050
5 Combination switchp. 2050
6 Twist-off boltp. 2050
7 Starter switchp. 2050
8 Steering column (For details, see later pages.)p. 2050
9 Dust coverp. 2050
10 Dust coverp. 2050
11 Dust coverp. 2050
+Work before removalp. 2050
Alignment mark: Steering column and power steering gearp. 2050
+Removal procedurep. 2051
Removal: Horn padp. 2051
Removal: Front column coverp. 2051
Removal: Starter switchp. 2051
Removal: Steering columnp. 2051
+Installation procedurep. 2052
Installation: Steering columnp. 2052
Installation: Starter switchp. 2052
Installation: Steering wheelp. 2052
+Inspection after installationp. 2052
Inspection: Noise from steering wheelp. 2052
1 Lever coverp. 2054
2 Lever protectorp. 2054
3 Pinp. 2054
4 Lock leverp. 2054
5 Nutp. 2054
6 Boltp. 2054
7 Spacerp. 2054
8 Pinp. 2054
9 Collarp. 2054
10 Tilting and telescoping leverp. 2054
11 Springp. 2054
12 Steering column supportp. 2054
13 Shock absorbing rubberp. 2054
14 Steering columnp. 2054
+Work before removalp. 2054
Alignment mark: Nut and lock leverp. 2054
+Installation procedurep. 2055
Installation: Lock leverp. 2055
+Inspection after installationp. 2055
Inspection: Tilting and telescoping lever operating forcep. 2055
Adjustment: Lock leverp. 2055
1 Drag linkp. 2057
2 Feed pipep. 2057
3 Return pipep. 2057
4 Power steering gearp. 2057
+Inspection procedurep. 2058
Inspection: Drag linkp. 2058
(1) Playp. 2058
(2) Rotation torquep. 2058
(3) Dust coverp. 2058
+Installation procedurep. 2058
Installation: Drag linkp. 2058
+Power Steering Gearp. 2059
1 Pitman armp. 2060
2 Dust coverp. 2060
4 Y-packingp. 2060
5 Backup ringp. 2060
6 O-ringp. 2060
7 Side coverp. 2060
10 Sector shaftp. 2060
11 Plugp. 2060
12 Dust coverp. 2060
13 Ball tube clipp. 2060
14 Ball tubep. 2060
15 Steel ballp. 2060
16 Seal ringp. 2060
17 O-ringp. 2060
18 Pistonp. 2060
19 Ball bearingp. 2060
20 Oil sealp. 2060
21 Adjusting plugp. 2060
22 O-ringp. 2060
23 Seal ringp. 2060
24 O-ringp. 2060
25 O-ringp. 2060
26 Valve housingp. 2060
27 Side racep. 2060
28 Steel ballp. 2060
29 Bearing cagep. 2060
30 Seal ringp. 2060
31 Rotorp. 2060
32 Worm and stub shaftp. 2060
33 O-ringp. 2060
34 Oil sealp. 2060
36 Y-packingp. 2060
37 Backup ringp. 2060
38 Bodyp. 2060
+Inspection before removalp. 2065
+Inspection: Starting torquep. 2065
A: Starting torque (= engaging torque + normal turning torque)p. 2065
B: Engaging torquep. 2065
C: Normal turning torquep. 2065
+Removal procedurep. 2065
Removal: Pitman armp. 2065
Removal: Sector shaftp. 2066
Removal: Side coverp. 2066
Removal: Retainerp. 2066
Removal: Worm shaft and valve housingp. 2067
Removal: Ball tube and steel ballp. 2067
Removal: Pistonp. 2068
Removal: Worm and stub shaftp. 2068
+Inspection procedurep. 2068
Inspection: Side play of piston and worm and stub shaftp. 2068
+Installation procedurep. 2069
Installation: Backup ring and Y-packingp. 2069
Installation: Oil sealp. 2069
Installation: Seal ringp. 2069
Installation: Rotorp. 2070
Installation: Side race, steel balls and bearing cagep. 2070
Installation: Oil sealp. 2071
Installation: Worm and stub shaftp. 2071
Installation: Adjusting plugp. 2071
Installation: Seal ring and O-ringp. 2072
Installation: Ball tubep. 2072
Installation: Ball screw and valve housingp. 2072
Installation: Retainerp. 2073
Installation: Seal ring and O-ringsp. 2073
Installation of sensor shaftp. 2073
+Adjustment after installationp. 2074
Inspection: Starting torquep. 2074
1 Pipep. 2075
2 Hosep. 2075
3 Suction connectorp. 2075
4 O-ringp. 2075
5 Pinp. 2075
6 Coverp. 2075
7 Cartridge assemblyp. 2075
8 Vanep. 2075
9 Rotorp. 2075
10 Cam ringp. 2075
11 O-ringp. 2075
12 Side platep. 2075
13 O-ringp. 2075
14 Connectorp. 2075
15 Flow control valvep. 2075
16 Flow control springp. 2075
17 O-ringp. 2075
18 O-ringp. 2075
19 Bodyp. 2075
+Inspection procedurep. 2076
Inspection: Flow control valvep. 2076
+Installation procedurep. 2076
Installation: Cam ringp. 2076
Installation: Vanep. 2077
+Installation: Pinp. 2077
A: 18.1 mm {0.71 in.}p. 2077
1 Eyeboltp. 2079
2 Pipep. 2079
3 Hosep. 2079
4 Suction connectorp. 2079
5 O-ringp. 2079
6 Plugp. 2079
7 O-ringp. 2079
8 Springp. 2079
9 Plugp. 2079
10 O-ringp. 2079
11 Control valvep. 2079
12 Control valve springp. 2079
13 Straight pinp. 2079
14 O-ringp. 2079
15 Rear bodyp. 2079
16 Cartridge assemblyp. 2079
17 Vanep. 2079
18 Rotorp. 2079
19 Cam ringp. 2079
20 Sealp. 2079
21 Rubber springp. 2079
22 Adapterp. 2079
23 Pressure platep. 2079
24 O-ringp. 2079
25 O-ringp. 2079
26 O-ringp. 2079
27 Seal ringp. 2079
28 Front bodyp. 2079
+Inspection procedurep. 2080
Inspection: Control valvep. 2080
+Installation procedurep. 2080
Installation: Seal and rubber springp. 2080
Installation: Vanep. 2081
1 Hosep. 2083
2 Hosep. 2083
3 Capp. 2083
4 Strainerp. 2083
5 Bodyp. 2083
POWER STEERING GEAR AND DRAG LINKp. 2069
POWER STEERING GEAR AND DRAG LINKp. 2065
POWER STEERING GEAR AND DRAG LINKp. 2071
POWER STEERING GEAR AND DRAG LINKp. 2073
POWER STEERING OIL PUMPp. 2075
POWER STEERING OIL PUMPp. 2079
POWER STEERING TANKp. 2083
POWER STEERING OIL PUMPp. 2077
POWER STEERING OIL TANKp. 2081
SPECIFICATIONSp. 2115
DOORp. 2125
ON-VEHICLE INSPECTION AND ADJUSTMENTp. 2119
STRUCTURE AND OPERATIONp. 2117
DOORp. 2127
DOORp. 2123
ON-VEHICLE INSPECTION AND ADJUSTMENTp. 2121
DOORp. 2129
TROUBLESHOOTINGp. 2118
STRUCTURE AND OPERATIONp. 2116
INDEXp. 2114
1. Door Lock Systemp. 2116
2. Window Opening and Closing Mechanismp. 2117
+1. Door Alignmentp. 2119
1.1 Adjustment of hinge positionsp. 2119
1.2 Adjustment of striker positionp. 2119
+1.3 Door alignment dimensionsp. 2120
1 Door (See later section.)p. 2123
2 Upper hingep. 2123
3 Lower hingep. 2123
4 Strikerp. 2123
5 Striker shimp. 2123
6 Door switchp. 2123
+Doorp. 2124
1 Power window switchp. 2124
2 Clipp. 2124
3 Regulator handlep. 2124
4 Lower door trimp. 2124
5 Trim bracketp. 2124
6 Speakerp. 2124
7 Water-proof coverp. 2124
8 Weatherstripp. 2124
9 Door fenderp. 2124
10 Air outlet garnishp. 2124
11 Weatherstripp. 2124
12 Door panel (See later section.)p. 2124
+Removal procedurep. 2125
Removal: Power window switchp. 2125
Removal: Lower door trimp. 2125
Removal: Air outlet garnishp. 2125
Installation: Air outlet garnishp. 2125
Installation: Water-proof coverp. 2126
Installation: Power window switchp. 2126
+Door Panel Assemblyp. 2127
1 Glass holderp. 2127
2 Door glassp. 2127
3 Regulator and motor Manual regulatorp. 2127
4 Sash garnishp. 2127
5 Beltline moldingp. 2127
6 Delta garnishp. 2127
7 Door lock actuator Door lockp. 2127
8 Door lock cylinderp. 2127
9 Outside handlep. 2127
10 Ash trayp. 2127
11 Weatherstripp. 2127
12 Inside handle inner coverp. 2127
13 Inside lock cablep. 2127
14 Inside open cablep. 2127
15 Inside handlep. 2127
16 Inside handle outer coverp. 2127
17 Springp. 2127
18 Ash tray coverp. 2127
19 Upper door trimp. 2127
20 Runchannelp. 2127
21 Protectorp. 2127
22 Door checkp. 2127
23 Door panelp. 2127
+Removal sequencep. 2128
Removal: Sash garnishp. 2128
Removal: Beltline moldingp. 2128
Removal: Delta garnishp. 2129
+Installation procedurep. 2129
Installation: Protectorp. 2129
Installation: Upper door trimp. 2129
Installation: Delta garnishp. 2129
Installation: Beltline moldingp. 2129
Installation: Sash garnishp. 2129
Installation: Regulator and motor or manual regulatorp. 2130
sr54_INDEXwm09.pdfp. 2182
sr54_HOW_TOwm09.pdfp. 2186
sr54-00Awm09.pdfp. 2190
sr54-00Bwm09.pdfp. 2202
sr54-00Cwm09.pdfp. 2206
sr54-00Dwm09.pdfp. 2228
sr54-01wm09.pdfp. 2238
sr54-02wm09.pdfp. 2276
sr54-03wm09.pdfp. 2280
sr54-04wm09.pdfp. 2294
sr54-05wm09.pdfp. 2300
sr54-06wm09.pdfp. 2312
sr54-07wm09.pdfp. 2322
sr54-08wm09.pdfp. 2324
sr54-09wm09.pdfp. 2326
sr54-10wm09.pdfp. 2332
sr54-11wm09.pdfp. 2350
sr54-12wm09.pdfp. 2374
sr54-13wm09.pdfp. 2398
+sr54-14wm09.pdfp. 2412
CONNECTOR CONFIGURATION CHARTp. 2413
CONNECTOR CONFIGURATION CHARTp. 2481
CONNECTOR CONFIGURATION CHARTp. 2483
CONNECTOR CONFIGURATION CHARTp. 2415
CONNECTOR CONFIGURATION CHARTp. 2417
CONNECTOR CONFIGURATION CHARTp. 2423
CONNECTOR CONFIGURATION CHARTp. 2425
CONNECTOR CONFIGURATION CHARTp. 2427
CONNECTOR CONFIGURATION CHARTp. 2419
CONNECTOR CONFIGURATION CHARTp. 2421
CONNECTOR CONFIGURATION CHARTp. 2429
CONNECTOR CONFIGURATION CHARTp. 2431
CONNECTOR CONFIGURATION CHARTp. 2485
CONNECTOR CONFIGURATION CHARTp. 2433
CONNECTOR CONFIGURATION CHARTp. 2435
+54-14 CONNECTOR CONFIGURATION CHARTp. 2412
CONNECTOR CONFIGURATION CHARTp. 2437
CONNECTOR CONFIGURATION CHARTp. 2439
CONNECTOR CONFIGURATION CHARTp. 2441
CONNECTOR CONFIGURATION CHARTp. 2443
CONNECTOR CONFIGURATION CHARTp. 2445
CONNECTOR CONFIGURATION CHARTp. 2447
CONNECTOR CONFIGURATION CHARTp. 2449
CONNECTOR CONFIGURATION CHARTp. 2451
CONNECTOR CONFIGURATION CHARTp. 2453
CONNECTOR CONFIGURATION CHARTp. 2455
CONNECTOR CONFIGURATION CHARTp. 2457
CONNECTOR CONFIGURATION CHARTp. 2459
CONNECTOR CONFIGURATION CHARTp. 2463
CONNECTOR CONFIGURATION CHARTp. 2465
CONNECTOR CONFIGURATION CHARTp. 2467
CONNECTOR CONFIGURATION CHARTp. 2461
CONNECTOR CONFIGURATION CHARTp. 2469
CONNECTOR CONFIGURATION CHARTp. 2471
CONNECTOR CONFIGURATION CHARTp. 2473
CONNECTOR CONFIGURATION CHARTp. 2475
CONNECTOR CONFIGURATION CHARTp. 2477
CONNECTOR CONFIGURATION CHARTp. 2479
CONNECTOR CONFIGURATION CHARTp. 2487
CONNECTOR CONFIGURATION CHARTp. 2489
CONNECTOR CONFIGURATION CHARTp. 2491
CONNECTOR CONFIGURATION CHARTp. 2493
ON-VEHICLE INSPECTION AND ADJUSTMENTp. 2506
ON-VEHICLE INSPECTION AND ADJUSTMENTp. 2508
1. Heaterp. 2498
2. Front Air Conditionerp. 2499
3. Air Ductp. 2500
+4. Heater Controlp. 2501
4.1 Mode selectionp. 2501
4.2 Air mix selectionp. 2502
4.3 Fresh/recirculation changeoverp. 2503
1. Recovery of Refrigerantp. 2506
2. Recharging the System with Refrigerantp. 2507
3. Checking Refrigerant Charge Levelp. 2509
+4. Adding Refrigerantp. 2510
1 Flange (pipe end)p. 2511
2 Flange (mating end)p. 2511
3 O-ringp. 2511
4 Pipep. 2511
5 Pipep. 2511
6 Unionp. 2511
7 Nutp. 2511
1 Discharge hose (high pressure side) (See AIR CONDITIONER PIPE CONNECTING.)p. 2512
2 Suction hose (low pressure side) (See AIR CONDITIONER PIPE CONNECTING.)p. 2512
3 V-ribbed beltp. 2512
4 Spacerp. 2512
5 Shaftp. 2512
6 Adjusting platep. 2512
7 Clampp. 2512
+8 Compressorp. 2512
Inspection: Compressorp. 2513
1 Baffle platep. 2514
2 Intercept platep. 2514
3 Baffle plate (upper)p. 2514
4 Eva platep. 2514
5 Baffle plate (lower)p. 2514
6 Discharge hose (compressor end)p. 2514
7 Liquid hose (heater and cooling unit end)p. 2514
8 Liquid pipep. 2514
9 Receiverp. 2514
10 Condenser rear bracketp. 2514
11 Condenserp. 2514
+12 Condenser front bracketp. 2514
Inspection: Condenserp. 2515
1 Air mix control cable (BLACK)p. 2516
2 Mode selection control cable (NATURAL)p. 2516
+3 Heater control unitp. 2516
Adjustment: Temperature control knobp. 2517
Removal: Control cablesp. 2517
Adjustment: Heater control unit knobsp. 2518
Installation: Air mix control cablep. 2519
Installation: Mode selection control cablep. 2519
1 Center ductp. 2521
2 Driver face ductp. 2521
3 Center face ductp. 2521
4 Passenger face ductp. 2521
5 Clip ( ¥ 7)p. 2521
6 Front defroster ductp. 2521
7 Side defroster ductp. 2521
8 Passenger foot ductp. 2521
9 Center foot ductp. 2521
10 Foot duct bracketp. 2521
11 Driver foot duct Bp. 2521
+12 Driver foot duct Ap. 2521
Installation: Front defroster ductp. 2521
1 Heater hose (outlet)p. 2523
2 Heater hose (return)p. 2523
3 Drain hosep. 2523
4 Discharge hose (high pressure)p. 2523
5 Suction hose (low pressure)p. 2523
6 Air filterp. 2523
7 Fresh/recirculation changeover motorp. 2523
8 Blowerp. 2523
9 Bracketp. 2523
10 Bracketp. 2523
11 Joint ductp. 2523
+12 Heater and cooling unit (See later sections.)p. 2523
Installation: Fresh/recirculation changeover motorp. 2523
+Heater Unit or Heater and Cooling Unitp. 2524
1 Coverp. 2524
2 Baffle coverp. 2524
3 Pipe assemblyp. 2524
4 Rubber insulationp. 2524
5 Case coverp. 2524
6 Evaporator assemblyp. 2524
7 Coverp. 2524
8 Heater corep. 2524
9 Heater and cooling unit casep. 2524
SPECIFICATIONSp. 2496
+INDEXp. 2495
STRUCTURE AND OPERATIONp. 2502
TROUBLESHOOTINGp. 2504
STRUCTURE AND OPERATIONp. 2498
STRUCTURE AND OPERATIONp. 2500
ON-VEHICLE INSPECTION AND ADJUSTMENTp. 2510
CONNECTING AIR CONDITIONER PIPINGp. 2511
CONDENSER, RECEIVERp. 2514
HEATER CONTROLp. 2516
HEATER CONTROLp. 2518
AIR DUCTp. 2520
HEATER AND COOLING UNIT, BLOWERp. 2522
HEATER AND COOLING UNIT, BLOWERp. 2524
COMPRESSORp. 2512
What This Manual Enables You to Do
Whether you are a professional technician or a fleet maintenance manager, this 2009 Mitsubishi Fuso FE Workshop Manual gives you the complete factory procedures needed to keep these trucks running. You can diagnose engine faults using the common rail diagnostic codes, perform a complete transmission service, rebuild brake calipers, replace suspension components, and trace electrical faults through the full circuit diagrams.
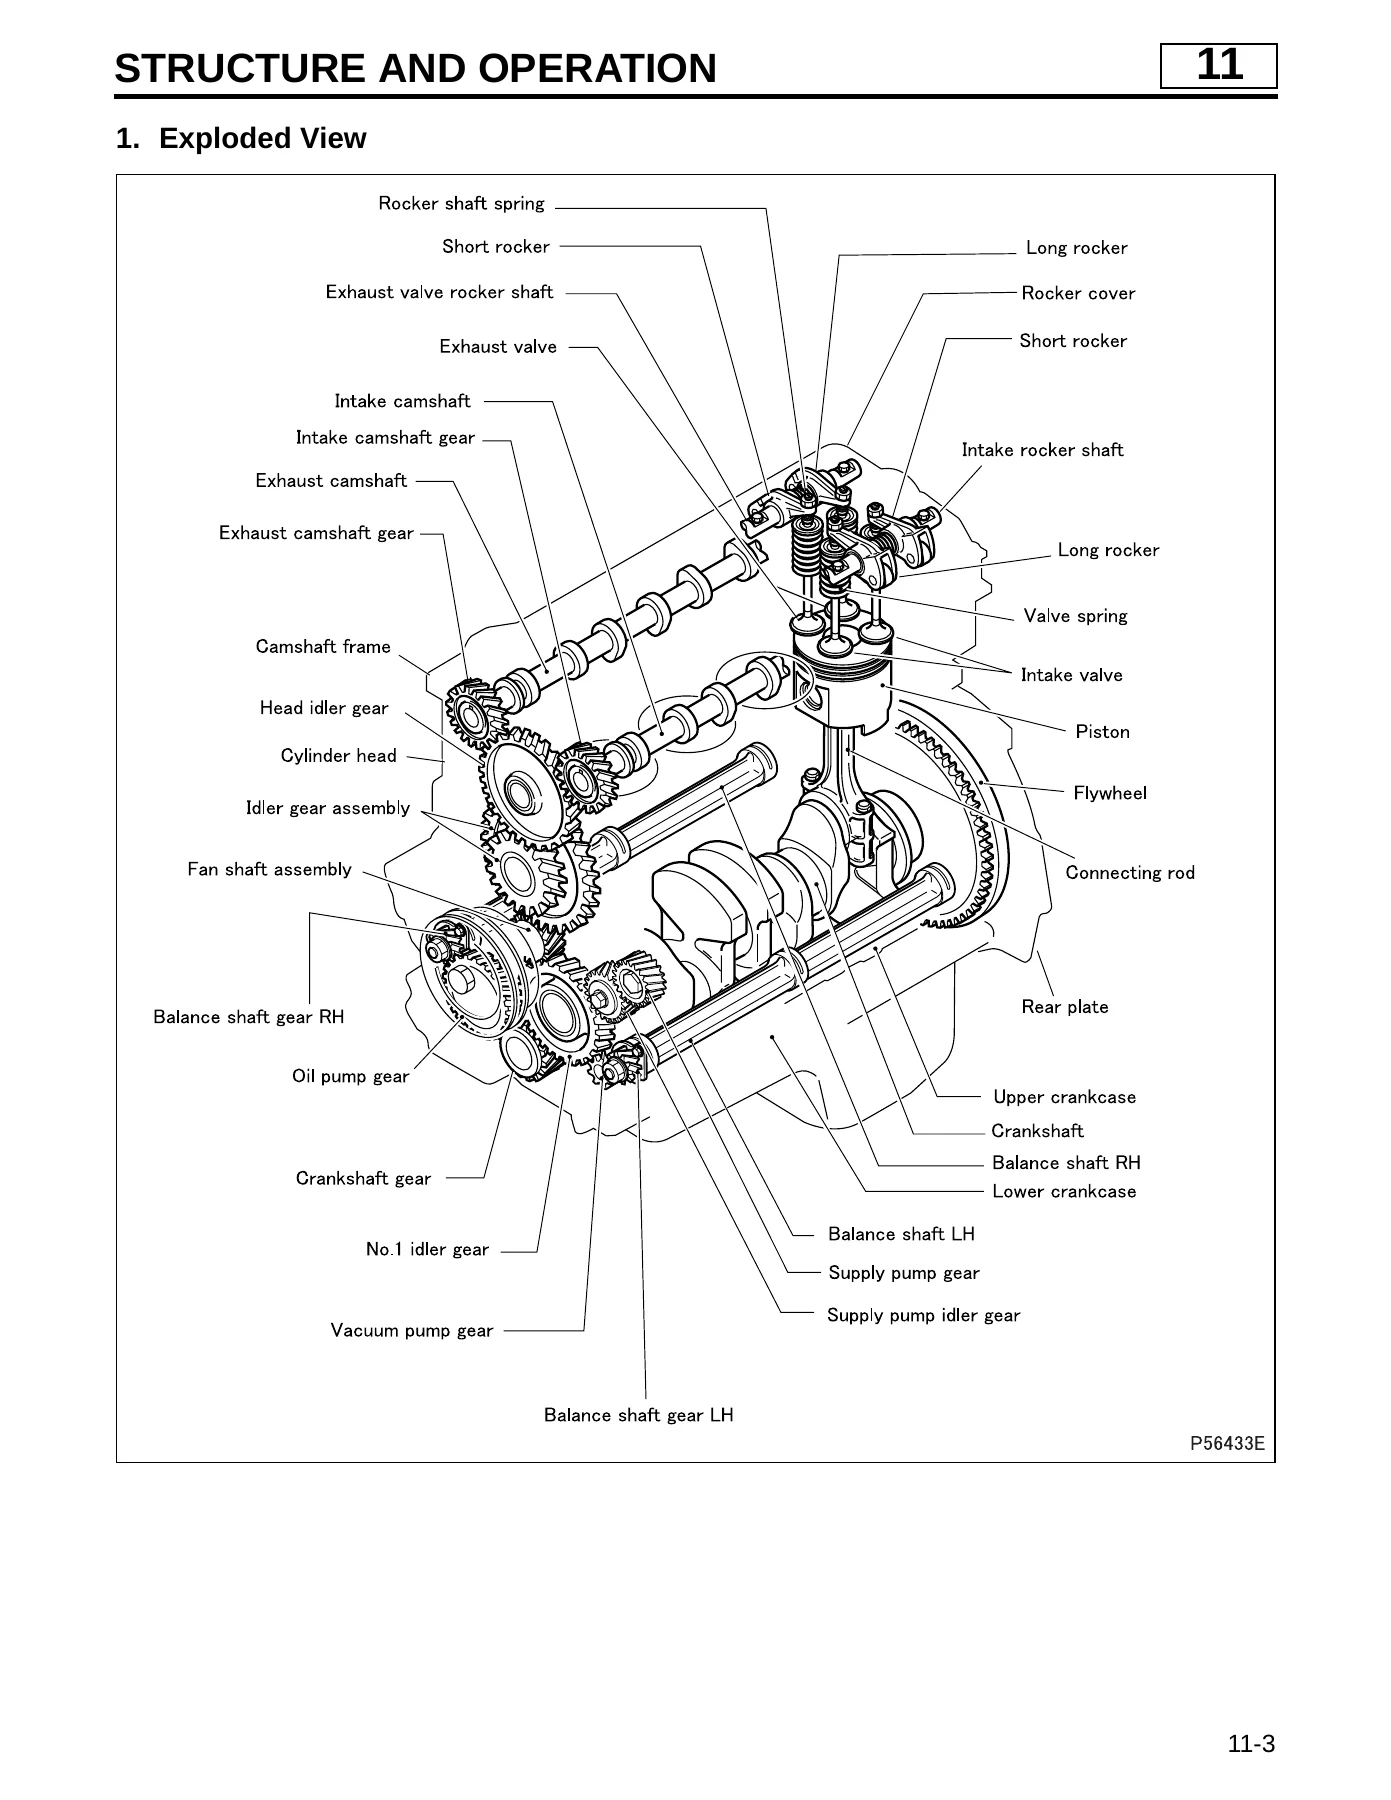
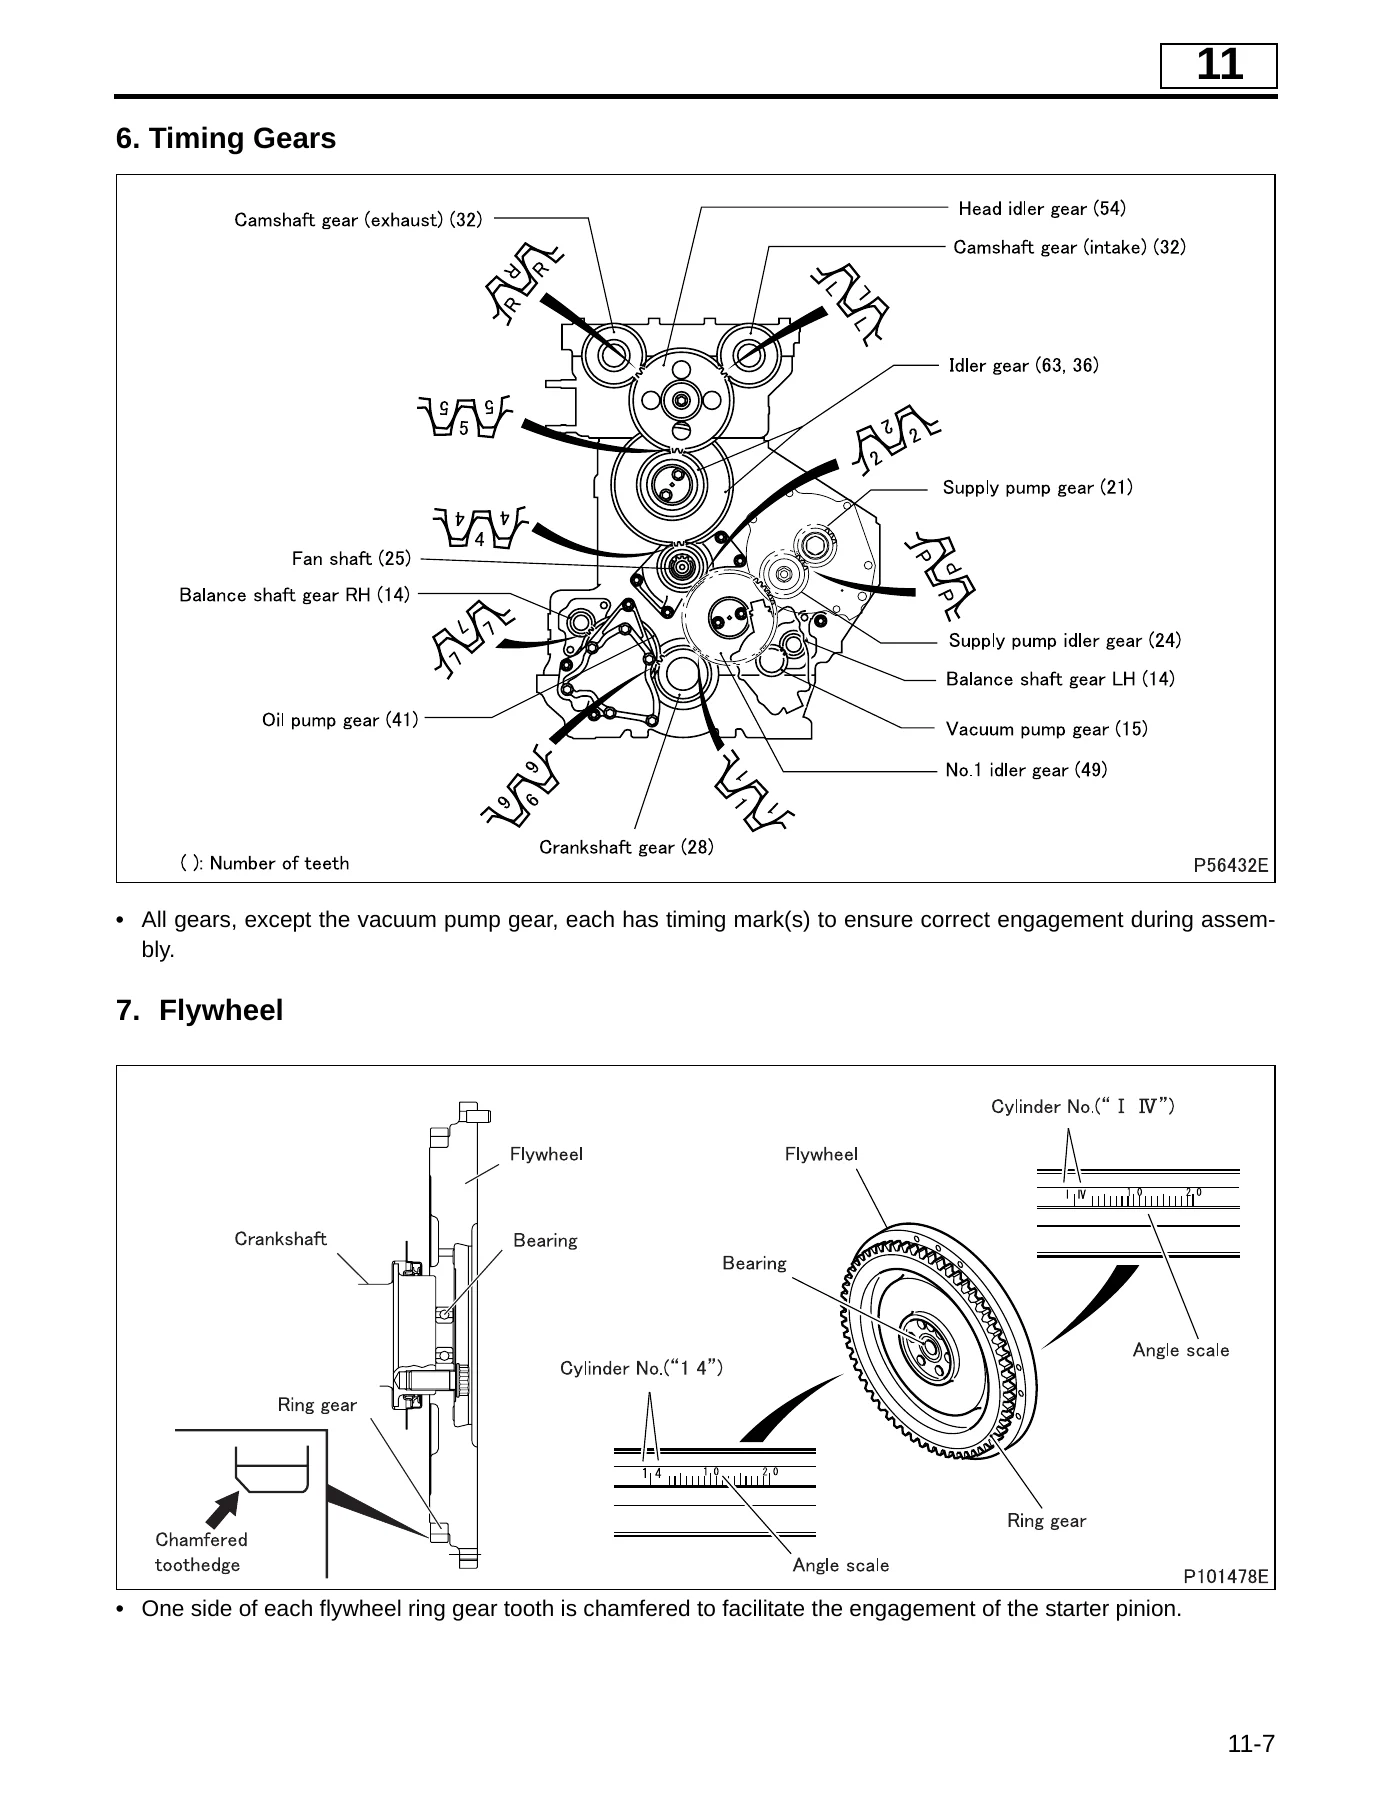
The manual includes exact torque values, fluid capacities, wear limits, and adjustment procedures — the kind of detail that prevents costly comebacks and ensures every repair is done right the first time. You get step-by-step disassembly and reassembly sequences, exploded views, and troubleshooting flowcharts that guide you from symptom to solution. The engine section alone covers valve clearance adjustment, compression testing, cylinder head service, piston and connecting rod work, crankshaft and crankcase procedures, and balance shaft service.
On the transmission side, the manual provides complete service information for the automatic transmission, including stall tests, time lag tests, line pressure tests, road tests, and detailed troubleshooting for every diagnostic code. The brake section covers both front and rear disc brakes, the anti-lock brake system, and the driveline parking brake. Suspension coverage includes leaf springs, shock absorbers, stabilizers, and all mounting hardware with the correct torque specifications.
Why This Manual Matters
Commercial trucks like the Fuso FE need to stay on the road. Using correct procedures and specifications isn’t just about fixing the current problem — it’s about avoiding secondary damage, ensuring safety systems work as designed, and getting the vehicle back into service quickly. This manual is the authoritative reference for every system on the vehicle. The wiring diagrams and connector pinouts alone are worth the investment, allowing you to diagnose electrical faults methodically instead of guessing.
The manual also includes the complete maintenance schedule, showing exactly what needs to be checked, adjusted, or replaced at each service interval. This is essential for fleet operators who need to keep accurate service records and avoid unexpected breakdowns.
Instant PDF Delivery
Your purchase gives you immediate access to the complete 2524-page PDF. Download it instantly after payment, view it on any device — laptop, tablet, or phone — and print any page or section you need for the shop. No shipping, no waiting, no bulky binders. The entire workshop manual is yours to keep and reference whenever you need it.

Reviews
There are no reviews yet.