★ TRUSTED BY 321,897+ PROFESSIONALS WORLDWIDE
🏒
Trusted Business
Verified & Licensed
πŸ›‘οΈ
Virus Free Files
100% Safe Downloads
πŸ”’
Secure Payment
SSL Protected
⚑
Instant Delivery
Available Immediately
Sale!

Benelli TNT 25 250 Euro IV ABS Service Manual – Motorcycle Maintenance Manual PDF

Original price was: $34.95.Current price is: $20.95.

Complete 440-page Benelli TNT 25 / BJ250-15 workshop manual covering the Euro IV ABS model – engine, EFI, cooling, chassis, brakes, suspension, electrical and full troubleshooting.

⚑
Instant PDF Download
Available immediately
πŸ’Ύ
Save to Your Device
Download & keep forever
πŸ›‘οΈ
Antivirus Scanned
100% virus-free
🌍
Trusted Worldwide
175,000+ customers

Description

The Benelli TNT 25 250 Euro IV ABS Service Manual is the complete workshop-level maintenance and repair guide for the Benelli TNT 25 (BJ250-15 and BJ250-15A) 250cc single-cylinder motorcycle, covering the Euro IV ABS specification alongside the China, Europe and Non-Europe variants. Every procedure a technician or serious owner needs – from a routine valve clearance check to a full engine teardown – is laid out with torque figures, service limits, exploded views and step-by-step disassembly and reassembly instructions. This is the same document used in the workshop, converted to a clean PDF for reference on any device.

File Details

  • Manual type: Motorcycle Maintenance Manual (Service / Workshop Manual)
  • Brand: Benelli (Qianjiang Motorcycle)
  • Models covered: Benelli TNT 25 – BJ250-15A (a1-1, a2-1), BJ250-15 (Europe), BJ250-15 (Non-Europe), BJ250-15 (Europe IV ABS)
  • Engine: 250cc, four-stroke, double overhead camshaft, single cylinder, liquid-cooled
  • Language: English
  • Page count: 440 pages
  • File format: PDF

Chapters Covered

  • Chapter I – Basic Information: notes before maintenance, battery installation, sharp edge and solvent safety, cleaning and storing removed parts, tightening torque, gaskets and O-ring seals, silicone sealant and locking agent, press fitting, ball and needle bearings, oil seals, circlips and cotter pins, lubrication, engine rotation direction, wiring and connector checks, cable arrangement, model information for China, Europe and Non-Europe, general technical parameters, unit conversion table
  • Chapter II – Regular Maintenance: regular maintenance table, torque and locking agent specifications, main locking torque specs, nut, bolt and screw fastening torque, fuel injection system checks, throttle control system, fuel hose, evaporation and recovery system, cooling system, valve clearance check and adjustment, air inlet device, clutch, wheel and tire checks, final drive mechanism and drive chain, brake system, suspension, steering, electrical system, lamp and switch, engine stop switch, frame lubrication, fastener tightness, replacement parts
  • Chapter III – Fuel Injection System (EFI): EFI introduction and system overview, part positions, technical parameters, fuel tank and evaporative recovery system, EFI service notes, ECU (MT05) removal and installation, fuel pump operation and maintenance, throttle body, fuel injector, engine temperature sensor, intake air temperature sensor, manifold absolute pressure sensor, oxygen sensor, idle speed stepper motor, carbon canister solenoid valve, fault maintenance and diagnostic method, DTC tables, diagnostic tool XCM-PT100X and PCHUD software, common troubleshooting
  • Chapter IV – Cooling System: exploded view, coolant flow diagram, technical parameters, coolant condition, coolant level, discharging and adding coolant, pressure testing, cleaning the cooling system, reserve tank, coolant pump, radiator and radiator fan, radiator cap, radiator filler, thermostat
  • Chapter V – Engine Lubrication System and Internals: lubrication system overview, oil passage diagram, oil pump, cylinder head and camshaft, valve assembly, cylinder and piston, piston rings, crankshaft and connecting rod, balance shaft, tensioner, clutch, shift mechanism, primary and secondary shaft components
  • Chapter VI – Chassis: wheel and tire, hub bearing, drive mechanism, drive chain, sprockets and shaft sleeves, brake system including calipers, brake pads, master cylinders, brake discs, brake fluid and brake hoses, front and rear suspension, rear swing arm, steering system, handlebar, frame, side stand, pedals, muffler, fenders, body covers
  • Chapter VII – Electrical System: precautions, technical parameters, electrical wiring and wiring inspection, charging system, battery, magneto, voltage regulator/rectifier, ignition system, crankshaft sensor, ignition coil, spark plug, ECU, starting system, starter motor, starter relay, lighting system, headlight, instrument, switches and sensors, speed sensor, oxygen sensor, fuel level sensor, horn, fan and fan switch, relay and fuse box
  • Chapter VIII – Appendix: routing of cable, wire and hose, main harness routing, throttle cable routing, clutch cable routing, troubleshooting guide, circuit diagram, special tool list summary

What sets this Benelli TNT 25 workshop manual apart is the level of detail carried through the entire drivetrain. The engine section alone walks through the camshaft support, valve lifter and shim selection by thickness code, piston-to-cylinder clearance measurement points, connecting rod big-end side clearance, crankshaft runout, balance shaft and tensioner – each one paired with a measurable service limit and a standard value so a machinist can judge a wear tolerance on the spot. The clutch and shift mechanism are documented down to the shift locating roller, star wheel pressure plate and shift drum wear limits. The cylinder head tightening sequence is prescribed across three passes, and the front and rear shock absorbers have their oil level, oil quantity and spring free-length standard and limit both listed.

The EFI portion of this manual is equally thorough. It covers the Delphi MT05 ECU pinout on both connectors, throttle position sensor resistance, idle air control valve winding resistance, fuel injector resistance at 20 degrees Celsius, fuel pressure ranges, oxygen sensor heater resistance, manifold absolute pressure sensor characteristic curve, coolant temperature and intake air temperature sensor resistance tables, and a full DTC code list mapped between hexadecimal and decimal forms so a scan tool readout or flash-count method both lead to the same fault. The coolant system is documented with the radiator cap relief pressure range, thermostat open and full-lift temperatures, and coolant capacity for both a drain-and-refill and a complete engine strip.

On the chassis side, the manual walks through wheel runout standards, static rim balance with weight sizes, hub and shaft sleeve bearing removal and installation with the correct special tools, drive chain slackness and 20-link wear limits, sprocket deformation, front and rear brake disc thickness and runout, caliper piston and oil seal service, brake master cylinder piston and cup inspection, and fork oil viscosity, quantity, oil level and spring service limits. The steering stem bearing is covered with a full sequence – clamp load, back-off, final torque, and a free-play confirmation – which is exactly the kind of procedure that gets skipped without the factory instruction and then causes a wobble at speed.

The electrical section is not just a wiring key. It carries the charging circuit diagram, magneto AC output test values, regulator and rectifier diode testing, ignition coil primary and secondary resistance standards, spark plug gap, starter motor carbon brush and commutator service limits, ignition system troubleshooting flow, switch continuity tables and the fan switch break-over temperature. The appendix closes the manual with the main harness, throttle cable and clutch cable routing diagrams and a consolidated troubleshooting guide organised by symptom – hard starting, poor low-speed running, poor high-speed power, overheating, overcooling, clutch slip and drag, shifting problems, engine noise, drive system noise, frame noise, excess exhaust smoke, poor stability and battery faults.

What This Benelli TNT 25 Service Manual Lets You Do

With this Benelli TNT 25 250 Euro IV ABS service manual open in front of you, you can carry out the full scheduled maintenance table yourself, diagnose a no-start or poor-running condition using the EFI fault codes, remove and rebuild the top end, service the clutch and shift mechanism, tear down the crankshaft and balance shaft, replace fork oil and seals to the correct level, overhaul calipers and master cylinders, set brake pad and disc wear limits, chase an electrical fault through the charging and starting circuits, and adjust valve clearance with the correct shim – all with the same torque values, service limits and assembly orders the workshop uses.

Complete PDF Bookmark Tree

Complete Bookmarks

The complete bookmarks in the β€œBenelli TNT 25 250 Euro IV ABS Service Manual – Motorcycle Maintenance Manual PDF” are as follows:

Remarksp. 1
Exhaust Emission Control Informationp. 4
Remarksp. 4
Chapter I Basic Informationp. 17
Notes before Maintenancep. 17
Battery Installationp. 17
Sharp Edge of Partp. 17
Solventp. 17
Cleaning Motorcycle before Disassemblyp. 18
Collecting and Cleaning Removed Partp. 18
Storing Removed Partp. 18
Checkp. 18
Replacement Partp. 19
Assembly Orderp. 19
Fastening Orderp. 19
Tightening Torquep. 19
Forcep. 20
Gasket and O-Ring Sealp. 20
Silicone Sealant and Non-permanent Locking Agentp. 20
Press Fittingp. 20
Ball Bearing and Needle Bearingp. 21
Oil Seal and Grease Oil Sealp. 21
Circlip and Cotter Pinp. 22
Lubricationp. 22
Rotation Direction of Enginep. 22
Wirep. 23
Cable Connector Checkp. 23
1. Disconnectionp. 23
2. Checkp. 23
3. Checkp. 24
4. Checkp. 24
5. Checkp. 24
Cable Arrangementp. 25
Toolp. 25
Model Informationp. 26
Chinap. 26
Europep. 28
Non-Europep. 29
Basic Specificationp. 30
General Technical Parameterp. 31
Unit Conversion Tablep. 34
Chapter II Regular Maintenancep. 35
CHAPTER II REGULAR MAINTENANCEp. 35
Regular Maintenance Tablep. 37
Torque and Locking Agentp. 39
Main Locking Torque Specificationsp. 39
Nut, Bolt, Screw Fastening Torque and Relative Parametersp. 43
Regular Maintenance Proceduresp. 47
Fuel Injection System (EFI)p. 47
Checking Throttle Control Systemp. 47
Checking Idle Speedp. 48
Checking Fuel Hose (Fuel Leakage, Hose Break and Hose Installation Situations)p. 48
Checking Fuel Evaporation and Recovery System (Chinese, European and US Models)p. 49
Cooling Systemp. 51
Checking Coolant Levelp. 51
Check Radiator Pipe (Coolant Leakage, Radiator Pipe Damage and Installation State of Radiator Pipe)p. 51
Engine Cylinder Head and Cylinder Head Coverp. 52
Check Valve Clearancep. 52
Adjusting Valve Clearancep. 54
Check Whether Air Inlet Device is Damagedp. 58
Clutchp. 59
Check Whether Clutch Control System is Normalp. 59
Check Free Play of Clutch Handlep. 59
Wheel/Tirep. 60
Checking Tire Pressurep. 60
Checking Whether Rim/Tire is Brokenp. 60
Checking Wear Situations of Threadp. 61
Checking Whether Wheel Bearing is Damagedp. 62
Final Drive Mechanismp. 63
Checking Lubrication State of Drive Chainp. 63
Checking Whether Drive Chain is Loosep. 63
Adjusting Slackness of Drive Chainp. 64
Checking Wheel Alignmentp. 65
Checking Wear of Drive Chainp. 65
Brakep. 67
Check Whether Brake Hose and Brake Pipe are Damaged and Their Installation Statesp. 67
Free Play of Front Brakep. 67
Free Play of Rear Brakep. 67
Checking Brakep. 68
Checking Brake Fluid Levelp. 68
Checking Wear of Brake Padp. 69
Checking Brake Lamp Switchp. 70
Suspension Systemp. 71
Checking Front /Rear Shock Absorberp. 71
Check for Front Shock Absorber Oil Leakagep. 71
Check for Rear Shock Absorber Oil Leakagep. 72
Steering Systemp. 73
Checking Steering Clearancep. 73
Adjusting Tightness of Steering Seatp. 73
Adding Lubricant to Steering Stem Bearingp. 74
Electrical Systemp. 75
Checking Lamp and Switchp. 75
Checking Accuracy of Head Lampp. 79
Check Side Stand Switchp. 80
Checking Engine Stop Switchp. 81
Othersp. 82
Adding Lubricant to Frame Partsp. 82
Check Tightness of Bolt, Nut and Fastenerp. 83
Replacement Partp. 85
Replacing Air Filter Elementp. 85
Replacing Fuel hosep. 87
Replacing Coolantp. 88
Replacing Radiator Hosep. 91
Replacing Oilp. 92
Replacing Brake Hosep. 93
Replacing Rear Brake Fluid Pipep. 95
Replacing Brake Fluidp. 96
Replacing Rubber Parts of Brake master cylinderp. 98
Replacing Rubber Parts of Calipersp. 101
Replacing Spark Plugp. 105
Chapter III Fuel Injection Systemp. 108
Introduction to EFIp. 108
EFI Systemp. 109
EFI Part Positionp. 111
Technical Parametersp. 115
Fuel tankp. 117
Fuel tank Exploded Viewp. 117
Fuel Evaporative Recovery Systemp. 120
Disassembly of Fuel Tankp. 121
Notes for EFI servicep. 122
ECUp. 124
Engine controller (MT05 ECU)p. 124
ECU Disassemblyp. 125
ECU Installationp. 125
Notes for ECUp. 125
ECU Power Supply Requirementsp. 125
ECU Temperature Requirementsp. 125
Fuel pumpp. 126
Fuel pump Workingp. 126
Fuel pump Appearancep. 126
Fuel pump Label and Markp. 127
Working Environment of Fuel pumpp. 127
Fuel pump Maintenance Process:p. 128
Safety Protection:p. 128
Fault Diagnosis of Fuel Pump Assembly:p. 128
Disassembly of Fuel Pump Assembly:p. 128
Installation of Fuel Pump Assembly:p. 128
Fuel Pressure Release Process:p. 129
Fuel Leakage Check Process:p. 129
Notes for Use:p. 129
Throttle Bodyp. 132
Working Principle of Throttle Bodyp. 132
Appearance of Throttle Body:p. 132
Technical Parametersp. 133
Throttle Body:p. 133
Throttle Position Sensor:p. 133
Idle Air Control Valve:p. 133
Working Environment of Throttlep. 133
Disassembly of Throttlep. 133
Cleaning Method of Throttlep. 134
Installation of Throttlep. 134
Precautions for Installation of Throttlep. 134
Notes for Use of Throttle Valvep. 134
Working Principle of Fuel Injectorp. 135
Appearance of Fuel Injectorp. 135
Sealing Ring of Fuel Injectorp. 135
O-ring Seal Connected to fuel Rail or fuel Injection Capp. 136
O-ring Seal Connected to Intake Air Pipe Endp. 136
Recommended Lubricantp. 136
Overvoltage Impact of Fuel Injectorp. 137
Temperature Range of Fuel Injector:p. 137
Fuel Contaminants of Fuel Injectorp. 137
Fuel Injector Harness Arrangementp. 137
Notes for Use of Fuel Injectorp. 138
Requirements for Installation of Fuel Injectorp. 139
Injector Replaceabilityp. 139
Blocking of Fue Injectorp. 140
Engine Temperature Sensorp. 141
Intake Air Temperature Sensorp. 142
Manifold Absolute Pressure Sensorp. 144
Oxygen Sensorp. 146
Idle Speed Stepper Motorp. 148
Carbon Canister Solenoid Valve (ECP)p. 150
Fault Maintenance Diagnosis Method of EFI Systemp. 152
Directly Making the Fault Lamp at Instrument Flash for Diagnosisp. 152
Diagnosing Fault Using Diagnostic Toolp. 155
Checking Fault Using Diagnostic Software PCHUDp. 156
Common Troubleshooting Methods of electronic Fuel Injection Systemp. 162
Maintenance Toolp. 162
Engine Working Data Flow Displayed by Diagnostic Toolp. 163
Step Ip. 163
Step IIp. 163
Step IIIp. 163
Concise Troubleshootingp. 163
Daily Use and Maintenancep. 163
Fault Phenomenon-Start Faultp. 163
Fault Phenomenonβ€”Instable Idle Speedp. 164
Fault Phenomenonβ€”Too High or Too Low Idle Speed (Idle speed is obviously inconsistent with target idle speed)p. 164
Fault Phenomenonβ€”Instable Idle Speed with Deceleration and Flameoutp. 165
Fault Phenomenonβ€”Insufficient Power of Decelerationp. 165
Chapter IV Cooling Systemp. 168
Explosive Viewp. 168
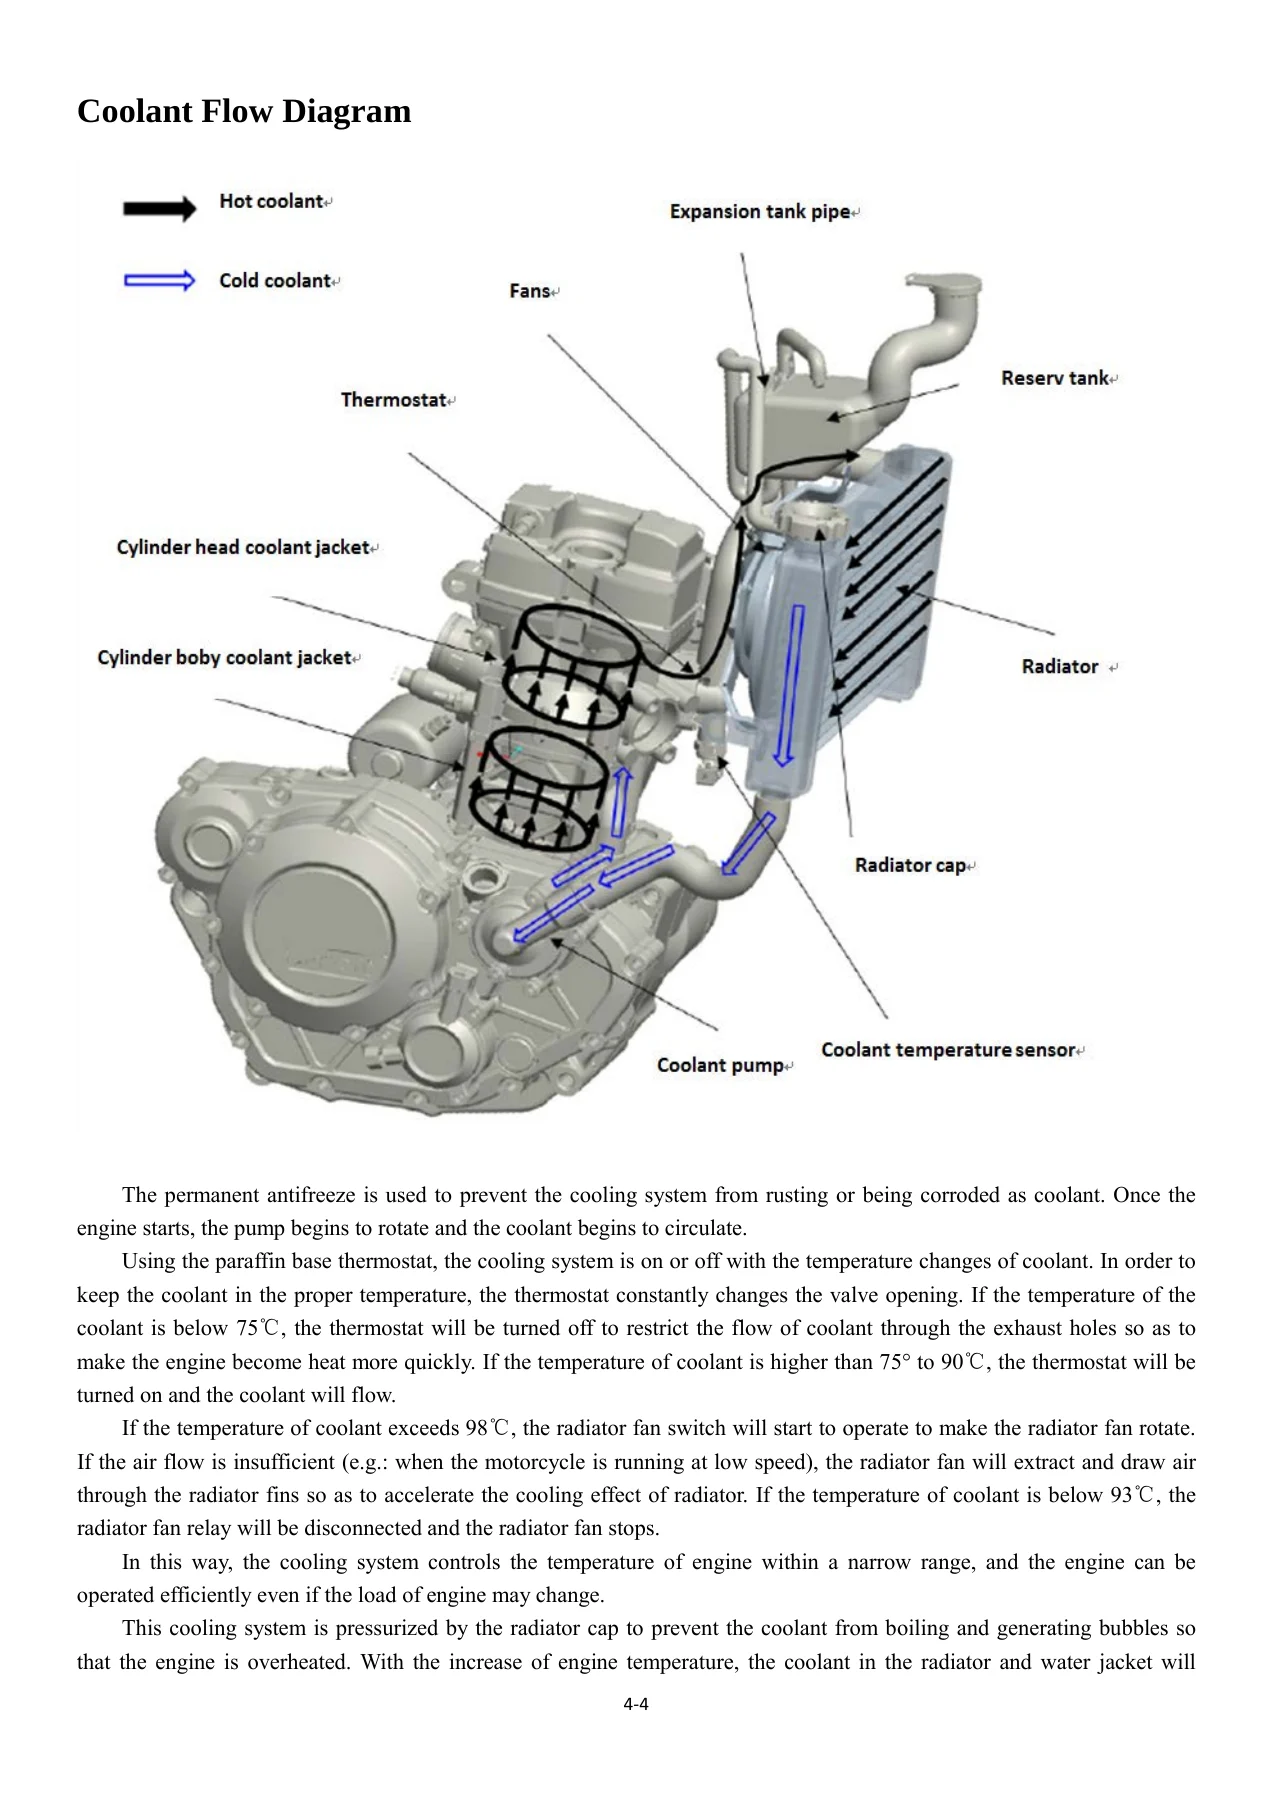
Coolant Flow Diagramp. 170
Technical Parametersp. 172
Coolantp. 173
Checking Whether Coolant Deterioratesp. 173
Checking Coolant Levelp. 173
Discharging Coolantp. 173
Adding Coolantp. 173
Detecting Pressurep. 173
Cleaning Cooling Systemp. 174
Disassembling/Installing Reserve Tankp. 174
coolant Pumpp. 175
Disassembling coolant pumpp. 175
Installing coolant Pumpp. 175
Checking coolant Pump Impellerp. 176
Radiatorp. 177
Disassembling Radiator and Radiator Fanp. 177
Installing Radiator and Radiator Fanp. 178
Checking Radiatorp. 178
Checking Radiator Capp. 179
Checking Radiator Fillerp. 180
Thermostatp. 181
Disassembling Thermostatp. 181
Installing Thermostatp. 181
Checking Thermostatp. 182
Hose and Pipelinep. 183
Installing Hosep. 183
Checking Hosep. 183
coolant Temperature Sensorp. 184
Disassembling/Installing coolant Temperature Sensorp. 184
Checking coolant Temperature Sensorp. 184
Chapter V Enginep. 185
CHAPTER V ENGINEp. 185
Lubrication Systemp. 186
Preparation Informationp. 186
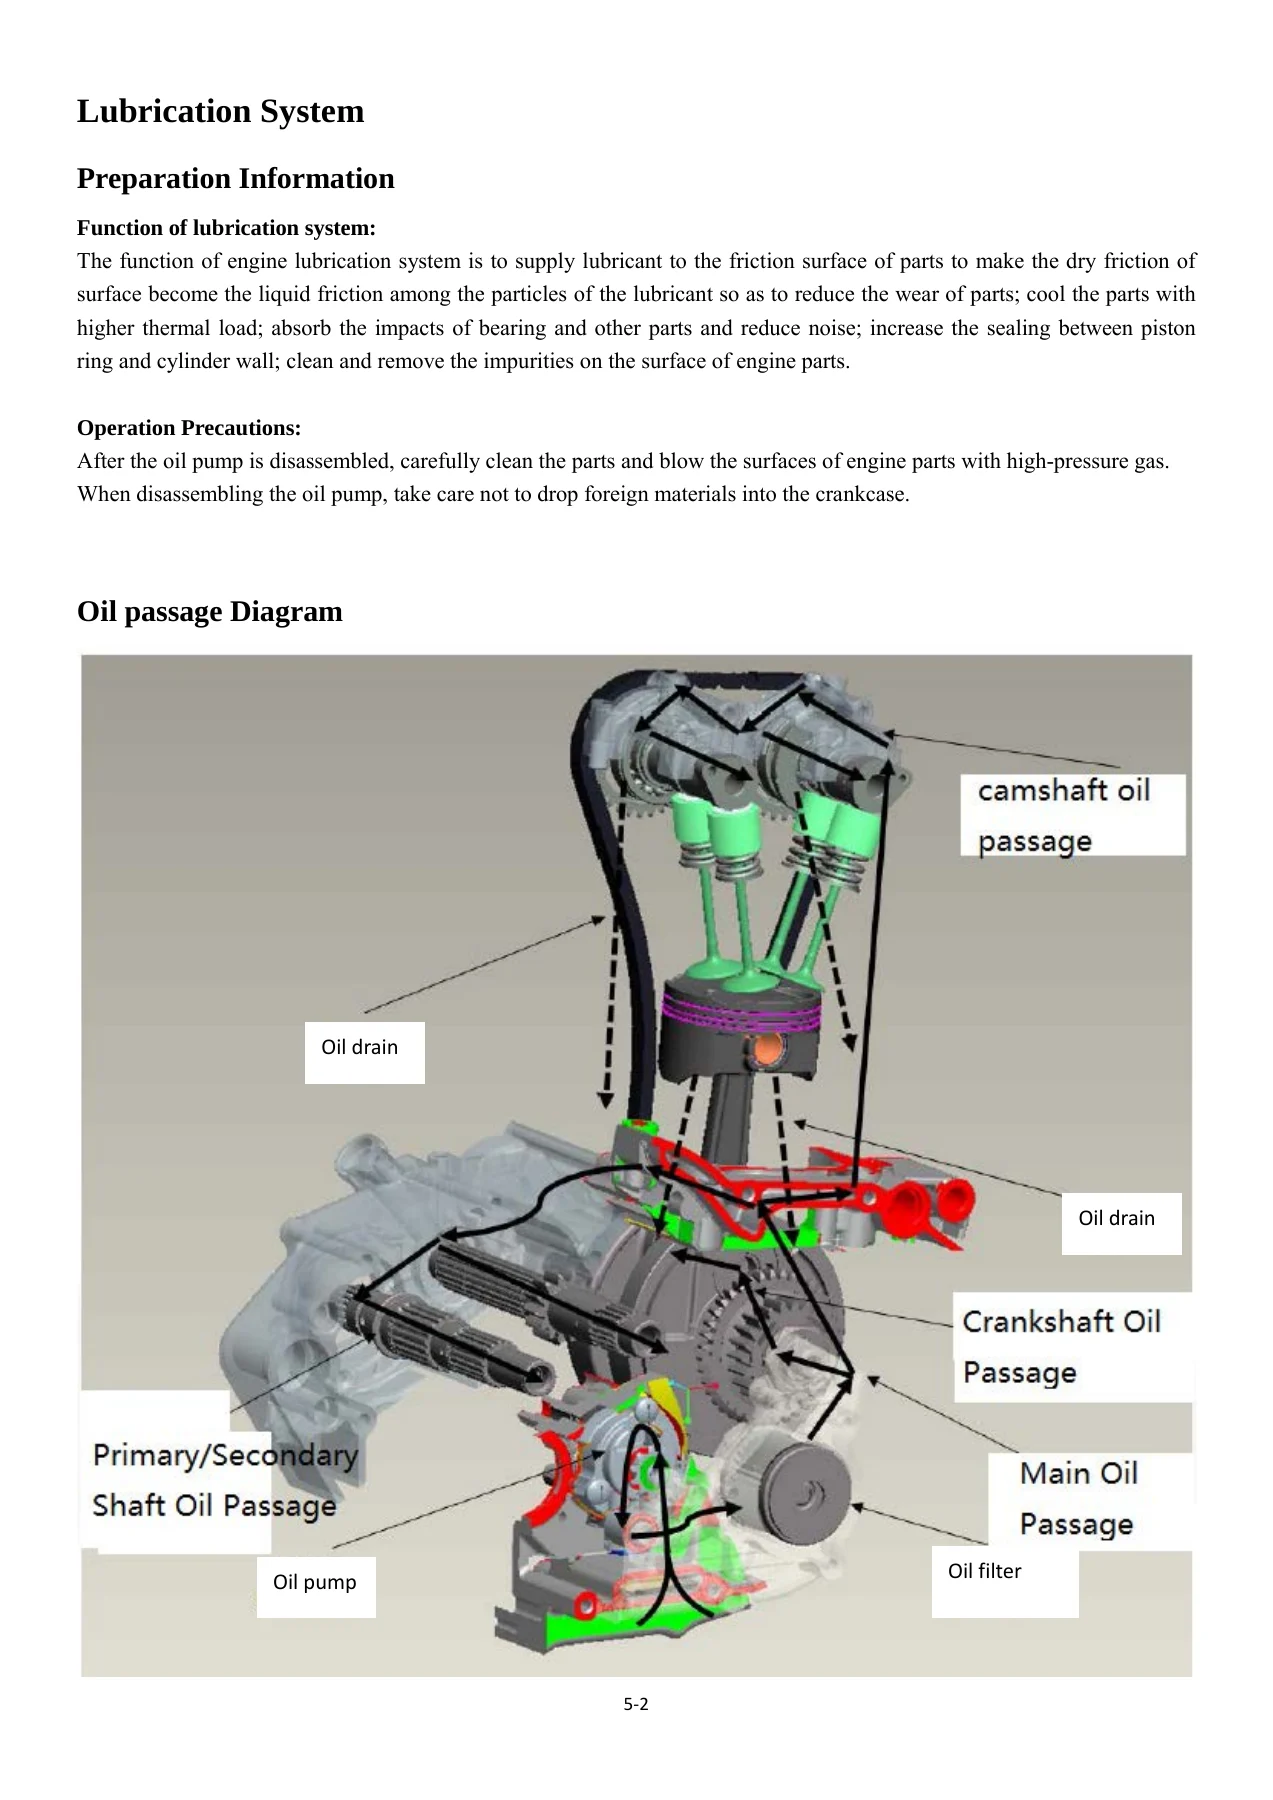
Oil passage Diagramp. 186
Technical Parametersp. 187
Oil Pumpp. 188
Oil Pump Disassemblyp. 188
Checking Oil Pumpp. 189
Installing Oil Pumpp. 190
Cylinder Headp. 191
Cylinder Head Exploded Viewp. 191
Camshaft and Valve Exploded Viewp. 192
Preparation Informationp. 193
Technical Parametersp. 194
Special Tools and Sealantp. 195
Cylinder Headp. 197
Disassembling Cylinder Headp. 197
Valve Decompositionp. 199
Checking Combustion Chamberp. 200
Checking Cylinder Head Joint Surfacep. 200
Checking Intake and Exhaust Springsp. 200
Checking Valve stemp. 200
Checking Valve Guidep. 201
Replacing Valve Guidep. 201
Finishing Valve Seat Ringp. 202
Installing Cylinder Headp. 204
Cylinder and Pistonp. 205
Cylinder Exploded Viewp. 205
Piston, Crankshaft Connecting Rod Exploded Viewp. 206
Preparation Informationp. 207
Technical Parametersp. 208
Cylinder Checking and Replacementp. 209
Disassembling Cylinderp. 209
Installing Cylinderp. 209
Checking Cylinderp. 210
Pistonp. 211
Disassembling Pistonp. 211
Installing Pistonp. 211
Checking Piston, Piston Pin and Piston Ringp. 213
Crankshaft Connecting Rodp. 217
Crankshaft Connecting RodExploded Viewp. 217
Preparation Informationp. 218
Technical Parametersp. 219
Crankshaft Connecting Rodp. 220
Disassembling Crankshaft Connecting Rodp. 220
Assemblyp. 220
Checkingp. 220
Balance Shaftp. 222
Preparation Informationp. 222
Disassembling Balance Shaftp. 222
Assembling Balance Shaft:p. 222
Checking Balance Shaft:p. 222
Tensionerp. 223
Disassembling Tensionerp. 223
Assembling Tensionerp. 223
Checking Tensionerp. 223
Clutchp. 224
Clutch Exploded Viewp. 224
Special Toolp. 225
Disassembling Clutchp. 226
Installing Clutchp. 228
Checking Clutchp. 228
Shift Mechanismp. 229
Shift Mechanism Exploded Viewp. 229
Disassembling Shift Mechanismp. 230
Installing Shift Mechanismp. 230
Checking Shift Mechanismp. 231
Disassembling primary/secondary Shaft Componentp. 232
Installing primary/secondary Shaftp. 233
Checking primary/secondary Shaft Componentp. 234
Chapter VI Chassisp. 237
Wheel / Tirep. 237
Exploded View of Front Wheel / Tirep. 237
Exploded View of Rear Wheel / Tirep. 239
Technical Parametersp. 241
Special Toolsp. 242
Wheel (Rim)p. 243
Disassembling Front Wheelp. 243
Installing Front Wheelp. 244
Disassembling Rear Wheelp. 245
Installing Rear Wheelp. 247
Checking Wheelsp. 248
Checking Wheel Shaftp. 248
Adjustment of Static Balance of Rimp. 249
Checking / Adjusting Tire Pressurep. 252
Checking Tirep. 252
Disassembling Tirep. 252
Installing Tirep. 253
Hub Bearingp. 255
Disassembling Hub Bearingp. 255
Installing Hub Bearingp. 255
Checking Hub Bearingp. 256
Hub Bearing Lubricationp. 256
Drive Mechanismp. 257
Exploded View of Drive Mechanismp. 257
Technical Parametersp. 259
Special Toolsp. 260
Drive Chainp. 261
Checking the Slackness of Drive Chainp. 261
Checking / Adjusting Wheel Alignmentp. 261
Checking the Wear of Drive Chainp. 261
Lubrication of Drive Chainp. 261
Disassembling Drive Chainp. 261
Installing Drive Chainp. 262
Sprocket, Shaft Sleeve, Shaft Sleeve Bearingp. 263
Disassembling Rear Sprocketp. 263
Installing Rear Sprocketp. 263
Disassembling Shaft Sleeve Bearingp. 264
Installing Shaft Sleeve Bearingp. 264
Checking Shaft Sleeve Bearingp. 265
Lubrication of Shaft Sleeve Bearingp. 265
Checking the Buffer Block of Shaft Sleevep. 265
Checking the Wear of Sprocketp. 265
Check the Deformation of Rear Sprocketp. 266
Brakep. 267
Exploded View of Front Brakep. 267
Exploded View of Rear Brakep. 269
Technical Parametersp. 271
Special Toolsp. 272
Brake handle/pedal, Brake Pedalp. 273
Adjusting the Position of Brake handle/pedalp. 273
Checking the Position of Brake Pedalp. 273
Adjusting the Position of Brake Pedalp. 273
Removing the Brake Pedalp. 274
Installing the Brake Pedalp. 274
Calipersp. 276
Disassembling Front Calipersp. 276
Disassembling Rear Calipersp. 276
Installing the Calipersp. 277
Disassembling Front Calipersp. 277
Assembling Front Calipersp. 277
Disassembling Rear Calipersp. 277
Assembling Rear Calipersp. 277
Checking the Oil seal of the Calipers for Damagep. 277
Checking Dust Seal of the Calipers for Damagep. 278
Checking the Calipers Piston and Brake Caliper for Damagep. 278
Brake Padsp. 279
Disassembling Front Brake Padsp. 279
Installing Front Brake Padsp. 279
Disassembling Rear Brake Padsp. 280
Installing Rear Brake Padsp. 280
Checking the Wear of Brake Padsp. 280
Brake Master Cylinderp. 281
Disassembling Front Brake Master Cylinderp. 281
Installing Front Brake Master Cylinderp. 281
Disassembling Rear Brake Master Cylinderp. 282
Installing Rear Brake Master Cylinderp. 282
Disassembling Front Brake Master Cylinderp. 282
Disassembling Rear Brake Master Cylinderp. 282
Assembling Brake Master Cylinderp. 282
Checking Brake Master Cylinder (Visual Check)p. 282
Brake Discsp. 283
Disassembling Brake Discsp. 283
Installing Brake Discp. 283
Checking the Wear of Brake Discp. 283
Checking the Deformation of Brake Discp. 283
Brake Fluidp. 284
Checking the Level of Brake Fluidp. 284
Replace Brake Fluidp. 284
Air Bleeding from Brake Pipep. 284
Brake Hosep. 286
Disassembling / Installing Brake Hose and Brake Pipep. 286
Checking Brake Hose and Brake Pipep. 286
Suspension Systemp. 287
Front Suspension System Exploded Viewp. 287
Rear Suspension System Exploded Viewp. 289
Technical Parametersp. 291
Special Toolp. 292
Front Shock Absorberp. 293
Disassembling Front Shock Absorberp. 293
Installing Front Shock Absorberp. 294
Replacing Front Shock Absorber Oilp. 294
Disassembling Front Shock Absorberp. 298
Checking Inner Pipe and Outer Pipep. 300
Checking Dustproof Ringp. 300
Checking Spring Tensionp. 300
Rear Shock Absorberp. 301
Adjusting Spring Preloadp. 301
Disassembling Rear Shock Absorberp. 302
Installing Rear Shock Absorberp. 303
Checking Rear Shock Absorberp. 303
Rear Swing Armp. 304
Disassembling Swing Armp. 304
Installing Swing Armp. 305
Disassembling Swing Arm Bearingp. 306
Installing Swing Arm Bearingp. 306
Checking Swing Arm Bearingp. 307
Steering systemp. 308
Steering system Exploded Viewp. 308
Special Toolp. 310
Steering systemp. 311
Checking Steering systemp. 311
Adjusting Steering systemp. 311
Steering Stemp. 312
Disassembling Steering Stem and Steering Stem Bearingp. 312
Installing Steering Stem and Steering Stem Bearingp. 313
Steering Stem Bearing Lubricationp. 316
Checking Deformation of Steering Stemp. 316
Handlebarp. 317
Disassembling Handlebarp. 317
Installing Handlebarp. 318
Framep. 320
Frame Exploded Viewp. 320
Left Pedal Exploded Viewp. 322
Right Pedal Exploded Viewp. 324
Muffler Exploded Viewp. 326
Fender Exploded Viewp. 328
Body CoversFuel Tank Garnish Plates Exploded Viewp. 330
Seat Cushion and Body Covers Exploded Viewp. 332
Bottom Cover and Engine Exploded Viewp. 334
Seat Cushionp. 336
Disassembling Seat Cushionp. 336
Installing Seat Cushionp. 336
Body Coversp. 337
Disassembling Left Body Coversp. 337
Installing Left Body Coversp. 337
Disassembling Right Body Coversp. 338
Installing Right Body Coversp. 338
Rear Handrail and Tail Coverp. 339
Disassembling Rear Handrailp. 339
Installing Rear Handrailp. 339
Disassembling Tail Coverp. 340
Installing Tail Coverp. 340
Rear Fenderp. 341
Disassembling Rear Fenderp. 341
Installing Rear Fenderp. 341
Front Fenderp. 342
Disassembling Front Fenderp. 342
Installing Front Fenderp. 342
Body CoversFuel Tank Garnish Plates and Fairingp. 343
Disassembling Body CoversFuel Tank Garnish Platesp. 343
Installing Body CoversFuel Tank Garnish Platesp. 343
Radiator Fairingp. 344
Disassembling Radiator Fairingp. 344
Installing Radiator Fairingp. 344
Bottom Coverp. 345
Disassembling Bottom Coverp. 345
Installing Bottom Coverp. 345
Framep. 346
Disassembling Framep. 346
Installing Framep. 346
Checking Framep. 346
Side Standp. 347
Disassembling Side Standp. 347
Installing Side Standp. 347
Left Front Pedalp. 348
Disassembling Left Front Pedalp. 348
Installing Left Front Pedalp. 348
Left Rear Pedalp. 349
Disassembling Left Rear Pedalp. 349
Installing Left Rear Pedalp. 349
Front Right Pedalp. 350
Disassembling Front Right Pedalp. 350
Installing Front Right Pedalp. 350
Rear Right Pedalp. 351
Disassembling Rear Right Pedalp. 351
Installing Rear Right Pedalp. 351
Disassembling/Installing Enginep. 354
Engine Disassembly and Installation Exploded Viewp. 354
Disassembling Enginep. 356
Installing Enginep. 360
Chapter VII Electrical Systemp. 364
Precautionsp. 364
Technical Parametersp. 365
Special Toolp. 366
Electrical Wiringp. 367
Wiring Inspectionp. 367
Charging Systemp. 368
Charging System Circuit Diagramp. 368
Batteryp. 369
Disassembling Batteryp. 369
Battery Installationp. 369
Battery Activationp. 370
Initial Chargep. 371
Charging State Inspectionp. 372
Magnetop. 373
Magneto Disassemblyp. 373
Magneto Inspectionp. 374
Magneto Installationp. 375
Voltage Regulator/Rectifierp. 376
Rectifier Disassembly:p. 376
Main Wiring Terminal Circuit Inspectionp. 376
Rectifier Inspectionp. 376
Rectifier Installation:p. 376
Ignition Systemp. 377
Ignition System Circuit Diagramp. 377
Operation Precautionsp. 377
Crankshaft Sensorp. 378
Crankshaft Position Sensor Disassemblyp. 378
Checkingp. 378
Ignition Coilp. 379
Ignition Coil Disassembly:p. 379
Ignition Coil Inspectionp. 379
Spark Plugp. 380
Spark Plug condition Inspectionp. 380
Checkingp. 380
IC Igniter Inspectionp. 381
ECUp. 381
Ignition System Troubleshootingp. 382
Starting Systemp. 383
Starting System Circuit Diagramp. 383
Starter Motorp. 384
Starter Motor Disassemblyp. 384
Starter Motor Inspectionp. 384
Carbon Brush Inspectionp. 384
Commutator Cleaning and Inspectionp. 385
Carbon Brush Leads Inspectionp. 385
Start Motor Front Cover Assembly Inspectionp. 385
Starter Relayp. 386
Starter Relay Disassembly and Action Inspectionp. 386
Lighting Systemp. 387
Headlightp. 387
Headlight Bulb Replacementp. 387
Front City Light Bulb Replacementp. 388
Instrumentp. 389
Instrument Disassemblyp. 389
Switch, Sensor and Other Partsp. 390
Main Switchp. 390
Main Switch Disassemblyp. 390
Main Switch Inspectionp. 390
Handle Switchp. 391
Switch State 1p. 391
Switch State 2 (Automatic Headlight On)p. 392
Brake Lamp LightingTime Inspectionp. 393
Brake Lamp Lighting Time Adjustmentp. 393
Switch Inspectionp. 393
Rear Brake Lamp Switch Connectionp. 393
Side Stand Switch Connectionp. 393
Speed Sensorp. 394
Speed Sensor Disassemblyp. 394
Speed Sensor Inspectionp. 394
Oxygen Sensorp. 395
Oxygen Sensor Disassemblyp. 395
Oxygen Sensor Installationp. 395
Oxygen Sensor Inspectionp. 395
Fuel Level Sensorp. 396
Fuel Level Sensor Disassemblyp. 396
Hornp. 397
Horn Disassemblyp. 397
Horn Inspectionp. 397
Fanp. 398
Fan Disassemblyp. 398
Fan Inspectionp. 398
Fan Switchp. 399
Fan Switch Disassemblyp. 399
Checking Fan Switchp. 399
Relay and Fuse Boxp. 400
Relay and Fuse Box Disassemblyp. 400
Relay Circuit Inspectionp. 400
Relay Circuit Inspection (Disconnecting Battery)p. 400
Relay Circuit Inspection (Equipped with Battery)p. 400
Internal Circuit of Relay Boxp. 401
Fusep. 403
Fuse Disassemblyp. 403
Fuse Installationp. 403
Fuse Inspectionp. 404
Chapter VIII Appendixp. 406
Routing of Cable, Wire and Hosep. 406
Main Harness Routing:p. 407
Throttle Cable Routingp. 411
Clutch Cable Routing:p. 413
Other Matters:p. 415
Troubleshooting Guidep. 429
Too much exhaust smoke:p. 435
White exhaust smoke:p. 435
Black exhaust smoke:p. 435
Brown exhaust smoke:p. 435
Special Tool list Summaryp. 439
Circuit Diagramp. 437

Getting these numbers right is what separates a repair that lasts from one that comes back. A cylinder head bolt torqued to the wrong sequence will warp the joint surface. A shim picked without the thickness table will leave the valve too tight and burn the seat. An oil level set by eye in a fork leg will unbalance the front end. A brake master cylinder cup reused once too often will fail under heat. This Benelli TNT 25 250 Euro IV ABS workshop manual removes the guesswork by giving the standard, the service limit and the tightening order for the parts that actually matter.

IMAGES PREVIEW

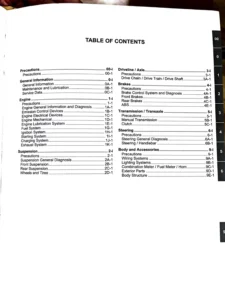
Benelli TNT 25 250 Euro IV ABS Service Manual - Motorcycle Maintenance Manual PDF β€” PDF page 1 preview
Benelli TNT 25 250 Euro IV ABS Service Manual - Motorcycle Maintenance Manual PDF β€” PDF page 170 preview
Benelli TNT 25 250 Euro IV ABS Service Manual - Motorcycle Maintenance Manual PDF β€” PDF page 186 preview

Delivery is instant. The file is a PDF you download immediately after checkout – no shipping, no waiting. It opens on a laptop, tablet or phone, and any page can be printed for the bench, so you can keep the torque table next to the bike and the exploded view on the screen. Whether you are servicing one TNT 25 or running a small workshop that sees them regularly, this Benelli TNT 25 repair manual PDF is the reference you keep going back to.

Reviews

There are no reviews yet.

Be the first to review “Benelli TNT 25 250 Euro IV ABS Service Manual – Motorcycle Maintenance Manual PDF”

What Our Customers Say

β˜…β˜…β˜…β˜…β˜… Live reviews from customers
Loading customer reviews...
0
    0
    Your Cart
    Your cart is emptyReturn to Shop
    πŸ›’
    Recently Purchased
    πŸ•’ verified order