Description
Bobcat E26 Compact Excavator Service Manual – 6990097enUS
This Bobcat E26 Compact Excavator Service Manual is the comprehensive workshop resource for professional mechanics and serious owners maintaining, diagnosing and repairing the E26 compact excavator. Published under document number 6990097enUS with a May 2019 print date, this 972-page PDF service manual covers every major system on the machine, from the hydraulic pump and control valve to the engine, electrical harness, swing section, undercarriage and HVAC system. Whether you are troubleshooting a hydraulic fault, rebuilding a boom cylinder or chasing an electrical service code, this E26 service manual delivers the specifications, procedures and diagrams needed to complete the job correctly.
File Details
- Manual Type: Service Manual
- Brand: Bobcat
- Model: E26 Compact Excavator
- Document Number: 6990097enUS
- Publication Date: May 2019 (05-19)
- Language: English
- Page Count: 972 pages
- File Format: PDF
- Serial Number Coverage: S/N AJRY11001 & Above, S/N B33211001 & Above, S/N B3JE11001 & Above
Complete PDF Bookmark Tree
Complete Bookmarks
The complete bookmarks in the “Bobcat E26 Compact Excavator Service Manual 2019 – 6990097enUS PDF Repair Guide” are as follows:
MAINTENANCE SAFETYp. 3
CONTENTSp. 5
+FOREWORDp. 7
FOREWORDp. 9
SAFETY INSTRUCTIONSp. 11
+FIRE PREVENTIONp. 13
Maintenancep. 13
Operationp. 13
Electricalp. 13
Hydraulic Systemp. 13
Fuelingp. 13
Startingp. 13
Spark Arrester Exhaust Systemp. 13
Welding And Grindingp. 14
Fire Extinguishersp. 14
+SERIAL NUMBER LOCATIONSp. 15
Excavator Serial Numberp. 15
Engine Serial Numberp. 15
DELIVERY REPORTp. 16
EXCAVATOR IDENTIFICATIONp. 17
+SAFETY AND MAINTENANCEp. 19
+LIFTING AND BLOCKING THE EXCAVATORp. 23
+LIFTING THE EXCAVATORp. 25
+OPERATOR CAB (ROPS / TOPS) S/N AJRY11001 & ABOVE AND B33211001 & ABOVEp. 27
Descriptionp. 27
Cab Doorp. 28
Front Windowp. 29
Front Wiperp. 30
Window Washer Reservoirp. 30
Right Side Windowp. 31
+OPERATOR cab (ROPS / TOPS) S/N B3JE11001 & ABOVEp. 33
Descriptionp. 33
Cab Doorp. 34
Front Wiperp. 36
Window Washer Reservoirp. 36
Right Side Windowp. 37
+OPERATOR CANOPY (ROPS / TOPS)p. 39
+TRANSPORTING THE EXCAVATOR ON A TRAILERp. 41
Loading And Unloadingp. 41
Fasteningp. 42
+TAILGATEp. 43
Opening And Closingp. 43
Adjusting The Latchp. 43
+RIGHT SIDE COVERp. 45
+SERVICE SCHEDULEp. 47
Maintenance Intervalsp. 47
+AIR CLEANER SERVICEp. 49
Daily Checkp. 49
Replacing The Filter Elementsp. 49
+CAB FILTERS (S/N AJRY11001 – AJRY12331)p. 51
Cleaning And Maintenancep. 51
+CAB FILTERS (S/N AJRY12332 & ABOVE, B33211000 & Above AND B3JE11001 & ABOVE)p. 53
Cleaning And Maintenancep. 53
+ENGINE COOLING SYSTEMp. 55
Cleaningp. 55
Checking Levelp. 56
Removing And Replacing Coolantp. 57
+FUEL SYSTEMp. 59
Fuel Specificationsp. 59
Biodiesel Blend Fuelp. 59
Filling The Fuel Tankp. 60
Fuel Filterp. 61
Draining The Fuel Tankp. 61
Removing Air From The Fuel Systemp. 62
+ENGINE LUBRICATION SYSTEMp. 63
Checking And Adding Engine Oilp. 63
Engine Oil Chartp. 63
Removing And Replacing Oil And Filterp. 64
+HYDRAULIC SYSTEMp. 65
Checking And Adding Hydraulic Fluidp. 65
Hydraulic / Hydrostatic Fluid Chartp. 66
Removing And Replacing The Hydraulic Filtersp. 66
Removing And Replacing Hydraulic Fluidp. 68
+LUBRICATING THE EXCAVATORp. 69
Lubrication Locationsp. 69
+PIVOT PINSp. 73
Inspection And Maintenancep. 73
+TRAVEL MOTORp. 75
Checking And Adding Oilp. 75
Removing And Replacing Oilp. 75
+SPARK ARRESTER MUFFLERp. 77
+EMERGENCY EXITp. 79
Right Rear Side Windowp. 79
Front Windowp. 79
+SEAT BELTp. 81
Inspection And Maintenancep. 81
+CONTROL CONSOLE LOCKOUTSp. 83
Inspection And Maintenancep. 83
+TOWING THE EXCAVATORp. 85
+REMOTE START TOOL KIT – MEL1563p. 87
Remote Start Tool – MEL1563p. 87
Service Tool Harness Control – MEL1565p. 88
Service Tool Harness Communicator – MEL1566p. 89
+REMOTE START TOOL (SERVICE TOOL) KIT – 7217666p. 91
Descriptionp. 91
Remote Start Tool (Service Tool) – 7022042p. 92
Excavator Service Tool Harness – 6689747p. 93
Computer Service Tool Harness – 6689746p. 94
+HYDRAULIC SYSTEMp. 95
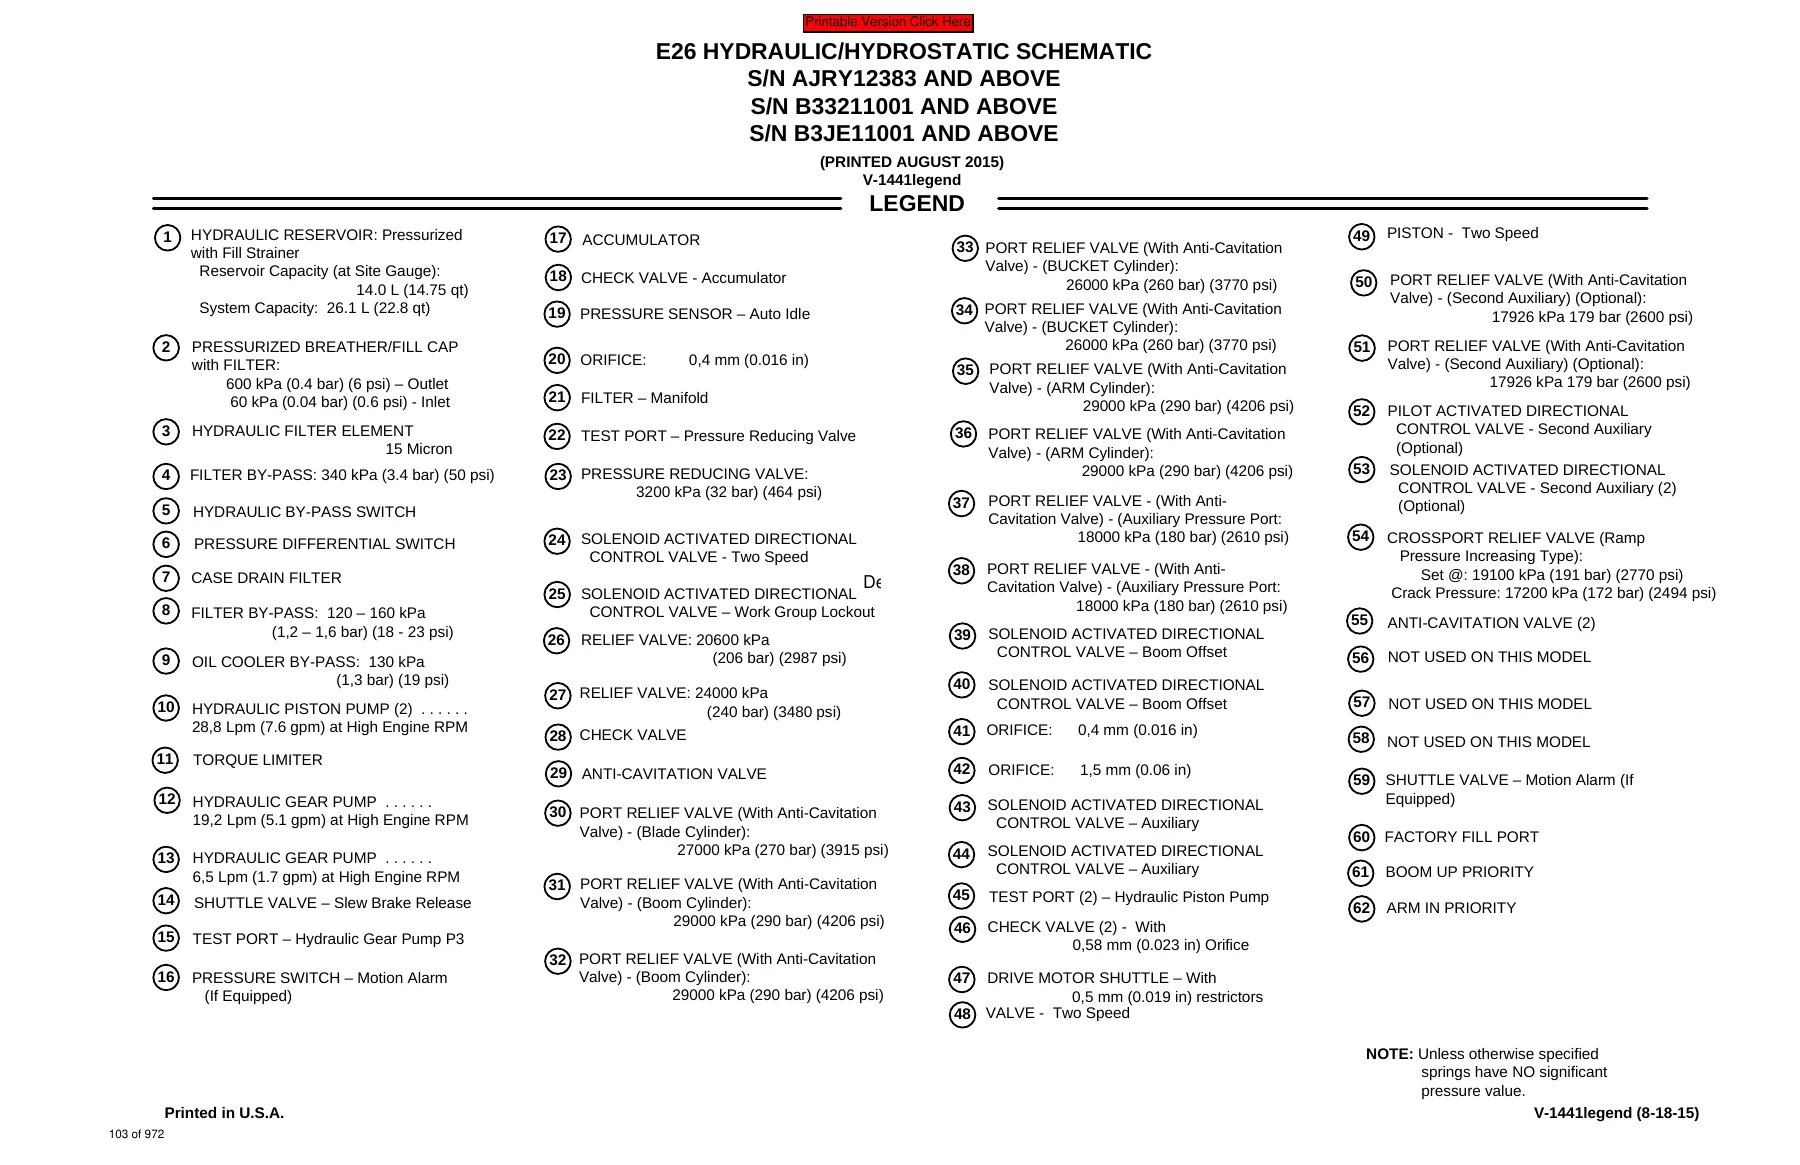
HYDRAULIC / HYDROSTATIC SCHEMATICSp. 101
+HYDRAULIC SYSTEM INFORMATIONp. 105
Glossary Of Hydraulic / Hydrostatic Symbolsp. 105
Troubleshooting The Hydraulic Circuitp. 108
Troubleshooting The Cylinder Circuitp. 109
Troubleshooting The Swing (Upperstructure Slew) Circuitp. 110
Troubleshooting The Travel Circuitp. 111
+CYLINDER (BOOM)p. 113
Testingp. 113
Removal And Installationp. 115
Parts Identificationp. 118
Disassemblyp. 119
Assemblyp. 122
+CYLINDER (ARM)p. 127
Testingp. 127
Removal And Installationp. 129
Parts Identificationp. 131
Disassemblyp. 132
Assemblyp. 134
+CYLINDER (BOOM SWING)p. 137
Testingp. 137
Removal And Installationp. 139
Parts Identificationp. 141
Disassemblyp. 142
Assemblyp. 144
+CYLINDER (BUCKET)p. 149
Testingp. 149
Removal And Installationp. 150
Parts Identificationp. 152
Disassemblyp. 153
Assemblyp. 155
+CYLINDER (BLADE)p. 159
Testingp. 159
Removal And Installationp. 161
Parts Identificationp. 162
Disassemblyp. 163
Assemblyp. 165
+CYLINDER (CLAMP)p. 169
Testingp. 169
Removal And Installationp. 170
Parts Identificationp. 172
Disassemblyp. 173
Assemblyp. 176
+VALVES (MAIN RELIEF)p. 181
Testing And Adjustingp. 181
+VALVES (PORT RELIEF)p. 187
Testing And Adjustingp. 187
+VALVES (CROSS PORT RELIEF)p. 189
Testingp. 189
Removal And Installationp. 191
Disassembly And Assemblyp. 191
+VALVES (PILOT PRESSURE RELIEF)p. 193
Testing And Adjustingp. 193
+HYDRAULIC CONTROL VALVEp. 195
Removal And Installationp. 195
Parts Identificationp. 200
Disassemblyp. 211
Auxiliary Valve Section Disassembly And Assemblyp. 213
Arm Valve Section Disassembly And Assemblyp. 217
RH Travel Valve Section Disassembly And Assemblyp. 220
Bucket Valve Section Disassembly And Assemblyp. 223
Boom Valve Section Disassembly And Assemblyp. 226
LH Travel Valve Section Disassembly And Assemblyp. 227
“Priority Valve” Valve Section Disassembly And Assemblyp. 228
Blade Valve Section Disassembly And Assemblyp. 230
Boom Swing Valve Section Disassembly And Assemblyp. 233
Slew Valve Section Disassembly And Assemblyp. 236
Assemblyp. 239
+HYDRAULIC PUMPp. 245
Descriptionp. 245
Torque Adjustmentp. 246
Testing The Piston Pump P1p. 247
Testing The Piston Pump P2p. 249
Testing The Gear Pump P3p. 250
Testing The Gear Pump P4p. 252
Testing Auxiliary Hydraulic Flowp. 255
Removal And Installationp. 256
Coupler Removal And Installationp. 257
Hydraulic Pump Startupp. 258
Gear Pump Disassembly And Assemblyp. 259
Piston Pump Parts Identificationp. 264
Piston Pump Disassembly And Assemblyp. 265
+MANIFOLD ASSEMBLY / ACCUMULATORp. 277
Descriptionp. 277
Removal And Installationp. 277
Parts Identificationp. 280
Disassembly And Assemblyp. 281
+TRAVEL MOTORp. 287
Descriptionp. 287
Removal And Installationp. 287
Parts Identification Hydraulic Motorp. 288
Parts Identification Gear Reduction Hubp. 289
Disassemblyp. 290
Assemblyp. 301
+SWIVEL JOINTp. 313
Removal And Installationp. 313
Parts Identificationp. 315
Disassembly And Assemblyp. 316
+SWING MOTOR (S/N AJRY11001 – AJRY12382)p. 319
Removal And Installationp. 319
Parts Identificationp. 321
Disassembly And Assemblyp. 322
+SWING MOTOR (S/N AJRY12383 & ABOVE, B33211001 & ABOVE AND B3JE11001 & ABOVE)p. 331
Removal And Installationp. 331
Parts Identificationp. 333
Disassembly And Assemblyp. 334
+SWING MOTOR (DRIVE CARRIER)p. 341
Removal And Installationp. 341
Parts Identificationp. 342
Disassembly And Assemblyp. 343
+CONTROL PATTERN SELECTOR VALVEp. 349
Removal And Installationp. 349
Parts Identificationp. 350
Disassembly And Assemblyp. 351
+RIGHT CONTROL LEVER (JOYSTICK) (S/N AJRY11001 – AJRY12331)p. 353
Testingp. 353
Handle Removal And Installationp. 354
Joystick Assembly Removal And Installationp. 357
Parts Identificationp. 358
Disassemblyp. 359
Assemblyp. 364
+RIGHT CONTROL LEVER (JOYSTICK) (S/N AJRY12332 & ABOVE, B33211001 & ABOVE AND B3JE11001 & ABOVE)p. 369
Testingp. 369
Handle Removal And Installationp. 370
Joystick Assembly Removal And Installationp. 372
Parts Identificationp. 374
Disassemblyp. 375
Assemblyp. 379
+LEFT CONTROL LEVER (JOYSTICK) (S/N AJRY11001 – AJRY12331)p. 383
Testingp. 383
Handle Removal And Installationp. 384
Joystick Assembly Removal And Installationp. 386
Parts Identificationp. 387
Disassemblyp. 388
Assemblyp. 393
+LEFT CONTROL LEVER (JOYSTICK) (S/N AJRY12332 & ABOVE, B33211001 & ABOVE AND B3JE11001 & ABOVE)p. 399
Testingp. 399
Handle Removal And Installationp. 400
Joystick Assembly Removal And Installationp. 402
Parts Identificationp. 403
Disassemblyp. 404
Assemblyp. 408
+HYDRAULIC FILTER MOUNTp. 413
Removal And Installationp. 413
+HYDRAULIC RESERVOIRp. 415
Removal And Installationp. 415
+OIL COOLERp. 419
Removal And Installationp. 419
+DIRECT TO TANK VALVEp. 421
Removal And Installationp. 421
+BLADE CONTROL LEVERp. 423
Handle Removal And Installationp. 423
Parts Identificationp. 427
Disassembly And Assemblyp. 428
+CASE DRAIN FILTER MOUNTp. 433
Removal And Installationp. 433
+TRAVEL CONTROL VALVEp. 435
Removal And Installationp. 435
Parts Identificationp. 436
Disassembly And Assemblyp. 437
+REMOVING AIR FROM THE HYDRAULIC SYSTEMp. 443
+SECONDARY AUXILIARY VALVEp. 445
Removal And Installationp. 445
Parts Identificationp. 448
Disassembly And Assemblyp. 449
+VALVE (BOOM LOAD HOLDING VALVE)p. 455
Removal And Installationp. 455
+VALVE (ARM LOAD HOLDING VALVE)p. 457
Removal And Installationp. 457
+UNDERCARRIAGEp. 459
+BLADEp. 461
Removal And Installationp. 461
+TRACK UNDERCARRIAGE COMPONENTS (RUBBER TRACK)p. 463
Descriptionp. 463
Track Lug Heightp. 463
Checking Tensionp. 464
Adjusting Tensionp. 465
Track Removal And Installationp. 466
Idler Removal And Installationp. 468
Idler Parts Identificationp. 469
Track Idler Disassemblyp. 470
Track Idler Assemblyp. 472
Track Tensioner Removal And Installationp. 474
Track Tensioner Parts Identificationp. 475
Track Tensioner Disassembly And Assemblyp. 476
Roller Removal And Installationp. 477
Sprocket Removal And Installationp. 478
+TRACK MAINTENANCEp. 479
Track Damage Identificationp. 479
+SWING CIRCLE GEARp. 491
Swing Bearing Removalp. 491
Swing Bearing Installationp. 492
+UPPERSTRUCTURE AND SWING SECTIONp. 495
+UPPERSTRUCTUREp. 499
Removalp. 499
Installationp. 501
+ROPS CANOPYp. 503
Removal And Installationp. 503
+CABp. 507
Removal And Installationp. 507
Door Removal And Installationp. 510
Front Window Removal And Installationp. 511
Right Side Rear Sliding Window Removal And Installationp. 512
Right Side Front Sliding Window Removal And Installationp. 512
Right Side Front And Rear Sliding Window Weather Strip Removal And Installationp. 513
Right Side Front And Rear Sliding Window Wiper Strip Removal And Installationp. 513
Glass Removalp. 514
Glass Installationp. 515
+SEATp. 521
Removal And Installationp. 521
Seat Mount Removal And Installationp. 522
+RIGHT CONSOLE (S/N AJRY11001 – AJRY12331)p. 523
Console Cover Removal And Installationp. 523
+RIGHT CONSOLE (S/N AJRY12332 & ABOVE, B33211000 & ABOVE AND B3JE11001 & ABOVE)p. 529
Console Cover Removal And Installationp. 529
+LEFT CONSOLEp. 535
Lower Console Cover Removal And Installationp. 535
Upper Console Cover Removal And Installationp. 536
Compression Spring Removal And Installationp. 539
Lock Lever Removal And Installationp. 541
Console Removal And Installationp. 541
+LEFT UPPERSTRUCTURE COVERp. 543
Removal And Installationp. 543
+RIGHT UPPERSTRUCTURE COVERp. 545
Removal And Installationp. 545
+COUNTERWEIGHTp. 547
Removal And Installationp. 547
Long Arm Counterweight Removal And Installationp. 550
+TRAVEL LEVERS AND PEDALSp. 551
Removal And Installationp. 551
Disassembly And Assemblyp. 552
+FLOOR MATp. 553
Removal And Installationp. 553
+FUEL TANKp. 555
Removal And Installationp. 555
+HORNp. 557
Removal And Installationp. 557
+SWING FRAMEp. 559
Removal And Installationp. 559
Boom Swing Frame Hose Routingp. 561
Bushing Removalp. 562
Bushing Installationp. 563
+BOOMp. 565
Removal And Installationp. 565
+ARM (STANDARD AND LONG)p. 567
Removal And Installationp. 567
Arm To Boom Bushing Removal And Installationp. 568
Arm To Bucket And Bucket Link Bushing Removal And Installationp. 569
+BUCKETp. 571
Bucket Teeth Removal And Installationp. 571
Bucket Side Cutting Edge Removal And Installationp. 572
+CLAMPp. 573
Removal And Installationp. 573
+TAILGATEp. 575
Removal And Installationp. 575
Latch Removal And Installationp. 576
+X-CHANGEp. 577
Removal And Installationp. 577
Disassemblyp. 579
Assemblyp. 580
+BOBCAT HYDRAULIC PIN GRABBER COUPLER HPG2p. 583
Troubleshootingp. 583
Daily Inspectionp. 584
Removal And Installationp. 585
Parts Identificationp. 586
Disassembly And Assemblyp. 587
+RIGHT SIDE COVERp. 591
Removal And Installationp. 591
+TOOL BOXp. 593
Removal And Installationp. 593
+ELECTRICAL SYSTEM AND ANALYSISp. 595
ELECTRICAL SCHEMATICSp. 597
+ELECTRICAL SYSTEM INFORMATIONp. 659
Troubleshooting Chartp. 659
Descriptionp. 660
Fuse And Relay Location / Identificationp. 660
+BATTERYp. 663
Servicingp. 663
Removal And Installationp. 664
Using A Booster Battery (Jump Starting)p. 665
+ALTERNATORp. 667
Belt Adjustmentp. 667
Belt Replacementp. 667
Charging System Inspectionp. 668
Alternator Voltage Testingp. 669
Low Voltage Testingp. 669
High Voltage Testingp. 670
Removal And Installationp. 670
Parts Identificationp. 672
+STARTERp. 673
Testingp. 673
Removal And Installationp. 674
Parts Identificationp. 675
+LIGHTSp. 677
Removal And Installationp. 677
Boom Light Removal And Installationp. 678
Boom Light Bulb Replacementp. 678
+MAGNETIC LOCKOUT SENSORp. 679
Removalp. 679
Installationp. 680
+FUEL LEVEL SENDERp. 681
Removal And Installationp. 681
Testingp. 682
+DIAGNOSTICS SERVICE CODE (S/N AJRY11001 – AJRY12331)p. 683
+DIAGNOSTIC SERVICE CODES (S/N AJRY12332 & ABOVE, B33211000 & ABOVE AND B3JE11001 & ABOVE)p. 685
Viewing Service Codesp. 685
Number Codes Listp. 686
+DELUXE INSTRUMENT PANEL SETUP (S/N AJRY11001 – AJRY12331)p. 689
Passwordsp. 689
Password Entry (For Starting And Operating The Machine)p. 689
Changing The Operator Passwordp. 689
Password Lockout Featurep. 690
Job Clockp. 690
RPMp. 690
Maintenance Clockp. 691
+CONTROL PANEL SETUP (S/N AJRY12332 & ABOVE, B33211000 & ABOVE AND B3JE11001 & ABOVE)p. 695
Panel Setup (Deluxe Instrument Panel)p. 695
Password Setup (Keyless Start Panel)p. 701
Password Setup (Deluxe Instrument Panel)p. 702
Maintenance Clockp. 704
+INSTRUMENT PANEL / CONTROLLER (S/N AJRY11001 – AJRY12331)p. 707
Removal And Installationp. 707
+INSTRUMENT PANEL (S/N AJRY12332 & ABOVE, B33211001 & ABOVE AND B3JE11001 & ABOVE)p. 709
Removal And Installationp. 709
+CONTROLLER (S/N AJRY12332 & ABOVE, B33211001 & ABOVE AND B3JE11001) (GATEWAY AND AUXILIARY)p. 711
Descriptionp. 711
Gateway Controller Removal And Installationp. 711
Auxiliary Controller Removal And Installationp. 712
+KEY SWITCHp. 713
Removal And Installationp. 713
+WIPER MOTORp. 715
Removal And Installationp. 715
+MOTION ALARM SYSTEMp. 717
Descriptionp. 717
Inspectingp. 717
Adjusting Switch Positionp. 718
+SERVICE PC (LAPTOP COMPUTER)p. 719
Connecting The Remote Start Toolp. 719
Connecting Remote Start Tool (Service Tool)p. 719
Operationp. 720
+BOBCAT MACHINE IQ WIRELESS COMMUNICATIONSp. 721
Descriptionp. 721
Controller Removal And Installationp. 721
Antenna Removal And Installationp. 723
Procedurep. 725
+ENGINE SERVICEp. 727
+ENGINE INFORMATIONp. 729
Descriptionp. 729
Specificationsp. 730
Engine Bolt Torquep. 735
Crankshaft Re-Grind Datap. 736
Torque For Kubota® Metric Boltsp. 737
Troubleshootingp. 738
Engine Removal And Installationp. 739
Compression Checkingp. 745
+ENGINE SPEED CONTROLp. 747
Removal And Installationp. 747
Auto Idle Controller Removal And Installationp. 748
Calibrationp. 749
Actuator Removal And Installationp. 752
+MUFFLERp. 755
Removalp. 755
Installationp. 756
+AIR CLEANERp. 759
Removal And Installationp. 759
+ENGINE COOLING SYSTEMp. 761
Radiator Removal And Installationp. 761
Fan Removal And Installationp. 763
Water Pump Removal And Installationp. 764
Water Pump Disassembly And Assemblyp. 764
Thermostat Housing Removal And Installationp. 765
Thermostat – Checkingp. 765
+LUBRICATION SYSTEMp. 767
Oil Pan Removal And Installationp. 767
Oil Pump Removal And Installationp. 767
Oil Pump Inspectionp. 768
Engine Oil Pressure – Testingp. 769
+FUEL SYSTEMp. 771
Fuel Shutoff Solenoid – Checkingp. 771
Fuel Shutoff Solenoid Removal And Installationp. 772
Fuel Injection Pump – Checkingp. 773
Fuel Injection Pump Removal And Installationp. 774
Fuel Injection Pump – Timingp. 777
Fuel Camshaft Removal And Installationp. 779
Fuel Camshaft Governorp. 779
Fuel Injector Removal And Installationp. 780
Fuel Injector Nozzle Pressure – Checkingp. 782
Nozzle Spray Conditionp. 783
Valve Seat Tightnessp. 783
+CYLINDER HEADp. 785
Glow Plugs – Testingp. 785
Glow Plugs Removal And Installationp. 785
Valve Clearance Adjustmentp. 786
Valve Timing – Checkingp. 786
Cylinder Head Removal And Installationp. 787
Cylinder Head Disassembly And Assemblyp. 789
Cylinder Head – Servicingp. 790
Cylinder Head Top Clearancep. 790
Valve Guide – Checkingp. 791
Reconditioning The Valve And Valve Seatp. 792
Valve Springp. 794
Valve Tappetsp. 795
Rocker Arm And Shaft – Checkingp. 795
Push Rod Alignment – Checkingp. 796
+CRANKSHAFT AND PISTONSp. 797
Piston And Connecting Rod Removal And Installationp. 797
Piston And Connecting Rod – Servicingp. 799
Cylinder Bore – Checkingp. 801
Connecting Rod Alignmentp. 802
Crankshaft Gear Removal And Installationp. 803
Crankshaft And Bearings Removal And Installationp. 804
Crankshaft And Bearings – Servicingp. 807
+CAMSHAFT AND TIMING GEARSp. 811
Timing Gearcase Cover Removal And Installationp. 811
Timing Gears Backlash – Checkingp. 814
Idle Gear And Camshaft Removal And Installationp. 815
Camshaft Servicingp. 817
Idle Gear And Shaft Servicingp. 818
+FLYWHEEL AND HOUSINGp. 819
Hydraulic Pump Coupler Removal And Installationp. 819
Flywheel Removal And Installationp. 821
Flywheel Ring Gearp. 821
+HEATING, VENTILATION AND AIR CONDITIONING S/N ACRA11001 – ACRA13000p. 823
+AIR CONDITIONING SYSTEM FLOWp. 825
Descriptionp. 825
Chartp. 826
Componentsp. 827
Safety Equipmentp. 830
+REGULAR MAINTENANCEp. 831
Cab Filtersp. 831
Air Conditioning Compressor Belt Adjustmentp. 832
Air Conditioning Compressor Belt Replacementp. 832
Condenserp. 833
Air Conditioning Lubricationp. 833
Evaporator / Heater Coilp. 833
Air Conditioning Service Chartp. 834
+TROUBLESHOOTINGp. 835
Blower Motor Does Not Operatep. 835
Blower Motor Operates Normally, But Air Flow Is Insufficientp. 835
Insufficient Cooling Although Air Flow And Compressor Operation Are Normalp. 835
The Compressor Operates Improperly Or Not At Allp. 835
Gauge Pressure Related Troubleshootingp. 836
Temperature / Pressure Chartp. 837
Poor A/C Performancep. 838
HVAC Repair And Leaksp. 838
Electrical Systemp. 839
Engine Coolant Bypassing The Heater Valvep. 841
+SYSTEM CHARGING AND RECLAMATIONp. 843
Refrigerant Identificationp. 843
Reclamation And Charging With Recovery / Charging Unitp. 844
+COMPRESSORp. 847
Removal And Installationp. 847
+CONDENSERp. 849
Removal And Installationp. 849
+RECEIVER / DRIERp. 851
Receiver / Drier Removal And Installationp. 851
Pressure Relief Valve Removal And Installationp. 852
Pressure Switch Removal And Installationp. 852
+EVAPORATOR / HEATER UNITp. 853
Removal And Installationp. 853
+THERMOSTATp. 857
Descriptionp. 857
Removal And Installationp. 858
+EXPANSION VALVEp. 859
Removal And Installationp. 859
+EVAPORATOR COILp. 861
Removal And Installationp. 861
+HEATER COILp. 863
Removal And Installationp. 863
+BLOWER FANp. 865
Removal And Installationp. 865
+HEATER VALVEp. 867
Removal And Installationp. 867
+HVAC DUCTp. 869
Removal And Installationp. 869
+HEATING, VENTILATION AND AIR CONDITIONING S/N AJRY12332 & ABOVE, B33211001 & ABOVE AND B3JE11001 & ABOVEp. 871
+AIR CONDITIONING SYSTEM FLOWp. 873
Descriptionp. 873
Chartp. 874
Componentsp. 875
Safety Equipmentp. 878
+REGULAR MAINTENANCEp. 879
Cab Filtersp. 879
Air Conditioning Compressor Belt Adjustmentp. 880
Air Conditioning Compressor Belt Replacementp. 880
Condenserp. 880
Air Conditioning Lubricationp. 881
Evaporator / Heater Coilp. 881
Air Conditioning Service Chartp. 883
+TROUBLESHOOTINGp. 885
Blower Motor Does Not Operatep. 885
Blower Motor Operates Normally, But Air Flow Is Insufficientp. 885
Insufficient Cooling Although Air Flow And Compressor Operation Are Normalp. 885
The Compressor Operates Improperly Or Not At Allp. 885
Gauge Pressure Related Troubleshootingp. 886
Temperature / Pressure Chartp. 887
Poor A/C Performancep. 888
HVAC Repair And Leaksp. 888
Electrical Systemp. 889
Engine Coolant Bypassing The Heater Valvep. 891
+SYSTEM CHARGING AND RECLAMATIONp. 893
Refrigerant Identificationp. 893
Reclamation And Charging With Recovery / Charging Unitp. 894
+COMPRESSORp. 897
Removal And Installationp. 897
+CONDENSERp. 899
Removal And Installationp. 899
+RECEIVER / DRIERp. 901
Receiver / Drier Removal And Installationp. 901
Pressure Relief Valve Removal And Installationp. 902
Pressure Switch Removal And Installationp. 902
+EVAPORATOR / HEATER UNITp. 903
Removal And Installationp. 903
+THERMOSTATp. 907
Descriptionp. 907
Removal And Installationp. 908
+EXPANSION VALVEp. 911
Removal And Installationp. 911
+EVAPORATOR COILp. 913
Removal And Installationp. 913
+HEATER COILp. 915
Removal And Installationp. 915
+BLOWER FANp. 917
Removal And Installationp. 917
+HEATER VALVEp. 919
Removal And Installationp. 919
+HVAC DUCTp. 921
Removal And Installationp. 921
+SPECIFICATIONSp. 923
+EXCAVATOR SPECIFICATIONS (S/N AJRY11001 & ABOVE AND B33211001 & ABOVE)p. 925
Machine Dimensions (Standard Arm)p. 925
Machine Dimensions (Long Arm)p. 927
Performancep. 929
Controlsp. 929
Engine (E26 S/N B33211001 & Above)p. 930
Engine (E26 S/N AJRY11001 & Above)p. 930
Hydraulic Systemp. 931
Hydraulic Cylindersp. 932
Hydraulic Cycle Timesp. 932
Electricalp. 932
Drive Systemp. 932
Slew Systemp. 933
Undercarriagep. 933
Capacitiesp. 933
Tracksp. 933
Ground Pressurep. 933
+EXCAVATOR SPECIFICATIONS (S/N B3JE11001 & ABOVE)p. 935
Machine Dimensions (Standard Arm)p. 935
Machine Dimensions (Long Arm)p. 937
Performancep. 939
Controlsp. 939
Enginep. 940
Hydraulic Systemp. 940
Hydraulic Cylindersp. 941
Hydraulic Cycle Timesp. 941
Electricalp. 941
Drive Systemp. 941
Slew Systemp. 942
Undercarriagep. 942
Capacitiesp. 942
Tracksp. 942
Ground Pressurep. 942
+TECHNICAL SERVICE GUIDE SPECIFICATIONSp. 943
Enginep. 943
Engine Torquesp. 943
Cooling Systemp. 943
Excavator Torquesp. 944
Lubricationp. 944
Torque For General SAE Boltsp. 945
Torque For General Metric Boltsp. 946
+HYDRAULIC CONNECTION SPECIFICATIONSp. 947
O-ring Face Seal Connectionp. 947
Straight Thread O-ring Fittingp. 947
Tubelines And Hosesp. 948
Flare Fittingp. 948
O-ring Flare Fittingp. 949
Port Seal Fittingp. 951
Push To Connect Fittingsp. 952
+HYDRAULIC FLUID SPECIFICATIONSp. 955
+CONVERSIONSp. 957
Decimal And Millimeter Equivalent Chartp. 957
U.S. To Metric Conversion Chartp. 958
+SERVICE TOOLS REQUIREDp. 959
Remote Start Toolsp. 959
Hydraulic Toolsp. 960
Engine Toolsp. 963
Electrical Toolsp. 965
General Toolsp. 965
HVAC Toolsp. 966
ALPHABETICAL INDEXp. 967
Chapters Covered
- Safety and Maintenance – Safety instructions, fire prevention, lifting and blocking the excavator, maintenance intervals, lubricating the excavator, pivot pins
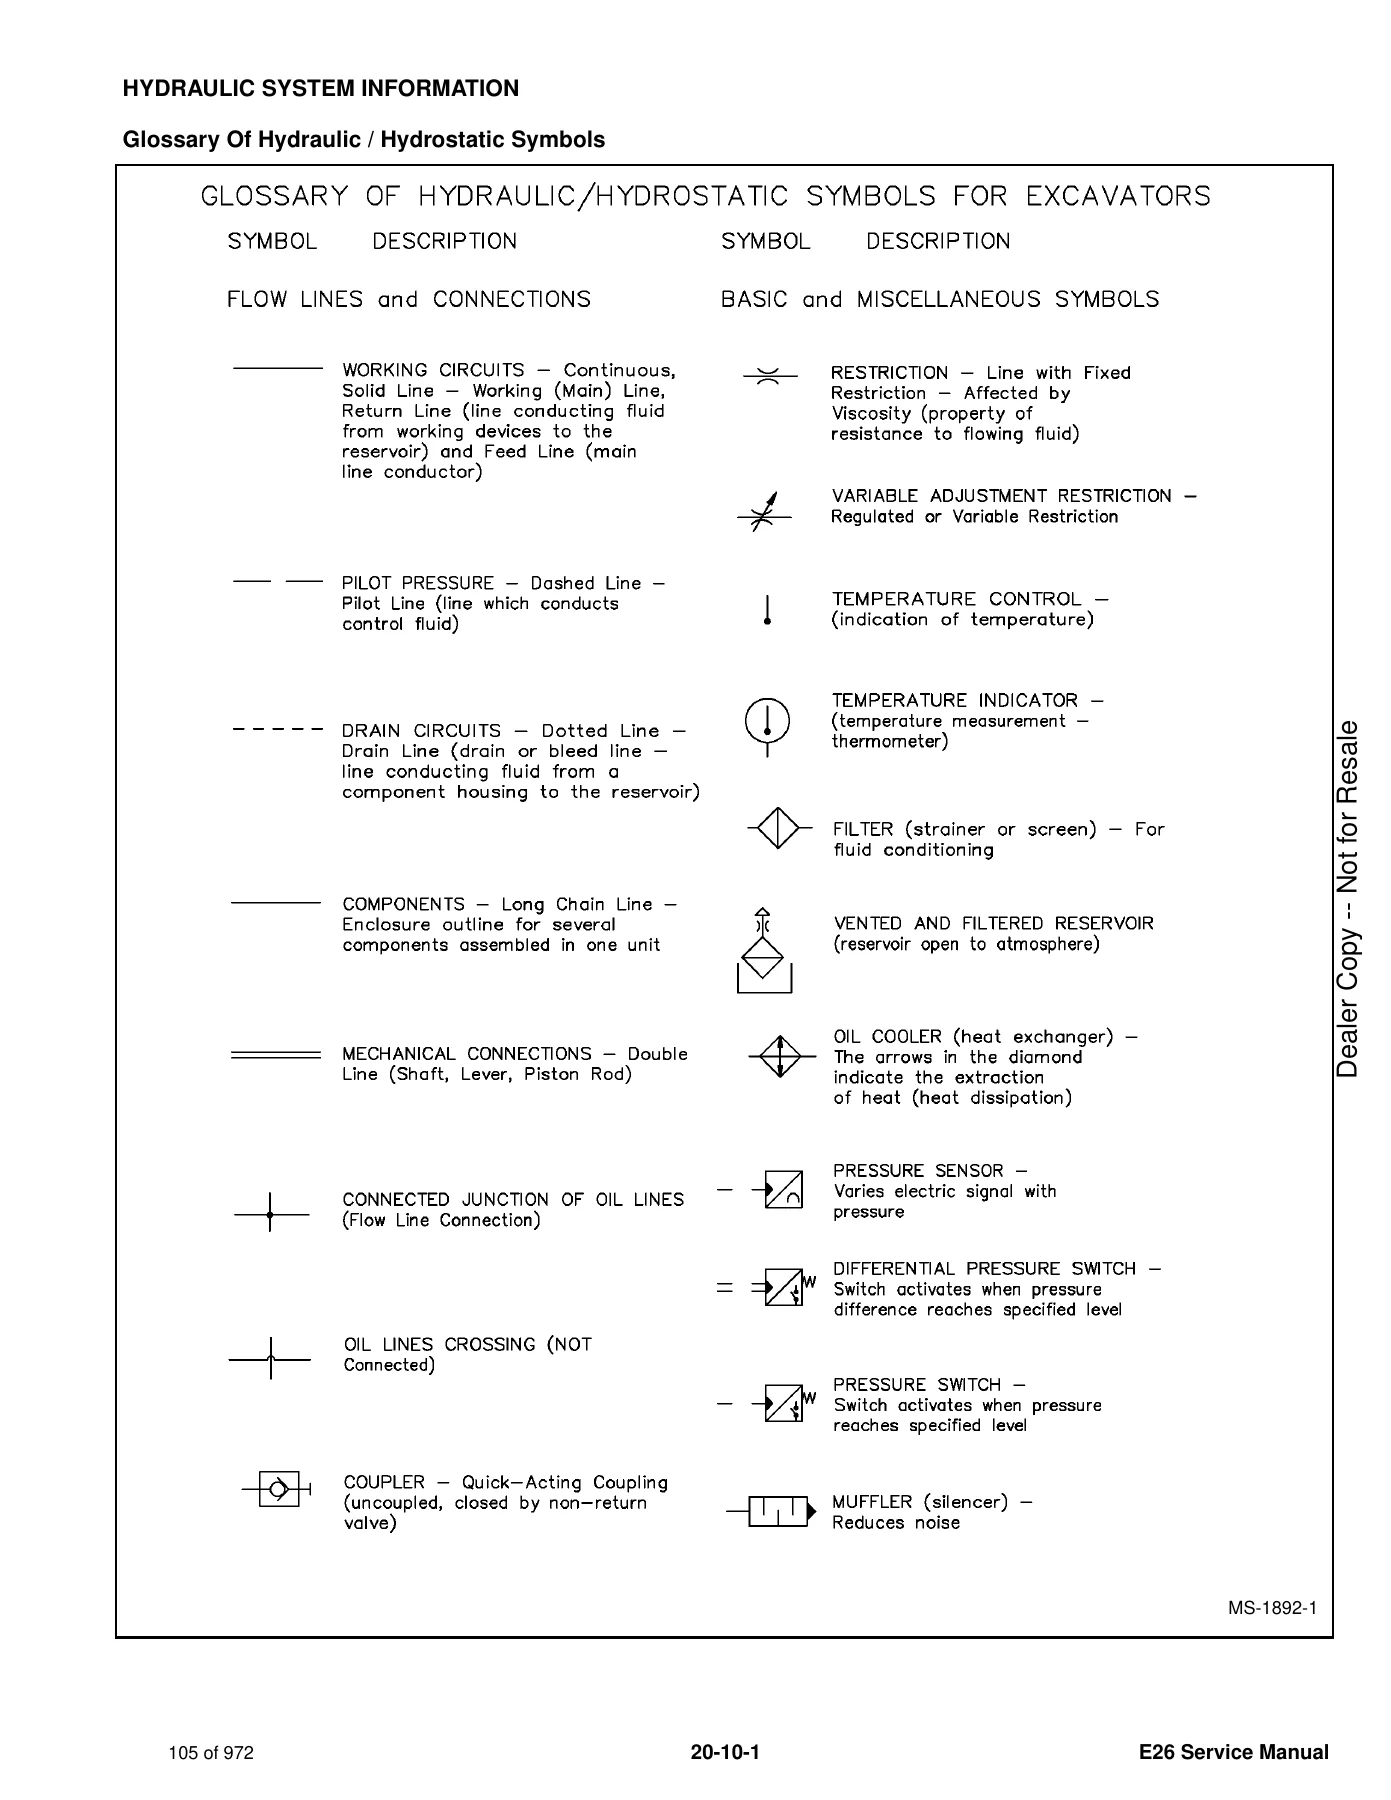
- Hydraulic System – Hydraulic symbols glossary, troubleshooting charts, boom/arm/bucket/blade/clamp/boom swing cylinders, port relief valves, cross port relief valves, pilot pressure relief valves, hydraulic control valve, hydraulic pump, manifold assembly and accumulator, travel motor, swivel joint, swing motor, control pattern selector valve, joysticks, hydraulic filter mount, hydraulic reservoir, oil cooler, direct to tank valve, blade control lever, case drain filter mount, travel control valve, removing air from the hydraulic system, secondary auxiliary valve, load holding valves
- Undercarriage – Blade, track undercarriage components (rubber track), track tension, idler, track tensioner, rollers, sprocket, track maintenance, swing circle gear
- Upperstructure and Swing Section – Upperstructure removal and installation, ROPS canopy, cab, door, windows, seat, consoles, upperstructure covers, counterweight, travel levers and pedals, floor mat, fuel tank, horn, swing frame, boom, arm, bucket, clamp, tailgate, X-Change, hydraulic pin grabber coupler, side covers, tool box
- Electrical System and Analysis – Electrical troubleshooting, battery, alternator, starter, lights, magnetic lockout sensor, fuel level sender, diagnostics service codes, instrument panel setup, controllers, key switch, wiper motor, motion alarm system, service PC, Machine IQ wireless communications
- Engine Service – Engine information and specifications, engine removal and installation, engine speed control, muffler, air cleaner, engine cooling system, lubrication system, fuel system, cylinder head, crankshaft and pistons, camshaft and timing gears, flywheel and housing
- Heating, Ventilation and Air Conditioning – A/C system flow, components, safety equipment, regular maintenance, troubleshooting, system charging and reclamation, compressor, condenser, receiver/drier, evaporator/heater unit, thermostat, expansion valve, evaporator coil, heater coil, blower fan, heater valve, HVAC duct
- Specifications – Machine dimensions, performance, engine specifications, hydraulic system, hydraulic cylinders, cycle times, electrical, drive system, slew system, undercarriage, capacities, tracks, ground pressure, torque values, conversion charts, service tools
This Bobcat E26 service manual covers the machine inside and out. The hydraulic section alone spans over two hundred pages with detailed disassembly and assembly procedures for every cylinder, valve and motor on the E26. The electrical section provides complete wiring schematics across fourteen sheets, connector assignments and diagnostic service codes. The engine service chapter walks through the Kubota V1505 engine from removal to complete overhaul, including torque values, clearances and reconditioning specifications. Every procedure is supported with illustrations, exploded views and step-by-step instructions written for the technician working on the machine.
What This Bobcat E26 Service Manual Enables You to Do
With this E26 Compact Excavator Service Manual on hand, you can confidently tackle hydraulic cylinder resealing, control valve disassembly and assembly, travel motor rebuilds, swing motor service, engine top-end and bottom-end overhauls, electrical diagnostics using the service code list, HVAC system charging and component replacement, undercarriage track tensioning and component replacement, and complete upperstructure removal when major work is required. The manual provides the exact torque specifications, pressure settings, clearances and adjustment procedures that keep the E26 running within factory tolerances.
Diagnostic work is made far easier with the complete electrical wiring schematics, hydraulic circuit diagrams and troubleshooting charts for the hydraulic circuit, cylinder circuit, swing circuit and travel circuit. Instead of guessing at a fault, you can follow the systematic diagnostic procedures laid out in the manual to isolate the problem and apply the correct fix.
Why This Manual Matters
Working on compact excavators without the correct service information risks costly mistakes. Over-torquing a hydraulic fitting, setting a relief valve to the wrong pressure, or skipping a critical step during engine reassembly can lead to component failure, downtime and expensive repairs. This Bobcat E26 repair manual gives you the same procedures, specifications and diagrams used in professional service environments, so every repair is done right the first time.
The manual also includes detailed specifications sections covering machine dimensions, operating weights, digging forces, hydraulic pressures, flow rates, cylinder dimensions, cycle times, electrical ratings, capacities and ground pressure figures. These reference values are essential when checking machine performance against factory standards or when ordering replacement parts.
Instant PDF Delivery
This Bobcat E26 Compact Excavator Service Manual is delivered as an instant PDF download after payment. No shipping, no waiting for a physical book to arrive. The file works on any device, including laptops, tablets and smartphones, and can be printed for use in the workshop. Keep it on your computer for quick searches or print the pages you need for the job at hand. With 972 pages of comprehensive service information, this manual is the essential reference for anyone responsible for maintaining or repairing the Bobcat E26.
Reviews
There are no reviews yet.