★ TRUSTED BY 321,897+ PROFESSIONALS WORLDWIDE
🏒
Trusted Business
Verified & Licensed
πŸ›‘οΈ
Virus Free Files
100% Safe Downloads
πŸ”’
Secure Payment
SSL Protected
⚑
Instant Delivery
Available Immediately
Sale!

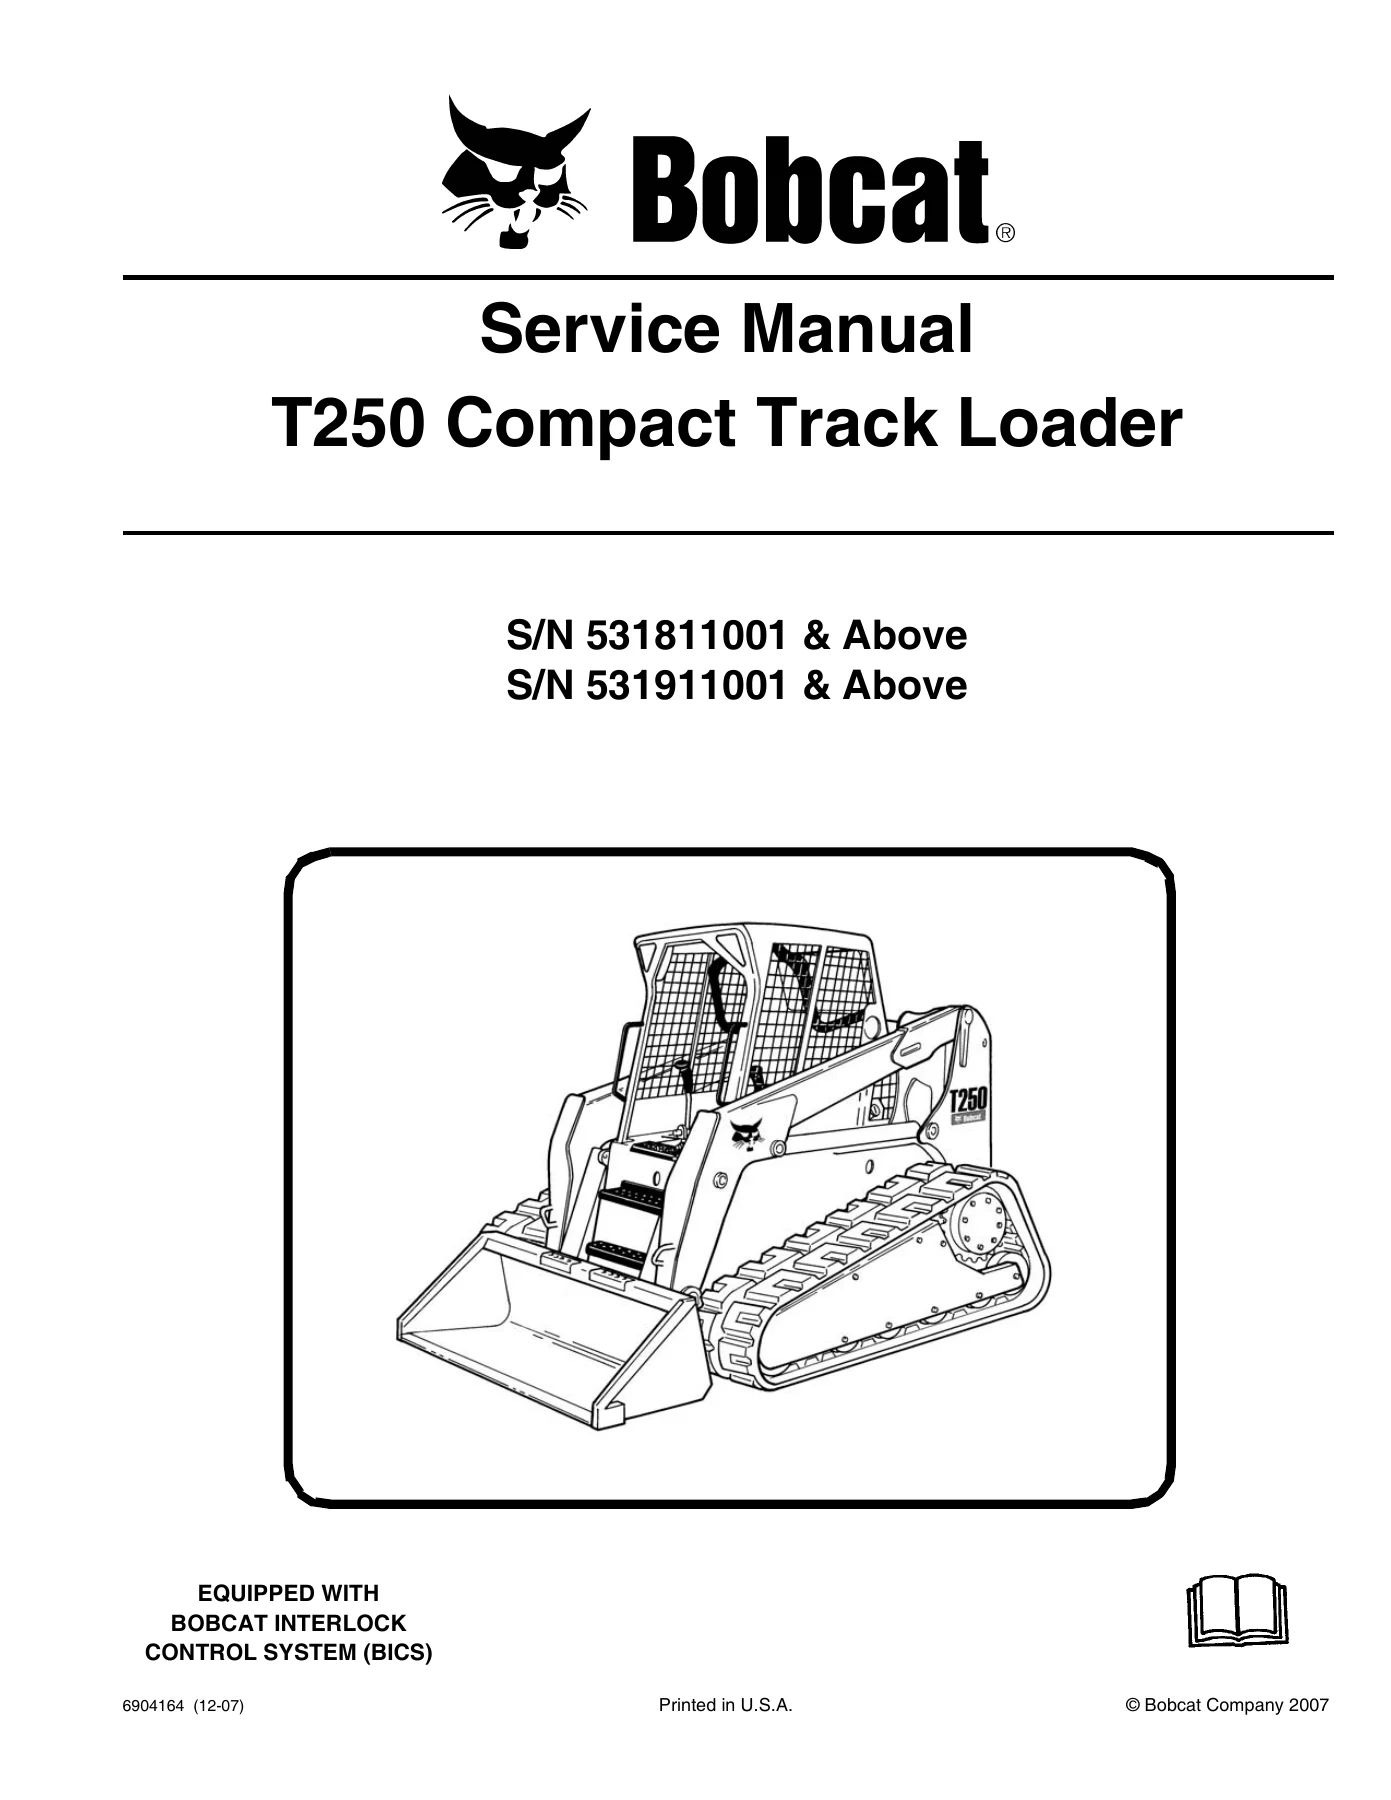
Bobcat T250 Compact Track Loader Service Manual 2007 – PDF Repair Guide

Original price was: $39.95.Current price is: $24.95.

Comprehensive Bobcat T250 Compact Track Loader Service Manual (P/N 6904164, November 2007). Over 960 pages covering hydraulic, hydrostatic, electrical, engine, drive, and HVAC systems with detailed procedures, schematics, and specifications.

SKU: BOBCAT-T250-SM-6904164-HD Category: Tags: , , , Vendor: Diagnostics Manuals
⚑
Instant PDF Download
Available immediately
πŸ’Ύ
Save to Your Device
Download & keep forever
πŸ›‘οΈ
Antivirus Scanned
100% virus-free
🌍
Trusted Worldwide
175,000+ customers

Description

Bobcat T250 Compact Track Loader Service Manual – Complete 2007 Workshop Edition

This Bobcat T250 Compact Track Loader Service Manual is the full workshop reference for professional mechanics and serious owner-operators who need factory-level service, diagnostic, and repair procedures for the T250 compact track loader. Published under document number 6904164 and dated November 2007, this T250 service manual covers the complete machine across every major system, from routine maintenance through hydraulic and hydrostatic component overhaul. Whether you are adjusting track tension, rebuilding a lift cylinder, tracing a fault code, or setting up the SJC drive controller, this Bobcat T250 repair guide provides the procedures, torque values, and diagrams needed to complete the job correctly.

File Details

  • Manual Type: Service Manual (Workshop / Repair)
  • Brand: Bobcat
  • Model: T250 Compact Track Loader
  • Document Number: 6904164
  • Edition / Date: November 2007 (revisions through December 2007)
  • Serial Coverage: S/N 531811001 & Above; S/N 531911001 & Above
  • Language: English
  • File Format: PDF
  • Page Count: 964 pages

Chapters Covered

This Bobcat T250 Compact Track Loader service manual is organized by system, covering the entire machine from safety and maintenance through to complete engine service.

  • Safety & Maintenance – Maintenance safety, service schedule, lifting and blocking, lubrication, air cleaner, engine cooling system, engine lubrication system, fuel system, hydraulic/hydrostatic fluid, case drain filters, spark arrestor muffler, pivot pins, stopping the engine
  • Hydraulic System – Hydraulic system information, hydraulic control valve (standard, ACS, SJC), lift arm bypass control valve, hydraulic pumps (standard, high flow, SJC, SJC high flow), hydraulic/hydrostatic filters, hydraulic fluid reservoir, oil cooler, bucket position valve, rear auxiliary diverter valve, hydraulic cylinders (lift, tilt, Bob-Tach), front auxiliary hydraulic coupler block, Power Bob-Tach block, hydraulic connection specifications
  • Hydrostatic System – Hydrostatic system information, hydrostatic motor, hydrostatic pump (standard and SJC), charge pressure, drive belt, case drain filter
  • Drive System – Brake, track carriage components (idler, roller, sprocket, track tension, track damage identification)
  • Main Frame – Seat bar, operator cab, operator seat (suspension), Bob-Tach (hand lever and power), control handles/levers (standard, ACS, joystick), control panel, control pedals and linkages, fuel tank, lift arms, rear grill, rear door, fuel tank, access panels, windows (front door, rear, side, top), cab door
  • Electrical System & Analysis – Electrical system information, battery, alternator, starter, instrument panels, Bobcat controllers (main, ACS, SJC drive), speed sensors, diagnostic service codes, BICS, seat bar sensor, traction lock, calibration procedures, control panel setup, maintenance clock, password setup, back-up alarm system, service PC connection
  • Engine Service – Engine information, engine speed control, air cleaner, engine cooling system, lubrication system, fuel system, cylinder head, crankshaft and pistons, camshaft and timing gears, turbocharger, flywheel and housing
  • Heating, Ventilation, Air Conditioning – A/C system flow, regular maintenance, troubleshooting, system charging and reclamation, compressor, condenser, receiver/drier, evaporator/heater unit, thermostat, expansion valve, evaporator, heater coil, blower fan, heater valve
  • Specifications – T250 loader specifications, torque specifications for bolts, hydraulic connection specifications, hydraulic/hydrostatic fluid specifications, conversions

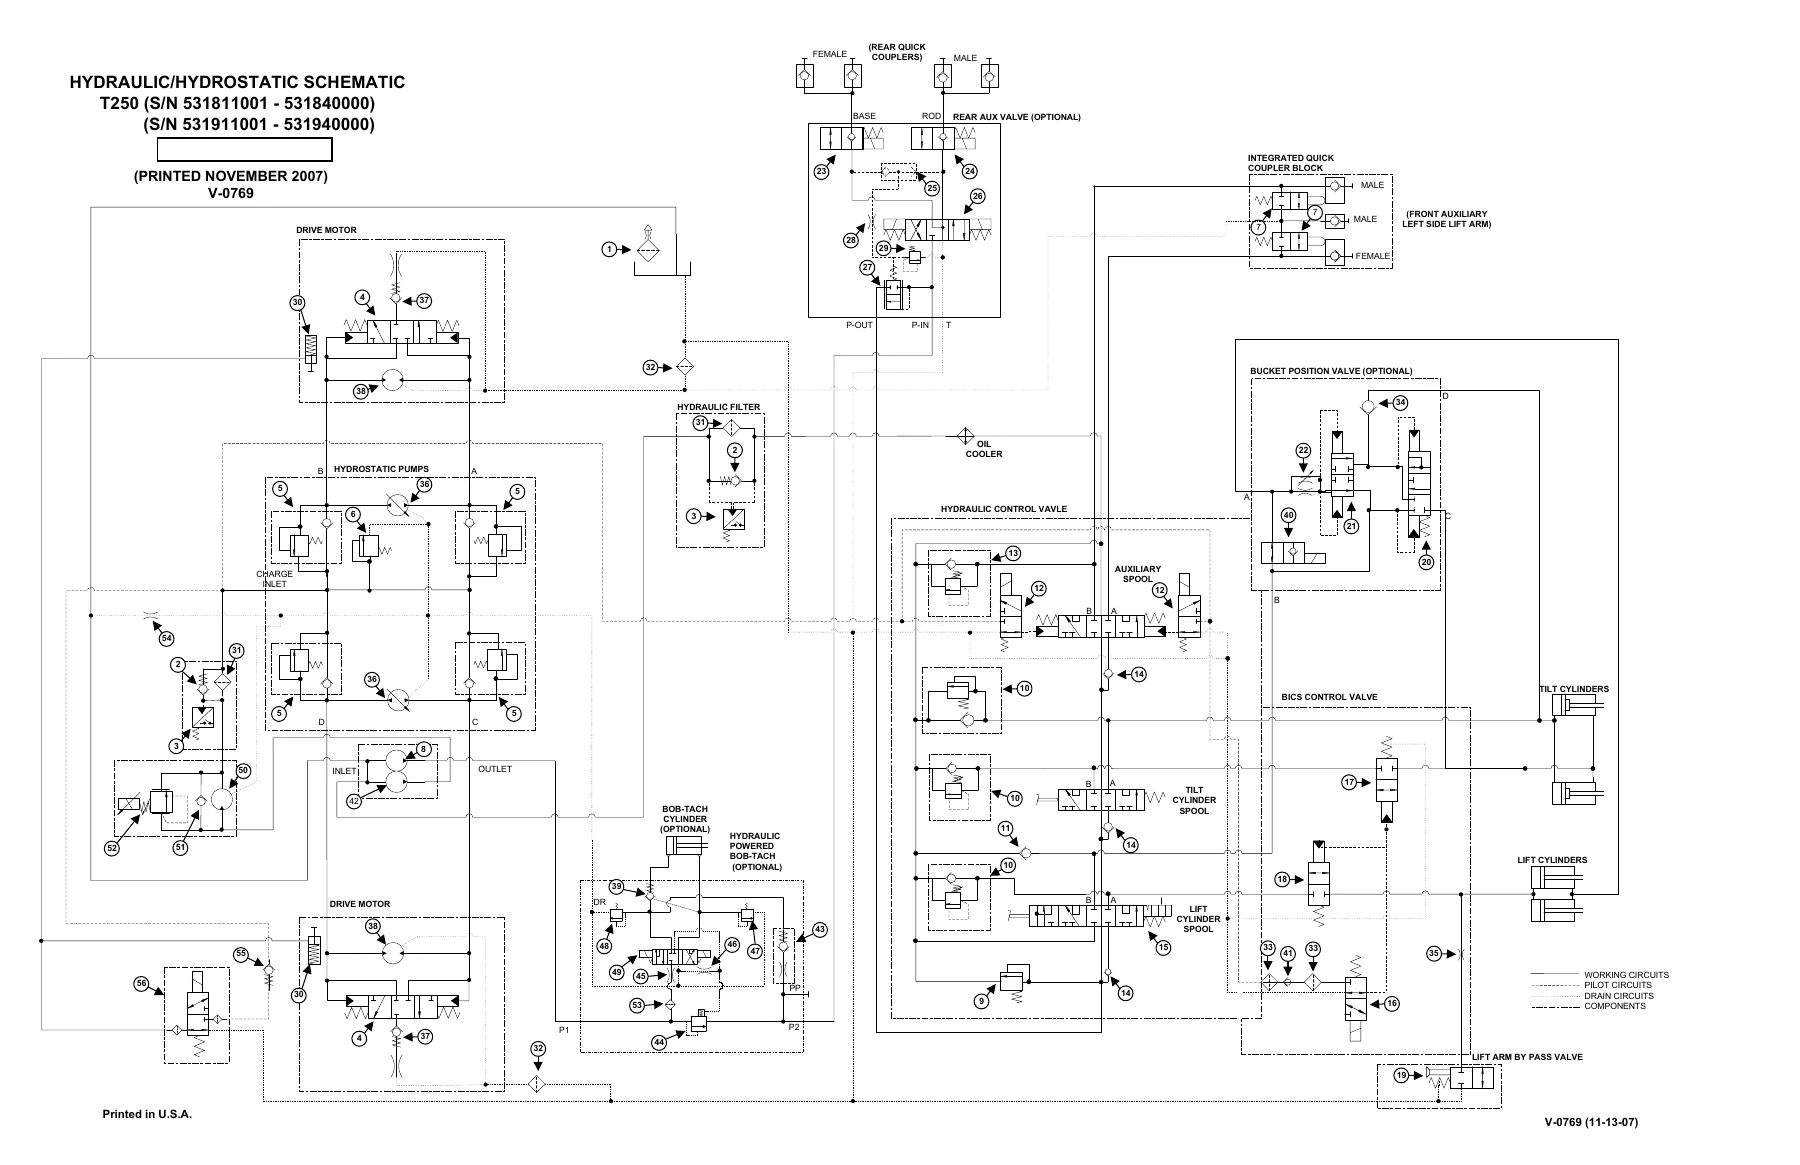
As a complete T250 compact track loader service manual PDF, this document goes well beyond routine maintenance. It contains detailed disassembly and assembly procedures for the hydrostatic pump and motor, step-by-step instructions for replacing the drive belt and tensioner, full electrical schematics with connector identification, hydraulic and hydrostatic circuit diagrams for standard, high flow, and SJC configurations, and diagnostic service code lists with probable causes. The engine section covers the Kubota V3300 turbo-diesel from cylinder head removal through crankshaft and bearing servicing, including valve clearance adjustment, injection pump timing, and turbocharger testing. The HVAC chapter is equally thorough, covering refrigerant identification, reclamation and charging, compressor clutch service, and evaporator/heater coil cleaning.

What This Manual Enables You to Do

With this Bobcat T250 service manual on hand, you can confidently tackle jobs that would otherwise require a trip to the dealer:

  • Diagnose and repair hydraulic faults using the complete hydraulic/hydrostatic schematics and troubleshooting charts
  • Remove, disassemble, and rebuild lift, tilt, and Bob-Tach cylinders with the correct seals and torque values
  • Service the hydrostatic pump and motor, including charge pressure adjustment and SJC pump calibration
  • Trace electrical problems using the wiring schematics, connector identification charts, and diagnostic service code list
  • Perform engine service on the Kubota V3300-DI-T, including cylinder head work, valve adjustment, and injection pump timing
  • Maintain the HVAC system, from refrigerant charging through compressor clutch replacement
  • Adjust track tension, identify track damage, and service the track carriage components
  • Set up control panels, calibrate actuators and joysticks, and configure maintenance clocks
  • Follow the correct service schedule and safety procedures for every maintenance interval

The value of a Bobcat T250 repair manual like this is in the detail. Correct torque values, proper disassembly sequences, and accurate specifications prevent damage to expensive components and reduce downtime. Whether you are a professional technician maintaining a fleet or an owner-operator keeping your machine in peak condition, this manual gives you the same information the dealership service department uses.

Complete PDF Bookmark Tree

Complete Bookmarks

The complete bookmarks in the β€œBobcat T250 Compact Track Loader Service Manual 2007 – PDF Repair Guide” are as follows:

MAINTENANCE SAFETYp. 3
ALPHABETICAL INDEXp. 5
CONTENTSp. 7
FOREWORDp. 8
SAFETY INSTRUCTIONSp. 11
FIRE PREVENTIONp. 13
Maintenancep. 13
Operationp. 13
Electricalp. 13
Hydraulic Systemp. 13
Fuelingp. 13
Startingp. 13
Spark Arrestor Exhaust Systemp. 13
Welding And Grindingp. 14
Fire Extinguishersp. 14
SERIAL NUMBER LOCATIONSp. 15
Loader Serial Numberp. 15
Engine Serial Numberp. 15
DELIVERY REPORTp. 16
LOADER IDENTIFICATIONp. 17
SAFETY AND MAINTENANCEp. 19
LIFTING AND BLOCKING THE LOADERp. 21
Procedurep. 21
LIFT ARM SUPPORT DEVICEp. 23
Installingp. 23
Removingp. 24
OPERATOR CABp. 25
Descriptionp. 25
Raisingp. 26
Loweringp. 27
Cab Door Sensor (If Equipped)p. 28
Special Applications Kitp. 28
Special Applications Kit Inspection And Maintenancep. 28
TRANSPORTING THE LOADER ON A TRAILERp. 29
Loading And Unloadingp. 29
Fasteningp. 29
TOWING THE LOADERp. 31
Procedurep. 31
REMOTE START TOOL KIT-MEL1563p. 33
Remote Start Tool – MEL1563p. 33
Service Tool Harness Control – MEL1565p. 34
Service Tool Harness Communicator – MEL1566p. 35
Remote Start Procedurep. 36
REMOTE START TOOL (SERVICE TOOL) KIT – 6689779p. 39
Descriptionp. 39
Remote Start Tool (Service Tool) – 6689778p. 40
Loader Service Tool Harness – 6689747p. 41
Computer Service Tool Harness – 6689746p. 42
Remote Start Procedurep. 43
SERVICE SCHEDULEp. 47
Chartp. 47
AIR CLEANER SERVICEp. 49
Replacing Filter Elementsp. 49
ENGINE COOLING SYSTEMp. 51
Cleaningp. 51
Checking Levelp. 52
Removing And Replacing Coolantp. 52
FUEL SYSTEMp. 55
Fuel Specificationsp. 55
Biodiesel Blend Fuelp. 55
Filling The Fuel Tankp. 56
Fuel Filterp. 56
Removing Air From The Fuel Systemp. 57
ENGINE LUBRICATION SYSTEMp. 59
Checking And Adding Engine Oilp. 59
Engine Oil Chartp. 59
Removing And Replacing Oil And Filterp. 60
HYDRAULIC / HYDROSTATIC SYSTEMp. 61
Checking And Adding Fluidp. 61
Hydraulic / Hydrostatic Fluid Chartp. 61
Removing And Replacing Hydraulic Fluidp. 62
Removing And Replacing Hydraulic / Hydrostatic Filterp. 63
Removing And Replacing Case Drain Filtersp. 64
Removing And Replacing Hydraulic Charge Filterp. 65
Breather Capp. 66
BOB-TACH (HAND LEVER)p. 67
Inspection And Maintenancep. 67
BOB-TACH (POWER)p. 69
Inspection And Maintenancep. 69
LUBRICATING THE LOADERp. 71
Lubrication Locationsp. 71
SPARK ARRESTOR MUFFLERp. 73
Cleaning Procedurep. 73
PIVOT PINSp. 75
Inspection And Maintenancep. 75
LOADER STORAGE AND RETURN TO SERVICEp. 77
Storagep. 77
Return to Servicep. 77
STOPPING THE ENGINE AND LEAVING THE LOADERp. 79
Procedurep. 79
Emergency Exitp. 80
HYDRAULIC SYSTEMp. 81
HYDRAULIC/HYDROSTATIC SCHEMATICSp. 87
HYDRAULIC SYSTEM INFORMATIONp. 103
Glossary Of Hydraulic / Hydrostatic Symbolsp. 103
Troubleshootingp. 107
CYLINDER (LIFT)p. 109
Testingp. 109
Removal And Installationp. 110
Parts Identificationp. 112
Disassemblyp. 113
Assemblyp. 115
CYLINDER (TILT)p. 117
Testingp. 117
Removal And Installationp. 118
Base End Pivot Pin Removal And Installationp. 120
Parts Identificationp. 121
Disassemblyp. 122
Assemblyp. 124
CYLINDER (BOB-TACH)p. 127
Testingp. 127
Removal And Installationp. 128
Parts Identificationp. 129
Disassemblyp. 130
Assemblyp. 131
MAIN RELIEF VALVEp. 135
Descriptionp. 135
Testingp. 136
Adjustingp. 138
Removal And Installationp. 139
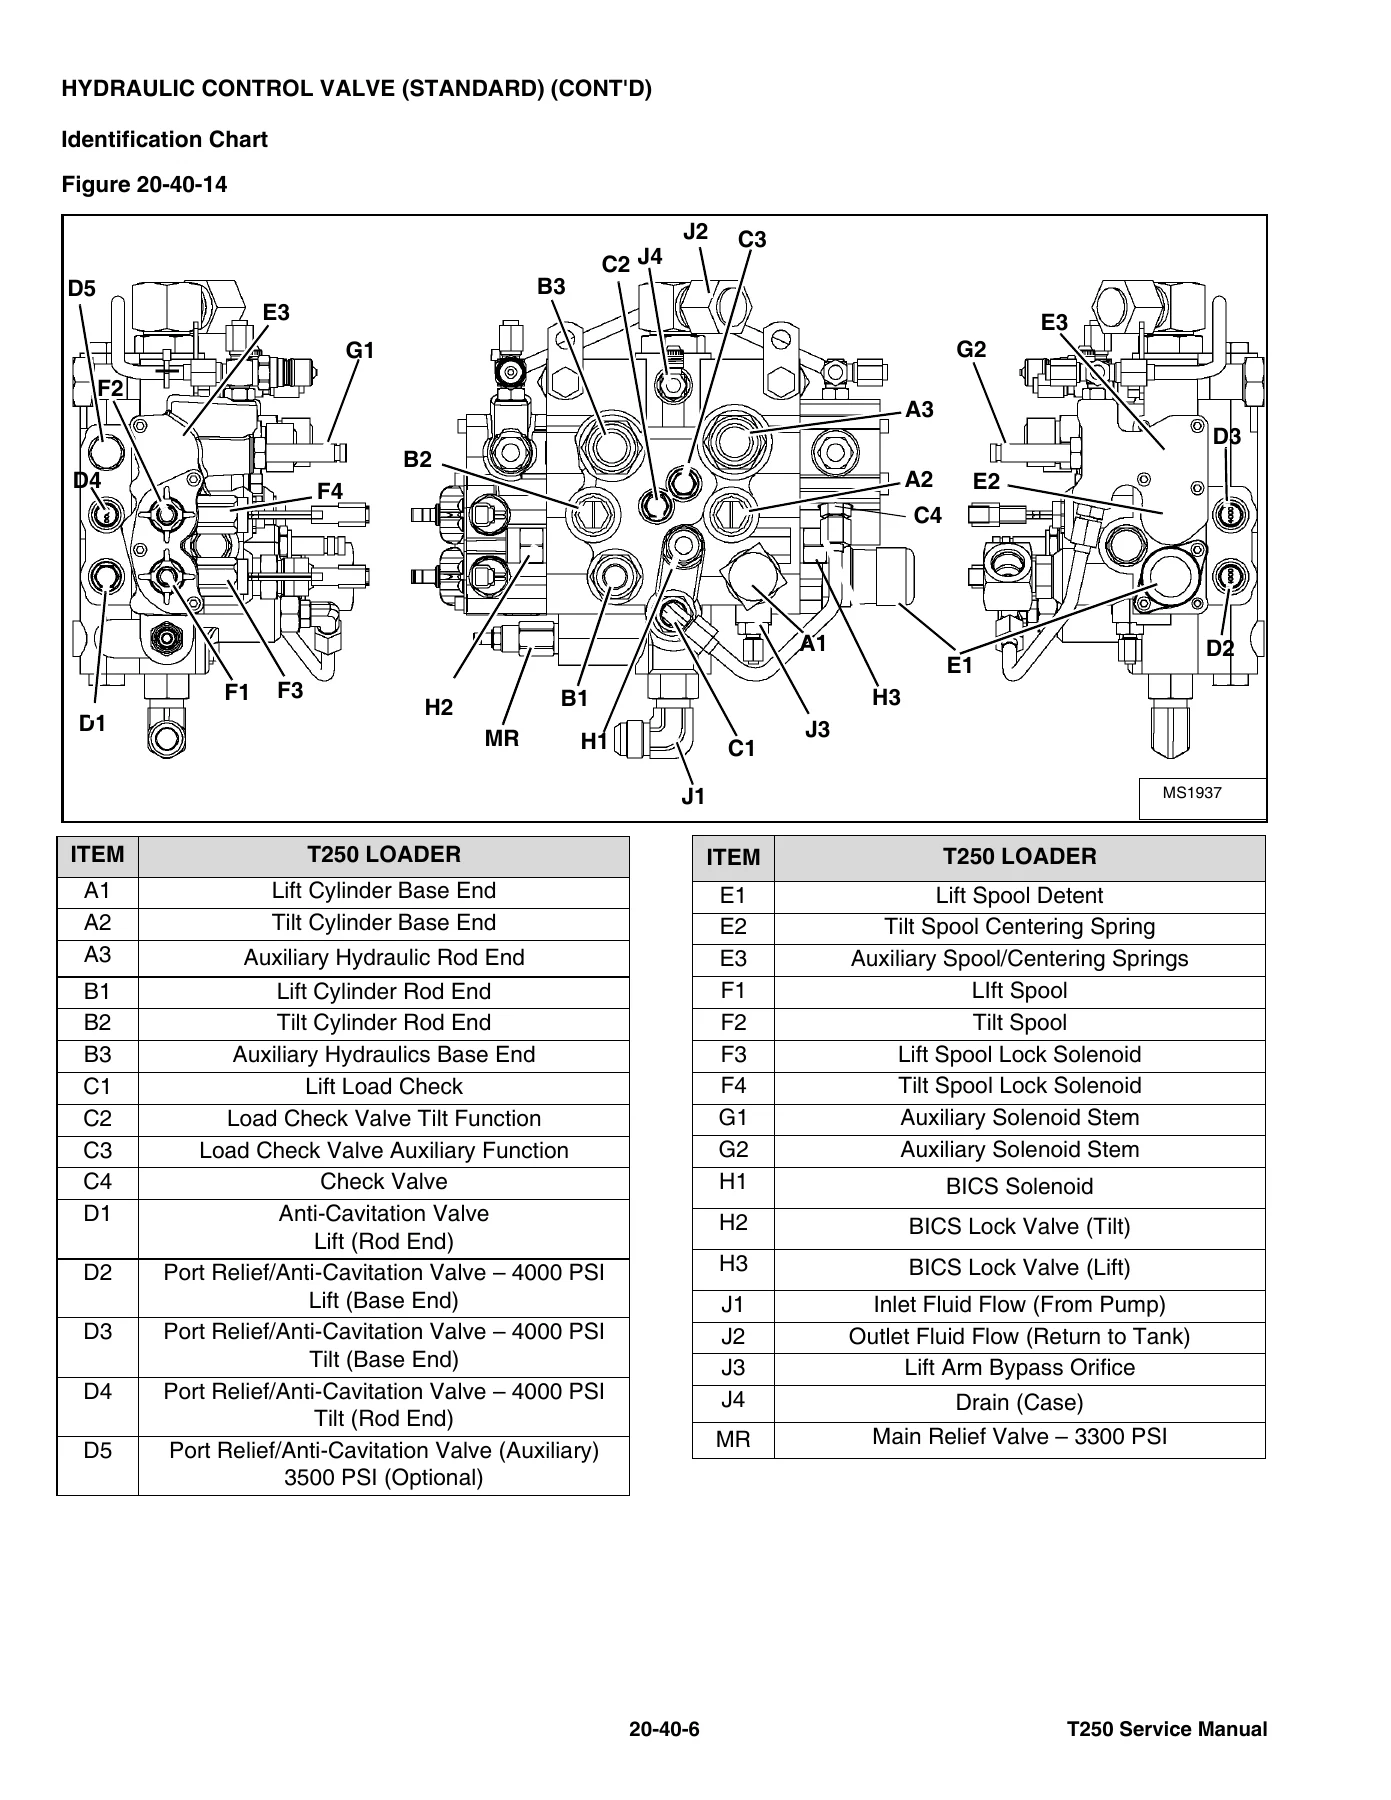
HYDRAULIC CONTROL VALVE (STANDARD)p. 141
Descriptionp. 141
Removal And Installationp. 142
Identification Chartp. 146
Mount Bracket Removal And Installationp. 147
Lift Load Check Valve Removal And Installationp. 147
Load Check Valve Removal And Installation (Tilt & Auxiliary)p. 148
Anti-Cavitation Valve Removal And Installation (Lift, Rod End)p. 148
Port Relief / Anti-Cavitation Valve Removal And Installation (Lift, Base End)p. 149
Port Relief / Anti-Cavitation Valve Removal And Installation (Tilt, Base End)p. 150
Port Relief / Anti-Cavitation Valve Removal And Installation (Tilt, Rod End)p. 150
Port Relief Valve Removal And Installationp. 151
Plug Removal And Installationp. 152
Rubber Boot Removal and Installationp. 153
End Cap Block Removal and Installationp. 154
Lift Spool And Detent Removal And Installationp. 155
Tilt Spool Removal And Installationp. 165
Auxiliary Spool Removal And Installationp. 167
Auxiliary Solenoid Removal And Installationp. 169
Solenoid Removal And Installationp. 170
Lock Valve Removal And Installationp. 171
Lift Arm Bypass Orifice Removal And Installationp. 173
Main Relief Valve Removal And Installationp. 173
Check Valve Removal And Installationp. 174
HYDRAULIC CONTROL VALVE (ACS) OR (SJC)p. 175
Descriptionp. 175
Removal And Installationp. 176
Actuator Removal And Installation (In Loader)p. 180
Actuator Removal And Installation (Out of Loader)p. 182
Identification Chartp. 185
Mount Bracket Removal And Installationp. 186
Lift Load Check Valve Removal And Installationp. 186
Load Check Valve Removal And Installation (Tilt & Auxiliary)p. 187
Anti-Cavitation Valve Removal And Installation (Lift, Rod End)p. 187
Port Relief / Anti-Cavitation Valve Removal And Installation (Lift, Base End)p. 188
Port Relief / Anti-Cavitation Valve Removal And Installation (Tilt, Base End)p. 189
Port Relief / Anti-Cavitation Valve Removal And Installation (Tilt, Rod End)p. 189
Port Relief Valve Removal And Installationp. 190
Plug Removal And Installationp. 191
End Cap Block Removal And Installationp. 192
Lift Spool And Detent Removal And Installationp. 193
Tilt Spool Removal And Installationp. 198
Auxiliary Spool Removal And Installationp. 200
Auxiliary Solenoid Removal And Installationp. 202
Solenoid Removal And Installationp. 203
Lock Valve Removal And Installationp. 204
Lift Arm Bypass Orifice Removal And Installationp. 206
Main Relief Valve Removal And Installationp. 206
Check Valve Removal And Installationp. 207
LIFT ARM BYPASS CONTROL VALVEp. 209
Descriptionp. 209
Testingp. 209
Removal And Installationp. 209
Disassembly And Assemblyp. 210
HYDRAULIC PUMP (STANDARD)p. 211
Descriptionp. 211
Pump Test at Quick Couplersp. 212
Direct Pump Test (Standard Section)p. 213
Direct Pump Test (Charge Section)p. 215
Removal And Installationp. 219
Hydraulic Pump Start Upp. 221
Parts Identificationp. 222
Disassembly And Assemblyp. 223
HYDRAULIC PUMP (STANDARD) (HIGH FLOW)p. 225
Descriptionp. 225
Pump Test At Quick Couplersp. 226
Direct Pump Test (Standard Section)p. 227
Direct Pump Test (Charge Section)p. 229
Direct Pump Test (High Flow Section)p. 233
High Flow Relief Valve Adjustmentp. 235
High Flow Relief Valve Removal And Installationp. 237
Solenoid Removal And Installationp. 238
Removal And Installationp. 239
Hydraulic Pump Start Upp. 241
Parts Identificationp. 242
Disassembly And Assemblyp. 243
HYDRAULIC PUMP (SJC)p. 245
Descriptionp. 245
Pump Test At Quick Couplersp. 246
Direct Pump Test (Standard Section)p. 247
Direct Pump Test (Charge Section)p. 249
Removal And Installationp. 253
Hydraulic Pump Start Upp. 255
Parts Identificationp. 256
Disassembly And Assemblyp. 257
HYDRAULIC PUMP (SJC) (HIGH FLOW)p. 259
Descriptionp. 259
Pump Test At Quick Couplersp. 260
Direct Pump Test (Standard Section)p. 261
Direct Pump Test (Charge Section)p. 263
Direct Pump Test (High Flow Section)p. 267
High Flow Relief Valve Adjustmentp. 269
High Flow Relief Valve Removal And Installationp. 271
Solenoid Removal And Installationp. 272
Removal And Installationp. 273
Hydraulic Pump Start Upp. 275
Parts Identificationp. 276
Disassembly And Assemblyp. 277
HYDRAULIC/HYDROSTATIC FILTERSp. 279
Descriptionp. 279
Housing Removal And Installationp. 279
Charge Filter Housing Removal And Installationp. 281
HYDRAULIC FLUID RESERVOIRp. 285
Descriptionp. 285
Removal And Installationp. 285
Hydraulic Fluid Screenp. 288
OIL COOLERp. 289
Descriptionp. 289
Removal And Installationp. 289
BUCKET POSITION VALVEp. 291
Descriptionp. 291
Solenoid Removal And Installationp. 292
Solenoid Testingp. 293
Removal And Installationp. 293
Disassembly And Assemblyp. 294
REAR AUXILIARY DIVERTER VALVEp. 297
Descriptionp. 297
Solenoid Testingp. 297
Removal And Installationp. 298
Disassembly And Assemblyp. 300
BOB-TACH (POWER) BLOCKp. 307
Descriptionp. 307
Removal And Installationp. 307
Disassembly And Assemblyp. 309
FRONT AUXILIARY HYDRAULIC COUPLER BLOCKp. 313
Descriptionp. 313
Removal and Installationp. 313
Disassembly And Assemblyp. 314
HYDROSTATIC SYSTEMp. 317
HYDROSTATIC SYSTEM INFORMATIONp. 319
Troubleshootingp. 319
Descriptionp. 320
HYDROSTATIC MOTORp. 321
Descriptionp. 321
Removing And Replacing Oilp. 321
Removal And Installationp. 322
Parts Identificationp. 324
Disassembly And Assemblyp. 326
CHARGE PRESSUREp. 339
Descriptionp. 339
Testingp. 340
Sender Removal And Installationp. 342
Adjustingp. 343
HYDROSTATIC PUMPp. 345
Descriptionp. 345
Removal And Installationp. 346
Hydrostatic Pump Start Upp. 348
Replenishing / High Pressure Relief Valve Removal And Installationp. 349
Parts Identification (Left Half)p. 350
Parts Identification (Right Half)p. 351
Disassemblyp. 352
Assemblyp. 359
HYDROSTATIC PUMP (SJC)p. 365
Descriptionp. 365
Hydraulic Controller Removal And Installationp. 366
Removal And Installationp. 368
Hydrostatic Pump Start Upp. 370
Parts Identificationp. 371
High Pressure Relief And Bypass Valvep. 372
Charge Relief Valvep. 373
Disassembly And Assemblyp. 374
Mechanical Neutral Adjustmentp. 391
Hydraulic Controller Neutral Adjustmentp. 394
DRIVE BELTp. 397
Descriptionp. 397
Drive Belt Shield Removal And Installationp. 397
Adjustingp. 398
Belt Adjustmentp. 398
Drive Belt Removal And Installationp. 398
Tensioner Pulley Removal And Installationp. 399
Disassembly And Assemblyp. 400
Tensioner Pulley Tension Spring Removal And Installationp. 401
CASE DRAIN FILTERp. 403
Descriptionp. 403
Disassembly And Assemblyp. 403
DRIVE SYSTEMp. 405
BRAKEp. 407
Descriptionp. 407
Block Removal And Installationp. 408
Block Disassembly And Assemblyp. 409
TRACK CARRIAGE COMPONENTSp. 411
Descriptionp. 411
Checking Tensionp. 412
Adjusting Tensionp. 413
Track Removal And Installationp. 414
Idler (Front) Removal And Installationp. 417
Idler (Rear) Removal And Installationp. 420
Roller Removal And Installationp. 420
Sprocket Removal And Installationp. 421
Track Housing Removal And Installationp. 422
Track Damage Identificationp. 423
MAIN FRAMEp. 433
SEAT BARp. 437
Descriptionp. 437
Removal And Installationp. 437
Disassembly And Assemblyp. 439
Compression Spring Disassembly And Assemblyp. 440
OPERATOR CABp. 441
Gas Cylinder Removal And Installationp. 441
Gas Cylinder Bracket Disassembly And Assemblyp. 443
Removal And Installationp. 444
OPERATOR SEAT (SUSPENSION)p. 447
Removal And Installationp. 447
Slide Rail Removal And Installationp. 448
Seat Belt Removal And Installationp. 448
Lower Cushion Removal And Installationp. 449
Back Cushion Removal And Installationp. 450
Shock Removal And Installationp. 450
3-Point Seat Belt Removal And Installationp. 451
BOB-TACH (HAND LEVER)p. 453
Descriptionp. 453
Removal And Installationp. 453
Lever And Wedge Disassembly And Assemblyp. 456
Pivot Pin Bushing And Seal Removal And Installationp. 457
BOB-TACH (POWER)p. 459
Descriptionp. 459
Removal And Installationp. 459
Lever And Wedge Disassembly And Assemblyp. 462
Pivot Pin Bushing And Seal Removal And Installationp. 464
LIFT ARMSp. 465
Removal And Installationp. 465
REAR GRILLp. 469
Removal And Installationp. 469
REAR DOORp. 471
Removal And Installationp. 471
Striker Removal And Installationp. 472
Striker Disassembly And Assemblyp. 472
Striker (Adjusting)p. 473
Latch Removal And Installationp. 474
FUEL TANKp. 475
Removal And Installationp. 475
Fuel Level Sender Removal And Installationp. 477
Fuel Fill Screen Removal And Installationp. 477
CONTROL PEDALS AND LINKAGESp. 479
Descriptionp. 479
Pedal Removal And Installationp. 480
Linkage Removal And Installationp. 481
Pedal (Adjusting)p. 482
CONTROL PEDALS (ACS)p. 483
Descriptionp. 483
Foot Sensor Removal And Installationp. 484
Foot Pedal Removal And Installationp. 485
Foot Pedal Linkage Disassembly And Assemblyp. 486
CONTROL PANEL (S/N 531813473 & BELOW AND 531911429 & BELOW)p. 487
Descriptionp. 487
Removal And Installationp. 488
Shock Removal And Installationp. 490
Shaft Removal And Installationp. 490
Shaft Disassembly And Assemblyp. 491
Linkage Removal And Installationp. 492
Pintle Arm Disassembly and Assemblyp. 496
Linkage Neutral (Adjusting)p. 497
Linkage Travel (Adjusting)p. 501
CONTROL PANEL (S/N 531813474 & ABOVE AND 531911430 & ABOVE)p. 505
Descriptionp. 505
Removal And Installationp. 506
Shock Removal And Installationp. 508
Shaft Removal And Installationp. 509
Linkage Removal And Installationp. 510
Pintle Arm Disassembly and Assemblyp. 514
Linkage Neutral (Adjusting)p. 515
Linkage Travel (Adjusting)p. 519
CONTROL PANEL (S/N 531813473 & BELOW AND 531911429 & BELOW) (SJC)p. 523
Descriptionp. 523
Removal And Installationp. 524
CONTROL PANEL (S/N 531813474 & ABOVE AND 531911430 & ABOVE) (SJC)p. 527
Descriptionp. 527
Removal And Installationp. 528
CONTROL HANDLE / LEVERp. 531
Descriptionp. 531
Lever Removal And Installationp. 531
Boot Removal And Installationp. 532
CONTROL HANDLE / LEVER (ACS)p. 533
Descriptionp. 533
Handle Sensor Removal And Installationp. 533
Handle Removal And Installationp. 536
Handle Disassembly And Assemblyp. 537
Lever Removal And Installationp. 538
Boot Removal And Installationp. 539
JOYSTICK CONTROLp. 541
Description (Earlier Models And Later Models)p. 541
Testing (Earlier Models And Later Models)p. 542
Removal And Installation (Earlier Models)p. 543
Removal And Installation (Later Models)p. 544
Boot Removal And Installation (Earlier Models)p. 545
Joystick Mount Removal And Installation (Earlier Models)p. 545
Joystick Mount Removal And Installation (Earlier Models) (Cont’d)p. 546
Joystick Mount Removal And Installation (Later Models)p. 546
ACCESS PANEL (INSIDE)p. 547
Removal And Installation (Left)p. 547
Removal And Installation (Right)p. 547
ACCESS PANEL (INSIDE) (SJC)p. 549
Removal And Installation (Left)p. 549
Removal And Installation (Right)p. 550
WINDOW (REAR)p. 553
Removalp. 553
Installationp. 553
WINDOW (TOP)p. 555
Removal And Installationp. 555
WINDOW (SIDE)p. 557
Removal And Installationp. 557
WINDOW (FRONT DOOR)p. 559
Removal (Standard Window)p. 559
Installation (Standard Window)p. 560
Removal And Installation (Special Applications Window)p. 562
CAB DOORp. 563
Descriptionp. 563
Removal And Installationp. 563
Aligningp. 564
Adjustingp. 565
Checking Operationp. 565
ELECTRICAL SYSTEM & ANALYSISp. 567
ELECTRICAL SCHEMATICSp. 571
ELECTRICAL SYSTEM INFORMATIONp. 584
Glossary Of Electrical Symbolsp. 584
Cab Harness Connectorsp. 587
Mainframe Harness Connectorsp. 588
Descriptionp. 590
Troubleshootingp. 592
Fuse And Relay Location / Identificationp. 593
Solenoid Testingp. 594
BATTERYp. 596
Servicingp. 596
Using A Booster Battery (Jump Starting)p. 596
Removal And Installationp. 598
ALTERNATORp. 600
Belt Adjustmentp. 600
Belt Replacementp. 600
Charging System Inspectionp. 601
Alternator Voltage Testingp. 602
Low Voltage Testingp. 602
High Voltage Testingp. 603
Removal And Installationp. 604
Parts Identificationp. 605
STARTERp. 606
Testingp. 606
Removal And Installationp. 607
Parts Identificationp. 608
INSTRUMENT PANELSp. 610
Left Panelp. 610
Right Panel (Key Switch)p. 611
Right Panel (Keyless)p. 612
Side And Front Panelsp. 614
Removal And Installation (Left And Right)p. 615
Bulb Removal And Installation (Left Only)p. 618
Key Switch Removal And Installationp. 619
Alarm Removal And Installationp. 620
Front Panel Removal And Installationp. 620
LIGHTSp. 622
Front Removal And Installationp. 622
Rear Removal And Installationp. 623
Cab Light Removal And Installationp. 623
BOBCAT CONTROLLER (MAIN)p. 624
Descriptionp. 624
Connector Identificationp. 625
Removal And Installationp. 627
BOBCAT CONTROLLER (ACS)p. 628
Descriptionp. 628
Connector And Wire Identificationp. 629
Removal And Installationp. 631
BOBCAT CONTROLLER (SJC) (DRIVE)p. 633
Descriptionp. 633
Connector Identificationp. 634
Removal And Installationp. 636
SPEED SENSORS (SJC)p. 637
Descriptionp. 637
Testingp. 637
Removal and Installationp. 639
DIAGNOSTIC SERVICE CODESp. 643
Viewing Service Codes (Key Switch)p. 643
Viewing Service Codes (Keyless)p. 643
Service Codes Listp. 644
BOBCAT INTERLOCK CONTORL SYSTEM (BICS)p. 649
Descriptionp. 649
Inspecting The BICS Controller (Engine Stopped – Key ON)p. 650
Inspecting Deactivation Of The Auxiliary Hydraulics System (Engine STOPPED – Key ON)p. 650
Inspecting The Seat Bar Sensor (Engine RUNNING)p. 650
Inspecting The Traction Lock (Engine RUNNING)p. 650
Inspecting The Lift Arm Bypass Controlp. 650
Inspecting Deactivation Of Lift And Tilt Functions (ACS and SJC)p. 650
Troubleshootingp. 651
Troubleshooting Chartp. 652
SEAT BAR SENSORp. 653
Descriptionp. 653
Troubleshootingp. 654
Testingp. 655
Removal And Installationp. 656
Bobcat Interlock Control System (BICS) Circuit Testp. 657
TRACTION LOCKp. 659
Descriptionp. 659
Troubleshootingp. 660
Inspectingp. 661
Parking Brake Solenoid Removal And Installationp. 662
CONTROL SYSTEM (ACS)p. 663
Descriptionp. 663
Troubleshooting Chartp. 664
Handle Sensor Connector Disassembly And Assemblyp. 665
Switch Handle Removalp. 666
Switch Handle Installationp. 668
Actuator Connector Disassembly And Assemblyp. 671
Handle Lock Solenoid Removal And Installationp. 672
Handle Lock Solenoid Disassembly And Assemblyp. 673
Foot Sensor Disassembly And Assemblyp. 673
Foot Lock Solenoid Removal And Installationp. 674
ELECTRICAL / HYDRAULIC CONTROLSp. 675
Identification Chartp. 675
ELECTRICAL / HYDRAULIC CONTROLS (SJC)p. 677
Identification Chartp. 677
SERVICE PC (LAPTOP COMPUTER)p. 681
Connecting Remote Start Toolp. 681
Connecting Remote Start Tool (Service Tool)p. 681
CALIBRATIONp. 683
Descriptionp. 683
Actuator Testingp. 683
Lift And Tilt Calibration (ACS)p. 685
Lift And Tilt Calibration (SJC)p. 687
Hydrostatic Pump Calibration (SJC)p. 689
STEERING DRIFT COMPENSATIONp. 695
Descriptionp. 695
Selecting And Adjustingp. 695
Exiting And Savingp. 696
FLYWHEEL RPM SENSORp. 697
Descriptionp. 697
Adjustmentp. 698
CONTROL PANEL SETUPp. 699
Right Panel Setup (Keyless)p. 699
Attachment Control Information (Keyless)p. 700
PASSWORD SETUP (IF EQUIPPED WITH KEYLESS START)p. 701
Password Descriptionp. 701
Changing The Owner Passwordp. 701
Changing The User Passwordsp. 702
Password Lockout Featurep. 702
MAINTENANCE CLOCKp. 703
Descriptionp. 703
Setupp. 704
Resetp. 708
BACK-UP ALARM SYSTEMp. 709
Descriptionp. 709
Inspectingp. 709
Adjusting Switch Positionp. 710
Troubleshooting (Standard And ACS)p. 711
Troubleshooting (Joystick)p. 712
Alarm Removal And Installationp. 713
Switch Removal And Installationp. 713
ENGINE SERVICEp. 715
ENGINE INFORMATIONp. 719
Descriptionp. 719
Specificationsp. 720
Torque Valuesp. 724
Troubleshootingp. 725
Engine Removal And Installationp. 727
Engine Mount Replacementp. 736
Compression -Checkingp. 737
ENGINE SPEED CONTROLp. 739
Removal And Installationp. 739
Cable Removal And Installationp. 740
ENGINE SPEED CONTROL (SJC)p. 741
Removal And Installationp. 741
Disassembly And Assemblyp. 744
Speed Control Cable Removal And Installationp. 746
MUFFLERp. 747
Removal And Installationp. 747
AIR CLEANERp. 749
Housing Removal And Installationp. 749
ENGINE COOLING SYSTEMp. 751
Radiator Removal And Installation (S/N 531812825 & Below, 531911354 & Below)p. 751
Radiator Removal And Installation (S/N 531812826 & Above, 531911355 & Above)p. 753
Radiator Mount Removal And Installationp. 755
Hydraulic Fan Motor Description (S/N 531812825 & Below, 531911354 & Below)p. 756
Blower Housing Removal And Installation (S/N 531812825 & Below, 531911354 & Below)p. 756
Fan Removal And Installation (S/N 531812825 & Below, 531911354 & Below)p. 758
Hydraulic Fan Motor Removal And Installation (S/N 531812825 & Below, 531911354 & Below)p. 759
Hydraulic Fan Motor Disassembly And Assembly (S/ N 531812825 & Below, 531911354 & Below)p. 759
Hydraulic Fan Motor Description (S/N 531812826 – 531840000, 531911355 – 531940000)p. 760
Axial Fan Housing Removal And Installation (S/N 531812826 – 531840000, 531911355 – 531940000)p. 760
Axial Fan Removal And Installation (S/N 531812826 – 531840000, 531911355 – 531940000)p. 762
Hydraulic Fan Motor Removal And Installation (S/N 531812826 – 531840000, 531911355 – 531940000)p. 764
Hydraulic Fan Motor Disassembly And Assembly (S/ N 531812826 – 531840000, 531911355 – 531940000)p. 764
Hydraulic Fan Motor Description (S/N 531840001 & Above, 531940001 & Above)p. 765
Axial Fan Housing Removal And Installation (S/N 531840001 & Above, 531940001 & Above)p. 765
Axial Fan Removal And Installation (S/N 531840001 & Above, 531940001 & Above)p. 768
Hydraulic Fan Motor Removal And Installation (S/N 531840001 & Above, 531940001 & Above)p. 769
Hydraulic Fan Motor Disassembly And Assembly (S/ N 531840001 & Above, 531940001 & Above)p. 770
Water Pump Removal And Installationp. 771
Water Pump Disassembly And Assemblyp. 772
Thermostat Housing Removal And Installationp. 772
LUBRICATION SYSTEMp. 775
Oil Pan Removal And Installationp. 775
Oil Pump Removal And Installationp. 776
Oil Pump Inspectionp. 777
Oil Filter Cooler Removal And Installationp. 780
Engine Oil Pressure – Testingp. 781
FUEL SYSTEMp. 783
Fuel Camshaft Removal And Installationp. 783
Injection Pump Governor Housing Removal And Installationp. 785
Injection Pump Governor Housing Disassembly And Assemblyp. 787
Fuel Shutoff Solenoid – Checkingp. 789
Fuel Shutoff Solenoid – Removal And Installationp. 789
Fuel Injection Pump Removal And Installationp. 790
Fuel Injection Pump Housing Removalp. 798
Fuel Injection Pump Housing Installationp. 802
Injection Pump Timingp. 805
Fuel Injector Removal and Installationp. 808
Fuel Injector Nozzle Pressure – Checkingp. 809
Nozzle Spraying Conditionp. 810
Valve Seat Tightnessp. 810
CYLINDER HEADp. 811
Intake Air Heater – Testingp. 811
Intake Air Heater Removal And Installationp. 811
Valve Clearance Adjustmentp. 812
Valve Timing – Checkingp. 813
Cylinder Head Removal And Installationp. 814
Cylinder Head Disassembly And Assemblyp. 817
Cylinder Head – Servicingp. 817
Cylinder Head Top Clearancep. 818
Valve Guide – Checkingp. 819
Reconditioning The Valve And Valve Seatp. 821
Valve Springp. 823
Valve Tappetsp. 824
Rocker Arm And Shaft – Checkingp. 825
CRANKSHAFT AND PISTONSp. 827
Piston And Connecting Rod Removal And Installationp. 827
Piston And Connecting Rod – Servicingp. 829
Cylinder Bore Checkingp. 834
Connecting Rod Alignmentp. 835
Crankshaft Gear Removal And Installationp. 835
Crankshaft And Bearings Removal and Installationp. 836
Crankshaft And Bearings – Servicingp. 840
CAMSHAFT AND TIMING GEArSp. 847
Timing Gearcase Cover Removal And Installationp. 847
Timing Gears Backlash – Checkingp. 848
Camshaft – Servicingp. 849
Idle Gear And Shaft Removal And Installationp. 851
Idler Gear And Shaft – Servicingp. 852
TURBOCHARGERp. 855
Descriptionp. 855
Testingp. 855
Removal And Installationp. 856
FLYWHEEL AND HOUSINGp. 857
Flywheel Removal And Installationp. 857
Ring Gear Removal And Installationp. 857
Housing Removal And Installationp. 858
HEATING, VENTILATION, AIR CONDITIONINGp. 859
AIR CONDITIONING SYSTEM FLOWp. 862
Descriptionp. 862
Chartp. 863
Componentsp. 864
Safety Equipmentp. 867
REGULAR MAINTENANCEp. 869
Filter Elements Removal And Installationp. 869
Compressor Drive Belt Inspectionp. 870
Condenserp. 871
Air Conditioning Lubricationp. 871
Air Conditioning Service Chartp. 872
Cleaning The A/C Evaporator Coil & Heater Coilp. 873
TROUBLESHOOTINGp. 875
Blower Motor Does Not Operatep. 875
Blower Motor Operates Normally, But Air Flow Is Insufficientp. 875
Insufficient Cooling Although Air Flow And Compressor Operation Are Normalp. 875
The Compressor Does Not Operate At All, Or Operates Improperlyp. 875
Gauge Pressure Related Troubleshootingp. 876
Troubleshooting Treep. 878
Temperature / Pressure Chartp. 882
Poor A/C Performancep. 884
HVAC Repair And Leaksp. 885
Electrical Systemp. 886
Engine Coolant Bypassing The Heater Valvep. 893
Heater Valve Not Opening Or Closingp. 894
SYSTEM CHARGING AND RECLAMATIONp. 895
Refrigerant Identificationp. 895
Reclamation And Charging With Recovery / Charging Unitp. 896
Charging With A Manifold Gauge Setp. 898
COMPRESSORp. 901
Belt Adjustmentp. 901
Removal And Installationp. 901
Oilp. 902
Oil Checkp. 903
Clutch Disassembly And Assemblyp. 904
CONDENSERp. 909
Removal And Installationp. 909
RECEIVER / DRIERp. 911
Receiver / Drier Removal And Installationp. 911
Pressure Relief Valve Removal And Installationp. 912
Pressure Switch Removal And Installationp. 912
Schraeder Valve Removal And Installationp. 913
EVAPORATOR / HEATER UNITp. 915
Removal And Installationp. 915
THERMOSTATp. 917
Removal And Installationp. 917
EXPANSION VALVEp. 919
Removal And Installationp. 919
EVAPORATORp. 921
Removal And Installationp. 921
HEATER COILp. 923
Removal And Installation With A/Cp. 923
Removal And Installation Without A/Cp. 925
BLOWER FANp. 927
Removal And Installationp. 927
Disassembly And Assemblyp. 928
Connector Identificationp. 930
HEATER VALVEp. 931
Removal And Installationp. 931
Disassembly And Assemblyp. 932
SPECIFICATIONSp. 933
(T250) LOADER SPECIFICATIONSp. 935
Machine Dimensionsp. 935
Performancep. 936
Controlsp. 936
Enginep. 936
Hydraulic Systemp. 937
Electricalp. 938
Drive Systemp. 938
Capacitiesp. 938
Tracksp. 938
Ground Pressurep. 938
TORQUE SPECIFICATIONS FOR BOLTSp. 939
Torque For General SAE Boltsp. 939
Torque For General Metric Boltsp. 940
HYDRAULIC CONNECTION SPECIFICATIONSp. 941
O-ring Face Seal Connectionp. 941
Straight Thread O-ring Fittingp. 942
Tubelines And Hosesp. 942
Flare Fittingp. 943
Port Seal Fittingp. 944
HYDRAULIC / HYDROSTATIC FLUID SPECIFICATIONSp. 945
Specificationsp. 945
CONVERSIONSp. 947
Decimal And Millimeter Equivalentsp. 947
U.S. To Metric Conversion Chartp. 947
SMRp. 949
T250-1p. 949
T250-2p. 951
T250-3p. 953
T250-4p. 955
T250-5p. 957
T250-6p. 959
T250-7p. 961
T250-8p. 963


IMAGES PREVIEW

Bobcat T250 Compact Track Loader Service Manual 2007 - PDF Repair Guide β€” PDF page 1 preview
Bobcat T250 Compact Track Loader Service Manual 2007 - PDF Repair Guide β€” PDF page 88 preview
Bobcat T250 Compact Track Loader Service Manual 2007 - PDF Repair Guide β€” PDF page 146 preview

Instant PDF Delivery

This Bobcat T250 Compact Track Loader Service Manual is delivered as an instant PDF download after payment. No shipping, no waiting for a physical book. The PDF can be viewed on any computer, tablet, or smartphone, and individual pages or sections can be printed for use in the shop. Keep the complete 964-page manual on your device for quick reference, or print only the chapters you need for the job at hand.

Reviews

There are no reviews yet.

Be the first to review “Bobcat T250 Compact Track Loader Service Manual 2007 – PDF Repair Guide”

What Our Customers Say

β˜…β˜…β˜…β˜…β˜… Live reviews from customers
Loading customer reviews...
0
    0
    Your Cart
    Your cart is emptyReturn to Shop
    πŸ›’
    Recently Purchased
    πŸ•’ verified order