★ TRUSTED BY 321,897+ PROFESSIONALS WORLDWIDE
🏢
Trusted Business
Verified & Licensed
🛡️
Virus Free Files
100% Safe Downloads
🔒
Secure Payment
SSL Protected
Instant Delivery
Available Immediately
Sale!

King Air B200/B200GT/250 Pro Line 21 Pilot Training Manual Volume 2 Aircraft Systems PDF

Original price was: $24.95.Current price is: $14.95.

FlightSafety International Pilot Training Manual Volume 2 for the King Air B200/B200GT/250 with Pro Line 21, covering all 22 aircraft systems chapters plus WAAS avionics, Revision 1.0, June 2015, instant PDF download.

Instant PDF Download
Available immediately
💾
Save to Your Device
Download & keep forever
🛡️
Antivirus Scanned
100% virus-free
🌍
Trusted Worldwide
175,000+ customers

Description

King Air B200/B200GT/250 Pro Line 21 Pilot Training Manual Volume 2 Aircraft Systems

This is the King Air B200/B200GT/250 Pro Line 21 Pilot Training Manual Volume 2 Aircraft Systems, produced by FlightSafety International for pilots training on the King Air B200, B200GT, and 250 (including the HALO 250 Commuter Category Conversion STC) equipped with Pro Line 21 avionics. Revision 1.0, dated June 2015, this volume is dedicated entirely to aircraft systems knowledge — the electrical, mechanical, hydraulic, pneumatic, and avionics systems a King Air crew must understand cold.

  • Manual type: Pilot Training Manual, Volume 2 – Aircraft Systems
  • Aircraft covered: King Air B200, B200GT, 250 (with HALO 250 Commuter Category Conversion STC)
  • Avionics platform: Pro Line 21
  • Publisher: FlightSafety International, Inc.
  • Revision: 1.0, June 2015 (original issued September 2008)
  • Language: English
  • Page count: 453 pages
  • File format: PDF

IMAGES PREVIEW

King Air B200/B200GT/250 Pro Line 21 Pilot Training Manual Volume 2 Aircraft Systems PDF — PDF page 1 preview
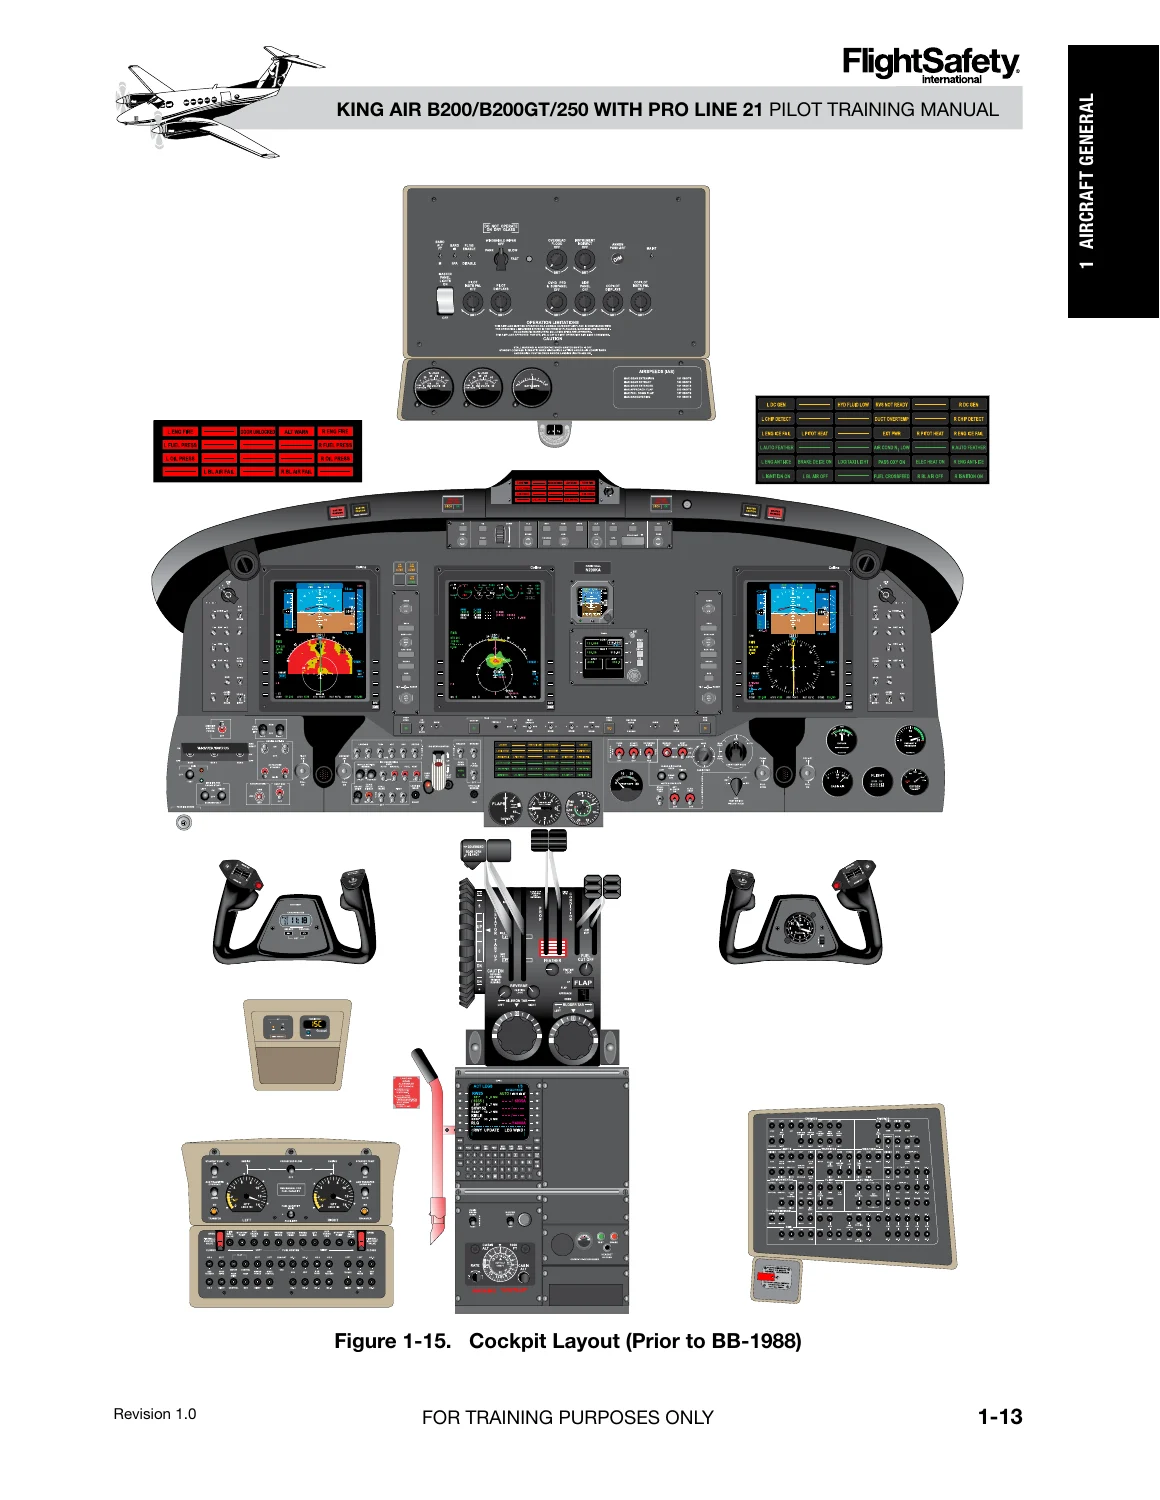
King Air B200/B200GT/250 Pro Line 21 Pilot Training Manual Volume 2 Aircraft Systems PDF — PDF page 21 preview
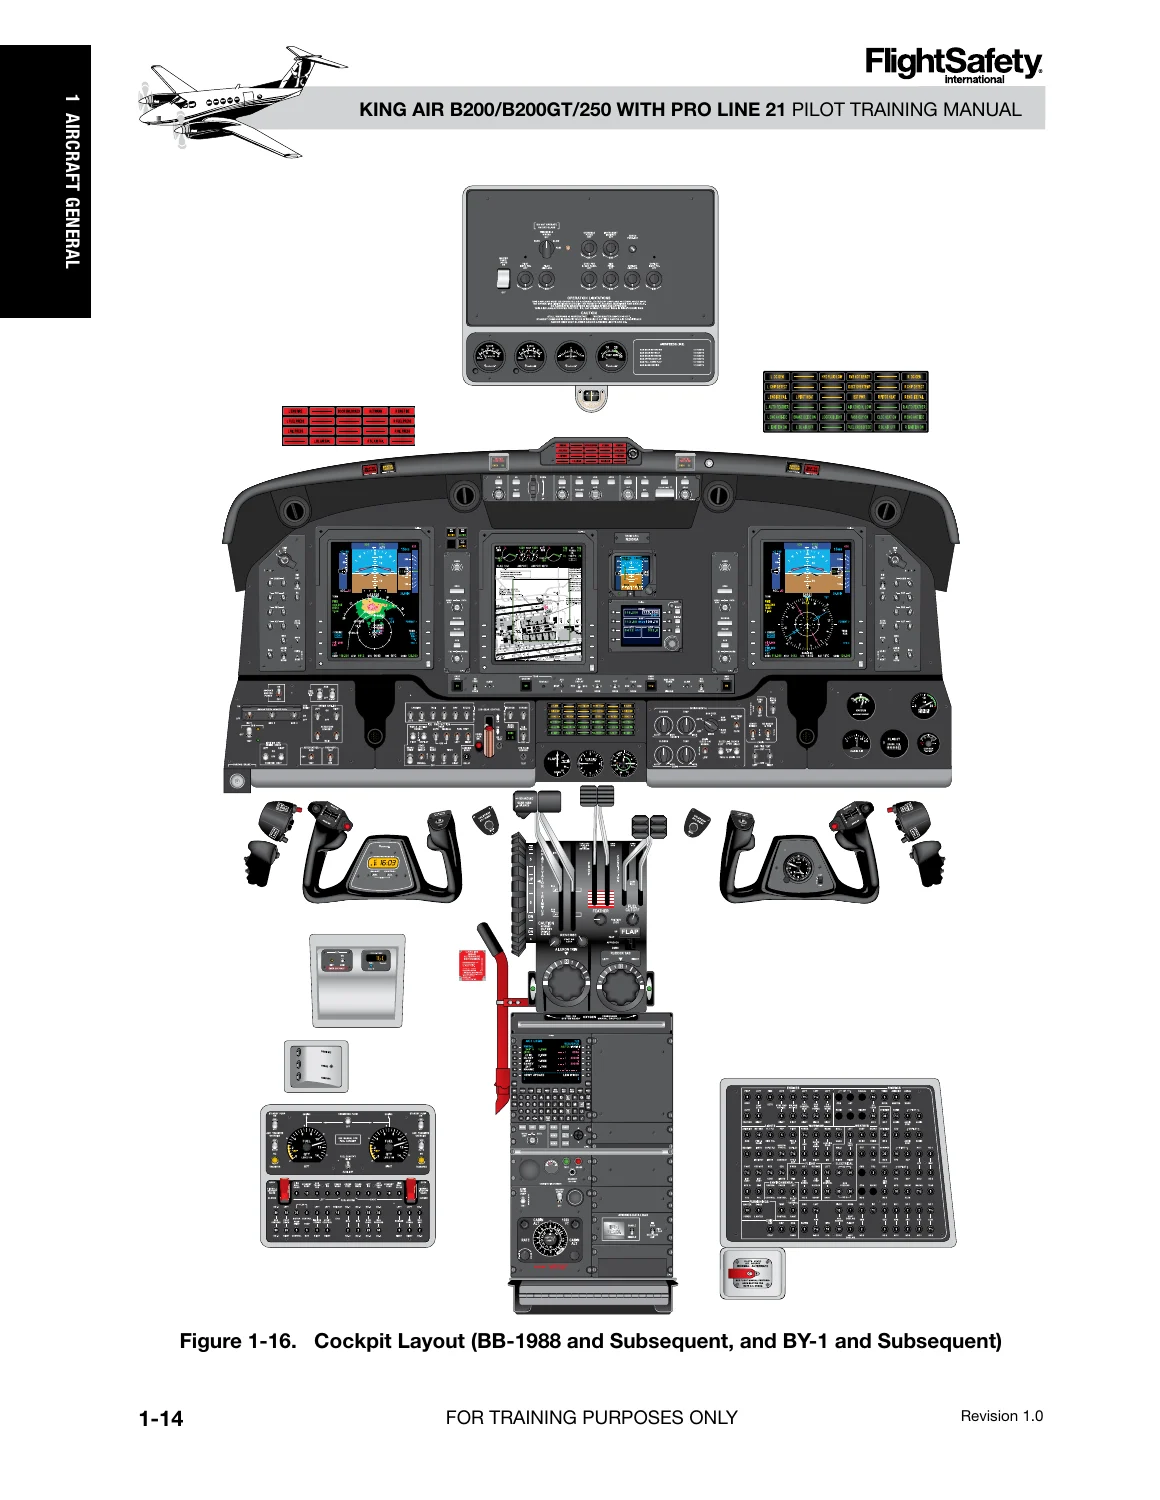
King Air B200/B200GT/250 Pro Line 21 Pilot Training Manual Volume 2 Aircraft Systems PDF — PDF page 22 preview

Chapters Covered

  • Chapter 1 – Aircraft General (structures, doors, cockpit layout, HALO 250 safety features)
  • Chapter 2 – Electrical Power Systems
  • Chapter 3 – Lighting
  • Chapter 4 – Master Warning System
  • Chapter 5 – Fuel System
  • Chapter 6 – Auxiliary Power System
  • Chapter 7 – Powerplant
  • Chapter 8 – Fire Protection
  • Chapter 9 – Pneumatics
  • Chapter 10 – Ice and Rain Protection
  • Chapter 11 – Air Conditioning
  • Chapter 12 – Pressurization
  • Chapter 13 – Hydraulic Power System
  • Chapter 14 – Landing Gear and Brakes
  • Chapter 15 – Flight Controls
  • Chapter 16 – Avionics
  • Chapter 16A – Wide Area Augmentation System (WAAS)
  • Chapter 17 – Oxygen System
  • Chapter 18 – Water and Waste
  • Chapter 19 – Maneuvers and Procedures
  • Chapter 20 – Weight and Balance
  • Chapter 21 – Flight Planning and Performance
  • Chapter 22 – Crew Resource Management
  • Walkaround, Appendix A – Terminology, Appendix B – Answers to Questions, Annunciator Panel

Taken together, this Pilot Training Manual Volume 2 walks a King Air B200/B200GT/250 pilot through every major system on the airframe — from the 28 VDC electrical system and dual Pratt & Whitney PT6A turboprop engines to pressurization, hydraulics, ice protection, and the Pro Line 21 avionics suite — with the same depth used in FlightSafety’s classroom and simulator courses.

Complete PDF Bookmark Tree

Complete Bookmarks

The complete bookmarks in the “King Air B200/B200GT/250 Pro Line 21 Pilot Training Manual Volume 2 Aircraft Systems PDF” are as follows:

King Air B200/B200GT/250 with Pro Line 21 Pilot Training Manualp. 1
List of Effective Pagesp. 4
Table of Contentsp. 5
Chapter 1 Aircraft Generalp. 6
Contentsp. 6
Introductionp. 9
Generalp. 9
Aircraft Systemsp. 10
Electrical Power Systemp. 10
Lightingp. 10
Master Warning Systemp. 11
Fuel Systemp. 11
Powerplantp. 11
Fire Detection and Protectionp. 12
Bleed-Air Systemp. 12
Ice and Rain Protectionp. 13
Air Conditioning and Heatingp. 14
Pressurizationp. 14
Landing Gear and Brakesp. 15
Flight Controlsp. 16
Oxygen Systemp. 17
Aircraft Structuresp. 17
Fuselagep. 20
Doorsp. 24
Emergency Exitp. 26
Cabin Windowsp. 26
Control Locksp. 26
Centex HALO 250 Conversion Safety Featuresp. 27
Illustrationsp. 7
Figure 1-1. External Power Socketp. 10
Figure 1-2. Overhead Light Control Panelp. 10
Figure 1-3. Fuel Control Panelp. 12
Figure 1-4. Bleed-Air Valves Controlp. 13
Figure 1-5. Ice Protection Switches—Pilot Right Subpanelp. 13
Figure 1-6. Windshield Wipers Control Switchp. 14
Figure 1-7. Parking Brake Handlep. 15
Figure 1-8. Flight Control Surfacesp. 16
Figure 1-9. Trim Tab Controls and Indicationsp. 17
Figure 1-10. Flap Control Leverp. 17
Figure 1-11. Cockpit Oxygen Handlesp. 17
Figure 1-12. King Air B200/B200GT Aircraft Dimensionsp. 18
Figure 1-13. King Air 250/250C Aircraft Dimensionsp. 19
Figure 1-14. Fuselage Stations and Compartmentsp. 20
Figure 1-15. Cockpit Layout (Prior to BB-1988)p. 21
Figure 1-16. Cockpit Layout (BB-1988 and Subsequent, and BY-1 and Subsequent)p. 22
Figure 1-17. Cockpit Layout (HALO 250 STC)p. 23
Figure 1-18. Cabin Doorp. 24
Figure 1-19. Door Handlesp. 24
Figure 1-20. Placard and Inspection Portp. 25
Figure 1-21. Latch Boltp. 25
Figure 1-22. Cargo Doorp. 25
Figure 1-23. Emergency Exit Release Handlesp. 26
Figure 1-24. Control Locksp. 26
Figure 1-25. HALO 250 Conversion Safety Featuresp. 27
Table 1-1. Cabin Altitudesp. 14
Chapter 2 Electrical Power Systemsp. 28
Contentsp. 28
Introductionp. 31
DC Power Systemp. 31
Descriptionp. 31
Componentsp. 32
Controls and Indicationsp. 39
Operationp. 40
AC Power Systemp. 41
Descriptionp. 41
Controls and Indicationsp. 41
Operationp. 42
Limitationsp. 42
Generator Limitsp. 42
Startersp. 42
Circuit Breakersp. 42
Emergency/Abnormalp. 42
Questionsp. 49
Illustrationsp. 29
Figure 2-1. Electrical Component Locationp. 32
Figure 2-2. Hot Battery Busp. 33
Figure 2-3. Volt-Loadmeters-Battery Ammeterp. 33
Figure 2-4. Electrical Distributionp. 34
Figure 2-5. Circuit-Breaker Panels—Pilotp. 35
Figure 2-6. Circuit-Breaker Panels—Copilotp. 36
Figure 2-7. Starter-Generatorp. 37
Figure 2-8. Generator Control Circuitp. 37
Figure 2-9. External Power Socket (Receptacle)p. 38
Figure 2-10. Electrical Control Switchesp. 39
Figure 2-11. Starter Switchesp. 39
Figure 2-12. Avionics Power Distributionp. 40
Figure 2-13. Loadmetersp. 40
Figure 2-14. Annunciatorsp. 41
Figure 2-15. Inverterp. 41
Figure 2-16. Copilot Left Subpanelp. 41
Tablesp. 30
Table 2-1. Limitations—Ground Operationsp. 42
Table 2-2. Circuit Breakersp. 43
Chapter 3 Lightingp. 51
Contentsp. 51
Introductionp. 53
Generalp. 53
Interior Lightingp. 54
Cabinp. 54
Cockpitp. 57
Controls and Indicationsp. 58
Exterior Lightingp. 59
Landing Lightsp. 59
Taxi Lightp. 60
Wing Ice Lightsp. 60
Navigation Lightsp. 60
Recognition Lightsp. 60
Beacon Lightsp. 60
Tail Floodlightsp. 60
Strobe Lightsp. 60
Airstair Floodlightp. 61
Understep Lightingp. 61
Questionsp. 62
Illustrationsp. 52
Figure 3-1. Threshold Lightp. 54
Figure 3-2. Fluorescent Light Switchp. 54
Figure 3-3. Passenger Warning Signsp. 55
Figure 3-4. Reading Lightsp. 55
Figure 3-5. Cabin Emergency Lighting System Controls (HALO 250 STC Only)p. 56
Figure 3-6. Overhead Lighting Controlsp. 57
Figure 3-7. Copilot Left Subpanelsp. 57
Figure 3-8. Pilot Subpanelp. 58
Figure 3-9. Instrument Indirect Lightsp. 58
Figure 3-10. FREE AIR TEMP Gaugep. 59
Figure 3-11. Landing and Taxi Lightsp. 59
Figure 3-12. Exterior Lightsp. 60
Figure 3-13. Airstair Floodlightp. 61
Figure 3-14. Understep Lightingp. 61
Tablesp. 52
Table 3-1. Required Charging of Emergency Escape Path Markingsp. 56
Chapter 4 Master Warning Systemp. 63
Contentsp. 63
Introductionp. 65
Generalp. 65
Componentsp. 68
Dim Modep. 68
Test Modep. 68
Glareshield Flashersp. 68
Warning Annunciator Panel (Red)p. 68
Caution/Advisory Annunciator Panel (Amber/Green)p. 70
Emergency/Abnormalp. 70
Questionsp. 72
Illustrationsp. 64
Figure 4-1. Component Locations (Sheet 1 of 2)p. 66
Figure 4-2. MASTER WARNING and MASTER CAUTION Flashersp. 68
Figure 4-3. Warning Annunciator Panelp. 69
Figure 4-4. Caution/Advisory Annunciator Panelp. 70
Tablesp. 64
Table 4-1. Warning Annuciatorsp. 69
Table 4-2. Caution/Advisory Annunciatorsp. 71
Chapter 5 Fuel Systemp. 73
Contentsp. 73
Introductionp. 76
Generalp. 76
Main and Auxiliary Fuel Systemsp. 77
Componentsp. 77
Firewall Shutoff Valvep. 77
Engine-Driven Boost Pumpp. 79
Standby Boost Pumpp. 80
Firewall Fuel Filterp. 80
Fuel Heaterp. 80
High-Pressure Engine Fuel Pumpp. 81
Fuel Manifold Clearingp. 81
Controls And Indicationsp. 82
Low Fuel Pressure Switchp. 82
Fuel Flow Transmitter and Indicationsp. 83
Operationp. 83
Routing to the Enginep. 83
Auxiliary Fuel Transfer Systemp. 83
Fuel Crossfeed Systemp. 85
Fuelingp. 86
Limitationsp. 86
Approved Fuel Grades and Operating Limitationsp. 86
Approved Fuel Additivesp. 87
Fueling Considerationsp. 88
Zero-Fuel Weightp. 88
Emergency/Abnormalp. 88
Questionsp. 89
Illustrationsp. 75
Figure 5-1. Fuel System Schematicp. 78
Figure 5-2. Fuel Pressure Warning Lightsp. 79
Figure 5-3. Fuel Control Panelp. 80
Figure 5-4. Fuel Purge Systemp. 81
Figure 5-5. Fuel Flow Indicationsp. 83
Figure 5-6. Auxiliary Fuel Transfer Systemp. 84
Figure 5-7. Fuel Crossfeed Systemp. 85
Figure 5-8. FUEL CROSSFEED Annunciatorp. 86
Figure 5-9. Fuel Temperature (OAT) Versus Minimum Oil Temperature Graphp. 87
Tablesp. 75
Table 5-1. Drain Locationsp. 82
Chapter 6 Auxiliary Power Systemp. 90
Chapter 7 Powerplantp. 91
Contentsp. 91
Introductionp. 95
Generalp. 95
Enginep. 96
Descriptionp. 96
Major Sectionsp. 96
Operationp. 99
Engine Lubrication Systemp. 100
Componentsp. 100
Controls and Indicationsp. 101
Operationp. 101
Engine Fuel Systemp. 103
Componentsp. 103
Controls and Indicationsp. 103
Operationp. 103
Engine Ignition Systemp. 106
Descriptionp. 106
Componentsp. 106
Controls and Indicationsp. 106
Operationp. 107
Propellerp. 108
Descriptionp. 108
Controls and Indicationsp. 109
Operationp. 111
Powerplantp. 113
Engine Indicating Systemp. 116
Propeller Featheringp. 118
Limitationsp. 122
Approved Fuelsp. 122
Propellerp. 122
Powerplant Engine Indicating System Colorsp. 122
Emergency/Abnormalp. 123
Questionsp. 129
Illustrationsp. 93
Figure 7-1. King Air B200/B200GTp. 96
Figure 7-2. PT6A Enginep. 97
Figure 7-3. Engine Cutawayp. 97
Figure 7-4. Compressor Bleed Valve(s)p. 98
Figure 7-5. Engine Stationsp. 100
Figure 7-6. Oil Pressure/Temperature Indicationsp. 101
Figure 7-7. CHIP DETECT Annunciatorsp. 101
Figure 7-8. Oil System Schematicp. 102
Figure 7-9. Fuel Low Pressure Annunciatorsp. 103
Figure 7-10. Fuel Flow Indicatorsp. 103
Figure 7-11. Simplified Fuel Control Schematicp. 104
Figure 7-12. IGNITION AND ENGINE START Switchesp. 106
Figure 7-13. ENG AUTO IGN Switchesp. 107
Figure 7-14. Ignition System Schematicp. 107
Figure 7-15. Propellerp. 108
Figure 7-16. PROP GOV TEST Switchp. 110
Figure 7-17. Propeller Onspeed Schematicp. 111
Figure 7-18. Overspeed Governor Schematicp. 112
Figure 7-19. Propeller Overspeed Schematicp. 112
Figure 7-20. Propeller Underspeed Schematicp. 113
Figure 7-21. Powerplant Control Leversp. 114
Figure 7-22. Beta and Reverse Controlp. 115
Figure 7-23. Propeller Control Leverp. 115
Figure 7-24. Friction Control Knobsp. 116
Figure 7-25. Engine Indicating Systemp. 117
Figure 7-26. Propeller Synchroscopep. 118
Figure 7-27. Propeller Synchroscope and Switches (Type II)p. 118
Figure 7-28. Type II System Schematicp. 119
Figure 7-29. AUTOFEATHER Switchp. 119
Figure 7-30. AUTO FEATHER Annunciatorsp. 120
Figure 7-31. Autofeather System Schematicp. 121
Figure 7-32. Autofeather Test Schematicp. 121
Tablesp. 94
Table 7-1. Engine Operating Limits (PT6A-42 Engine) (Sheet 1 of 2)p. 124
Table 7-2. Power Plant Instrument Markings (PT6A-42 Engine)p. 126
Table 7-3. Engine Operating Limits (PT6A-52 Engine) (Sheet 1 of 2)p. 127
Chapter 8 Fire Protectionp. 130
Contentsp. 130
Introductionp. 132
Fire Detectionp. 133
Componentsp. 133
Controls and Indicationsp. 133
Fire Extinguishingp. 133
Controls and Indicationsp. 133
Operationp. 133
System Testingp. 136
Portable Fire Extinguishersp. 137
Limitationsp. 137
Emergency/Abnormalp. 137
Questionsp. 138
Illustrationsp. 131
Figure 8-1. Fire-Detection Systemp. 134
Figure 8-2. Fire-Extinguishing Systemp. 135
Figure 8-3. Gauge Locationp. 136
Figure 8-4. Portable Fire Extinguisherp. 137
Tablesp. 131
Table 8-1. Temperature Vs. Pressure Datap. 136
Chapter 9 Pneumaticsp. 139
Contentsp. 139
Introductionp. 141
Generalp. 141
Descriptionp. 143
Pneumatic and Vacuum Systemsp. 143
Bleed-Air Warning Systemp. 144
Door Seal Systemp. 145
Controls And Indicationsp. 146
Limitationsp. 146
Emergency/Abnormalp. 146
Questionsp. 147
Illustrationsp. 140
Figure 9-1. Pneumatic and Vacuum Systemsp. 142
Figure 9-2. Bleed-Air Ejectorp. 143
Figure 9-3. VACUUM and PNEUMATIC PRESSURE Gaugesp. 143
Figure 9-4. Bleed-Air Warning System Diagramp. 144
Figure 9-5. L and R BL AIR FAIL Warning Annunciatorsp. 144
Figure 9-6. BLEED AIR VALVES Switchesp. 145
Figure 9-7. Pneumatic Plastic Tubingp. 145
Figure 9-8. Cabin Door Air Sealp. 146
Figure 9-9. FLIGHT Hourmeterp. 146
Chapter 10 Ice and Rain Protectionp. 148
Contentsp. 148
Introductionp. 150
Generalp. 150
Ice Protection—Pneumatic Sourcep. 151
Wing and Horizontal Stabilizer Deice Systemp. 151
Brake Deice Systemp. 153
Ice Protection—Electrical Sourcep. 155
Windshield Heatp. 155
Controls and Indicationsp. 156
Propeller Heatp. 157
Pitot Heatp. 159
Stall Warning Vane Heatp. 160
Stall Warning Ice Mode (Halo 250 STC Only)p. 160
Fuel Vent Heatp. 161
Fuel Control Unit Heat (Prior to BB–1988)p. 161
Miscellaneous Systemsp. 161
Powerplantp. 161
Controls and Indicationsp. 162
Raisbeck Ram Air Recovery Systemp. 163
Windshield Wipersp. 163
Wing Ice Lightsp. 164
Limitationsp. 164
Emergency/Abnormalp. 166
Questionsp. 167
Illustrationsp. 149
Figure 10-1. Weather-Protected Aircraft Surfacesp. 151
Figure 10-2. Ice and Rain Protection Controls and Indicationsp. 152
Figure 10-3. Wing and Horizontal Stabilizer Deice Boots Systemp. 154
Figure 10-4. Brake Deice Systemp. 155
Figure 10-5. Windshield Anti-Ice Systemp. 156
Figure 10-6. Propeller Electrical Deice Controls and Indicatorsp. 158
Figure 10-7. Pitot Tubes, Stall Warning Vane, and Heat Controlsp. 159
Figure 10-8. Heated Fuel Vent and Controlsp. 160
Figure 10-9. Stall Warning Ice Mode Switchp. 160
Figure 10-10. Engine Intake Inertial Vane Positions and Bypass Doorp. 161
Figure 10-11. Powerplant Intake Ice Protectionp. 162
Figure 10-12. WINDSHIELD WIPERS Knobp. 163
Figure 10-13. Wing Ice Inspection Light and Controlp. 164
Chapter 11 Air Conditioningp. 169
Contentsp. 169
Introductionp. 171
Generalp. 171
Prior To SN BB-1988p. 173
Componentsp. 173
Controls And Indicationsp. 175
Operationp. 178
SN BB-1988 and Subsequent, SN BY-1 and Subsequentp. 180
Componentsp. 180
Controls and Indicationsp. 182
Operationp. 187
Limitationsp. 189
Emergency/Abnormalp. 189
Questionsp. 190
Illustrationsp. 170
Figure 11-1. Air Conditioning System (Prior to BB-1988)p. 172
Figure 11-2. Condenser and Receiver-Dryer Sight Gaugep. 173
Figure 11-3. Air Conditioner Condenser Intakep. 173
Figure 11-4. Floor and Ceiling Outletsp. 174
Figure 11-5. Cockpit Eyeball Outletsp. 174
Figure 11-6. Air Conditioning System Control Diagramp. 175
Figure 11-7. ENVIRONMENTAL Panelp. 176
Figure 11-8. CABIN TEMP MODE Control Knobp. 176
Figure 11-9. MANUAL TEMP INCR–DECR Switch/ELECT HEAT–OFF Switchp. 177
Figure 11-10. Annunciator Panelp. 177
Figure 11-11. Condenser and Receiver-Dryer Sight Gaugep. 180
Figure 11-12. Cockpit Heating Air Outletsp. 181
Figure 11-13. Floor and Ceiling Outletsp. 181
Figure 11-14. Cockpit Eyeball Outletsp. 181
Figure 11-15. Air Conditioning System Control Diagramp. 183
Figure 11-16. Air Conditioning System (BB-1988 and Subsequent and BY-1 and Subsequent)p. 184
Figure 11-17. ENVIRONMENTAL Panelp. 185
Figure 11-18. Environmental Control System Knobp. 185
Figure 11-19. COCKPIT and CABIN BLOWER Control Knobsp. 185
Figure 11-20. Annunciator Panelp. 187
Chapter 12 Pressurizationp. 191
Contentsp. 191
Introductionp. 193
Generalp. 193
Componentsp. 195
Flow Control Unitp. 195
Controls and Indicationsp. 197
BLEED AIR VALVES Switchesp. 197
ENVIR BLEED AIR Switch (BB-1988 and Subsequent, BY-1 and Subsequent)p. 197
Pressurization Controllerp. 197
CABIN ALT Gaugep. 198
CABIN CLIMB Gaugep. 198
CABIN PRESS DUMP Switchp. 198
L–R BL AIR Annunciatorp. 199
ALT WARN Annunciatorp. 199
Operationp. 199
Preflight Operationp. 199
In-Flight Operationp. 199
Descent and Landing Operationp. 199
Limitationsp. 200
Questionsp. 201
Illustrationsp. 192
Figure 12-1. Pressurization Controlsp. 194
Figure 12-2. Electronic Flow Control Unitp. 195
Figure 12-3. Outflow Valvep. 196
Figure 12-4. Safety Valvep. 197
Figure 12-5. Pressurization Controllerp. 198
Figure 12-6. CABIN ALT Gaugep. 198
Figure 12-7. CABIN CLIMB Gaugep. 198
Figure 12-8. CABIN PRESS DUMP Switchp. 198
Figure 12-9. ALT WARN Annunciatorp. 199
Tablesp. 192
Table 12-1. Pressurization Controller Setting—Landingp. 200
Chapter 13 Hydraulic Power Systemp. 202
Chapter 14 Landing Gear and Brakesp. 203
Contentsp. 203
Introductionp. 205
Generalp. 205
Landing Gearp. 206
Descriptionp. 206
Componentsp. 206
Controls and Indicationsp. 209
Operationp. 212
Normal Retractionp. 212
Nosewheel Steeringp. 215
Descriptionp. 215
Operationp. 215
Brake Systemp. 215
Operationp. 215
Care And Handling In Cold Weatherp. 217
Preflightp. 217
Taxiingp. 217
Limitationsp. 218
Airspeed Limitationsp. 218
Emergency/Abnormalp. 218
Questionsp. 219
Illustrationsp. 204
Figure 14-1. Hydraulic Power Packp. 206
Figure 14-2. Components Locationsp. 207
Figure 14-3. Hydraulic Landing Gear Systemp. 207
Figure 14-4. Nose Gear Assemblyp. 208
Figure 14-5. Internal Nose Gear Lockp. 208
Figure 14-6. Main Gear Assemblyp. 209
Figure 14-7. Main Gear Door Mechanism (Standard Gear)p. 210
Figure 14-8. Main Gear Door Mechanism (High-Flotation Gear)p. 210
Figure 14-9. Landing Gear Control Handle and Indicator Lightsp. 211
Figure 14-10. Normal Indications, Gear Downp. 211
Figure 14-11. Normal Indications, Gear Upp. 211
Figure 14-12. Normal Indications, Gear Downp. 212
Figure 14-13. Normal Indications, Gear Upp. 212
Figure 14-14. Normal Retractionp. 213
Figure 14-15. Normal Extensionp. 214
Figure 14-16. Alternate Extensionp. 216
Figure 14-17. Brake System Schematicp. 217
Chapter 15 Flight Controlsp. 221
Contentsp. 221
Introductionp. 223
Generalp. 223
Flight Controlsp. 224
Componentsp. 224
Rudder Boost Systemp. 225
Controls and Indicationsp. 225
Operationp. 226
Yaw Damping Systemp. 226
Trim Systemp. 226
Elevator Electric Trimp. 226
Takeoff Trim Warning (HALO 250 STC Only)p. 227
FLAPSp. 228
Split-Flap Protectionp. 228
Controls and Indicationsp. 229
Limitationsp. 232
Airspeed Limitationsp. 232
Overspeed Warningp. 232
Maneuver Limitsp. 233
Maximum Operating Pressure-Altitude Limitsp. 233
Flight Load Factor Limits at 12,500 Poundsp. 233
Emergency/Abnormalp. 233
Questionsp. 234
Illustrationsp. 222
Figure 15-1. Flight Controls and Trim Tabsp. 224
Figure 15-2. Flight Control Locksp. 224
Figure 15-3. Rudder Boost Diagramp. 225
Figure 15-4. RUDDER BOOST Switchp. 226
Figure 15-5. Autopilot and Yaw Damp Switchesp. 226
Figure 15-6. Trim System Controlp. 227
Figure 15-7. E and A Indicatorsp. 227
Figure 15-8. Split-Flap Protectionp. 228
Figure 15-9. Flap Control and Indicationp. 229
Figure 15-10. Stall Warning Systemp. 230
Chapter 16 Avionicsp. 235
Contentsp. 235
Introductionp. 245
Electronic Flight Instrument Systemp. 245
Primary Flight Displayp. 246
Multifunction Displayp. 257
Display Control Panelsp. 260
Integrated Avionics Processor Systemp. 267
Air Data Computersp. 267
Attitude And Heading Reference Systemp. 268
Reversionary Operationsp. 269
Pitot and Static Systemp. 272
Outside Air Temperaturep. 273
Stall Warning Systemp. 274
Flight Guidance Systemp. 275
Flight Guidance Computersp. 276
Flight Guidance Panelp. 276
Control Wheel Switchesp. 282
Control Display Unitp. 284
Flight Management Systemp. 288
FMS Initializationp. 289
Vertical Navigationp. 290
Global Positioning Systemp. 292
Integrated Flight Information Systemp. 293
Cursor Control Panelp. 297
Electronic Charts (Optional)p. 300
Graphical Weather (Optional)p. 303
Communication/Navigation Systemsp. 308
Radio Sensor Systemp. 308
VHF Communications Systemp. 308
VHF Navigation Systemp. 308
Distance Measuring Equipmentp. 309
ATC Transponderp. 310
Audio Systemp. 311
Radio Tuning Unitp. 313
HF Operation (Optional)p. 317
TCAS II Operation (Optional)p. 317
CDU Tuningp. 317
Electronic Standby Instrument Systemp. 322
Weather Radar Systemp. 324
Cockpit Voice Recorderp. 328
Emergency Locator Transmitterp. 329
Enhanced Ground Proximity Warning Systemp. 329
Basic Ground Proximity Warning Systemp. 329
Enhanced Ground Proximity Warning Systemp. 331
Terrain Awareness and Warning System (TAWS+)p. 333
Basic Ground Proximity Warnings (Reactive)p. 333
Enhanced Ground Proximity Warnings (Predictive)p. 335
Traffic Collision and Avoidance System (TCAS I)p. 337
Traffic Collision and Avoidance System (TCAS II) (OPTIONAL)p. 340
Appendix A—Avionics Equipment Locationsp. 345
Appendix B—Flight Guidance Modesp. 347
Appendix C—Avionics Acronymsp. 349
Questionsp. 352
Illustrationsp. 237
Figure 16-1. Adaptive Flight Displaysp. 246
Figure 16-2. Primary Flight Displayp. 247
Figure 16-3. Attitude Displayp. 248
Figure 16-4. Airspeed Displayp. 248
Figure 16-5. Trend Vectorp. 248
Figure 16-6. Low-Speed Cuep. 249
Figure 16-7. High-Speed Cuep. 249
Figure 16-8. Airspeed Bugp. 249
Figure 16-9. Acceleration Displayp. 250
Figure 16-10. Altimeter Displayp. 250
Figure 16-11. Altitude Negativep. 250
Figure 16-12. BARO Switchp. 251
Figure 16-13. Vertical Speed Indicatorp. 251
Figure 16-14. Altitude Preselect Bugsp. 251
Figure 16-15. Metric Altitudep. 252
Figure 16-16. BARO ALT Switchp. 252
Figure 16-17. Heading and Navigation Displayp. 252
Figure 16-18. DME Holdp. 253
Figure 16-19. PFD Compass Rose Formatp. 254
Figure 16-20. PFD Arc Formatp. 254
Figure 16-21. PFD Map Formatp. 254
Figure 16-22. Terrain and Radar Overlay Sectionp. 255
Figure 16-23. PFD TCAS Message Area (Non-IFIS)p. 255
Figure 16-24. PFD Lower Display Informationp. 255
Figure 16-25. Pilot MFD Displayp. 256
Figure 16-26. Non-IFIS MFD Checklistp. 258
Figure 16-27. MFD Upper Format (IFIS)p. 258
Figure 16-28. MFD Plan Formatp. 259
Figure 16-29. MFD TCAS Onlyp. 260
Figure 16-30. MFD Lower Display Informationp. 260
Figure 16-31. Display Control Panelsp. 261
Figure 16-32. Display Control Panelp. 261
Figure 16-33. Barometric Setting with Yellow Underlinep. 261
Figure 16-34. IN/hPA Switchp. 261
Figure 16-35. Barometric Setting with STDp. 262
Figure 16-36. PFD REFS Menu Page 1 of 2p. 262
Figure 16-37. PFD V-Speedsp. 263
Figure 16-38. Radio Altitude Minimump. 263
Figure 16-39. Barometric Minimump. 264
Figure 16-40. Minimums Annunciatorp. 264
Figure 16-41. PFD REFS Menu Page 2 of 2p. 264
Figure 16-42. Metric Altitudep. 265
Figure 16-43. Flight Director Formatsp. 265
Figure 16-44. PFD NAV/BRG Menup. 266
Figure 16-45. Bearing Pointer Informationp. 266
Figure 16-46. IAPSp. 267
Figure 16-47. ADCp. 267
Figure 16-48. AHRSp. 268
Figure 16-49. Heading Slave and Slewp. 269
Figure 16-50. AFD Reversionsp. 269
Figure 16-51. Reversionary Modesp. 269
Figure 16-52. ADC1 Failurep. 270
Figure 16-53. ADC Miscomparep. 270
Figure 16-54. ADC Switch—ADC 2 Selectedp. 270
Figure 16-55. AHRS1 Failurep. 271
Figure 16-56. AHRS Miscomparep. 271
Figure 16-57. AHRS Switch—AHRS 2 Selectedp. 271
Figure 16-58. Pitot Tubesp. 272
Figure 16-59. Static Portsp. 272
Figure 16-60. Alternate Static Source Selectionp. 272
Figure 16-61. System Integrationp. 273
Figure 16-62. OAT Gaugep. 274
Figure 16-63. Rosemont Probep. 274
Figure 16-64. Transducer Vanep. 274
Figure 16-65. STALL WARN TEST Switchp. 274
Figure 16-66. Stall Warning Heatp. 275
Figure 16-67. Flight Guidance Panelp. 275
Figure 16-68. Flight Guidance System Displayp. 275
Figure 16-69. Flight Guidance Couple Arrowp. 276
Figure 16-70. Independent Flight Director Operationp. 277
Figure 16-71. YD/AP Disconnect Barp. 277
Figure 16-72. Heading Vector Linep. 278
Figure 16-73. Half Bank Modep. 278
Figure 16-74. APPR Mode Selectionp. 279
Figure 16-75. Localizer Nav-to-Nav Capturep. 279
Figure 16-76. VNAV Glidepath Modep. 280
Figure 16-77. APPR Mode Selectionp. 281
Figure 16-78. Flight Level Change Modep. 281
Figure 16-79. Left Yokep. 282
Figure 16-80. Pilot PFD with SYNCp. 283
Figure 16-81. GO AROUND Buttonp. 283
Figure 16-82. PFD Go-Around Modep. 283
Figure 16-83. Control Display Unitp. 284
Figure 16-84. Active Flight Plan Pagep. 285
Figure 16-85. Active Legs Pagep. 286
Figure 16-86. DIRECT-TO Pagesp. 286
Figure 16-87. Hold FLPN Modep. 287
Figure 16-88. MFD Menu Key (CDU)p. 287
Figure 16-89. MFD Advance Key (CDU)p. 288
Figure 16-90. MFD Text Pagep. 288
Figure 16-91. Database Unitsp. 289
Figure 16-92. Active Legs Page with VNAV Altitudesp. 290
Figure 16-93. VNAV Top of Descentp. 291
Figure 16-94. VNAV Modesp. 291
Figure 16-95. GPS CONTROL Pagep. 292
Figure 16-96. PROGRESS Pagep. 293
Figure 16-97. IFS Block Diagramp. 294
Figure 16-98. Ethernet Database Unitp. 295
Figure 16-99. USB Database Unit (DBU-5000)p. 295
Figure 16-100. MCDU Menup. 295
Figure 16-101. IFS Dataload Block Diagramp. 296
Figure 16-102. Cursor Control Panelp. 297
Figure 16-103. MFD Store Completep. 297
Figure 16-104. Geo-Political Overlayp. 298
Figure 16-105. Airspace Overlayp. 298
Figure 16-106. Airways Overlayp. 299
Figure 16-107. Database Effectivity (STAT Key)p. 299
Figure 16-108. STAT Menup. 300
Figure 16-109. Chart Subscription (STAT Key)p. 300
Figure 16-110. MFD Chart Displayp. 300
Figure 16-111. MFD Chart Menup. 301
Figure 16-112. MFD Chart Approach Indexp. 301
Figure 16-113. MFD Chart Zoom Chartp. 302
Figure 16-114. MFD Chart Geo-Reference Symbolsp. 302
Figure 16-115. MFD PLAN Map Weather Overlayp. 303
Figure 16-116. MFD Dedicated Graphical Weather Format (XM Weather)p. 304
Figure 16-117. MFD XM Weather Menup. 304
Figure 16-118. MFD Metar Displayp. 304
Figure 16-119. Graphical Weather Overlay Selections (IFIS v 6.0)p. 305
Figure 16-120. Overlay Legendsp. 305
Figure 16-121. MFD Graphical Weather Time Stampsp. 305
Figure 16-122. MCDU Datalink Pages (Universal Weather)p. 306
Figure 16-123. Datalink Weather Selections (Universal Weather)p. 306
Figure 16-124. MFD Plan Map Weather Overlayp. 307
Figure 16-125. MFD Dedicated Graphical Weather Format (Universal Weather)p. 307
Figure 16-126. Universal Weather Menup. 307
Figure 16-127. RTU/CDU TUNE Switchp. 308
Figure 16-128. Emergency Frequency Buttonp. 308
Figure 16-129. Antennasp. 309
Figure 16-130. RMT Tune Switchp. 309
Figure 16-131. PFD DME Displaysp. 310
Figure 16-132. DME Hold Selection and Imagesp. 310
Figure 16-133. ATC Transponder Switchp. 310
Figure 16-134. Flight ID Selectionp. 311
Figure 16-135. Audio Panelsp. 311
Figure 16-136. Audio System Componentsp. 312
Figure 16-137. Control Wheel (PTT) Switchesp. 313
Figure 16-138. Radio Tuning Unitp. 314
Figure 16-139. RTU in Preset Tuning Modep. 314
Figure 16-140. RTU COMM Pagesp. 315
Figure 16-141. RTU NAV Pagesp. 315
Figure 16-142. RTU ADF Pagesp. 316
Figure 16-143. RTU ATC Pagep. 316
Figure 16-144. RTU HF Pagesp. 317
Figure 16-145. RTU TCAS II Pagesp. 317
Figure 16-146. CDU Tune with TCAS Ip. 318
Figure 16-147. CDU Frequency Datap. 318
Figure 16-148. CDU COMM Pagep. 318
Figure 16-149. CDU NAV Pagep. 319
Figure 16-150. CDU ATC Pagep. 319
Figure 16-151. CDU ADF Pagep. 320
Figure 16-152. CDU TUNE with TCAS IIp. 320
Figure 16-153. MFD TCAS Displayp. 320
Figure 16-154. CDU TCAS II Controlp. 321
Figure 16-155. CDU HF Controlp. 321
Figure 16-156. Radio Tuning Unit Switchp. 321
Figure 16-157. Static Wicksp. 322
Figure 16-158. ESIS Displayp. 322
Figure 16-159. ESIS Power Switchp. 323
Figure 16-160. ESIS Menup. 324
Figure 16-161. PFD Radar Menup. 325
Figure 16-162. Test Modep. 325
Figure 16-163. Radar Ground Map Modep. 325
Figure 16-164. Radar Display with Path Attenuation Barp. 326
Figure 16-165. Radar Display Turbulence Modep. 326
Figure 16-166. Turbulence Only Displayp. 326
Figure 16-167. Radar Gain Displayp. 327
Figure 16-168. Pilot PFD with TGTp. 327
Figure 16-169. Radar Ground Clutter Supressionp. 328
Figure 16-170. Radar Tilt Displayp. 328
Figure 16-171. CVR Controllersp. 329
Figure 16-172. ELT Manual Switchp. 329
Figure 16-173. PFD GND PROX and PULL UP Annunciatorsp. 330
Figure 16-174. GPWS Failure Annunciatorsp. 330
Figure 16-175. EGPWS Buttonsp. 331
Figure 16-176. EGPWS Terrain Displayp. 332
Figure 16-177. EGPWS Terrain Fail and TERR Annunciatorsp. 332
Figure 16-178. PFD GND PROX and PULL UP Annunciatorsp. 334
Figure 16-179. TAWS Failure Annunciatorsp. 334
Figure 16-180. TAWS Buttonsp. 335
Figure 16-181. TAWS Terrain Displayp. 336
Figure 16-182. Terrain Advisory Linep. 336
Figure 16-183. Avoid Terrain Warningp. 337
Figure 16-184. Terrain Fail and TERR Annunciationsp. 337
Figure 16-185. TCAS I TESTp. 338
Figure 16-186. Operating Mode Buttonp. 338
Figure 16-187. TCAS II Testp. 340
Figure 16-188. Overview of Avionics Unitsp. 345
Tablesp. 244
Table 16-1. GPWS Cautions and Warningsp. 331
Table 16-2. EGPWS Buttonsp. 331
Table 16-3. EGPWS Cautions and Warningsp. 333
Table 16-4. Basic Cautions and Warningsp. 334
Table 16-5. TAWS Buttonsp. 335
Table 16-6. TAWS+ Cautions and Warningsp. 336
Table 16-7. TCAS Messagesp. 341
Table 16-8. TCAS II Annunciatorsp. 341
Table 16-9. TCAS II Traffic Advisoryp. 342
Table 16-10. TCAS II Resolution Advisoriesp. 343
Chapter 16A Wide Area Augmentation System (WAAS)p. 354
Contentsp. 354
Introductionp. 357
Generalp. 357
Operationp. 360
Integrityp. 360
Departuresp. 360
Enroutep. 360
Arrivalsp. 361
Approachesp. 361
Degraded SBAS Integrity During LPV Approachp. 365
Missed Approachp. 366
Lateral Guidancep. 366
FMS Quick Referencep. 367
Select SBAS Providerp. 367
Load LPV Approachp. 367
Failure of SBAS During LPV Approachp. 368
Failure of SBAS During LNAV/VNAV Approachp. 370
Load LNAV/VNAV Approach with WAAS (RARE)p. 371
Load Non-GPS Approachp. 371
Navigation Integrityp. 372
Raim Predictionp. 372
Rockwell Collins FMS Differencesp. 373
Questionsp. 374
Illustrationsp. 355
Figure 16A-1. Worldwide SBAS Providersp. 358
Figure 16A-2. Rockwell Collins WAAS FMS (Version 4.0)p. 359
Figure 16A-3. SBAS Service Providersp. 361
Figure 16A-4. Check SBAS Providerp. 361
Figure 16A-5. Approach Loadingp. 362
Figure 16A-6. Approach Selectionp. 362
Figure 16A-7. Arrival Datap. 363
Figure 16A-8. NON-WGS-84 Airportp. 363
Figure 16A-9. WAAS Channel Numberp. 363
Figure 16A-10. PFD Annunciations LPV Approachp. 364
Figure 16A-11. Course To Final Approach Messagep. 364
Figure 16A-12. SBAS Failure Messagesp. 365
Figure 16A-13. VNAV Flagp. 365
Figure 16A-14. Changing VNAV Guidancep. 366
Figure 16A-15. PFD Annunciations LPV Approachp. 366
Figure 16A-16. Loss of Nonprecision Approach RAIMp. 367
Figure 16A-17. Select SBAS Providerp. 367
Figure 16A-18. LPV Approach (Sheet 1 of 2)p. 368
Figure 16A-19. Failure of SBAS During LPV Approach (Sheet 1 of 3)p. 369
Figure 16A-20. Load LNAV/VNAV or LNAV Approachp. 370
Figure 16A-21. RAIM Failure after SBAS Failurep. 371
Figure 16A-22. LNAV/VNAV Approach with WAASp. 371
Figure 16A-23. Load Non-GPS Approachp. 372
Figure 16A-24. Navigation Integrityp. 372
Figure 16A-25. RAIM Predictionp. 373
Tablesp. 356
Table 16A-1. Loss of Integrityp. 360
Table 16A-2. Non-WAAS/WAAS Differencesp. 373
Chapter 17 Oxygen Systemp. 375
Contentsp. 375
Introductionp. 377
Generalp. 377
Crew Oxygenp. 379
Controls and Indicationsp. 379
First Aid Oxygenp. 379
Controls and Indicationsp. 379
Passenger Oxygenp. 380
Controls and Indicationsp. 381
Limitationsp. 381
Emergency/Abnormalp. 381
Questionsp. 383
Illustrationsp. 376
Figure 17-1. Oxygen Systemp. 378
Figure 17-2. Oxygen Mask Stowedp. 379
Figure 17-3. Oxygen Mask Selectorp. 379
Figure 17-4. First Aid Mask Access Panelp. 380
Figure 17-5. Oxygen System Push-Pull Handlesp. 380
Figure 17-6. Oxygen Bottle and Shutoff Valvep. 380
Figure 17-7. Passenger Oxygen Mask Deployedp. 381
Figure 17-8. Oxygen System Annunciatorsp. 381
Figure 17-9. Oxygen Available with Partially Full Bottlep. 382
Tablesp. 376
Table 17-1. Average Time of Useful Consciousnessp. 379
Table 17-2. Oxygen Durationp. 382
Chapter 18 Water and Wastep. 384
Contentsp. 384
Introductionp. 386
Toiletp. 387
Relief Tubesp. 387
Emergency/Abnormalp. 387
Questionsp. 388
Illustrationsp. 385
Figure 18-1. Toiletp. 387
Figure 18-2. Relief Tubep. 387
Chapter 19 Maneuvers and Proceduresp. 389
Chapter 20 Weight And Balancep. 390
Contentsp. 390
Introductionp. 392
Weight And Balancep. 393
Weight and Balance Computationp. 393
Questionsp. 405
Illustrationsp. 391
Figure 20-1. Basic Empty Weight and Balance Formp. 394
Figure 20-2. Weight and Balance Loading Formp. 395
Figure 20-3. Loading Data (Passenger)p. 396
Figure 20-4. Cabin Loadingp. 397
Figure 20-5. Loading Data Cargo Configurationp. 398
Figure 20-6. Density Variation of Aviation Fuelp. 399
Figure 20-7. Useful Load Weights and Moments Usable Fuelp. 400
Figure 20-8. Moment Limits vs. Weightp. 401
Figure 20-9. Moment Limits vs. Weight with CGp. 402
Figure 20-10. HALO Commuter Category STC Weight and Balance Diagramp. 403
Tablesp. 391
Table 20-1. Center Of Gravity Limits, Landing Gear Down (Normal Category)p. 404
Table 20-2. Center Of Gravity Limits, Landing Gear Down (Halo Commuter Category)p. 404
Chapter 21 Flight Planning and Performancep. 406
Chapter 22 Crew Resource Management (CRM)p. 407
Contentsp. 407
Introductionp. 409
Crew Concept Briefing Guidep. 411
Descriptionp. 411
Common Termsp. 411
Pretakeoff Briefing (IFR/VFR)p. 411
Crew Coordination Approach Sequencep. 411
Illustrationsp. 408
Figure 22-1. Situational Awareness in the Cockpitp. 410
Figure 22-2. Command and Leadershipp. 410
Figure 22-3. Communication Processp. 412
Figure 22-4. Decision-Making Processp. 412
Figure 22-5. Error Management Processp. 412
Figure 22-6. Crew Performance Standards (Sheet 1 of 2)p. 414
Tablesp. 408
Table 22-1. Altitude Callouts—Enroutep. 416
Table 22-2. Altitude Callouts—Approach (Precision)p. 416
Table 22-3. Altitude Callouts—Approach (Nonprecision)p. 416
Table 22-4. Altitude Callouts—Callouts Of Significant Deviationp. 416
WALKAROUNDp. 417
APPENDIX Ap. 447
APPENDIX Bp. 452
Annunciator Panelp. 453

Why Pilots and Owner-Pilots Use This Manual

This King Air B200/B200GT/250 Pro Line 21 Pilot Training Manual Volume 2 Aircraft Systems is built to answer the systems-knowledge questions that come up in checkride prep, recurrent training, and day-to-day operation: how the fuel crossfeed and auxiliary tank system works, how the bleed-air system feeds pressurization and the pneumatic deice system, how the annunciator and master warning logic is structured, and how the WAAS-equipped Pro Line 21 avionics fit into the aircraft’s systems architecture. Because it mirrors the manufacturer’s Airplane Flight Manual, Pilot Manual, and Maintenance Manual content in training format, it’s a practical companion for anyone studying the King Air B200/B200GT/250 systems in depth — whether preparing for a type-specific check, refreshing before a flight review, or simply wanting a single, organized reference to how the airplane’s systems fit together.

This King Air B200/B200GT/250 Pro Line 21 Pilot Training Manual Volume 2 downloads instantly as a PDF after purchase — no shipping, no waiting. Read it on a laptop, tablet, or phone, or print any chapter for the flight bag.
Reviews

There are no reviews yet.

Be the first to review “King Air B200/B200GT/250 Pro Line 21 Pilot Training Manual Volume 2 Aircraft Systems PDF”

What Our Customers Say

★★★★★ Live reviews from customers
Loading customer reviews...
0
    0
    Your Cart
    Your cart is emptyReturn to Shop
    🛒
    Recently Purchased
    🕒 verified order