★ TRUSTED BY 321,897+ PROFESSIONALS WORLDWIDE
🏢
Trusted Business
Verified & Licensed
🛡️
Virus Free Files
100% Safe Downloads
🔒
Secure Payment
SSL Protected
⚡
Instant Delivery
Available Immediately
Sale!

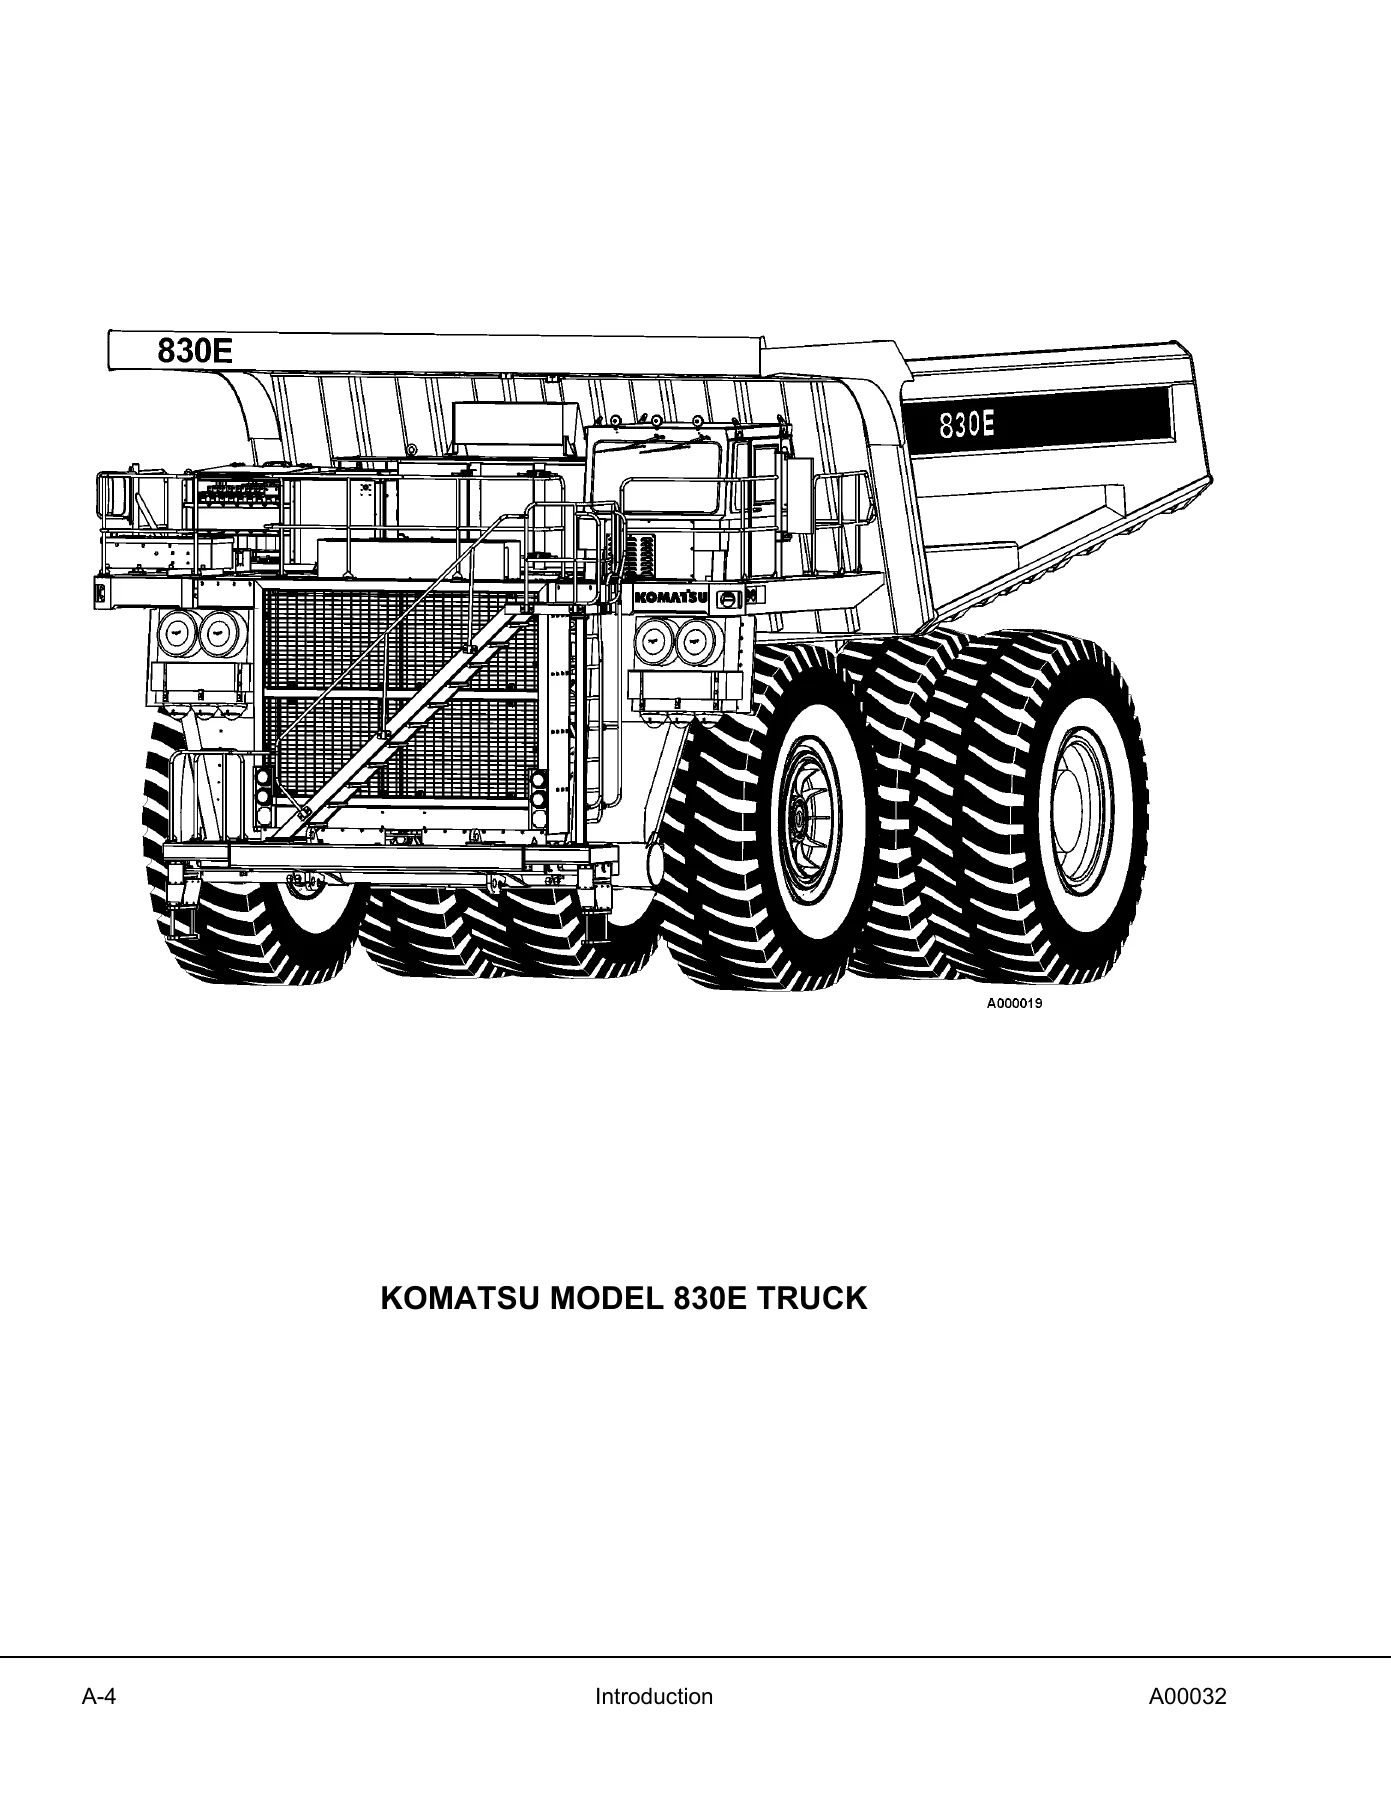
Komatsu 830E Dump Truck Shop Manual – Electric Drive Mining Truck Service Manual PDF

Original price was: $39.95.Current price is: $23.95.

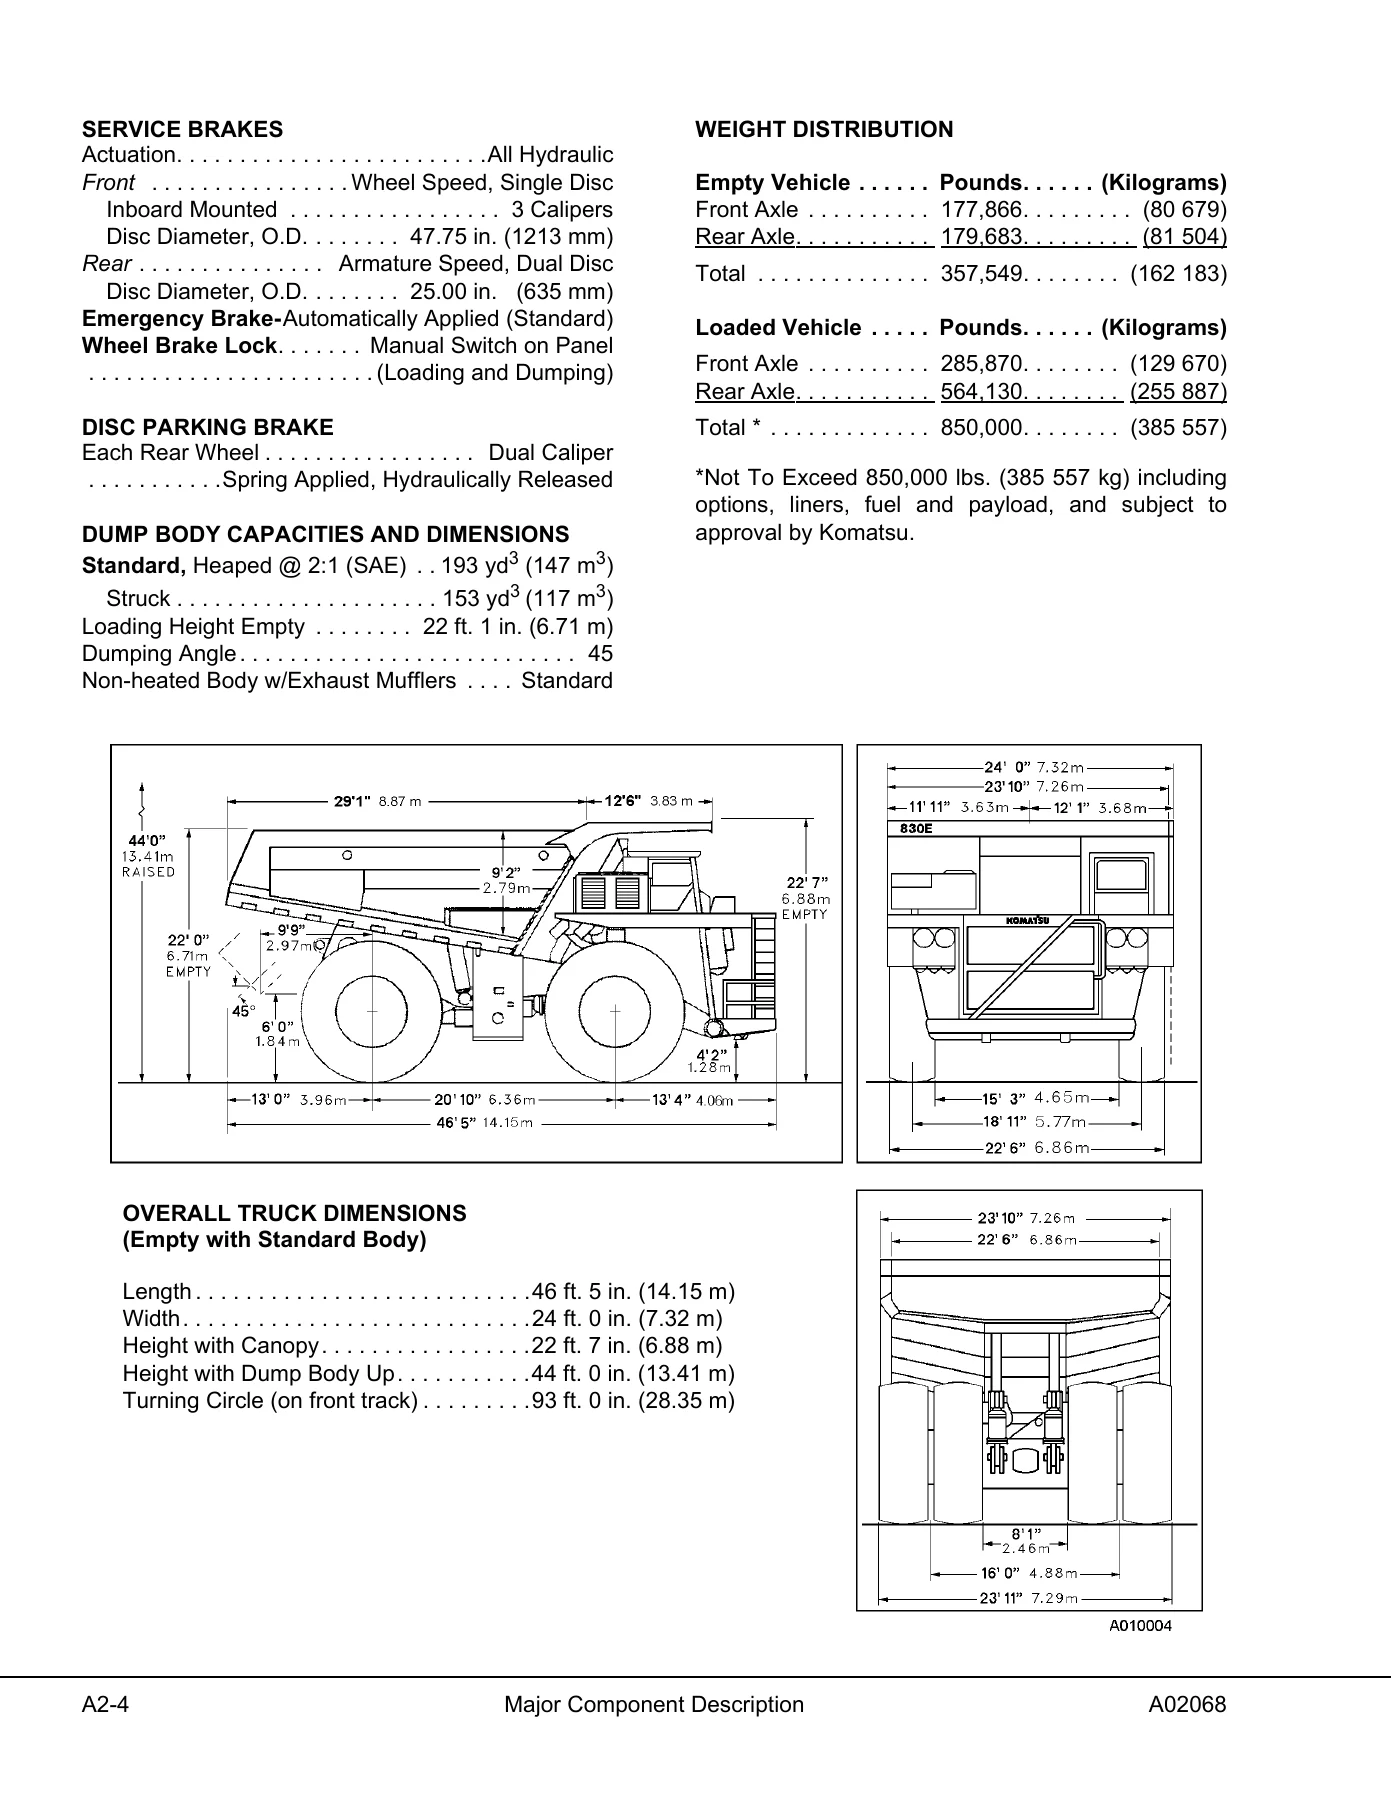
Complete Komatsu 830E electric drive dump truck shop manual covering serial numbers A30733 and up. 823-page PDF with full service, repair, and maintenance procedures for engine, electric propulsion, hydraulics, brakes, suspensions, and more.

⚡
Instant PDF Download
Available immediately
💾
Save to Your Device
Download & keep forever
🛡️
Antivirus Scanned
100% virus-free
🌍
Trusted Worldwide
175,000+ customers

Description

Komatsu 830E Dump Truck Shop Manual – Complete Service and Repair Reference

This Komatsu 830E Shop Manual is the comprehensive service and repair reference for the 830E electric drive off-highway rear dump truck, covering serial numbers A30733 & Up. Produced under publication number CEBM014900, this 823-page PDF gives service technicians, fleet maintenance teams, and owners the full mechanical and electrical detail needed to keep an 830E running and in production. Every major serviceable area is dealt with individually, from disassembly through service and reassembly, with standard torque values, safety notices, and dimensional specifications throughout.

File Details

  • Manual Type: Shop Manual (Service & Repair)
  • Brand: Komatsu
  • Model: 830E Dump Truck
  • Serial Numbers: A30733 & Up
  • Publication Number: CEBM014900
  • Language: English
  • File Format: PDF
  • Page Count: 823 pages
  • Dimensions Used: U.S. standard and metric (SI) units throughout

Chapters Covered

This Komatsu 830E Shop Manual is organized into major sections, each dealing with a specific serviceable area:

  • Section A – General Information: Major components and specifications, general safety and truck operation, warnings and cautions, standard tables, storage procedures
  • Section B – Structures: Ladders, right hand deck, center and left hand deck components, fuel tank, dump body, body pads, body guide, body-up retention cable, body position indicator, rock ejectors, hoist limit switch, body up switch
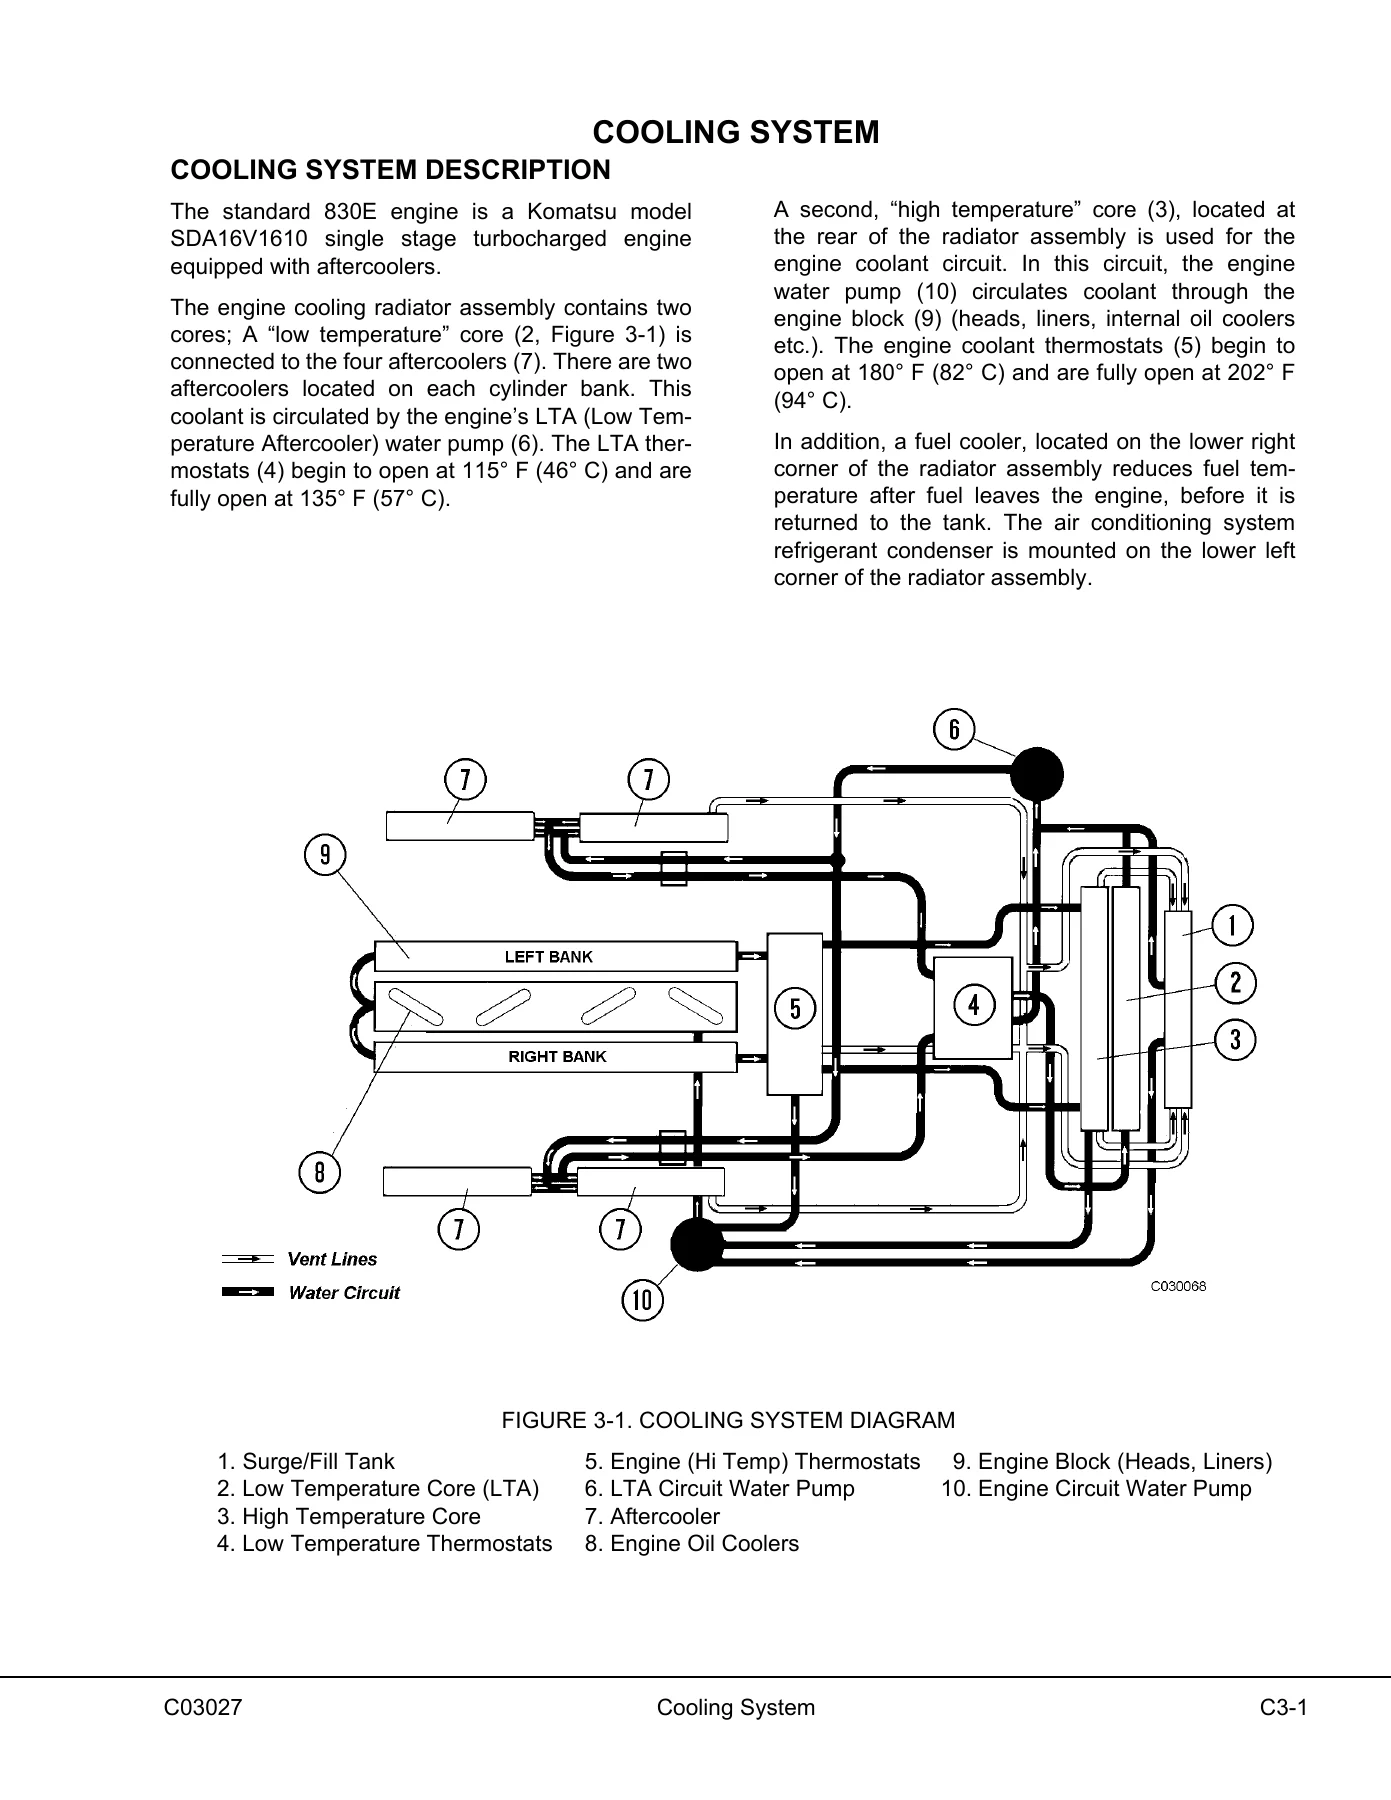
  • Section C – Engine, Fuel, Cooling and Air Cleaner: Power module preparation, removal and installation, cooling system description, radiator removal and installation, radiator filling procedure, power train, alternator removal procedure, engine/alternator mating, engine removal and installation, air filtration system, air cleaner, main filter element, safety filter element, air intake troubleshooting, air cleaner assembly cleaning
  • Section D – Electric System (24 VDC, Non-Propulsion): Electrical system description, battery maintenance and service, battery charging system, 24VDC electric starter system with Prelub, cranking motors, electrical system components, passenger seat base compartment, alarm indicating device, battery equalizer box, body up switch, hoist limit switch, 24 volt relay and diode boards, circuit breaker chart
  • Section E – Electric Propulsion and Control: General system description, control system, FL275 panel, computer description, software, 2-digit display panel, events, frames, windows, subcode descriptions, Portable Test Unit (PTU) description, software installation, main menu, configuration files, programming the truck, event data, statistical data, truck specific information, temporary truck settings, miscellaneous electrical propulsion components, alternator, electric wheel motors, retarding grids, electronic accelerator and retard control, cooling blower warning system, electrical control cabinet, Statex III checkout procedure
  • Section G – Drive Axle, Spindles and Wheels: Tires and rims, front tires and rims removal and installation, rear tires and rims removal and installation, rim and tire preparation, lubricants, tire installation, front wheel hub and spindle assembly, wheel bearing adjustment, steering cylinders and tie rod, spherical bearing wear limits, bearing replacement, toe-in adjustment, rear axle housing attachment, pivot pin, pivot eye bearing, anti-sway bar, rear axle housing, wheel motor removal and installation
  • Section H – HYDRAIR II Suspensions: Front suspension removal and installation, minor repair lower bearing structure and seals, major suspension rebuild, disassembly and assembly, pressure test, rear suspension removal and installation, disassembly and assembly, pressure test, oiling and charging procedures, oil and nitrogen specifications
  • Section J – Brake Circuit: Service brake circuit operation, secondary braking and automatic apply, parking brake circuit, brake lock circuit, warning circuit, brake circuit component service, brake valve, removal, installation, disassembly, cleaning and inspection, assembly, differential pressure switch, valve bench test and adjustment, installation of brake pedal actuator to brake valve, brake valves with integral mounted electronic retard pedal, hydraulic brake accumulators, brake manifold, brake circuit checkout procedure, troubleshooting, hydraulic brake system checkout procedure data sheet, Rockwell wheel speed front disc brakes, brake caliper, brake lining, brake pad conditioning burnishing procedure, brake bleeding procedure, Rockwell armature speed rear disc brakes, rear brakes, caliper, disc and parking brake, caliper piston assembly, bench test, brake lining, brake pad conditioning burnishing procedure, brake bleeding procedure, Rockwell disc parking brake, park brake caliper, parking brake adjustment, park brake caliper disassembly and assembly, park brake lining, park brake burnish procedure, brake bleeding procedure
  • Section L – Hydraulic System: Hydraulic system operation, component description, hoist pump removal, installation, disassembly and assembly, hydraulic tank, hydraulic tank strainers, hoist circuit filters, steering circuit operation, component description, steering control unit, flow amplifier, bleed down manifold, accumulators, steering circuit filter, brake/steering pump, steering circuit component repair, bleed down manifold, accumulator, steering accumulator charging procedure, flow amplifier, steering control unit, steering cylinder, steering circuit filter, steering and brake pump, hoist circuit operation, component description, hydraulic tank, hoist pump, high pressure filters, hoist valve, hoist pilot valve, hoist-up limit solenoid, pilot operated check valve, counterbalance valve manifold, hoist system operation modes, hoist circuit component repair, hoist valve, inlet section, spool section, hoist pilot valve, body-up limit solenoid, pilot operated check valve, hoist cylinders, counterbalance valve manifold, disabled truck dumping procedure, hydraulic checkout procedure, steering and brake pump, bleed down manifold, shock and suction valves, leakage tests, troubleshooting chart, checking hoist system relief valve pressure, counterbalance valve, troubleshooting guide, hydraulic system flushing procedure, oil cleanliness check
  • Section M – Options and Special Tools: Fire control system manual, operation, inspection and maintenance, recharging procedures, Wiggins Quick Fill Fuel System, fuel receiver, tank breather valve, Buckeye Quick Fill Fuel System, tank breather valve, fuel receiver, engine coolant heater, heating element, thermostat, special tool group, heater/air conditioning system, environmental impact, principles of refrigeration, air conditioner system components, electrical circuit, system servicing, service tools and equipment, manifold gauge set, system performance test, system leak testing, system repair, evacuating the system, troubleshooting, preventive maintenance schedule, radiator shutters, payload meter III, reserve engine oil system
  • Section N – Operator’s Cab: Truck cab description, removal, installation, cab door removal, installation, door adjustment, door handle plunger adjustment, replace door glass, replace door window regulator, door and hinge seal replacement, glass replacement, adhesive-bonded windows, windshield and rear glass, cab components, windshield wiper, windshield washer, operator comfort, operator seat, adjustment, heater/air conditioner compartment and controls, heater components, filter, operator controls and equipment, steering wheel and controls, steering column, pedal controls, overhead controls, gauges, center console controls, hoist control lever, instrument panel and indicator lights, control symbols, instrument panel, panel gauges, indicators, controls, overhead status and warning indicator lights
  • Section P – Lubrication and Service: Lubrication specifications charts, service capacities, hydraulic tank service and filling instructions, radiator filling procedure, anti-freeze specifications, reserve engine oil system, lubrication chart oil and grease specifications, 10 hour daily lubrication and maintenance checks, 50 hour checks, 100 hour checks, 250 hour checks, 500 hour checks, 1000 hour checks, 2500 hour checks, 5000 hour checks, 10,000 hour checks, automatic lubrication system, general description, system components, system operation, injector operation, general instructions, system checkout, pump rebuild, system troubleshooting chart, preventative maintenance procedures, motorized wheel maintenance schedule
  • Section Q – Alphabetical Index: Comprehensive alphabetical index for quick reference across all sections
  • Section R – System Schematics: Hydraulic hoist/steering schematic, hydraulic brake schematic, Payload Meter III schematic, 830E Statex III electrical schematic, index and symbols, circuit number location, component locator, power distribution 24 volt, power circuits, drive system monitoring and control circuits, two-digit display circuits, G.E. digital inputs, auto lube circuits, rear tail lights, dimmer control, 5-minute idle, spare circuits, windows, radio and gauge circuits, contactor feedback circuits, contactor coil circuits, machine control circuits, accelerator and retard pedal circuits, hydraulic controls and alarm circuits, heater/AC and windshield wiper control circuits, light control circuits, instrument lights and diagnostic port circuits, Modular Mining dispatch circuits, Komatsu engine circuits, wiper turn signal combination switch

This Komatsu 830E Shop Manual is not a generic overview. It is the full service documentation used by professional technicians to disassemble, inspect, repair, and reassemble every major system on the 830E electric drive truck. Each major serviceable area is treated as a complete unit, with its own removal, disassembly, cleaning, inspection, assembly, and installation procedures. Standard torque values, clearances, wear limits, and service specifications are printed in bold face type throughout, and both U.S. standard and metric units are used side by side so the manual works in any shop. The electrical propulsion section alone covers the Statex III control system, FL275 panel, Portable Test Unit software, event and statistical data, and the complete electrical checkout procedure, giving technicians the diagnostic depth needed for the electric drive system.

What This Komatsu 830E Shop Manual Covers In Practice

With this 830E Dump Truck Shop Manual on hand, a technician can perform engine removal and installation, alternator-to-engine mating with shim calculation, power module rollout, cooling system service, and air cleaner element replacement. The manual walks through the complete brake circuit, including the dual circuit treadle valve, brake manifold, accumulators, automatic apply, parking brake, brake lock, and both front wheel speed and rear armature speed disc brakes. Steering and hoist hydraulics are covered in full, from the steering control unit and flow amplifier to the hoist valve, pilot valve, cylinders, counterbalance manifold, and the disabled truck dumping procedure. Suspension service, including HYDRAIR II front and rear rebuild, oiling, charging, and pressure testing, is documented step by step. The drive axle, spindle, wheel bearing adjustment, toe-in, and wheel motor removal and installation are all included, as is the 24VDC electrical system, battery equalizer, relay boards, and circuit breaker chart. For troubleshooting, the manual provides event codes, subcodes, statistical data, leakage tests, and system troubleshooting charts for the steering circuit, hoist pump, brake circuit, and air intake.

Why the Komatsu 830E Shop Manual Matters

The 830E is a 850,000 lb GVW electric drive mining truck powered by a Komatsu SDA16V160 diesel engine rated at 2500 HP, with a G.E. GTA-26 alternator and General Electric 787 wheel motors. Working on equipment of this scale without the correct procedures and specifications is not practical and not safe. Torque values, clearances, wear limits, and adjustment procedures must be followed exactly to avoid component damage, premature failure, or personal injury. This manual provides those values and procedures in the manufacturer’s own format, so the technician is not guessing or relying on generic repair advice. Whether the job is a routine 250-hour service, a wheel bearing preload check, a brake burnishing procedure, or a full suspension rebuild, the Komatsu 830E Shop Manual is the reference that keeps the work accurate and the truck productive.

Complete PDF Bookmark Tree

Complete Bookmarks

The complete bookmarks in the “Komatsu 830E Dump Truck Shop Manual – Electric Drive Mining Truck Service Manual PDF” are as follows:

MAIN MENU
COVERp. 1
FOREWORDp. 5
TABLE OF CONTENTSp. 7
GENERAL INFORMATIONp. 9
MAJOR COMPONENT DESCRIPTIONp. 11
SPECIFICATIONSp. 13
GENERAL SAFETYp. 15
SAFETY RULESp. 15
SAFETY FEATURESp. 15
CLOTHING AND PERSONAL PROTECTIVE ITEMSp. 15
UNAUTHORIZED MODIFICATIONp. 15
LEAVING THE OPERATOR'S SEATp. 16
MOUNTING AND DISMOUNTINGp. 16
FIRE PREVENTION FOR FUEL AND OILp. 16
PRECAUTIONS WHEN HANDLING AT HIGH TEMPERATURESp. 17
ASBESTOS DUST HAZARD PREVENTIONp. 17
PREVENTION OF INJURY BY WORK EQUIPMENTp. 17
FIRE EXTINGUISHER AND FIRST AID KITp. 17
PRECAUTIONS WHEN USING ROPSp. 18
PRECAUTIONS FOR ATTACHMENTSp. 18
PRECAUTIONS ON STARTING MACHINEp. 18
PRECAUTIONS DURING OPERATIONp. 19
SAFETY IS THINKING AHEADp. 19
SAFETY AT WORKSITEp. 19
FIRE PREVENTIONp. 19
PREPARING FOR OPERATIONp. 19
VENTILATION FOR ENCLOSED AREASp. 19
IN OPERATOR'S CAB – BEFORE STARTING ENGINEp. 20
KEEP MIRRORS, WINDOWS, AND LIGHTS CLEANp. 20
OPERATING THE MACHINEp. 20
WHEN STARTING ENGINEp. 20
Truck Operation – Generalp. 20
CHECK WHEN TRAVELING IN REVERSEp. 21
TRAVELINGp. 21
TRAVELING ON SLOPESp. 22
ENSURE GOOD VISIBILITYp. 22
OPERATE CAREFULLY ON SNOWp. 22
AVOID DAMAGE TO DUMP BODYp. 22
DO NOT GO CLOSE TO HIGH-VOLTAGE CABLESp. 22
WHEN DUMPINGp. 23
WORKING ON LOOSE GROUNDp. 23
WHEN LOADINGp. 23
PARKING THE MACHINEp. 23
TOWINGp. 23
WHEN TOWING, FIX WIRE TO HOOKp. 23
BATTERYp. 24
BATTERY HAZARD PREVENTIONp. 24
STARTING WITH BOOSTER CABLESp. 24
PRECAUTIONS FOR MAINTENANCEp. 25
BEFORE CARRYING OUT MAINTENANCEp. 25
WARNING TAGp. 25
PROPER TOOLSp. 25
STOPPING THE ENGINE BEFORE SERVICEp. 25
SECURING THE DUMP BODYp. 25
DURING MAINTENANCEp. 26
PERSONNELp. 26
ATTACHMENTSp. 26
WORK UNDER THE MACHINEp. 26
KEEP THE MACHINE CLEANp. 26
RULES TO FOLLOW WHEN ADDING FUEL OR OILp. 26
RADIATOR WATER LEVELp. 27
USE OF LIGHTINGp. 27
PRECAUTIONS WITH BATTERYp. 27
HANDLING HIGH-PRESSURE HOSESp. 27
PRECAUTIONS WITH HIGH PRESSURE OILp. 27
PRECAUTIONS WHEN CARRYING OUT MAINTENANCE AT HIGH TEMPERATURE OR HIGH PRESSUREp. 28
ROTATING FAN AND BELTp. 28
WASTE MATERIALSp. 28
TIRESp. 29
HANDLING TIRESp. 29
STORING TIRES AFTER REMOVALp. 29
ADDITIONAL JOB SITE RULESp. 30
WHEN REPAIRS ARE NECESSARYp. 31
OPERATING INSTRUCTIONSp. 33
PREPARING FOR OPERATIONp. 33
SAFETY IS THINKING AHEADp. 33
ENGINE START-UP SAFETY PRACTICESp. 36
AFTER ENGINE HAS STARTEDp. 37
MACHINE OPERATION SAFETY PRECAUTIONSp. 38
MACHINE OPERATION ON THE HAUL ROADp. 38
DYNAMIC RETARDING OPERATIONp. 39
OPTIONAL – DUAL FUNCTION / SINGLE PEDALp. 39
STARTING ON A GRADE WITH A LOADED TRUCKp. 40
PASSINGp. 40
LOADINGp. 40
DUMPINGp. 40
To Raise dump body:p. 40
To Lower Bodyp. 41
To Lower Bodyp. 41
SAFE PARKING PROCEDURESp. 42
TOWINGp. 42
NORMAL ENGINE SHUTDOWN PROCEDUREp. 43
DELAYED ENGINE SHUTDOWN PROCEDUREp. 43
SUDDEN LOSS OF ENGINE POWERp. 44
WARNINGS AND CAUTIONSp. 47
STANDARD CHARTS AND TABLESp. 55
STORAGE AND IDLE MACHINE PREPARATIONp. 61
SHORT TERM IDLE PERIODSp. 61
PREPARATION FOR STORAGEp. 62
REMOVAL FROM STORAGEp. 63
RECONDITIONING AN IDLE VEHICLEp. 65
ENGINE OPERATIONp. 68
AFTER ENGINE HAS STARTEDp. 69
ENGINE STORAGE-CUMMINSp. 70
Engine Storage-(Short Term)p. 70
Prepare the Engine for Short Term Storagep. 70
Remove the Engine from Short Term Storagep. 70
Engine Storage- (Long Term)p. 71
6 Months to 24 Monthsp. 71
Prepare the Engine for Long Term Storagep. 71
Remove the Engine from Long Term Storagep. 71
ENGINE STORAGE – DETROIT DIESELp. 72
Preparing Engine For Storagep. 72
Temporary Storage (30 Days Or Less)p. 72
Extended Storage (more Than 30 Days)p. 72
PROCEDURE FOR RESTORING AN ENGINE TO SERVICE WHICH HAS BEEN IN EXTENDED STORAGEp. 74
ELECTRIC DRIVE TRUCKSp. 75
Storage Instructions and Proceduresp. 75
Placing Equipment Into Storagep. 75
When Storing A Truck That Is Operationalp. 75
When Storing A Truck That Is Not Operationalp. 76
When Storing A Major Componentp. 76
Periodic Inspectionsp. 77
Placing Equipment Into Service After Storagep. 77
When A Truck Is Operationalp. 77
When A Truck Is Not Operationalp. 77
For The First Hourp. 78
PRESERVATION AND STORAGE ALLISON TRANSMISSIONp. 79
Storage, New Transmissionp. 79
Storage, One Year — Without Oilp. 79
Storage, One Year With Oil (normally in a vehicle chassis)p. 79
Restoring Transmission to Servicep. 79
STRUCTURESp. 81
STRUCTURAL COMPONENTSp. 83
LADDERSp. 83
Installationp. 84
Removalp. 84
RIGHT HAND DECKp. 84
Removalp. 84
Installationp. 84
CENTER AND LEFT HAND DECK COMPONENTSp. 85
FUEL TANKp. 86
Removalp. 86
Installationp. 86
DUMP BODYp. 87
Removalp. 87
Installationp. 88
BODY PADSp. 89
Adjustmentp. 90
BODY GUIDEp. 90
BODY-UP RETENTION CABLEp. 90
BODY POSITION INDICATORp. 91
ROCK EJECTORSp. 91
Inspectionp. 91
HOIST LIMIT SWITCHp. 91
BODY UP SWITCHp. 91
ENGINEp. 93
POWER MODULEp. 95
PREPARATIONp. 95
Removalp. 95
Installationp. 99
COOLING SYSTEMp. 101
COOLING SYSTEM DESCRIPTIONp. 101
RADIATORp. 102
Removalp. 102
Servicep. 104
Installationp. 104
RADIATOR FILLING PROCEDUREp. 104
POWER TRAINp. 105
ALTERNATOR REMOVAL PROCEDUREp. 105
ENGINE ALTERNATOR MATINGp. 107
Measuring Procedurep. 107
Joining Alternator and Enginep. 109
ENGINEp. 110
Removalp. 110
Installationp. 110
AIR FILTRATION SYSTEMp. 111
AIR CLEANERp. 111
Operationp. 111
General Service Informationp. 111
MAIN FILTER ELEMENTp. 111
Removalp. 111
Installationp. 112
SAFETY FILTER ELEMENTp. 113
Removalp. 113
Installationp. 113
AIR INTAKE TROUBLESHOOTINGp. 113
AIR CLEANER ASSEMBLY CLEANINGp. 113
Main Filter Cleaningp. 113
Precleaner Section Cleaningp. 114
FAN CLUTCHp. 117
REMOVAL & INSTALLATION TOOLINGp. 117
FAN CLUTCH – DISASSEMBLYp. 120
CLEANING AND INSPECTIONp. 130
ASSEMBLY – FAN CLUTCHp. 134
TEST PROCEDUREp. 148
ELECTRICAL SYSTEM (24VDC NON-PROPULSIONp. 149
24VDC ELECTRIC SUPPLY SYSTEMp. 151
ELECTRICAL SYSTEM DESCRIPTIONp. 151
BATTERYp. 151
Maintenance and Servicep. 151
Troubleshootingp. 151
BATTERY CHARGING SYSTEM (Niehoff)p. 153
General Descriptionp. 153
TROUBLESHOOTING PROCEDURES (On-Truck)p. 153
Preliminary Checksp. 154
Test Setupp. 154
Test Procedurep. 154
Regulator Bypass Testp. 155
ON VEHICLE TROUBLESHOOTING GUIDE – SELF ENERGIZED ALTERNATORp. 156
ALTERNATOR ELECTRICAL CONDITION – Low Voltage – High Voltage – No Voltagep. 156
PRELIMINARY PROCEDURESp. 156
LOW VOLTAGE OUTPUTp. 156
HIGH VOLTAGE OUTPUTp. 156
NO VOLTAGE OUTPUTp. 156
TOOLS AND EQUIPMENT:p. 156
BATTERY CONDITIONS AND CHARGE VOLTAGE REACTIONS:p. 156
Low Maintenance Types:p. 156
Maintenance Free types:p. 157
High-Cycle Maintenance Free Types:p. 157
DEFINITIONSp. 157
ADVANCED SYSTEM TROUBLESHOOTING 24V/240A Self Energizedp. 158
NO ALTERNATOR OUTPUTp. 158
STATIC TEST – ENGINE OFF, KEY ON, BATTERY SWITCH ON.p. 158
GO TO ALTERNATOR”p. 158
GO TO “R” TERMINAL ON ALTERNATORp. 158
RE-TEST CHARGING CIRCUIT FOR OPERATION with ENGINE RUNNING.p. 158
GO TO REGULATOR (IF REQUIRED)p. 159
GO TO REGULATOR CONNECTOR ON ALTERNATORp. 159
MAINTENANCEp. 161
Prelube System Operation Checksp. 161
Check Valvep. 161
Timer Solenoidp. 161
24 VDC ELECTRIC STARTER SYSTEM (WITH PRELUBE)p. 160
OPERATIONp. 160
Pressure Switchp. 161
Check Valvep. 161
Timer Solenoidp. 161
Troubleshooting Prelube Starter Circuitp. 162
24 VDC ELECTRIC START SYSTEMp. 164
CRANKING MOTORSp. 164
OPERATIONp. 164
Removalp. 164
Installationp. 164
CRANKING MOTOR TROUBLESHOOTINGp. 165
Preliminary Inspectionp. 165
No-Load Testp. 165
Interpreting Results of Testsp. 165
Disassemblyp. 166
Cleaning and Inspectionp. 168
Armature Servicingp. 168
Field Coil Checksp. 168
Field Coil Removalp. 168
Solenoid Checksp. 169
Testp. 169
Assemblyp. 170
Bearing Replacement:p. 170
Motor Assembly:p. 170
Pinion Clearancep. 171
MAGNETIC SWITCHp. 171
Installationp. 171
Coil Testp. 172
24 VDC ELECTRICAL SYSTEM COMPONENTSp. 173
PASSENGER SEAT BASE COMPARTMENTp. 173
COMPONENTSp. 173
TAIL LIGHT RESISTOR DIODE ASSEMBLIESp. 173
INCLINOMETERp. 173
BRAKE WARNING BUZZER (BWB)p. 173
LUBRICATION SYSTEM TIMERp. 173
5 MINUTE IDLE TIMER COMPONENTSp. 173
5 Minute Idle Timerp. 175
5 Minute Idle Relayp. 175
5 Minute Idle Contactorp. 175
5 MINUTE IDLE CIRCUIT TESTp. 175
DATA STORE SWITCHp. 175
KOMATSU ENGINE QUANTUM CONNECTORp. 175
KOMATSU ENGINE CENSE CONNECTORp. 175
STATEX III PROPULSION SYSTEM DIAGNOSTIC CONNECTORp. 175
SPARE CONNECTOR LOCATIONp. 175
ALARM INDICATING DEVICE (AID) SYSTEMp. 176
Diode Matrix (Without Sound)p. 176
Diode Matrix (With Sound)p. 176
Hot Switch Inverterp. 177
Hot Switch Inverter Card (Slot 4) (Not Used)p. 177
Temperaturep. 177
Oil Levelp. 177
Temperature and Latchp. 177
Coolant Level/Flasherp. 177
Lamp Testp. 177
BATTERY EQUALIZER BOXp. 178
Troubleshootingp. 178
BODY-UP SWITCHp. 179
Adjustmentp. 179
Servicep. 179
HOIST LIMIT SWITCHp. 179
Adjustmentp. 179
Servicep. 179
24 VOLT RELAY AND DIODE BOARDSp. 180
RELAY BOARDSp. 180
Descriptionp. 180
SERVICEp. 181
To replace a relay:p. 181
To replace a circuit breaker:p. 181
To replace a circuit panel cardp. 182
RELAY BOARD COMPONENTSp. 182
DIODE BOARD 1p. 185
Diode Testingp. 185
CIRCUIT BREAKERSp. 186
ELECTRICAL PROPULSION COMPONENTSp. 187
ELECTRICAL PROPULSION COMPONENTSp. 189
GENERAL SYSTEM DESCRIPTIONp. 189
CONTROL SYSTEMp. 189
System Operationp. 190
FL275 Panelp. 191
CARD REPLACEMENTp. 192
Removalp. 192
Installationp. 192
Card Repairp. 192
Panel Wiringp. 192
COMPUTER DESCRIPTIONp. 193
Microprocessorp. 193
Download Capabilityp. 193
SOFTWAREp. 193
Base Monitor Programp. 193
Runtime Monitor Program – OBJ Running Codep. 193
Configuration Software – CFGp. 194
PTU – Portable Test Unit Codep. 194
System Regulationp. 194
Propulsionp. 195
Retardingp. 195
2-DIGIT DISPLAY PANELp. 196
The Coded Numberp. 196
Eventsp. 196
Framesp. 197
Windowsp. 197
System Categoriesp. 197
Limits On Resetting Faultsp. 197
NA Faultsp. 198
Event Sequencep. 198
Resetting Eventsp. 198
Event Descriptionsp. 198
Subcode Descriptionsp. 198
2-DIGIT DISPLAY PANEL CODESp. 199
2-DIGIT DISPLAY PANEL SUBCODESp. 206
PORTABLE TEST UNIT (PTU)p. 209
DESCRIPTIONp. 209
Operational Hintsp. 209
Hard Disk Space Requirementsp. 210
SOFTWARE INSTALLATION ON PTUp. 210
PTU/Truck Communication Problemsp. 211
THE MAIN MENUp. 212
“Quit Menu”p. 212
“PTU Talk To Truck”p. 212
“View PTU Saved Files”p. 212
“List Stat Data Files”p. 212
“Truck Setup (CFG)”p. 212
“Select Truck Setup”p. 212
“Update CFG Version”p. 212
“Change PTU Password”p. 212
CONFIGURATION (CFG) FILE CONVERSIONp. 214
Conversion Procedurep. 214
Convert old CFG files for new software:p. 215
STATEX CONFIGURATION FILESp. 218
“0) Source Directory: . . .”p. 218
“1) Select A Truck Configuration . . .”p. 219
“2) View Truck Configuration: Data Curves . . .”p. 220
“3) Change/View Serial and Model Numbers . . .”p. 221
“4) View Options . . .”p. 221
“5) Change/View Truck Specifics . . .”p. 223
“6) Change/View Overspeeds . . .”p. 225
“7) Save a Truck Configuration, filename: . . .”p. 226
“8) Save Directory: . . .”p. 227
“CHANGE PTU PASSWORD”p. 228
PROGRAMMING THE TRUCKp. 229
Connect PTU to the Truckp. 229
Select Configuration Filep. 229
Activate The PTU Modep. 229
Check Object Code Versionp. 230
Download Configuration Filesp. 231
Date And Timep. 232
Event Datap. 233
Statistical Datap. 235
“View Counters”p. 235
“View Profiles”p. 235
“Upload Statistical Data To A File”p. 235
Statistical Data Codes – Countersp. 236
STATISTICAL DATA CODES – COUNTERSp. 237
STATISTICAL DATA CODES – PROFILESp. 242
TRUCK SPECIFIC INFORMATIONp. 246
Temporary Truck Settingsp. 247
MISCELLANEOUS FEATURESp. 248
Saving Datap. 248
PTU Abbreviationsp. 249
Other Menu Selectionsp. 249
MISCELLANEOUS ELECTRICAL PROPULSION COMPONENTSp. 250
ALTERNATORp. 250
ELECTRIC WHEEL MOTORSp. 250
RETARDING GRIDSp. 250
ELECTRONIC ACCELERATOR AND RETARD PEDALSp. 250
Removalp. 250
Installationp. 250
Disassemblyp. 251
Reassemblyp. 251
COOLING BLOWER WARNING SYSTEMp. 252
Operationp. 252
Testp. 252
Removalp. 252
Installationp. 252
ELECTRICAL CONTROL CABINETp. 253
ABBREVIATIONS FOR STATEX III ELECTRIC DRIVE COMPONENTSp. 258
CARD IDENTIFICATION LIST 17FL275 PANEL, STATEX IIIp. 259
STATEX III ELECTRICAL SYSTEM CHECKOUT PROCEDUREp. 261
GENERAL INFORMATIONp. 263
COMMUNICATIONS PORT CHECKp. 264
PTU Hookupp. 264
1.0 SEQUENCE TESTS – (Engine not running)p. 266
1.1 Throttle System Check and Adjustmentp. 267
1.1.1 Electronic Throttle System. (Williams electronic foot pedal, Dresser ACC/RET Interface Circuit and Pedal Detector Card).p. 267
1.1.2 Electronic Throttle System (Fuel Saver System).p. 268
1.2 Retard System Check and Adjustmentp. 270
1.2.1 Williams Electronic Retard Pedal and Dresser ACC/RET or RET Interface Box.p. 270
1.2.2 Electronic Retard Pedal; Fuel Saver Equipped Trucks and Current Production.p. 271
1.3 Reverser and Propulsion Contactors Checkp. 273
1.4 Propulsion Lockout Test (DDEC & MTU Engine Trucks Only)p. 274
1.5 Retard Contactors Operation Checkp. 275
1.6 Ground Fault Sensing Checkp. 275
1.7 Ground Fault in Retard Operation Checkp. 275
1.8 Override Operation Checkp. 276
1.9 Anti-Reversal Function (AR) Checkp. 277
1.10 Overspeed Retard Operation Checkp. 277
1.11 Hoist Interlock Operation Checkp. 278
1.12 Motor Blower Fault Light Operation Checkp. 279
2.0 DIGITAL INPUT/OUTPUT SIGNALS TEST – FL275 CARD PANELp. 280
2.1 Setup Manual Digital Input/Output Test on PTUp. 280
2.2 Digital Input Checksp. 281
2.3 Digital Output Checksp. 283
3.0 ANALOG INPUT SIGNALS TEST – FL275 CARD PANELp. 286
3.1 Setup Analog Input Monitor Screen on PTUp. 286
3.2 Analog Input Checksp. 287
3.3 Frequency Input Checksp. 294
4.0 SPEED EVENT CHECKSp. 296
4.1 Single Speed Overspeed Truck – Overspeed Settings Checkp. 297
4.2 Two Speed Overspeed Truck (Empty Truck) – Overspeed Settings Checkp. 297
4.3 Two Speed Overspeed Truck (Loaded Truck) – Overspeed Settings Checkp. 297
4.4 Other Speed Events Checksp. 297
5.0 RETARD SPEED CONTROL SYSTEM CHECKp. 299
5.1 Overspeed Pickup and Dropout Checkp. 299
5.2 Retard Pot Maximum Setting Checkp. 300
5.3 Retard Pot Minimum Setting Checkp. 300
5.4 Accelerator Pedal Override of Retard Speed Controlp. 300
6.0 LOAD TEST USING TRUCK RETARD GRIDSp. 301
6.1 Load Testp. 302
7.0 MOTOR FIELD CURRENT CHECK IN RETARDINGp. 303
7.1 Retard Checkp. 303
8.0 MISCELLANEOUS COMPONENT TEST AND ADJUSTMENTp. 304
8.1 Brake System Interlocks Checkp. 304
8.2 Blower Loss Pressure Switch Adjustmentp. 305
8.3 SYNC Transformer Checkoutp. 305
8.4 Power Contactor Position Sensor Adjustmentp. 305
8.5 Battery Boost Adjustmentp. 306
8.6 Isolation amplifier & voltage module test.p. 306
8.6.1 Voltage Measuring Module Test (VMM1 and VMM2)p. 306
8.6.2 ISOA3, ISOA4, ISOA5, ISOA6, ISOA-7, and ISOA-8 Test.p. 307
8.7 Motor Rotation Testp. 307
8.8 Ground Fault Checksp. 308
9.0 MISCELLANEOUS CHARTSp. 309
9.1 Wheel Motor Gear Ratiosp. 309
9.2 Maximum Allowable Truck Speedsp. 310
9.3 Engine Optionsp. 311
DRIVE AXLE, SPINDLE AND WHEELSp. 313
TIRES AND RIMSp. 315
FRONT TIRES AND RIMSp. 315
Removalp. 315
Installationp. 316
REAR TIRES AND RIMSp. 317
Removalp. 317
Installationp. 318
RIMp. 319
RIM AND TIRE PREPARATIONp. 319
Tire Removalp. 319
LUBRICANTSp. 320
TIRE INSTALLATIONp. 320
FRONT WHEEL HUB AND SPINDLEp. 323
WHEEL HUB AND SPINDLE ASSEMBLYp. 323
Removalp. 323
Spindle Pusher Tool Usagep. 324
Installationp. 325
Disassemblyp. 327
Cleaning and Inspectionp. 327
Assemblyp. 328
Wheel Bearing Adjustment (Tire Removed)p. 330
Wheel Bearing Adjustment (Tire mounted)p. 330
STEERING CYLINDERS AND TIE RODp. 332
Spherical Bearing Wear Limitsp. 332
Removalp. 333
Installationp. 333
Bearing Replacementp. 333
TOE-IN ADJUSTMENTp. 335
REAR AXLE HOUSING ATTACHMENTp. 337
PIVOT PINp. 337
Removalp. 337
Installationp. 337
PIVOT EYE BEARINGp. 338
Disassemblyp. 338
Assemblyp. 338
PIVOT EYE REPAIRp. 339
Removalp. 339
Disassemblyp. 339
Assemblyp. 339
Installationp. 339
ANTI-SWAY BARp. 340
Removalp. 340
Installationp. 340
Disassemblyp. 340
Cleaning and Inspectionp. 340
Assemblyp. 340
REAR AXLE HOUSINGp. 341
Removalp. 341
Installationp. 341
WHEEL MOTORp. 341
Removalp. 341
Cleaning and Inspectionp. 342
Installationp. 342
Maximum Capscrew Usagep. 342
SUSPENSIONSp. 343
FRONT SUSPENSIONp. 345
Removalp. 345
Installationp. 346
MAXIMUM CAPSCREW USAGEp. 347
“TURN-OF-THE-NUT” Tightening Procedurep. 348
MINOR REPAIR ONLY (Lower Bearing Structure & Seals)p. 349
Bearing Structure Removalp. 349
Bearing Structure Installationp. 349
MAJOR SUSPENSION REBUILDp. 350
Disassemblyp. 350
Assemblyp. 351
PRESSURE TESTp. 352
REAR SUSPENSIONSp. 353
Removalp. 353
Installationp. 355
Disassemblyp. 357
Cleaning and Inspectionp. 357
Assemblyp. 357
PRESSURE TESTp. 358
OILING AND CHARGING PROCEDUREp. 359
GENERALp. 359
EQUIPMENT LISTp. 359
HYDRAIR® CHARGING KITp. 359
Installation of Charging Kitp. 359
Removal of Charging Kitp. 360
SUPPORT BLOCKS FOR OILING AND CHARGING DIMENSIONSp. 360
FRONT SUSPENSIONp. 361
Front Suspension Oilingp. 361
Front Suspension Nitrogen Chargingp. 362
REAR SUSPENSIONp. 363
Rear Suspension Oilingp. 363
Rear Suspension Nitrogen Chargingp. 364
OIL AND NITROGEN SPECIFICATIONS CHARTp. 366
BRAKE CIRCUITp. 367
BRAKE CIRCUITp. 369
SERVICE BRAKE CIRCUIT OPERATIONp. 369
SECONDARY BRAKING AND AUTOMATIC APPLYp. 371
PARKING BRAKE CIRCUITp. 371
Normal Operation (key switch on, engine running)p. 371
BRAKE LOCK CIRCUITp. 372
WARNING CIRCUITp. 372
BRAKE CIRCUIT COMPONENT SERVICEp. 375
BRAKE VALVEp. 375
Rebuild Criteriap. 375
Removalp. 375
DISASSEMBLYp. 378
Cleaning and Inspectionp. 380
ASSEMBLYp. 380
Actuator Base Threaded Insertsp. 380
Boot and Capp. 380
Valve Body Seal Installationp. 381
Regulator Sleeve O-Ring Installationp. 381
Actuator Plunger O-ring Installationp. 381
Assembly of Valvep. 382
DIFFERENTIAL PRESSURE SWITCHp. 383
Disassemblyp. 383
Cleaning and Inspection.p. 383
Assemblyp. 383
VALVE BENCH TEST AND ADJUSTMENTp. 384
Test Set Up Procedurep. 385
Brake Valve Output Pressure Adjustmentp. 385
Differential Pressure Switch Testp. 385
Final Test and Adjustmentp. 386
Installation Of Brake Pedal Actuator Assembly to Brake Valvep. 387
BRAKE ASSEMBLIES WITH INTEGRAL MOUNTED ELECTRONIC RETARD PEDAL (Dual Function Pedal)p. 388
Installation of Retard Pedal To Brake Pedalp. 388
HYDRAULIC BRAKE ACCUMULATORSp. 389
Brake Accumulator Bleed Down Procedurep. 389
Removalp. 389
Installationp. 389
Disassemblyp. 389
Cleaning and Inspectionp. 390
Assemblyp. 391
Charging Procedurep. 392
BRAKE MANIFOLDp. 393
Removalp. 393
Removalp. 393
Installationp. 394
Disassemblyp. 394
Cleaning and Inspection.p. 394
Assemblyp. 394
BRAKE CIRCUIT CHECK-OUT PROCEDUREp. 395
BRAKE CIRCUIT AND BRAKE VALVE TROUBLESHOOTINGp. 401
EQUIPMENT REQUIREDp. 397
INITIAL SYSTEM SET-UPp. 398
PARKING BRAKEp. 398
BRAKE SYSTEM CHECK-OUTp. 398
Failure Modes Check-Outp. 399
KOMATSU CHECK-OUT PROCEDURE HYDRAULIC BRAKE SYSTEM DATA SHEETp. 405
ROCKWELL WHEEL SPEED FRONT DISC BRAKESp. 407
BRAKE CALIPERp. 407
Caliper Removalp. 407
Installationp. 408
Disassemblyp. 409
Assemblyp. 409
Cleaning and Inspectionp. 410
BRAKE LININGp. 411
Replacementp. 411
FRONT SERVICE BRAKE CONDITIONING (BURNISHING) PROCEDUREp. 412
SAFETY PRECAUTIONSp. 412
Front Brake Conditioningp. 412
BRAKE BLEEDING PROCEDURESp. 413
ROCKWELL ARMATURE SPEED REAR DISC BRAKESp. 415
REAR BRAKESp. 415
CALIPER, DISC, AND PARKING BRAKEp. 415
Caliper, Disc, and Parking Brake Removalp. 415
Caliper, Disc, And Parking Brake Installationp. 416
CALIPER, DISC, & PARKING BRAKE REMOVAL [For trucks equipped with one-piece adapter (16, Figure 6-3A)]p. 418
Caliper, Disc, And Parking Brake Installationp. 419
CALIPER PISTONp. 420
Piston Assembly Removalp. 420
Inspectionp. 420
Piston Assembly Installationp. 420
FUNCTIONAL TEST OF PISTON ASSEMBLYp. 421
Return Spring Forcep. 421
Built-In Clearancep. 421
Grip Forcep. 422
Grip Force Measurementp. 423
Spring Force Measurementp. 424
Disassembly of Piston Assemblyp. 425
Assembly of Piston Assemblyp. 426
BENCH TESTp. 426
BRAKE LININGp. 427
Replacementp. 427
SERVICE BRAKE CONDITIONING (BURNISHING) PROCEDUREp. 430
Generalp. 430
Safety Precautionsp. 430
Rear Brake Conditioningp. 431
BRAKE BLEEDING PROCEDUREp. 432
ROCKWELL DISC PARKING BRAKEp. 433
PARK BRAKE CALIPERp. 433
Removalp. 433
Installationp. 434
Parking Brake Adjustmentp. 434
Park Brake Caliper Disassemblyp. 436
Cleaning and Inspectionp. 436
Park Brake Caliper Assemblyp. 437
PARK BRAKE LINING REPLACEMENTp. 438
PARK BRAKE BURNISH PROCEDUREp. 438
Lining Conditioningp. 438
BRAKE BLEEDING PROCEDUREp. 438
HYDRAULIC SYSTEMp. 439
HYDRAULIC SYSTEMp. 441
HYDRAULIC SYSTEM OPERATIONp. 441
COMPONENT DESCRIPTIONp. 442
HYDRAULIC SYSTEM COMPONENT REPAIRp. 445
HOIST PUMPp. 445
Removalp. 445
Installationp. 446
Disassemblyp. 447
INSPECTION OF PARTSp. 450
Assemblyp. 451
HYDRAULIC TANKp. 456
Filling Instructionsp. 456
Removalp. 456
Installationp. 457
HYDRAULIC TANK STRAINERSp. 457
Removalp. 457
Inspect and Cleanp. 457
Installationp. 457
HYDRAULIC TANK BREATHERSp. 458
HOIST CIRCUIT FILTERSp. 458
FILTER ELEMENT REPLACEMENTp. 459
Removalp. 459
INDICATOR SWITCHp. 459
STEERING CIRCUITp. 461
STEERING CIRCUIT OPERATIONp. 461
COMPONENT DESCRIPTIONp. 462
STEERING CONTROL UNITp. 462
FLOW AMPLIFIERp. 462
No Steerp. 464
Steering Leftp. 466
Steering Rightp. 468
No Steer, External Shock Loadp. 470
BLEED DOWN MANIFOLDp. 472
ACCUMULATORSp. 473
Low Precharge Warning Switchp. 473
HIGH PRESSURE FILTERp. 473
STEERING/BRAKE PUMPp. 473
Operationp. 474
PRINCIPLE OF OPERATIONp. 476
Full Pump Volume:p. 476
Half Pump Volume:p. 476
STEERING CIRCUIT COMPONENT REPAIRp. 479
BLEED DOWN MANIFOLDp. 479
Removalp. 479
Installationp. 479
ACCUMULATORp. 480
Removalp. 480
Installationp. 481
Disassemblyp. 481
Cleaning and Inspectionp. 481
Assemblyp. 482
LEAK TESTINGp. 483
STEERING ACCUMULATOR CHARGING PROCEDUREp. 484
Temperature During Prechargep. 487
ACCUMULATOR STORAGE PROCEDURESp. 488
INstructions For Storing Bladder Accumulatorsp. 488
Instructions For Installing A Bladder Accumulator That Was In A Parts Warehouse Or In Storagep. 488
Bladder Storage Proceduresp. 489
FLOW AMPLIFIERp. 490
Removalp. 490
Installationp. 490
Disassemblyp. 490
Reassemblyp. 493
STEERING CONTROL UNITp. 494
Removalp. 494
Spline Inspectionp. 494
Installationp. 494
Disassemblyp. 495
Cleaning and Inspectionp. 496
Assemblyp. 496
STEERING CYLINDERp. 500
Disassemblyp. 500
Inspection and Cleaningp. 500
Assemblyp. 500
STEERING CIRCUIT FILTERp. 501
FILTER ELEMENT REPLACEMENTp. 501
Removalp. 502
Installationp. 502
INDICATOR SWITCHp. 502
STEERING AND BRAKE PUMPp. 503
Removalp. 503
Installationp. 503
Disassemblyp. 505
Control Piston Groupp. 505
Valve Plate Groupp. 505
Rotating Groupp. 506
Swashblock Groupp. 506
Driveshaft Groupp. 506
INSPECTIONp. 506
Control Piston Groupp. 506
Valve Plate Groupp. 506
Rotating Groupp. 506
Swashblock Groupp. 510
Driveshaft Groupp. 510
Compensator Block and Unloader Modulep. 510
Stroke Adjuster Assemblyp. 510
ASSEMBLYp. 510
Swashblock Groupp. 510
Control Piston Groupp. 512
Valve Plate Groupp. 512
HOIST CIRCUITp. 515
HOIST CIRCUIT OPERATIONp. 515
COMPONENT DESCRIPTIONp. 516
Hydraulic Tankp. 516
Hoist Pumpp. 516
High Pressure Filtersp. 516
HOIST VALVEp. 517
HOIST PILOT VALVEp. 518
HOIST-UP LIMIT SOLENOIDp. 518
PILOT OPERATED CHECK VALVEp. 518
COUNTERBALANCE VALVE MANIFOLDp. 518
FLOAT POSITION OF PILOT VALVE AND BODY ON FRAME (Figure 7-6)p. 520
HOIST SYSTEM OPERATION MODESp. 519
POWER UP OPERATION (Figure 7-7)p. 522
FLOAT POSITION OF PILOT VALVE AND BODY ON FRAME (Figure 7-6)p. 520
HOLD OPERATION (Figure 7-8)p. 524
POWER DOWN OPERATION (Figure 7-9)p. 526
FLOAT OPERATION (Figure 7-10)p. 528
HOIST CIRCUIT COMPONENT REPAIRp. 531
HOIST VALVEp. 531
Removalp. 531
Installationp. 531
O-Ring Replacementp. 532
INLET SECTIONp. 532
Disassemblyp. 532
Cleaning and Inspectionp. 533
Assemblyp. 534
SPOOL SECTIONp. 534
Disassemblyp. 534
Cleaning and Inspectionp. 536
Assemblyp. 536
HOIST PILOT VALVEp. 537
Removalp. 537
Installationp. 537
Disassemblyp. 537
Cleaning and Inspectionp. 539
Assemblyp. 539
BODY UP LIMIT SOLENOIDp. 540
PILOT OPERATED CHECK VALVEp. 540
HOIST CYLINDERSp. 540
Removalp. 540
Installationp. 541
Disassemblyp. 543
Cleaning and Inspectionp. 544
ASSEMBLY OF QUILL AND CYLINDERp. 545
Quill Installationp. 545
Installation of Check Balls and Plugs in Quillp. 546
Assembly of Cylinderp. 547
COUNTERBALANCE MANIFOLDp. 548
DISABLED TRUCK DUMPING PROCEDUREp. 549
HOOKUPp. 549
DUMPING PROCEDUREp. 549
HYDRAULIC CHECKOUT PROCEDUREp. 551
STEERING AND BRAKE PUMPp. 551
Pressure Check And Adjustment Procedurep. 551
BLEEDDOWN MANIFOLDp. 552
SHOCK & SUCTION VALVESp. 553
Shock & Suction Valve Settingsp. 553
LEAKAGE TESTSp. 554
Steering Control Unit & Flow Amplifierp. 554
Bleeddown Manifoldp. 554
ACCUMULATOR BLEED DOWN PROCEDUREp. 555
LOW STEERING PRESSURE SWITCHp. 555
TROUBLESHOOTING CHART (Steering Circuit)p. 556
CHECKING HOIST SYSTEM PRESSURESp. 562
Hoist System Relief Pressure Adjustmentp. 562
Power Down Relief Pressure Adjustmentp. 563
Hoist Counterbalance Valve Adjustmentp. 564
Preparation:p. 564
Counterbalance Valve Pressure Check Only:p. 564
Counterbalance Valve Adjustmentp. 565
TROUBLESHOOTING CHART (Hoist Pump)p. 566
HYDRAULIC SYSTEM FLUSHING PROCEDUREp. 568
OIL CLEANLINESS CHECKp. 569
OPTIONS AND SPECIAL TOOLSp. 571
FIRE CONTROL SYSTEM (MANUAL)p. 573
Operationp. 573
Inspection and Maintenancep. 573
Recharging Proceduresp. 574
WIGGINS QUICK FILL FUEL SYSTEMp. 575
FUEL RECEIVERp. 575
TANK BREATHER VALVEp. 576
Removalp. 576
Installationp. 576
Disassemblyp. 576
Assemblyp. 576
LEFT SIDE FILLp. 577
BUCKEYE QUICK FUEL SYSTEMp. 579
FUEL TANK BREATHER VALVEp. 579
Maintenancep. 579
Filter Servicep. 579
Disassemblyp. 579
Inspectionp. 579
Assemblyp. 579
FUEL RECEIVERp. 580
ENGINE COOLANT HEATERp. 581
Maintenancep. 581
HEATING ELEMENTp. 581
Removalp. 581
Installationp. 581
THERMOSTATp. 582
Removalp. 582
Installationp. 582
SPECIAL TOOLSp. 583
AIR CONDITIONING SYSTEMp. 589
Environmental Impactp. 589
OPERATOR CAB AIR CONDITIONINGp. 590
PRINCIPLES OF REFRIGERATIONp. 590
Air Conditioningp. 590
Refrigeration – The Act Of Coolingp. 591
The Refrigeration Cyclep. 591
AIR CONDITIONER SYSTEM COMPONENTSp. 592
Compressor (Refrigerant Pump)p. 592
Service Valvesp. 592
Condenserp. 592
Expansion Block Valvep. 593
Evaporatorp. 593
ELECTRICAL CIRCUITp. 594
Thermostatp. 594
Compressor Clutchp. 594
Trinary™ Switchp. 595
SYSTEM SERVICINGp. 596
SYSTEM OILp. 597
Handling and Reusing PAG Oilp. 597
Oil Quantityp. 597
Replacing Oil After Servicing the Systemp. 597
Setting Up a New Compressorp. 597
REFRIGERANTp. 598
Recycled Refrigerantp. 598
Reclaimed Refrigerantp. 598
Refrigerant Quantityp. 598
R-134a Refrigerant Containersp. 598
SERVICE TOOLS AND EQUIPMENTp. 599
Recovery/Recycle Stationp. 599
Leak Detectorp. 599
Service Valvesp. 600
Vacuum Pumpp. 600
Manifold Gauge Setp. 601
Installing Manifold Gauge Setp. 602
Purging Air From Service Hosesp. 603
Stabilizing the AC Systemp. 604
SYSTEM PERFORMANCE TESTp. 604
SYSTEM LEAK TESTINGp. 605
Electronic leak detectorp. 605
Tracer dyesp. 605
Soap and waterp. 605
SYSTEM REPAIRp. 606
System Cleaningp. 606
Hoses and Fittingsp. 606
Linesp. 606
Expansion Valvep. 606
Receiver-Drierp. 607
Thermostatp. 607
Compressorp. 607
Clutchp. 607
Servicing the Compressor Clutchp. 608
Pulley Removalp. 610
Clutch Coil Checkp. 610
Pulley Installationp. 610
Clutch Assembly Installationp. 611
RECOVERING AND RECYCLING THE REFRIGERANTp. 612
Performing the Recovery Cyclep. 612
Performing the Recycling Procedurep. 612
Evacuating and Charging the AC Systemp. 612
EVACUATING THE SYSTEMp. 613
CHARGING THE AC SYSTEMp. 614
TROUBLESHOOTINGp. 615
PREVENTATIVE MAINTENANCE SCHEDULE FOR AC SYSTEMp. 623
Pre-Diagnosis Checksp. 615
Preparing For Diagnosisp. 615
Preliminary Stepsp. 615
System Performance Testp. 615
Diagnosis Of Gauge Readings And System Performancep. 616
RADIATOR SHUTTERSp. 625
PAYLOAD METER III ™p. 637
OPERATION SECTIONp. 641
Introductionp. 641
Data Summaryp. 641
Data Gatheringp. 641
COMPONENT DESCRIPTIONp. 642
System Diagramp. 642
Suspension Pressure Sensorsp. 642
Inclinometerp. 642
Operator Displayp. 642
Operator Switchp. 643
Speed Inputp. 643
Body-Up Switchp. 643
Brake Lock Switchp. 643
Payload Meterp. 643
Communications Portsp. 643
Keyswitch Inputp. 644
Payload Meter Powerp. 644
Load Lightsp. 644
Wiring and Terminationp. 645
TCI Outputsp. 645
OPERATOR’S DISPLAY AND SWITCHp. 646
Reading the Speedometerp. 646
Reading the Load Displayp. 646
Using the Operator IDp. 646
Using the Load and Ton Counterp. 646
Total Ton Counterp. 646
Total Load Counterp. 647
Clearing the Countersp. 647
Viewing Live Sensor Datap. 647
Other Display Messagesp. 647
PAYLOAD OPERATION & CALCULATIONp. 648
Description of Haul Cycle Statesp. 648
Haul Cycle Descriptionp. 648
Load Calculationp. 649
Carry Backp. 649
Measurement Accuracyp. 649
SOURCES FOR PAYLOAD ERRORp. 649
Payload Errorp. 649
Loading Conditionsp. 650
Pressure Sensorsp. 650
Swingloadsp. 650
Speed and Distancep. 650
HAUL CYCLE DATAp. 650
Haul Cycle Datap. 651
Haul Cycle Warning Flagsp. 652
M: Haul Cycle Too Longp. 653
N: Sensor Input Errorp. 653
Alarm Recordsp. 653
Frame Torque Datap. 653
Sprung Weight Datap. 654
Maximum Speed Datap. 654
PC SOFTWARE OVERVIEWp. 654
PC Overviewp. 654
System Configurationp. 654
Installing the PLMIII Softwarep. 654
DOWNLOADING DATAp. 655
PLM III SYSTEM CONFIGURATIONp. 656
Starting Communicationsp. 656
Displayed Payload Unitsp. 656
Time Unitsp. 656
Connection Menup. 656
Connecting to the Payload Meterp. 657
Configure the Payload Meterp. 657
Setting the Date and Timep. 657
Setting the Truck Typep. 658
Setting the Gauge Display Unitsp. 658
Setting the Frame Serial Numberp. 658
Setting the Truck Numberp. 658
Setting the Komatsu Distributorp. 658
Setting the Komatsu Customerp. 658
Clean Truck Tarep. 659
Inclinometer Calibrationp. 659
DATA ANALYSISp. 660
Creating a Queryp. 660
Sorting on Truck Unit Numberp. 660
Sorting on Truck Typep. 660
Sorting on Date Rangep. 661
Sorting on Time Rangep. 661
Payload Detail Screenp. 662
Creating Reportsp. 662
Summary – one page reportp. 663
Detailed – multi-page reportp. 663
Creating Graphsp. 664
Exporting Datap. 664
CSV Exportp. 664
Compressedp. 665
Importing Datap. 666
Deleting Haul Cycle Recordsp. 666
Viewing Alarmsp. 667
Deleting Alarm Recordsp. 667
TROUBLESHOOTING SECTIONp. 668
TROUBLESHOOTINGp. 668
Viewing Active Alarmsp. 668
Real-Time Data Displayp. 668
Testing the Payload Lightsp. 668
Creating Log Files of Inputsp. 669
Daily Inspectionsp. 669
Periodic Maintenancep. 669
Abnormal Displays at Power-Upp. 670
No Payload Display When Keyswitch is Turned ONp. 671
No Display on Speedometerp. 672
No Display on Operator Displayp. 672
No Communications With PCp. 673
Load Lights Don’t Light During Loadingp. 674
Load Lights Remain ONp. 675
Load Lights Remain ON During Dumpingp. 675
Display Doesn't Clear When The Load Is Dumpedp. 675
Calibration Problemsp. 676
Alarm 1 – Left Front Pressure Highp. 677
Alarm 2 – Left Front Pressure Lowp. 677
Troubleshoot Wiring to Left Front Suspensionp. 677
Alarm 3 – Right Front Pressure Highp. 678
Alarm 4 – Right Front Pressure Lowp. 678
Troubleshoot Wiring to Right Front Suspensionp. 678
Alarm 5 -Left Rear Pressure Highp. 679
Alarm 6 – Left Rear Pressure Lowp. 679
Troubleshoot Wiring to Left Rear Suspensionp. 679
Alarm 7 – Right Rear Pressure Highp. 680
Alarm 8 – Right Rear Pressure Lowp. 680
Troubleshoot Wiring to Right Rear Suspensionp. 680
Alarm 9 – Inclinometer Highp. 681
Alarm 10 – Inclinometer Lowp. 681
Troubleshoot Inclinometer Wiringp. 681
Alarm 13 – Body Up Input Failurep. 682
Alarm 15 – Memory Write Failurep. 683
Alarm 16 – Memory Read Failurep. 683
Alarm 24 – System Key-On Statusp. 683
Operator Switch Doesn't Workp. 684
Alarm 26 – User Switch Fault – SELECTp. 684
Alarm 27 – User Switch Fault – SETp. 684
Connector Mapp. 685
Connectorsp. 686
PLMIII CHECK OUT PROCEDUREp. 687
General Descriptionp. 687
Tools Requiredp. 687
Checkout Procedurep. 687
PLMIII CHECKOUT PROCEDURE CONFIRMATIONp. 691
Flashburn Programmingp. 691
Confirmation Checklistp. 693
PAYLOAD METER III COMPONENTSp. 694
RESERVE ENGINE OIL SYSTEMp. 695
OPERATORS CABp. 701
TRUCK CABp. 703
Descriptionp. 703
Removalp. 704
Installationp. 705
CAB DOORp. 706
Removalp. 706
Installationp. 706
Door Adjustmentp. 706
Door Jamb Bolt Adjustmentp. 706
Door Handle Plunger Adjustmentp. 708
Replace Door Glassp. 709
Replace Door Window Regulatorp. 713
Replace Door Handle or Latch Assemblyp. 713
Door and Door Hinge Seal Replacementp. 714
Door Opening Seal Removalp. 714
Installationp. 714
GLASS REPLACEMENTp. 715
ADHESIVE-BONDED WINDOWSp. 715
Replacement Procedurep. 715
WINDSHIELD & REAR GLASSp. 716
Removalp. 716
Installationp. 717
CAB COMPONENTSp. 719
WINDSHIELD WIPERSp. 719
Wiper Motorp. 719
Removalp. 719
Installationp. 719
Wiper Armp. 719
Removalp. 719
Installationp. 720
Wiper Linkagep. 720
Removalp. 720
Installationp. 720
WINDSHIELD WASHERp. 721
Operationp. 721
Servicep. 721
OPERATOR COMFORTp. 723
OPERATORS SEATp. 723
HEATER/AIR CONDITIONER CONTROLSp. 724
OPERATIONp. 724
HEATER/AIR CONDITIONERp. 725
OPERATIONp. 725
HEATER COMPONENTSp. 725
CIRCUIT BREAKERSp. 725
RELAYSp. 725
HEATER COREp. 726
FAN MOTOR AND SPEED CONTROLp. 726
Testp. 726
ACTUATORSp. 726
Testp. 726
FILTERp. 726
Servicep. 726
AIR CONDITIONER COMPONENTSp. 726
OPERATOR CONTROLS AND EQUIPMENTp. 729
STEERING WHEEL AND CONTROLSp. 730
STEERING COLUMNp. 731
Removalp. 731
Steering Column Inspectionp. 731
Installationp. 731
Horn Buttonp. 730
Tilt / Telescope Leverp. 730
Multi-Function Turn Signal Switchp. 730
PEDAL CONTROLSp. 732
Throttle Pedalp. 732
Service Brake Pedalp. 732
Optional Dual Function/ Single Pedalp. 732
Dynamic Retarding Pedalp. 732
OVERHEAD CONTROLS, GAUGES, ETC.p. 733
Grade/speed Warning Chartp. 733
Radio Speakersp. 733
Warning Alarm Buzzerp. 733
Cab Radiop. 733
Warning Lights Dimmer Controlp. 733
Status / Warning Indicator Light Panelp. 733
Windshield Wipersp. 733
Air Cleaner Vacuum Gaugesp. 734
CENTER CONSOLE CONTROLSp. 734
F-N-R Selector Switchp. 734
Hoist Controlp. 735
Ash Trayp. 735
Lighterp. 735
Window Switchesp. 735
Engine Shutdown Switchp. 735
Override Switchp. 736
Retard Speed Control (RSC) Switchp. 736
RSC Adjust Dialp. 736
Operationp. 736
RSC Control Adjustmentp. 737
Statex III Propulsion System Diagnostic Connectorp. 737
Modular Mining Port Conectorp. 737
Unused Connectorp. 737
Komatsu Engine Quantum Connectorp. 737
Komatsu Engine Cense Connectorp. 737
Data Store Buttonp. 737
Passenger Seatp. 737
Service Engine Light (Blue)p. 737
Payload Meter (Not Shown)p. 737
INSTRUMENT PANEL AND INDICATOR LIGHTSp. 738
CONTROL SYMBOLSp. 738
INSTRUMENT PANELp. 739
PANEL GAUGES, INDICATORS, AND CONTROLS (Figure 5-7)p. 740
Key Switchp. 740
Engine Shutdown Switch (with Timer Delay)p. 740
Operationp. 740
To Cancel Delay Sequencep. 740
Fog Lights (Optional)p. 740
Ladder Light Switchp. 740
Backup Light Switchp. 740
Panel Illumination Lightsp. 741
Cab Air Conditioner/heater Ventsp. 741
Engine Cold Weather Starting Aid (Optional)p. 741
Operationp. 741
Rotating Beacon Light Switch (Optional)p. 741
Heated Mirror Switch (Optional)p. 741
Blank (Not Used In This Application)p. 741
Wheel Brake Lock Controlp. 741
Operationp. 741
Parking Brake Controlp. 742
Tachometerp. 742
Right Turn Signal Indicatorp. 742
High Beam Indicatorp. 742
Left Turn Signal Indicatorp. 742
Speedometer / Payload Meterp. 742
Voltmeterp. 742
Engine Oil Pressure Gaugep. 742
Water Temperature Gaugep. 743
Fuel Gaugep. 743
Blankp. 743
Hourmeterp. 743
The hourmeter (24, Figure 5- 7) registers the total number of hours the truck engine has been operating.p. 743
Blankp. 743
Headlight Switchp. 743
Panel Light Dimmerp. 743
Payload Meter Switchp. 743
OVERHEAD STATUS / WARNING INDICATOR LIGHTSp. 744
INDICATOR LIGHTSp. 745
LUBRICATION AND SERVICEp. 751
LUBRICATION AND SERVICEp. 753
Service Capacitiesp. 753
HYDRAULIC TANK SERVICEp. 753
Adding Oilp. 753
COOLANT LEVEL CHECKp. 754
Radiator Filling Procedurep. 754
Anti-Freeze Specificationsp. 754
RESERVE ENGINE OIL SYSTEM (Optional)p. 754
Reserve Oil Tank Filling Procedure (Remote fill)p. 754
10 HOUR (DAILY) LUBRICATION AND MAINTENANCE CHECKSp. 756
10 HOUR LUBRICATION AND MAINTENANCE CHECKSp. 756
LED Light Signals:p. 756
50 HOUR LUBRICATION AND MAINTENANCE CHECKSp. 758
100 HOUR LUBRICATION AND MAINTENANCE CHECKSp. 759
250 HOUR LUBRICATION AND MAINTENANCE CHECKSp. 760
250 HOUR LUBRICATION AND MAINTENANCE CHECKS (CONTINUED)p. 761
500 HOUR LUBRICATION AND MAINTENANCE CHECKSp. 762
1000 HOURS LUBRICATION AND MAINTENANCE CHECKSp. 763
2500 HOUR MAINTENANCE CHECKSp. 764
5000 HOURS LUBRICATION AND MAINTENANCE CHECKSp. 765
10,000 HOURS LUBRICATION AND MAINTENANCE CHECKSp. 765
AUTOMATIC LUBRICATION SYSTEMp. 767
GENERAL DESCRIPTIONp. 767
SYSTEM COMPONENTSp. 769
System Operationp. 770
Normal Operationp. 770
Pressure Failure Detection Circuitsp. 771
INJECTOR OPERATIONp. 772
STAGE 1.p. 772
STAGE 2.p. 772
STAGE 3.p. 772
STAGE 4.p. 772
GENERAL INSTRUCTIONSp. 773
LUBRICANT REQUIRED FOR SYSTEMp. 773
SYSTEM PRIMINGp. 773
FILTER ASSEMBLYp. 773
LUBRICANT PUMPp. 774
Pump Housing Oil Levelp. 774
Pump Pressure Controlp. 774
Pressure Control Valve Adjustmentp. 774
INJECTORS (SL-1 Series "H")p. 775
Injector Specificationsp. 775
Injector Adjustmentp. 775
SYSTEM CHECKOUTp. 776
24 VDC TIMER CHECKp. 776
Lubrication Cycle Timer Adjustmentp. 776
PUMP REBUILDp. 777
Disassemblyp. 777
Cleaning and Inspectionp. 777
Assemblyp. 779
SYSTEM TROUBLESHOOTING CHARTp. 780
Preventative Maintenance Proceduresp. 783
Daily Lubrication System Inspectionp. 783
250 Hour Inspectionp. 783
1000 Hour Inspectionp. 783
MOTORIZED WHEEL MAINTENANCE SCHEDULEp. 785
ALPHABETICAL INDEXp. 789
SYSTEM SCHEMATICSp. 793
HH353 HYDRAULIC SCHEMATICp. 795
HH354 HYDRAULIC BRAKE SCHEMATICp. 796
HE481 PAYLOAD METER III SCHEMATICp. 797
XS1400 ELECTRIC SCHEMATICp. 798
XS1401 INDEX & SYMBOLSp. 798
XS1402 CIRCUIT NUMBER LOCATORp. 799
XS1403 COMPONENT LOCATORp. 800
XS1404 COMPONENT LOCATORp. 801
XS1405 POWER DISTRIBUTION – 24VDCp. 802
XS1406 PWR 18 ELEM., 3 STEP RETARDINGp. 803
XS1407 PWR 18 ELEM., 7 STEP RETARDINGp. 804
XS1408 PWR 20 ELEM., 7 STEP RETARDINGp. 805
XS1409 DRIVE SYSTEM CONTROL CIRCUITSp. 806
XS1410 TWO DIGIT DISPLAYp. 807
XS1411 G.E. DIG. INPUTS, LUBE CENTER TESTp. 808
XS1412 REAR TAIL LTS, DIMMER CONTROLp. 809
XS1413 5 MINUTE IDLE, SPARE WIRESp. 810
XS1414 WINDOWS, RADIO, GAUGESp. 811
XS1415 CONTACTOR FEEDBACKp. 812
XS1416 CONTACTOR COILSp. 813
XS1417 MACHINE CONTROL CIRCUITSp. 814
XS1418 ACCELERATOR, RETARD PEDALSp. 815
XS1419 HYDRAULIC CONTROLS, ALARMSp. 816
XS1420 HTR/AC, WINDSHIELD WIPER CONTROLSp. 817
XS1421 LIGHT CONTROL CIRCUITSp. 818
XS1422 INSTR. LIGHTS, DIAGNOSTIC PORTSp. 819
XS1423 MODULAR MINING DISPATCHp. 820
XS1424 CUMMINS QSK-60 ENGINEp. 821
XS1425 CUMMINS QSK-60 ENGINEp. 822
XS1426 COMBO TURN SIGNAL / WIPER SWITCHp. 823


IMAGES PREVIEW

Komatsu 830E Dump Truck Shop Manual - Electric Drive Mining Truck Service Manual PDF — PDF page 8 preview
Komatsu 830E Dump Truck Shop Manual - Electric Drive Mining Truck Service Manual PDF — PDF page 14 preview
Komatsu 830E Dump Truck Shop Manual - Electric Drive Mining Truck Service Manual PDF — PDF page 101 preview

Instant PDF Delivery

This Komatsu 830E Dump Truck Shop Manual is delivered as an instant PDF download after payment. There is no shipping, no waiting for a physical book, and no risk of a lost or damaged paper copy. The file can be viewed on any device, printed for the shop, and kept on hand for quick reference. Whether you are maintaining a single truck or an entire fleet, this 830E service manual gives you the complete factory-level procedures, specifications, and diagnostics in one searchable, printable document.
Reviews

There are no reviews yet.

Be the first to review “Komatsu 830E Dump Truck Shop Manual – Electric Drive Mining Truck Service Manual PDF”

What Our Customers Say

★★★★★ Live reviews from customers
Loading customer reviews...
0
    0
    Your Cart
    Your cart is emptyReturn to Shop
    🛒
    Recently Purchased
    🕒 verified order