★ TRUSTED BY 321,897+ PROFESSIONALS WORLDWIDE
🏢
Trusted Business
Verified & Licensed
🛡️
Virus Free Files
100% Safe Downloads
🔒
Secure Payment
SSL Protected
Instant Delivery
Available Immediately
Sale!

Bobcat A770 All-Wheel Steer Loader Service Manual 7253836 January 2019 PDF

Original price was: $39.95.Current price is: $24.95.

Complete 994-page Bobcat A770 All-Wheel Steer Loader Service Manual (doc 7253836, January 2019). Covers engine, hydraulic, hydrostatic, drive, electrical, SCR, HVAC, mainframe, specifications, diagnostics, wiring and hydraulic schematics for A770 loaders (S/N AT5711001 & Above, B3BU11001 & Above). Instant PDF download.

Instant PDF Download
Available immediately
💾
Save to Your Device
Download & keep forever
🛡️
Antivirus Scanned
100% virus-free
🌍
Trusted Worldwide
175,000+ customers

Description

Bobcat A770 All-Wheel Steer Loader Service Manual – Document 7253836

This is the full Bobcat A770 All-Wheel Steer Loader Service Manual, published under document number 7253836 in enUS language with a January 2019 print date. At 994 pages, it is the complete shop-level reference for the A770 AWS platform – the manual Bobcat technicians use to diagnose, service and rebuild the machine rather than the shorter operator’s booklet that ships in the cab.

Everything is organized by numbered service groups (10 through 80, plus SPEC and INDEX sections), and every procedure is written around the All-Wheel Steer configuration of the A770, so the four steer cylinders, AWS Drive Plus controller, wheel position sensors and steering drift compensation routines are covered on their own terms instead of being buried in a generic skid-steer chapter.

File Details

  • Manual type: Service / Repair Manual (shop-level)
  • Brand: Bobcat
  • Model: A770 All-Wheel Steer Loader
  • Document number: 7253836
  • Language: enUS (English)
  • Print date: January 2019
  • Page count: 994 pages
  • File format: PDF
  • Serial coverage: A770 (S/N AT5711001 & Above) and A770 (S/N B3BU11001 & Above), with per-serial AWS wiring schematic breakdowns

Chapters Covered

The manual follows Bobcat’s service-group numbering. Top-level groups and their main sub-sections are:

  • Group 1 – Safety & Introduction: Safety instructions, fire prevention, serial number locations, delivery report, loader identification
  • Group 10 – Maintenance & Adjustments: Lifting and blocking, lift arm support device, operator cab raise/lower, transporting and towing, remote start tool, service schedule, engine air cleaner, engine cooling system, fuel system, DEF/AdBlue system, engine lubrication, hydraulic/hydrostatic system, final drive chaincase, Bob-Tach, lubrication points, tires, pivot pins, storage, emergency exit, seat belt
  • Group 20 – Hydraulic System: Hydraulic symbol glossary, troubleshooting, lift/tilt/Bob-Tach/steering cylinders, main relief valve, hydraulic control valve, lift arm bypass control valve, hydraulic pump (standard and high flow), filters, fluid reservoir, oil cooler, bucket position valve, rear auxiliary diverter valve, Power Bob-Tach block, front auxiliary coupler block, automatic ride control
  • Group 30 – Hydrostatic System: Hydrostatic drive motor, motor carrier, charge pressure, hydrostatic pump, drive belt, two-speed/brake valve, drain manifold
  • Group 40 – Drive System: Brake, steering block, drive components, chaincase covers, hub
  • Group 50 – Mainframe: Seat bar, operator cab, operator seat, Bob-Tach (hand lever and power), lift arms, rear grille, engine cover, rear door, fuel tank, floor pan, control panel, joystick control, access panels, rear/top/side windows, cab door, armrest, lower panels, headliner, fan duct panels
  • Group 60 – Electrical System: Glossary of electrical symbols, connector assignments, battery, alternator, starter, instrument panels, lights, Gateway/Auxiliary controllers, ACS controller, Drive Plus controller, Dosing Control Unit, Engine Control Unit, wheel position sensors, diagnostic service codes, BICS, seat bar sensor, traction lock, electrical/hydraulic controls, Service PC, calibration, steering drift compensation, control panel and password setup, maintenance clock, back-up alarm, front horn, camshaft/crankshaft sensors, engine compartment temperature sensor, Machine IQ
  • Group 70 – Engine Service: Engine information and specifications, engine speed control (hand and foot), SCR system, DOC, air cleaner, engine cooling system, lubrication system, fuel system, cylinder head, camshaft, crankshaft and pistons, gearcase, turbocharger, flywheel and housing, EGR system
  • Group 80 – HVAC: Air conditioning flow, regular maintenance, troubleshooting, system charging and reclamation, compressor, condenser, receiver/drier, evaporator/heater unit, thermostat, expansion valve, evaporator coil, heater coil, blower fan, heater valve
  • SPEC – Specifications: Loader dimensions, performance, engine, drive system, controls, hydraulic system, electrical system, capacities, tires, torque specifications, hydraulic connection specifications, fluid specifications, conversions, service tools required
  • INDEX: Alphabetical index across the entire manual

Complete PDF Bookmark Tree

Complete Bookmarks

The complete bookmarks in the “Bobcat A770 All-Wheel Steer Loader Service Manual 7253836 January 2019 PDF” are as follows:

MAINTENANCE SAFETYp. 3
CONTENTSp. 5
FOREWORDp. 7
FOREWORDp. 9
SAFETY INSTRUCTIONSp. 11
FIRE PREVENTIONp. 13
Maintenancep. 13
Operationp. 13
Electricalp. 13
Hydraulic Systemp. 13
Fuelingp. 13
Startingp. 13
Spark Arrester Exhaust Systemp. 13
Welding And Grindingp. 14
Fire Extinguishersp. 14
SERIAL NUMBER LOCATIONSp. 15
Loader Serial Numberp. 15
Engine Serial Numberp. 15
DELIVERY REPORTp. 16
LOADER IDENTIFICATIONp. 17
SAFETY AND MAINTENANCEp. 19
LIFTING AND BLOCKING THE LOADERp. 23
Procedurep. 23
LIFT ARM SUPPORT DEVICEp. 25
Descriptionp. 25
Installingp. 26
Removingp. 27
OPERATOR CABp. 29
Descriptionp. 29
Raisingp. 30
Loweringp. 31
Cab Door Sensorp. 32
Special Applications Kitp. 33
Special Applications Kit Inspection And Maintenancep. 33
Forestry Door And Window Kitp. 34
Forestry Door And Window Kit Inspection And Maintenancep. 34
TRANSPORTING THE LOADER ON A TRAILERp. 35
Loading And Unloadingp. 35
Fasteningp. 35
TOWING THE LOADERp. 37
Procedurep. 37
REMOTE START TOOL KIT – MEL1563p. 39
Remote Start Tool – MEL1563p. 39
Service Tool Harness Communicator – MEL1566p. 41
Remote Start Procedurep. 41
REMOTE START TOOL (SERVICE TOOL) KIT – 7217666p. 45
Descriptionp. 45
Remote Start Tool (Service Tool) – 7022042p. 46
Loader Service Tool Harness – 6689747p. 47
Computer Service Tool Harness – 6689746p. 48
Remote Start Procedurep. 49
SERVICE SCHEDULEp. 53
Maintenance Intervalsp. 53
ENGINE AIR CLEANERp. 55
Replacing Filtersp. 55
ENGINE COOLING SYSTEMp. 57
Maintenance Platformp. 57
Cleaningp. 57
Checking And Adding Coolantp. 60
Removing And Replacing Coolantp. 61
FUEL SYSTEMp. 63
Fuel Specificationsp. 63
Biodiesel Blend Fuelp. 63
Filling The Fuel Tankp. 64
Fuel Filterp. 65
Removing Air From The Fuel Systemp. 66
DIESEL EXHAUST FLUID (DEF) / ADBLUE® SYSTEMp. 67
Descriptionp. 67
Filling The DEF / AdBlue® Tankp. 67
ENGINE LUBRICATION SYSTEMp. 69
Checking And Adding Engine Oilp. 69
Engine Oil Chartp. 69
Removing And Replacing Oil And Filterp. 70
HYDRAULIC / HYDROSTATIC SYSTEMp. 73
Checking And Adding Fluidp. 73
Hydraulic / Hydrostatic Fluid Chartp. 73
Removing And Replacing Hydraulic Fluidp. 74
Removing And Replacing Hydraulic / Hydrostatic Filterp. 76
Removing And Replacing Steering Filterp. 77
Removing And Replacing Hydraulic Charge Filterp. 78
Replacing Reservoir Breather Capp. 79
FINAL DRIVE TRANSMISSION (CHAINCASE)p. 81
Checking And Adding Fluidp. 81
Removing And Replacing Fluidp. 81
BOB-TACH (HAND LEVER)p. 83
Inspection And Maintenancep. 83
BOB-TACH (POWER)p. 85
Inspection And Maintenancep. 85
LUBRICATING THE LOADERp. 87
Lubrication Locationsp. 87
TIRE MAINTENANCEp. 91
Wheel Nutsp. 91
Rotatingp. 91
Mountingp. 92
PIVOT PINSp. 93
Inspection And Maintenancep. 93
LOADER STORAGE AND RETURN TO SERVICEp. 95
Storagep. 95
Return To Servicep. 95
STOPPING THE ENGINE AND LEAVING THE LOADERp. 97
Procedurep. 97
EMERGENCY EXITp. 99
Rear Window Identificationp. 99
Rear Window Removal (Latches)p. 99
Rear Window Removal (Rubber Cord)p. 99
External Access (Rear Window With Latches)p. 100
External Access (Rear Window With Rubber Cord)p. 100
Front Doorp. 100
SEAT BELTp. 103
Inspection And Maintenancep. 103
HYDRAULIC SYSTEMp. 105
HYDRAULIC / HYDROSTATIC SCHEMATICSp. 109
HYDRAULIC SYSTEM INFORMATIONp. 113
Glossary Of Hydraulic / Hydrostatic Symbolsp. 113
Troubleshootingp. 117
CYLINDER (LIFT)p. 119
Testingp. 119
Removal And Installationp. 120
Parts Identificationp. 123
Disassemblyp. 124
Assemblyp. 126
CYLINDER (TILT)p. 129
Testingp. 129
Removal And Installationp. 130
Base End Pivot Pin Removal And Installationp. 132
Parts Identificationp. 133
Disassemblyp. 134
Assemblyp. 136
CYLINDER (BOB-TACH)p. 139
Testingp. 139
Removal And Installationp. 140
Parts Identificationp. 141
Disassemblyp. 142
Assemblyp. 143
CYLINDER (STEERING)p. 147
Testingp. 147
Removal And Installation (Front)p. 149
Removal And Installation (Rear)p. 152
Parts Identificationp. 155
Disassemblyp. 156
Assemblyp. 157
MAIN RELIEF VALVEp. 161
Descriptionp. 161
Testingp. 162
Main Relief Valve Adjustmentp. 164
Main Relief Valve Removal And Installationp. 164
Auxiliary Relief Valve Adjustmentp. 165
Auxiliary Relief Valve Removal And Installationp. 166
HYDRAULIC CONTROL VALVEp. 167
Descriptionp. 167
Removal And Installationp. 167
Actuator Removal And Installation (In Loader)p. 172
Actuator Removal And Installation (Out Of Loader)p. 173
Identification Chartp. 176
Mount Bracket Removal And Installationp. 177
Lift Load Check Valve Removal And Installationp. 177
Load Check Valve Removal And Installation (Tilt And Auxiliary)p. 178
Anti-Cavitation Valve Removal And Installation (Lift, Rod End)p. 179
Port Relief / Anti-Cavitation Valve Removal And Installation (Lift, Base End)p. 179
Port Relief / Anti-Cavitation Valve Removal And Installation (Tilt, Base End)p. 180
Port Relief / Anti-Cavitation Valve Removal And Installation (Tilt, Rod End)p. 180
Port Relief Valve Removal And Installationp. 181
Plug Removal And Installationp. 183
End Cap Block Removal And Installationp. 184
Lift Spool Removal And Installationp. 184
Lift Spool Disassembly And Assemblyp. 186
Tilt Spool Removal And Installationp. 187
Auxiliary Spool Removal And Installationp. 189
Auxiliary Solenoid Removal And Installationp. 190
Solenoid Removal And Installationp. 191
Lock Valve Removal And Installationp. 192
Lift Arm Bypass Orifice Removal And Installationp. 194
Main Relief Valve Removal And Installationp. 194
Auxiliary Relief Valve Removal And Installationp. 195
Check Valve Removal And Installationp. 195
LIFT ARM BYPASS CONTROL VALVEp. 197
Descriptionp. 197
Testingp. 197
Removal And Installationp. 198
Bracket Removal And Installationp. 199
Disassembly And Assemblyp. 199
HYDRAULIC PUMPp. 201
Descriptionp. 201
Pump Test At Quick Couplersp. 201
Direct Pump Test (Standard Section)p. 202
Direct Pump Test (Charge Section)p. 204
Direct Pump Test (Steering Section)p. 206
Removal And Installationp. 208
Hydraulic Pump Startupp. 210
Parts Identificationp. 211
Disassembly And Assemblyp. 212
HYDRAULIC PUMP (HIGH FLOW)p. 213
Descriptionp. 213
Pump Test At Quick Couplersp. 213
Direct Pump Test (Standard Section)p. 214
Direct Pump Test (Charge Section)p. 215
Direct Pump Test (High Flow Section)p. 217
High Flow Relief Valve Adjustmentp. 219
High Flow Relief Valve Removal And Installationp. 220
Direct Pump Test (Steering Section)p. 221
Solenoid Removal And Installationp. 223
Removal And Installationp. 224
Hydraulic Pump Startupp. 226
Parts Identificationp. 227
Disassembly And Assemblyp. 228
HYDRAULIC / HYDROSTATIC FILTERSp. 229
Descriptionp. 229
Housing Removal And Installationp. 229
HYDRAULIC FLUID RESERVOIRp. 231
Descriptionp. 231
Removal And Installationp. 231
Hydraulic Fluid Screenp. 232
OIL COOLERp. 233
Descriptionp. 233
Removal And Installationp. 233
BUCKET POSITION VALVEp. 235
Descriptionp. 235
Solenoid Removal And Installationp. 235
Solenoid Testingp. 237
Removal And Installationp. 237
Disassembly And Assemblyp. 239
REAR AUXILIARY DIVERTER VALVEp. 241
Descriptionp. 241
Solenoid Testingp. 241
Removal And Installationp. 242
Disassembly And Assemblyp. 243
BOB-TACH (POWER) BLOCKp. 249
Descriptionp. 249
Testing Relief Valvep. 250
Removal And Installationp. 252
Disassembly And Assemblyp. 254
FRONT AUXILIARY HYDRAULIC COUPLER BLOCKp. 259
Descriptionp. 259
Removal And Installationp. 260
Disassembly And Assembly (FFI/FI)p. 260
Disassembly And Assembly (FFH/FH)p. 262
AUTOMATIC RIDE CONTROLp. 265
Descriptionp. 265
Removal And Installationp. 266
Checking The Pressure In The Accumulatorp. 269
Adding Nitrogen To The Accumulatorp. 271
HYDROSTATIC SYSTEMp. 273
HYDROSTATIC SYSTEM INFORMATIONp. 275
Descriptionp. 275
Troubleshootingp. 276
HYDROSTATIC DRIVE MOTORp. 277
Descriptionp. 277
Removal And Installationp. 277
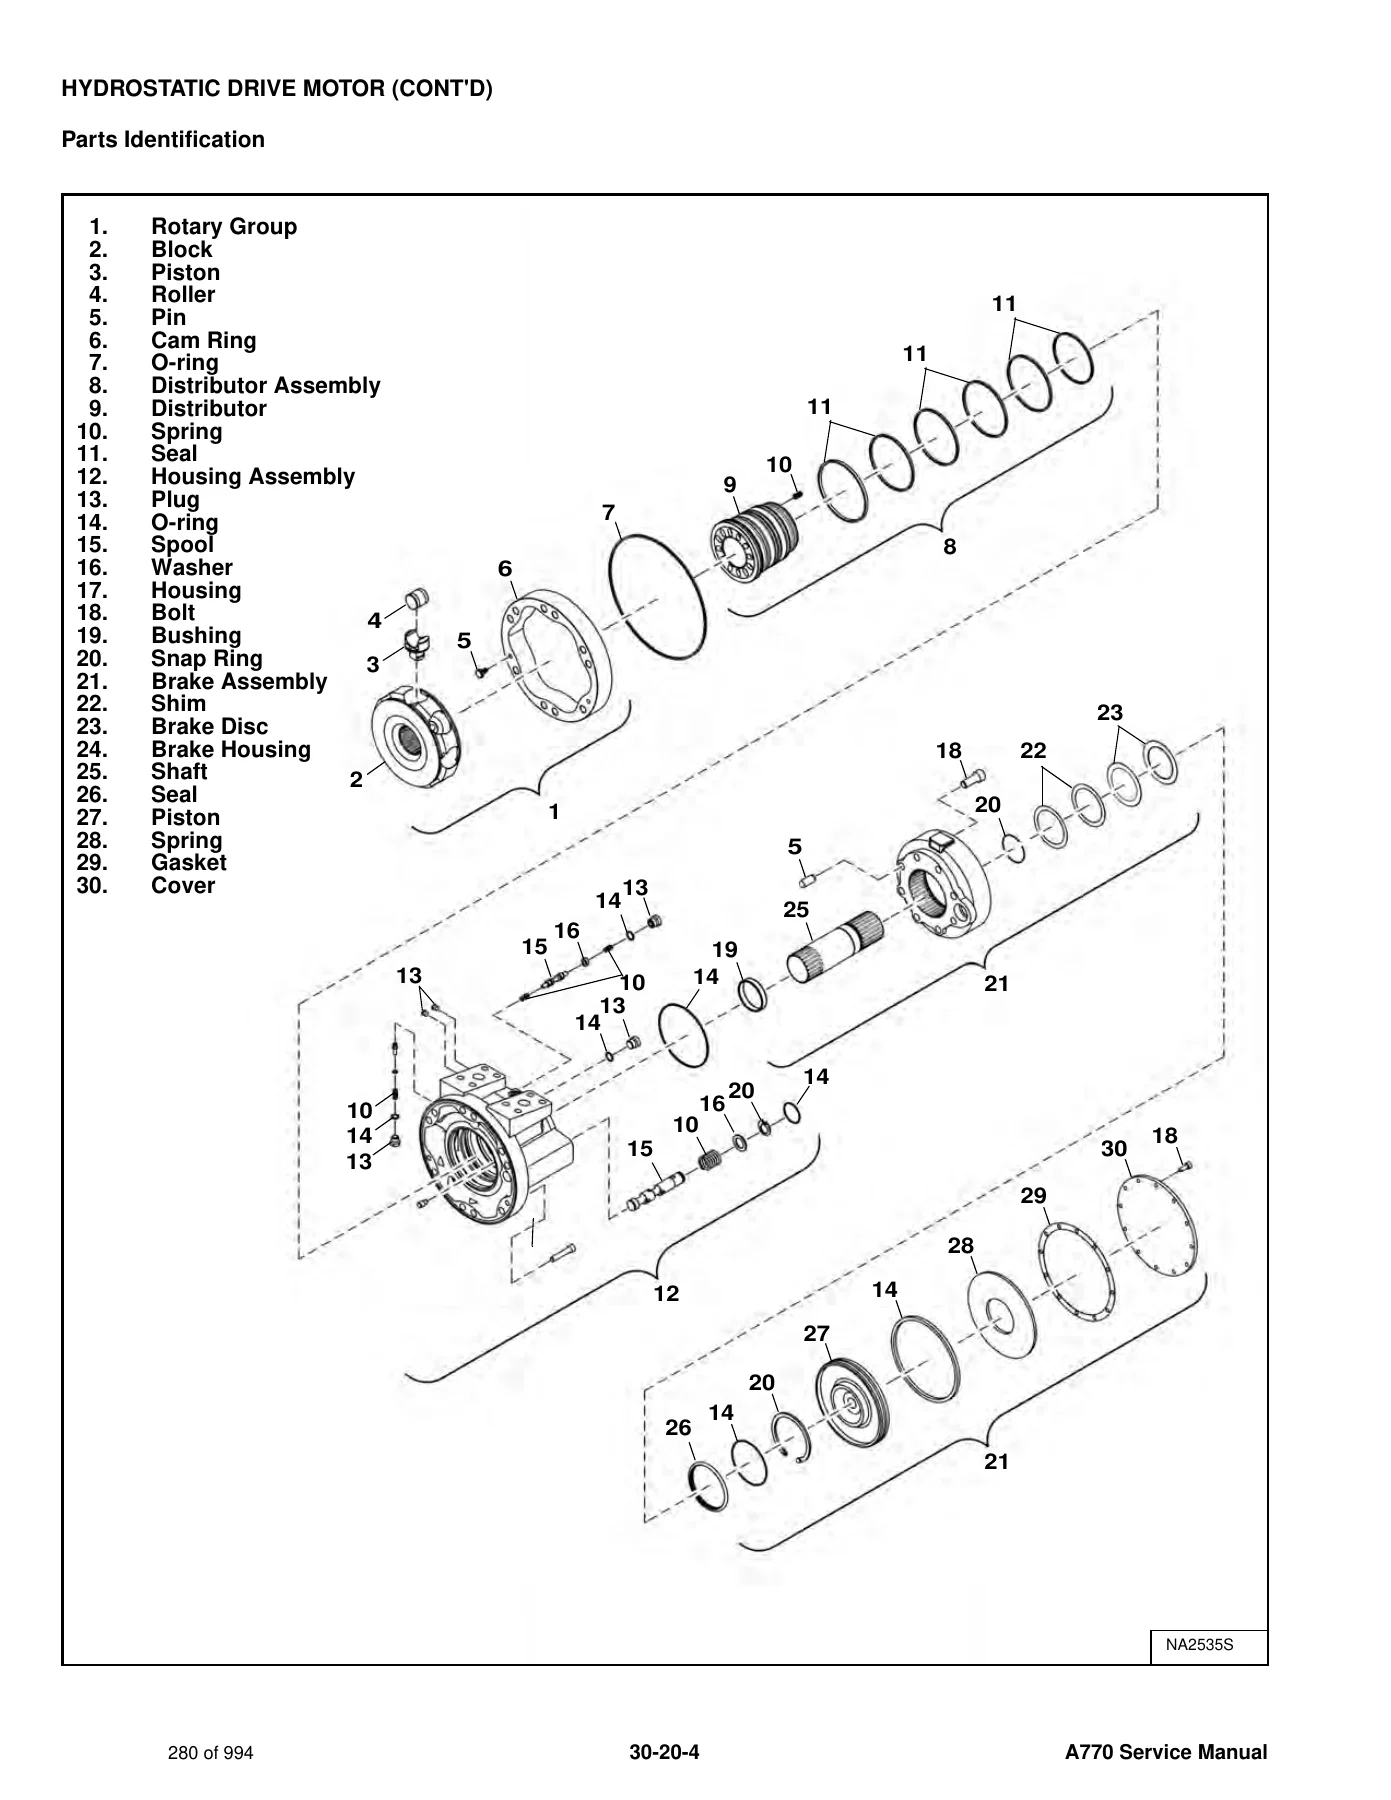
Parts Identificationp. 280
Disassemblyp. 281
Assemblyp. 287
HYDROSTATIC MOTOR CARRIERp. 293
Descriptionp. 293
Removal And Installationp. 294
Parts Identificationp. 296
Disassemblyp. 297
Assemblyp. 299
CHARGE PRESSUREp. 301
Descriptionp. 301
Testingp. 302
Sender Removal And Installationp. 303
Adjustingp. 304
HYDROSTATIC PUMPp. 305
Descriptionp. 305
Hydraulic Controller Removal And Installationp. 306
Removal And Installationp. 308
Hydrostatic Pump Startupp. 310
Parts Identificationp. 311
High Pressure Relief And Bypass Valvep. 312
Charge Relief Valvep. 313
Disassemblyp. 314
Inspectionp. 323
Assemblyp. 327
Mechanical NEUTRAL Adjustmentp. 337
Hydraulic Controller NEUTRAL Adjustmentp. 340
DRIVE BELTp. 343
Belt Adjustmentp. 343
Stop Adjustmentp. 343
Belt Replacementp. 344
Tensioner Pulley Removal And Installation (Earlier Models)p. 346
Tensioner Pulley Disassembly And Assemblyp. 346
Tensioner Pulley Removal And Installation (Later Models)p. 347
Tensioner Pulley Disassembly And Assemblyp. 347
TWO-SPEED / BRAKE VALVEp. 349
Descriptionp. 349
Valve Block Removal And Installationp. 350
Valve Block Disassembly And Assemblyp. 352
DRAIN MANIFOLDp. 355
Descriptionp. 355
Drain Manifold Removal And Installationp. 355
DRIVE SYSTEMp. 357
BRAKEp. 359
Descriptionp. 359
STEERING BLOCKp. 361
Descriptionp. 361
Identificationp. 362
Removal And Installationp. 364
Disassembly And Assemblyp. 365
DRIVE COMPONENTSp. 373
Descriptionp. 373
Axle Seal Removal And Installationp. 374
Axle, Sprocket And Bearings Removal And Installationp. 376
Chain Removal And Installationp. 381
CHAINCASEp. 383
Descriptionp. 383
Front Cover Removal And Installationp. 383
Center Cover Removal And Installationp. 384
Rear Cover Removal And Installationp. 385
HUBp. 387
Descriptionp. 387
Removalp. 387
Installationp. 390
Disassemblyp. 394
Assemblyp. 397
MAINFRAMEp. 401
SEAT BARp. 405
Descriptionp. 405
Removal And Installationp. 405
Disassembly And Assemblyp. 406
Compression Spring Disassembly And Assemblyp. 407
OPERATOR CABp. 409
Gas Spring Removal And Installationp. 409
Gas Spring Bracket Disassembly And Assemblyp. 410
Removal And Installationp. 410
OPERATOR SEAT (SUSPENSION)p. 413
Removal And Installationp. 413
Slide Rail Removal And Installationp. 413
Seat Belt Removal And Installationp. 414
Lower Cushion Removalp. 414
Lower Cushion Installationp. 415
Back Cushion Removal And Installationp. 415
Shock Removal And Installationp. 416
3-Point Seat Belt Removal And Installationp. 416
BOB-TACH (HAND LEVER)p. 419
Descriptionp. 419
Removal And Installationp. 419
Lever And Wedge Disassembly And Assemblyp. 421
Pivot Pin Bushing And Seal Removal And Installationp. 423
BOB-TACH (POWER)p. 425
Descriptionp. 425
Removal And Installationp. 425
Lever And Wedge Disassembly And Assemblyp. 428
Pivot Pin Bushing And Seal Removal And Installationp. 430
LIFT ARMSp. 431
Stabilizer Bar Removal And Installationp. 431
Link Removal And Installationp. 432
Removal And Installationp. 433
REAR GRILLEp. 437
Removingp. 437
Installingp. 437
Shield Removal And Installationp. 438
engine coverp. 439
Removal And Installationp. 439
REAR DOOR (TAILGATE)p. 441
Removal And Installationp. 441
Striker Removal And Installationp. 442
Striker Disassembly And Assemblyp. 442
Striker (Adjusting)p. 442
Latch Removal And Installationp. 443
Tailgate Fan Removal And Installationp. 444
FUEL TANKp. 445
Removal And Installationp. 445
Fuel Level Sender Removal And Installationp. 446
Fuel Fill Screen Removal And Installationp. 447
FLOOR PANp. 449
Removal And Installationp. 449
CONTROL PANELp. 451
Descriptionp. 451
Removal And Installationp. 451
joystick controlp. 453
Descriptionp. 453
Joystick Testingp. 453
Joystick Removal And Installationp. 454
ACCESS PANEL (INSIDE)p. 455
Removal And Installation (Left)p. 455
Removal And Installation (Right)p. 455
WINDOW (REAR)p. 457
Rear Window Identificationp. 457
Rear Window Removal (Latches)p. 457
Rear Window Removal (Rubber Cord)p. 457
External Access (Rear Window With Latches)p. 458
External Access (Rear Window With Rubber Cord)p. 458
Disassembly And Assembly (Latches)p. 459
WINDOW (TOP)p. 461
Removal And Installationp. 461
WINDOW (SIDE)p. 463
Removal And Installationp. 463
CAB DOORp. 465
Descriptionp. 465
Removal And Installationp. 465
Disassembly And Assemblyp. 466
Aligningp. 467
Adjustingp. 468
Checking Operationp. 468
ARMRESTp. 469
Descriptionp. 469
Removal And Installationp. 470
Disassembly And Assemblyp. 471
LEFT SIDE LOWER PANELp. 473
Removal And Installationp. 473
Disassembly And Assemblyp. 475
RIGHT SIDE LOWER PANELp. 477
Removal And Installationp. 477
Disassembly And Assemblyp. 478
HEADLINERp. 481
Removal And Installationp. 481
FAN DUCT PANELSp. 483
Removal And Installationp. 483
ELECTRICAL SYSTEMp. 485
ELECTRICAL SCHEMATICSp. 491
ELECTRICAL SYSTEM INFORMATIONp. 571
Glossary Of Electrical Symbolsp. 571
Cab Harness Connectorsp. 574
Mainframe Harness Connectorsp. 575
All-Wheel Steer Harness Connectorsp. 576
Engine Harness Connectorsp. 577
Descriptionp. 578
Troubleshootingp. 579
Fuse And Relay Location / Identificationp. 580
Solenoid Testingp. 586
BATTERYp. 587
Removal And Installationp. 587
Battery Maintenancep. 588
Maintaining Battery Charge Levelp. 588
Battery Service During Machine Storagep. 588
Battery Testingp. 589
Battery Chargingp. 589
Using A Booster Battery (Jump Starting)p. 590
ALTERNATORp. 591
Belt Adjustmentp. 591
Belt Replacementp. 591
Charging System Inspectionp. 592
Alternator Voltage Testingp. 593
Low Voltage Testingp. 593
High Voltage Testingp. 594
Removal And Installationp. 595
Parts Identificationp. 597
STARTERp. 599
Testingp. 599
Removal And Installationp. 599
Parts Identificationp. 600
INSTRUMENT PANELSp. 601
Left Panelp. 601
Display Screenp. 603
Right Panel (Standard Key Panel)p. 604
Right Panel (Keyless Start Panel)p. 605
Right Panel (Deluxe Instrumentation Panel)p. 606
Left Switch Panelp. 608
Right Switch Panelp. 608
Left Side Lower Panelp. 609
Right Side Lower Panelp. 609
Left Panel Removal And Installationp. 610
Right Panel (Standard Key Panel) Removal And Installationp. 610
Right Panel (Keyless Start Panel) Removal And Installationp. 611
Right Panel (Deluxe Instrumentation Panel) Removal And Installationp. 611
Key Switch Disassembly And Assemblyp. 612
Alarm Disassembly And Assemblyp. 612
Left Switch Panel Removal And Installationp. 613
Right Switch Panel Removal And Installationp. 613
LIGHTSp. 615
Front Removal And Installationp. 615
Rear Removal And Installationp. 616
Cab Light Removal And Installationp. 616
BOBCAT CONTROLLERS (GATEWAY AND AUXILIARY)p. 617
Descriptionp. 617
Connector Identificationp. 618
Removal And Installationp. 624
BOBCAT CONTROLLER (ACS)p. 625
Descriptionp. 625
Connector And Wire Identificationp. 626
Removal And Installationp. 627
BOBCAT CONTROLLER (DRIVE PLUS)p. 629
Descriptionp. 629
Connector Identificationp. 630
Removal And Installationp. 632
DOSING CONTROL UNIT (DCU)p. 633
Descriptionp. 633
Removal And installationp. 633
ENGINE CONTROL UNIT (ECU)p. 635
Descriptionp. 635
Cleaningp. 636
Removal And Installationp. 637
WHEEL POSITION SENSORSp. 639
Descriptionp. 639
Wheel Alignment (Field Adjustment)p. 640
Testingp. 641
Sensor Removal And Installationp. 643
Wheel Alignment (Field Adjustment With Service Analyzer)p. 645
Wheel Alignment (Calibration)p. 649
DIAGNOSTIC SERVICE CODESp. 653
Viewing Service Codesp. 653
Service Codes Listp. 654
BOBCAT INTERLOCK CONTROL SYSTEM (BICS™)p. 669
Descriptionp. 669
Inspecting The BICS™ (Engine STOPPED – Key ON)p. 670
Inspecting Deactivation Of The Auxiliary Hydraulics System (Engine STOPPED – Key ON)p. 670
Inspecting The Seat Bar Sensor (Engine RUNNING)p. 670
Inspecting The Traction Lock And Parking Brake (Engine RUNNING)p. 670
Inspecting The Lift Arm Bypass Controlp. 670
Inspecting Deactivation Of Lift And Tilt Functionsp. 670
Troubleshootingp. 671
SEAT BAR SENSORp. 673
Descriptionp. 673
Troubleshootingp. 673
Testingp. 674
Removalp. 675
Installationp. 676
Bobcat Interlock Control System (BICS™) Circuit Testp. 678
TRACTION LOCKp. 681
Descriptionp. 681
Troubleshootingp. 682
Inspectingp. 683
ELECTRICAL / HYDRAULIC CONTROLSp. 685
Identification Chartp. 685
Descriptionp. 686
Identification Chart ACD Group 0p. 687
Identification Chart ACD Group 1p. 688
Identification Chart ACD Group 2p. 689
Identification Chart ACD Group 3p. 690
SERVICE PC (LAPTOP COMPUTER)p. 691
Connecting Remote Start Toolp. 691
Connecting Remote Start Tool (Service Tool)p. 691
CALIBRATIONp. 693
Descriptionp. 693
Actuator Testingp. 693
Lift And Tilt Calibrationp. 696
Hydrostatic Pump Calibrationp. 698
STEERING DRIFT COMPENSATION (operator mode)p. 703
Descriptionp. 703
Operationp. 703
STEERING DRIFT COMPENSATION (service mode)p. 705
Descriptionp. 705
Operationp. 705
CONTROL PANEL SETUPp. 707
Right Panel Setup (Deluxe Instrumentation Panel)p. 707
PASSWORD SETUP (DELUXE INSTRUMENTATION PANEL)p. 711
Password Descriptionp. 711
Changing The Owner Passwordp. 711
Changing The User Passwordsp. 712
Password Lockout Featurep. 712
PASSWORD SETUP (KEYLESS START PANEL)p. 713
Password Descriptionp. 713
Changing The Owner Passwordp. 713
Password Lockout Featurep. 713
MAINTENANCE CLOCKp. 715
Descriptionp. 715
Setupp. 716
Resetp. 719
BACK-UP ALARM SYSTEMp. 721
Descriptionp. 721
Inspectionp. 721
Troubleshootingp. 722
Alarm Removal And Installationp. 723
FRONT HORNp. 725
Descriptionp. 725
Inspectingp. 725
Removal And Installationp. 725
Troubleshootingp. 726
Camshaft and crankshaft position sensorp. 727
Removal And Installationp. 727
ENGINE COMPARTMENT TEMPERATURE SENSORp. 729
Removal And Installationp. 729
BOBCAT MACHINE IQ WIRELESS COMMUNICATIONSp. 731
Descriptionp. 731
Removal And Installationp. 731
Procedurep. 732
ENGINE SERVICEp. 733
ENGINE INFORMATIONp. 737
Descriptionp. 737
Specificationsp. 738
Sensor Locationp. 740
Torque Valuesp. 747
Troubleshootingp. 749
Engine Removal And Installationp. 751
Engine Mount Replacementp. 762
Compression – Testingp. 764
Injector Signal – Testingp. 766
Injector Signal – Testing (In-Line)p. 768
Oil Pressure Testing (At Oil Sensor On Block)p. 770
Oil Pressure Testing (At Turbocharger Oil Inlet)p. 772
ENGINE SPEED CONTROL (HAND)p. 775
Removal And Installationp. 775
ENGINE SPEED CONTROL (FOOT)p. 777
Removal And Installationp. 777
Disassembly And Assemblyp. 778
Foot Throttle Calibrationp. 780
SELECTIVE CATALYTIC REDUCTION (SCR) SYSTEMp. 783
Descriptionp. 783
Diesel Exhaust Fluid (DEF) / AdBlue® Levelp. 784
DeSOX Processp. 785
SCR System Codesp. 787
Diesel Exhaust Fluid (DEF) / AdBlue® Unsatisfactory Qualityp. 788
SCR System Component Tamperingp. 788
EGR Impededp. 789
Diesel Exhaust Fluid (DEF) / AdBlue® Dosing Interruptionp. 789
SCR Removal And Installationp. 790
Dosing Module Removal And Installationp. 792
Dosing Control Unit (DCU) Removal And Installationp. 793
Supply Module Removal And Installationp. 795
Supply Module Filter Removal And Installationp. 796
Diesel Exhaust Fluid (DEF) / AdBlue® Tank Removal And Installationp. 798
Diesel Exhaust Fluid (DEF) / AdBlue® Sensor Removal And Installationp. 801
Diesel Exhaust Fluid (DEF) / AdBlue® Coolant Valve Removal And Installationp. 803
DIESEL OXIDATION CATALYST (DOC)p. 805
Removal And Installationp. 805
AIR CLEANERp. 807
Housing Removal And Installationp. 807
ENGINE COOLING SYSTEMp. 809
Radiator Removal And Installationp. 809
Hydraulic Fan Descriptionp. 812
Hydraulic Reversing Fan Descriptionp. 812
Fan Duct Removal And Installationp. 812
Hydraulic Fan Motor Assembly Removal And Installationp. 813
Hydraulic Fan Motor Removal And Installationp. 815
Hydraulic Fan Motor Disassembly And Assemblyp. 816
Blower Housing Removal And Installationp. 826
Water Pump Removal And Installationp. 827
Thermostat Housing Removal And Installationp. 828
Thermostat – Testingp. 828
LUBRICATION SYSTEMp. 829
Descriptionp. 829
Oil Pan Removal And Installationp. 830
Oil Pump Removal And Installationp. 831
Oil Pump Relief Valve Descriptionp. 832
Oil Suction Tube Removal And Installationp. 832
Oil Cooler Removal And Installationp. 833
Oil Filter Head Removal And Installationp. 833
Oil Cooler Bypass Descriptionp. 834
FUEL SYSTEMp. 835
Descriptionp. 835
High Pressure Pump Removal And Installationp. 836
High Pressure Pump Drive Gear Removal And Installationp. 837
Fuel Cooler Removal And Installationp. 838
Fuel Bypass Valve Removal And Installationp. 838
Fuel Temperature Sensor Removal And Installationp. 838
Fuel Recirculation Valve Removal And Installationp. 839
Fuel Rail Assembly Removal And Installationp. 840
Fuel Injector Removal And Installationp. 841
Injector Codingp. 843
Removing Air From The Fuel Systemp. 845
CYLINDER HEADp. 847
Intake Air Heater Removal And Installationp. 847
Intake Air Heater Tube Removal And Installationp. 848
Valve Clearance Adjustmentp. 849
Cylinder Head Removal And Installationp. 851
Cylinder Head Disassembly And Assemblyp. 854
Cylinder Head Inspectionp. 855
Cylinder Head Top Clearancep. 856
Valve Step Heightp. 857
Valve Stem Heightp. 857
Valve Guidep. 858
Valvep. 858
Valve Springp. 859
Rocker Arm Shaft Disassembly And Assemblyp. 860
Rocker Arm Shaft Inspectionp. 861
Push Rod Inspectionp. 861
CRANKSHAFT AND PISTONSp. 863
Piston And Connecting Rod Removal And Installationp. 863
Piston And Connecting Rod Inspectionp. 864
Timing Wheel Removal And Installationp. 866
Crankshaft Removal And Installationp. 868
Cylinder Block Inspectionp. 870
Crankshaft Inspectionp. 872
Connecting Rod Inspectionp. 872
Engine Component Classp. 873
CAMSHAFTp. 875
Removal And Installationp. 875
Inspectingp. 876
GEARCASEp. 879
Gear Backlashp. 879
Gear End Playp. 879
Gear Timingp. 880
Idle Gear Removal And Installationp. 881
Idle Gear Inspectionp. 881
TURBOCHARGERp. 883
Descriptionp. 883
Removal And Installationp. 883
Testingp. 885
FLYWHEEL AND HOUSINGp. 887
Flywheel Removal And Installationp. 887
Ring Gear Removal And Installationp. 887
Housing Removal And Installationp. 888
EXHAUST GAS RECIRCULATION (EGR) SYSTEMp. 889
Descriptionp. 889
Removal And Installationp. 890
HEATING, VENTILATION AND AIR CONDITIONING (HVAC)p. 893
AIR CONDITIONING SYSTEM FLOWp. 895
Descriptionp. 895
Chartp. 896
Componentsp. 897
Safety Equipmentp. 900
REGULAR MAINTENANCEp. 901
Filtersp. 901
Belt Adjustmentp. 902
Belt Replacementp. 902
Condenserp. 903
Air Conditioning Lubricationp. 903
Air Conditioning Service Chartp. 904
Air Conditioning Evaporator / Heater Coilp. 905
TROUBLESHOOTINGp. 907
Blower Motor Does Not Operatep. 907
Blower Motor Operates Normally, But Air Flow Is Insufficientp. 907
Insufficient Cooling Although Air Flow And Compressor Operation Are Normalp. 907
The Compressor Does Not Operate At All, Or Operates Improperlyp. 907
Gauge Pressure Related Troubleshootingp. 908
Troubleshooting Treep. 910
Temperature / Pressure Chartp. 913
Poor A/C Performancep. 915
HVAC Repair And Leaksp. 916
Electrical Systemp. 917
Engine Coolant Bypassing The Heater Valvep. 923
Heater Valve Not Opening Or Closingp. 924
SYSTEM CHARGING AND RECLAMATIONp. 925
Refrigerant Identificationp. 925
Reclamation And Charging With Recovery / Charging Unitp. 926
COMPRESSORp. 929
Removal And Installationp. 929
Oilp. 931
Oil Checkp. 932
CONDENSERp. 933
Removal And Installationp. 933
RECEIVER / DRIERp. 935
Receiver / Drier Removal And Installationp. 935
Pressure Switch Removal And Installationp. 937
Schrader® Valve Removal And Installationp. 938
EVAPORATOR / HEATER UNITp. 939
Removal And Installationp. 939
THERMOSTATp. 941
Descriptionp. 941
Removal And Installationp. 942
EXPANSION VALVEp. 943
Removal And Installationp. 943
EVAPORATOR COILp. 945
Removal And Installationp. 945
HEATER COILp. 947
Removal And Installationp. 947
BLOWER FANp. 949
Removal And Installationp. 949
Disassembly And Assemblyp. 949
HEATER VALVEp. 953
Removal And Installationp. 953
EVAPORATOR / HEATER COVERp. 955
Removingp. 955
Installingp. 955
SPECIFICATIONSp. 957
LOADER SPECIFICATIONSp. 959
Machine Dimensionsp. 959
Performancep. 960
Enginep. 960
Drive Systemp. 961
Controlsp. 961
Hydraulic Systemp. 962
Electrical Systemp. 963
Capacitiesp. 963
Tiresp. 964
TECHINCAL SERVICE GUIDE SPECIFICATIONSp. 965
Enginep. 965
Engine Torquesp. 965
Cooling Systemp. 965
Loader Torquesp. 966
Hydraulic / Hydrostatic Systemp. 966
Fuel Consumptionp. 966
TORQUE SPECIFICATIONS FOR BOLTSp. 967
Torque For General SAE Boltsp. 967
Torque For General Metric Boltsp. 968
HYDRAULIC CONNECTION SPECIFICATIONSp. 969
Straight Thread O-ring Fittingp. 969
Flare Fittingp. 970
Tubelines And Hosesp. 970
HYDRAULIC / HYDROSTATIC FLUID SPECIFICATIONSp. 971
Specificationsp. 971
CONVERSIONSp. 973
Decimal And Millimeter Equivalent Chartp. 973
U.S. To Metric Conversion Chartp. 973
SERVICE TOOLS REQUIREDp. 975
Remote Start Toolsp. 975
Hydraulic Toolsp. 976
Mainframe And Drive Toolsp. 979
Electrical Toolsp. 982
Engine Toolsp. 983
HVAC Toolsp. 988
ALPHABETICAL INDEXp. 989

Taken as a whole, the A770 Service Manual is the master reference for the machine. Each group opens with a description, then moves through testing, removal and installation, parts identification, disassembly and assembly, and finally torque and adjustment values. Hydraulic and electrical faults are handled through dedicated troubleshooting charts and diagnostic service code lists, and the schematic drawings at the back of Group 60 cover power, ground, CAN bus, engine, hydraulics, cab display, cab, controls, lights, HVAC and options. For a workshop that already knows how a skid-steer works, this manual closes the gap for the AWS variant specifically – four-wheel steering geometry, the Drive Plus controller, swash-plate neutral adjustment, controller calibration and wheel alignment procedures are all documented step by step.

What This Manual Enables You To Do

The Bobcat A770 All-Wheel Steer Loader Service Manual 7253836 is written for the jobs that keep an A770 working. Engine service covers the Bobcat 3.4L D34P Tier 4 diesel – compression testing, injector signal testing, injector coding, oil pressure testing at the block and at the turbo inlet, valve clearance adjustment, cylinder head top clearance, camshaft and crankshaft measurement, gearcase backlash and timing, and turbocharger testing. The SCR chapter walks through DEF/AdBlue tank, dosing module, DCU, supply module and coolant valve service, plus the DeSOX process and the diagnostic codes that derate the engine if the system is ignored.

On the hydraulic side, the manual gives you the pressure values to actually diagnose rather than guess: main relief, auxiliary relief, charge pressure, high-flow relief, port relief and anti-cavitation settings are all listed with adjustment procedures and torque values. Lift, tilt, Bob-Tach and steering cylinders each have their own test, remove, disassemble and reseal sequence with the tooling callouts. The hydrostatic section covers the tandem pump, drive motors, motor carrier bearings and the mechanical and hydraulic controller NEUTRAL adjustment, which is exactly the procedure an A770 needs after any pump or controller work.

IMAGES PREVIEW

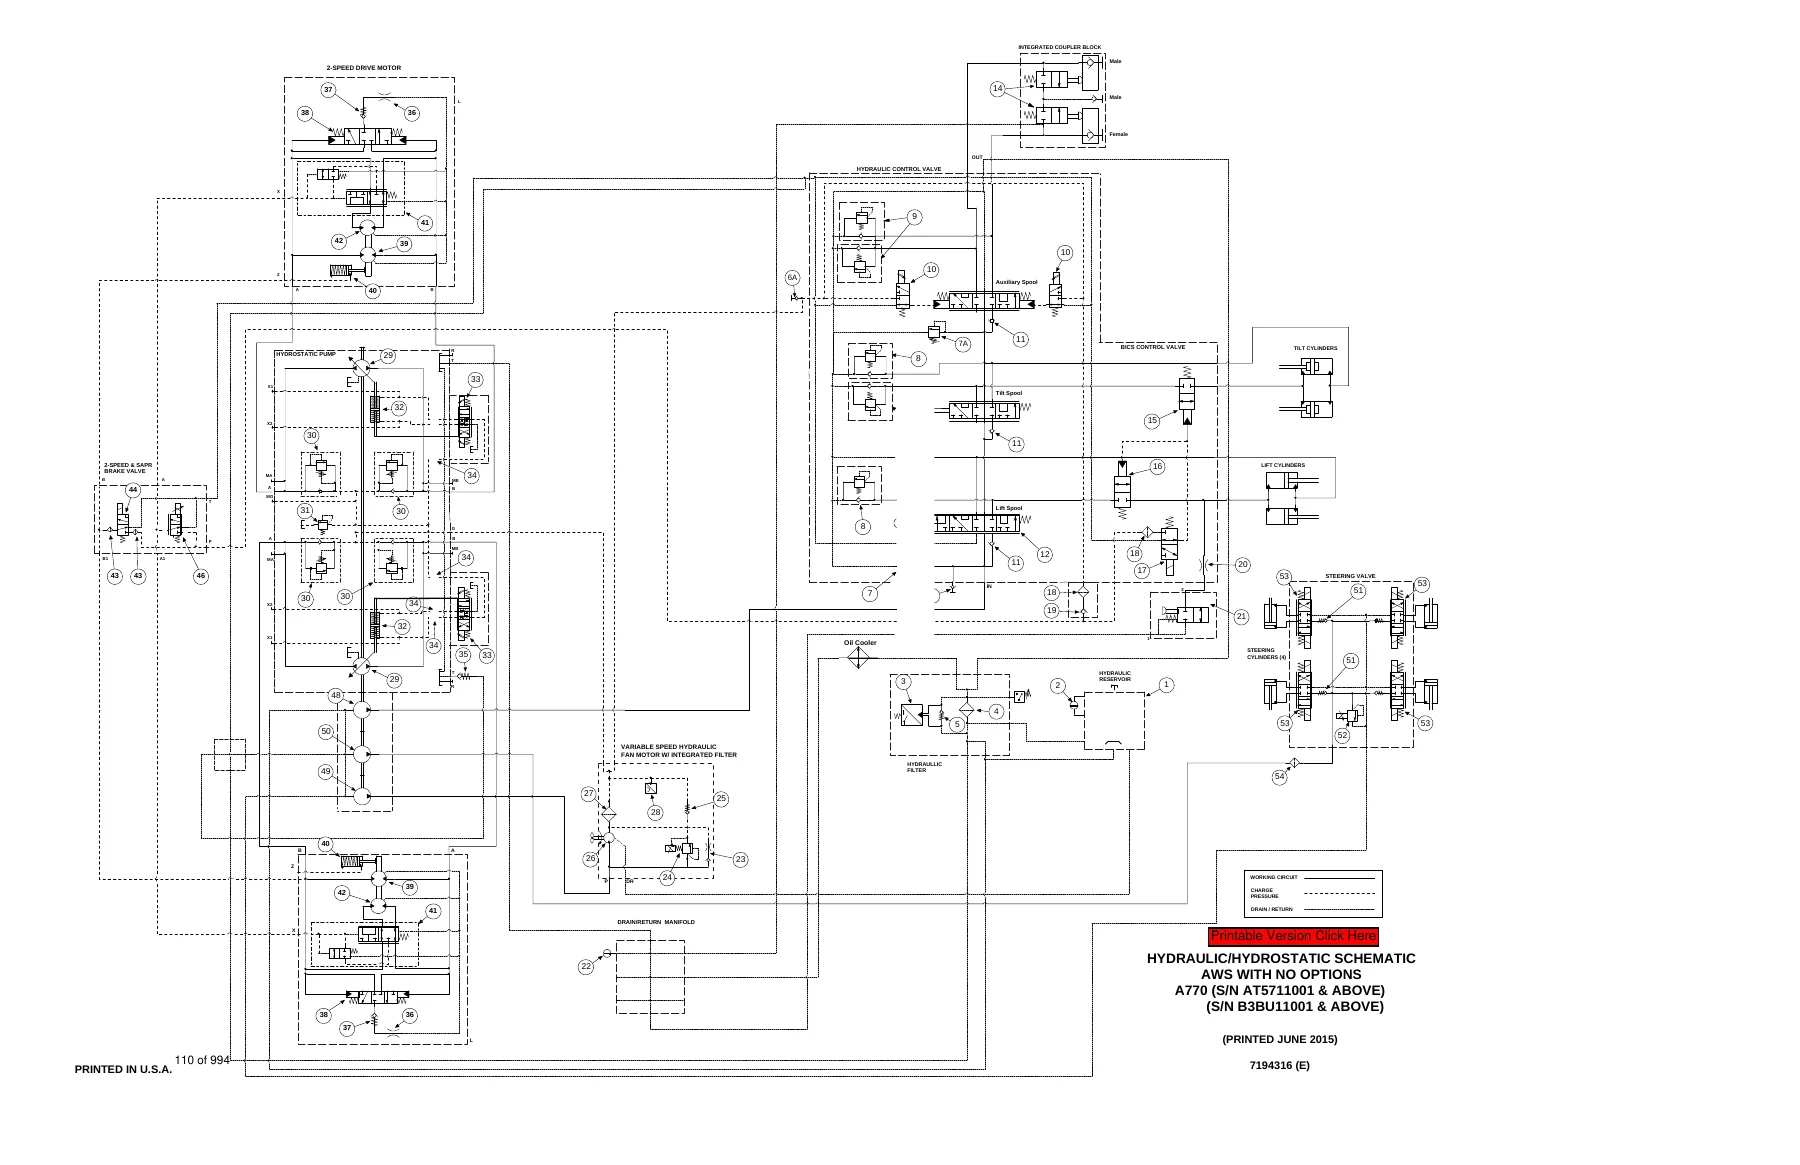
Bobcat A770 All-Wheel Steer Loader Service Manual 7253836 January 2019 PDF — PDF page 110 preview
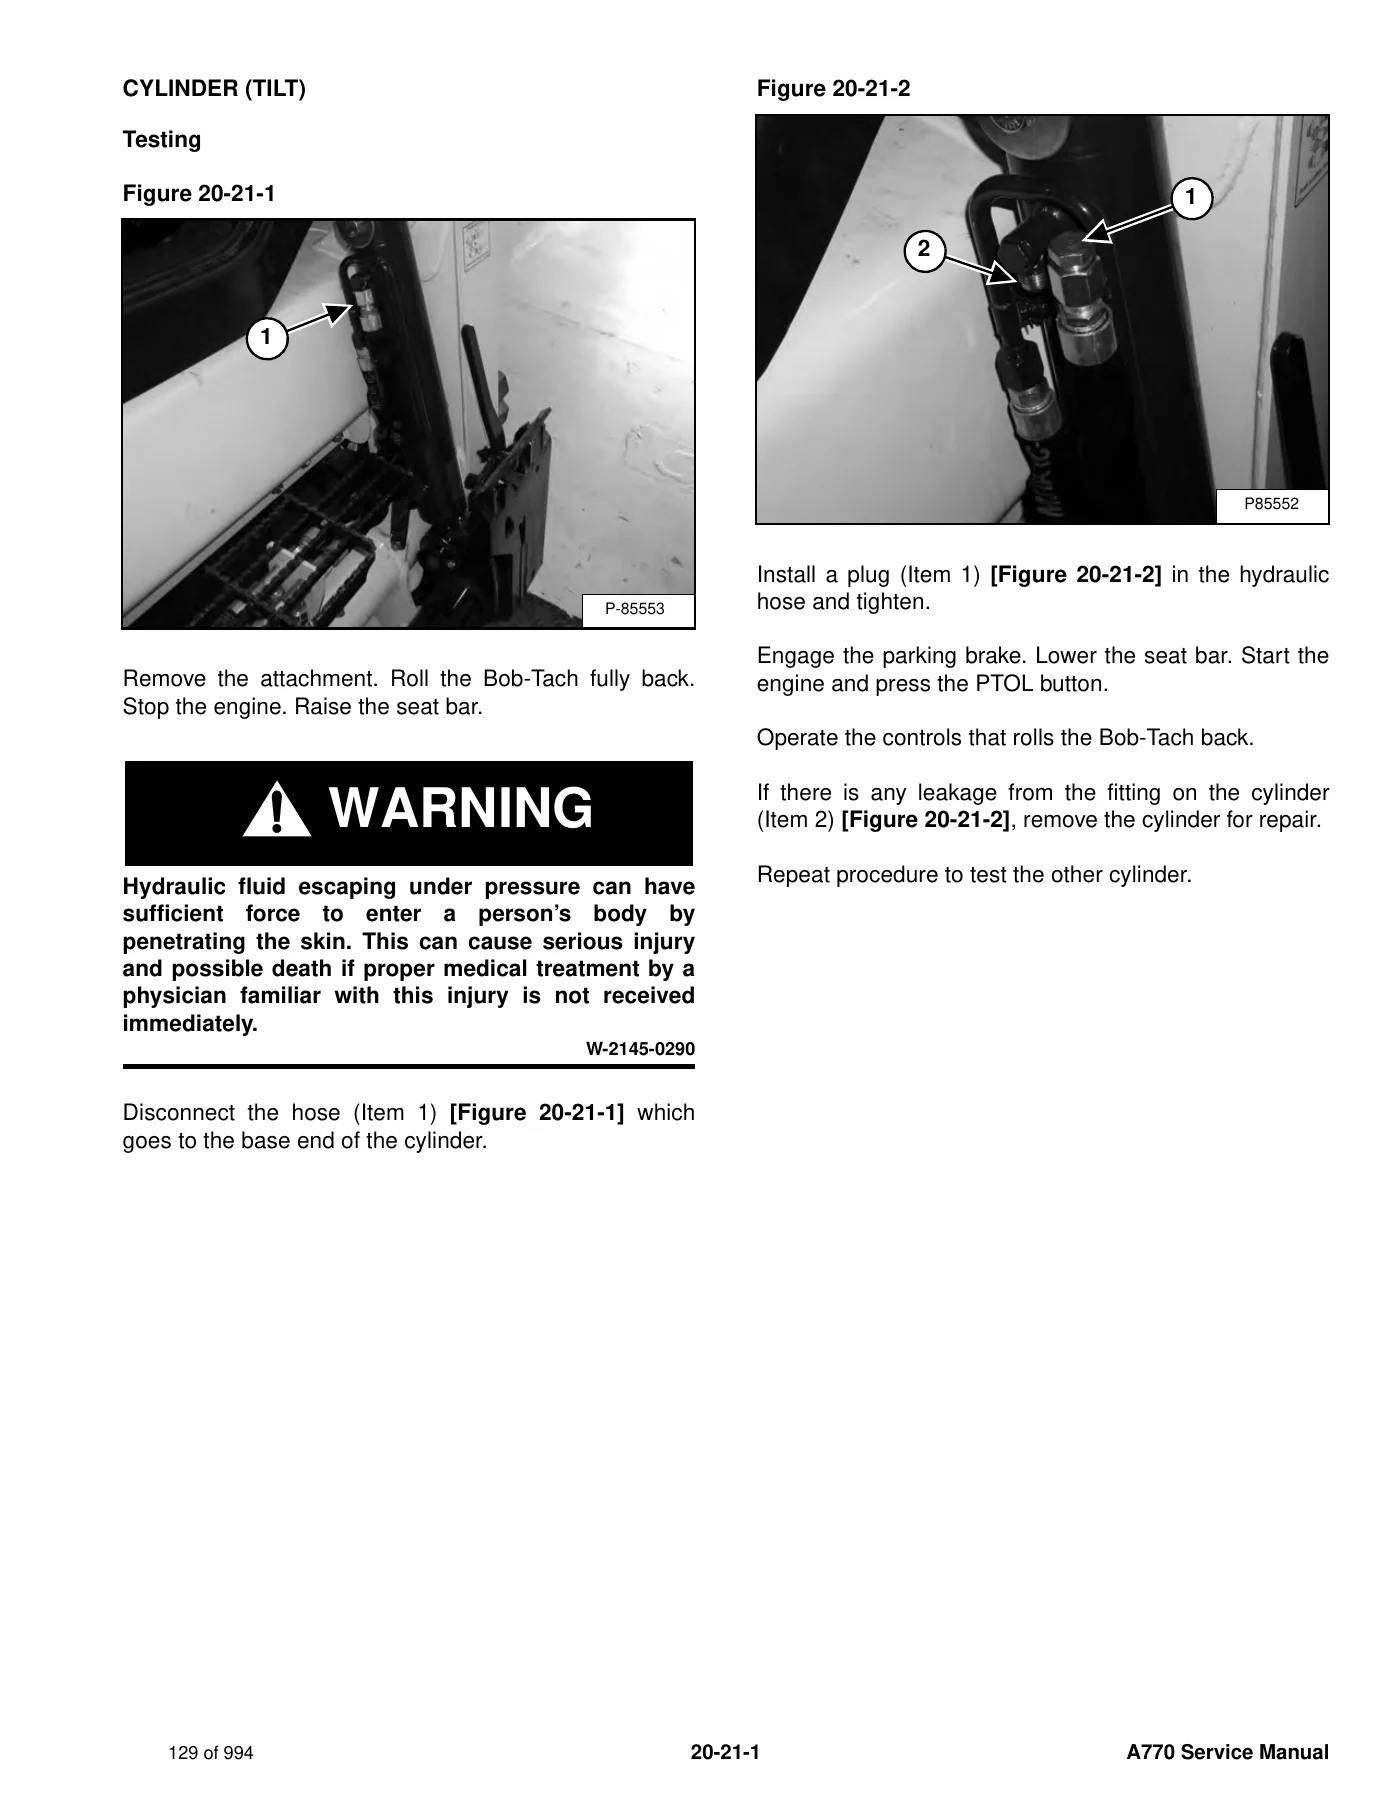
Bobcat A770 All-Wheel Steer Loader Service Manual 7253836 January 2019 PDF — PDF page 129 preview
Bobcat A770 All-Wheel Steer Loader Service Manual 7253836 January 2019 PDF — PDF page 280 preview

Electrical coverage is equally complete. Wiring schematics are provided by serial number break so you use the diagram that matches the machine in front of you. Connector assignments, fuse and relay locations, solenoid resistance values, controller pinouts for the Gateway, Auxiliary, ACS and Drive Plus controllers, wheel position sensor testing, seat bar sensor testing, BICS inspection, calibration procedures for lift and tilt, hydrostatic pump calibration and wheel alignment are all documented. Diagnostic service codes are listed with descriptions, so a code on the left panel can be traced straight back to the circuit or component.

Who This Manual Is For

Independent heavy equipment mechanics, Bobcat dealership technicians, fleet maintenance departments, rental yards and owner-operators who work on their own A770 will all find this manual useful. It is written at shop level – torque values, clearances, service limits, tool part numbers and step-by-step procedures – so it suits someone who is actually turning wrenches rather than someone looking for a general overview. The specification and capacity tables near the back make it a quick-reference document even when you are not doing a full repair.

Instant PDF Delivery

The Bobcat A770 All-Wheel Steer Loader Service Manual 7253836 is delivered as an instant PDF download – no shipping, no waiting for a physical book. The file is 994 pages, arranged in the same service-group order Bobcat uses, so you can jump straight to Group 20 for hydraulics, Group 60 for electrical, Group 70 for engine work, or the SPEC section for a torque value. Open it on a laptop in the shop, a tablet next to the machine, or print just the pages you need for the job in front of you.
Reviews

There are no reviews yet.

Be the first to review “Bobcat A770 All-Wheel Steer Loader Service Manual 7253836 January 2019 PDF”

What Our Customers Say

★★★★★ Live reviews from customers
Loading customer reviews...
0
    0
    Your Cart
    Your cart is emptyReturn to Shop
    🛒
    Recently Purchased
    🕒 verified order