Description
Bobcat E42 Compact Excavator Service Manual 6989433
This Bobcat E42 Compact Excavator Service Manual is the complete shop-level repair document for the E42 compact excavator, published under part number 6989433 in July 2020. It covers machines from serial number AG3411001 & Above and AHHB11001 & Above, giving technicians and owners the full procedure set needed to disassemble, inspect, repair, adjust and reassemble every major system on the machine. Whether you are rebuilding a boom cylinder, chasing an electrical fault, resealing a travel motor or setting pump pressures, this Bobcat E42 service manual PDF gives you the reference material that the factory itself uses.
File Details
- Manual Type: Service / Repair Manual
- Brand: Bobcat
- Model: E42 Compact Excavator
- Document Number: 6989433
- Edition / Date: July 2020
- Language: English (enUS)
- File Format: PDF
- Serial Coverage: S/N AG3411001 & Above, S/N AHHB11001 & Above
Chapters Covered
This E42 excavator service manual is organised into the same service groups Bobcat technicians work from in the shop:
- Safety Instructions, Fire Prevention, Serial Number Locations, Delivery Report, Excavator Identification
- Lifting and Blocking the Excavator, Lifting the Excavator
- Operator Cab (ROPS / TOPS) — cab door, front window, wiper, washer reservoir, right side windows, HVAC ducting
- Operator Canopy (ROPS / TOPS)
- Transporting the Excavator on a Trailer, Tailgate, Right Side Cover
- Service Schedule and Maintenance Intervals
- Air Cleaner Service, Cab Filters (early and later serial ranges)
- Engine Cooling System, Fuel System, Engine Lubrication System
- Hydraulic System — checking fluid, filters, reservoir, fluid replacement
- Lubricating the Excavator (earlier and later models), Pivot Pins
- Travel Motor service, Spark Arrester Muffler, Emergency Exit, Seat Belt, Control Console Lockouts
- Towing the Excavator, Remote Start Tool and Service Tool kits
- Hydraulic System — troubleshooting circuits, cylinder, swing and travel circuit fault-finding
- Cylinders — Boom (two serial ranges), Arm, Boom Swing, Bucket, Blade, Clamp, Angle Blade, Extendable Arm
- Valves — Main Relief, Port Relief, Cross Port Relief, Pressure Reducing
- Hydraulic Control Valve — inlet, boom swing, slew, blade, travel, angle blade, boom, auxiliary, arm, bucket sections
- Hydraulic Pump — work sheet, testing, removal, coupler, startup, torque limiter, pump control
- Manifold Assembly / Accumulator (with and without angle blade)
- Travel Motor and Travel Motor S/N AG3416000 & Above
- Swivel Joint — angle blade and straight blade swivel variants by serial number
- Swing Motor (earlier and later models) and Swing Motor Drive Carrier
- Control Pattern Selector Valve
- Right and Left Control Levers (Joysticks) — two serial ranges
- Hydraulic Filter Mount, Hydraulic Reservoir, Oil Cooler, Direct to Tank Valve
- Blade Control Lever, Case Drain Filter Mount, Travel Control Valve
- Removing Air from the Hydraulic System
- Manifold (Hydraulic X-Change) earlier and later models, Manifold (Pin Grabber)
- Secondary Auxiliary Valve (earlier and later models), Valve (Boom Lock), Valve (Arm Lock)
- Undercarriage — Blade, Angle Blade, Rubber Track and Steel Track components, idler, tensioner, rollers, sprocket
- Track Maintenance and Track Damage Identification
- Swing Circle Gear
- Uppertructure — Uppertructure, ROPS Canopy, Cab, Seat, Consoles, covers, Counterweight
- Travel Levers and Pedals, Floor Mat, Fuel Tank, Horn, Swing Frame, Boom
- Standard and Long Arm, Extendable Arm, Bucket, Clamp, Tailgate
- X-Change, Hydraulic X-Change (earlier and later models), Quick Coupler (KLAC, Lehnhoff, Pin Grabber)
- Electrical System and Analysis — troubleshooting, battery, alternator, starter, lights, sensors, service codes
- Instrument Panel setup, Controllers, Key Switch, Wiper Motor, Motion Alarm, Service PC, Shut-Off Switch
- Travel Motor Auto-Shift, Auto Idle Pressure Sensor, Bobcat Machine IQ Wireless Communications
- Engine Service — specifications, torque values, removal, compression testing, speed control, muffler, air cleaner, cooling, lubrication, fuel system
- Cylinder Head, Crankshaft and Pistons, Camshaft and Timing Gears, Flywheel and Housing, Flywheel RPM Sensor
- Heating, Ventilation and Air Conditioning — system flow, maintenance, troubleshooting, charging and reclamation, compressor, condenser, receiver/drier, evaporator/heater unit, thermostat, expansion valve, coils, blower, heater valve, HVAC duct
- Specifications, Torque Specification for Bolts, Hydraulic Connection Specifications, Hydraulic Fluid Specifications, Conversions, Service Tools Required
- Alphabetical Index
Complete PDF Bookmark Tree
Complete Bookmarks
The complete bookmarks in the “Bobcat E42 Compact Excavator Service Manual 6989433 – PDF Download” are as follows:
MAINTENANCE SAFETYp. 3
CONTENTSp. 5
+FOREWORDp. 7
FOREWORDp. 9
SAFETY INSTRUCTIONSp. 11
+FIRE PREVENTIONp. 13
Maintenancep. 13
Operationp. 13
Electricalp. 13
Hydraulic Systemp. 13
Fuelingp. 13
Startingp. 13
Spark Arrester Exhaust Systemp. 13
Welding And Grindingp. 14
Fire Extinguishersp. 14
+SERIAL NUMBER LOCATIONSp. 15
Excavator Serial Numberp. 15
Engine Serial Numberp. 15
DELIVERY REPORTp. 16
EXCAVATOR IDENTIFICATIONp. 17
+SAFETY AND MAINTENANCEp. 19
+LIFTING AND BLOCKING THE EXCAVATORp. 23
+LIFTING THE EXCAVATORp. 25
+OPERATOR CAB (ROPS / TOPS)p. 27
Descriptionp. 27
Cab Doorp. 28
Front Windowp. 29
Front Wiperp. 30
Window Washer Reservoirp. 30
Right Side Windowsp. 31
Heating, Ventilation, And Air Conditioning Ductingp. 33
+OPERATOR CANOPY (ROPS / TOPS)p. 35
+TRANSPORTING THE EXCAVATOR ON A TRAILERp. 37
Loading And Unloadingp. 37
Fasteningp. 37
+TAILGATEp. 39
Opening And Closingp. 39
Adjusting The Latchp. 39
+RIGHT SIDE COVERp. 41
+SERVICE SCHEDULEp. 43
Maintenance Intervalsp. 43
+AIR CLEANER SERVICEp. 45
Daily Checkp. 45
Replacing The Filtersp. 45
+CAB FILTERS (S/N AG3411001 – AG3413999)p. 47
Cleaning And Maintenancep. 47
+CAB FILTERS (S/N AG3414000 & ABOVE)p. 49
Cleaning And Maintenancep. 49
+ENGINE COOLING SYSTEMp. 51
Cleaningp. 51
Checking Levelp. 52
Removing And Replacing Coolantp. 53
+FUEL SYSTEMp. 55
Fuel Specificationsp. 55
Biodiesel Blend Fuelp. 55
Filling The Fuel Tankp. 56
Fuel Filtersp. 57
Draining The Fuel Tankp. 57
Removing Air From The Fuel Systemp. 58
+ENGINE LUBRICATION SYSTEMp. 59
Checking And Adding Engine Oilp. 59
Engine Oil Chartp. 59
Removing And Replacing Oil And Filterp. 60
+HYDRAULIC SYSTEMp. 61
Checking And Adding Hydraulic Oilp. 61
Hydraulic / Hydrostatic Fluid Chartp. 62
Removing And Replacing The Hydraulic Filtersp. 62
Removing And Replacing The Hydraulic Fluidp. 64
+LUBRICATING THE EXCAVATOR (EARLIER MODELS)p. 65
Lubrication Locationsp. 65
+LUBRICATING THE EXCAVATOR (LATER MODELS)p. 69
Lubrication Locationsp. 69
+PIVOT PINSp. 73
Inspection And Maintenancep. 73
+TRAVEL MOTORp. 75
Checking And Adding Oilp. 75
Removing And Replacing Oilp. 75
+SPARK ARRESTER MUFFLERp. 77
+EMERGENCY EXITp. 79
Right Side Rear Windowp. 79
Front Windowp. 79
+SEAT BELTp. 81
Inspection And Maintenancep. 81
+CONTROL CONSOLE LOCKOUTSp. 83
Inspection And Maintenancep. 83
+TOWING THE EXCAVATORp. 85
+REMOTE START TOOL KIT – MEL1563p. 87
Remote Start Tool – MEL1563p. 87
Service Tool Harness Communicator – MEL1566p. 89
+REMOTE START TOOL (SERVICE TOOL) KIT – 7217666p. 91
Descriptionp. 91
Remote Start Tool (Service Tool) – 7022042p. 92
Excavator Service Tool Harness – 6689747p. 93
Computer Service Tool Harness – 6689746p. 94
+HYDRAULIC SYSTEMp. 95
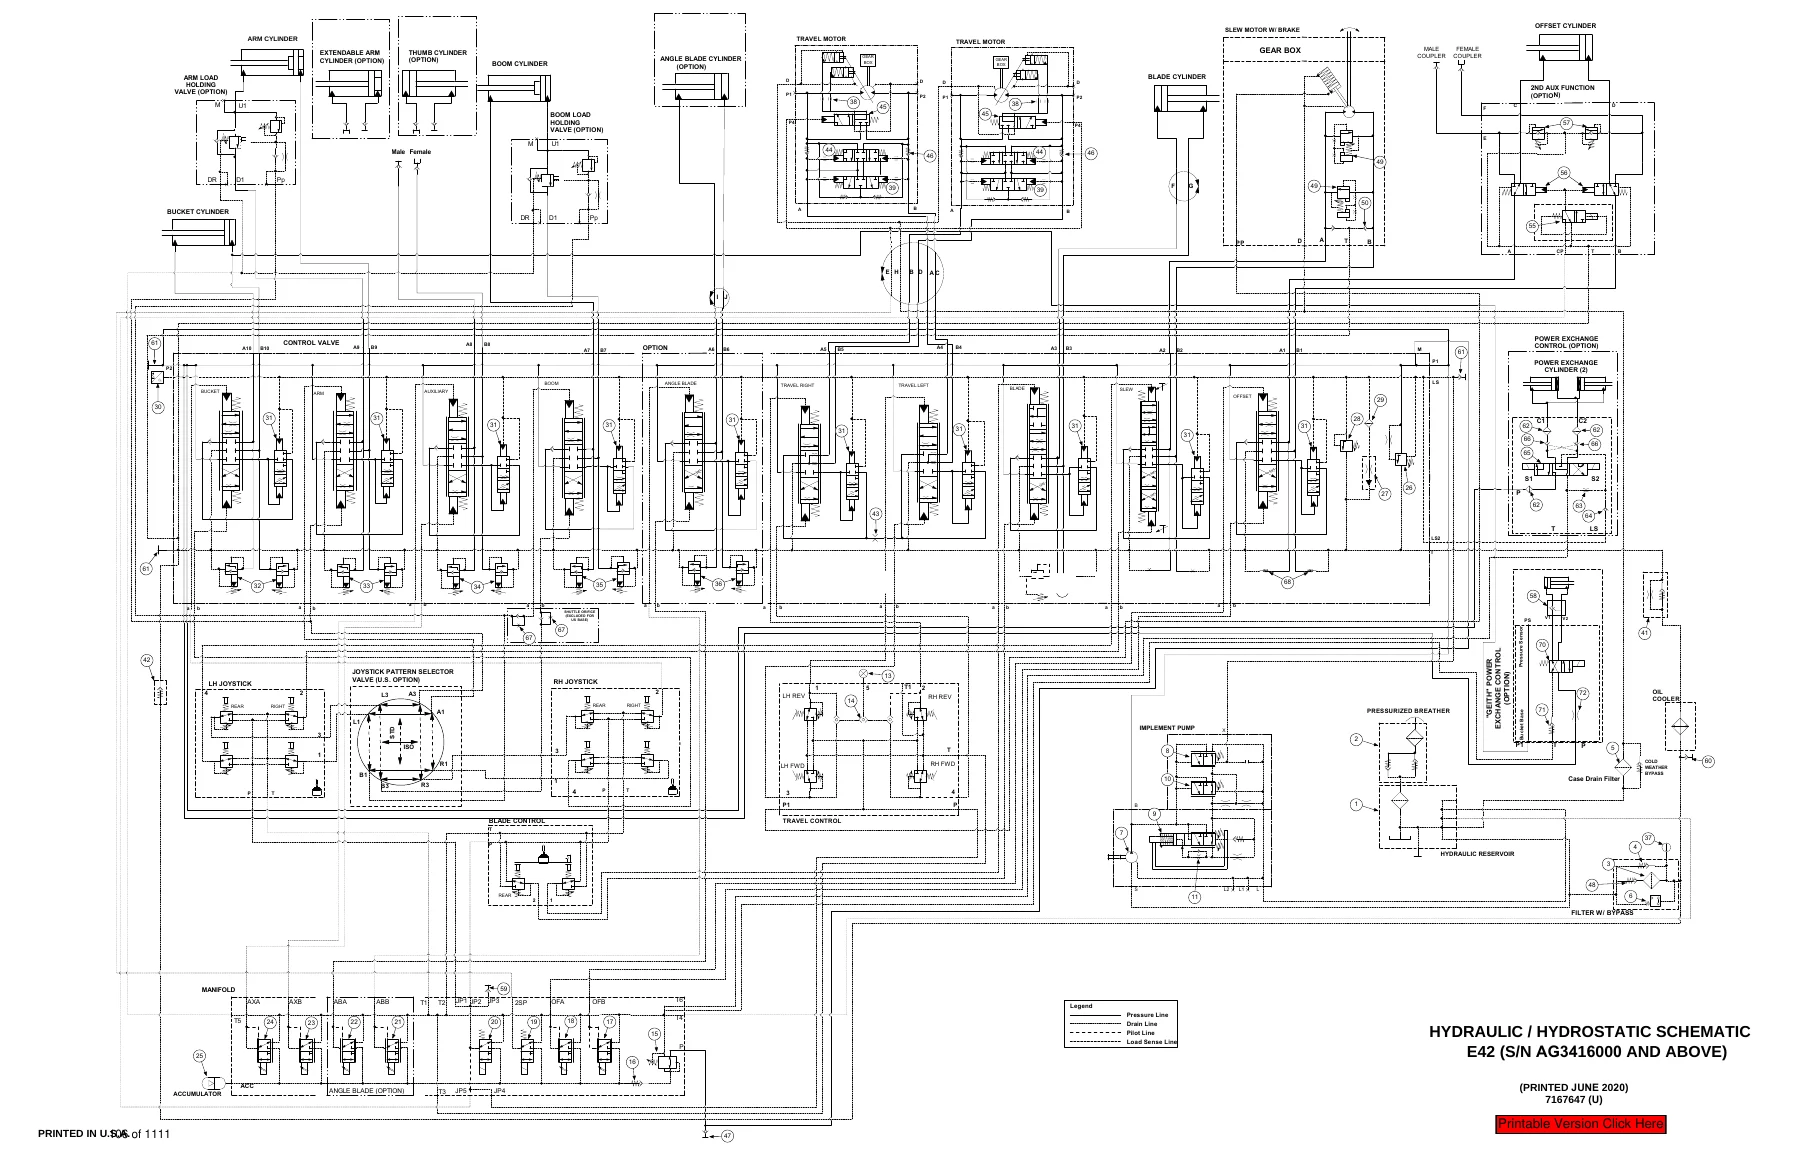
HYDRAULIC / HYDROSTATIC SCHEMATICSp. 101
+HYDRAULIC SYSTEM INFORMATIONp. 107
Glossary Of Hydraulic / Hydrostatic Symbolsp. 107
Troubleshooting The Hydraulic Circuitp. 110
Troubleshooting The Cylinder Circuitp. 111
Troubleshooting The Swing (Upperstructure Slew) Circuitp. 112
Troubleshooting The Travel Circuitp. 113
+CYLINDER (BOOM) (S/N AG3411031 & ABOVE, AHHB11002 & ABOVE)p. 115
Testingp. 115
Removal And Installationp. 117
Parts Identificationp. 120
Disassemblyp. 121
Assemblyp. 124
+CYLINDER (BOOM) (S/N AG3411030 & BELOW, AHHB11001 & BELOW)p. 129
Testingp. 129
Removal And Installationp. 131
Parts Identificationp. 134
Disassemblyp. 135
Assemblyp. 138
+CYLINDER (ARM)p. 143
Testingp. 143
Removal And Installationp. 145
Parts Identificationp. 147
Disassemblyp. 148
Assemblyp. 150
+CYLINDER (BOOM SWING)p. 155
Testingp. 155
Removal And Installationp. 157
Parts Identificationp. 160
Disassemblyp. 161
Assemblyp. 163
+CYLINDER (BUCKET)p. 167
Testingp. 167
Removal And Installationp. 169
Parts Identificationp. 171
Disassemblyp. 172
Assemblyp. 174
+CYLINDER (BLADE)p. 177
Testingp. 177
Removal And Installationp. 179
Parts Identificationp. 180
Disassemblyp. 181
Assemblyp. 183
+CYLINDER (CLAMP)p. 187
Testingp. 187
Removal And Installationp. 188
Parts Identificationp. 190
Disassemblyp. 191
Assemblyp. 194
+CYLINDER (ANGLE BLADE)p. 199
Testingp. 199
Removal And Installationp. 200
Parts Identificationp. 202
Disassemblyp. 203
Assemblyp. 205
+CYLINDER (EXTENDABLE ARM)p. 209
Testingp. 209
Parts Identificationp. 211
Disassemblyp. 212
Assemblyp. 214
+VALVES (MAIN RELIEF)p. 219
Testing And Adjustingp. 219
+VALVES (PORT RELIEF)p. 221
Testing And Adjusting Port Relief Valve Pressurep. 221
+VALVES (CROSS PORT RELIEF)p. 223
Testingp. 223
Removal And Installationp. 226
Cross Port Relief Valve Disassembly And Assemblyp. 226
+VALVES (PRESSURE REDUCING)p. 227
Testing And Adjustingp. 227
+HYDRAULIC CONTROL VALVEp. 229
Descriptionp. 229
Removal And Installationp. 229
Parts Identificationp. 233
Disassembly And Assemblyp. 234
Inlet Valve Section Disassembly And Assemblyp. 238
Boom Swing Valve Section Disassembly And Assemblyp. 242
Slew Valve Section Disassembly And Assemblyp. 245
Blade Valve Section Disassembly And Assemblyp. 249
Right And Left Travel Valve Section Disassembly And Assemblyp. 253
Angle Blade, Boom, Auxiliary, Arm And Bucket Valve Section Disassembly And Assemblyp. 255
+HYDRAULIC PUMPp. 259
Hydraulic Pump Work Sheetp. 259
Pump Testingp. 262
Removal And Installationp. 271
Coupler Removal And Installationp. 272
Hydraulic Pump Startupp. 273
Torque Limiter Assembly Parts Identificationp. 274
Torque Limiter Assembly Removal And Installationp. 275
Torque Limiter Valve Assembly Disassembly And Assemblyp. 275
Pump Control Parts Identificationp. 276
Pump Control Removal And Installationp. 277
Pump Control Disassembly And Assemblyp. 277
Parts Identificationp. 283
Disassembly And Assemblyp. 284
+MANIFOLD ASSEMBLY / ACCUMULATOR (WITHOUT ANGLE BLADE)p. 293
Descriptionp. 293
Removal And Installationp. 293
Parts Identificationp. 295
Disassembly And Assemblyp. 296
+MANIFOLD ASSEMBLY / ACCUMULATOR (WITH ANGLE BLADE)p. 303
Descriptionp. 303
Removal And Installationp. 303
Parts Identificationp. 305
Disassembly And Assemblyp. 306
+TRAVEL MOTORp. 313
Removal And Installationp. 313
Parts Identification Hydraulic Motorp. 314
Parts Identification Gear Reduction Hubp. 315
Disassemblyp. 316
Assemblyp. 326
+TRAVEL MOTOR (S/N AG3416000 & Above)p. 339
Removal And Installationp. 339
Parts Identification Hydraulic Motorp. 340
Parts Identification Gear Reduction Hubp. 341
Disassemblyp. 342
Assemblyp. 350
+SWIVEL JOINTp. 359
Removal And Installationp. 359
Parts Identification Angle Blade Swivel (S/N AG3411001 – AG3414791)p. 361
Parts Identification Angle Blade Swivel (AG3414792 – AG3414817)p. 362
Parts Identification Angle Blade Swivel (S/NAG3414818 & Above)p. 363
Parts Identification Straight Blade Swivel (S/N AG3411001 – AG3414790)p. 364
Parts Identification Straight Blade Swivel (AG3414791 – AG3414817)p. 365
Parts Identification Straight Blade Swivel (S/N AG3414818 & Above)p. 366
Disassembly And Assemblyp. 367
+SWING MOTOR (EARLIER MODEL)p. 369
Removal And Installationp. 369
Parts Identificationp. 370
Disassembly And Assemblyp. 371
+SWING MOTOR (LATER MODEL)p. 379
Removal And Installationp. 379
Parts Identificationp. 380
Disassembly And Assemblyp. 381
+SWING MOTOR (DRIVE CARRIER)p. 387
Removal And Installationp. 387
Parts Identificationp. 388
Disassembly And Assemblyp. 389
+CONTROL PATTERN SELECTOR VALVEp. 395
Removal And Installationp. 395
Parts Identificationp. 396
Disassembly And Assemblyp. 397
+RIGHT CONTROL LEVER (JOYSTICK) (S/N AG3411001 – AG3413999 AND AHHB11001 – AHHB13999)p. 399
Testingp. 399
Handle Removal And Installationp. 400
Joystick Assembly Removal And Installationp. 402
Parts Identificationp. 403
Disassemblyp. 404
Assemblyp. 409
+RIGHT CONTROL LEVER (JOYSTICK) (S/N AG3414001 & ABOVE AND AHHB14001 & ABOVE)p. 413
Testingp. 413
Handle Removal And Installationp. 414
Joystick Assembly Removal And Installationp. 416
Parts Identificationp. 417
Disassemblyp. 418
Assemblyp. 422
+LEFT CONTROL LEVER (JOYSTICK) (S/N AG3411001 – AG3413999 AND AHHB11001 – AHHB13999)p. 427
Testingp. 427
Handle Removal And Installationp. 428
Joystick Assembly Removal And Installationp. 430
Parts Identificationp. 431
Disassemblyp. 432
Assemblyp. 437
+LEFT CONTROL LEVER (JOYSTICK) (S/N AG3414001 & ABOVE AND AHHB14001 & ABOVE)p. 441
Testingp. 441
Handle Removal And Installationp. 442
Joystick Assembly Removal And Installationp. 444
Parts Identificationp. 445
Disassemblyp. 446
Assemblyp. 450
+HYDRAULIC FILTER MOUNTp. 455
Removal And Installationp. 455
+HYDRAULIC RESERVOIRp. 457
Removal And Installationp. 457
+OIL COOLERp. 459
Removal And Installationp. 459
+DIRECT TO TANK VALVEp. 461
Removal And Installationp. 461
+BLADE CONTROL LEVERp. 463
Handle Removal And Installationp. 463
Removal And Installationp. 465
Parts Identificationp. 467
Disassembly And Assemblyp. 468
+CASE DRAIN FILTER MOUNTp. 473
Removal And Installationp. 473
+TRAVEL CONTROL VALVEp. 475
Removal And Installationp. 475
Parts Identificationp. 476
Disassembly And Assemblyp. 477
+REMOVING AIR FROM THE HYDRAULIC SYSTEMp. 483
+MANIFOLD (HYDRAULIC X-CHANGE) (EARLIER MODELS)p. 485
Removal And Installationp. 485
Parts Identificationp. 486
Disassembly And Assemblyp. 487
+MANIFOLD (HYDRAULIC X-CHANGE) (LATER MODELS)p. 491
Removal And Installationp. 491
Parts Identificationp. 492
Disassembly And Assemblyp. 493
+MANIFOLD (PIN GRABBER)p. 499
Removal And Installationp. 499
Parts Identificationp. 500
Disassembly And Assemblyp. 501
+SECONDARY AUXILIARY VALVE (EARLIER MODELS)p. 503
Removal And Installationp. 503
Parts Identificationp. 505
Disassembly And Assemblyp. 506
+SECONDARY AUXILIARY VALVE (LATER MODELS)p. 511
Removal And Installationp. 511
Parts Identificationp. 513
Disassembly And Assemblyp. 514
+VALVE (BOOM LOCK)p. 517
Removal And Installationp. 517
+VALVE (ARM LOCK)p. 519
Removal And Installationp. 519
+UNDERCARRIAGEp. 521
+BLADEp. 523
Removal And Installationp. 523
+BLADE (ANGLE)p. 525
Removal And Installationp. 525
Cutting Edge Removal And Installationp. 526
+TRACK UNDERCARRIAGE COMPONENTS (RUBBER TRACK)p. 527
Descriptionp. 527
Track Lug Heightp. 527
Checking Tensionp. 528
Adjusting Tensionp. 529
Track Removal And Installationp. 531
Idler Removal And Installationp. 532
Idler Parts Identificationp. 533
Idler Disassemblyp. 534
Idler Assemblyp. 536
Track Tensioner Removal And Installationp. 539
Track Tensioner Parts Identificationp. 540
Track Tensioner Disassembly And Assemblyp. 541
Roller Removal And Installationp. 543
Sprocket Removal And Installationp. 544
+TRACK UNDERCARRIAGE COMPONENTS (STEEL TRACK)p. 545
Descriptionp. 545
Checking Tensionp. 546
Adjusting Tensionp. 547
Track Removalp. 549
Track Installationp. 552
Idler Removal And Installationp. 554
Idler Parts Identificationp. 555
Idler Disassemblyp. 556
Idler Assemblyp. 558
Track Tensioner Removal And Installationp. 561
Track Tensioner Parts Identificationp. 562
Track Tensioner Disassembly And Assemblyp. 563
Roller Removal And Installationp. 565
Sprocket Removal And Installationp. 566
Guide Plate Removal And Installationp. 566
+TRACK MAINTENANCEp. 567
Track Damage Identificationp. 567
+SWING CIRCLE GEARp. 579
Swing Bearing Removalp. 579
Swing Bearing Installationp. 580
+UPPERSTRUCTURE AND SWING SECTIONp. 581
+UPPERSTRUCTUREp. 585
Removalp. 585
Installationp. 587
+ROPS CANOPYp. 589
Removal And Installationp. 589
+CABp. 593
Removal And Installationp. 593
Door Removal And Installationp. 596
Front Window Removal And Installation (Earlier Models)p. 597
Front Window Removal And Installation (Later Models)p. 598
Front Window Disassembly And Assembly (Later Models)p. 599
Front Window Adjustment (Later Models)p. 601
Right Side Rear Sliding Window Removal And Installationp. 603
Right Side Front Sliding Window Removal And Installationp. 603
Right Side Front And Rear Sliding Window Weather Strip Removal And Installationp. 604
Right Side Front And Rear Sliding Window Wiper Strip Removal And Installationp. 604
Glass Removalp. 605
Glass Installationp. 606
+SEATp. 613
Removal And Installationp. 613
Seat Mount Removal And Installationp. 614
+RIGHT CONSOLE S/N AG3411001 – AG3413999p. 615
Console Cover Removal And Installationp. 615
+RIGHT CONSOLE S/N AG3414000 & ABOVEp. 621
Console Cover Removal And Installationp. 621
+LEFT CONSOLEp. 627
Lower Console Cover Removal And Installationp. 627
Upper Console Cover Removal And Installationp. 628
Compression Spring Removal And Installationp. 630
Lock Lever Removal And Installationp. 632
Console Removal And Installationp. 633
+LEFT UPPERSTRUCTURE COVERp. 635
Removal And Installationp. 635
+RIGHT UPPERSTRUCTURE COVERp. 637
Removal And Installationp. 637
+COUNTERWEIGHTp. 639
Removal And Installationp. 639
Long Arm Counterweight Removal And Installationp. 642
+TRAVEL LEVERS AND PEDALSp. 643
Removal And Installationp. 643
Disassembly And Assemblyp. 644
+FLOOR MATp. 645
Removal And Installationp. 645
+FUEL TANKp. 647
Removal And Installation (Canopy Equipped Excavator)p. 647
Removal And Installation (Cab Equipped Excavator)p. 648
Fuel Tank Fitting Removal And Installationp. 648
+HORNp. 649
Removal And Installationp. 649
+SWING FRAMEp. 651
Removal And Installationp. 651
Boom Swing Frame Hose Routingp. 654
Bushing Removalp. 655
Bushing Installationp. 656
+BOOMp. 657
Removal And Installationp. 657
+STANDARD AND LONG ARMp. 659
Removal And Installationp. 659
Arm To Boom Bushing Removal And Installationp. 660
Arm To Bucket And Bucket Link Bushing Removal And Installationp. 661
+ARM (EXTENDABLE)p. 663
Removal And Installationp. 663
Arm To Boom Bushing Removal And Installationp. 664
Arm To Bucket Bushing Removal And Installationp. 665
Disassembly And Assemblyp. 666
Shimming Procedurep. 673
+BUCKETp. 675
Bucket Teeth Removal And Installationp. 675
Bucket Side Cutting Edge Removal And Installationp. 676
+CLAMPp. 677
Removal And Installationp. 677
+TAILGATEp. 679
Removal And Installationp. 679
Latch Removal And Installationp. 680
+X-CHANGEp. 681
Removal And Installationp. 681
Disassemblyp. 683
Assemblyp. 684
+X-CHANGE (HYDRAULIC) Earlier Modelsp. 687
Removal And Installationp. 687
Parts Identificationp. 689
Disassemblyp. 690
Assemblyp. 695
Expansion Plug Installationp. 703
+X-CHANGE (HYDRAULIC) Later modelp. 705
Removal And Installationp. 705
Parts Identificationp. 707
Disassemblyp. 708
Assemblyp. 713
Expansion Plug Installationp. 721
+QUICK COUPLER (KLAC™ SYSTEM)p. 723
Troubleshootingp. 723
Daily Inspectionp. 723
Removal And Installationp. 724
Parts Identificationp. 726
Disassemblyp. 727
Assemblyp. 729
+QUICK COUPLER (LEHNHOFF® SYSTEM)p. 731
Troubleshootingp. 731
Daily Inspectionp. 731
Removal (MS03 And MS08)p. 732
Installation (MS03 And MS08)p. 733
Parts Identification (MS03)p. 734
Disassembly And Assembly (MS03)p. 735
Parts Identification (MS08)p. 736
Disassembly (MS08)p. 737
Assembly (MS08)p. 740
+QUICK COUPLER (PIN GRABBER)p. 745
Troubleshootingp. 745
Daily Inspectionp. 746
Removal And Installationp. 746
Parts Identificationp. 748
Disassembly And Assemblyp. 749
+RIGHT SIDE COVER (EARLIER MODEL)p. 751
Removal And Installationp. 751
Latch Removal And Installationp. 752
Latch Adjustmentp. 753
+RIGHT SIDE COVER (LATER MODEL)p. 755
Removal And Installationp. 755
Latch Removal And Installationp. 756
Adjustmentp. 757
+TOOL BOXp. 759
Removal And Installationp. 759
+ELECTRICAL SYSTEM AND ANALYSISp. 761
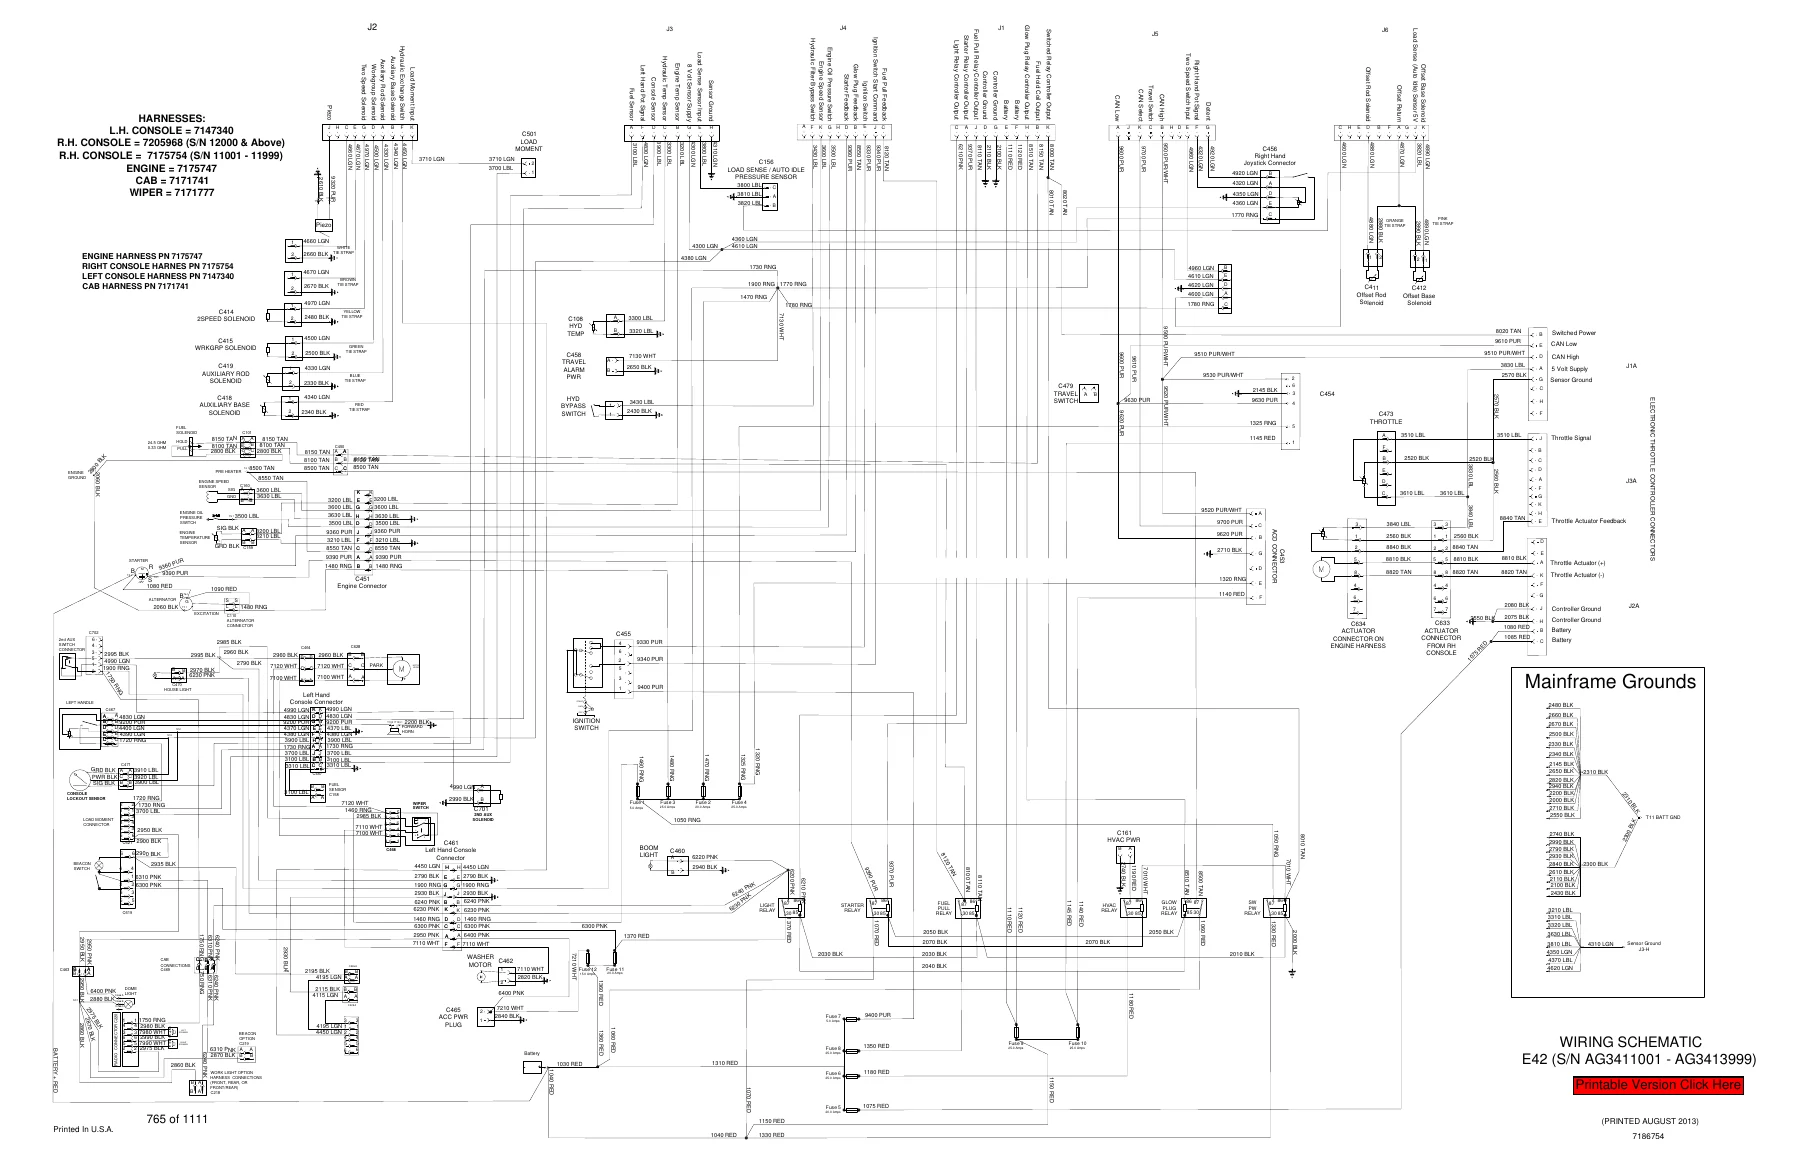
ELECTRICAL SCHEMATICSp. 765
+ELECTRICAL SYSTEM INFORMATIONp. 774
Troubleshooting Chartp. 774
Descriptionp. 775
Fuse And Relay Location / Identificationp. 775
+BATTERYp. 778
Servicingp. 778
Using A Booster Battery (Jump Starting)p. 779
Removing And Installingp. 780
+ALTERNATORp. 782
Belt Adjustmentp. 782
Belt Replacementp. 782
Charging System Inspectionp. 784
Alternator Voltage Testingp. 785
Low Voltage Testingp. 785
High Voltage Testingp. 786
Removal And Installationp. 787
Parts Identificationp. 789
+STARTERp. 790
Testingp. 790
Removal And Installationp. 791
Parts Identificationp. 792
+LIGHTSp. 794
Removal And Installationp. 794
Boom Light Removal And Installationp. 795
Boom Light Bulb Replacementp. 795
+MAGNETIC LOCKOUT SENSORp. 796
Removal And Installationp. 796
+FUEL LEVEL SENDERp. 798
Removal And Installationp. 798
Testingp. 799
+DIAGNOSTIC SERVICE CODES (S/N AG3411001 – AG3413999)p. 800
+DIAGNOSTIC SERVICE CODES (S/N AG3414000 & ABOVE)p. 802
Viewing Service Codesp. 802
Number Codes Listp. 803
+DELUXE INSTRUMENT PANEL SETUP (S/N AG3411001 – AG3413999)p. 806
Passwordsp. 806
Password Entry (For Starting And Operating The Machine)p. 806
Changing The Operator Passwordp. 806
Password Lockout Featurep. 807
Job Clockp. 807
RPMp. 807
+CONTROL PANEL SETUP (S/N AG3414000 & ABOVE)p. 808
Panel Setup (Deluxe Instrument Panel)p. 808
Password Setup (Keyless Start Panel)p. 815
Password Lockout Featurep. 815
Password Setup (Deluxe Instrument Panel)p. 816
Maintenance Clockp. 819
+INSTRUMENT PANEL / CONTROLLER (S/N AG3411001 – AG3413999)p. 822
Removal And Installationp. 822
+INSTRUMENT PANEL (S/N AG3414000 & ABOVE)p. 824
Removal And Installationp. 824
+CONTROLLER (S/N AG3414000 & ABOVE) (GATEWAY AND AUXILIARY)p. 826
Descriptionp. 826
Gateway Controller Removal and Installationp. 826
Auxiliary Controller Removal And Installationp. 827
+KEY SWITCHp. 828
Removal And Installationp. 828
+WIPER MOTORp. 830
Removal And Installationp. 830
+MOTION ALARM SYSTEMp. 832
Descriptionp. 832
Inspectingp. 832
Adjusting Switch Positionp. 833
+SERVICE PC (LAPTOP COMPUTER)p. 834
Connecting The Remote Start Toolp. 834
Connecting Remote Start Tool (Service Tool)p. 834
Operationp. 835
+SHUT-OFF SWITCHp. 836
Descriptionp. 836
Removal And Installationp. 837
+TRAVEL MOTOR AUTO-SHIFTp. 840
Auto-Shift Drive System (If Equipped)p. 840
Troubleshootingp. 841
+AUTO IDLE PRESSURE SENSORp. 844
Descriptionp. 844
Removal And Installationp. 845
+BOBCAT MACHINE IQ WIRELESS COMMUNICATIONSp. 846
Descriptionp. 846
Controller Removal And Installationp. 846
Antenna Removal And Installationp. 848
Procedurep. 850
+ENGINE SERVICEp. 852
+ENGINE INFORMATIONp. 854
Descriptionp. 854
Specificationsp. 855
Crankshaft Re-Grind Datap. 861
Torque For Kubota Metric Boltsp. 862
Troubleshootingp. 863
Removal And Installationp. 864
Compression Checkingp. 874
+ENGINE SPEED CONTROLp. 876
Removal And Installationp. 876
Auto Idle Descriptionp. 877
Auto Idle Controller Removal And Installationp. 878
Calibrationp. 879
Actuator Removal And Installationp. 882
+MUFFLERp. 886
Removal And Installationp. 886
+AIR CLEANERp. 888
Housing Removal And Installationp. 888
+ENGINE COOLING SYSTEMp. 890
Radiator Removal And Installationp. 890
Fan Removal And Installationp. 894
Water Pump Removal And Installationp. 895
Water Pump Disassembly And Assemblyp. 895
Thermostat Housing Removal And Installationp. 896
Thermostat – Checkingp. 896
+LUBRICATION SYSTEMp. 898
Oil Pan Removal And Installationp. 898
Oil Pump Removal And Installationp. 899
Oil Pump Inspectionp. 899
Engine Oil Pressure – Testingp. 900
+FUEL SYSTEMp. 902
Fuel Shutoff Solenoid – Checkingp. 902
Fuel Shut-off Solenoid Removal And Installationp. 903
Fuel Injection Pump – Checkingp. 904
Fuel Injection Pump Removal And Installationp. 905
Fuel Injection Pump – Timingp. 908
Fuel Camshaft Removal And Installationp. 910
Fuel Camshaft Governorp. 911
Fuel Injector Removal And Installationp. 912
Fuel Injector Nozzle Pressure – Checkingp. 914
Nozzle Spray Conditionp. 915
Valve Seat Tightnessp. 915
+CYLINDER HEADp. 916
Glow Plugs – Testingp. 916
Glow Plugs Removal And Installationp. 917
Valve Clearance Adjustmentp. 918
Valve Timing – Checkingp. 918
Cylinder Head Removal And Installationp. 919
Cylinder Head Disassembly And Assemblyp. 922
Cylinder Head – Servicingp. 923
Cylinder Head Top Clearancep. 923
Valve Guide – Checkingp. 924
Valve Guide Removal And Installationp. 925
Reconditioning The Valve And Valve Seatp. 926
Valve Springp. 927
Valve Tappetsp. 928
Rocker Arm And Shaft – Checkingp. 929
Push Rod Alignment – Checkingp. 929
+CRANKSHAFT AND PISTONSp. 930
Piston And Connecting Rod Removal And Installationp. 930
Piston And Connecting Rod – Servicingp. 933
Cylinder Bore – Checkingp. 935
Connecting Rod Alignmentp. 936
Crankshaft Gear Removal And Installationp. 937
Crankshaft And Bearings Removal And Installationp. 938
Crankshaft And Bearings – Servicingp. 941
+CAMSHAFT AND TIMING GEARSp. 946
Timing Gearcase Cover Removal And Installationp. 946
Timing Gears Backlash – Checkingp. 949
Idle Gear And Camshaft Removal And Installationp. 950
Camshaft – Servicingp. 952
Idle Gear And Shaft – Servicingp. 953
+FLYWHEEL AND HOUSINGp. 954
Hydraulic Pump Coupler Removal And Installationp. 954
Flywheel Removal And Installationp. 956
Flywheel Ring Gearp. 956
+FLYWHEEL RPM SENSORp. 958
Descriptionp. 958
Removalp. 958
Installationp. 958
+HEATING, VENTILATION AND AIR CONDITIONING S/N AG3411001 – AG3413999p. 960
+AIR CONDITIONING SYSTEM FLOWp. 962
Descriptionp. 962
Chartp. 963
Componentsp. 964
Safety Equipmentp. 968
+REGULAR MAINTENANCEp. 970
Cab Filtersp. 970
Air Conditioning Compressor Belt Adjustmentp. 971
Air Conditioning Compressor Belt Replacementp. 971
Condenserp. 972
Air Conditioning Lubricationp. 972
Evaporator / Heater Coilp. 972
Air Conditioning Service Chartp. 973
+TROUBLESHOOTINGp. 974
Blower Motor Does Not Operatep. 974
Blower Motor Operates Normally, But Air Flow Is Insufficientp. 974
Insufficient Cooling Although Air Flow And Compressor Operation Are Normalp. 974
The Compressor Operates Improperly Or Not At Allp. 974
Gauge Pressure Related Troubleshootingp. 975
Temperature / Pressure Chartp. 976
Poor A/C Performancep. 977
HVAC Repair And Leaksp. 978
Electrical Systemp. 979
Engine Coolant Bypassing The Heater Valvep. 981
+SYSTEM CHARGING AND RECLAMATIONp. 982
Refrigerant Identificationp. 982
Reclamation And Charging With Recovery / Charging Unitp. 984
+COMPRESSORp. 986
Removal And Installationp. 986
Oilp. 988
Oil Checkp. 989
+CONDENSERp. 992
Removal And Installationp. 992
+RECEIVER / DRIERp. 994
Receiver / Drier Removal And Installationp. 994
Pressure Relief Valve Removal And Installationp. 995
Pressure Switch Removal And Installationp. 995
+EVAPORATOR / HEATER UNITp. 996
Removal And Installationp. 996
+THERMOSTATp. 998
Descriptionp. 998
Removal And Installationp. 999
+EXPANSION VALVEp. 1002
Removal And Installationp. 1002
+EVAPORATOR COILp. 1004
Removal And Installationp. 1004
+HEATER COILp. 1006
Removal And Installationp. 1006
+BLOWER FANp. 1008
Removal And Installationp. 1008
+HEATER VALVEp. 1010
Removal And Installationp. 1010
+HVAC DUCTp. 1012
Removal And Installationp. 1012
+HEATING, VENTILATION AND AIR CONDITIONING S/N AG3414000 & ABOVEp. 1014
+AIR CONDITIONING SYSTEM FLOWp. 1016
Descriptionp. 1016
Chartp. 1017
Componentsp. 1018
Safety Equipmentp. 1022
+REGULAR MAINTENANCEp. 1024
Cab Filtersp. 1024
Air Conditioning Compressor Belt Adjustmentp. 1026
Air Conditioning Compressor Belt Replacementp. 1026
Condenserp. 1027
Air Conditioning Lubricationp. 1027
Evaporator / Heater Coilp. 1027
Air Conditioning Service Chartp. 1029
+TROUBLESHOOTINGp. 1030
Blower Motor Does Not Operatep. 1030
Blower Motor Operates Normally, But Air Flow Is Insufficientp. 1030
Insufficient Cooling Although Air Flow And Compressor Operation Are Normalp. 1030
The Compressor Operates Improperly Or Not At Allp. 1030
Gauge Pressure Related Troubleshootingp. 1031
Temperature / Pressure Chartp. 1032
Poor A/C Performancep. 1033
HVAC Repair And Leaksp. 1034
Electrical Systemp. 1035
Engine Coolant Bypassing The Heater Valvep. 1037
+SYSTEM CHARGING AND RECLAMATIONp. 1038
Refrigerant Identificationp. 1038
Reclamation And Charging With Recovery / Charging Unitp. 1040
+COMPRESSORp. 1042
Removal And Installationp. 1042
Oilp. 1044
Oil Checkp. 1045
+CONDENSERp. 1048
Removal And Installationp. 1048
+RECEIVER / DRIERp. 1050
Receiver / Drier Removal And Installationp. 1050
Pressure Relief Valve Removal And Installationp. 1051
Pressure Switch Removal And Installationp. 1051
+EVAPORATOR / HEATER UNITp. 1052
Removal And Installationp. 1052
+THERMOSTATp. 1054
Descriptionp. 1054
Removal And Installationp. 1055
+EXPANSION VALVEp. 1058
Removal And Installationp. 1058
+EVAPORATOR COILp. 1060
Removal And Installationp. 1060
+HEATER COILp. 1062
Removal And Installationp. 1062
+BLOWER FANp. 1064
Removal And Installationp. 1064
+HEATER VALVEp. 1066
Removal And Installationp. 1066
+HVAC DUCTp. 1068
Removal And Installationp. 1068
+SPECIFICATIONSp. 1070
+EXCAVATOR SPECIFICATIONSp. 1072
Machine Dimensionsp. 1072
Machine Dimensions – Standard Armp. 1073
Machine Dimensions – Long Armp. 1074
Machine Dimensions – Extendable Armp. 1075
Machine Dimensions – Angle Bladep. 1076
Performancep. 1077
Controlsp. 1077
Enginep. 1078
Hydraulic Systemp. 1079
Hydraulic Cylindersp. 1080
Hydraulic Cycle Timesp. 1080
Drive Systemp. 1080
Slew Systemp. 1080
Undercarriagep. 1080
Electricalp. 1081
Capacitiesp. 1081
Tracksp. 1081
Ground Pressurep. 1082
+TORQUE SPECIFICATION FOR BOLTSp. 1084
Torque For General SAE Boltsp. 1084
Torque For General Metric Boltsp. 1085
+HYDRAULIC CONNECTION SPECIFICATIONSp. 1086
O-ring Face Seal Connectionp. 1086
Straight Thread O-ring Fittingp. 1086
Tubelines And Hosesp. 1087
Flare Fittingp. 1087
O-ring Flare Fittingp. 1088
Port Seal Fittingp. 1090
Push To Connect Fittingsp. 1091
+HYDRAULIC FLUID SPECIFICATIONSp. 1094
+CONVERSIONSp. 1096
Decimal And Millimeter Equivalent Chartp. 1096
U.S. To Metric Conversion Chartp. 1097
+SERVICE TOOLS REQUIREDp. 1098
Remote Start Toolsp. 1098
Hydraulic Toolsp. 1099
Engine Toolsp. 1102
Electrical Toolsp. 1104
General Toolsp. 1104
HVAC Toolsp. 1105
ALPHABETICAL INDEXp. 1106
Across its 1111 pages, this Bobcat E42 Compact Excavator Service Manual moves through every system on the machine in the order a technician actually works — safety and identification first, then maintenance, then hydraulic component teardown, then undercarriage, uppertructure, electrical, engine and HVAC. Each cylinder section carries its own testing, removal and installation, parts identification, disassembly and assembly procedures, with serial-number splits called out where Bobcat changed the design (for example, boom cylinder S/N AG3411031 & Above versus AG3411030 & Below). The hydraulic chapter opens with a full symbol glossary and troubleshooting flow for the cylinder, swing and travel circuits, so you can diagnose before you disassemble. The engine chapter provides Kubota V2403-M-DI-E3B-BC-5 specifications, torque tables, valve clearance, injection pump timing, compression limits and cylinder head service data in one place.
Hydraulic System Coverage
The heart of this E42 excavator repair manual is its hydraulic section. It documents the variable displacement load-sensing piston pump, the ten-section closed-centre control valve, work port relief pressures, cross port relief settings for the swing motor, the pressure reducing valve that feeds the joysticks, and the manifold / accumulator assembly. Diagnostic pressure tables give the target and acceptable ranges for joystick pilot pressure, system standby, system relief, swing motor cross port relief and more, so a technician can confirm a fault with a gauge before touching a component. Cylinder sections cover testing procedures that isolate internal leakage at the base end fitting — a practical method that avoids unnecessary teardown.
Electrical and Diagnostic Coverage
Electrical coverage includes fuse and relay identification, battery servicing and jump starting procedure, alternator voltage testing, starter testing, lights, magnetic lockout sensor, fuel level sender, motion alarm and the auto idle pressure sensor. Diagnostic service code lists are provided for both early (S/N AG3411001 – AG3413999) and later (S/N AG3414000 & Above) machines, with the number codes and descriptions a technician needs to interpret panel warnings. Deluxe Instrument Panel and keyless start panel setup, password management and maintenance clock reset procedures are also documented.
Engine and Undercarriage Service
The engine chapter covers the Kubota V2403-M-DI-E3B-BC-5 in full — specifications, crankshaft regrind data, Kubota metric bolt torque, troubleshooting, removal and installation, compression checking, speed control calibration, fuel system service including injection pump timing, and cylinder head, crankshaft, piston, camshaft and timing gear procedures. The undercarriage chapter handles rubber track and steel track variants separately, with lug height, tension checking and adjusting, track removal and installation, idler and tensioner service, roller and sprocket replacement, plus a track damage identification guide that explains the causes of common rubber track failures and how to prevent them.
What This Manual Lets You Do
With this Bobcat E42 service manual on hand you can perform scheduled maintenance to the correct intervals, diagnose hydraulic and electrical faults using factory pressure values and service codes, remove and reseal any cylinder on the machine, overhaul the travel and swing motors, rebuild the control valve, service the undercarriage, repair the Kubota engine, and recharge or repair the air conditioning system. Every torque figure, clearance, pressure setting and adjustment value is given in the units Bobcat publishes — metric first with imperial equivalents.
Having the correct procedure and the correct specification matters on a compact excavator. A cylinder nut torqued to the wrong value, a relief valve set outside its acceptable range, or a pump margin pressure adjusted incorrectly will all cause repeat failures and unnecessary downtime. This manual removes the guesswork by giving you the exact figures, sequences and special tool part numbers for the E42.
Your Bobcat E42 Compact Excavator Service Manual 6989433 is delivered as an instant PDF download — no shipping, no waiting, no physical book to lose in the workshop. Open it on a laptop, tablet or phone, print only the pages you need for the job, and keep the complete 1111-page reference on file for the life of the machine.
Reviews
There are no reviews yet.