★ TRUSTED BY 321,897+ PROFESSIONALS WORLDWIDE
🏢
Trusted Business
Verified & Licensed
🛡️
Virus Free Files
100% Safe Downloads
🔒
Secure Payment
SSL Protected
⚡
Instant Delivery
Available Immediately
Sale!

Bobcat E50 Compact Excavator Service Manual 2019 – PDF Repair Guide

Original price was: $39.95.Current price is: $24.95.

Complete Bobcat E50 Compact Excavator Service Manual covering S/N AG3N11001 & Above, AHHE11001 & Above, B3NN11001 & Above and B3NS11001 & Above. 1038-page PDF with hydraulic, electrical, engine, undercarriage and HVAC service procedures plus full specifications.

⚡
Instant PDF Download
Available immediately
💾
Save to Your Device
Download & keep forever
🛡️
Antivirus Scanned
100% virus-free
🌍
Trusted Worldwide
175,000+ customers

Description

Bobcat E50 Compact Excavator Service Manual – PDF Download

This is the full Bobcat E50 Compact Excavator Service Manual, document number 6989441enUS (05-19) (M), published by Bobcat Company in 2019. It covers four serial-number ranges of the E50 compact excavator and provides the in-depth service, repair, diagnostic and specification information a mechanic or technically minded owner needs to keep the machine working correctly. The manual is delivered as an instant-download PDF and runs to well over a thousand pages of illustrated procedures.

File Details

  • Manual type: Service Manual
  • Brand: Bobcat
  • Model: E50 Compact Excavator
  • Document number: 6989441enUS (05-19) (M)
  • Publication year: 2019
  • Language: English
  • File format: PDF
  • Page count: 1038 pages
  • Serial coverage: S/N AG3N11001 & Above; S/N AHHE11001 & Above; S/N B3NN11001 & Above; S/N B3NS11001 & Above

Chapters Covered

The manual is organised into numbered service groups. Where a system differs by serial number, the sections are split accordingly:

  • Safety Instructions – Fire Prevention, Maintenance, Operation, Electrical, Hydraulic System, Fueling, Starting, Spark Arrester Exhaust System, Welding and Grinding, Fire Extinguishers
  • Serial Number Locations – Excavator Serial Number, Engine Serial Number
  • Delivery Report – Excavator Identification
  • Hydraulic System (10) – Lifting and Blocking, Lifting the Excavator, Operator Cab (ROPS/TOPS), Operator Canopy, Transporting, Tailgate, Right Side Cover, Service Schedule, Air Cleaner Service, Cab Filters, Engine Cooling System, Fuel System, Engine Lubrication System, Hydraulic System, Lubrication, Pivot Pins, Travel Motor, Spark Arrester Muffler, Emergency Exit, Seat Belt, Control Console Lockouts, Towing, Remote Start Tool Kit
  • Hydraulic System (20) – Hydraulic Symbols Glossary, Troubleshooting (Cylinder, Swing, Travel circuits), Cylinder testing/removal/overhaul for Boom, Arm, Boom Swing, Bucket, Blade, Clamp and Angle Blade, Main Relief, Port Relief, Cross Port Relief, Pressure Reducing Valves, Hydraulic Control Valve, Hydraulic Pump, Manifold/Accumulator, Travel Motor, Swivel Joint, Swing Motor, Control Pattern Selector Valve, Joysticks, Hydraulic Filter Mount, Hydraulic Reservoir, Oil Cooler, Direct to Tank Valve, Blade Control Lever, Case Drain Filter Mount, Travel Control Valve, Air Removal, X-Change Manifold, Pin Grabber, Secondary Auxiliary Valve, Boom Lock Valve, Arm Lock Valve
  • Undercarriage (30) – Blade and Angle Blade, Rubber Track Components (Tension Checking and Adjustment, Track Removal, Idler, Track Tensioner, Roller, Sprocket), Steel Track Components, Track Maintenance, Swing Circle Gear
  • Upperstructure and Swing Section (40) – Upperstructure removal/installation, ROPS Canopy, Cab (door, windows, glass), Seat, Right and Left Consoles, Covers, Counterweight (standard and long arm), Travel Levers and Pedals, Floor Mat, Fuel Tank, Horn, Swing Frame, Boom, Arm, Bucket, Clamp, Tailgate, X-Change (manual and hydraulic), Quick Coupler (KLAC, Lehnhoff MS03/MS08, Pin Grabber), Side Covers, Tool Box
  • Electrical System and Analysis (50) – Electrical System Information and Troubleshooting, Fuse and Relay Identification, Shut-Off Switch, Battery, Alternator, Starter, Lights, Magnetic Lockout Sensor, Fuel Level Sender, Diagnostic Service Codes (earlier and later serials), Deluxe Instrument Panel Setup, Control Panel Setup, Instrument Panel/Controller, Gateway and Auxiliary Controllers, Key Switch, Wiper Motor, Motion Alarm, Service PC hookup, Travel Motor Auto-Shift, Auto Idle Pressure Sensor, Bobcat Machine IQ Wireless Communications
  • Engine Service (60) – Engine Information and Specifications, Crankshaft Re-Grind Data, Metric Bolt Torques, Troubleshooting, Engine Removal and Installation, Compression Checking, Engine Speed Control, Muffler, Air Cleaner, Engine Cooling System, Lubrication System, Fuel System, Cylinder Head, Crankshaft and Pistons, Camshaft and Timing Gears, Turbocharger, Flywheel and Housing, Flywheel RPM Sensor
  • Heating, Ventilation and Air Conditioning (70 / 71) – Split by serial range. A/C System Flow, Regular Maintenance, Troubleshooting, System Charging and Reclamation, Compressor, Condenser, Receiver/Drier, Evaporator/Heater Unit, Thermostat, Expansion Valve, Evaporator Coil, Heater Coil, Blower Fan, Heater Valve, HVAC Duct
  • Specifications – Excavator dimensions, rated lift capacity tables, performance, controls, engine, hydraulic system, hydraulic cylinders, cycle times, drive system, slew, undercarriage, electrical, capacities, tracks, ground pressure, torque specification for bolts, hydraulic connection specs, hydraulic fluid specifications, conversions, service tools required
  • Alphabetical Index

Together these chapters turn the manual into a working reference for the whole machine. You are not just getting a tune-up sheet; you are getting the factory-level breakdown of every major system, from the Kubota V2403 diesel and its turbocharger through the closed-centre hydraulic control valve, pilot-operated joysticks, travel motors, swing motor, swivel joint and the full 12-volt electrical architecture with its diagnostic service-code list. There are exploded parts identification drawings for components such as cylinders, the hydraulic pump, control valve sections, travel motor and swing motor, so you can see how a unit is built before you take it apart, and the specification section lists torque values, pressures, clearances and capacities in one place.

What This Bobcat E50 Service Manual Covers in Practice

Because the E50 is a compact excavator used in tight-access digging, trenching, utility work and general site duties, the service manual is written around the tasks that actually come up: correcting a slow or dead circuit, diagnosing a travel or slew complaint, rebuilding a leaking cylinder, pulling the hydraulic pump, removing the engine, chasing an electrical fault with a service code, recharging the air conditioning, resetting the tracks to the correct tension, or replacing a blown hose and bleeding the system afterwards. Each major system chapter opens with a description and a troubleshooting chart so you can work from symptom to cause before you start pulling the machine apart.

Procedures and Diagnostics You Can Follow

  • Lifting and blocking the E50 safely, with jackstand placement under the blade and track frame
  • Removing and installing the boom, arm, bucket, boom swing cylinder and all hydraulic cylinders
  • Overhauling cylinders with new seals, O-rings, wear rings and wipers, including torque figures for the head and piston nut
  • Testing and adjusting main relief, port relief, cross port relief and pressure reducing valves
  • Servicing the closed-centre hydraulic control valve section by section
  • Pump testing and the six adjustment steps in the correct order: minimum displacement, pump margin pressure, back-up relief, load sense relief, torque limiter
  • Removing and rebuilding the travel motor and swing motor, and the swing motor drive carrier
  • Track tension checking and adjustment on rubber and steel tracks, and replacing track components
  • Removing and installing the upperstructure and swing bearing, with bolt tightening sequence
  • Engine removal and installation, cylinder head work, valve clearance, injection pump timing, injector nozzle testing and turbocharger service
  • Reading and clearing diagnostic service codes on both the standard and Deluxe instrument panels
  • Setting up the Deluxe Instrument Panel, passwords, job clock and maintenance clock
  • Servicing and recharging the air conditioning system, compressor oil checks and heater valve replacement

Why the Bobcat E50 Compact Excavator Service Manual Matters

Getting a Bobcat E50 back into service is rarely about brute force – it is about knowing the correct pressure setting, the right sequence of bolts, the correct fluid, the correct clearance and the correct torque before a fastener is tightened. A cylinder head torqued in the wrong order, a hydraulic pump adjusted out of sequence, or a track tensioned by feel instead of by measurement can each turn a routine job into an expensive one. This service manual gives you the numbers and sequences that the machine was designed around, covering the boom, arm and bucket cylinders, the swing and travel circuits, the engine and the electrical system in the same level of detail.

Complete PDF Bookmark Tree

Complete Bookmarks

The complete bookmarks in the “Bobcat E50 Compact Excavator Service Manual 2019 – PDF Repair Guide” are as follows:

MAINTENANCE SAFETYp. 3
CONTENTSp. 5
FOREWORDp. 7
FOREWORDp. 9
SAFETY INSTRUCTIONSp. 11
FIRE PREVENTIONp. 13
Maintenancep. 13
Operationp. 13
Electricalp. 13
Hydraulic Systemp. 13
Fuelingp. 13
Startingp. 13
Spark Arrester Exhaust Systemp. 13
Welding And Grindingp. 14
Fire Extinguishersp. 14
SERIAL NUMBER LOCATIONSp. 15
Excavator Serial Numberp. 15
Engine Serial Numberp. 15
DELIVERY REPORTp. 16
EXCAVATOR IDENTIFICATIONp. 17
SAFETY AND MAINTENANCEp. 19
LIFTING AND BLOCKING THE EXCAVATORp. 23
Procedurep. 23
LIFTING THE EXCAVATORp. 25
Procedurep. 25
OPERATOR CAB (ROPS / TOPS)p. 27
Descriptionp. 27
Cab Doorp. 28
Front Windowp. 29
Front Wiperp. 30
Window Washer Reservoirp. 30
Right Side Windowsp. 31
OPERATOR CANOPY (ROPS / TOPS)p. 33
Descriptionp. 33
TRANSPORTING THE EXCAVATOR ON A TRAILERp. 35
Loading And Unloadingp. 35
Fasteningp. 35
TAILGATEp. 37
Opening And Closingp. 37
Adjusting The Latchp. 37
RIGHT SIDE COVERp. 39
Opening And Closingp. 39
SERVICE SCHEDULEp. 41
Maintenance Intervalsp. 41
AIR CLEANER SERVICEp. 43
Daily Checkp. 43
Replacing The Filter Elementsp. 43
CAB FILTERS (S/N AG3N11001 – AG3N13999 AND AHHE11001 – AHHE13999)p. 45
Cleaning And Maintenancep. 45
CAB FILTERS (S/N AG3N14000 & ABOVE, AHHE14000 & ABOVE, B3NN11001 AND B3NS11001 & ABOVE)p. 47
Cleaning And Maintenancep. 47
ENGINE COOLING SYSTEMp. 49
Cleaningp. 49
Checking Levelp. 50
Removing And Replacing Coolantp. 51
FUEL SYSTEMp. 53
Fuel Specificationsp. 53
Biodiesel Blend Fuelp. 53
Filling The Fuel Tankp. 54
Fuel Filtersp. 55
Draining The Fuel Tankp. 55
Removing Air From The Fuel Systemp. 56
ENGINE LUBRICATION SYSTEMp. 57
Checking And Adding Engine Oilp. 57
Engine Oil Chartp. 57
Removing And Replacing Oil And Filterp. 58
HYDRAULIC SYSTEMp. 59
Checking And Adding Hydraulic Fluidp. 59
Hydraulic / Hydrostatic Fluid Chartp. 60
Removing And Replacing The Hydraulic Filtersp. 60
Removing And Replacing The Hydraulic Fluidp. 62
LUBRICATING THE EXCAVATOR (EARLIER MODELS)p. 65
Lubrication Locationsp. 65
LUBRICATING THE EXCAVATOR (LATER MODELS)p. 69
Lubrication Locationsp. 69
PIVOT PINSp. 73
Inspection And Maintenancep. 73
TRAVEL MOTORp. 75
Checking And Adding Oilp. 75
Removing And Replacing Oilp. 75
SPARK ARRESTER MUFFLERp. 77
Cleaning Procedurep. 77
EMERGENCY EXITp. 79
Right Side Rear Windowp. 79
Front Windowp. 79
SEAT BELTp. 81
Inspection And Maintenancep. 81
CONTROL CONSOLE LOCKOUTSp. 83
Inspection And Maintenancep. 83
TOWING THE EXCAVATORp. 85
Procedurep. 85
REMOTE START TOOL KIT – MEL1563p. 87
Remote Start Tool – MEL1563p. 87
Service Tool Harness Control – MEL1565p. 88
Service Tool Harness Communicator – MEL1566p. 89
REMOTE START TOOL (SERVICE TOOL) KIT – 7217666p. 91
Descriptionp. 91
Remote Start Tool (Service Tool) – 7022042p. 92
Excavator Service Tool Harness – 6689747p. 93
Computer Service Tool Harness – 6689746p. 94
HYDRAULIC SYSTEMp. 95
HYDRAULIC / HYDROSTATIC SCHEMATICSp. 101
HYDRAULIC SYSTEM INFORMATIONp. 105
Glossary Of Hydraulic / Hydrostatic Symbolsp. 105
Troubleshooting The Hydraulic Circuitp. 108
Troubleshooting The Cylinder Circuitp. 109
Troubleshooting The Swing (Upperstructure Slew) Circuitp. 110
Troubleshooting The Travel Circuitp. 111
CYLINDER (BOOM) (S/N AG3N11018 & ABOVE, AHHE11035 & ABOVE, B3NN11001 & ABOVE AND B3NS11001 & ABOVE)p. 113
Testingp. 113
Removal And Installationp. 115
Parts Identificationp. 118
Disassemblyp. 119
Assemblyp. 122
CYLINDER (BOOM) (S/N AG3N11017 & BELOW, AHHE11034 & BELOW)p. 127
Testingp. 127
Removal And Installationp. 129
Parts Identificationp. 132
Disassemblyp. 133
Assemblyp. 136
CYLINDER (ARM)p. 141
Testingp. 141
Removal And Installationp. 143
Parts Identificationp. 145
Disassemblyp. 146
Assemblyp. 148
CYLINDER (BOOM SWING)p. 153
Testingp. 153
Removal And Installationp. 155
Parts Identificationp. 158
Disassemblyp. 159
Assemblyp. 161
CYLINDER (BUCKET)p. 165
Testingp. 165
Removal And Installationp. 167
Parts Identificationp. 169
Disassemblyp. 170
Assemblyp. 172
CYLINDER (BLADE)p. 175
Testingp. 175
Removal And Installationp. 177
Parts Identificationp. 178
Disassemblyp. 179
Assemblyp. 181
CYLINDER (CLAMP)p. 185
Testingp. 185
Removal And Installationp. 186
Parts Identificationp. 188
Disassemblyp. 189
Assemblyp. 192
CYLINDER (ANGLE BLADE)p. 197
Testingp. 197
Removal And Installationp. 198
Parts Identificationp. 200
Disassemblyp. 201
Assemblyp. 203
VALVES (MAIN RELIEF)p. 207
Testing And Adjustingp. 207
VALVES (PORT RELIEF)p. 209
Testing And Adjusting Port Relief Valve Pressurep. 209
VALVES (CROSS PORT RELIEF)p. 211
Testing And Adjustingp. 211
Removal And Installationp. 214
VALVES (PRESSURE REDUCING)p. 215
Testing And Adjustingp. 215
HYDRAULIC CONTROL VALVEp. 217
Descriptionp. 217
Removal And Installationp. 217
Parts Identificationp. 221
Disassembly And Assemblyp. 222
Inlet Valve Section Disassembly And Assemblyp. 226
Boom Swing Valve Section Disassembly And Assemblyp. 230
Slew Valve Section Disassembly And Assemblyp. 233
Blade Valve Section Disassembly And Assemblyp. 236
Right And Left Travel Valve Section Disassembly And Assemblyp. 240
Angle Blade, Boom, Auxiliary, Arm And Bucket Valve Section Disassembly And Assemblyp. 242
HYDRAULIC PUMPp. 247
Hydraulic Pump Work Sheetp. 247
Pump Testingp. 250
Removal And Installationp. 259
Coupler Removal And Installationp. 260
Hydraulic Pump Startupp. 261
Torque Limiter Assembly Parts Identificationp. 262
Torque Limiter Assembly Removal And Installationp. 263
Torque Limiter Valve Assembly Disassembly And Assemblyp. 263
Pump Control Parts Identificationp. 264
Pump Control Removal And Installationp. 265
Pump Control Disassembly And Assemblyp. 265
Parts Identificationp. 271
Disassembly And Assemblyp. 272
MANIFOLD ASSEMBLY / ACCUMULATOR (WITHOUT ANGLE BLADE)p. 281
Descriptionp. 281
Removal And Installationp. 281
Parts Identificationp. 283
Disassembly And Assemblyp. 284
MANIFOLD ASSEMBLY / ACCUMULATOR (WITH ANGLE BLADE)p. 291
Descriptionp. 291
Removal And Installationp. 291
Parts Identificationp. 293
Disassembly And Assemblyp. 294
TRAVEL MOTORp. 301
Removal And Installationp. 301
Parts Identification Hydraulic Motorp. 302
Parts Identification Gear Reduction Hubp. 303
Disassemblyp. 304
Assemblyp. 313
SWIVEL JOINTp. 325
Removal And Installationp. 325
Parts Identification Earlier Model Angle Blade Swivelp. 327
Parts Identification Later Model Angle Blade Swivelp. 328
Parts Identification Earlier Model Straight Blade Swivelp. 329
Parts Identification Later Model Straight Blade Swivelp. 330
Disassembly And Assemblyp. 331
SWING MOTORp. 333
Removal And Installationp. 333
Parts Identificationp. 335
Disassembly And Assemblyp. 336
SWING MOTOR (DRIVE CARRIER)p. 345
Removal And Installationp. 345
Parts Identificationp. 346
Disassembly And Assemblyp. 347
CONTROL PATTERN SELECTOR VALVEp. 353
Removal And Installationp. 353
Parts Identificationp. 354
Disassembly And Assemblyp. 355
RIGHT CONTROL LEVER (JOYSTICK) (S/N AG3N11001 – AG3N13999 AND AHHE11001 – AHHE13999)p. 357
Testingp. 357
Handle Removal And Installationp. 358
Joystick Assembly Removal And Installationp. 360
Parts Identificationp. 361
Disassemblyp. 362
Assemblyp. 367
RIGHT CONTROL LEVER (JOYSTICK) (S/N AG3N14001 & ABOVE, AHHE14001 & ABOVE, B3NN11001 & ABOVE, AND B3NS11001 & ABOVE)p. 371
Testingp. 371
Handle Removal And Installationp. 372
Joystick Assembly Removal And Installationp. 374
Parts Identificationp. 375
Disassemblyp. 376
Assemblyp. 380
LEFT CONTROL LEVER (JOYSTICK) (S/N AG3N11001 – AG3N13999 AND AHHE11001 – AHHE13999)p. 385
Testingp. 385
Handle Removal And Installationp. 386
Joystick Assembly Removal And Installationp. 388
Parts Identificationp. 389
Disassemblyp. 390
Assemblyp. 394
LEFT CONTROL LEVER (JOYSTICK) (AG3N14001 & ABOVE, AHHE14001 & ABOVE, B3NN11001 & ABOVE AND B3NS11001 & ABOVE)p. 399
Testingp. 399
Handle Removal And Installationp. 400
Joystick Assembly Removal And Installationp. 402
Parts Identificationp. 403
Disassemblyp. 404
Assemblyp. 408
HYDRAULIC FILTER MOUNTp. 413
Removal And Installationp. 413
HYDRAULIC RESERVOIRp. 415
Removal And Installationp. 415
OIL COOLERp. 417
Removal And Installationp. 417
DIRECT TO TANK VALVEp. 419
Removal And Installationp. 419
BLADE CONTROL LEVERp. 421
Handle Removal And Installationp. 421
Removal And Installationp. 423
Parts Identificationp. 424
Disassembly And Assemblyp. 425
CASE DRAIN FILTER MOUNTp. 429
Removal And Installationp. 429
TRAVEL CONTROL VALVEp. 431
Removal And Installationp. 431
Parts Identificationp. 432
Disassembly And Assemblyp. 433
REMOVING AIR FROM THE HYDRAULIC SYSTEMp. 439
Procedurep. 439
MANIFOLD (HYDRAULIC X-CHANGE) (EARLIER MODELS)p. 441
Removal And Installationp. 441
Parts Identificationp. 442
Disassembly And Assemblyp. 443
MANIFOLD (HYDRAULIC X-CHANGE) (LATER MODELS)p. 447
Removal And Installationp. 447
Parts Identificationp. 448
Disassembly And Assemblyp. 449
MANIFOLD (PIN GRABBER)p. 455
Removal And Installationp. 455
Parts Identificationp. 456
Disassembly And Assemblyp. 457
SECONDARY AUXILIARY VALVE (EARLIER MODELS)p. 459
Removal And Installationp. 459
Parts Identificationp. 461
Disassembly And Assemblyp. 462
SECONDARY AUXILIARY VALVE (LATER MODELS)p. 467
Removal And Installationp. 467
Parts Identificationp. 469
Disassembly And Assemblyp. 470
VALVE (BOOM LOCK)p. 473
Removal And Installationp. 473
VALVE (ARM LOCK)p. 475
Removal And Installationp. 475
UNDERCARRIAGEp. 477
BLADEp. 479
Removal And Installationp. 479
BLADE (ANGLE)p. 481
Removal And Installationp. 481
Cutting Edge Removal And Installationp. 482
TRACK UNDERCARRIAGE COMPONENTS (RUBBER TRACK)p. 483
Descriptionp. 483
Track Lug Heightp. 483
Checking Tensionp. 484
Adjusting Tensionp. 485
Track Removal And Installationp. 487
Idler Removal And Installationp. 488
Idler Parts Identificationp. 489
Idler Disassemblyp. 490
Idler Assemblyp. 492
Track Tensioner Removal And Installationp. 495
Track Tensioner Parts Identificationp. 496
Track Tensioner Disassembly And Assemblyp. 497
Roller Removal And Installationp. 499
Sprocket Removal And Installationp. 500
TRACK UNDERCARRIAGE COMPONENTS (STEEL TRACK)p. 501
Descriptionp. 501
Checking Tensionp. 502
Adjusting Tensionp. 503
Track Removalp. 505
Track Installationp. 508
Idler Removal And Installationp. 510
Idler Parts Identificationp. 511
Idler Disassemblyp. 512
Idler Assemblyp. 514
Track Tensioner Removal And Installationp. 517
Track Tensioner Parts Identificationp. 518
Track Tensioner Disassembly And Assemblyp. 519
Roller Removal And Installationp. 521
Sprocket Removal And Installationp. 522
Guide Plate Removal And Installationp. 522
TRACK MAINTENANCEp. 523
Track Damage Identificationp. 523
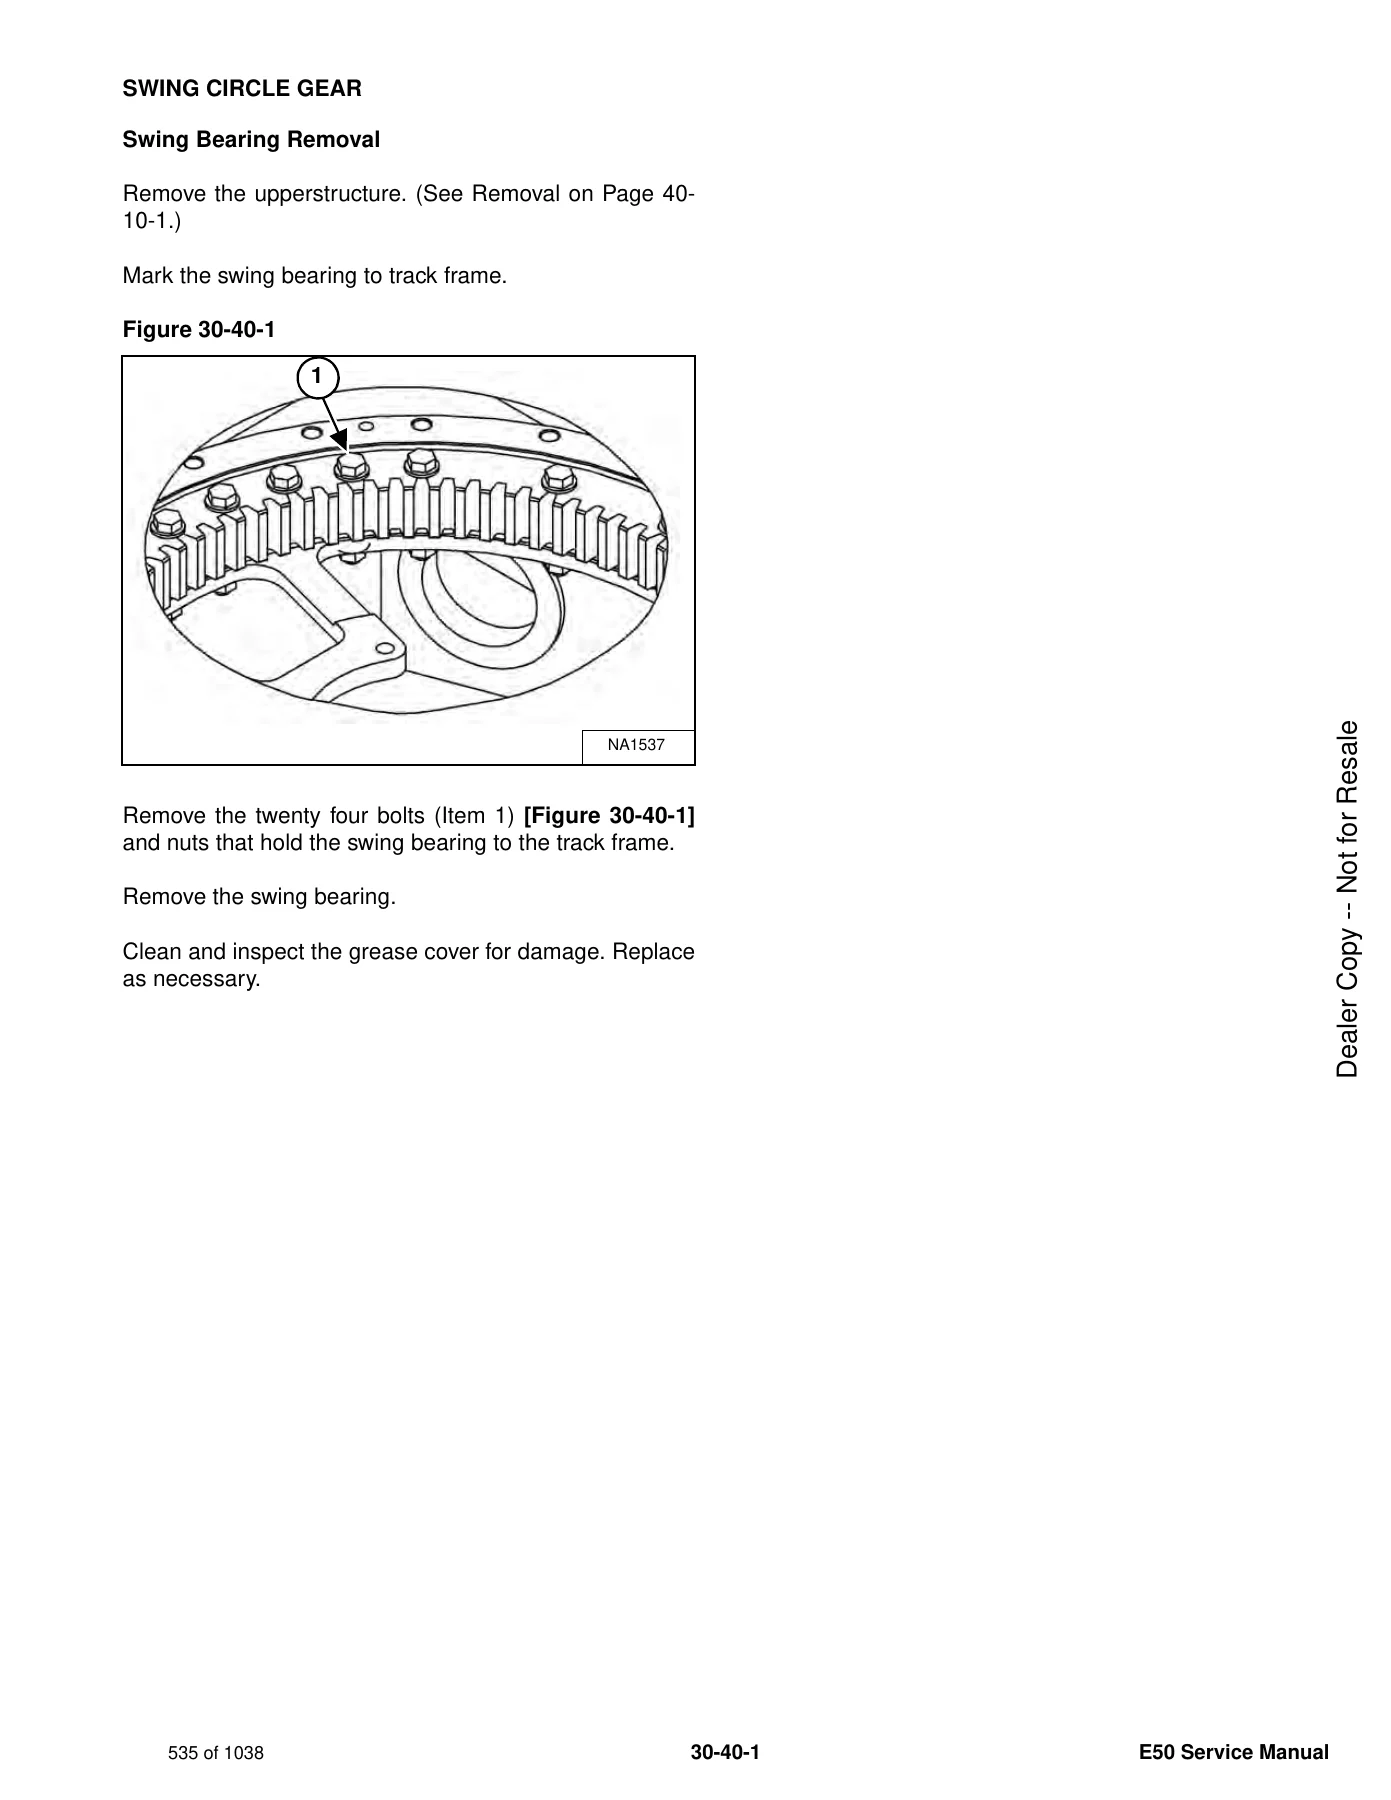
SWING CIRCLE GEARp. 535
Swing Bearing Removalp. 535
Swing Bearing Installationp. 536
UPPERSTRUCTURE AND SWING SECTIONp. 537
UPPERSTRUCTUREp. 541
Removalp. 541
Installationp. 543
ROPS CANOPYp. 545
Removal And Installationp. 545
CABp. 549
Removal And Installationp. 549
Door Removal And Installationp. 552
Front Window Removal And Installation (Earlier Models)p. 553
Front Window Removal And Installation (Later Models)p. 554
Front Window Disassembly And Assembly (Later Models)p. 555
Front Window Adjustment (Later Models)p. 557
Right Side Rear Sliding Window Removal And Installationp. 559
Right Side Front Sliding Window Removal And Installationp. 559
Right Side Front And Rear Sliding Window Weather Strip Removal And Installationp. 560
Right Side Front And Rear Sliding Window Wiper Strip Removal And Installationp. 560
Glass Removalp. 561
Glass Installationp. 562
SEATp. 569
Removal And Installationp. 569
Seat Mount Removal And Installationp. 570
RIGHT CONSOLE (S/N AG3N11001 – AG3N13999 AND AHHE11001 – AHHE13999)p. 571
Console Cover Removal And Installationp. 571
RIGHT CONSOLE (S/N AG3N14000 & ABOVE, AHHE14000 & ABOVE, B3NN11001 & ABOVE AND B3NS11001 & ABOVE)p. 577
Console Cover Removal And Installationp. 577
LEFT CONSOLEp. 583
Lower Console Cover Removal And Installationp. 583
Upper Console Cover Removal And Installationp. 584
Compression Spring Removal And Installationp. 587
Lock Lever Removal And Installationp. 589
Console Removal And Installationp. 589
LEFT UPPERSTRUCTURE COVERp. 591
Removal And Installationp. 591
RIGHT UPPERSTRUCTURE COVERp. 593
Removal And Installationp. 593
COUNTERWEIGHTp. 595
Removal And Installationp. 595
Long Arm Counterweight Removal And Installationp. 598
TRAVEL LEVERS AND PEDALSp. 599
Removal And Installationp. 599
Disassembly And Assemblyp. 599
FLOOR MATp. 601
Removal And Installationp. 601
FUEL TANKp. 603
Removal And Installationp. 603
Fuel Tank Fitting Removal And Installationp. 604
Removal And Installation (Cab Equipped Excavator)p. 604
HORNp. 605
Removal And Installationp. 605
SWING FRAMEp. 607
Removal And Installationp. 607
Boom Swing Frame Hose Routingp. 610
Bushing Removalp. 611
Bushing Installationp. 612
BOOMp. 613
Removal And Installationp. 613
ARM (STANDARD AND LONG)p. 615
Removal And Installationp. 615
Arm To Boom Bushing Removal And Installationp. 616
Arm To Bucket And Bucket Link Bushing Removal And Installationp. 617
BUCKETp. 619
Bucket Teeth Removal And Installationp. 619
Bucket Side Cutting Edge Removal And Installationp. 620
CLAMPp. 621
Removal And Installationp. 621
TAILGATEp. 623
Removal And Installationp. 623
Latch Removal And Installationp. 624
X-CHANGEp. 625
Removal And Installationp. 625
Disassemblyp. 627
Assemblyp. 628
X-CHANGE (HYDRAULIC)p. 631
Removal And Installationp. 631
Parts Identificationp. 633
Disassemblyp. 634
Assemblyp. 639
Expansion Plug Installationp. 647
QUICK COUPLER (KLAC™ SYSTEM)p. 649
Troubleshootingp. 649
Daily Inspectionp. 649
Removal And Installationp. 650
Parts Identificationp. 652
Disassemblyp. 653
Assemblyp. 654
QUICK COUPLER (LEHNHOFF® SYSTEM)p. 657
Troubleshootingp. 657
Daily Inspectionp. 657
Removal (MS03 And MS08)p. 658
Installation (MS03 And MS08)p. 659
Parts Identification (MS03)p. 660
Disassembly And Assembly (MS03)p. 661
Parts Identification (MS08)p. 662
Disassembly (MS08)p. 663
Assembly (MS08)p. 666
QUICK COUPLER (PIN GRABBER)p. 671
Troubleshootingp. 671
Daily Inspectionp. 672
Removal And Installationp. 672
Parts Identificationp. 674
Disassembly And Assemblyp. 675
RIGHT SIDE COVER (EARLIER MODEL)p. 677
Removal And Installationp. 677
Latch Removal And Installationp. 678
Latch Adjustmentp. 679
RIGHT SIDE COVER (LATER MODEL)p. 681
Removal And Installationp. 681
Latch Removal And Installationp. 682
Adjustmentp. 682
TOOL BOXp. 685
Removal And Installationp. 685
ELECTRICAL SYSTEM AND ANALYSISp. 687
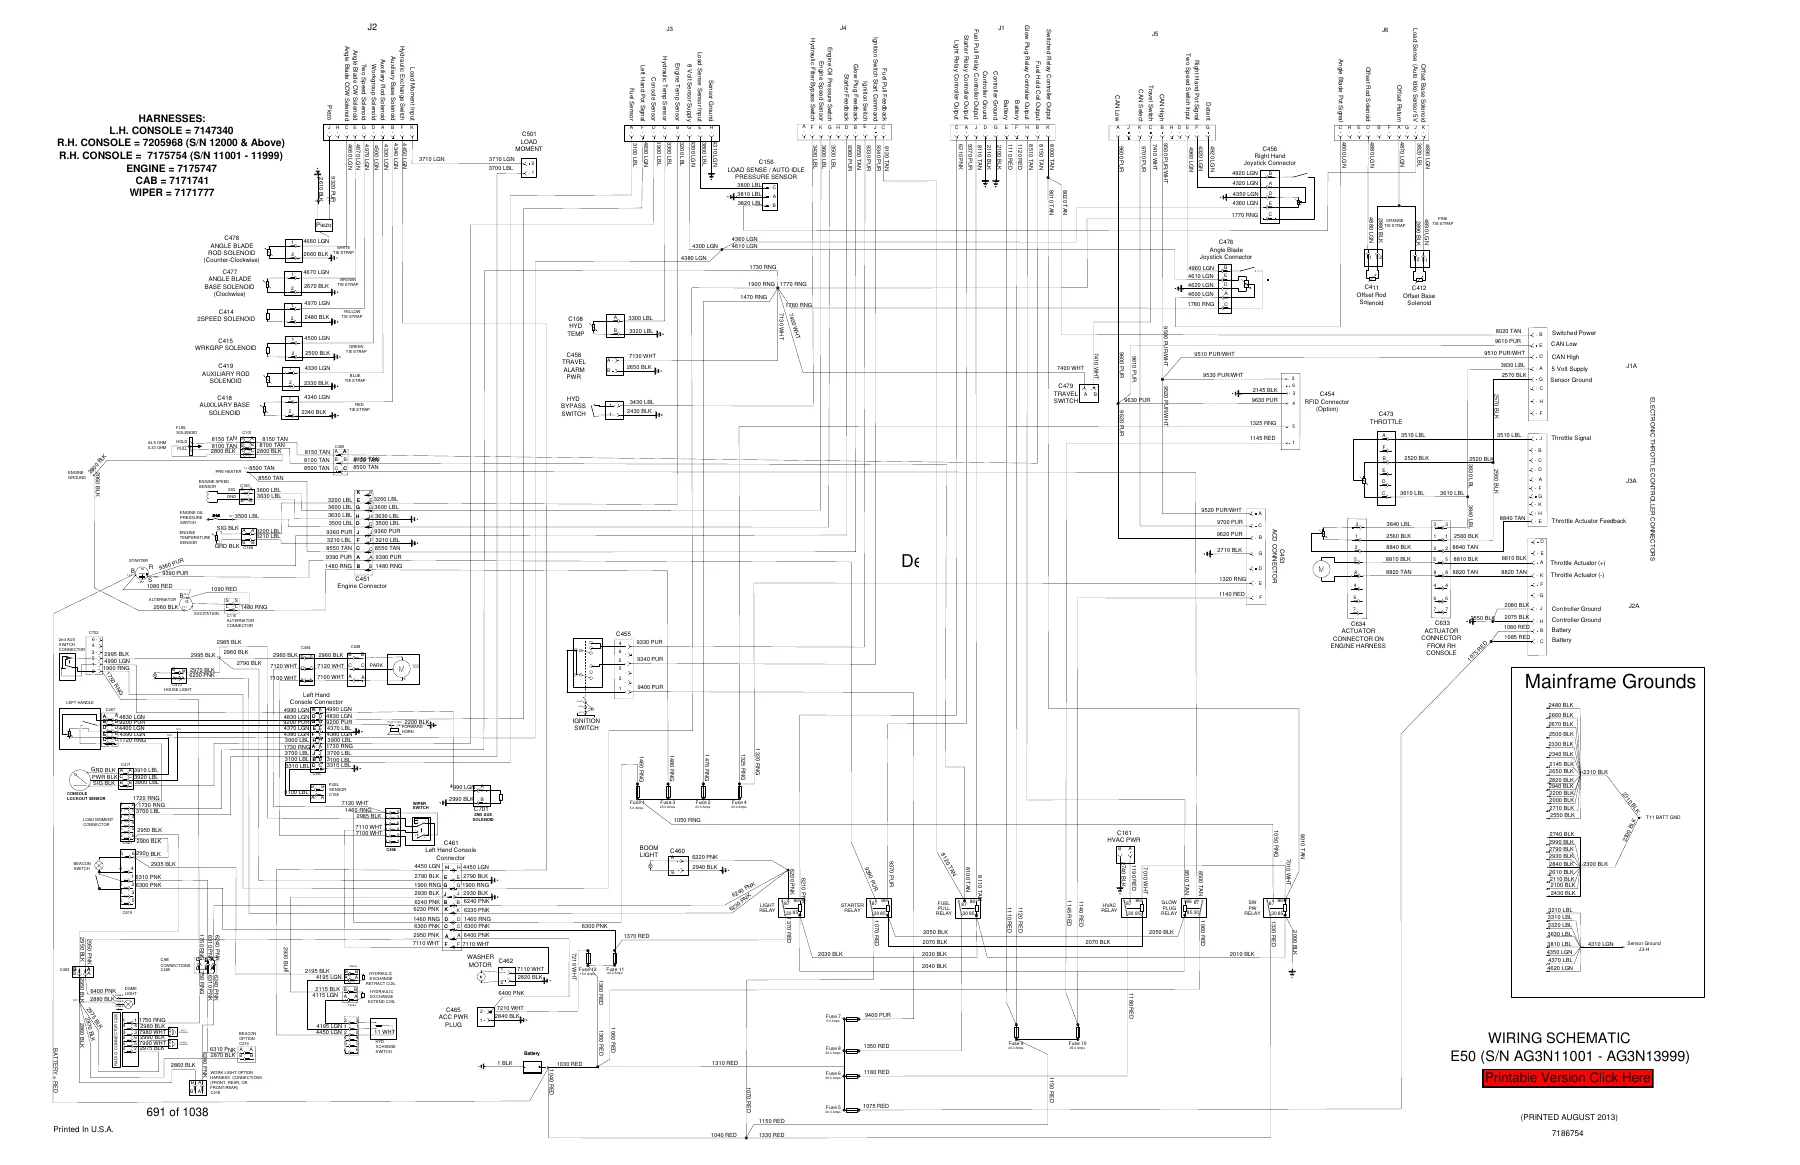
ELECTRICAL SCHEMATICSp. 691
ELECTRICAL SYSTEM INFORMATIONp. 700
Troubleshooting Chartp. 700
Descriptionp. 701
Fuse And Relay Location / Identificationp. 701
Shut-Off Switch (If Equipped)p. 703
BATTERYp. 704
Servicingp. 704
Removing And Installingp. 705
Using A Booster Battery (Jump Starting)p. 706
ALTERNATORp. 708
Belt Adjustmentp. 708
Belt Replacementp. 708
Charging System Inspectionp. 710
Alternator Voltage Testingp. 711
Low Voltage Testingp. 711
High Voltage Testingp. 712
Removal And Installationp. 713
Parts Identificationp. 715
STARTERp. 716
Testingp. 716
Removal And Installationp. 717
Parts Identificationp. 718
LIGHTSp. 720
Removal And Installationp. 720
Boom Light Removal And Installationp. 721
Boom Light Bulb Replacementp. 721
MAGNETIC LOCKOUT SENSORp. 722
Removal And Installationp. 722
FUEL LEVEL SENDERp. 724
Removal And Installationp. 724
Testingp. 725
DIAGNOSTIC SERVICE CODES (S/N AG3N11001 – AG3N13999 AND AHHE11001 – AHHE13999)p. 726
Service Codes Listp. 726
DIAGNOSTIC SERVICE CODES (S/N AG3N14000 & ABOVE, AHHE14000 & ABOVE, B3NN11001 & ABOVE AND B3NS11001 & ABOVE)p. 728
Viewing Service Codesp. 728
Number Codes Listp. 729
DELUXE INSTRUMENT PANEL SETUP (S/N AG3N11001 – AG3N13999 AND AHHE11001 – AHHE13999)p. 732
Passwordsp. 732
Password Entry (For Starting And Operating The Machine)p. 732
Changing The Operator Passwordp. 732
Password Lockout Featurep. 733
Job Clockp. 733
RPMp. 733
CONTROL PANEL SETUP (S/N AG3N14000 & ABOVE, AHHE14000 & ABOVE, B3NN11001 & ABOVE AND B3NS11001 & ABOVE)p. 734
Panel Setup (Deluxe Instrument Panel)p. 734
Password Setup (Keyless Start Panel)p. 740
Password Setup (Deluxe Instrument Panel)p. 741
Maintenance Clockp. 743
INSTRUMENT PANEL / CONTROLLER (S/N AG3N11001 – AG3N13999 AND AHHE11001 – AHHE13999)p. 746
Removal And Installationp. 746
INSTRUMENT PANEL (S/N AG3N14000 & ABOVE, AHHE14000 & ABOVE, B3NN11001 & ABOVE AND B3NS11001 & ABOVE)p. 748
Removal And Installationp. 748
CONTROLLER (S/N AG3N14000 & ABOVE, AHHE14000 & ABOVE, B3NN11001 & ABOVE AND B3NS11001 & ABOVE) (GATEWAY AND AUXILIARY)p. 750
Descriptionp. 750
Gateway Controller Removal And Installationp. 750
Auxiliary Controller Removal And Installationp. 751
KEY SWITCHp. 752
Removal And Installationp. 752
WIPER MOTORp. 754
Removal And Installationp. 754
MOTION ALARM SYSTEMp. 756
Descriptionp. 756
Inspectingp. 756
Adjusting Switch Positionp. 757
SERVICE PC (LAPTOP COMPUTER)p. 758
Connecting The Remote Start Toolp. 758
Connecting Remote Start Tool (Service Tool)p. 758
Operationp. 759
SHUT-OFF SWITCHp. 760
Descriptionp. 760
Removal And Installationp. 761
TRAVEL MOTOR AUTO-SHIFTp. 764
Auto-Shift Drive System (If Equipped)p. 764
Troubleshootingp. 765
AUTO IDLE PRESSURE SENSORp. 768
Descriptionp. 768
Removal And Installationp. 769
BOBCAT MACHINE IQ WIRELESS COMMUNICATIONSp. 770
Descriptionp. 770
Controller Removal And Installationp. 770
Antenna Removal And Installationp. 772
Procedurep. 774
ENGINE SERVICEp. 776
ENGINE INFORMATIONp. 779
Descriptionp. 779
Specificationsp. 780
Crankshaft Re-Grind Datap. 786
Torque For Kubota® Metric Boltsp. 787
Troubleshootingp. 788
Removal And Installationp. 789
Compression Checkingp. 799
ENGINE SPEED CONTROLp. 801
Removal And Installationp. 801
Auto Idle Descriptionp. 801
Auto Idle Controller Removal And Installationp. 802
Calibrationp. 803
Actuator Removal And Installation (Earlier Model)p. 806
Actuator Removal And Installation (Later Model)p. 809
MUFFLERp. 811
Removal And Installationp. 811
AIR CLEANERp. 813
Housing Removal And Installationp. 813
ENGINE COOLING SYSTEMp. 815
Radiator Removal And Installationp. 815
Fan Removal And Installationp. 819
Water Pump Removal And Installationp. 821
Water Pump Disassembly And Assemblyp. 821
Thermostat Housing Removal And Installationp. 822
Thermostat – Checkingp. 822
LUBRICATION SYSTEMp. 823
Oil Pan Removal And Installationp. 823
Oil Pump Removal And Installationp. 823
Oil Pump Inspectionp. 824
Engine Oil Pressure – Testingp. 825
FUEL SYSTEMp. 827
Fuel Shutoff Solenoid – Checkingp. 827
Fuel Shut-off Solenoid Removal And Installationp. 828
Fuel Injection Pump – Checkingp. 829
Fuel Injection Pump Removal And Installationp. 830
Fuel Injection Pump – Timingp. 833
Fuel Camshaft Removal And Installationp. 835
Fuel Camshaft Governorp. 836
Fuel Injector Removal And Installationp. 837
Fuel Injector Nozzle Pressure – Checkingp. 839
Nozzle Spray Conditionp. 840
Valve Seat Tightnessp. 840
CYLINDER HEADp. 841
Glow Plugs – Testingp. 841
Glow Plugs Removal And Installationp. 842
Valve Clearance Adjustmentp. 843
Valve Timing – Checkingp. 843
Cylinder Head Removal And Installationp. 844
Cylinder Head Disassembly And Assemblyp. 847
Cylinder Head – Servicingp. 848
Cylinder Head Top Clearancep. 848
Valve Guide – Checkingp. 849
Valve Guide Removal And Installationp. 850
Reconditioning The Valve And Valve Seatp. 851
Valve Springp. 852
Valve Tappetsp. 853
Rocker Arm And Shaft – Checkingp. 854
Push Rod Alignment – Checkingp. 854
CRANKSHAFT AND PISTONSp. 855
Piston And Connecting Rod Removal And Installationp. 855
Piston And Connecting Rod – Servicingp. 857
Cylinder Bore – Checkingp. 859
Connecting Rod Alignmentp. 860
Crankshaft Gear Removal And Installationp. 861
Crankshaft And Bearings Removal And Installationp. 862
Crankshaft And Bearings – Servicingp. 865
CAMSHAFT AND TIMING GEARSp. 869
Timing Gearcase Cover Removal And Installationp. 869
Timing Gears Backlash – Checkingp. 872
Idle Gear And Camshaft Removal And Installationp. 873
Camshaft – Servicingp. 875
Idle Gear And Shaft – Servicingp. 876
TURBOCHARGERp. 877
Descriptionp. 877
Testingp. 877
Removal And Installationp. 878
FLYWHEEL AND HOUSINGp. 881
Hydraulic Pump Coupler Removal And Installationp. 881
Flywheel Removal And Installationp. 883
Flywheel Ring Gearp. 883
FLYWHEEL RPM SENSORp. 885
Descriptionp. 885
Removalp. 885
Installationp. 885
HEATING, VENTILATION AND AIR CONDITIONING S/N AG3N11001 – AG3N13999 AND AHHE11001 – AHHE13999p. 887
AIR CONDITIONING SYSTEM FLOWp. 889
Descriptionp. 889
Chartp. 890
Componentsp. 891
Safety Equipmentp. 895
REGULAR MAINTENANCEp. 897
Cab Filtersp. 897
Air Conditioning Compressor Belt Adjustmentp. 898
Air Conditioning Compressor Belt Replacementp. 898
Condenserp. 899
Air Conditioning Lubricationp. 899
Evaporator / Heater Coilp. 899
Air Conditioning Service Chartp. 900
TROUBLESHOOTINGp. 901
Blower Motor Does Not Operatep. 901
Blower Motor Operates Normally, But Air Flow Is Insufficientp. 901
Insufficient Cooling Although Air Flow And Compressor Operation Are Normalp. 901
The Compressor Operates Improperly Or Not At Allp. 901
Gauge Pressure Related Troubleshootingp. 902
Temperature / Pressure Chartp. 903
Poor A/C Performancep. 904
HVAC Repair And Leaksp. 904
Electrical Systemp. 905
Engine Coolant Bypassing The Heater Valvep. 907
SYSTEM CHARGING AND RECLAMATIONp. 909
Refrigerant Identificationp. 909
Reclamation And Charging With Recovery / Charging Unitp. 911
COMPRESSORp. 913
Removal And Installationp. 913
Oilp. 915
Oil Checkp. 916
CONDENSERp. 919
Removal And Installationp. 919
RECEIVER / DRIERp. 921
Receiver / Drier Removal And Installationp. 921
Pressure Relief Valve Removal And Installationp. 922
Pressure Switch Removal And Installationp. 922
EVAPORATOR / HEATER UNITp. 923
Removal And Installationp. 923
THERMOSTATp. 925
Descriptionp. 925
Removal And Installationp. 926
EXPANSION VALVEp. 929
Removal And Installationp. 929
EVAPORATOR COILp. 931
Removal And Installationp. 931
HEATER COILp. 933
Removal And Installationp. 933
BLOWER FANp. 935
Removal And Installationp. 935
HEATER VALVEp. 937
Removal And Installationp. 937
HVAC DUCTp. 939
Removal And Installationp. 939
HEATING, VENTILATION AND AIR CONDITIONING S/N AG3N14000 & ABOVE, AHHE14000 & ABOVE, B3NN11001 & ABOVE AND B3NS11001 & ABOVEp. 941
AIR CONDITIONING SYSTEM FLOWp. 943
Descriptionp. 943
Chartp. 944
Componentsp. 945
Safety Equipmentp. 949
REGULAR MAINTENANCEp. 951
Cab Filtersp. 951
Air Conditioning Compressor Belt Adjustmentp. 952
Air Conditioning Compressor Belt Replacementp. 952
Condenserp. 953
Air Conditioning Lubricationp. 953
Evaporator / Heater Coilp. 953
Air Conditioning Service Chartp. 955
TROUBLESHOOTINGp. 957
Blower Motor Does Not Operatep. 957
Blower Motor Operates Normally, But Air Flow Is Insufficientp. 957
Insufficient Cooling Although Air Flow And Compressor Operation Are Normalp. 957
The Compressor Operates Improperly Or Not At Allp. 957
Gauge Pressure Related Troubleshootingp. 958
Temperature / Pressure Chartp. 959
Poor A/C Performancep. 960
HVAC Repair And Leaksp. 960
Electrical Systemp. 961
Engine Coolant Bypassing The Heater Valvep. 963
SYSTEM CHARGING AND RECLAMATIONp. 965
Refrigerant Identificationp. 965
Reclamation And Charging With Recovery / Charging Unitp. 967
COMPRESSORp. 969
Removal And Installationp. 969
Oilp. 971
Oil Checkp. 972
CONDENSERp. 975
Removal And Installationp. 975
RECEIVER / DRIERp. 977
Receiver / Drier Removal And Installationp. 977
Pressure Relief Valve Removal And Installationp. 978
Pressure Switch Removal And Installationp. 978
EVAPORATOR / HEATER UNITp. 979
Removal And Installationp. 979
THERMOSTATp. 981
Descriptionp. 981
Removal And Installationp. 982
EXPANSION VALVEp. 985
Removal And Installationp. 985
EVAPORATOR COILp. 987
Removal And Installationp. 987
HEATER COILp. 989
Removal And Installationp. 989
BLOWER FANp. 991
Removal And Installationp. 991
HEATER VALVEp. 993
Removal And Installationp. 993
HVAC DUCTp. 995
Removal And Installationp. 995
SPECIFICATIONSp. 997
EXCAVATOR SPECIFICATIONSp. 999
Machine Dimensionsp. 999
Machine Dimensions – Standard Armp. 1000
Machine Dimensions – Long Armp. 1001
Machine Dimensions – Angle Bladep. 1002
Rated Lift Capacity (Standard Arm)p. 1003
Rated Lift Capacity (Standard Arm With Additional Counterweight)p. 1004
Rated Lift Capacity (Long Arm)p. 1005
Performancep. 1006
Controlsp. 1006
Enginep. 1007
Hydraulic Systemp. 1007
Hydraulic Cylindersp. 1009
Hydraulic Cycle Timesp. 1009
Drive Systemp. 1009
Slew Systemp. 1009
Undercarriagep. 1009
Electricalp. 1010
Capacitiesp. 1010
Tracksp. 1010
Ground Pressurep. 1010
TORQUE SPECIFICATION FOR BOLTSp. 1011
Torque For General SAE Boltsp. 1011
Torque For General Metric Boltsp. 1012
HYDRAULIC CONNECTION SPECIFICATIONSp. 1013
O-ring Face Seal Connectionp. 1013
Straight Thread O-ring Fittingp. 1013
Tubelines And Hosesp. 1014
Flare Fittingp. 1014
O-ring Flare Fittingp. 1015
Port Seal Fittingp. 1017
Push To Connect Fittingsp. 1018
HYDRAULIC FLUID SPECIFICATIONSp. 1021
Specificationsp. 1021
CONVERSIONSp. 1023
Decimal And Millimeter Equivalent Chartp. 1023
U.S. To Metric Conversion Chartp. 1024
SERVICE TOOLS REQUIREDp. 1025
Remote Start Toolsp. 1025
Hydraulic Toolsp. 1026
Engine Toolsp. 1029
Electrical Toolsp. 1031
General Toolsp. 1031
HVAC Toolsp. 1032
ALPHABETICAL INDEXp. 1033
SERVICE SCHEDULE SYMBOLSp. 1037

It also matters because the E50 was built across several serial-number ranges, and Bobcat split certain systems by serial. This manual reflects that, with separate boom cylinder chapters for S/N AG3N11018 & Above / AHHE11035 & Above / B3NN11001 & Above / B3NS11001 & Above and for S/N AG3N11017 & Below / AHHE11034 & Below, and separate HVAC chapters for the earlier and later serial groups. That matters when you are ordering parts or following a procedure – using the wrong version can send you down the wrong path.

IMAGES PREVIEW

Bobcat E50 Compact Excavator Service Manual 2019 - PDF Repair Guide — PDF page 1 preview
Bobcat E50 Compact Excavator Service Manual 2019 - PDF Repair Guide — PDF page 691 preview
Bobcat E50 Compact Excavator Service Manual 2019 - PDF Repair Guide — PDF page 535 preview

Instant PDF Delivery for the Bobcat E50 Service Manual

The Bobcat E50 Compact Excavator Service Manual is delivered as an instant-download PDF once payment is confirmed. There is no shipping, no waiting for a parcel and no physical binder to store. You can keep it on a laptop in the workshop, open it on a tablet next to the machine, or print just the pages you need for a specific job and take them into the field. With 1038 pages of procedures, diagrams and specification tables covering the E50 in four serial-number ranges, this is the reference to have on hand before the next service, diagnosis or repair begins.
Reviews

There are no reviews yet.

Be the first to review “Bobcat E50 Compact Excavator Service Manual 2019 – PDF Repair Guide”

What Our Customers Say

★★★★★ Live reviews from customers
Loading customer reviews...
0
    0
    Your Cart
    Your cart is emptyReturn to Shop
    🛒
    Recently Purchased
    🕒 verified order