★ TRUSTED BY 321,897+ PROFESSIONALS WORLDWIDE
🏒
Trusted Business
Verified & Licensed
πŸ›‘οΈ
Virus Free Files
100% Safe Downloads
πŸ”’
Secure Payment
SSL Protected
⚑
Instant Delivery
Available Immediately
Sale!

Vermeer BC1000XL Brush Chipper Service Manual – Deutz, Cummins, Caterpillar and PSI Workshop Repair Guide PDF

Original price was: $39.95.Current price is: $24.95.

Complete Vermeer BC1000XL Brush Chipper Service Manual (105400ET4, 2021 edition). Covers engine integration, electrical and SmartFeed hydraulic systems, cutter drum drive, trailer brakes and full wiring/hydraulic schematics in 270 pages.

⚑
Instant PDF Download
Available immediately
πŸ’Ύ
Save to Your Device
Download & keep forever
πŸ›‘οΈ
Antivirus Scanned
100% virus-free
🌍
Trusted Worldwide
175,000+ customers

Description

The Vermeer BC1000XL Brush Chipper Service Manual is a complete workshop-level repair guide for the BC1000XL brush chipper, published under Vermeer part number 105400ET4 and current to the 2021 edition. It covers every major system on the machine β€” engine integration, electrical power and control, the SmartFeed hydraulic feed roller circuit, the mechanical cutter drum drive, and the trailer lighting and braking systems β€” with theory of operation, troubleshooting flow, and step-by-step removal and installation procedures written for experienced service technicians.

File Details

  • Manual type: Service / repair manual for experienced service technicians
  • Brand: Vermeer
  • Model: BC1000XL Brush Chipper
  • Document number: 105400ET4
  • Edition / revision: S5_01, dated 06/21
  • Language: English
  • Page count: 270 pages
  • File format: PDF
  • Copyright: 2021 Vermeer Corporation

Chapters Covered

  • 1 β€” Safety and General Information: Using the Manual, Reference Publications, Warranty Considerations, Safety, Replace Shields, Safety Symbol Explanation, Shop Requirements, Special Tools and Test Equipment, Personnel and Lifting Requirements, Replacement Parts, Shutdown Procedure, Quick Stop Procedure, Reference Designators
  • 2 β€” Machine Specifications: Machine Reference and Orientation, Serial Number Plate Locations, General Specifications, Engine Specifications, Electrical Specifications, Hydraulic Specifications, Lubricants, System Interlocks, Component Weights
  • 3 β€” Component Locations: Electrical and Engine Systems, Hydraulic Systems, Trailer Function
  • 4 β€” Electrical and Engine Systems: Engine, Intake Air/Exhaust, Coolant Delivery, Fuel Enable and Delivery (Caterpillar, Cummins, Deutz, PSI), Throttle Function, EcoIdle Function, Electrical Power Source, Alternator, Electrical Power Distribution, Controller A1, Circuit Breakers, Fuses, Ignition Switch Circuits, Gauges, Optional Tree Commander Remote Control System, Glow Plug Function, Engine Protection Interlocks, Troubleshooting, Repair, Battery BT1
  • 5 β€” Hydraulic Systems: Feed Roller Drive Function, Fluid Supply/Conditioning, Fluid Delivery, Feed Control Bar, Controller A1, Engine RPM Droop Settings, Feed Roller Drive NEUTRAL / FORWARD / REVERSE / Stop Modes, E-Stop Switch S11, Hold-to-Run Switches, Sensitivity Select Switch S4, Troubleshooting, Hydraulic Flow and Pressure Checks, System Pressure Check, Relief Valve PV1 Adjust, Pump Efficiency Testing, Excessive Heat, Excessive Noise or Vibration, Hydraulic Pump PMP3, Feed Roller Control Manifold AH1, Feed Roller Motor MH1
  • 6 β€” Cutter Drum Drive: Theory of Operation, Belt Tensioner, Cutter Drum, Drive Belt Slipping/Dragging, Drive Belt/Sheave Wear, Drive Belt Remove/Replace, Belt Tension Check/Adjust, Cutter Drum Remove/Install, Cutter Drum Inspect, Cutter Drum Shaft Remove/Install, Sheaves and Bushings, Driveline Assembly, Cutter Drum Knives and Shear Bar
  • 7 β€” Trailer: Running Light Functions, Trailer Brake Functions, Domestic and Australian Axles with Electric Brakes, Hydraulic Surge Brakes, European Axles with Mechanical Surge Brakes, Safety Breakaway Function, Fault Tables, Brake Synchronization and Adjustment, Wheel Bearings Replace/Repack, Axle Remove/Replace, Electric and Hydraulic Brake Drum Components, Surge Brake Actuator, Mechanical Brake Drum Components, Breakaway Switch S23
  • Addendum β€” Diagrams and Schematics: Legend for Reference Designators, Hydraulic Schematics (Caterpillar, Cummins, PSI, Deutz), Hydraulic Hose Location, Electrical Schematics (Caterpillar, Cummins, PSI, Deutz), Wire Harnesses (Front, Engine T4F Deutz, Domestic and Australian Trailer Lighting, European Trailer Lighting, Rear, Remote Harness)

Engines Covered

Because the BC1000XL shipped with several powerplants, this Vermeer BC1000XL service manual is split by engine option throughout the electrical and fuel chapters. The engines documented are the Deutz D2.9 L4 Tier 4 Final/Stage IIIB at 49 hp (37 kW), the turbocharged Deutz TD 2.9 L4 Tier 4 Final/Stage IIIB at 74 hp (55 kW), the Power Solutions International 3.0L gasoline engine at 85 hp (63 kW), the Caterpillar C2.2L Tier 4 Interim/Stage IIIB at 48.7 hp (36.3 kW), and the Cummins B3.3 Turbo Tier 4 Interim/Stage IIIB at 74 hp (55 kW). Each engine path has its own intake air and exhaust description, coolant delivery, fuel enable and delivery circuit, glow plug or grid heater function, and engine protection interlock thresholds.

What This BC1000XL Workshop Manual Gives You

This is not a generic chipper book. It is the machine-specific document Vermeer wrote for its own dealer service technicians, and it works the way a technician actually diagnoses a fault β€” from the symptom backward to the failed component. Chapter 4 opens with the controller A1 LED layout and walks through which indicator should be lit for each circuit, then moves into conventional multimeter testing and the VCTool diagnostic path, so electrical faults can be isolated before any component is replaced. Chapter 5 repeats the same discipline on the hydraulic side: a feed roller that will not run, runs one direction only, runs sluggish, overheats, or makes excessive noise is traced through electrical circuit testing first, then hydraulic circuit testing, then a volumetric efficiency test on pump PMP3 to decide whether the pump is worn out or the manifold is leaking internally.

The repair sections are the part most owners never get to see. Hydraulic pump PMP3 removal and installation is shown per engine option, including the PSI belt-drive arrangement with sheave alignment and belt tension procedure. Feed roller control manifold AH1 covers the directional control cartridge DV1, the pressure relief cartridge PV1, solenoid coils L3 and L4, and their seal kits with torque figures. Feed roller motor MH1, feed roller assembly removal, and feed roller disassembly and reassembly with the carriage offset measurement and locking collar torque sequence are all laid out step by step.

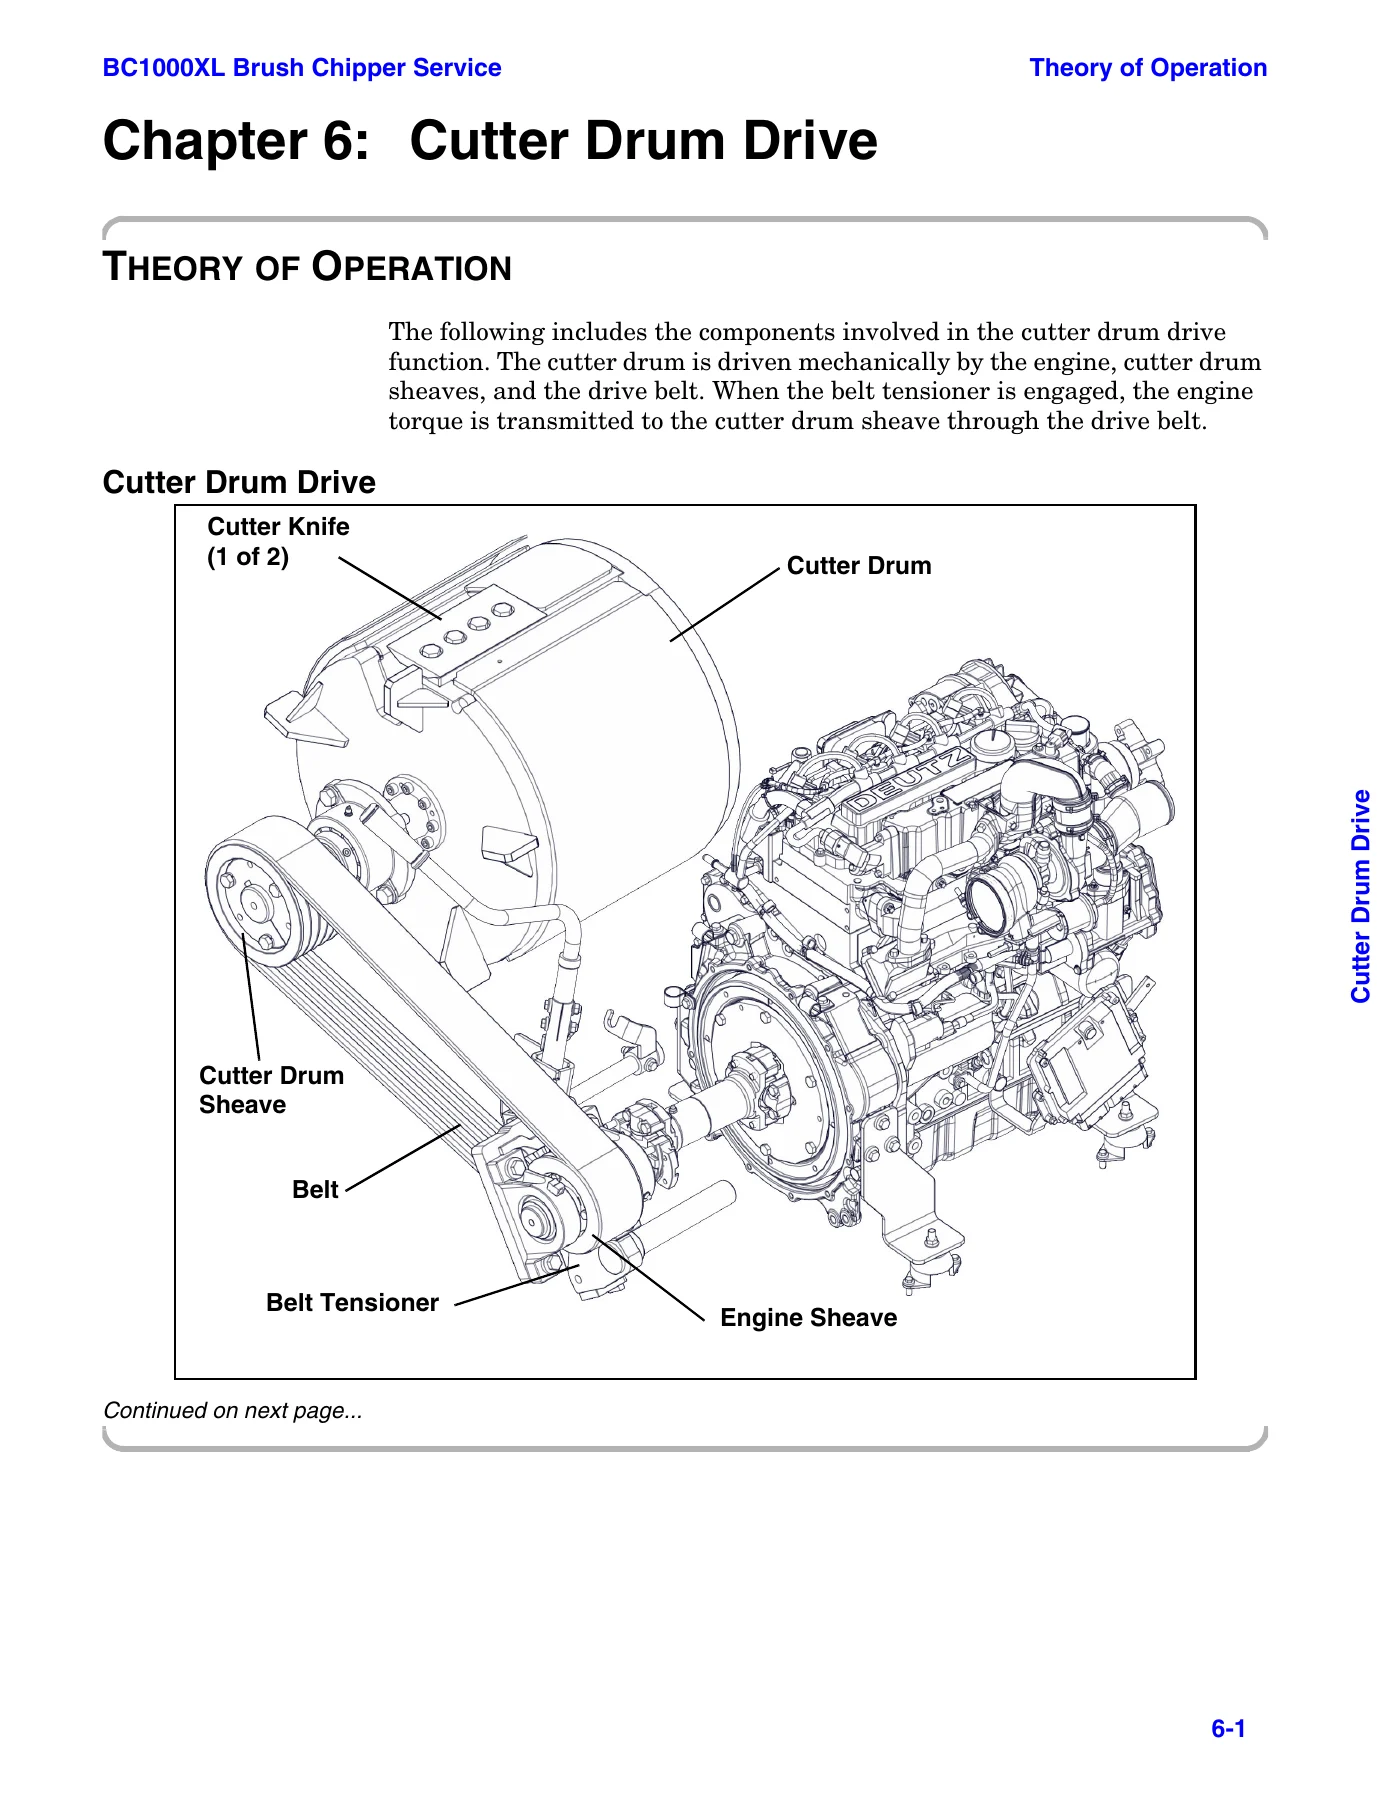
On the mechanical side, Chapter 6 covers the cutter drum drive end to end: drive belt removal and installation, the torque-wrench belt tension check at 125 ft-lb (170 Nm) on the clutch cable pivot, cutter drum removal and installation with bearing retaining compound and thread locker callouts, cutter drum inspection of air paddles, edge welds and pockets, drum shaft removal using the locking collar jacking screws, and sheave and bushing service with the sheave groove gauge method for spotting worn vee walls.

Chapter 7 handles the road-going half of the machine. Domestic and Australian axles with electric or hydraulic surge brakes, plus European axles with mechanical surge brakes, are each covered separately for running lights, brake function, safety breakaway, and adjustment. There are symptom-and-cause fault tables for weak brakes, locking brakes, intermittent brakes, brakes pulling to one side, harsh brakes, noisy brakes, surging brakes and dragging brakes, along with the electrical test procedure for measuring controller voltage and system amperage at the brake magnets, wheel bearing repack and torque values, axle removal and installation, brake drum component replacement, and the hydraulic surge brake actuator teardown. Breakaway switch S23 removal and replacement with heat-shrink sealed connectors closes the chapter.

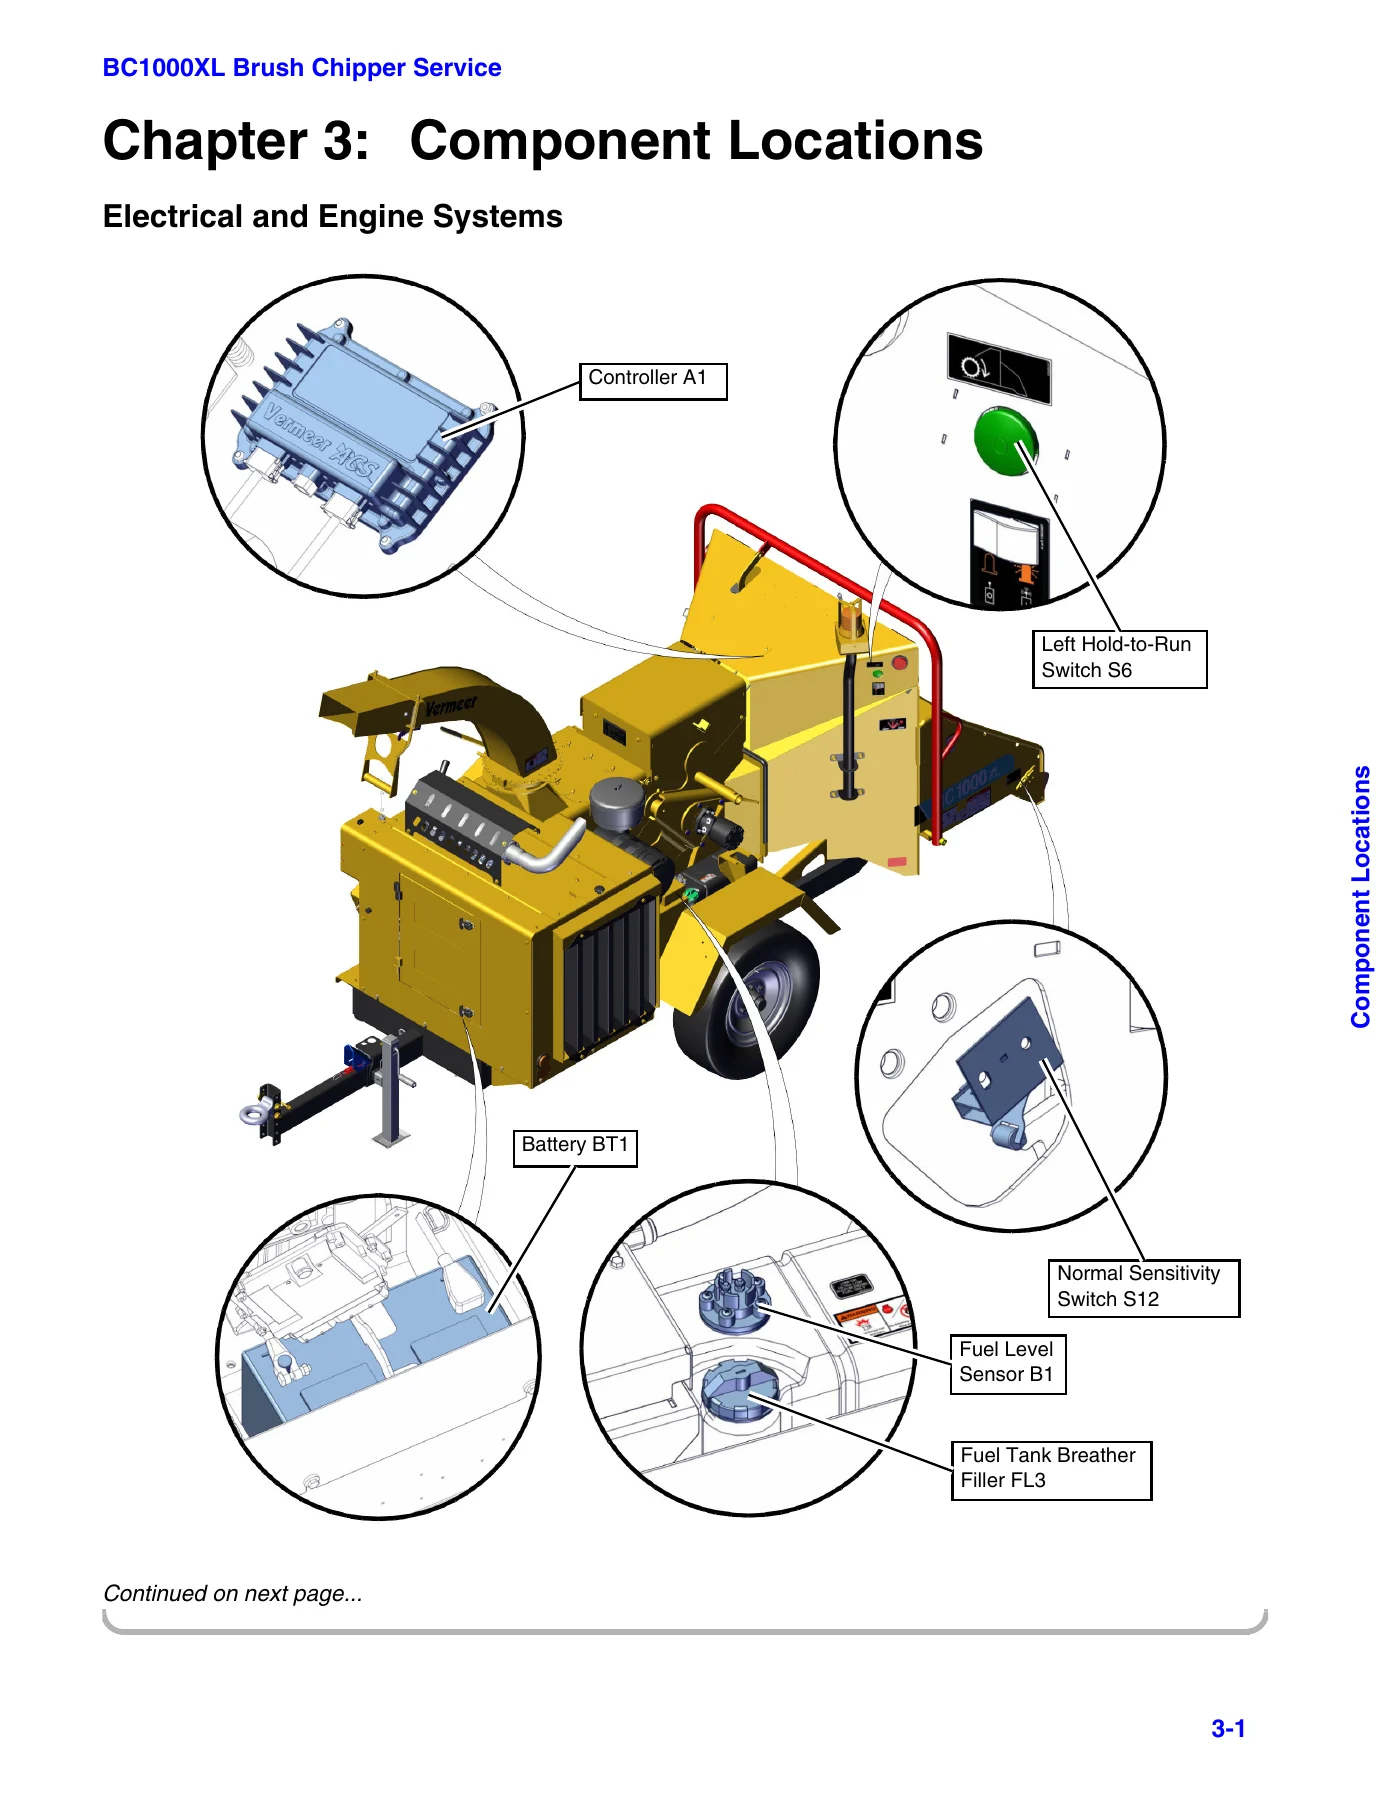
Chapter 2 is the numbers chapter β€” general dimensions, overall length and height, total weight and tongue weight by engine option, axle capacity, tire size and pressure, lug nut torque, fuel and coolant capacity, alternator output, feed roller drive motor speed ranges, pump drive ratios, relief valve setting, hydraulic fluid capacity and lubricant recommendations for every engine. Chapter 3 gives the physical location of the controller, battery, fuses, circuit breakers, relays, sensors, filters and lights, so you are not hunting for a component you have never seen.

Schematics, Wiring Diagrams and Hydraulic Circuits

The Addendum is a full schematic set rather than a single folded drawing. Hydraulic schematics are provided for the Caterpillar, Cummins, PSI and Deutz engine options, with a hydraulic hose location diagram. Electrical schematics are broken out per engine, and front wire harness pin-out diagrams list every connector, pin number, wire colour and circuit designation β€” which is what makes connector-level fault finding possible instead of guesswork. Domestic and Australian trailer lighting, European trailer lighting, rear harness and the remote harness are all included, with the reference designator legend that decodes every letter prefix used across the machine.

Who This Vermeer BC1000XL Repair Manual Is For

Independent mechanics, fleet maintenance shops, arborist operations running their own BC1000XL, and anyone who has been handed a machine with an electrical or hydraulic fault and no documentation. It assumes a competent technician with standard hand tools, a digital multimeter, and the ability to follow a test procedure β€” it is not a beginner’s guide, and it does not try to teach basic mechanics. Where a component sits under an engine manufacturer’s warranty, the manual says so plainly and points you to the appropriate authorised engine service facility rather than encouraging you to void coverage.

Complete PDF Bookmark Tree

Complete Bookmarks

The complete bookmarks in the β€œVermeer BC1000XL Brush Chipper Service Manual – Deutz, Cummins, Caterpillar and PSI Workshop Repair Guide PDF” are as follows:

Chapter 1: Safety and General Informationp. 11
Using the Manualp. 11
Reference Publicationsp. 12
Vermeer Publicationsp. 12
Vendor Publicationsp. 12
Warranty Considerationsp. 12
Vermeer Warrantyp. 12
Engine Warrantyp. 13
Safetyp. 13
Do Not Modify Machinep. 13
Replace Shieldsp. 14
Safety Symbol Explanationp. 14
Safety Equipmentp. 17
Shop Requirementsp. 17
Special Tools and Test Equipmentp. 17
Personnel and Lifting Requirementsp. 17
Replacement Partsp. 17
Part Numbers/Hose Lengths/Fitting Orientationp. 17
Parts Orderingp. 17
Shutdown Procedurep. 18
Stopping the Machinep. 18
Quick Stop Procedurep. 19
Reference Designatorsp. 19
Legend for Reference Designatorsp. 20
Chapter 2: Machine Specificationsp. 23
Machine Specificationsp. 23
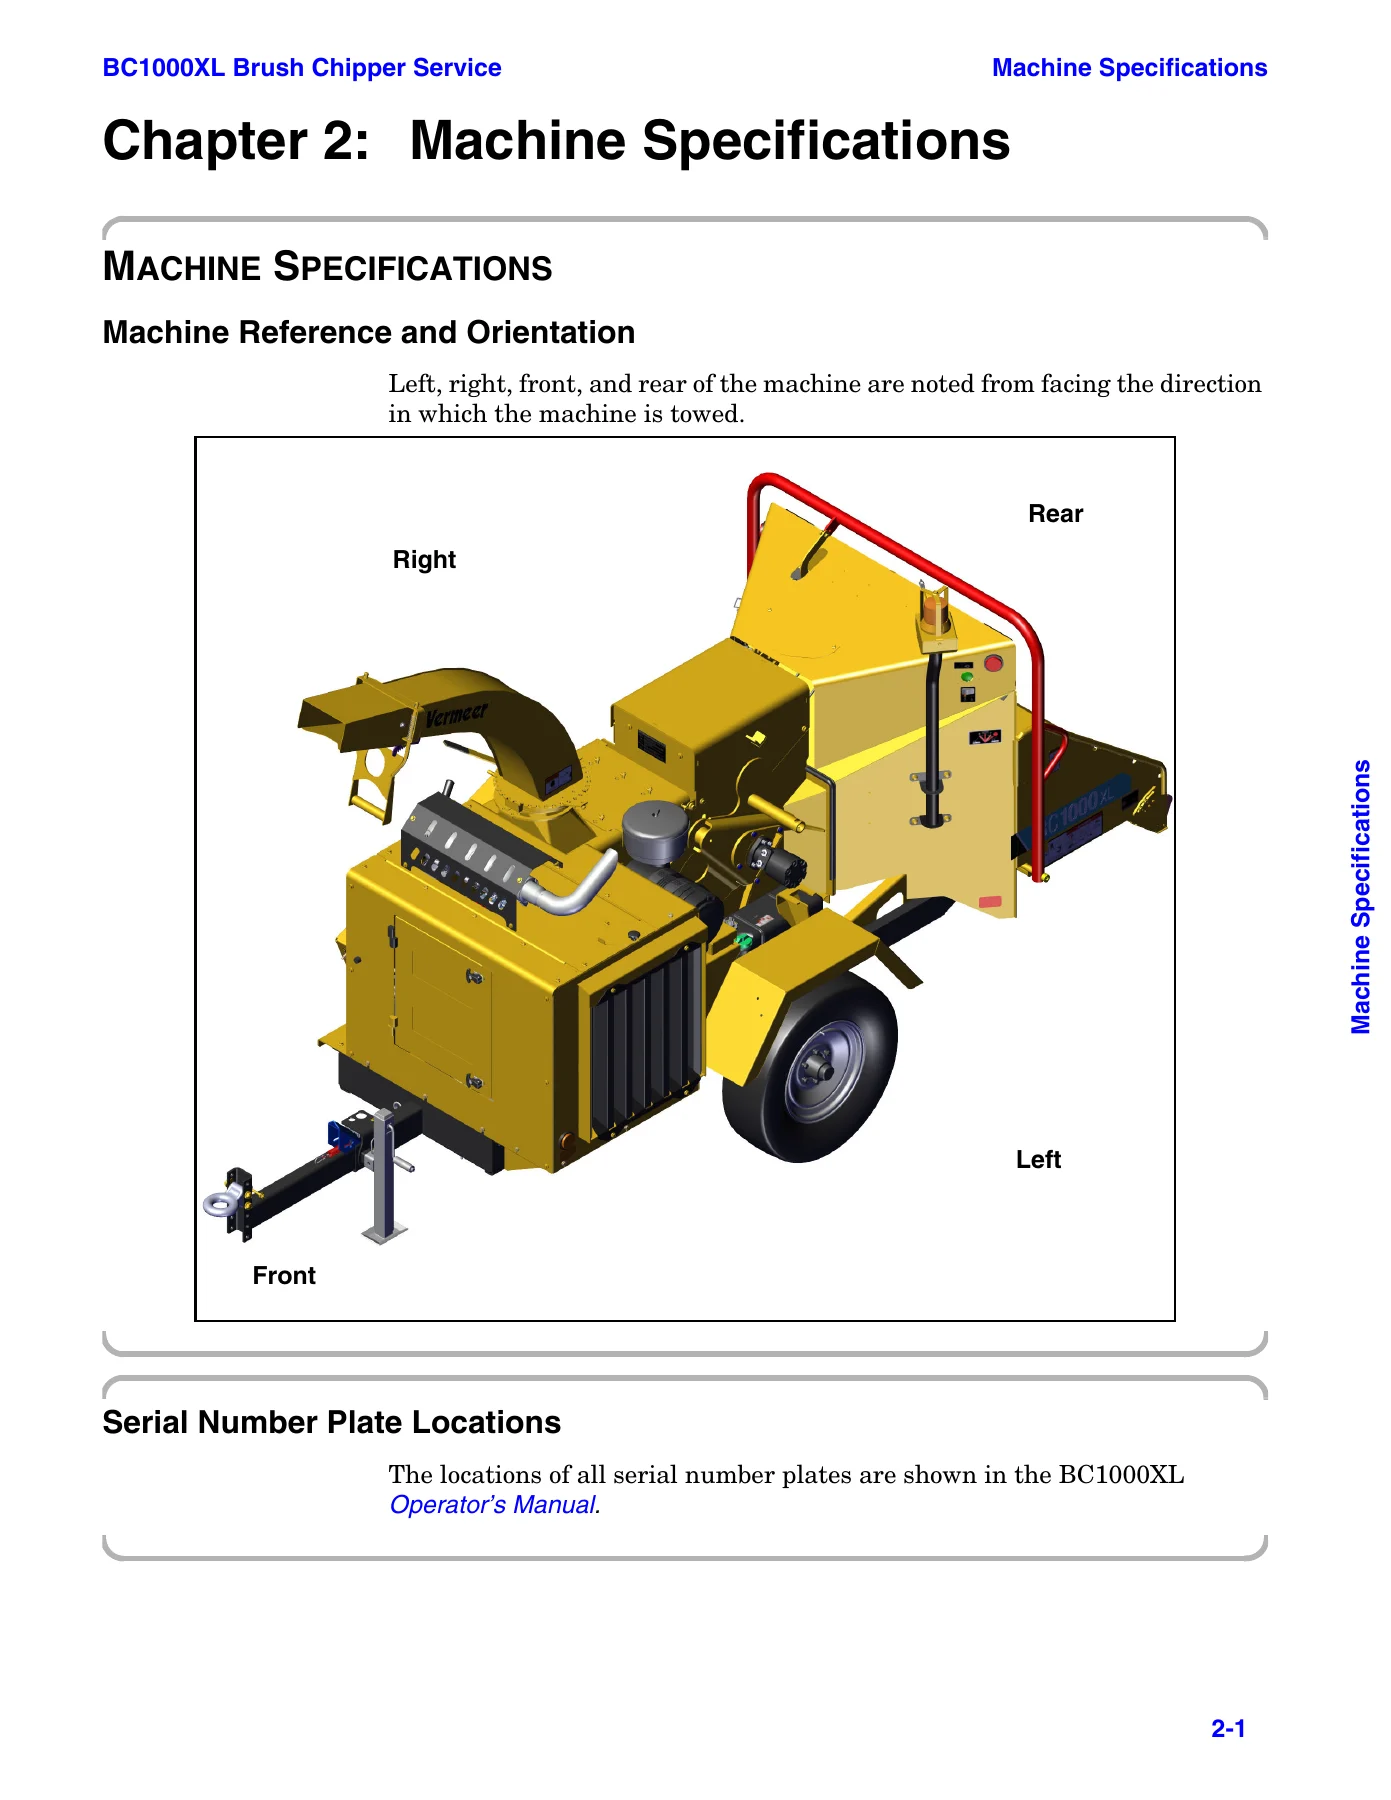
Machine Reference and Orientationp. 23
Serial Number Plate Locationsp. 23
Machine Specificationsp. 24
Generalp. 24
Engine Specificationsp. 25
Electrical Specificationsp. 26
Hydraulic Specificationsp. 27
Lubricantsp. 28
System Interlocksp. 29
Component Weightsp. 30
Chapter 3: Component Locationsp. 35
Electrical and Engine Systemsp. 35
Hydraulic Systemsp. 48
Trailer Functionp. 51
Chapter 4: Electrical and Engine Systemsp. 55
Introductionp. 55
Theory of Operationp. 55
Engine ENG1p. 55
Intake Air, Exhaust, Fuel, and Cooling Functions – Caterpillarp. 57
Intake Air/Exhaustp. 57
Coolant Deliveryp. 58
Fuel Enable and Deliveryp. 58
Intake Air, Exhaust, Fuel, and Cooling Functions – Cumminsp. 60
Intake Air/Exhaustp. 60
Coolant Deliveryp. 61
Fuel Enable and Deliveryp. 62
Intake Air, Exhaust, Fuel, and Cooling Functions – Deutzp. 63
Intake Air/Exhaustp. 63
Coolant Deliveryp. 64
Fuel Enable and Deliveryp. 65
Intake Air, Exhaust, Fuel, and Cooling Functions – PSI (Gasoline)p. 66
Intake Air/Exhaustp. 66
Fuel Enable and Deliveryp. 67
Coolant Deliveryp. 68
Throttle Functionp. 68
Throttle – Increase/ Decreasep. 68
EcoIdle Function – Deutz and PSIp. 70
Electrical Power Sourcep. 72
Battery BT1p. 72
Alternator G1p. 73
Electrical Power Distributionp. 73
Controller A1p. 73
Circuit Breakers CB1 and CB2p. 74
Fuses F1 and F2p. 74
Ignition Switch Circuitsp. 75
Caterpillar – Resistor R14 and Diodes V3 and V4p. 76
Gauges – Caterpillarp. 77
Hourmeter E3p. 77
Fuel Gauge E2p. 78
Gauges – Cummins (Standard)p. 78
Hourmeter E3 and Fuel Gauge E2p. 78
Gauges – Cummins (Deluxe)p. 79
Tachometer/ Hourmeter E5p. 79
4-in-1 Gauge E4p. 81
Gauges – Deutz and PSIp. 83
Fuel Gauge E2p. 83
Multifunction Display E35p. 84
Optional Tree Commander Remote Control Systemp. 88
Remote Transmitter A6p. 89
Remote Receiver A5p. 89
Remote Control/ Console Selector Switches S24 and S25p. 89
Amber Beacon E37p. 89
Remote Horn B15p. 89
Glow Plug Function – Caterpillarp. 90
Ignition Switch S1 in RUN/PREHEAT Positionp. 90
Glow Plug Function – Cumminsp. 91
Preheatp. 91
While Crankingp. 93
Postheatp. 94
Preheat/Postheat Time Calculation Tablep. 94
Glow Plug Function – Deutzp. 95
Ignition Switch S1 in RUN/PREHEAT Positionp. 95
Postheatp. 95
Preheat/Postheat Time Calculation Tablep. 96
Engine Protection Interlocksp. 96
Engine Shutdown – Caterpillarp. 96
Engine Shutdown – Cumminsp. 97
Engine Shutdown – Deutzp. 98
Engine Shutdown – PSIp. 99
Troubleshootingp. 99
Look for the Obviousp. 99
Fault Indicationsp. 99
Methods of Diagnosing/Testingp. 100
Conventional Diagnosis/Testingp. 100
Diagnosis Using Vermeer VCToolp. 101
Diagnostics Accessp. 101
Test Equipmentp. 102
Electrical Power Sourcep. 103
Battery Testingp. 103
EcoIdle Functionp. 104
Gaugesp. 105
Fuel Gauge E2 and Sensor B1p. 105
Hourmeter E3p. 105
Gauges – Cummins (Deluxe)p. 106
Tachometer/ Hourmeter E5p. 106
4-in-1 Gauge E4 Including, Oil Pressure/Coolant Temperature/Fuel Level/Voltmeterp. 107
Engine and Associated Functionsp. 108
Intake Air Functionp. 108
Intake Airp. 108
Fuel Functionp. 109
Fuel Function – Caterpillarp. 109
Fuel Function – Cumminsp. 111
Fuel Function – Deutzp. 113
Fuel Function – PSIp. 114
Cooling Functionp. 116
Glow Plug Function – Caterpillarp. 117
Glow Plug Function – Cumminsp. 119
Glow Plug Function – Deutzp. 121
Engine Protection Interlocksp. 121
Repairp. 122
Electronic Componentsp. 122
Welding Alertp. 122
Enginep. 123
Engine Servicep. 123
Engine Maintenancep. 123
Battery BT1p. 124
Safety Guidelinesp. 124
Maintenancep. 124
Chapter 5: Hydraulic Systemsp. 125
Introductionp. 125
Theory of Operationp. 125
Feed Roller Drive Function Components Overviewp. 125
Fluid Supply/ Conditioningp. 125
Fluid Deliveryp. 126
Feed Control Barp. 126
Controller A1p. 127
Engine RPM – Droop Settingsp. 128
Controller A1 Input/ Output Pin/Wire Color Designationsp. 129
Feed Roller Drive NEUTRAL Modep. 131
Feed Roller Drive FORWARD Modep. 132
Feed Roller Drive REVERSE Modep. 134
Feed Roller Drive Stop Modep. 134
E-Stop Switch S11p. 134
Hold-to-Run Switches S6 (Left) S7 (Right)p. 135
Sensitivity Select Switch S4p. 136
Sensitivity Switches S12 (Normal) and S13 (Reduced)p. 137
Troubleshootingp. 138
General Guidelines for Testing and Repairingp. 138
Avoid Oil Contaminationp. 138
Oil Samplingp. 139
Pump Startup Procedurep. 140
Isolating Faultsp. 140
Pretest Inspectionp. 141
Mechanicalp. 141
Electricalp. 141
Hydraulicp. 141
Feed Roller Drive Faultsp. 142
Fault Indicationsp. 142
Electrical Circuit Testingp. 143
Hydraulic Circuit Testingp. 144
Hydraulic Flow and Pressure Checksp. 145
Volumetric Efficiencyp. 145
Hydraulic System Test Equipmentp. 146
System Pressure Checkp. 147
Relief Valve PV1 – Adjustp. 148
Pump Efficiency Testingp. 149
Pump Flow Measurement Resultsp. 149
Excessive Heatp. 150
Excessive Noise or Vibrationp. 151
Hydraulic Oil Samplingp. 152
Preventive Maintenancep. 152
Repairp. 153
Hydraulic Pump PMP3p. 153
Removep. 153
Installp. 154
Removep. 154
Installp. 156
Feed Roller Control Manifold AH1p. 158
Removep. 158
Installp. 158
Manifold AH1 Components – Replacep. 159
Feed Roller Motor MH1p. 161
Removep. 161
Installp. 161
Hydraulic Fluid Tank RES1p. 161
Feed Roller Assemblyp. 162
Removep. 162
Installp. 163
Feed Roller Disassemblep. 163
Feed Roller Assemblep. 164
Adjust Upper Feed Control Bar Forcep. 164
Adjust Lower Feed Stop Bar Switchesp. 164
Chapter 6: Cutter Drum Drivep. 165
Theory of Operationp. 165
Cutter Drum Drivep. 165
Belt Tensionerp. 166
Cutter Drump. 166
Troubleshootingp. 167
Cutter Drum Drivep. 167
Drive Belt Slipping/ Draggingp. 167
Drive Belt/Sheave Wearp. 167
Cutter Drump. 168
Repairp. 169
Drive Beltp. 169
Remove/Replacep. 169
Installp. 170
Belt Tension – Check/Adjustp. 170
Cutter Drump. 171
Removep. 171
Installp. 173
Cutter Drum – Inspectp. 174
Cutter Drum Shaft – Removep. 175
Installp. 176
Sheaves and Bushingsp. 178
Engine Drive Sheave – Remove/Replacep. 178
Cutter Drum Sheave – Remove/Replacep. 178
Installp. 179
Driveline Assemblyp. 181
Remove/Replacep. 181
Installp. 182
Cutter Drum Knives and Shear Barp. 182
Chapter 7: Trailerp. 183
Theory of Operationp. 183
Running Light Functionsp. 183
Trailer Brake Functionsp. 183
Domestic and Australian Axles with Electric Brakesp. 183
Domestic and Australian Axles with Hydraulic Surge Brakesp. 184
European Axles with Mechanical Surge Brakesp. 185
Safety Breakaway Functionp. 185
Domestic and Australian Axles with Electric Brakesp. 185
Domestic and Australian Axles with Hydraulic Surge Brakesp. 186
European Axles with Mechanical Surge Brakesp. 186
Troubleshootingp. 187
Running Lights Functionsp. 187
Trailer Brake Functionsp. 188
Brake Synchronizationp. 188
Brake Adjustmentp. 188
Brake Troubleshootingp. 188
Fault Table – Domestic and Australian Axles Electric and Hydraulic Brakesp. 189
Fault Table – European Axlesp. 192
Domestic and Australian Axles with Electric Brakes – Testp. 193
Domestic and Australian Axles with Hydraulic Surge Brakes – Inspectp. 195
European Axles with Mechanical Surge Brakes – Inspectp. 195
Brake Adjustmentp. 196
Domestic and Australian Axles with Electric and Hydraulic Surge Brakes – Adjustp. 196
European Axles with Mechanical Surge Brakes – Set Up/ Adjustp. 197
Safety Breakaway Functionp. 199
Testing Switch S23p. 199
Repairp. 200
Wheel Bearings – Replace/Repackp. 200
Axle – Domestic and Australianp. 202
Remove/Replacep. 202
Installp. 202
Electric Brake Drum Components – Replacep. 203
Hydraulic Brake Drum Components – Replacep. 205
Hydraulic Surge Brake Actuator – Domestic and Australian Axlesp. 207
Remove/Replacep. 207
Axle – Europeanp. 210
Remove/Replacep. 210
Installp. 211
Mechanical Brake Drum Components – Replacep. 212
Breakaway Switch S23p. 214
Remove/Replacep. 214
Diagrams and Schematics
Legend for Reference Designators
Hydraulic Schematic – Caterpillar
Hydraulic Schematic – Cummins
Hydraulic Schematic – PSI
Hydraulic Schematic – Deutz
Hydraulic Hose Location
Electrical Schematic – Caterpillar
Wire Harness – Front Caterpillar
Electrical Schematic – Cummins
Wire Harness – Front Cummins
Electrical Schematic – PSI
Wire Harness – Front PSI
Electrical Schematic – Deutz
Wire Harness – Engine T4F Deutz
Electrical Schematic – Domestic and Australian Trailer Lighting
Electrical Schematic – European Trailer Lighting
Harness – Domestic Trailer Lighting
Wire Harness – Rear
Ap. 215
Bp. 215
Cp. 215
Dp. 215
Ep. 215
Fp. 215
Gp. 215
Hp. 215
Ip. 215
Mp. 216
Pp. 216
Rp. 216
Sp. 216
Tp. 216
Vp. 216
Wp. 216
bc1000xl (sn25380-) s5_01 addendum.pdfp. 1
Diagrams and Schematicsp. 219
Legend for Reference Designatorsp. 219
Hydraulic Schematic – Caterpillarp. 220
Hydraulic Schematic – Cumminsp. 221
Hydraulic Schematic – PSIp. 222
Hydraulic Schematic – Deutzp. 223
Hydraulic Hose Locationp. 224
Electrical Schematic – Caterpillarp. 225
Wire Harness – Front Caterpillarp. 226
Electrical Schematic – Cumminsp. 227
Electrical Schematic – Cumminsp. 228
Electrical Schematic – Cumminsp. 229
Wire Harness – Front Cumminsp. 230
Electrical Schematic – PSIp. 231
Electrical Schematic – PSIp. 232
Electrical Schematic – PSIp. 233
Wire Harness – Front PSIp. 234
Electrical Schematic – Deutzp. 235
Electrical Schematic – Deutzp. 236
Electrical Schematic – Deutzp. 237
Electrical Schematic – Deutzp. 238
Wire Harness – Engine T4F Deutzp. 239
Electrical Schematic – Domestic and Australian Trailer Lightingp. 240
Electrical Schematic – European Trailer Lightingp. 241
Harness – Domestic Trailer Lightingp. 242
Wire Harness – Rearp. 243
Diagrams and Schematicsp. 219
Legend for Reference Designatorsp. 219
Hydraulic Schematic – Caterpillarp. 220
Hydraulic Schematic – Cumminsp. 221
Hydraulic Schematic – PSIp. 222
Hydraulic Schematic – Deutzp. 223
Hydraulic Hose Locationp. 224
Electrical Schematic – Caterpillarp. 225
Wire Harness – Front Caterpillarp. 226
Electrical Schematic – Cumminsp. 227
Electrical Schematic – Cumminsp. 228
Electrical Schematic – Cumminsp. 229
Wire Harness – Front Cumminsp. 230
Electrical Schematic – PSIp. 231
Electrical Schematic – PSIp. 232
Electrical Schematic – PSIp. 233
Wire Harness – Front PSIp. 234
Electrical Schematic – Deutzp. 235
Electrical Schematic – Deutzp. 236
Electrical Schematic – Deutzp. 237
Electrical Schematic – Deutzp. 238
Wire Harness – Engine T4F Deutzp. 239
Electrical Schematic – Domestic and Australian Trailer Lightingp. 240
Electrical Schematic – European Trailer Lightingp. 241
Harness – Domestic Trailer Lightingp. 242
Wire Harness – Rearp. 243


IMAGES PREVIEW

Vermeer BC1000XL Brush Chipper Service Manual - Deutz, Cummins, Caterpillar and PSI Workshop Repair Guide PDF β€” PDF page 23 preview
Vermeer BC1000XL Brush Chipper Service Manual - Deutz, Cummins, Caterpillar and PSI Workshop Repair Guide PDF β€” PDF page 35 preview
Vermeer BC1000XL Brush Chipper Service Manual - Deutz, Cummins, Caterpillar and PSI Workshop Repair Guide PDF β€” PDF page 165 preview

Instant PDF Delivery

The Vermeer BC1000XL service manual is delivered as an instant PDF download β€” nothing is shipped, nothing is printed, and there is no waiting on a supplier. Open it on a laptop in the shop, a tablet beside the machine, or a phone under the hood, and print the pages you want to take to the bench. Having the correct relief valve setting, the correct belt tension figure, the correct bearing torque and the correct interlock threshold in front of you is the difference between a repair that holds and a comeback that costs you twice. Keep the whole guide on every device you own.
Reviews

There are no reviews yet.

Be the first to review “Vermeer BC1000XL Brush Chipper Service Manual – Deutz, Cummins, Caterpillar and PSI Workshop Repair Guide PDF”

What Our Customers Say

β˜…β˜…β˜…β˜…β˜… Live reviews from customers
Loading customer reviews...
0
    0
    Your Cart
    Your cart is emptyReturn to Shop
    πŸ›’
    Recently Purchased
    πŸ•’ verified order