★ TRUSTED BY 321,897+ PROFESSIONALS WORLDWIDE
🏒
Trusted Business
Verified & Licensed
πŸ›‘οΈ
Virus Free Files
100% Safe Downloads
πŸ”’
Secure Payment
SSL Protected
⚑
Instant Delivery
Available Immediately
Sale!

Mercury 135 150 175 200 HP Outboard Service Manual 90-878079R01 PDF

Original price was: $39.95.Current price is: $24.95.

Mercury 135 150 175 200 HP outboard service manual 90-878079R01 PDF covering EFI, XRI, XR6, MAG III, V-6 2.0/2.5L engines with repair, diagnostic, and specification procedures.

⚑
Instant PDF Download
Available immediately
πŸ’Ύ
Save to Your Device
Download & keep forever
πŸ›‘οΈ
Antivirus Scanned
100% virus-free
🌍
Trusted Worldwide
175,000+ customers

Description

Mercury 135 150 175 200 HP Outboard Service Manual 90-878079R01 PDF is a complete service manual for Mercury Marine V-6 outboard engines. It covers 135, 150, 175, and 200 HP models, including EFI, XRI, XR6, and MAG III variants. This Mercury 135 150 175 200 HP outboard service manual gives technicians the procedures, specifications, and diagrams needed to service, troubleshoot, and repair these outboards.

File Details

  • Manual type: Service Manual
  • Brand: Mercury Marine
  • Models: 135, 150, 175, 200 HP outboards
  • Engine family: V-6, 2-cycle, loop charged; 2.0 Liter and 2.5 Liter
  • Serial coverage: 0G960500 and Above; EFI Models 0G960500 thru 0T408999
  • Publication number: 90-878079R01
  • Date: August 2002
  • Language: English
  • Page count: 654
  • File format: PDF

Models Covered

  • 135 HP
  • 150 HP
  • 175 HP
  • 200 HP
  • 150 XRI
  • 175 XRI
  • 200 XRI
  • XR6
  • MAG III
  • EFI models

Chapters Covered

  • Section 1 – General Information and Specifications: Specifications, Maintenance, General Information, Outboard Installation
  • Section 2 – Electrical: Ignition, Charging and Starting System, Timing, Synchronizing and Adjusting, Wiring Diagrams
  • Section 3 – Fuel System: Fuel Pump, Carburetion, Fuel Injection, Oil Injection, Emissions
  • Section 4 – Powerhead: Powerhead, Cooling
  • Section 5 – Mid-Section: Clamp/Swivel Brackets and Drive Shaft Housing, Power Trim
  • Section 6 – Gear Housing: Right Hand Non-Ratcheting, Left Hand Non-Ratcheting
  • Section 7 – Attachments/Control Linkage
  • Section 8 – Color Diagrams

This Mercury 135 150 175 200 HP service manual is organized by system so a mechanic can move from general specifications into ignition, charging, fuel delivery, powerhead, midsection, gear housing, and control linkage work. It includes exploded views, wiring diagrams, flow charts, torque values, service limits, and step-by-step removal and installation sequences.

Engine and Model Coverage

The manual covers Mercury V-6 two-cycle loop-charged outboards in 2.0 Liter and 2.5 Liter displacements. Specific model families include 135 HP, 150 HP, 175 HP, 200 HP, 150 XRI, 175 XRI, 200 XRI, XR6, and MAG III. Serial number coverage starts at 0G960500 and above, with EFI models listed from 0G960500 through 0T408999. Carburetor and EFI fuel systems are both addressed, along with oil injection and emissions information.

Electrical System

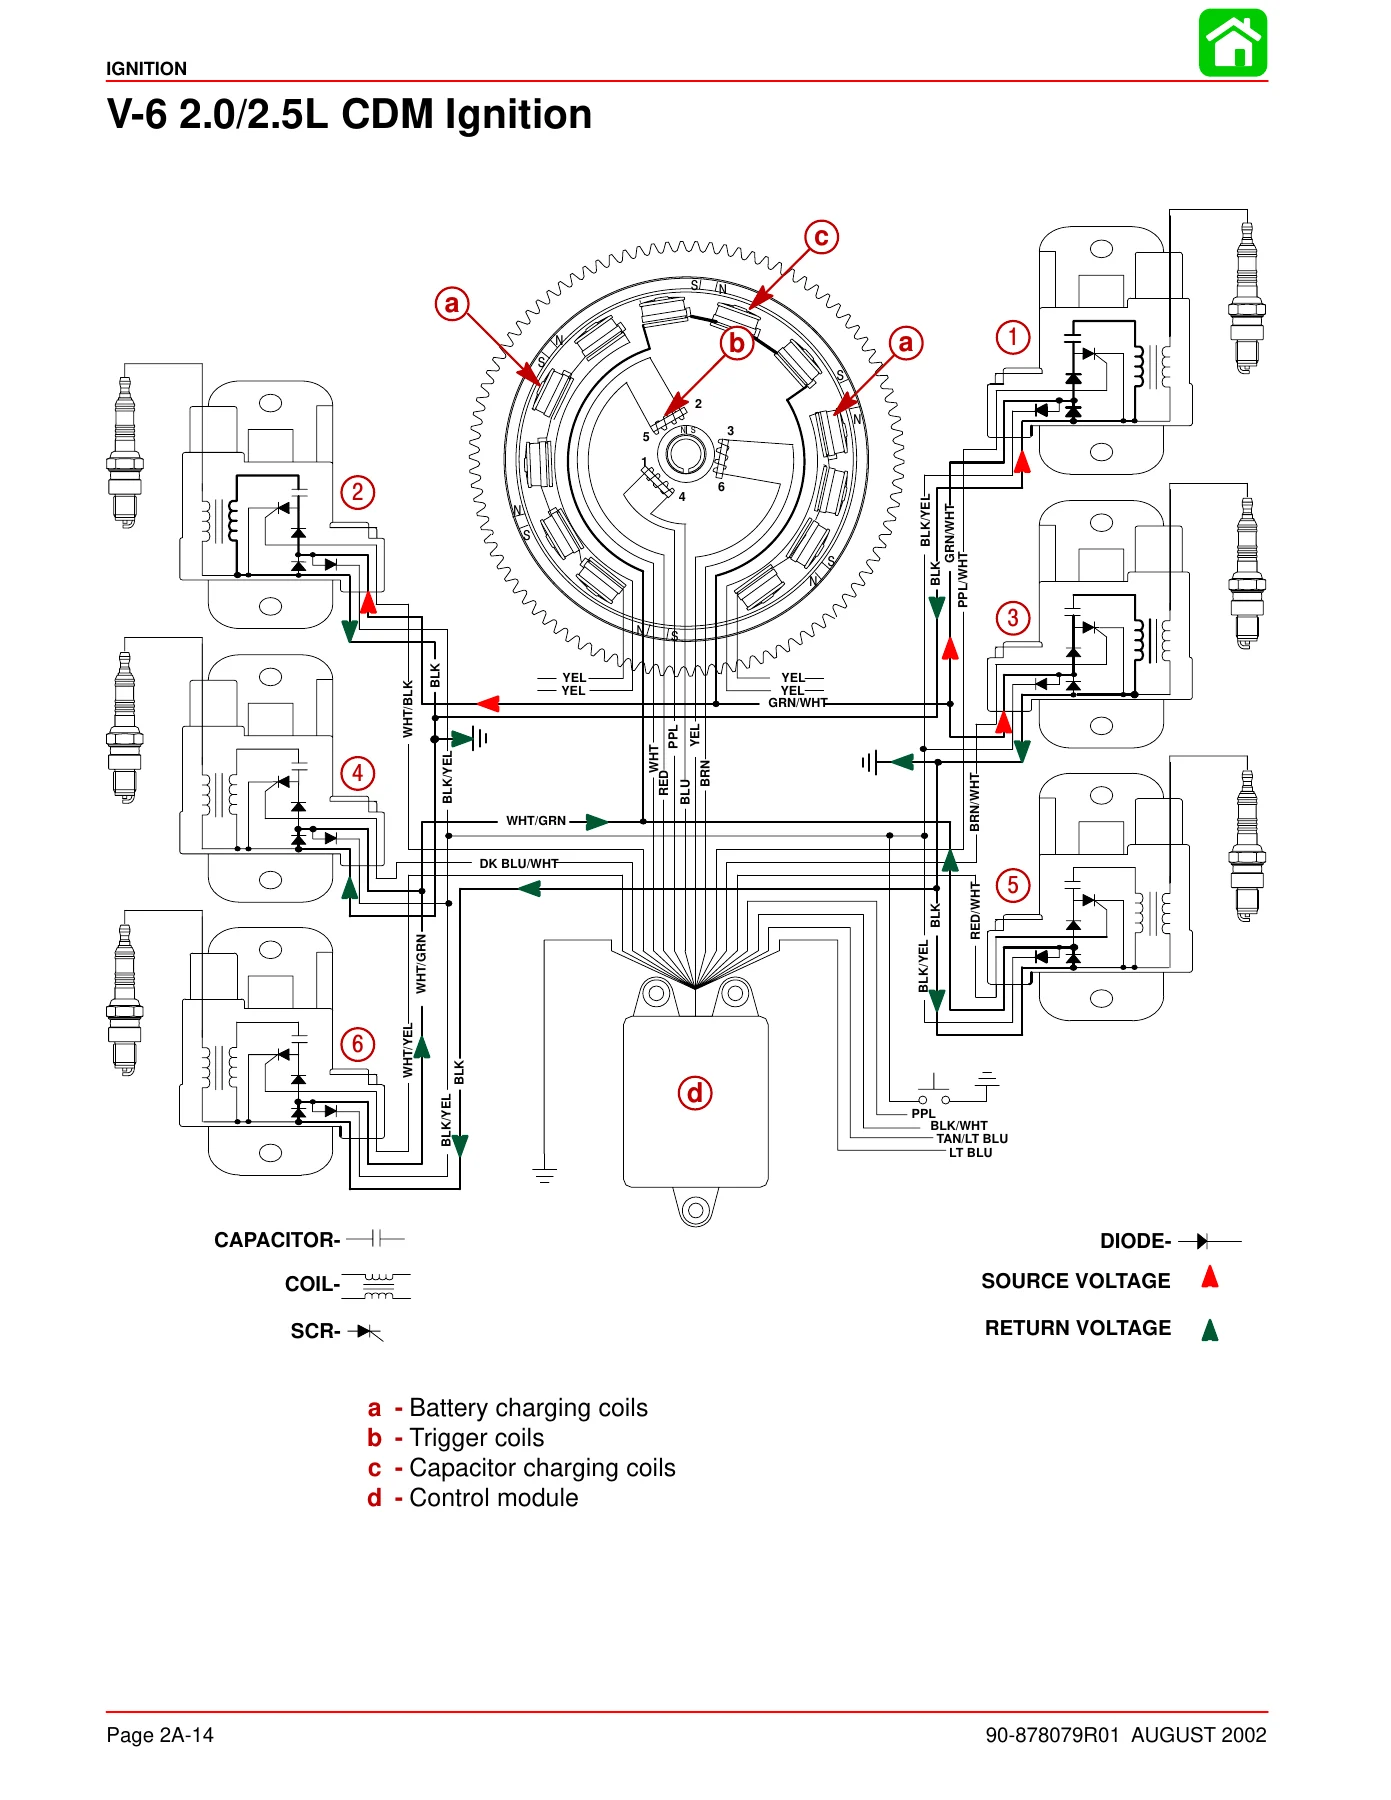
Electrical coverage includes capacitor discharge ignition with CDM modules, stator, trigger assembly, flywheel, control module, charging system, starting system, voltage regulators, battery cables, and wiring diagrams. Troubleshooting flow charts are provided for no-spark conditions, CDM stop diode faults, stator output tests, trigger input tests, bias circuits, idle stabilizer, rev-limit circuit, and EFI injector timing signals.

Fuel System

The fuel system section covers pulse fuel pumps, carburetor circuits, jet placement, float adjustment, synchronization, EFI fuel management, vapor separator, electric fuel pump, fuel rail, injectors, pressure regulator, water separating filter, and oil injection. The manual includes fuel pressure specifications, vacuum test procedures, injector electrical tests, detonation control system tests, and component removal and installation steps.

Powerhead and Cooling

Powerhead service includes removal from the driveshaft housing, complete disassembly, cleaning and inspection, cylinder bore measurement, piston and ring service, crankshaft and connecting rod inspection, reed block service, crankcase cover installation, torque sequences, and reassembly. Cooling coverage includes water flow description, thermostats, poppet valve, water pump, pressure checks, and overheating diagnosis.

Mid-Section, Gear Housing, and Controls

Mid-section coverage includes swivel bracket, steering arm, transom brackets, driveshaft housing, exhaust tube, dyna-float suspension, and power trim. Gear housing sections cover right-hand and left-hand non-ratcheting designs, including driveshaft, pinion gear, forward gear, reverse gear, bearing carrier, propeller shaft, shimming, backlash measurement, and water pump installation. Attachment and control linkage instructions cover steering cables, link rods, dual outboard routing, and trim tab adjustment.

Systems and Procedures Covered

  • Capacitor discharge ignition (CDM) theory, testing, and component replacement
  • Stator, trigger, flywheel, control module, and CDM service
  • Charging system, voltage regulator, battery, and starting system diagnostics
  • Timing, synchronization, throttle position sensor, and oil pump adjustment
  • Fuel pump, carburetor, EFI, vapor separator, fuel rail, injector, and pressure regulator service
  • Oil injection system setup, bleeding, pump volume testing, and troubleshooting
  • Powerhead removal, disassembly, cleaning, inspection, reassembly, and installation
  • Cylinder block, crankshaft, pistons, connecting rods, reed block, and cylinder head service
  • Cooling system, thermostat, water pump, poppet valve, and water flow diagnosis
  • Mid-section, swivel bracket, transom bracket, driveshaft housing, and power trim repair
  • Right-hand and left-hand non-ratcheting gear housing disassembly, shimming, and reassembly
  • Steering cable, control linkage, and attachment installation

Why This Mercury Service Manual Is Useful

Working on a V-6 two-stroke outboard without the correct service data can lead to incorrect assembly, damaged components, or repeat failures. This Mercury 135 150 175 200 HP outboard service manual provides the model-specific specifications and step-by-step procedures needed for accurate repairs, including gear housing shimming, pinion depth, forward and reverse gear backlash, ignition troubleshooting, fuel injection testing, and powerhead torque sequences.

Complete PDF Bookmark Tree

Complete Bookmarks

The complete bookmarks in the β€œMercury 135 150 175 200 HP Outboard Service Manual 90-878079R01 PDF” are as follows:

coverp. 1
135/150/175/ 200 HPp. 1
Noticep. 2
Notice to Users of This Manualp. 2
Cleanliness and Care of Outboard Motorp. 3
Page Numberingp. 3
Service Manual Outlinep. 4
1ap. 5
Section 1A – Specificationsp. 5
Table of Contentsp. 5
Specificationsp. 5
Mercury/Quicksilver Lubricants and Sealantsp. 10
1bp. 13
Section 1B – Maintenancep. 13
Table of Contentsp. 13
Specificationsp. 13
Special Toolsp. 14
Mercury/Quicksilver Lubricants and Sealantsp. 14
Inspection and Maintenance Schedulep. 15
Flushing Enginep. 16
Fuel Systemp. 17
Fuel Line Inspectionp. 17
Fuel Line Filter (Models With Carburetors)p. 17
Water Separating Fuel Filter – EFI Modelsp. 18
Corrosion Control Anodep. 18
Spark Plug Inspectionp. 19
Battery Inspectionp. 19
Fuse Replacementp. 20
Lubrication Pointsp. 20
Checking Power Trim Fluidp. 22
Gear Case Lubricationp. 23
Storage Preparationp. 24
1cp. 27
Section 1C – General Informationp. 27
Table of Contentsp. 27
Serial Number Locationp. 27
Conditions Affecting Performancep. 28
Weatherp. 28
Boatp. 29
Trimp. 30
Enginep. 31
Engine Compressionp. 31
Following Complete Submersionp. 32
Model 135/150/200 Powerhead Front Viewp. 34
Model 135/150/200 Powerhead Starboard Viewp. 35
Model 135/150/200 Powerhead Port Viewp. 36
Model 135/150/200 Powerhead Top Viewp. 37
Model 135/150/200 Powerhead Aft Viewp. 38
Model 150 XRI/175 XRI/200 XRI Powerhead Front Viewp. 39
Model 150 XRI/175 XRI/200 XRI Powerhead Starboard Viewp. 40
Model 150 XRI/175 XRI/200 XRI Powerhead Port Viewp. 41
Model 150 XRI/175 XRI/200 XRI Powerhead Top Viewp. 42
Model 150 XRI/175 XRI/200 XRI Powerhead Aft Viewp. 43
Painting Proceduresp. 44
Decal Applicationp. 45
1dp. 47
Section 1D – Outboard Motor Installationp. 47
Table of Contentsp. 47
Installation Specificationsp. 47
Lifting Outboardp. 47
Installing Outboard to Boat Transomp. 48
Installing Outboardp. 49
Drilling Outboard Mounting Holesp. 49
Securing Outboard To Boat Transomp. 50
Steering Cablep. 50
Steering Link Rodp. 51
Electrical, Hoses and Control Cablesp. 52
Installation Notep. 52
Remote Wiring Harnessp. 52
Battery Cablesp. 53
Fuel Hose Connectionp. 54
Oil Hose Connectionsp. 54
Speedometer Tubing Connectionp. 54
Water Pressure Tubing Connectionp. 54
Shift Cablep. 55
Installationp. 56
Throttle Cablep. 58
Front Clamp Reassemblyp. 59
Filling the Oil Injection Systemp. 60
Bleeding Air from Oil Injection Pump and Oil Injection Outlet Hosep. 61
Adjusting the Oil Injection Pumpp. 61
Trim In Stop Adjustmentp. 62
Trim Tab Adjustmentp. 63
2ap. 65
Section 2A – Ignitionp. 65
Table of Contentsp. 65
Specificationsp. 66
Special Toolsp. 68
Flywheel/Starter Motorp. 70
CDM Mountingp. 72
Solenoid Mountingp. 74
Theory of Operationp. 76
V-6 2.0/2.5L CDM Ignitionp. 78
Capacitor Charging #1, #2, & #3 CDMsp. 79
Capacitor Charging #4, #5 & #6 CDMsp. 79
#1 Cylinder Trigger Circuitp. 79
Ignition Coil Circuitp. 79
Stop Circuitp. 79
Ignition Component Descriptionp. 80
Capacitor Discharge Module (CDM)p. 80
Trigger Coilp. 80
Control Modulep. 80
Stator Assemblyp. 81
Flywheelp. 81
CDM (P/N 827509) Trouble Shooting Flowchartp. 83
CDM (P/N 827509)p. 83
CDM Stop Diode Trouble Shootingp. 84
CDM Trouble Shooting Flowchartp. 86
Direct Voltage Adaptor (DVA)p. 91
Troubleshooting Tipsp. 91
Ignition Test Proceduresp. 92
Direct Voltage Adaptor (DVA) Testp. 92
Resistance Testsp. 96
Bias Circuitp. 96
Shift Stabilizer Circuitp. 97
Idle Stabilizerp. 97
Rev-Limit Circuitp. 97
EFI Injector Timing Signal Testp. 98
EFI Detonation Control Systemp. 98
Ignition Component Removalp. 99
Flywheel Removalp. 99
Flywheel Installationp. 99
Stator Removalp. 100
Stator Installationp. 101
Trigger Removalp. 102
Trigger Installationp. 103
CDM Removalp. 104
CDM Installationp. 104
Control Module Removalp. 104
Control Module Installationp. 105
Detonation Module Removal (200 XRI only)p. 105
Detonation Module Installationp. 105
2bp. 107
Section 2B – Charging and Starting Systemp. 107
Table of Contentsp. 107
Specificationsp. 107
Special Toolsp. 108
Starter Motorp. 109
Electrical Platep. 110
Flywheel/Starter Motorp. 112
Battery Cable Sizep. 114
Replacement Partsp. 114
Recommended Batteryp. 115
Batteryp. 115
Charging a Discharged Batteryp. 115
Winter Storage of Batteriesp. 116
Flywheel Removal and Installationp. 117
Removalp. 117
Installationp. 118
Battery Charging System Descriptionp. 119
Battery Charging System Troubleshootingp. 120
General Troubleshootingp. 120
40 Ampere Alternator Systemp. 120
Removal of Voltage Regulatorsp. 123
Installation of Voltage Regulatorsp. 124
Incorporating a Battery Isolator with a 40 Ampere Charging Systemp. 124
System Wired for 40 Ampere Output to Isolatorp. 124
System Wired for Split Outputp. 125
Starter Systemp. 126
Starter System Componentsp. 126
Descriptionp. 126
Troubleshooting the Starter Circuitp. 126
Starter Circuit Troubleshooting Flow Chartp. 128
Starter Removalp. 130
Installationp. 130
Disassemblyp. 131
Starter Cleaning, Inspection and Testingp. 133
Starter Reassemblyp. 136
2cp. 141
Section 2C – Timing, Synchronizing & Adjustingp. 141
Table of Contentsp. 141
Specificationsp. 141
Special Toolsp. 143
Adjustmentsp. 144
Carburetor Modelsp. 144
Electronic Fuel Injection Modelsp. 150
2dp. 161
Section 2D – Wiring Diagramsp. 161
Table of Contentsp. 161
Power Trim Wiring Diagramp. 162
Instrument Wiring Connectionsp. 163
Commander 3000 Classic Panel Remote Controlp. 164
Commander 3000 Panel Remote Controlp. 165
Instrument/Lanyard Stop Switch Wiring Diagramp. 166
Oil Level Gauge Wiring Diagramp. 167
Instrument/Lanyard Stop Switch Wiring Diagram (Dual Outboard)p. 168
Panel Mount Remote Control Wiring Installationp. 170
QSI Gauge Wiring Diagramsp. 171
Tachometer Wiring Diagramp. 171
Water Temperature Gaugep. 172
Oil Level Gauge Wiringp. 173
Engine Synchronizer Wiring Diagramp. 175
Maintenancep. 176
Multi-Function Gaugep. 177
Dip Switch Setting/Testingp. 177
Outboard Multi-Function Gauge Settingp. 178
3ap. 179
Section 3A – Fuel Pumpp. 179
Table of Contentsp. 179
Specificationsp. 180
Special Toolsp. 180
Fuel Pump Assemblyp. 182
Fuel Pump Description/Operationp. 184
Checking for Restricted Fuel Flow Caused by Anti-Siphon Valvesp. 184
Checking Fuel Pump Lift (Vacuum)p. 185
Vacuum Test Troubleshootingp. 186
Fuel Pump Removal/Disassemblyp. 188
Cleaning/Inspectionp. 189
Reassembly/lnstallationp. 189
3bp. 193
Section 3B – Carburetorsp. 193
Table of Contentsp. 193
Attenuator And Carburetor Throttle Leversp. 194
Fuel Linesp. 196
Carburetorp. 198
Fuel System – Troubleshootingp. 202
General Informationp. 202
Problem: Engine Turns Over But Will Not Start Or Starts Hard When Coldp. 202
Problem: Engine Idles Rough and Stalls. Problem: Engine Hesitates Upon Acceleration. Problem: Engine Runs Uneven or Surges.p. 203
Reed Valve Leak Testp. 204
Thermal Air Valve Circuit Descriptionp. 205
Enrichener System Descriptionp. 206
Manual Operation of Enrichener Valvep. 206
Enrichener Valve Testp. 207
Carburetorp. 208
Carburetor Fuel Circuitsp. 209
Float Bowl Circuitp. 209
Idle Circuitp. 210
Cold Start Circuitp. 211
Off-Idle Circuitp. 211
Main Circuitp. 212
Back Draft Circuitp. 213
Carburetor Specificationsp. 214
Carburetor Placement and Jet Location for Each Cylinderp. 215
Carburetor Jet Placementp. 216
High Altitude Recommendationsp. 217
Jet Part Number Chartp. 217
High Altitude Jet Chartp. 218
Removing Carburetor(s) from Enginep. 219
Throttle Shaft Screwsp. 220
Float Adjustmentp. 220
Installing Carburetor(s) to Enginep. 221
3cp. 223
Section 3C – Fuel Injectionp. 223
Table of Contentsp. 223
Specificationsp. 224
Special Toolsp. 225
Ignition Controller and Detonation Modulep. 228
ECM Assemblyp. 230
Fuel Management Systemp. 232
Fuel Pumpp. 236
Electronic Fuel Injection (EFl) Systemp. 238
Introductionp. 238
Using the Test Proceduresp. 238
EFI System Testsp. 238
Safety Precautionsp. 238
Fuel Injection System Functionp. 239
Preliminary Checksp. 239
Ignition Spark Checkp. 239
Electronic Fuel Injection Set Upp. 240
Fresh Quality Fuelp. 240
Low Battery Voltagep. 240
Fuel Flow Diagramp. 241
Fuel Flow Component Descriptionp. 242
Pulse Fuel Pump (k)p. 242
Water Separating Filter (i)p. 242
Vapor Separator (n)p. 242
Bleed System (f,g)p. 242
Final Filter (t)p. 242
Electric Fuel Pump (Inside Vapor Separator) (q)p. 242
Fuel Injectors (a)p. 243
Induction Manifold (r)p. 243
Fuel Pressure Regulator (e)p. 243
EFI Electrical Componentsp. 243
EFI Fuel Management (Low Pressure Fuel Route)p. 246
EFI Fuel Management (High Pressure Fuel Route)p. 247
Fuel Rail Electrical/Fuel Determinationp. 248
EFI System Test Proceduresp. 249
Fuel Gauge Connection/Pressure Testp. 249
Vapor Separator Fuel Delivery Testp. 250
Vapor Separator Float Testp. 251
Water Separating Filter Flow Testp. 252
Pulse Fuel Pump Delivery Testp. 253
Final Filter Check and De-Pressurizing EFI System Proceduresp. 254
Pressure Regulator Testp. 256
Electric Fuel Pump Voltage Testp. 258
Injector Electrical Harness Testp. 261
ECM Injector Driver Testp. 262
Injector Fuel Delivery Testp. 262
Injector Operation Test (Manifold Cover Removed)p. 262
Induction Manifold Leak Check (Manifold Cover Removed)p. 265
Air Temperature Sensor Testp. 267
Engine Head Temperature Sensor Testp. 268
Detonation Control System Test (200 Models Only)p. 268
Detonation Sensor Checkp. 269
Detonation Control Module Checkp. 270
Throttle Position Sensor Testp. 271
Map Sensor Testp. 272
Problem Diagnosisp. 273
Engine Head Temperature Sensor Removalp. 276
EFI Induction Manifold Removalp. 277
Water Separating Filter Assembly Removalp. 278
Water Separating Filter Assembly Installationp. 279
Throttle Position Sensor and Temperature Sensor Fuel Injector Harness Disconnectionsp. 279
Oil Reservoir Removalp. 281
Fuel Pressure Regulator Removalp. 282
Fuel Pressure Regulator Disassemblyp. 283
Fuel Pressure Regulator Reassemblyp. 283
Vapor Separator Removalp. 284
Vapor Separator Disassemblyp. 286
Installing Vapor Separator Assembly to Induction Manifoldp. 292
Manifold Removalp. 295
EFI Induction Manifold Disassemblyp. 297
Air Temperature Sensor Removalp. 297
Throttle Position Sensor Removalp. 298
Fuel Rail Removalp. 299
Fuel Rail Disassemblyp. 301
Fuel Injector Removal and Disassemblyp. 301
Injector Harness Removalp. 303
Throttle Linkage Removedp. 304
EFI System Cleaning and Inspectionp. 305
Induction Manifold Assemblyp. 306
Injector Harness Installationp. 306
Fuel Injector Assembly and Installationp. 307
Fuel Rail Assemblyp. 309
Fuel Rail Installationp. 309
Throttle Position Sensor Installationp. 311
Air Temperature Sensor Installationp. 312
EFI Induction Manifold Installationp. 314
Oil Reservoir Installationp. 316
Vapor Separator Installationp. 317
Throttle Position Sensor, Air Temperature Sensor and Fuel Injector Harness Connectionsp. 319
ECM Installationp. 321
Engine Head Temperature Sensor Installationp. 322
3dp. 323
Section 3D – Oil Injectionp. 323
Table of Contentsp. 323
Operation of the Oil Injection Systemp. 324
Final Checks Before Operation of Enginep. 324
Checking Operation of the Oil Injection System (Engine Running)p. 325
Oil Injection Componentsp. 326
Oil Injection Flow System Componentsp. 328
Oil Injection Flow Systemp. 329
Pump Drive Assemblyp. 330
Pump Drive Systemp. 330
Set Up Instructions for Oil Injection Systemp. 331
Bleeding Air from Oil Injection Pump and Oil Injection Outlet Hosep. 334
Adjusting Oil Injection Pumpp. 334
Oil Injection Pumpp. 336
Worm Bushingp. 337
Worm Bushing Removalp. 337
Worm Bushing Installationp. 337
Oil Injection Pump Installationp. 338
Installing Drive Gear (for Oil Injection Pump) onto Crankshaftp. 338
Oil Injection System Trouble Shooting Chartp. 339
Oil Pump Volume (Flow) Testp. 341
Engine Mounted Oil Reservoirp. 342
3ep. 343
Section 3E – Emissionsp. 343
Table of Contentsp. 343
Exhaust Emissions Standardsp. 343
What Are Emissions?p. 343
Hydrocarbons – HCp. 343
Carbon Monoxide – COp. 343
Oxides of Nitrogen – NOxp. 344
Controlling Emissionsp. 344
Stoichiometric (14.7:1) Air/Fuel Ratiop. 344
Outboard Hydrocarbon Emissions Reductionsp. 344
Stratified vs Homogenized Chargep. 345
Homogenized Chargep. 345
Stratified Chargep. 346
Emissions Informationp. 346
Manufacturer’s Responsibility:p. 346
Dealer Responsibility:p. 347
Owner Responsibility:p. 347
EPA Emission Regulations:p. 347
Manufacturer’s Certification Label:p. 348
Service Replacement Certification Labelp. 349
4ap. 350
Section 4A – Powerheadp. 350
Table of Contentsp. 350
Powerhead Specifications (2 Liter Model 135)p. 351
Powerhead Specifications (2.5 Liter Model 150/175/200)p. 352
Special Toolsp. 353
Powerhead Repair Standp. 354
Cylinder Block Assemblyp. 355
Exhaust Manifold and Exhaust Platep. 357
Crankshaft, Pistons and Connecting Rodsp. 359
Reed Block and Cylinder Headp. 361
Bleed System Routing (Carburetor Models)p. 363
Bleed System Routing (EFI Models)p. 364
Torque Sequencep. 365
General Informationp. 366
Powerhead Removal from Driveshaft Housingp. 367
Removing Engine Componentsp. 371
Powerhead Disassemblyp. 372
Cleaning and Inspectionp. 383
Cylinder Block and Crankcase Coverp. 383
Special Service Informationp. 383
Cylinder Boresp. 384
Pistons and Piston Ringsp. 385
Cylinder Heads and Exhaust Divider Platep. 387
Crankshaftp. 387
Crankshaft (and End Cap) Bearingsp. 388
Reed Block Assemblyp. 389
Reed Block Housingp. 390
Connecting Rodsp. 390
Powerhead Reassembly and Installationp. 393
Generalp. 393
Crankshaft Installationp. 398
Piston and Connecting Rod Reassemblyp. 400
Piston and Piston Ring Combinationsp. 403
Piston Installationp. 403
Crankcase Cover Installationp. 407
Assembly of Reed Blocks to Intake Manifoldp. 409
Assembly of Exhaust Manifold to Blockp. 409
Cleaning and Inspectionp. 411
Cylinder Block and Crankcase Coverp. 411
Reinstalling Engine Componentsp. 413
Throttle Lever and Shift Shaftp. 415
Powerhead Installation On Driveshaft Housingp. 419
Gasoline/Oil Break-in Mixturep. 424
Break-ln Procedurep. 424
4bp. 425
Section 4B – Coolingp. 425
Table of Contentsp. 425
Specificationsp. 425
Special Toolsp. 426
Temperature Sensorp. 427
Water Flowp. 428
2.5 Litre V-6 Water Flow Diagram 2000 Modelsp. 429
Troubleshootingp. 431
Thermostat Testp. 431
Water Pressure Checkp. 432
Water Pump Cleaning and Inspectionp. 432
Problem Diagnosisp. 434
5ap. 435
Section 5A – Clamp/Swivel Brackets & Driveshaft Housingp. 435
Table of Contentsp. 435
Swivel Bracket and Steering Armp. 436
Transom Bracketsp. 438
Drive Shaft Housing and Exhaust Tubep. 440
Drive Shaft Housing and Dyna-Float Suspensionp. 442
Removal and Disassemblyp. 442
Reassembly and Installationp. 445
5bp. 449
Section 5B – Power Trimp. 449
Table of Contentsp. 449
Power Trim Specificationsp. 449
Special Toolsp. 450
Power Trim Componentsp. 452
Power Trim Motorp. 454
Power Trim – General Informationp. 455
Descriptionp. 455
Trimming Characteristicsp. 455
Trailering Outboardp. 456
Tilting Outboard Manuallyp. 456
Trim β€œIn” Angle Adjustmentp. 457
Striker Plate Replacementp. 457
Anode Platep. 458
Trim Indicator Gaugep. 458
Check, Fill and Purge – Power Trim Systemp. 458
Troubleshootingp. 460
Power Trim System with Relays and 2 Wire Trim Motorp. 462
Electrical System Troubleshootingp. 463
Troubleshooting the β€œDown Circuit”p. 463
Troubleshooting the β€œUp” Circuitp. 464
Troubleshooting the β€œDown” and β€œUp” Circuits ( All Circuits Inoperative)p. 465
Power Trim Assembly Removal and Installationp. 466
Removalp. 466
Installationp. 469
Testing Power Trim System With Test Gauge Kit (91-52915A6)p. 471
β€œUP” Pressure Checkp. 471
β€œDOWN” Pressure Checkp. 474
Hydraulic Repairp. 476
Trim Rod End Cap Sealp. 477
Tilt Ramp. 478
Disassemblyp. 479
Scraper Seal Replacementp. 482
Motor and Electrical Tests/Repairp. 486
Trim Pump Motor Testp. 486
Motor Disassemblyp. 486
Armature Testsp. 487
Motor Repairp. 488
Reassemblyp. 492
Reassembly – Motor and Pumpp. 494
Priming Power Trim Systemp. 495
Trim Sender Testp. 495
Trim Indicator Gauge Needle Adjustmentp. 496
Trim Indicator Wiring Diagramsp. 497
6ap. 499
Section 6A – Right Hand Non-Ratchetingp. 499
Table of Contentsp. 499
Gear Housing Specifications (Standard Rotation)p. 499
Special Toolsp. 500
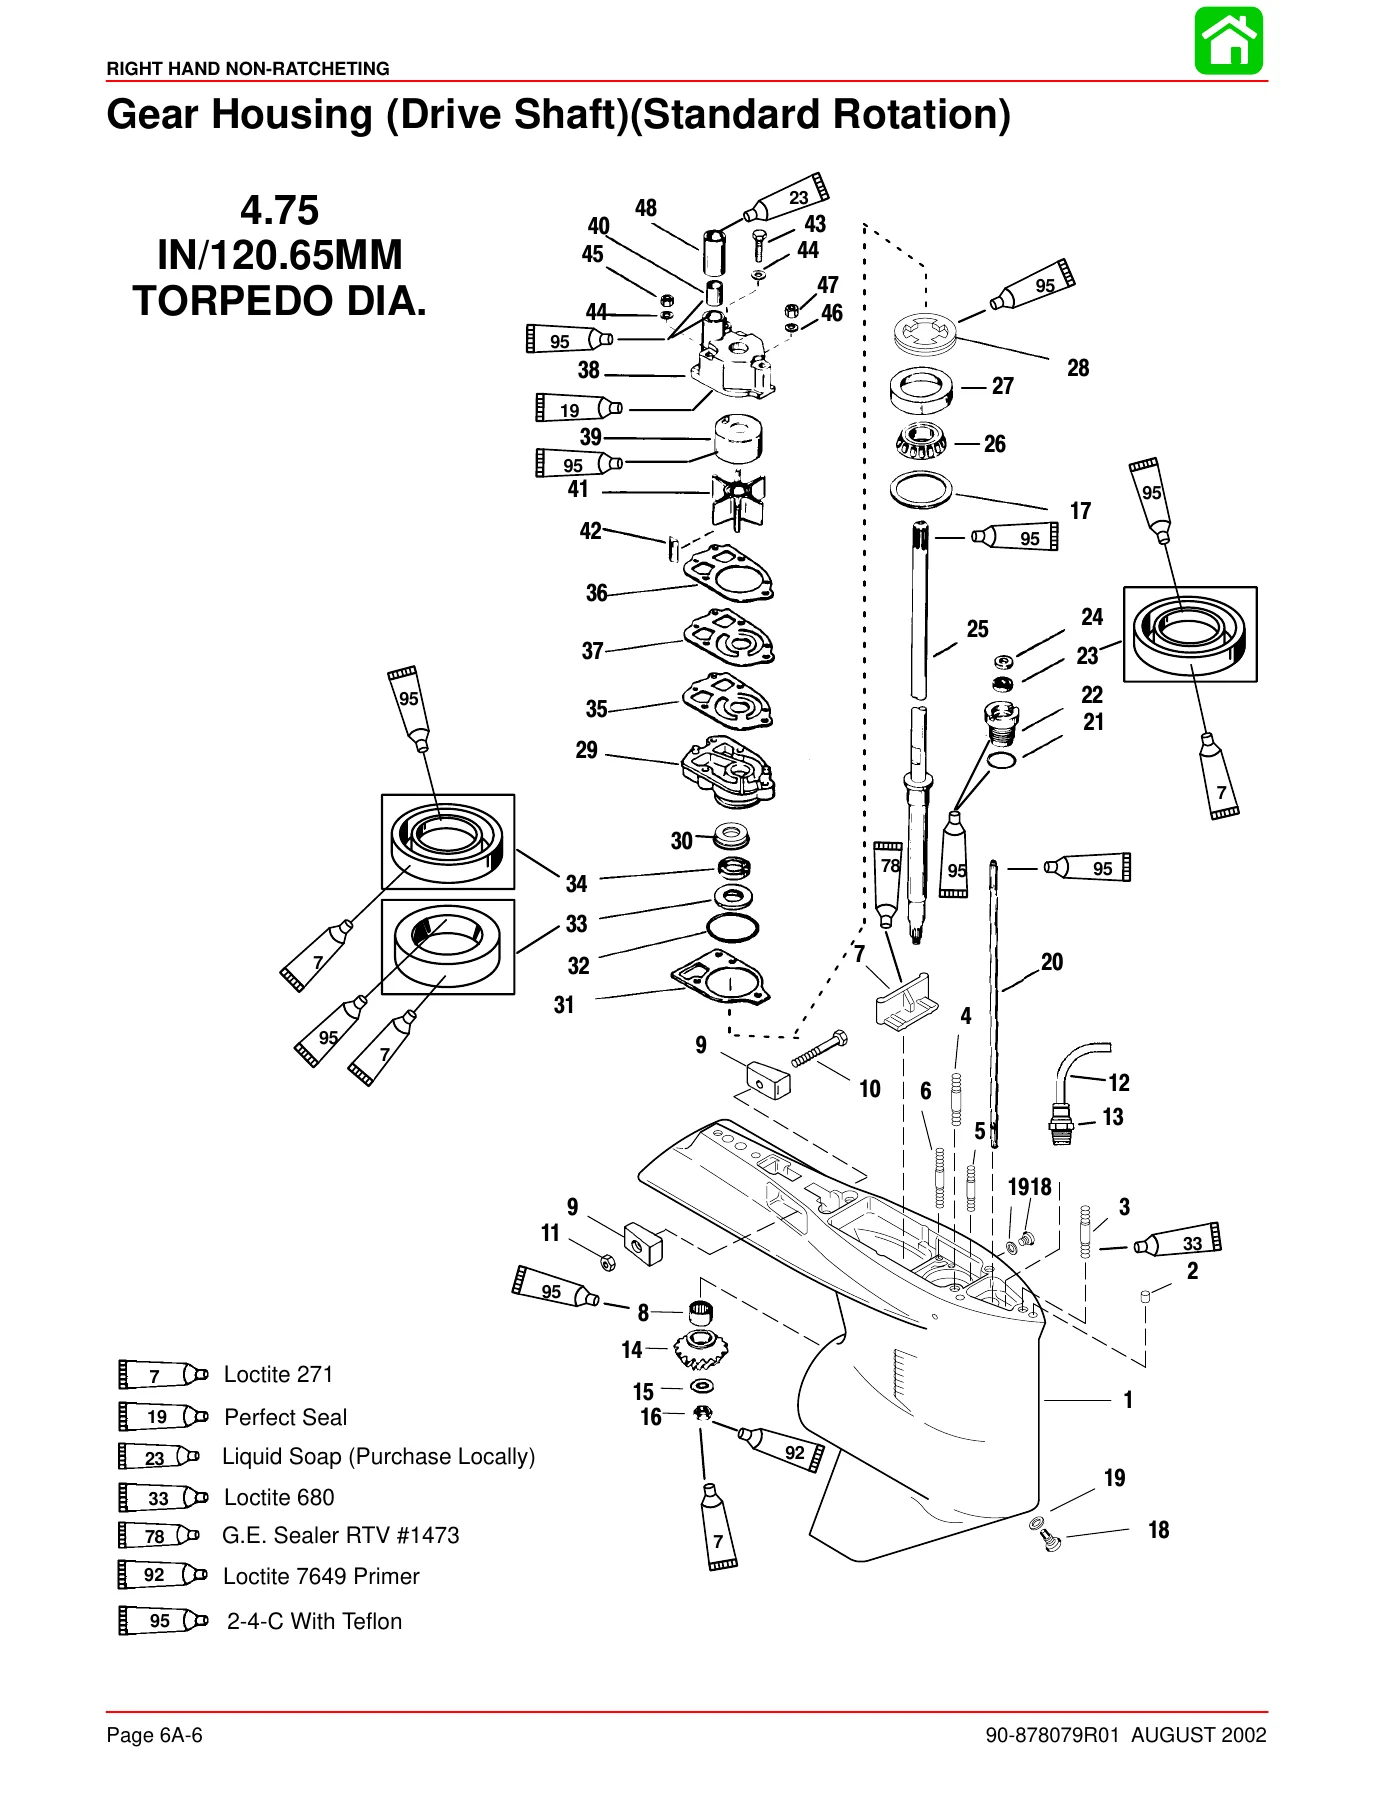
Gear Housing (Drive Shaft)(Standard Rotation)p. 504
Gear Housing (Prop Shaft)(Standard Rotation)p. 506
General Service Recommendationsp. 508
Removal, Disassembly, Cleaning and Inspection – Standard Rotationp. 509
Removalp. 509
Draining and Inspecting Gear Housing Lubricantp. 510
Water Pumpp. 511
Bearing Carrier and Propeller Shaft Removalp. 514
Shift Shaftp. 516
Propeller Shaftp. 518
Clutch Actuator Rodp. 520
Pinion Gear and Driveshaftp. 520
Forward Gearp. 523
Gear Housingp. 524
Reassembly and Installation Standard Rotationp. 524
Driveshaft Needle Bearingp. 524
Bearing Carrierp. 525
Forward Gearp. 528
Forward Gear Bearing Racep. 529
Driveshaft and Pinion Gearp. 530
Pinion Gear Depth/Forward Gear Backlash/Reverse Gear Backlashp. 532
Clutch Actuator Rodp. 536
Shift Shaft Bushingp. 536
Propeller Shaftp. 537
Water Pumpp. 540
Gear Lubricant Filling Instructionsp. 543
Installing Gear Housing to Driveshaft Housingp. 543
Right Hand Rotation Outboardp. 543
Propeller Installationp. 545
Speedometer Tube Installationp. 546
6bp. 547
Section 6B – Left Hand Non-Ratchetingp. 547
Table of Contentsp. 547
Gear Housing Specifications (Counter Rotation)p. 547
Special Toolsp. 548
Gear Housing (Drive Shaft)(Counter Rotation)p. 552
Gear Housing (Prop Shaft)(Counter Rotation)p. 554
General Service Recommendationsp. 558
Removal, Disassembly, Cleaning and Inspection of Counter Rotation ( Left Hand) Gear Housingp. 559
Water Pumpp. 562
Bearing Carrier and Propeller Shaftp. 564
Shift Shaftp. 566
Propeller Shaftp. 568
Clutch Actuator Rodp. 571
Forward Gear and Bearing Adapterp. 571
Pinion Gear and Driveshaftp. 573
Reverse Gearp. 575
Gear Housingp. 577
Reassembly and Installation of Counter Rotation Gear Housingp. 578
Driveshaft Needle Bearingp. 578
Bearing Carrier, Forward Gear and Bearing Adaptorp. 579
Reverse Gear Bearing Adaptor Assemblyp. 582
Driveshaft and Pinion Gearp. 584
Pinion Gear Depthp. 586
Reverse Gearp. 588
Forward Gearp. 589
Propeller Shaft/Forward Gear Bearing Adapter/Bearing Carrierp. 592
Water Pumpp. 599
Gear Lubricant Filling Instructionsp. 602
Installing Gear Housing to Driveshaft Housingp. 602
Counter Rotation Outboardp. 602
Propeller Installationp. 604
Speedometer Tube Installationp. 605
7p. 607
Section 7p. 607
Table of Contentsp. 607
Ride Guide Steering Cable/Attaching Kit Installation ( 92876A1)p. 608
Single Cablep. 608
Maintenance Instructionsp. 610
Ride Guide Steering Cable/Attaching Kit Installation ( 92876A3)p. 611
Dual Cable – Single Outboardp. 611
Super Ride-Guide Steering Kit Installationp. 612
Steering Cable Mounting Tube Installationp. 613
Installing Steering Cablesp. 614
Coupler Installationp. 615
Installing Link Rodp. 615
Maintenance Instructionsp. 617
Ride Guide Steering Cable/Attaching Kit Installation ( 92876A6)p. 618
Dual Cable – Dual Outboardp. 618
Installation Requirementsp. 618
Parallel Routed Steering Cables and Attaching Kit Installationp. 619
Opposite Side Routed Steering Cables and Attaching Kit Installationp. 626
Trim Tab Adjustmentp. 633
Ride Guide Steering Attachment Extension Couplersp. 633
Maintenance Instructionsp. 634
Transom Mounted Ride Guide Attaching Kit Installation ( 73770A1)p. 636
Attaching Kit Installationp. 636
Maintenance Instructionsp. 639
Clevis Attaching Kit Installation (A-70599A5)p. 640
8p. 641
Color Diagramsp. 641
2.5 Liter V-6 Carburetor Color Wiring Diagram 2000 Modelsp. 643
2.5 Liter V-6 150/175 EFI Color Wiring Diagram 2000 Modelsp. 646
2.5 Liter V-6 200 EFI Color Wiring Diagram 2000 Modelsp. 649
2.5 Liter V-6 Color Water Flow Diagram 2000 Modelsp. 652


IMAGES PREVIEW

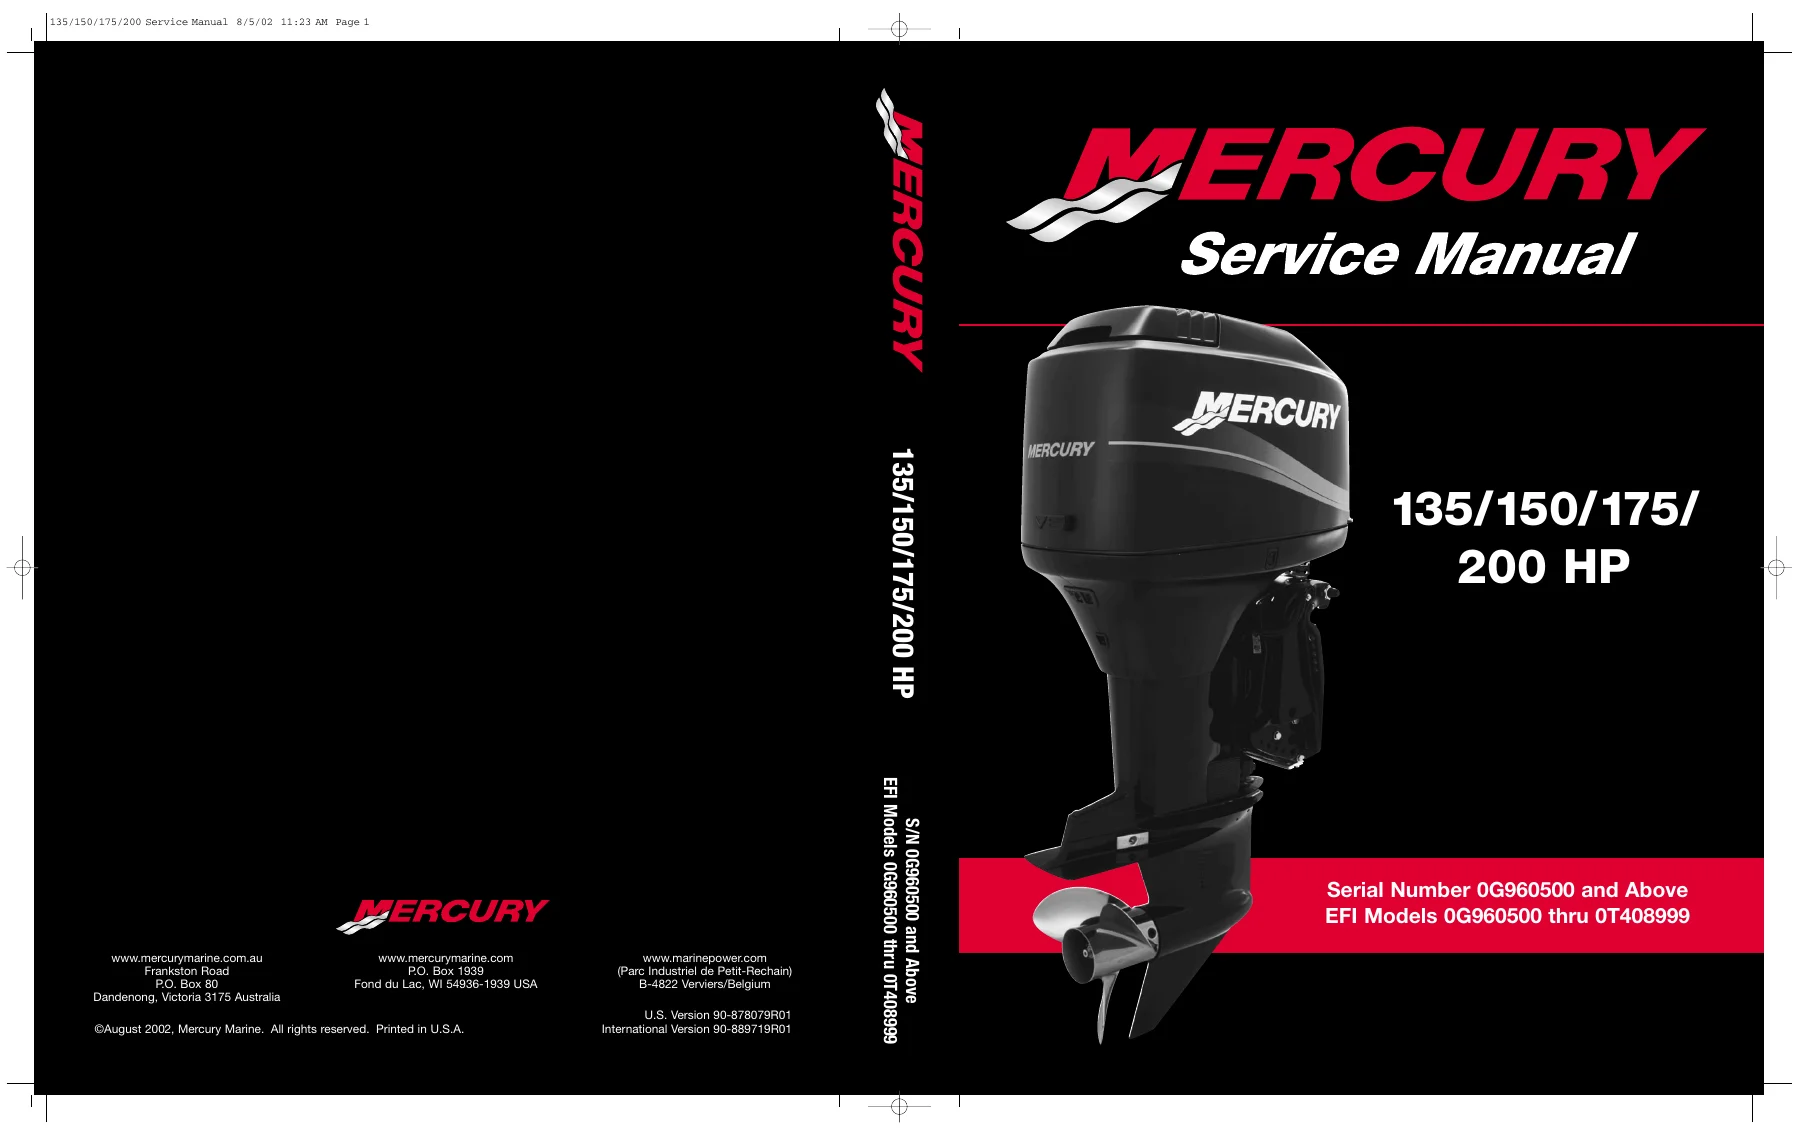
Mercury 135 150 175 200 HP Outboard Service Manual 90-878079R01 PDF β€” PDF page 1 preview
Mercury 135 150 175 200 HP Outboard Service Manual 90-878079R01 PDF β€” PDF page 78 preview
Mercury 135 150 175 200 HP Outboard Service Manual 90-878079R01 PDF β€” PDF page 504 preview

Instant PDF Delivery

This Mercury 135 150 175 200 HP outboard service manual 90-878079R01 is delivered as an instant PDF download after purchase. There is no shipping wait and no physical book to handle. You can view it on a computer, tablet, or smartphone, print only the pages you need for the job, and keep the manual on hand for future maintenance and repairs.
Reviews

There are no reviews yet.

Be the first to review “Mercury 135 150 175 200 HP Outboard Service Manual 90-878079R01 PDF”

What Our Customers Say

β˜…β˜…β˜…β˜…β˜… Live reviews from customers
Loading customer reviews...
0
    0
    Your Cart
    Your cart is emptyReturn to Shop
    πŸ›’
    Recently Purchased
    πŸ•’ verified order